三维变换矩阵实战——三维点云的旋转、缩放、镜像、错切、平移、正交投影

news2025/1/13 8:06:25

一、旋转矩阵(右手坐标系)

绕x轴旋转

旋转矩阵:右边矩阵是点云的原始坐标,左边的是旋转矩阵

\begin{bmatrix} 1&0 &0 \\ 0&cos\beta &-sin\beta \\ 0&sin\beta & cos\beta \end{bmatrix}  \begin{bmatrix} x\\ y \\z \end{bmatrix} 

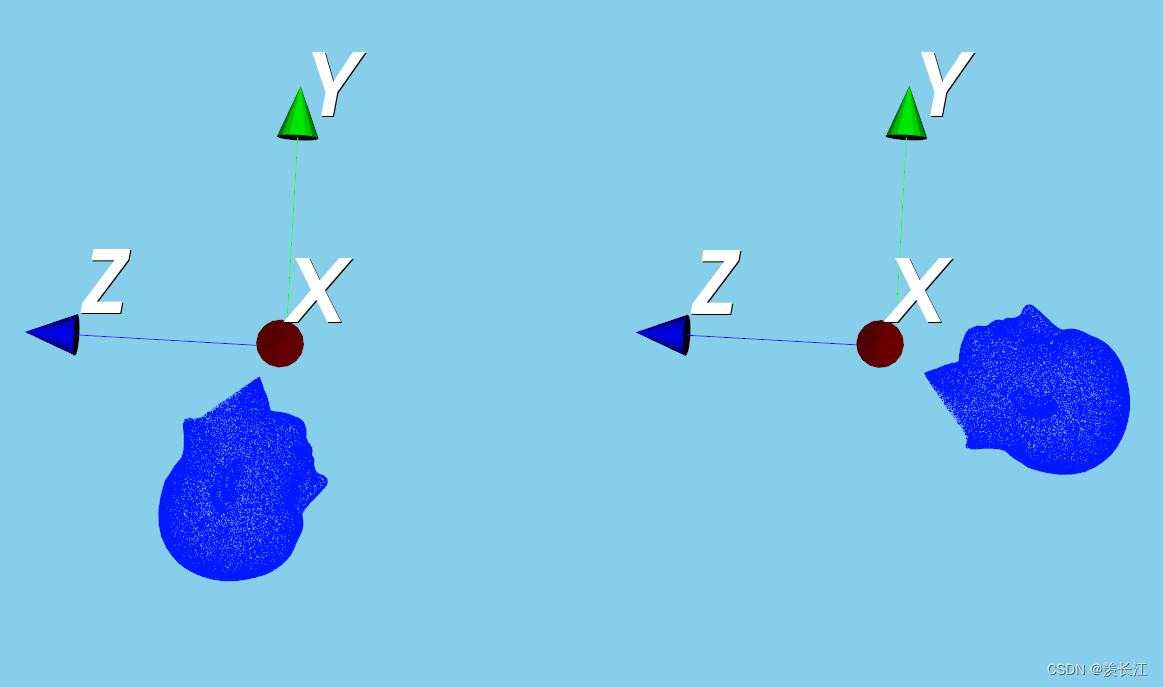
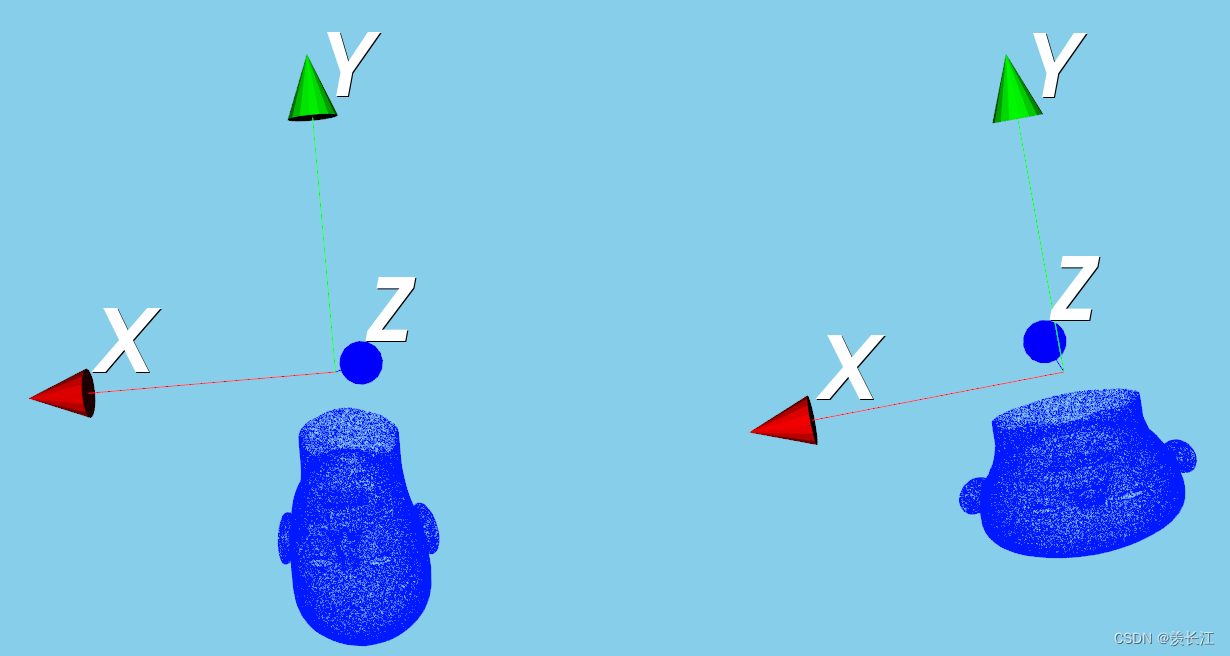
可视化:绕x轴旋转90度

代码:

import vtk
import numpy as np
import math

def pointPolydataCreate(pointCloud):
    points = vtk.vtkPoints()
    cells = vtk.vtkCellArray()
    i = 0
    for point in pointCloud:
        points.InsertPoint(i, point[0], point[1], point[2])
        cells.InsertNextCell(1)
        cells.InsertCellPoint(i)
        i += 1
    PolyData = vtk.vtkPolyData()
    PolyData.SetPoints(points)
    PolyData.SetVerts(cells)

    mapper = vtk.vtkPolyDataMapper()
    mapper.SetInputData(PolyData)

    actor = vtk.vtkActor()
    actor.SetMapper(mapper)
    actor.GetProperty().SetColor(0.0, 0.1, 1.0)

    return actor

def visiualize(pointCloud, pointCloud2):
    colors = vtk.vtkNamedColors()
    actor1 = pointPolydataCreate(pointCloud)
    actor2 = pointPolydataCreate(pointCloud2)
    Axes = vtk.vtkAxesActor()

    # 可视化
    renderer1 = vtk.vtkRenderer()
    renderer1.SetViewport(0.0, 0.0, 0.5, 1)
    renderer1.AddActor(actor1)
    renderer1.AddActor(Axes)
    renderer1.SetBackground(colors.GetColor3d('skyblue'))

    renderer2 = vtk.vtkRenderer()
    renderer2.SetViewport(0.5, 0.0, 1.0, 1)
    renderer2.AddActor(actor2)
    renderer2.AddActor(Axes)
    renderer2.SetBackground(colors.GetColor3d('skyblue'))

    renderWindow = vtk.vtkRenderWindow()
    renderWindow.AddRenderer(renderer1)
    renderWindow.AddRenderer(renderer2)
    renderWindow.SetSize(1040, 880)
    renderWindow.Render()
    renderWindow.SetWindowName('PointCloud')

    renderWindowInteractor = vtk.vtkRenderWindowInteractor()
    renderWindowInteractor.SetRenderWindow(renderWindow)
    renderWindowInteractor.Initialize()
    renderWindowInteractor.Start()


pointCloud = np.loadtxt("C:/Users/A/Desktop/pointCloudData/model.txt") #读取点云数据

angel_x = 90  # 旋转角度
radian = angel_x * np.pi / 180  # 旋转弧度
Rotation_Matrix_1 = [  # 绕x轴三维旋转矩阵 
    [1, 0, 0],
    [0, math.cos(radian), -math.sin(radian)],
    [0, math.sin(radian), math.cos(radian)]]

Rotation_Matrix_1 = np.array(Rotation_Matrix_1)

p = np.dot(Rotation_Matrix_1, pointCloud.T) # 计算
p = p.T
visiualize(pointCloud, p)

绕y轴旋转

旋转矩阵:

\begin{bmatrix} cos\beta &0 &sin\beta \\ 0&1 &0 \\ -sin\beta &0 &cos\beta \end{bmatrix}  \begin{bmatrix} x\\ y \\z \end{bmatrix}

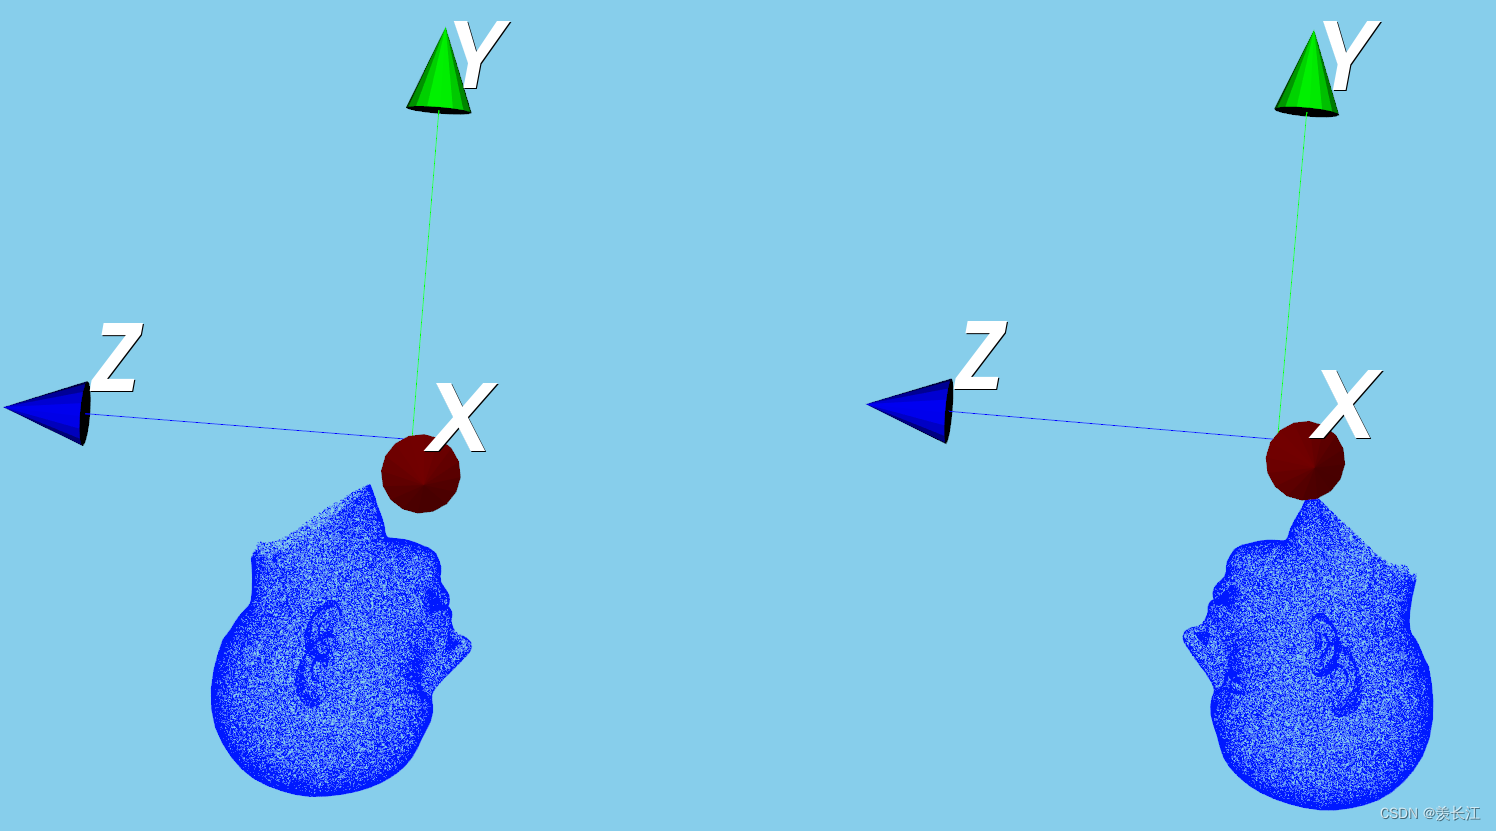
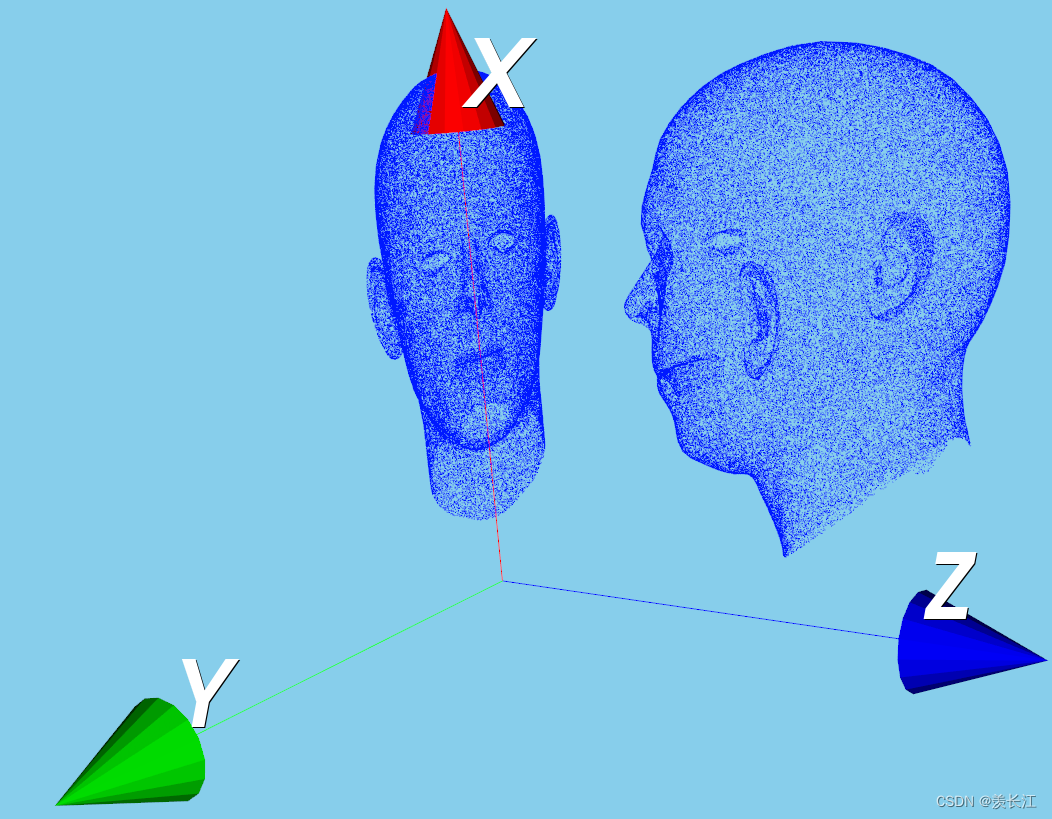
可视化:绕y轴旋转180度

代码:

angel_y = 180  # 旋转角度
radian = angel_y * np.pi / 180  # 旋转弧度
Rotation_Matrix_2 = [  # 绕y轴三维旋转矩阵
    [math.cos(radian), 0, math.sin(radian)],
    [0, 1, 0],
    [-math.sin(radian), 0, math.cos(radian)]]

Rotation_Matrix_1 = np.array(Rotation_Matrix_1)

p = np.dot(Rotation_Matrix_1, pointCloud.T) # 计算
p = p.T
visiualize(pointCloud, p)

绕z轴旋转

旋转矩阵:

\begin{bmatrix} cos\beta &-sin\beta &0 \\ sin\beta &cos\beta & 0\\ 0&0 & 1 \end{bmatrix}  \begin{bmatrix} x\\ y \\z \end{bmatrix}

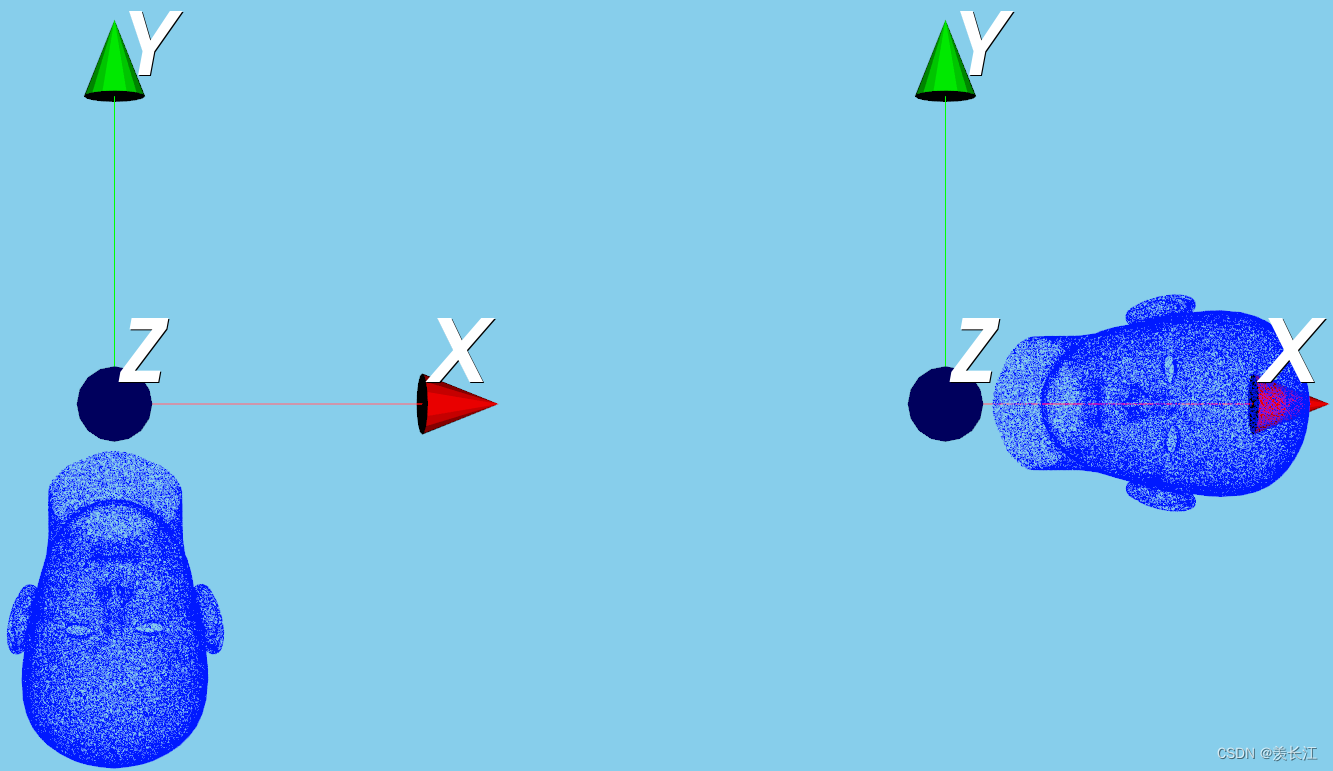
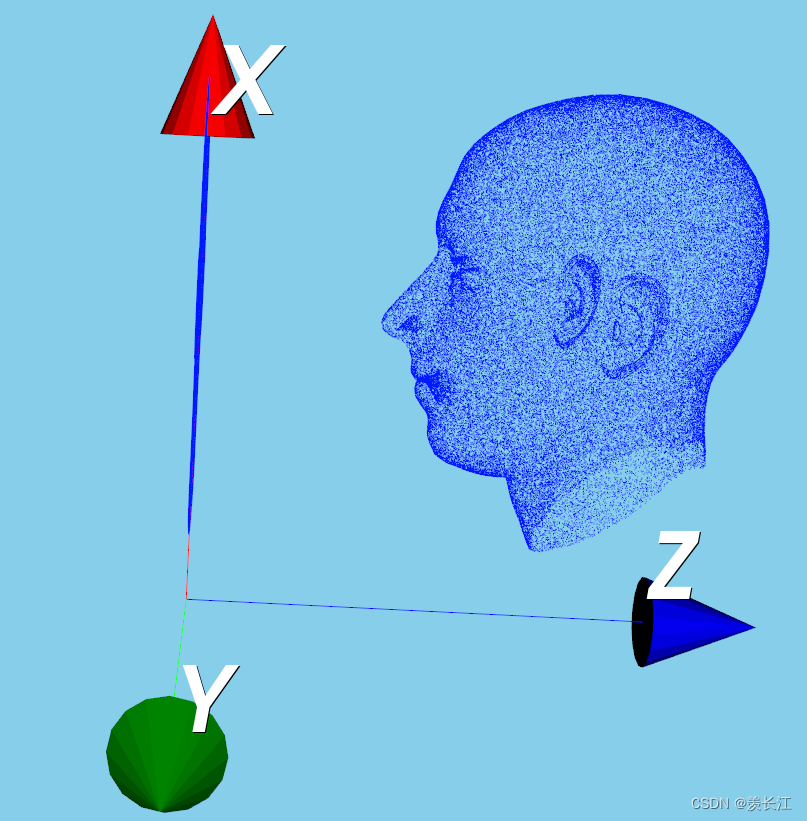
可视化:绕z轴旋转90度

代码:

angel_z = 90  # 旋转角度
radian = angel_z * np.pi / 180  # 旋转弧度
Rotation_Matrix_1 = [  # 绕z轴三维旋转矩阵
    [math.cos(radian), -math.sin(radian), 0],
    [math.sin(radian), math.cos(radian), 0],
    [0, 0, 1]]

Rotation_Matrix_1 = np.array(Rotation_Matrix_1)

p = np.dot(Rotation_Matrix_1, pointCloud.T) # 计算
p = p.T
visiualize(pointCloud, p)

线绕z轴旋转,再绕x轴旋转:

旋转矩阵:  线绕哪个轴转,xyz矩阵就和哪和轴的旋转矩阵先计算

\begin{bmatrix} 1&0 &0 \\ 0&cos\beta &-sin\beta \\ 0&sin\beta & cos\beta \end{bmatrix}  \begin{bmatrix} cos\beta &-sin\beta &0 \\ sin\beta &cos\beta & 0\\ 0&0 & 1 \end{bmatrix}  \begin{bmatrix} x\\ y \\z \end{bmatrix}

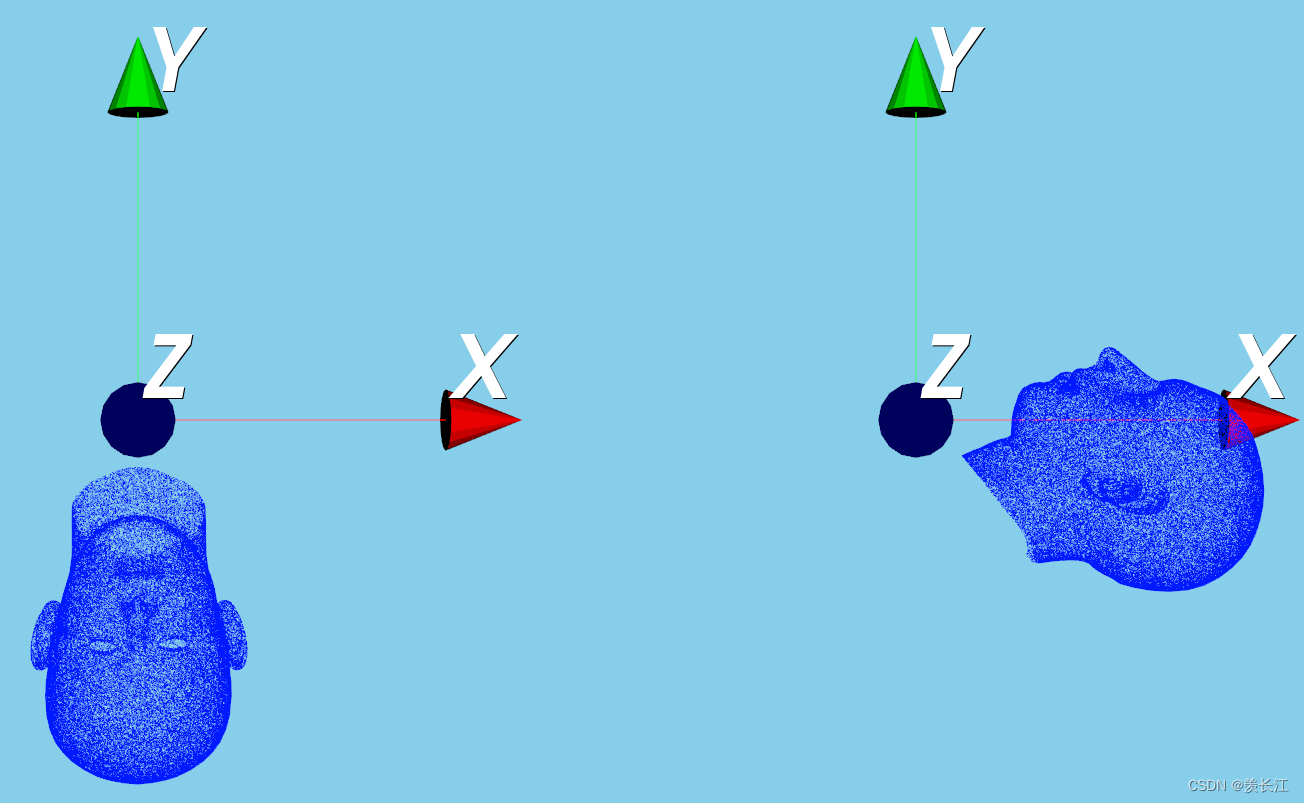
可视化:先绕z轴旋转90度,再绕x轴旋转90度

代码:

angel_z = 90  # 旋转角度
radian = angel_z * np.pi / 180  # 旋转弧度
Rotation_Matrix_z = [  # 绕z轴三维旋转矩阵
    [math.cos(radian), -math.sin(radian), 0],
    [math.sin(radian), math.cos(radian), 0],
    [0, 0, 1]]

angel_x = 90  # 旋转角度
radian = angel_x * np.pi / 180  # 旋转弧度
Rotation_Matrix_x = [  # 绕x轴三维旋转矩阵
    [1, 0, 0],
    [0, math.cos(radian), -math.sin(radian)],
    [0, math.sin(radian), math.cos(radian)]]


Rotation_Matrix_z = np.array(Rotation_Matrix_z)
Rotation_Matrix_x = np.array(Rotation_Matrix_x)

p = np.dot(Rotation_Matrix_z, pointCloud.T) # 计算
p = np.dot(Rotation_Matrix_x, p) # 计算
p = p.T
visiualize(pointCloud, p)

二、缩放矩阵

缩放矩阵:

\begin{bmatrix} k_{x}&0 &0 \\ 0& k_{y} &0 \\ 0&0 &k_{z} \end{bmatrix}

计算过程:三个k是xyz对应的缩放系数

\begin{bmatrix} k_{x}&0 &0 \\ 0& k_{y} &0 \\ 0&0 &k_{z} \end{bmatrix}   \begin{bmatrix} x\\ y \\z \end{bmatrix}= \begin{bmatrix} k_{x}x\\k_{y} y \\k_{z}z \end{bmatrix}

x坐标变为原来的1.5倍,y变为0.7倍,z不变

\begin{bmatrix} 1.5&0 &0 \\ 0& 0.7 &0 \\ 0&0 &1 \end{bmatrix}   \begin{bmatrix} x\\ y \\z \end{bmatrix}= \begin{bmatrix} 1.5x\\0.7 y \\1z \end{bmatrix}

可视化:

三、镜像矩阵

3D镜像矩阵:

\begin{bmatrix} 1-2n_x{}^{2} & -2n_x{}n_{y} &-2n_x{}n_{z} \\ -2n_x{}n_{y} &1-2n_y{}^{2} &-2n_y{}n_{z} \\ -2n_x{}n_{z} &-2n_y{}n_{z} & 1-2n_z{}^{2} \end{bmatrix}

 n=\begin{bmatrix} n_{x} &n_{y} & n_{z} \end{bmatrix}

向量n是垂直于镜像平面的单位向量

三维点云对xz平面的镜像:

①首先,确定一个垂直于xz平面的单位向量 n=[0, 1, 0]

②将该单位向量带入上述3D镜像矩阵

可视化:
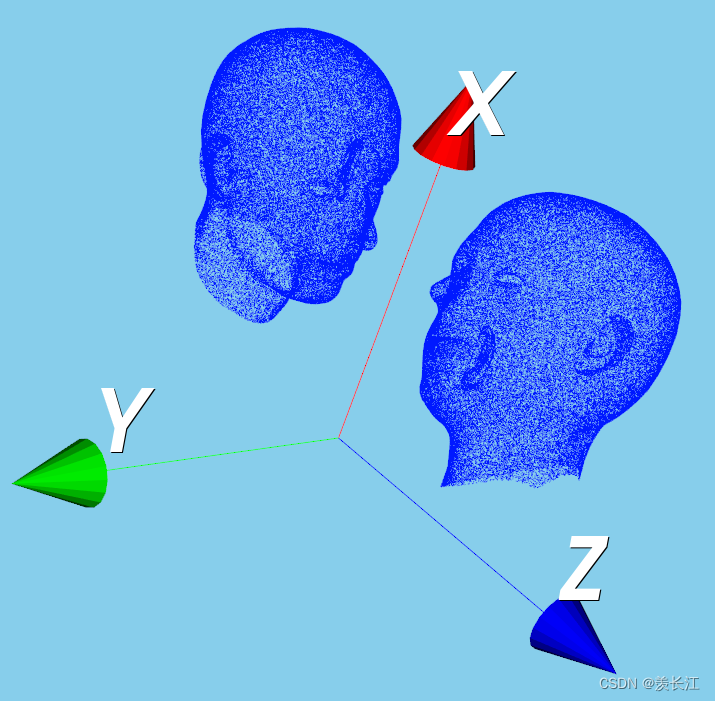
代码:

import vtk
import numpy as np
import math

def pointPolydataCreate(pointCloud):
    points = vtk.vtkPoints()
    cells = vtk.vtkCellArray()
    i = 0
    for point in pointCloud:
        points.InsertPoint(i, point[0], point[1], point[2])
        cells.InsertNextCell(1)
        cells.InsertCellPoint(i)
        i += 1
    PolyData = vtk.vtkPolyData()
    PolyData.SetPoints(points)
    PolyData.SetVerts(cells)

    mapper = vtk.vtkPolyDataMapper()
    mapper.SetInputData(PolyData)

    actor = vtk.vtkActor()
    actor.SetMapper(mapper)
    actor.GetProperty().SetColor(0.0, 0.1, 1.0)

    return actor

def visiualize(pointCloud, pointCloud2):
    colors = vtk.vtkNamedColors()
    actor1 = pointPolydataCreate(pointCloud)
    actor2 = pointPolydataCreate(pointCloud2)
    Axes = vtk.vtkAxesActor()

    # 可视化
    renderer1 = vtk.vtkRenderer()
    renderer1.SetViewport(0.0, 0.0, 0.5, 1)
    renderer1.AddActor(actor1)
    renderer1.AddActor(Axes)
    renderer1.SetBackground(colors.GetColor3d('skyblue'))

    renderer2 = vtk.vtkRenderer()
    renderer2.SetViewport(0.5, 0.0, 1.0, 1)
    renderer2.AddActor(actor1)
    renderer2.AddActor(actor2)
    renderer2.AddActor(Axes)
    renderer2.SetBackground(colors.GetColor3d('skyblue'))

    renderWindow = vtk.vtkRenderWindow()
    renderWindow.AddRenderer(renderer1)
    renderWindow.AddRenderer(renderer2)
    renderWindow.SetSize(1040, 880)
    renderWindow.Render()
    renderWindow.SetWindowName('PointCloud')

    renderWindowInteractor = vtk.vtkRenderWindowInteractor()
    renderWindowInteractor.SetRenderWindow(renderWindow)
    renderWindowInteractor.Initialize()
    renderWindowInteractor.Start()


pointCloud = np.loadtxt("C:/Users/A/Desktop/pointCloudData/model.txt") #读取点云数据

nx = 0
ny = 0
nz = 1
n = [nx, ny, nz] # 垂直xy平面的单位向量
# 镜像矩阵
Mirror_Matrix = [
    [1-2*nx**2, -2*nx*ny, -2*nx*nz],
    [-2*nx*ny, 1-2*ny**2, -2*ny*nz],
    [-2*nx*nz, -2*ny*nz, 1-2*nz**2]]

Mirror_Matrix = np.array(Mirror_Matrix)

p = np.dot(Mirror_Matrix, pointCloud.T)  # 计算
p = p.T
visiualize(pointCloud, p)

四、错切矩阵     

沿xy平面错切(z不变)                

                             矩阵                                                计算过程

H_{xy}(s, t)=\begin{bmatrix} 1 &0 &s \\ 0&1 &t \\ 0&0 &1 \end{bmatrix}                      \begin{bmatrix} 1 &0 &s \\ 0&1 &t \\ 0&0 &1 \end{bmatrix} \begin{bmatrix} x\\ y \\ z \end{bmatrix}=\begin{bmatrix} x+sz\\y+tz \\ z \end{bmatrix}

沿xz平面错切(y不变) 

                             矩阵                                                计算过程

H_{xz}(s, t)=\begin{bmatrix} 1 &0 &s \\ 0&1 &0 \\ 0&t &1 \end{bmatrix}                      \begin{bmatrix} 1 &0 &s \\ 0&1 &0 \\ 0&t &1 \end{bmatrix} \begin{bmatrix} x\\ y \\ z \end{bmatrix}=\begin{bmatrix} x+sz\\y \\ z+ty \end{bmatrix}

沿yz平面错切(x不变)

                             矩阵                                                计算过程

H_{yz}(s, t)=\begin{bmatrix} 1 &0 &0 \\ s&1 &0 \\ t&0 &1 \end{bmatrix}                      \begin{bmatrix} 1 &0 &0 \\ s&1 &0 \\ t&0 &1 \end{bmatrix} \begin{bmatrix} x\\ y \\ z \end{bmatrix}=\begin{bmatrix} x\\y+sx \\ z+tx \end{bmatrix}

可视化:沿yz平面错切

代码:

pointCloud = np.loadtxt("C:/Users/A/Desktop/pointCloudData/model.txt") #读取点云数据

s = 0.3
t = 0.3
# 沿yz平面错切矩阵
Shear_Matrix = [
    [1, 0, 0],
    [s, 1, 0],
    [t, 0, 1]]

Shear_Matrix = np.array(Shear_Matrix)

p = np.dot(Shear_Matrix, pointCloud.T)  # 计算
p = p.T
visiualize(pointCloud, p)

五、正交投影

正交投影矩阵(投影到三维空间任意平面):

\begin{bmatrix} 1-n_{x}^{2} &-n_{x}n_{y} &-n_{x}n_{z} \\ -n_{x}n_{y}&1-n_{y}^{2} &-n_{y}n_{z} \\ -n_{x}n_{z}&-n_{y}n_{z} & 1-n_{z}^{2} \end{bmatrix}

n=\begin{bmatrix} n_{x} &n_{y} & n_{z} \end{bmatrix}

向量n是垂直于投影平面的单位向量

可视化:点云在xy平面上的正交投影


六、平移矩阵

平移矩阵需要利用齐次矩阵(4*4矩阵),下面是一个平移矩阵

最右边一列是xyz的位移量

\begin{bmatrix} 1 &0 &0 & \Delta x \\ 0&1 &0 &\Delta y \\ 0&0 &1 & \Delta z\\ 0&0 & 0 & 1 \end{bmatrix}

计算过程:

\begin{bmatrix} 1 &0 &0 & \Delta x \\ 0&1 &0 &\Delta y \\ 0&0 &1 & \Delta z\\ 0&0 & 0 & 1 \end{bmatrix}   \begin{bmatrix} x\\y \\z \\ 1 \end{bmatrix}=\begin{bmatrix} x+\Delta x\\ y+\Delta y \\ z+\Delta z \\ 1 \end{bmatrix}

线性变换+平移:

增加的平移对原来的线性变换没影响,可以将前面介绍的变换矩阵和平移结合

例如:沿xy平面错切+平移
\begin{bmatrix} 1&0 &s &\Delta x \\ 0&1 &t &\Delta y \\ 0&0 &1 &\Delta z \\ 0& 0& 0 & 1 \end{bmatrix}

本文来自互联网用户投稿,该文观点仅代表作者本人,不代表本站立场。本站仅提供信息存储空间服务,不拥有所有权,不承担相关法律责任。如若转载,请注明出处:http://www.coloradmin.cn/o/1645053.html

如若内容造成侵权/违法违规/事实不符,请联系多彩编程网进行投诉反馈,一经查实,立即删除!

相关文章

毕业设计:《基于 Prometheus 和 ELK 的基础平台监控系统设计与实现》

前言 《基于 Prometheus 和 ELK 的基础平台监控系统设计与实现》,这是我在本科阶段的毕业设计,通过引入 Prometheus 和 ELK 架构实现企业对指标与日志的全方位监控。并且基于云原生,使用容器化持续集成部署的开发方式,通过 Sprin…

Eayswoole 报错 crontab info is abnormal

在执行一个指定的定时任务时 如 php easyswoole crontab show 报错 crontab info is abnormal 如下图所示: 查询了半天 修改了如下配置: 旧的 // 创建定时任务实例 $crontab new \EasySwoole\Crontab\Crontab($crontabConfig); 修改后&#…

PHP源码_众筹商城

众筹商城源码 众筹商品平台 商城加共识元富之路 网上商城众筹 前端是编译后的,后端PHP,带商城 运行截图 源码贡献 https://githubs.xyz/boot?app39 部分数据库表 CREATE TABLE ti_shopro_store (id int(11) NOT NULL AUTO_INCREMENT COMMENT ID,nam…

微信小程序生成二维码加密(CryptoJS4.0加密PHP8.0解密)AES方式加密

1、小程序创建 crypto-js.js和crypto.js两个文件(点击文件即可) 2、小程序js页面引入 var crypto require(../../utils/crypto.js);//注意路径是否正确3、使用 let data {id: that.data.id,name: dx}console.log(JSON.stringify(data))console.log(&…

信创国产化的基础知识

信创&国产化的基础知识 核心技术是国之重器,核心技术受制于人是我们最大的隐患。 实践反复告诉我们,关键核心技术是要不来、买不来、讨不来的。 要打好科技仪器设备、操作系统和基础软件国产化攻坚战,鼓励科研机构、高校同企业开展联合攻…

深度学习之GAN网络

目录 关于GAN网络 关于生成模型和判别模型 GAN网路的特性和搭建步骤(以手写字体识别数据集为例) 搭建步骤 特性 GAN的目标函数(损失函数) 目标函数原理 torch.nn.BCELoss(实际应用的损失函数) 代码…

延时任务通知服务的设计及实现(一)-- 设计方案

一、背景 在日常编程中,总是会遇到延时执行的任务。比如:定期发送邮件,定时上架商品;再比如订单在一定时间内未支付,需要到期关闭订单。 你也许会借助分布式任务xxl-job来实现,不仅性能差,cro…

Web安全研究(九)

知识星球 首先推荐一下我们的知识星球,以AI与安全结合作为主题,包括AI在安全上的应用和AI本身的安全; 加入星球你将获得: 【Ai4sec】:以数据驱动增强安全水位,涵盖内容包括:恶意软件分析,软件安全,AI安全,数据安全,系统安全,流量分析,防爬,验证码等安全方向。…

GStreamer日志调试笔记

1、查询所有分类 #gst-launch-1.0 --gst-debug-help 2、查询videotestsrc的日志 #gst-launch-1.0 --gst-debug-help | findstr videotestsrc 结果: 3、使用--gst-debug设置相应日志类型的相应等级,越大显示日志越多,排查内存泄露可以设置为9 …

一对一WebRTC视频通话系列(四)——offer、answer、candidate信令实现

本篇博客主要讲解offer、answer、candidate信令实现,涵盖了媒体协商和网络协商相关实现。 本系列博客主要记录一对一WebRTC视频通话实现过程中的一些重点,代码全部进行了注释,便于理解WebRTC整体实现。 一对一WebRTC视频通话系列往期博客 一…

图像处理

图像处理 导入图片 导入io模块,读取文件所在位置,将生成的图像数据赋给变量img,显示图像 from skimage import ioimgio.imread(D:\工坊\图像处理\十个勤天2.png)io.imshow(img) 运行结果: 将图片进行灰度处理 from skimage i…

透明屏幕的透明度如何?能否实现真正的透明效果?

透明屏幕的透明度是一个关键的特性,其实际表现会因技术、材料和设计等因素而有所不同。目前,透明屏幕技术已经取得了显著的进步,尤其是在OLED(有机发光二极管)领域。 OLED透明屏幕由于其自发光的技术优势,能…

如何修改图片大小?调整图片大小的几个方法介绍

当我们在不同的应用场景中使用图片的时候,常常会需要去调整图片尺寸来适应不同的要求,还有图片体积大小也会有要求,这时候就需要用到我们今天分享的这款图片在线处理工具了,不管是图片改大小或者图片压缩它都能快速解决&#xff0…

Hadamard Product(点乘)、Matmul Product(矩阵相乘)和Concat Operation(拼接操作)在神经网络中的应用

Hadamard乘积(Hadamard Product),矩阵乘法(Matmul Product)和拼接操作(Concatenation Operation)在神经网络中的使用情况如下: Hadamard Product点乘、内积: Hadamard乘…

websevere服务器从零搭建到上线(二)|Linux上的五种IO模型

文章目录 阻塞 blocking非阻塞 non-blockingIO复用 IO multiplexing信号驱动 signal-driven异步 asynchronous拓展知识 看过上篇文章英国基本能理解本文五张图的内容websevere服务器从零搭建到上线(一)|阻塞、非阻塞、同步、异步 本文要能够在…

使用Python编写自动化测试代码规范整理

大家好,我们平时在写自动化测试脚本或者性能测试脚本时,需要注意代码规范,提高代码的可读性与维护性,之前给大家分享过pycharm的两个插件,大家可以参考:Pycharm代码规范与代码格式化插件安装 本文中主要从自…

突破销量瓶颈:亚马逊,速卖通,国际站销量提升实战技巧

1、精心选品:选品是亚马逊销售的第一步,也是至关重要的一步。卖家应该进行市场调研,了解消费者的需求和喜好,选择有市场潜力的产品。要注意产品的差异化,避免与竞争对手的产品过于相似。 2、优化产品详情页&#xff1…

BERT模型的网络结构解析 运行案例分析

整体结构 第一部分:嵌入层第二部分:编码层第三部分:输出层 对于一个m分类任务,输入n个词作为一次数据,单个批次输入t个数据,在BERT模型的不同部分,数据的形状信息如下: 注1&#x…

(ARM-Linux) ORACLE JDK 22 的下载安装及环境变量的配置

目录 获取JDK 安装JDK 配置JAVA环境变量 其他补充:JDK 22的新特征 1. 语法 2. 库 3. 性能 4. 工具 在今年的3月份,ORACLE 更新了的JDK 发行版 JDK 22,作为了一位ORACLE Primavera系列产品的研究者,其实对JDK的迭代完全不感…

信创基础软件之操作系统

操作系统概述 操作系统是计算机系统软硬件资源的纽带。操作系统是连接硬件和数据库、中间件、应用软件的纽带,是承载各种信息设备和软件应用的重要基础软件。操作系统控制和管理整个计算机系统的硬件、软件资源,组织和调度计算机工作和资源,…