官网地址: Messaging that just works — RabbitMQ
我的Docker博客:Docker-CSDN博客
1.结构
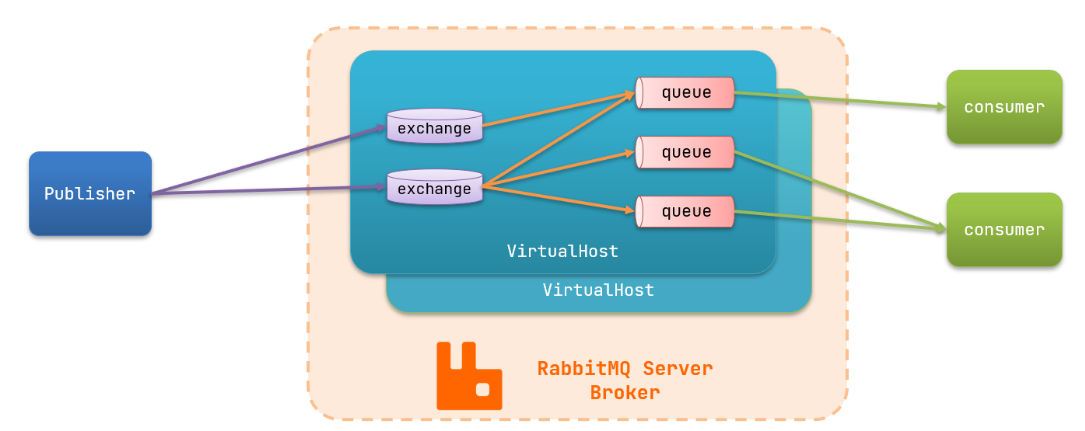
其中包含几个概念:
-
**publisher**:生产者,也就是发送消息的一方 -
**consumer**:消费者,也就是消费消息的一方 -
**queue**:队列,存储消息。生产者投递的消息会暂存在消息队列中,等待消费者处理 -
**exchange**:交换机,负责消息路由。生产者发送的消息由交换机决定投递到哪个队列。 -
**virtual host**:虚拟主机,起到数据隔离的作用。每个虚拟主机相互独立,有各自的exchange、queue
2.Docker安装
基于Docker来安装RabbitMQ,使用下面的命令即可:
docker run \
 -e RABBITMQ_DEFAULT_USER=user1 \
 -e RABBITMQ_DEFAULT_PASS=123 \
 -v mq-plugins:/plugins \
 --name mq \
 --hostname mq \
 -p 15672:15672 \
 -p 5672:5672 \
 --network n1 \
 -d \
 rabbitmq:3.8-management
root 是 你设置的用户名
123是你设置的密码
n1是你自定义的网络
可以看到在安装命令中有两个映射的端口:
-
15672:RabbitMQ提供的管理控制台的端口
-
5672:RabbitMQ的消息发送处理接口
安装完成后,我们访问 http://192.168.150.101:15672http://192.168.48.129:15672/http://192.168.150.101:15672即可看到管理控制台。首次访问需要登录,默认的用户名和密码在配置文件中已经指定了。
注意网址中的192.168.48.129要改成你自己虚拟机的

3.后端
3.1引入依赖
        <!--AMQP依赖,包含RabbitMQ-->
        <dependency>
            <groupId>org.springframework.boot</groupId>
            <artifactId>spring-boot-starter-amqp</artifactId>
        </dependency>
3.2yml
spring:
  rabbitmq:
    host: 192.168.48.129
    port: 5672
    virtual-host: /
    username: user1
    password: 123
    listener:
      simple:
        prefetch: 1
3.3.1.@Bean的方式声明队列和交换机
新建一个config类
用fanout类型的交换机来做例子
下面的代码会生成一个交换机
import org.springframework.amqp.core.*;
import org.springframework.context.annotation.Bean;
import org.springframework.context.annotation.Configuration;

@Configuration
public class DirectConfig {

    //声明交换机
    @Bean
    public FanoutExchange fanoutExchange(){
        return new FanoutExchange("a.fanout");
    }

    //创建1个队列
    @Bean
    public Queue fanoutQueue1(){
        return new Queue("fanout.queue1");
    }

    //绑定队列和交换机
    @Bean
    public Binding bindingQueue1(Queue fanoutQueue1, FanoutExchange fanoutExchange){
        return BindingBuilder.bind(fanoutQueue1).to(fanoutExchange);
    }

}
接收并处理
写在业务里
import lombok.extern.slf4j.Slf4j;
import org.springframework.amqp.core.ExchangeTypes;
import org.springframework.amqp.rabbit.annotation.Exchange;
import org.springframework.amqp.rabbit.annotation.Queue;
import org.springframework.amqp.rabbit.annotation.QueueBinding;
import org.springframework.amqp.rabbit.annotation.RabbitListener;
import org.springframework.stereotype.Component;


@Slf4j
@Component
public class MqListener {

    //业务逻辑
    @RabbitListener(queues = "fanout.queue1")
    public void listenFanoutQueue1(String msg) throws InterruptedException {
        System.out.println("消费者1 收到了 fanout.queue1的消息:【" + msg +"】");
    }


}
测试类
    @Test
    void test(){
        String queuename = "hmall.fanout1";

        String message = "hello, amqp!";

        rabbitTemplate.convertAndSend(queuename, null,message);
    }
3.3.2基于注解声明交换机和队列
不用再在配置类里去声明了,直接业务里用注解一同声明交换机和队列了
这里用direct类型的交换机来做例子
下面代码会创建一个交换机b.direct和两个队列direct.queue1,direct.queue2
import lombok.extern.slf4j.Slf4j;
import org.springframework.amqp.core.ExchangeTypes;
import org.springframework.amqp.rabbit.annotation.Exchange;
import org.springframework.amqp.rabbit.annotation.Queue;
import org.springframework.amqp.rabbit.annotation.QueueBinding;
import org.springframework.amqp.rabbit.annotation.RabbitListener;
import org.springframework.stereotype.Component;

import java.util.Map;

@Slf4j
@Component
public class MqListener {


    @RabbitListener(bindings = @QueueBinding(
            value = @Queue(name = "direct.queue1", durable = "true"),
            exchange = @Exchange(name = "b.direct", type = ExchangeTypes.DIRECT),
            key = {"red", "blue"}
    ))
    public void listenDirectQueue1(String msg) throws InterruptedException {
        System.out.println("消费者1 收到了 direct.queue1的消息:【" + msg +"】");
    }

    @RabbitListener(bindings = @QueueBinding(
            value = @Queue(name = "direct.queue2", durable = "true"),//队列名,是否持久化
            //交换机名,交换机类型
            exchange = @Exchange(name = "b.direct", type = ExchangeTypes.DIRECT),
            //direct类型交换机需要传的key
            key = {"red", "yellow"}
    ))
    public void listenDirectQueue2(String msg) throws InterruptedException {
        System.out.println("消费者2 收到了 direct.queue2的消息:【" + msg +"】");
    }
}
测试类
    @Test
    void testSendDirect() {
        String exchangeName = "b.direct";
        String msg = "蓝色通知";
        rabbitTemplate.convertAndSend(exchangeName, "blue", msg);
    }
    @Test
    void testSendDirect2() {
        String exchangeName = "b.direct";
        String msg = "红色通知";
        rabbitTemplate.convertAndSend(exchangeName, "red", msg);
    }    @Test
    void testSendDirect3() {
        String exchangeName = "b.direct";
        String msg = "黄色通知";
        rabbitTemplate.convertAndSend(exchangeName, "yellow", msg);
    }


![[附源码]SpringBoot+Vue网盘项目_仿某度盘](https://img-blog.csdnimg.cn/img_convert/994a618d6023a7d6e2162c09967a9748.webp?x-oss-process=image/format,png)
