1.inode & block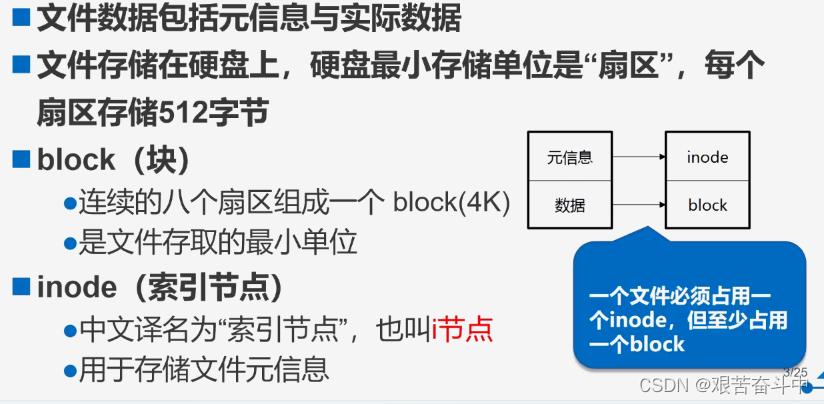
1.1 inode的内容
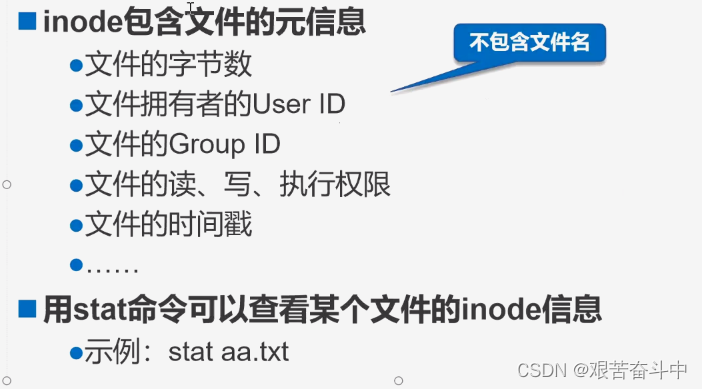
stat 文件名: 查看文件的元信息

df -i:查看每个分区的inode数量
[root@localhost ~]# df -i
文件系统                   Inode 已用(I)  可用(I) 已用(I)% 挂载点
devtmpfs                  478387     382   478005       1% /dev
tmpfs                     482656       1   482655       1% /dev/shm
tmpfs                     482656    1414   481242       1% /run
tmpfs                     482656      16   482640       1% /sys/fs/cgroup
/dev/mapper/centos-root 18610176  159957 18450219       1% /
/dev/sda1                 262144     341   261803       1% /boot
tmpfs                     482656       9   482647       1% /run/user/42
tmpfs                     482656       1   482655       1% /run/user/0
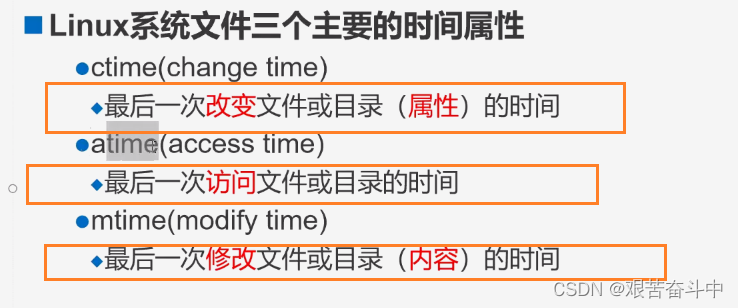
ctime(change time):更新文件的属性或者权限的时间
[root@localhost ~]# stat anaconda-ks.cfg
  文件:"anaconda-ks.cfg"
  大小:2051      	块:8          IO 块:4096   普通文件
设备:fd00h/64768d	Inode:67145282    硬链接:1
权限:(0777/-rwxrwxrwx)  Uid:(    0/    root)   Gid:(    0/    root)
环境:system_u:object_r:admin_home_t:s0
最近访问:2024-04-03 01:07:12.852859681 +0800
最近更改:2024-04-03 00:53:25.761942715 +0800
最近改动:2024-04-27 19:37:48.848692856 +0800
创建时间:-
mtime(modify time) :更新修改文件的内容数据的时间
注意:如果更改内容从而更改了文件大小,ctime也会发生改变。文件大小也属于文件的属性。
[root@localhost ~]# echo 123 >> anaconda-ks.cfg
[root@localhost ~]# stat anaconda-ks.cfg
  文件:"anaconda-ks.cfg"
  大小:2055      	块:8          IO 块:4096   普通文件
设备:fd00h/64768d	Inode:67145282    硬链接:1
权限:(0777/-rwxrwxrwx)  Uid:(    0/    root)   Gid:(    0/    root)
环境:system_u:object_r:admin_home_t:s0
最近访问:2024-04-03 01:07:12.852859681 +0800
最近更改:2024-04-27 19:44:01.011677712 +0800
最近改动:2024-04-27 19:44:01.011677712 +0800
创建时间:-
atime(accesstime):更新使用文件的时间

1.3 inode的号码
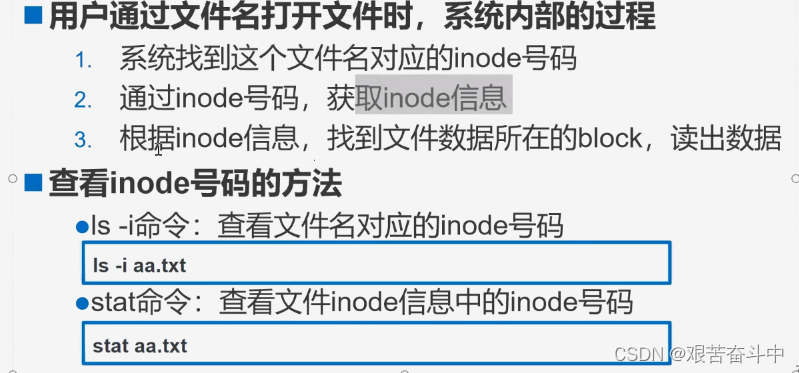

ls -i [文件名]:查看指定文件的inode号
[root@localhost ~]# ls -i abc.txt
67384763 abc.txt
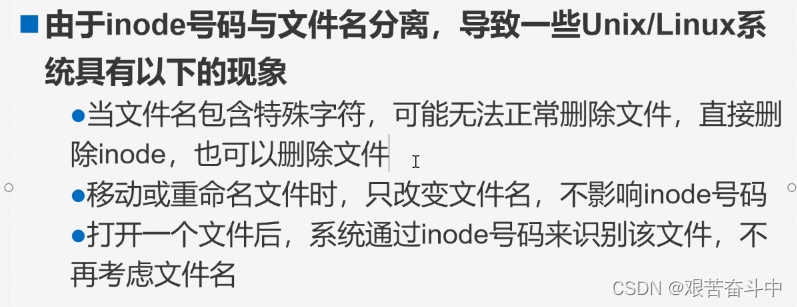
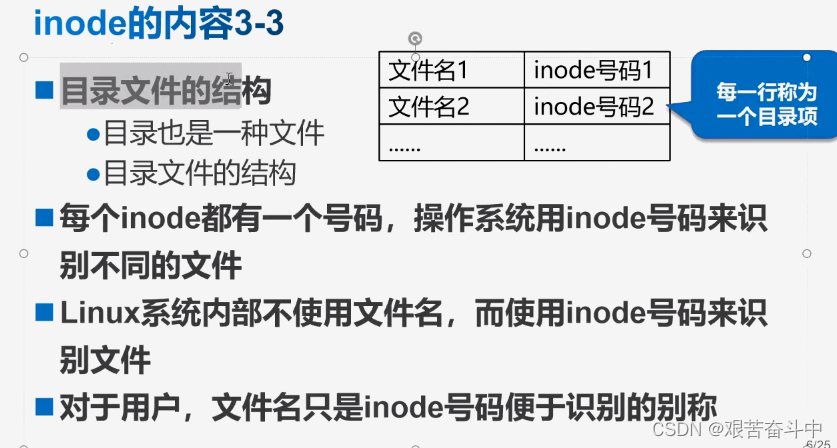
注意:Linux系统不使用 文件名 识别文件,而使用 inode号 来识别文件,文件名只是 inode号 便于识别的别称,文件名和inode号是一一对应的。
1.4 inode的大小

df -i:查看每个分区的inode数量
[root@localhost ~]# df -i
文件系统                   Inode 已用(I)  可用(I) 已用(I)% 挂载点
devtmpfs                  478387     382   478005       1% /dev
tmpfs                     482656       1   482655       1% /dev/shm
tmpfs                     482656    1414   481242       1% /run
tmpfs                     482656      16   482640       1% /sys/fs/cgroup
/dev/mapper/centos-root 18610176  159957 18450219       1% /
/dev/sda1                 262144     341   261803       1% /boot
tmpfs                     482656       9   482647       1% /run/user/42
tmpfs 482656 1 482655 1% /run/user/0注意:新挂载的磁盘显示使用一部分,其实就是inode号所消耗的
1.5 inode的特殊作用
find ./ -inum 67384746 -exec rm -rf {} \; 根据inode来查找指定文件并删除
同样适用于删除含特殊符号的文件
[root@localhost ~]# ls -i
 67384746 *123456               102613872 公共      82459 文档
 67384763 abc.txt                67145319 模板   33575890 下载
 67145282 anaconda-ks.cfg       102613873 视频   33575891 音乐
 67163917 initial-setup-ks.cfg   67145320 图片      82458 桌面
[root@localhost ~]# find ./ -inum 67384746 -exec rm -rf {} \;
[root@localhost ~]#
find ./ -inum 67384746 | xargs rm -f 通过find查找出文件后,通过xargs查找出参数再给rm -f删除
[root@localhost ~]# ls -i
 67384763 abc.txt               102613872 公共   67145320 图片   67384746 *小学生
 67145282 anaconda-ks.cfg        67145319 模板      82459 文档   33575891 音乐
 67163917 initial-setup-ks.cfg  102613873 视频   33575890 下载      82458 桌面
[root@localhost ~]# find ./ -inum 67384746 | xargs rm -f
移动或重命名文件时,只改变文件名,不影响inode号码,实例如下所示
[root@localhost opt]# ls -i
67384746 abc.txt  35302174 rh
[root@localhost opt]# mv abc.txt 123.txt
[root@localhost opt]# ls -i
67384746 123.txt  35302174 rh
修改文件的内容,inode号不会发生改变,如果使用vim编辑器更改文件内容,inode会发生改变
[root@localhost opt]# ls -i
67384746 123.txt  35302174 rh
[root@localhost opt]# echo 小学生 > 123.txt
[root@localhost opt]# cat 123.txt
小学生
[root@localhost opt]# ls -i
67384746 123.txt  35302174 rh
[root@localhost opt]# vim 123.txt
[root@localhost opt]# ls -i
67384774 123.txt  35302174 rh
1.6 模拟inode号被占满
模拟硬盘容量还有使用空间,但是文件inode号被占满的情况
[root@localhost xy101]# cd /root/xy101
[root@localhost xy101]# touch file{1..2549} #一条命令创建2549个文件的方式一
[root@localhost xy101]# echo > 123 123.txt
-bash: 123: 设备上没有空间
[root@localhost xy101]# df -i
文件系统                   Inode 已用(I)  可用(I) 已用(I)% 挂载点
devtmpfs                  478387     404   477983       1% /dev
tmpfs                     482656       1   482655       1% /dev/shm
tmpfs                     482656    1433   481223       1% /run
tmpfs                     482656      16   482640       1% /sys/fs/cgroup
/dev/mapper/centos-root 18610176  162372 18447804       1% /
/dev/sda1                 262144     341   261803       1% /boot
tmpfs                     482656       9   482647       1% /run/user/42
tmpfs                     482656       1   482655       1% /run/user/0
/dev/sdc1                   2560    2560        0     100% /root/xy101 #可以看到此时/dev/sdc1分区设备中的可用inode号为
磁盘有空间,但是仍然无法写入新文件的可能原因如下所示:
(1)inode号被占满;
(2)磁盘出现问题的情况又分为:磁盘坏道和文件系统出现问题;
- 磁盘坏道可以用badblocks命令查询:badblocks -v /dev/sda1 > ~/result.txt &
[root@localhost xy101]# badblocks -v /dev/sdb1 > ~/result.txt &  因为硬盘检测需要很长时间,所以在 badblocks 命令之后需要加 & 让进程在后台处理,最后将操作结果重定输出到根目录下的result.txt 文件中
[1] 2363
[root@localhost xy101]# 正在检查从 0 到 20970495的块
Checking for bad blocks (read-only test):
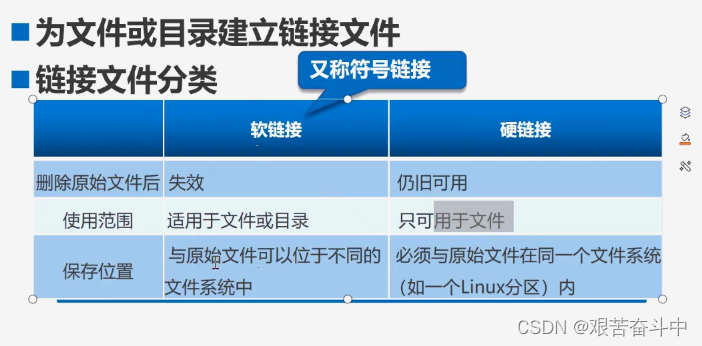
2. 链接文件
链接格式
硬链接
ln 源文件 目标位置
软链接
ln -s 源文件或目录… 链接文件或目标位置
3.文件恢复
3.1 修复EXT类型的文件

注意:extundelete工具目前只能恢复ext类型的文件;
3.1.1 EXT类型文件恢复步骤
插入两块新硬盘
(1)使用fdisk创建分区/dev/sdb1,格式化ext3文件系统;
[root@localhost ~]# fdisk /dev/sdb
欢迎使用 fdisk (util-linux 2.23.2)。

更改将停留在内存中,直到您决定将更改写入磁盘。
使用写入命令前请三思。

Device does not contain a recognized partition table
使用磁盘标识符 0xeffb4bef 创建新的 DOS 磁盘标签。

命令(输入 m 获取帮助):n
Partition type:
   p   primary (0 primary, 0 extended, 4 free)
   e   extended
Select (default p): p
分区号 (1-4,默认 1):1
起始 扇区 (2048-41943039,默认为 2048):
将使用默认值 2048
Last 扇区, +扇区 or +size{K,M,G} (2048-41943039,默认为 41943039):
将使用默认值 41943039
分区 1 已设置为 Linux 类型,大小设为 20 GiB

命令(输入 m 获取帮助):w
The partition table has been altered!

Calling ioctl() to re-read partition table.
正在同步磁盘。
[root@localhost ~]# echo 'n    #此处面交互操作分区
> p
> 1
>
> w' fdisk /dev/sdc
[root@localhost ~]# fdisk -l

磁盘 /dev/sda:42.9 GB, 42949672960 字节,83886080 个扇区
Units = 扇区 of 1 * 512 = 512 bytes
扇区大小(逻辑/物理):512 字节 / 512 字节
I/O 大小(最小/最佳):512 字节 / 512 字节
磁盘标签类型:dos
磁盘标识符:0x0000c682

   设备 Boot      Start         End      Blocks   Id  System
/dev/sda1   *        2048     1050623      524288   83  Linux
/dev/sda2         1050624    83886079    41417728   8e  Linux LVM

磁盘 /dev/sdb:21.5 GB, 21474836480 字节,41943040 个扇区
Units = 扇区 of 1 * 512 = 512 bytes
扇区大小(逻辑/物理):512 字节 / 512 字节
I/O 大小(最小/最佳):512 字节 / 512 字节
磁盘标签类型:dos
磁盘标识符:0xeffb4bef

   设备 Boot      Start         End      Blocks   Id  System
/dev/sdb1            2048    41943039    20970496   83  Linux
[root@localhost ~]# mkfs -t ext3 /dev/sdb1
mke2fs 1.42.9 (28-Dec-2013)
文件系统标签=
OS type: Linux
块大小=4096 (log=2)
分块大小=4096 (log=2)
Stride=0 blocks, Stripe width=0 blocks
1310720 inodes, 5242624 blocks
262131 blocks (5.00%) reserved for the super user
第一个数据块=0
Maximum filesystem blocks=4294967296
160 block groups
32768 blocks per group, 32768 fragments per group
8192 inodes per group
Superblock backups stored on blocks:
	32768, 98304, 163840, 229376, 294912, 819200, 884736, 1605632, 2654208,
	4096000

Allocating group tables: 完成
正在写入inode表: 完成
Creating journal (32768 blocks): 完成
Writing superblocks and filesystem accounting information: 完成

[root@localhost ~]# mkdir /xy101
[root@localhost ~]# mount /dev/sdb1 /xy101/
[root@localhost ~]# df -hT
文件系统                类型      容量  已用  可用 已用% 挂载点
devtmpfs                devtmpfs  1.9G     0  1.9G    0% /dev
tmpfs                   tmpfs     1.9G     0  1.9G    0% /dev/shm
tmpfs                   tmpfs     1.9G   13M  1.9G    1% /run
tmpfs                   tmpfs     1.9G     0  1.9G    0% /sys/fs/cgroup
/dev/mapper/centos-root xfs        36G  5.2G   31G   15% /
/dev/sda1               xfs       509M  181M  329M   36% /boot
tmpfs                   tmpfs     378M   12K  378M    1% /run/user/42
tmpfs                   tmpfs     378M     0  378M    0% /run/user/0
/dev/sdb1               ext3       20G   45M   19G    1% /xy101
[root@localhost ~]#
(2)安装依赖包
[root@localhost ~/extundelete-0.2.4]# yum -y install e2fsprogs-devel e2fsprogs-libs
已加载插件:fastestmirror, langpacks
Loading mirror speeds from cached hostfile
 * base: mirrors.ustc.edu.cn
 * extras: mirrors.ustc.edu.cn
 * updates: mirrors.ustc.edu.cn
file:///mnt/repodata/repomd.xml: [Errno 14] curl#37 - "Couldn't open file /mnt/repodata/repomd.xml"
正在尝试其它镜像。
软件包 e2fsprogs-libs-1.42.9-19.el7.x86_64 已安装并且是最新版本

   作为依赖被安装:
  libcom_err-devel.x86_64 0:1.42.9-19.el7
(3)编译安装extundelete
[root@localhost ~]# rz -E  #将windows系统的文件加载到虚拟机中
[root@localhost yum.repos.d]# cd /opt
[root@localhost opt]# ls
extundelete-0.2.4.tar.bz2  john-1.8.0  john-1.8.0.tar.gz  rh
[root@localhost opt]# tar xf extundelete-0.2.4.tar.bz2
[root@localhost opt]# ls
extundelete-0.2.4  extundelete-0.2.4.tar.bz2  john-1.8.0  john-1.8.0.tar.gz  rh
[root@localhost opt]# cd extundelete-0.2.4/
[root@localhost extundelete-0.2.4]# ls
acinclude.m4  autogen.sh   configure     depcomp     LICENSE      Makefile.in  README
aclocal.m4    config.h.in  configure.ac  install-sh  Makefile.am  missing      src


[root@localhost ~/extundelete-0.2.4]# ./configure --prefix=/usr/local/extundelete && make && make install  #将extundelete工具安装到指定路径/usr/local/extundelete中,并进行编译和安装
Configuring extundelete 0.2.4
Writing generated files to disk
make -s all-recursive
Making all in src
Making install in src
  /usr/bin/install -c extundelete '/usr/local/extundelete/bin'
[root@localhost ~/extundelete-0.2.4]# cd /usr/local/extundelete/bin/  #切换到/usr/local/extundelete/bin目录下

[root@localhost /usr/local/extundelete/bin]# ls
extundelete
[root@localhost /usr/local/extundelete/bin]# ex  #由于/usr/local/extundelete/bin/extundelete这个安装路径是自定义的,系统无法识别
ex        exec      exempi    exit      expand    export    exportfs  expr
[root@localhost /usr/local/extundelete/bin]# ln -s /usr/local/extundelete/bin/extundelete /usr/local/bin/  #创建软链接使/usr/local/bin/系统默认安装路径指向自定义安装路径 /usr/local/extundelete/bin/extundelete
(4)查看指定分区设备/dev/sdb1中,存在那些文件
[root@localhost /usr/local/extundelete/bin]# cd /data/  #切换到/data/目录下
[root@localhost /data]# ls
lost+found
[root@localhost /data]# echo a > a
[root@localhost /data]# echo b > b
[root@localhost /data]# echo c > c
[root@localhost /data]# echo d >d
[root@localhost /data]# mkdir 123
[root@localhost /data]# echo helloworld > 123/abc123.txt  #将helloworld写入到123/abc123.txt文件中
[root@localhost /data]# extundelete /dev/sdd1 --inode 2
(5)模拟删除并执行恢复操作
[root@localhost /data]# rm -rf c d 123   #删除文件c d 123
[root@localhost /data]# ls
a  b  lost+found
[root@localhost /data]# cd
[root@localhost ~]# umount /data/  #首先解挂载,防止数据写入
[root@localhost ~]# df -hT
文件系统       类型      容量  已用  可用 已用% 挂载点
devtmpfs       devtmpfs  2.0G     0  2.0G    0% /dev
tmpfs          tmpfs     394M     0  394M    0% /run/user/0
/dev/sdb1      xfs        20G   33M   20G    1% /root/data
[root@localhost ~]# extundelete /dev/sdb1 --inode 2
NOTICE: Extended attributes are not restored.
Loading filesystem metadata ... 160 groups loaded.
Group: 0
Contents of inode 2:
0000 | ed 41 00 00 00 10 00 00 8b 62 3a 64 88 62 3a 64 | .A.......b:d.b:d
0010 | 88 62 3a 64 00 00 00 00 00 00 03 00 08 00 00 00 | .b:d............
File name                                       | Inode number | Deleted status
.                                                 2
..                                                2
lost+found                                        11
a                                                 12
b                                                 13
c                                                 14             Deleted
d                                                 15             Deleted
123                                               475137         Deleted

[root@localhost ~]# extundelete /dev/sdb1 --restore-all   #恢复指定分区/dev/sdb1中删除的文件
NOTICE: Extended attributes are not restored.
0 recoverable inodes still lost.
[root@localhost ~]# ls
abc              extundelete-0.2.4          passwd           公共  图片  音乐
anaconda-ks.cfg  extundelete-0.2.4.tar.bz2  RECOVERED_FILES #在当前目录下生成的RECOVERED_FILES/目录,里面保存了已经恢复的文件  模板  文档  桌面
data             initial-setup-ks.cfg       result.txt       视频  下载
[root@localhost ~]# cd RECOVERED_FILES/  #切换到RECOVERED_FILES/ 目录下,查看已经恢复的文件
[root@localhost ~/RECOVERED_FILES]# ls
123  c  d
[root@localhost ~/RECOVERED_FILES]# cat d
d
[root@localhost ~/RECOVERED_FILES]# cat 123/abc123.txt
helloworld
3.2 修复XFS类型的文件

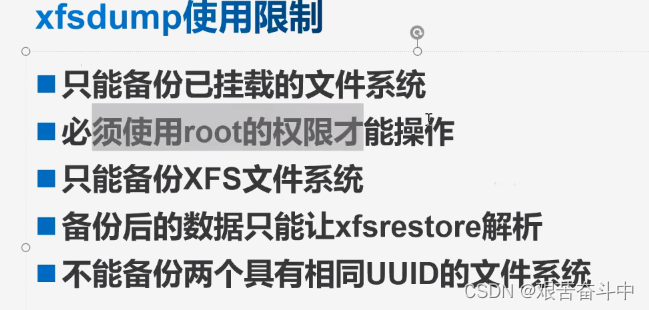
xfsdump使用限制
3.2.1 文件XFS类型文件恢复步骤
(1)使用fdisk创建分区/dev/sdc2,格式化xfs文件系统
[root@localhost ~]# fdisk /dev/sdc #创建新分区sdc2
欢迎使用 fdisk (util-linux 2.23.2)。

更改将停留在内存中,直到您决定将更改写入磁盘。
使用写入命令前请三思。


命令(输入 m 获取帮助):n
Partition type:
   p   primary (1 primary, 0 extended, 3 free)
   e   extended
Select (default p):
Using default response p
分区号 (2-4,默认 2):
起始 扇区 (22528-41943039,默认为 22528):
将使用默认值 22528
Last 扇区, +扇区 or +size{K,M,G} (22528-41943039,默认为 41943039):
将使用默认值 41943039
分区 2 已设置为 Linux 类型,大小设为 20 GiB

命令(输入 m 获取帮助):w
The partition table has been altered!

Calling ioctl() to re-read partition table.

WARNING: Re-reading the partition table failed with error 16: 设备或资源忙.
The kernel still uses the old table. The new table will be used at
the next reboot or after you run partprobe(8) or kpartx(8)
正在同步磁盘。
[root@localhost ~]# mkfs -t xfs /dev/sdc2
meta-data=/dev/sdc2              isize=512    agcount=4, agsize=1310016 blks
         =                       sectsz=512   attr=2, projid32bit=1
         =                       crc=1        finobt=0, sparse=0
data     =                       bsize=4096   blocks=5240064, imaxpct=25
         =                       sunit=0      swidth=0 blks
naming   =version 2              bsize=4096   ascii-ci=0 ftype=1
log      =internal log           bsize=4096   blocks=2560, version=2
         =                       sectsz=512   sunit=0 blks, lazy-count=1
realtime =none                   extsz=4096   blocks=0, rtextents=0
[root@localhost ~]# cd
[root@localhost ~]# mount /root/xy101   #挂载到xy101
mount: /dev/sdc1 已经挂载或 /root/xy101 忙
       /dev/sdc1 已经挂载到 /root/xy101 上
[root@localhost ~]# cp -a * /xy101/   #把所有数据复制到xy101
[root@localhost ~]# cd /xy101/
[root@localhost xy101]# ls
abc.txt          initial-setup-ks.cfg  xy10   公共  视频  文档  音乐
anaconda-ks.cfg  result.txt            xy101  模板  图片  下载  桌面
(2)使用xfsdump 命令备份整个分区
[root@localhost xy101]# xfsdump -f /opt/dump_sdc2 /dev/sdc2 -L /xy101 -M sdc2
#将分区设备/dev/sdc2下的文件备份到/opt/dump_sdc2目录中(添加-L打上备份标签和-M设备标签选项,可以避免交互式输入)
xfsdump: using file dump (drive_simple) strategy
xfsdump: version 3.1.7 (dump format 3.0) - type ^C for status and control
xfsdump: level 0 dump of localhost.localdomain:/xy101
xfsdump: dump date: Sun Apr 28 21:01:28 2024
xfsdump: session id: 5bd00820-e86e-4814-a4f2-b570ae02e9a3
xfsdump: session label: "/xy101"
xfsdump: ino map phase 1: constructing initial dump list
xfsdump: ino map phase 2: skipping (no pruning necessary)
xfsdump: ino map phase 3: skipping (only one dump stream)
xfsdump: ino map construction complete
xfsdump: estimated dump size: 37568 bytes
(3)模拟数据丢失并使用 xfsrestore 命令恢复文件
[root@localhost xy101]# cd /opt/
[root@localhost opt]# umount /xy101 #模拟前先解除挂载
[root@localhost opt]# mkfs.xfs -f /dev/sdc2 #进行强制格式化
meta-data=/dev/sdc2              isize=512    agcount=4, agsize=1310016 blks
         =                       sectsz=512   attr=2, projid32bit=1
         =                       crc=1        finobt=0, sparse=0
data     =                       bsize=4096   blocks=5240064, imaxpct=25
         =                       sunit=0      swidth=0 blks
naming   =version 2              bsize=4096   ascii-ci=0 ftype=1
log      =internal log           bsize=4096   blocks=2560, version=2
         =                       sectsz=512   sunit=0 blks, lazy-count=1
realtime =none                   extsz=4096   blocks=0, rtextents=0
[root@localhost opt]# mount /dev/sdc2 /xy101/ #重新进行挂载
[root@localhost opt]# cd /xy101/
[root@localhost xy101]# xfsrestore -f /opt/dump_sdc2 /xy101  #将/opt/目录下的备份文件/opt/dump_sdc2恢复到指定路径/xy101/目录下
xfsrestore: using file dump (drive_simple) strategy
xfsrestore: version 3.1.7 (dump format 3.0) - type ^C for status and control
xfsrestore: searching media for dump
xfsrestore: examining media file 0
xfsrestore: dump description:
xfsrestore: hostname: localhost.localdomain
xfsrestore: mount point: /xy101
xfsrestore: volume: /dev/sdc2
xfsrestore: session time: Sun Apr 28 21:01:28 2024
xfsrestore: level: 0
xfsrestore: session label: "/xy101"
xfsrestore: media label: "sdc2"
xfsrestore: file system id: 91afa5bb-b640-48c0-9055-705cab0b1dd6
xfsrestore: session id: 5bd00820-e86e-4814-a4f2-b570ae02e9a3
xfsrestore: media id: daa75800-6278-4638-a222-339b259d3ba9
xfsrestore: using online session inventory
xfsrestore: searching media for directory dump
xfsrestore: reading directories
xfsrestore: 11 directories and 14 entries processed
xfsrestore: directory post-processing
xfsrestore: restoring non-directory files
xfsrestore: restore complete: 0 seconds elapsed
xfsrestore: Restore Summary:
xfsrestore:   stream 0 /opt/dump_sdc2 OK (success)
xfsrestore: Restore Status: SUCCESS
