这是一个微信小程序用户隐私协议保护指引自定义组件封装详细教程及代码。【建议收藏】
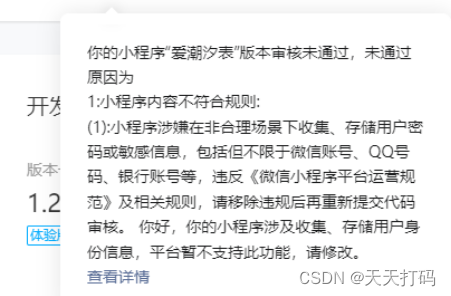
在做微信小程序有涉及表单提交,涉及用户信息收集时。提交代码会审核不过。
有需要了解到文档:https://developers.weixin.qq.com/miniprogram/dev/framework/user-privacy/PrivacyAuthorize.html
演示:扫码-进页面,拉下,点击-广告位申请,

需要以下处理:
- 1.填写:入口1:设置—功能设置—用户隐私保护指引设置
- 2.开发用户授权同意页面开发。
开发微信小程序用户隐私协议保护指引自定义组件:
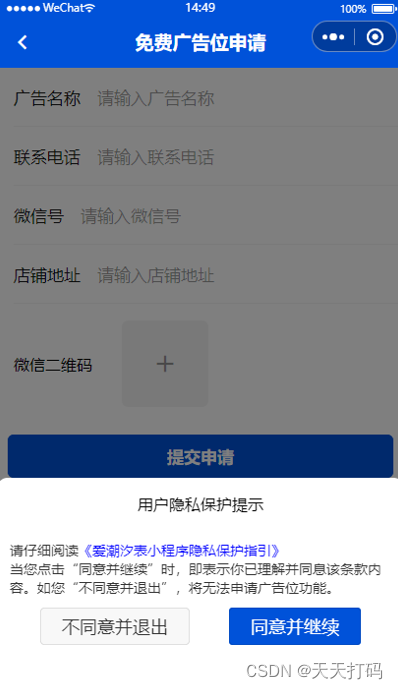
详细实现代码:
privacyPopup.wxml:
<view class="layer_privacy" wx:if="{{showPrivacy}}">
  <view class="agree_box">
    <view class="tit">{{title}}</view>
    <view class="content">
        <view class="dec">{{desc1}}</view>
        <view class="dec_link" style="color:blue" bindtap="openPrivacyContract">{{privacyContractName}}</view>
        <view class="dec">{{desc2}}</view>
        <view class="btn_group">
          <button class="disagree_btn" bindtap="handleDisagree">不同意并退出</button>
          <button class="agree_btn" open-type="agreePrivacyAuthorization" bindagreeprivacyauthorization="handleAgree">同意并继续</button>
        </view>
    </view>
  </view>
</view>
privacyPopup.wxss样式:
.layer_privacy{background-color:rgba(0, 0, 0, 0.5);position: fixed;top:0;right: 0;bottom: 0;left: 0;}
.agree_box{position: fixed;left: 0;right: 0;bottom: 0;height: 30%;background: #ffffff;padding: 25rpx;border-top-left-radius: 20rpx;border-top-right-radius: 20rpx;}
.agree_box .tit{text-align: center;line-height: 50rpx;margin-bottom: 40rpx;}
.agree_box .btn_group{padding: 0 20rpx;display: flex;justify-content: center;align-items: center;padding-top: 20rpx;}
.disagree_btn{line-height: 70rpx;color: #333;border-radius: 6rpx;padding: 0 40rpx;}
.agree_btn{background-color: #0052D9;line-height: 70rpx;color: #fff;border-radius: 6rpx;padding: 0 40rpx;}
.content .dec_link,.content .dec{display: inline-block;font-size: 26rpx;color: #333;}
privacyPopup.js
 Component({
    data: {
        title: "用户隐私保护提示",
        desc1: "请仔细阅读",
        desc2: "当您点击“同意并继续”时,即表示你已理解并同息该条款内容。如您“不同意并退出”,将无法申请广告位功能。",
        showPrivacy: false,
        privacyContractName:'',
    },
    lifetimes: {
      attached: function() {
        if (wx.getPrivacySetting) {
          wx.getPrivacySetting({
            success: res => {
                console.log("是否需要授权:", res.needAuthorization, "隐私协议的名称为:", res.privacyContractName)
                this.setData({
                  privacyContractName: res.privacyContractName
                })
                if (res.needAuthorization) {
                  this.popUp()
                } else{
                  this.triggerEvent("agree")
                }
            },
            fail: () => { },
            complete: () => { },
          })
        } else {
          // 低版本基础库不支持 wx.getPrivacySetting 接口,隐私接口可以直接调用
          this.triggerEvent("agree")
        }
      },
    },
    methods: {
        handleDisagree(e) {
            this.triggerEvent("disagree")
            this.hidenPopUp()
        },
        handleAgree(e) {
            this.triggerEvent("agree")
            this.hidenPopUp()
        },
        popUp() {
            this.setData({
              showPrivacy: true
            })
        },
        hidenPopUp() {
            this.setData({
              showPrivacy: false
            })
        },
        openPrivacyContract() {
          wx.openPrivacyContract({
            success: res => {
              console.log('openPrivacyContract success')
            },
            fail: res => {
              console.error('openPrivacyContract fail', res)
            }
          })
        }
    }
})
page需要引用页面:
page.json
{
  "component": true,
  "usingComponents": {
    "privacy-popup": "../../components/privacyPopup/privacyPopup"
  },
}
page.wxml
<privacy-popup bind:agree="agree" bind:disagree="disagree"></privacy-popup>
如果wx.getPrivacySetting中 needAuthorization始终返回的是false, 则需要在app.json中添加"__usePrivacyCheck__": true,

以上就是完整的实现代码,代码整理不易,希望大家点赞收藏,支持!!!!!
