目录
- 1 基础课程
- 2 安装环境
- 2.1 教程要求
- 2.2 安装 Lagent 和 AgentLego
- 3 实践操作
- 3.1 Lagent:轻量级智能体框架
- 3.1.1 Lagent Web Demo 使用
- 3.1.2 用 Lagent 自定义工具
- 3.2 AgentLego:组装智能体“乐高”
- 3.2.1 AgentLego 直接使用部分
- 3.2.2 AgentLego WebUI 使用
- 3.2.3 用 AgentLego 自定义工具
- 4 常见问题解决
- 5 ref
【相关链接汇总】
视频讲解 | 文档 | lagent- github官网 | agentlego-github地址
【作业内容】
-
基础作业
完成 Lagent Web Demo 使用,并在作业中上传截图。文档可见 Lagent Web Demo
完成 AgentLego 直接使用部分,并在作业中上传截图。文档可见 直接使用 AgentLego。 -
进阶作业
完成 AgentLego WebUI 使用,并在作业中上传截图。文档可见 AgentLego WebUI。
使用 Lagent 或 AgentLego 实现自定义工具并完成调用,并在作业中上传截图。文档可见:
用 Lagent 自定义工具
用 AgentLego 自定义工具 -
大作业选题
算法方向
在 Lagent 或 AgentLego 中实现 RAG 工具,实现智能体与知识库的交互。
基于 Lagent 或 AgentLego 实现工具的多轮调用,完成复杂任务。如:智能体调用翻译工具,再调用搜索工具,最后调用生成工具,完成一个完整的任务。
…
应用方向
基于 Lagent 或 AgentLego 实现一个客服智能体,帮助用户解决问题。
基于 Lagent 或 AgentLego 实现一个智能体,实现艺术创作,如生成图片、视频、音乐等。
…
1 基础课程
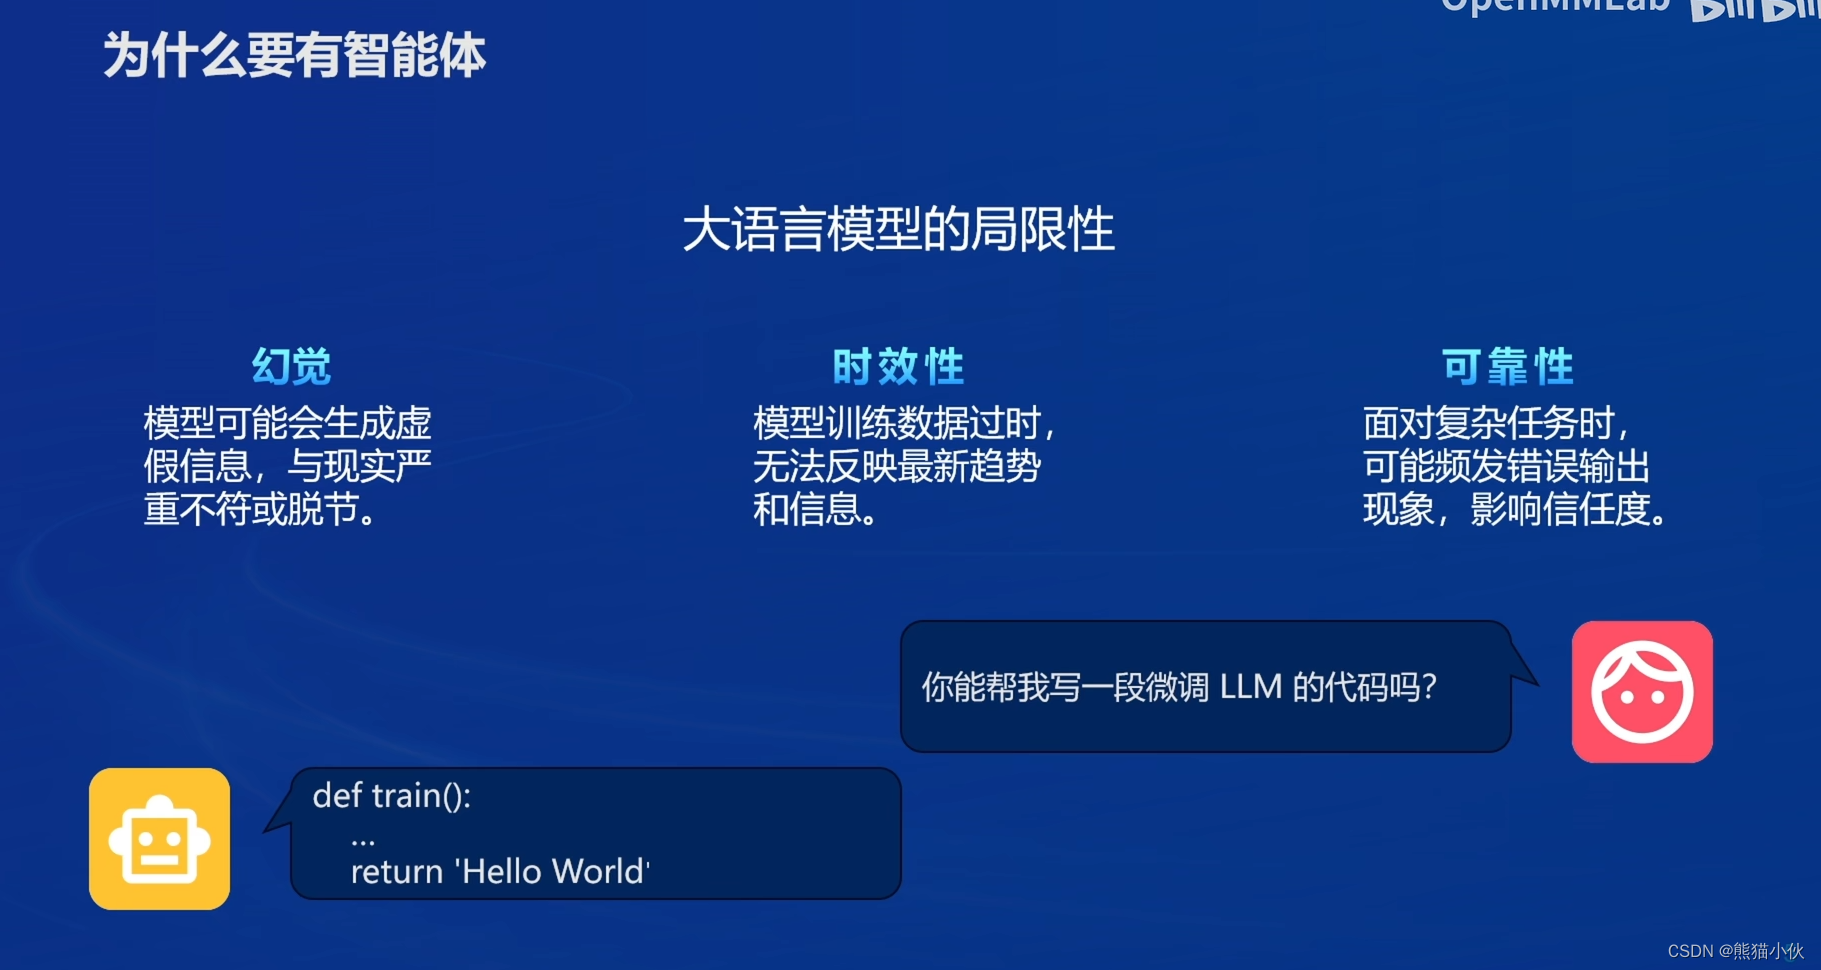
(1)为什么要有智能体
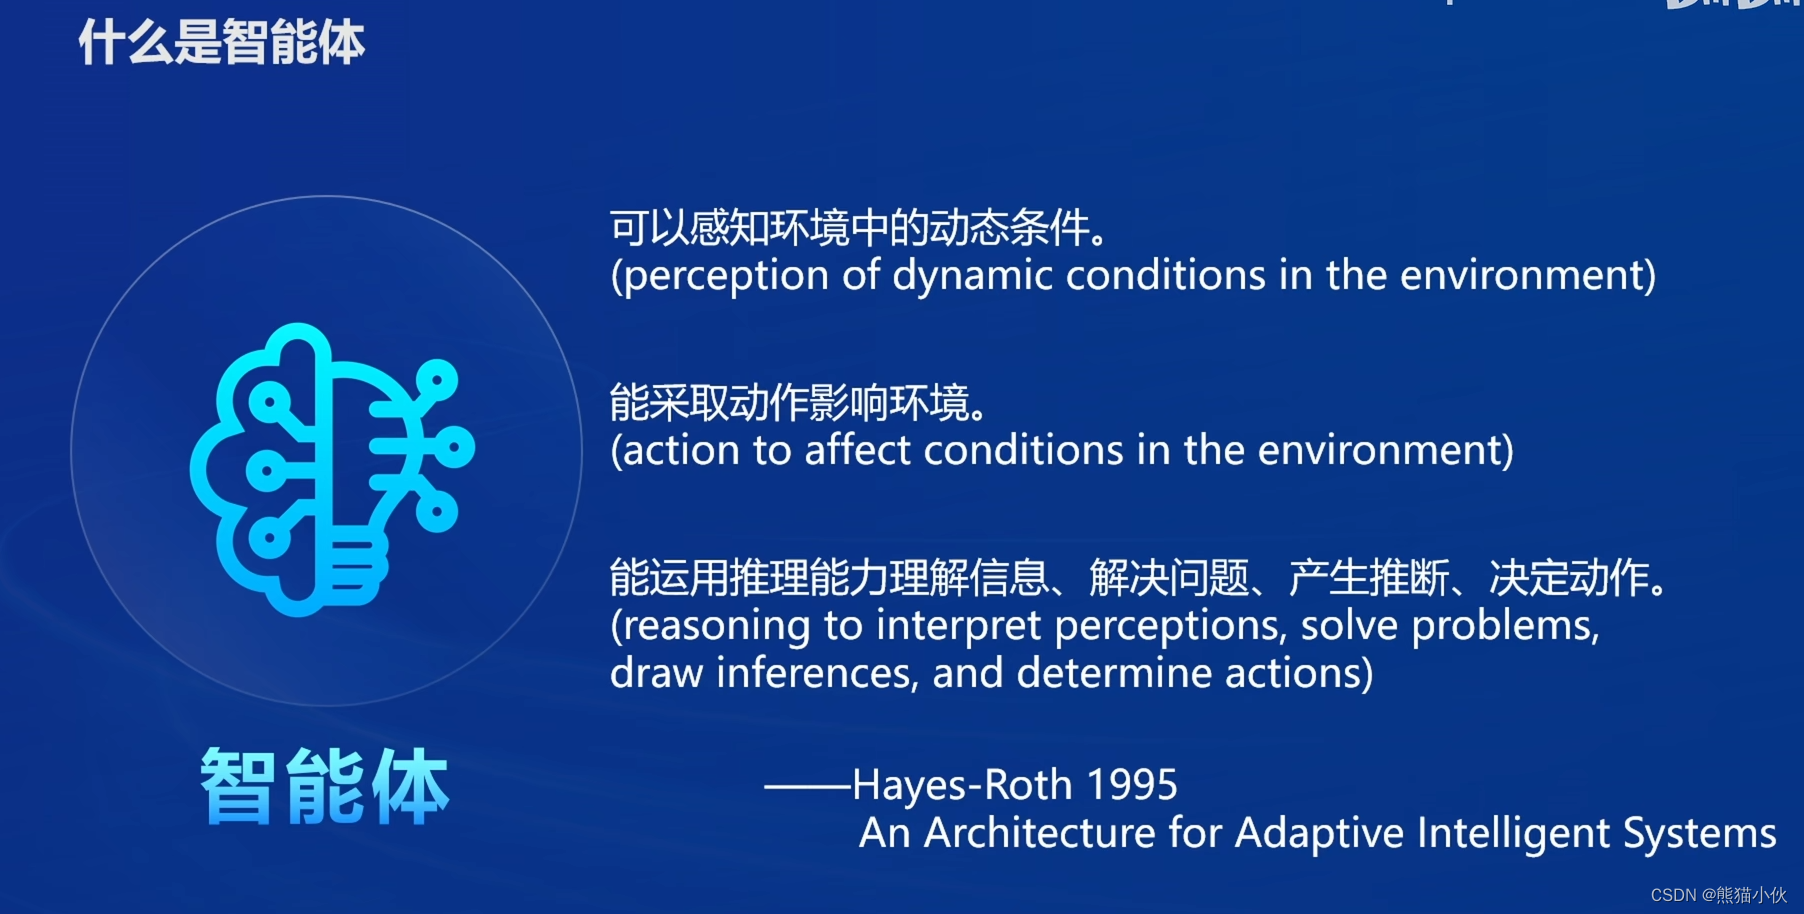
(2)定义
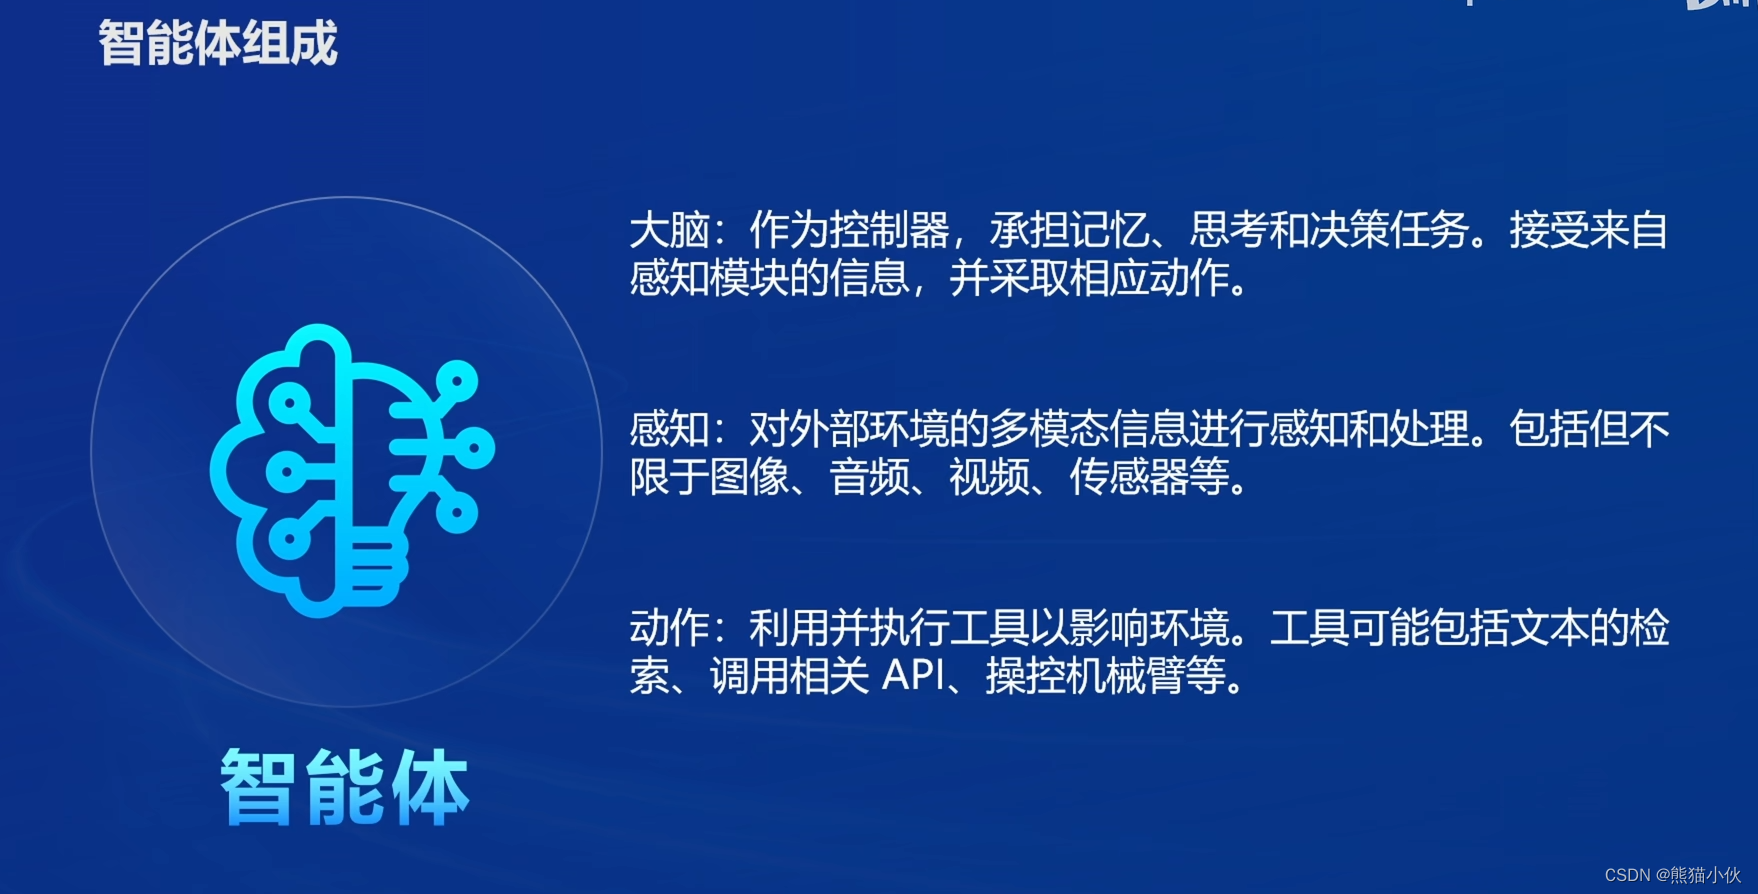
(3)组成
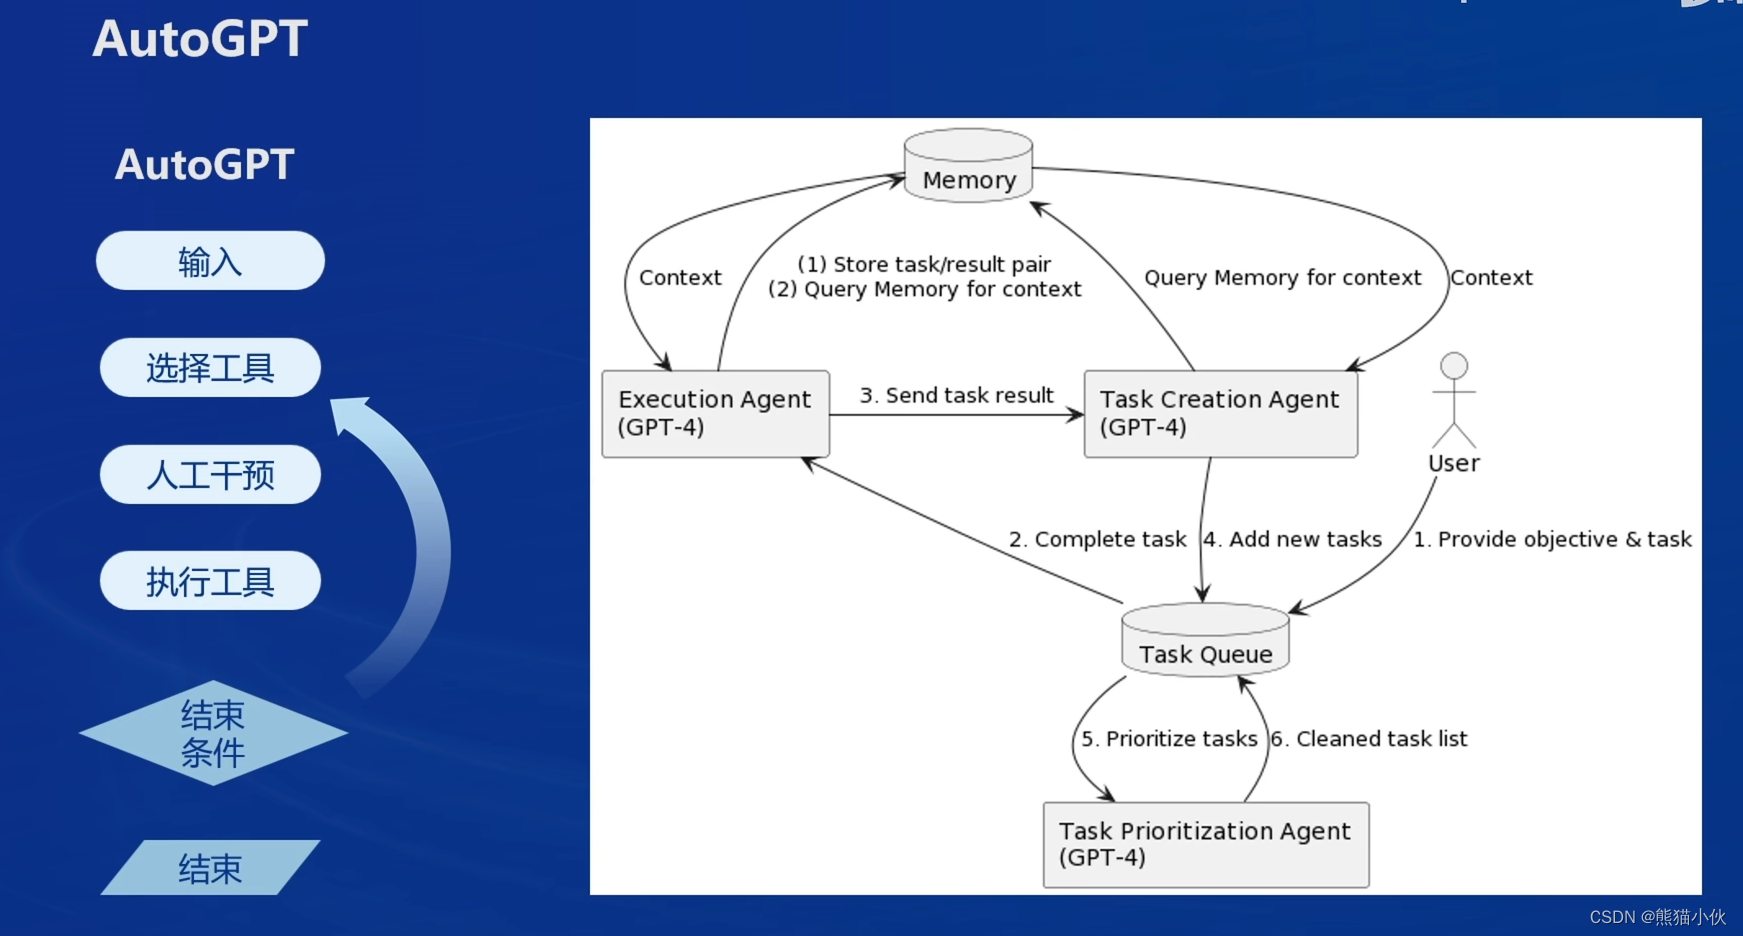
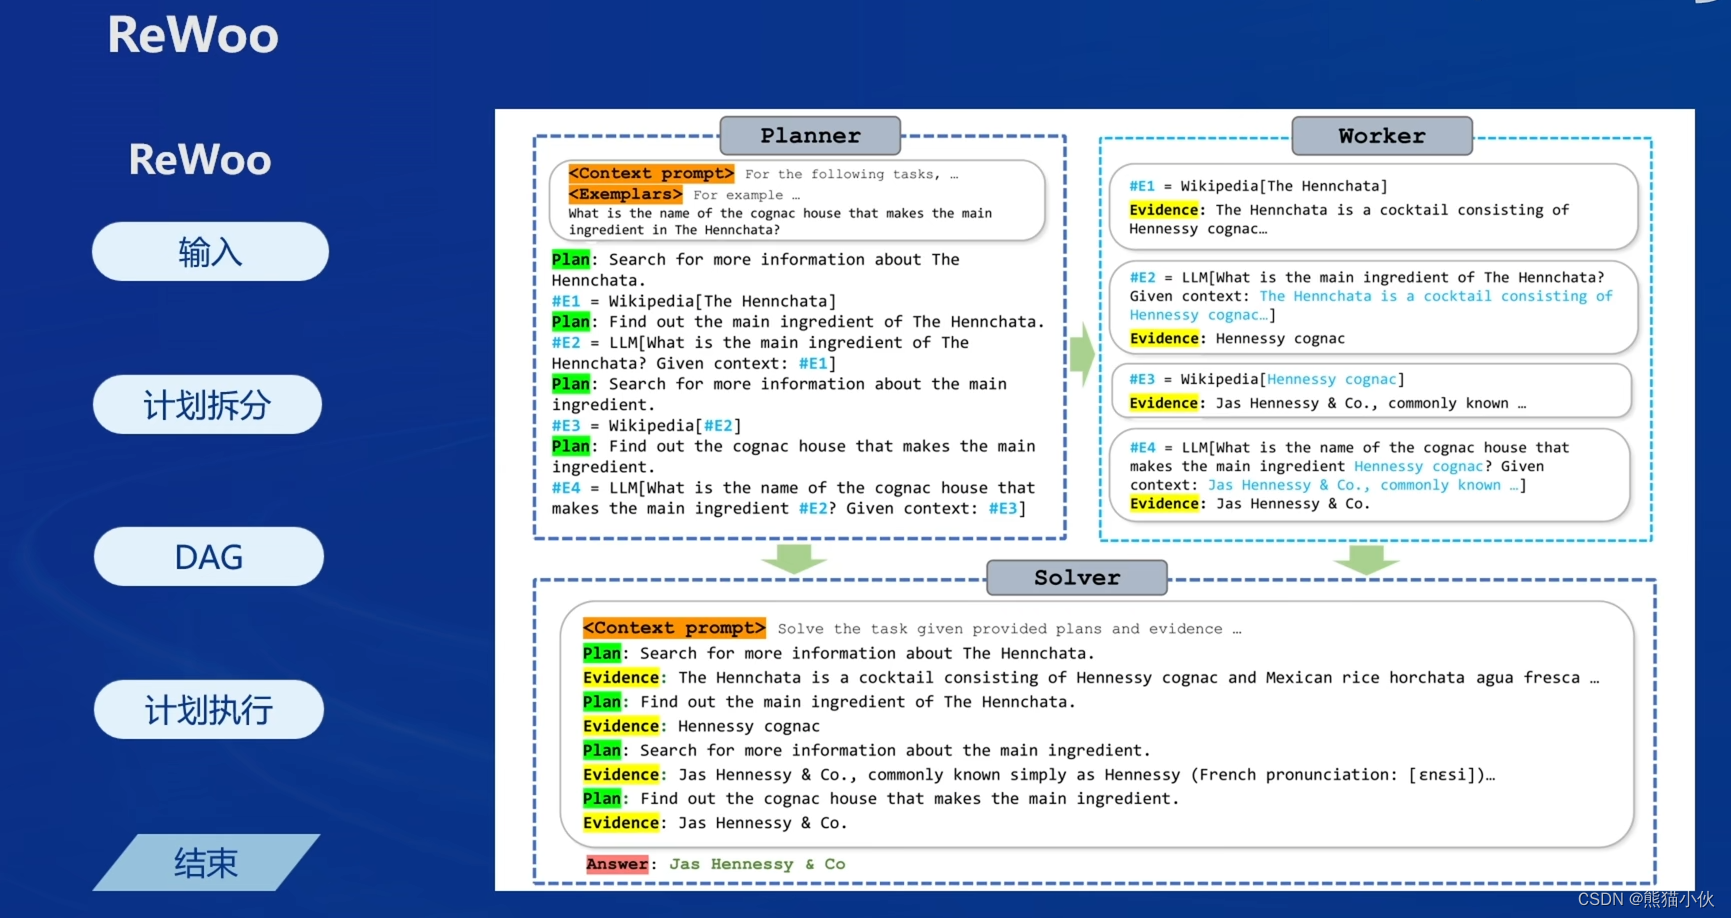
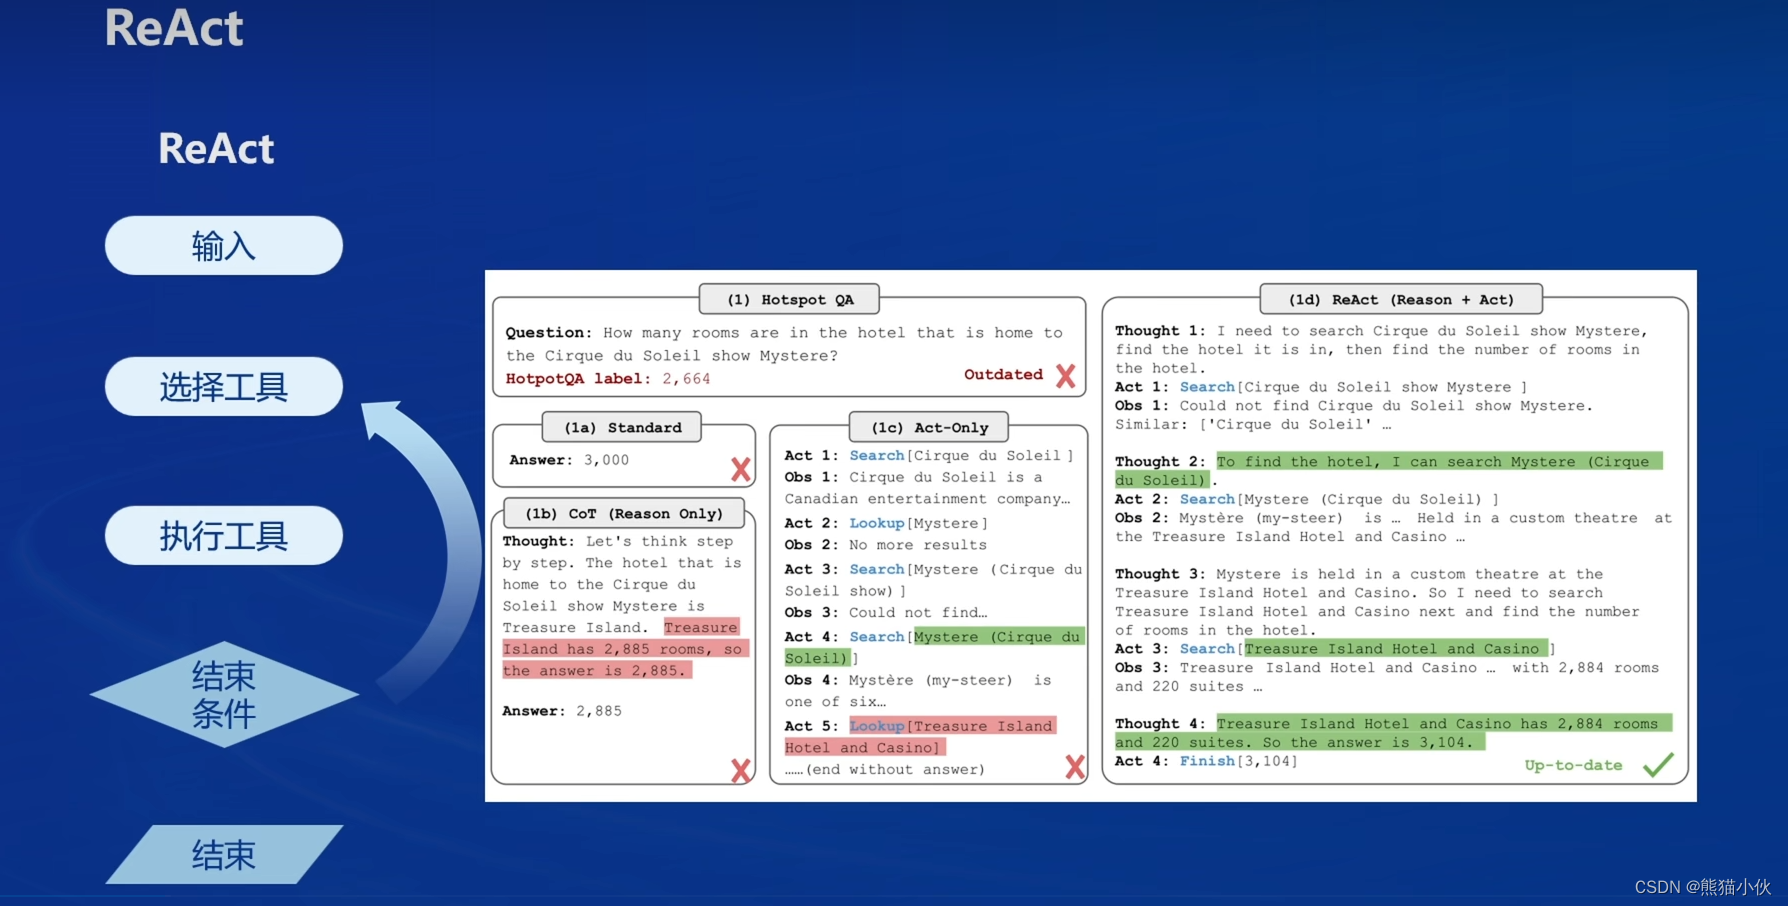
 (4)其他范式
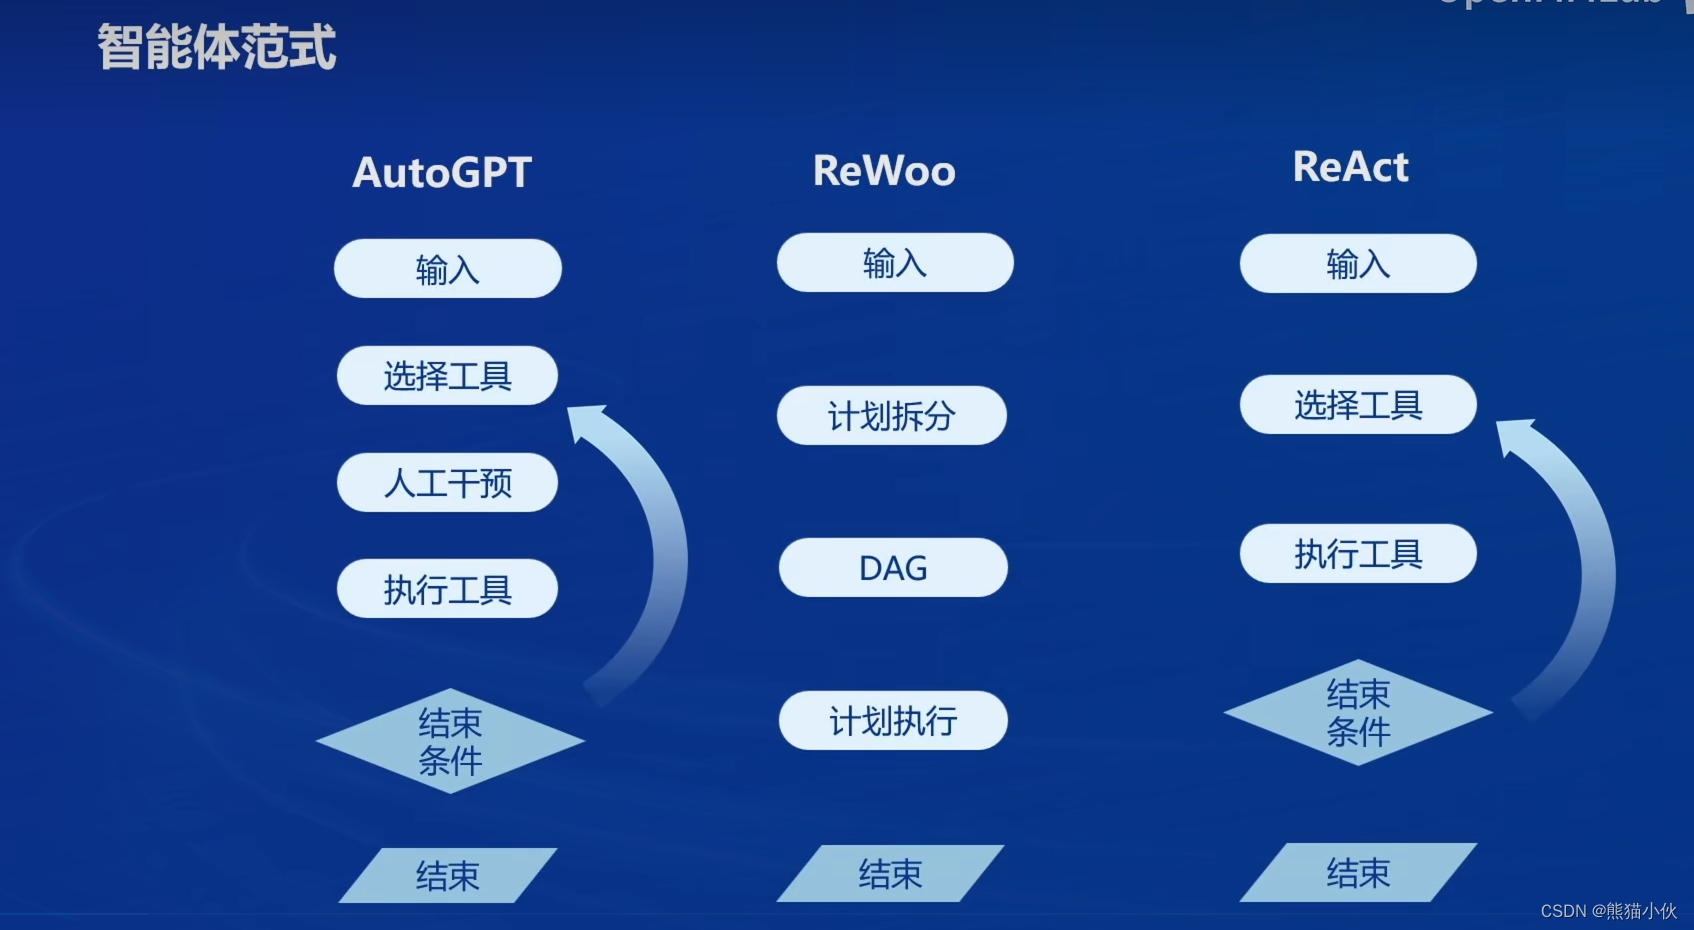 - AutoGPT
- ReWoo
- ReAct
 (5)Lagent
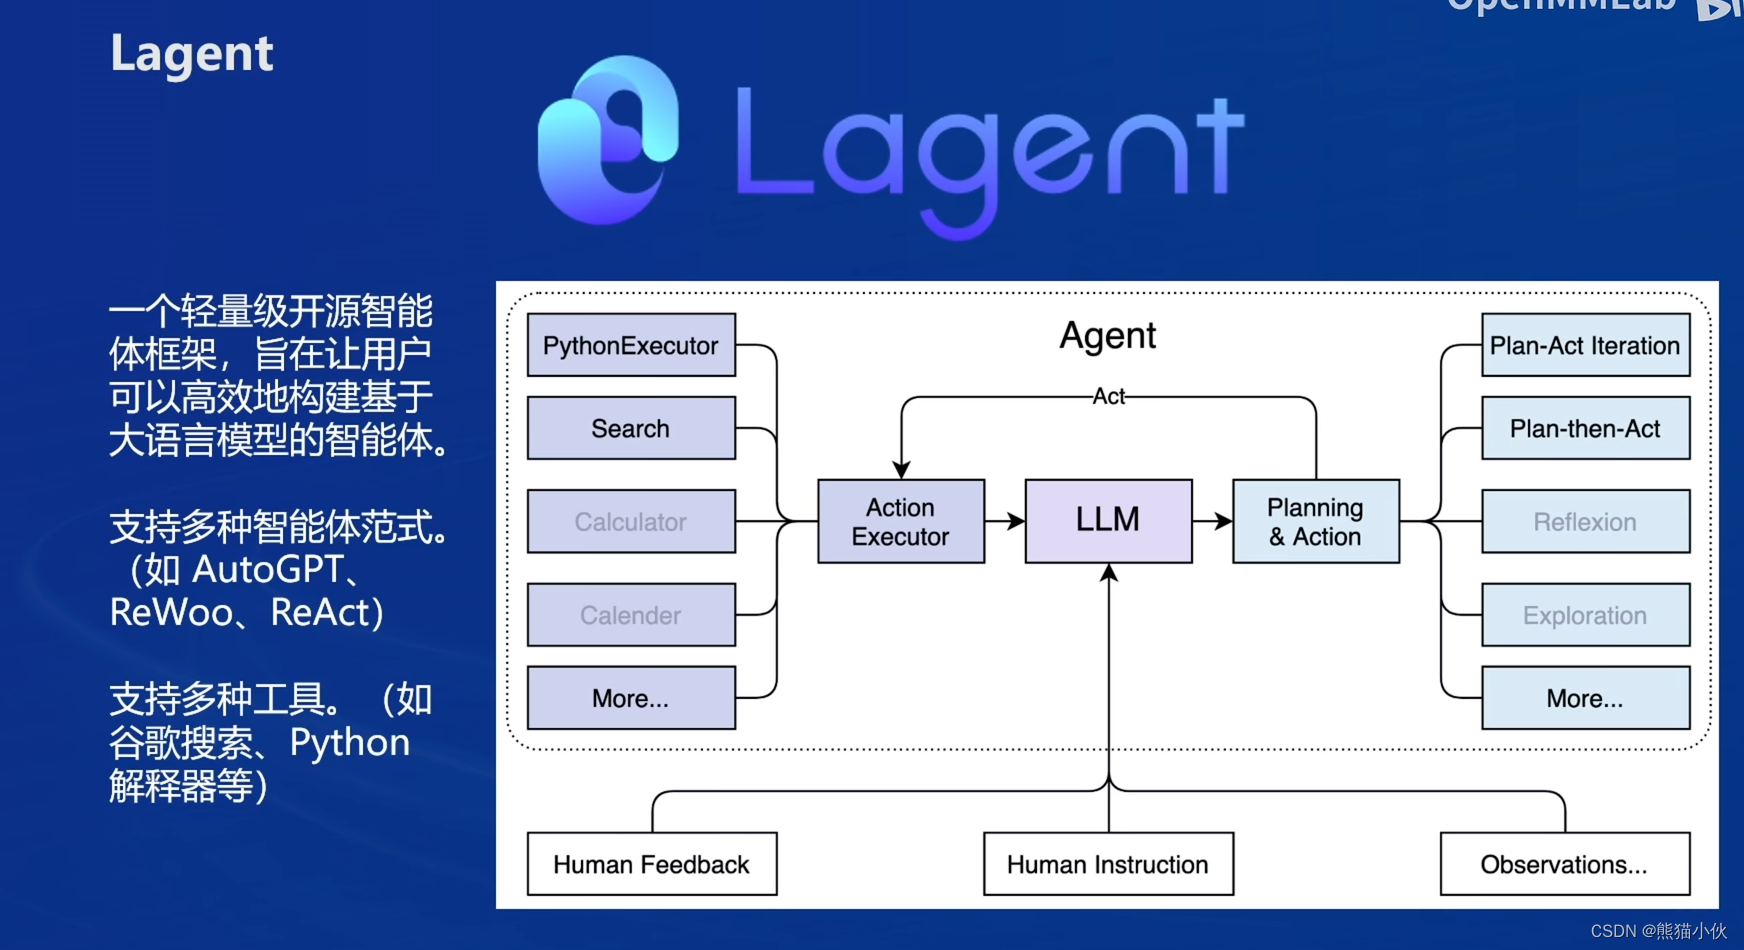
Lagent 是一个轻量级开源智能体框架,旨在让用户可以高效地构建基于大语言模型的智能体。同时它也提供了一些典型工具以增强大语言模型的能力。
Lagent 目前已经支持了包括 AutoGPT、ReAct 等在内的多个经典智能体范式,也支持了如下工具:
Arxiv 搜索
Bing 地图
Google 学术搜索
Google 搜索
交互式 IPython 解释器
IPython 解释器
PPT
Python 解释器
 (6)AgentLego
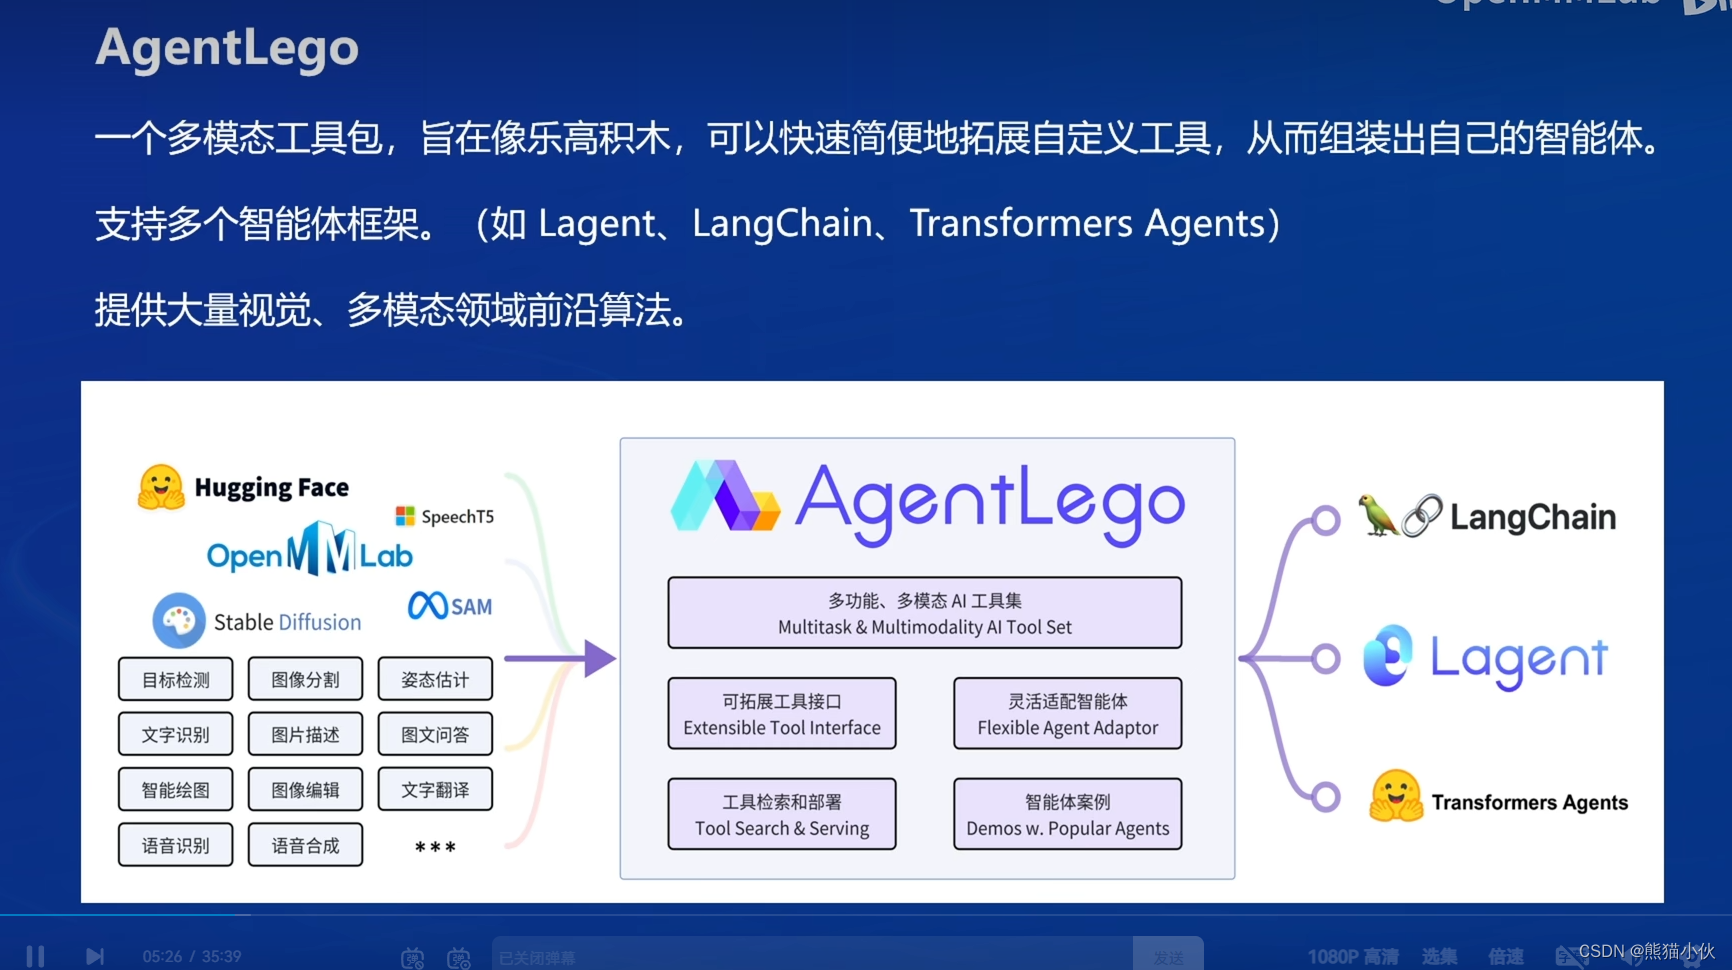 AgentLego 是一个提供了多种开源工具 API 的多模态工具包,旨在像是乐高积木一样,让用户可以快速简便地拓展自定义工具,从而组装出自己的智能体。通过 AgentLego 算法库,不仅可以直接使用多种工具,也可以利用这些工具,在相关智能体框架(如 Lagent,Transformers Agent 等)的帮助下,快速构建可以增强大语言模型能力的智能体。
AgentLego 目前提供了如下工具:
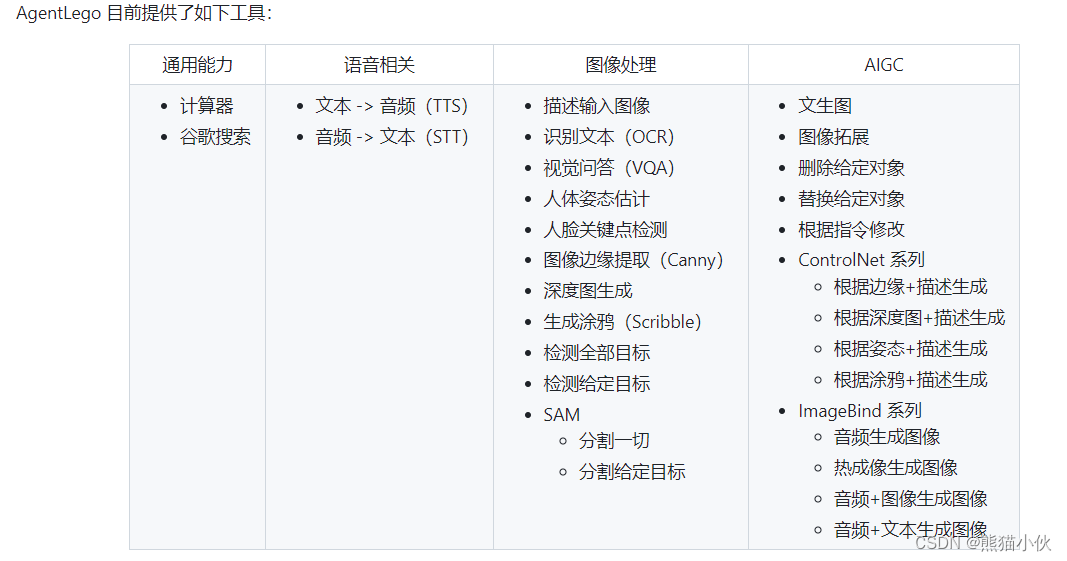 to-do:
这个调用多模态、图像处理(背靠mmlab大腿)和AIGC的能力写的很强,但是好像没有给出具体demo,后续有时间得做一做。
(7)lego & agentlego关系
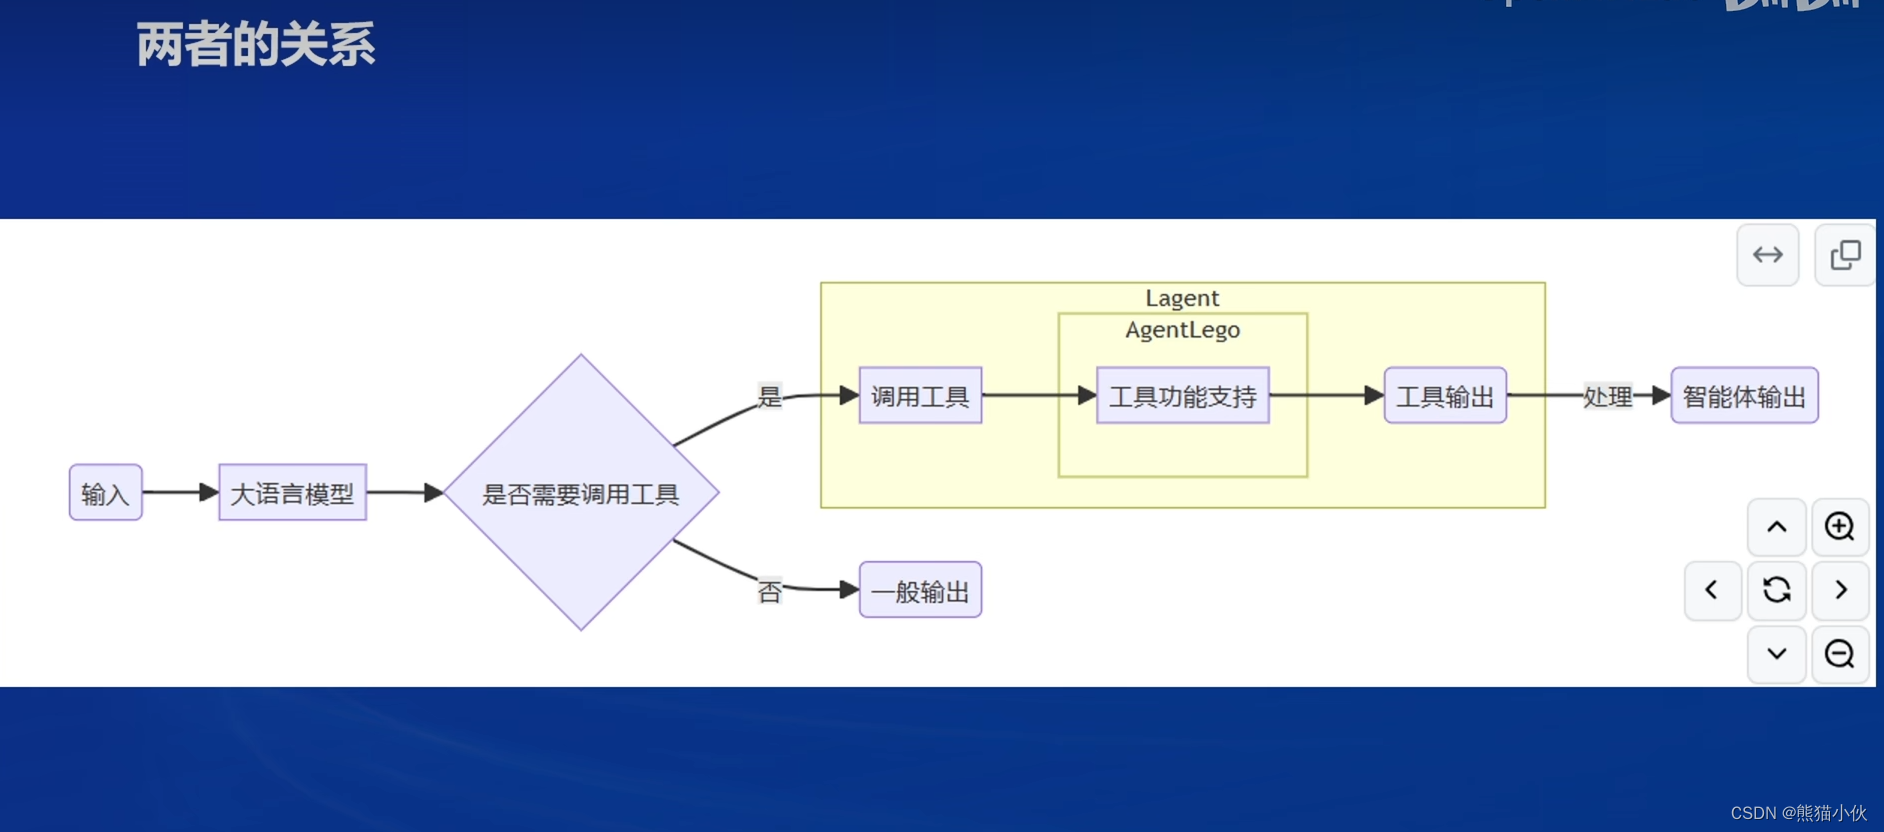
经过上面的介绍,我们可以发现,Lagent 是一个智能体框架,而 AgentLego 与大模型智能体并不直接相关,而是作为工具包,在相关智能体的功能支持模块发挥作用。
两者之间的关系可以用下图来表示:
2 安装环境
2.1 教程要求
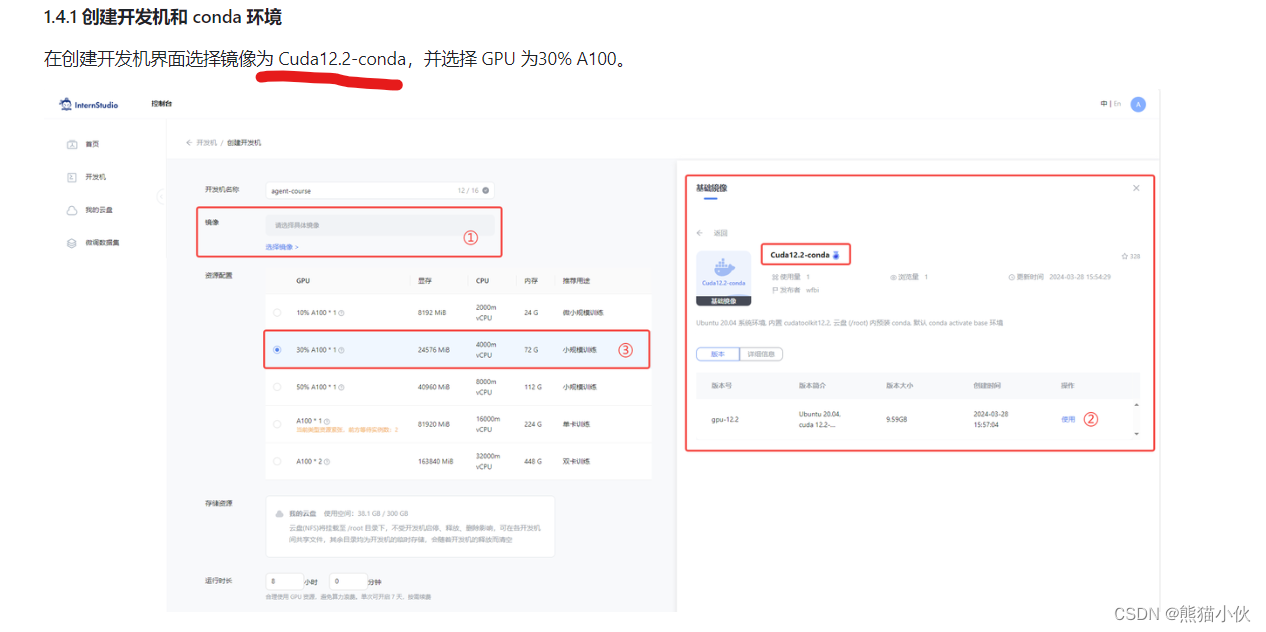 所以复用之前docker (
cuda12.2- torch2.1-flatten-attn2.5)
docker前置安装和搭建过程, 参见之前的讲解和链接。 【第5节】LMDeploy 大模型量化部署实践
# pip下载源更换
pip config set global.index-url http://mirrors.aliyun.com/pypi/simple/
pip config set install.trusted-host mirrors.aliyun.com
pip config list

# torch环境安装 cuda12.2 - torch 2.1.2
conda create -n lmdeploy -y python=3.10
conda activate lmdeploy
pip install torch==2.1.2 torchvision==0.16.2 torchaudio==2.1.2 --index-url https://download.pytorch.org/whl/cu121

# lmdeploy
pip install lmdeploy[all]==0.3.0
pip install modelscope
2.2 安装 Lagent 和 AgentLego
Lagent 和 AgentLego 都提供了两种安装方法,一种是通过 pip 直接进行安装,另一种则是从源码进行安装。为了方便使用 Lagent 的 Web Demo 以及 AgentLego 的 WebUI,我们选择直接从源码进行安装。
此处附上源码安装的相关帮助文档:
Lagent:https://lagent.readthedocs.io/zh-cn/latest/get_started/install.html
AgentLego:https://agentlego.readthedocs.io/zh-cn/latest/get_started.html
# step1: lmdeploy docker run
#docker run --name llmdeploy_cuda12.2_torch2.1_test \
#-p 6006:6006 \
#--gpus all \
#-it -v /home/fusionai/docker_share/cuda12.2_torch2.1.2_flashattn2.5.5:/home/#project/llmdeploy \
#jayce0625/cuda12.2_torch2.1.2_flashattn2.5.5 \
#/bin/bash

# restart the docker
docker start llmdeploy_cuda12.2_torch2.1_test
docker attach llmdeploy_cuda12.2_torch2.1_test

# step2: torch环境安装 cuda12.2 - torch 2.1.2
conda create -n agent -y python=3.10
conda activate agent
pip install torch==2.1.2 torchvision==0.16.2 torchaudio==2.1.2 --index-url https://download.pytorch.org/whl/cu121

# step3: lmdeploy
pip install lmdeploy[all]==0.3.0

# step4: 具体的位置需要自行换一下。安装 Lagent 和 AgentLego
mkdir -p /xxxx_dockerdir/agent
cd /xxxx_dockerdir/agent
# conda activate agent
git clone https://gitee.com/internlm/lagent.git
cd lagent && git checkout 581d9fb && pip install -e . && cd ..
git clone https://gitee.com/internlm/agentlego.git
cd agentlego && git checkout 7769e0d && pip install -e . && cd ..

# step5:准备 Tutorial
cd /xxxx_dockerdir/agent
git clone -b camp2 https://gitee.com/internlm/Tutorial.git
3 实践操作
指导文档 :
Lagent:轻量级智能体框架 | AgentLego:组装智能体“乐高” | Agent 工具能力微调
| 用 Lagent 自定义工具 | 用 AgentLego 自定义工具
3.1 Lagent:轻量级智能体框架
在这一部分中,我们将带大家体验 Lagent 的 Web Demo,使用 Lagent 自定义工具,并体验自定义工具的效果。
3.1.1 Lagent Web Demo 使用
(1) docker内部启动一个server
conda activate agent
# 将docker内的`localhost:6006`-> server_ip:6006映射出去; 模型还是用之前下载的1.8b
lmdeploy serve api_server /root/.cache/modelscope/hub/Shanghai_AI_Laboratory/internlm2-chat-7b \
--server-name 0.0.0.0 \
--server-port 6006 \
--model-name internlm2-chat-7b \
--cache-max-entry-count 0.5
(2) 外部服务器上(lmdeploy&lagent环境已安装)启动一个Lagent Web Demo进行显示
# 打开lagent/example里面运行这个internlm2_agent_web_demo.py
streamlit run internlm2_agent_web_demo.py \
--server.address 127.0.0.1
--server.port 7860
(3)查看后端 & 前端显示
打开浏览器http://server_ip:6006
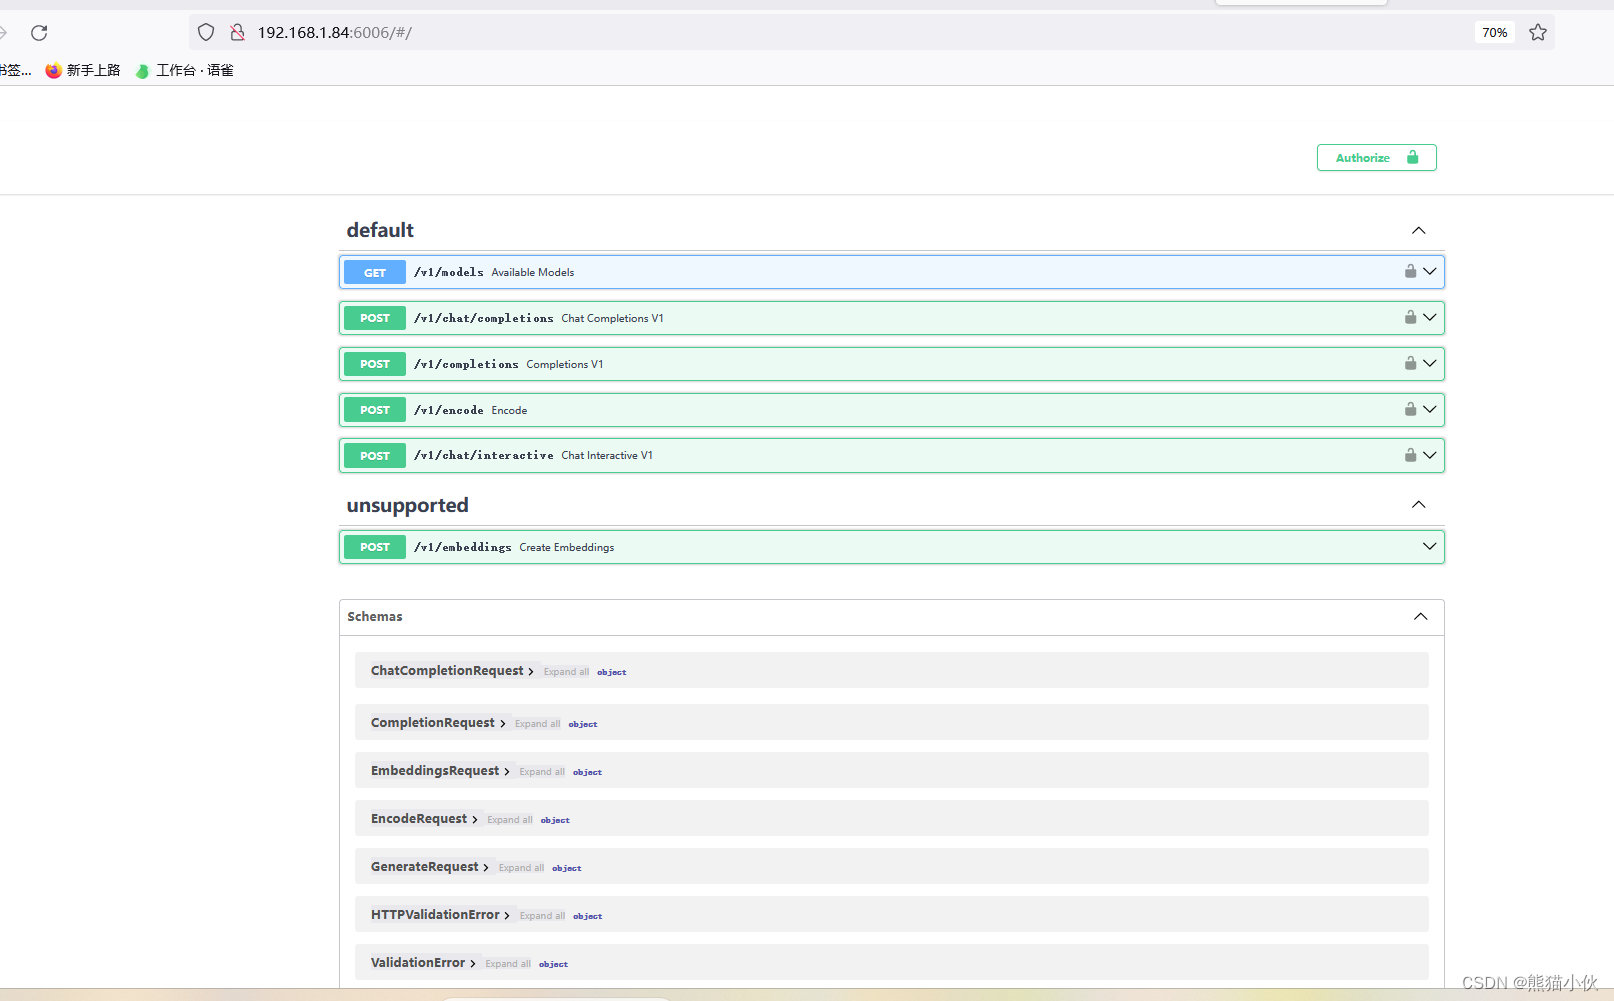 打开浏览器
打开浏览器http://127.0.0.1:7860, 注意下图花沟地方需要对应好
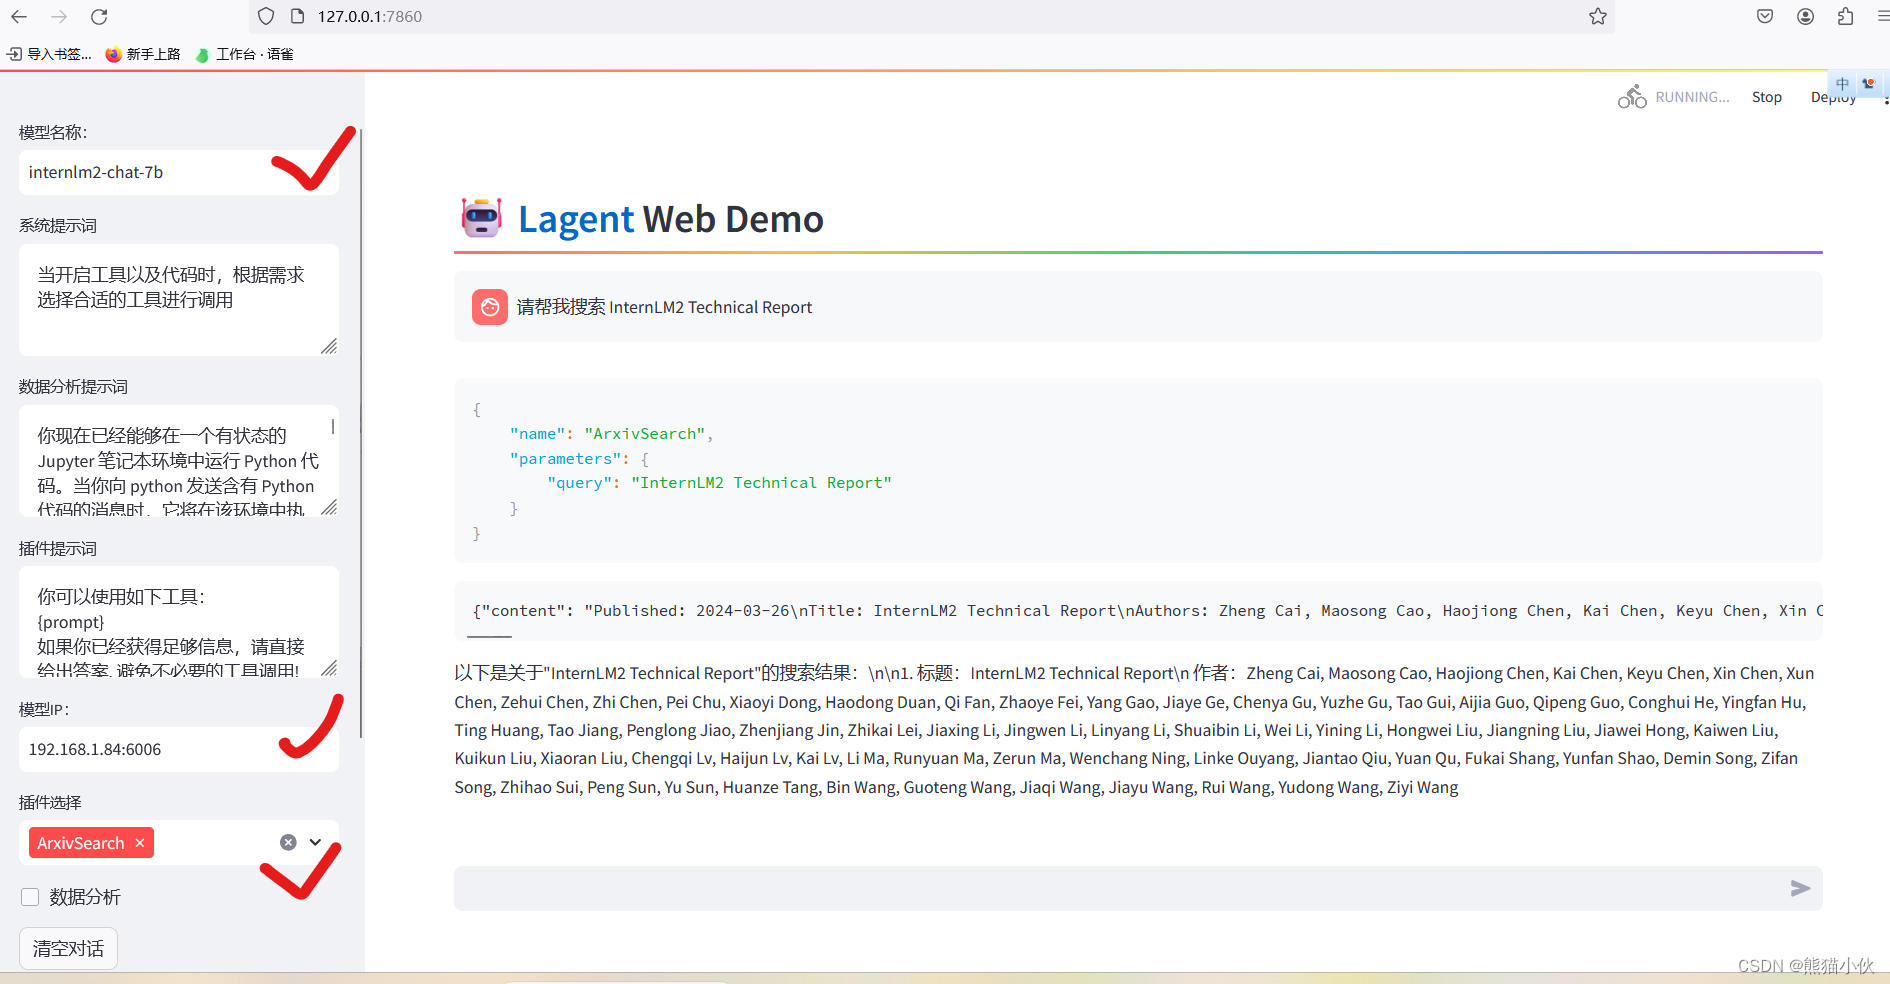
3.1.2 用 Lagent 自定义工具
to-do
3.2 AgentLego:组装智能体“乐高”
在这一部分中,我们将带大家直接使用 AgentLego 工具,体验 AgentLego 的 WebUI,以及基于 AgentLego 自定义工具并体验自定义工具的效果。
在上面介绍中可知,AgentLego 算法库既可以直接使用,也可以作为智能体工具使用。下面将分别介绍这两种使用方式。我们将以目标检测工具为例。
3.2.1 AgentLego 直接使用部分
由于 AgentLego 在安装时并不会安装某个特定工具的依赖,因此我们接下来准备安装目标检测工具运行时所需依赖。
AgentLego 所实现的目标检测工具是基于 mmdet (MMDetection) 算法库中的 RTMDet-Large 模型,因此我们首先安装 mim,然后通过 mim 工具来安装 mmdet。这一步所需时间可能会较长,请耐心等待。
conda activate agent
pip install openmim==0.3.9
mim install mmdet==3.3.0
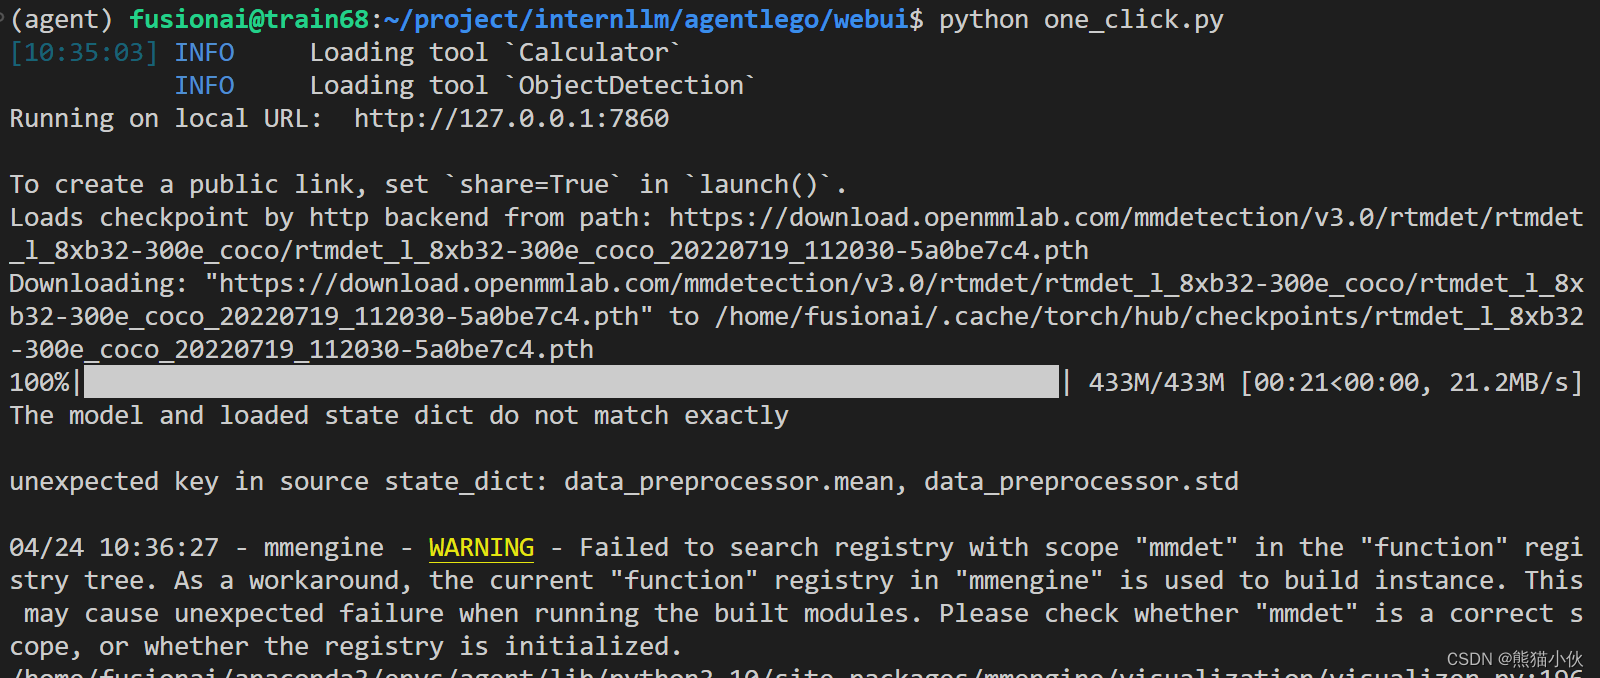
在安装完成后,可能会观察到以下现象(如下图所示),但请放心,这是正常现象,这并不会影响到我们的使用。
 然后通过
然后通过 touch xxx_dockerdir/direct_use.py(大小写敏感)的方式在xxx_dockerdir目录下新建 direct_use.py 以直接使用目标检测工具,direct_use.py 的代码如下:
# 注意更换一下图片存储路径
import re

import cv2
from agentlego.apis import load_tool

# load tool
tool = load_tool('ObjectDetection', device='cuda')

# apply tool
visualization = tool('/root/agent/road.jpg')
print(visualization)

# visualize
image = cv2.imread('/root/agent/road.jpg')

preds = visualization.split('\n')
pattern = r'(\w+) \((\d+), (\d+), (\d+), (\d+)\), score (\d+)'

for pred in preds:
    name, x1, y1, x2, y2, score = re.match(pattern, pred).groups()
    x1, y1, x2, y2, score = int(x1), int(y1), int(x2), int(y2), int(score)
    cv2.rectangle(image, (x1, y1), (x2, y2), (0, 255, 0), 1)
    cv2.putText(image, f'{name} {score}', (x1, y1), cv2.FONT_HERSHEY_SIMPLEX, 0.8, (0, 255, 0), 1)

cv2.imwrite('/root/agent/road_detection_direct.jpg', image)
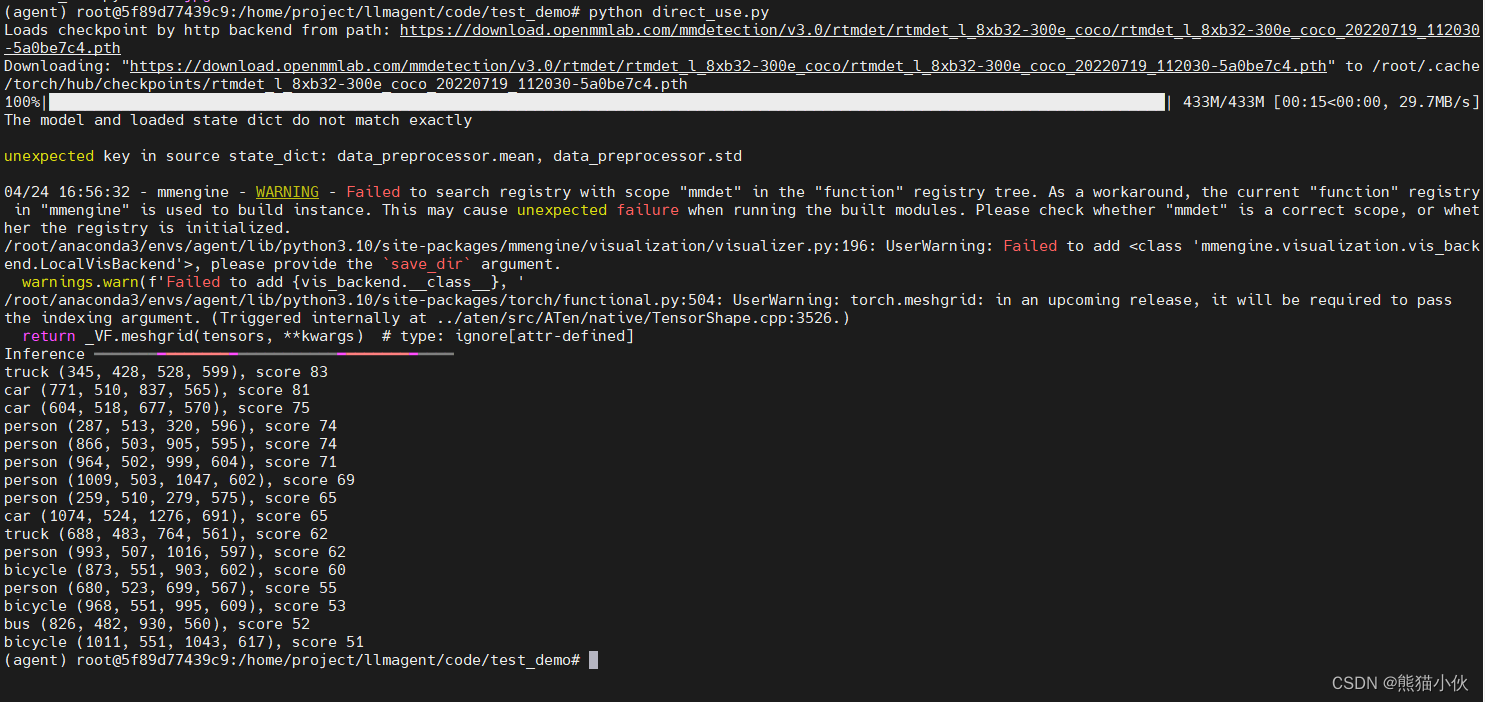
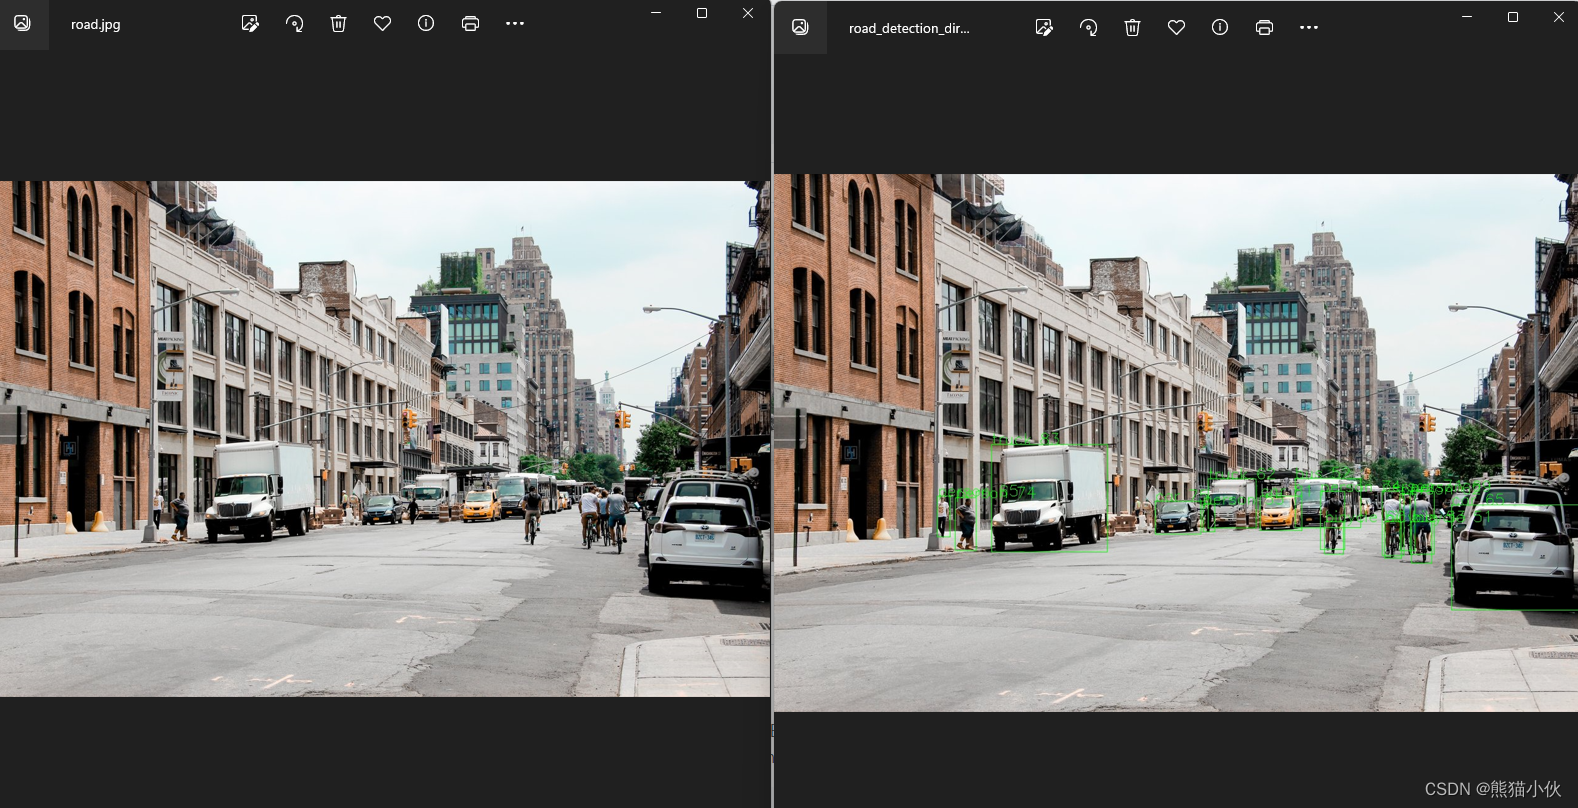
接下来在执行 python /root/agent/direct_use.py 以进行推理。在等待 RTMDet-Large 权重下载并推理完成后,我们就可以看到如下输出以及一张位于 /root/agent 名为 road_detection_direct.jpg 的图片
3.2.2 AgentLego WebUI 使用
(1)修改模型调用文件
由于 AgentLego 算法库默认使用 InternLM2-Chat-20B 模型,因此我们首先需要修改docker之外的运行环境中的模型使用,位置 /xxx/agent/agentlego/webui/modules/agents/lagent_agent.py 文件的第 105行位置,将 internlm2-chat-20b 修改为 internlm2-chat-7b,即

(2) docker中启动server
conda activate agent
# 将docker内的`localhost:6006`-> server_ip:6006映射出去; 模型还是用之前下载的1.8b
lmdeploy serve api_server /root/.cache/modelscope/hub/Shanghai_AI_Laboratory/internlm2-chat-7b \
--server-name 0.0.0.0 \
--server-port 6006 \
--model-name internlm2-chat-7b \
--cache-max-entry-count 0.5

(3)启动 AgentLego WebU
conda activate agent
cd /root/agent/agentlego/webui
python one_click.py
(4)参数和使用设置
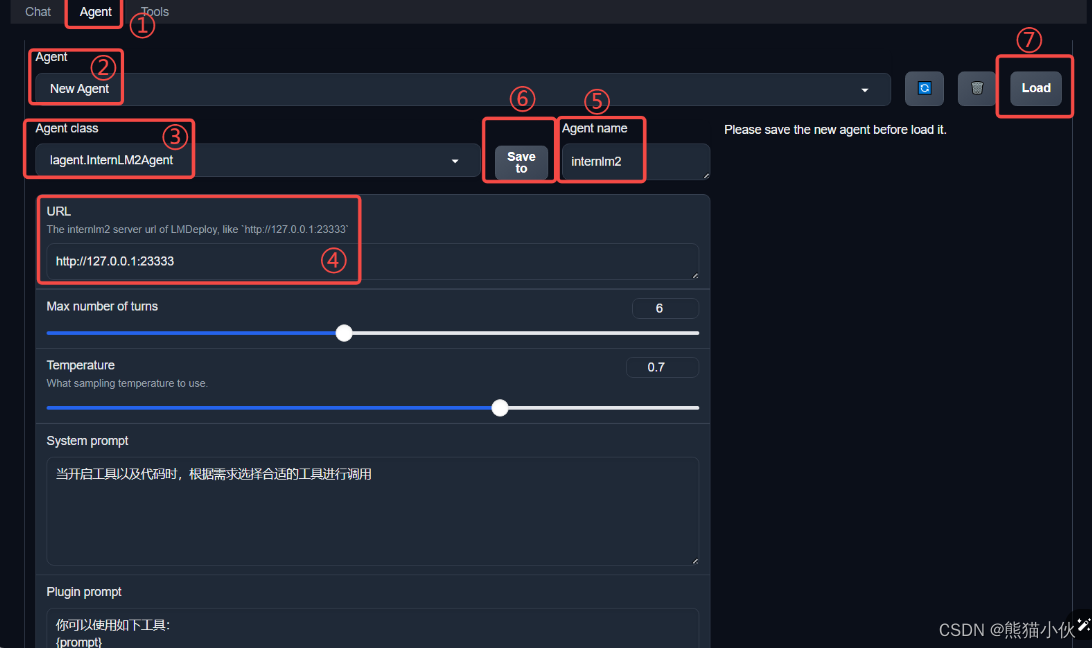
接下来在本地的浏览器页面中打开 http://localhost:7860 以使用 AgentLego WebUI。首先来配置 Agent,如下图所示。
点击上方 Agent 进入 Agent 配置页面。(如①所示)
点击 Agent 下方框,选择 New Agent。(如②所示)
选择 Agent Class 为 lagent.InternLM2Agent。(如③所示)
输入模型 URL 为 http://server_ip:6006(这块填写docker镜像往外发送的地址) 。(如④所示)
输入 Agent name,自定义即可,图中输入了 internlm2。(如⑤所示)
点击 save to 以保存配置,这样在下次使用时只需在第2步时选择 Agent 为 internlm2 后点击 load 以加载就可以了。(如⑥所示)
点击 load 以加载配置。(如⑦所示)
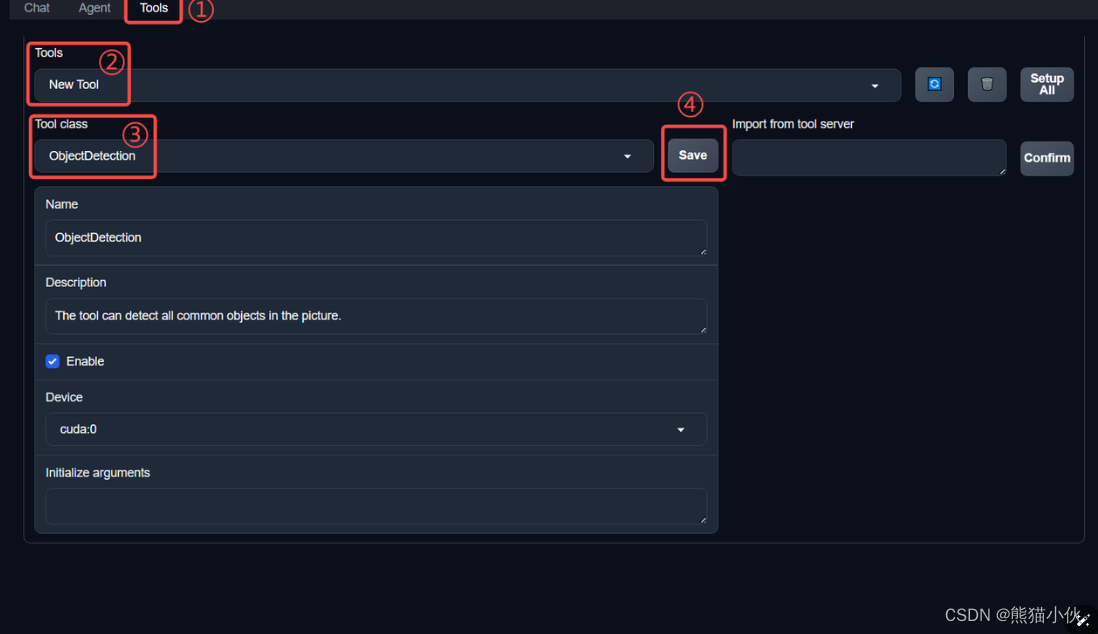
然后配置工具,如下图所示。
点击上方 Tools 页面进入工具配置页面。(如①所示)
点击 Tools 下方框,选择 New Tool 以加载新工具。(如②所示)
选择 Tool Class 为 ObjectDetection。(如③所示)
点击 save 以保存配置。(如④所示)
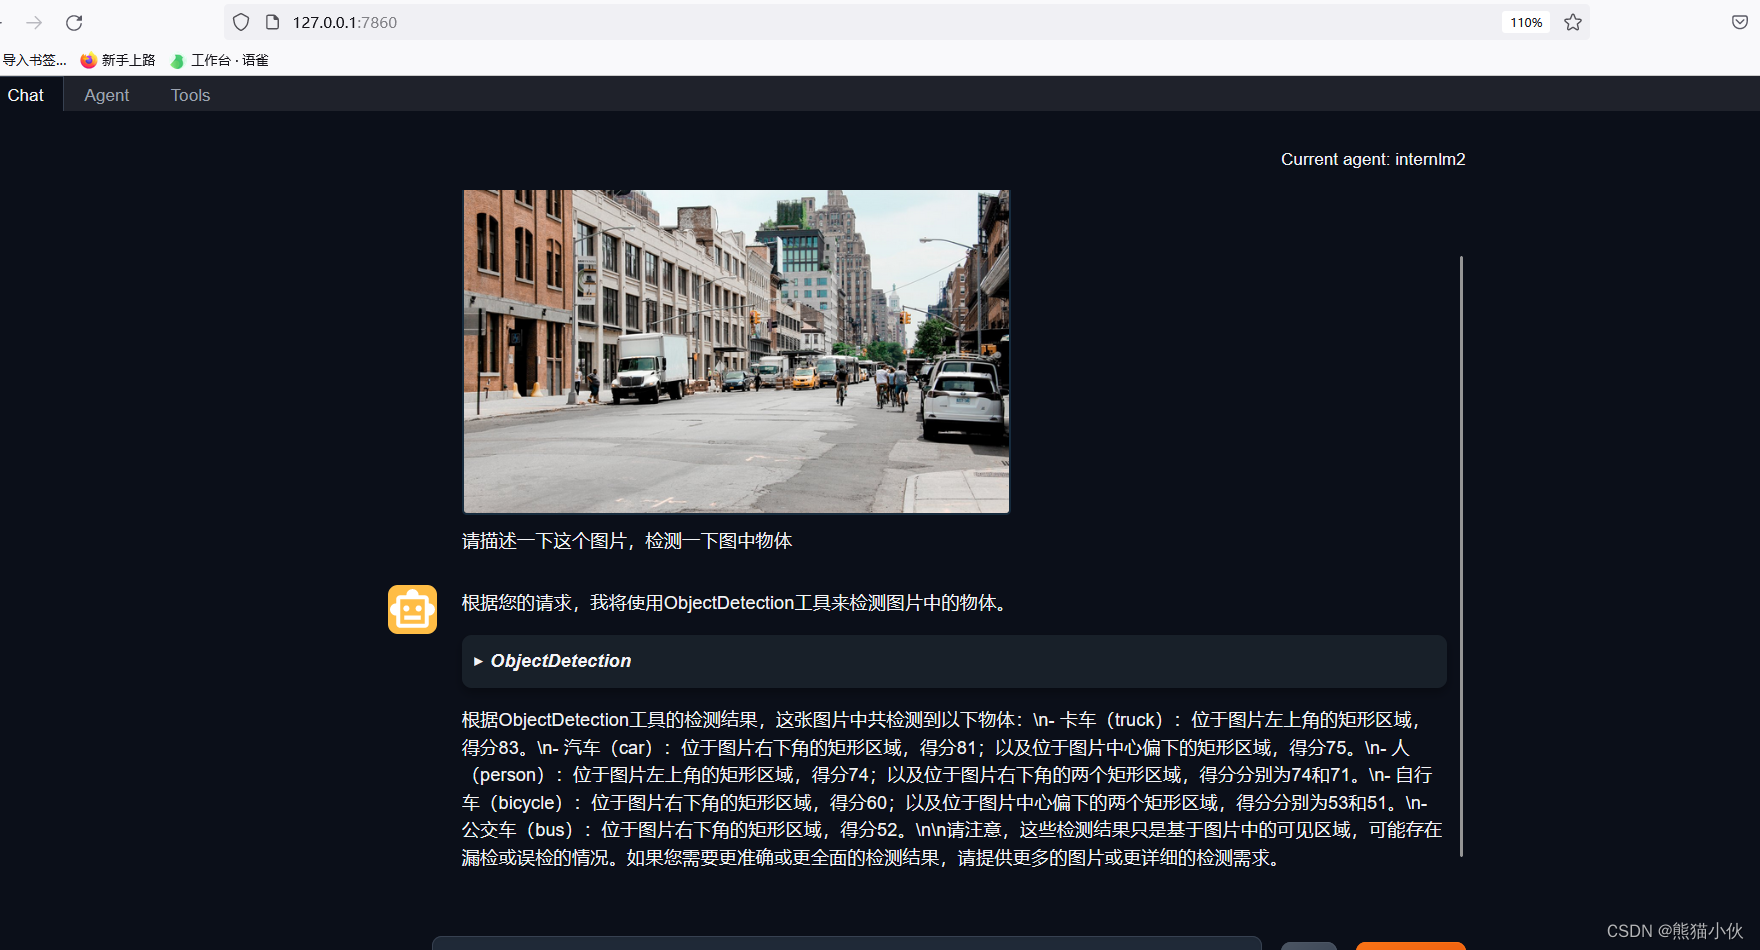
等待工具加载完成后,点击上方 Chat 以进入对话页面。在页面下方选择工具部分只选择 ObjectDetection 工具,如下图所示。为了确保调用工具的成功率,请在使用时确保仅有这一个工具启用。

结果如下所示
3.2.3 用 AgentLego 自定义工具
to-do
4 常见问题解决
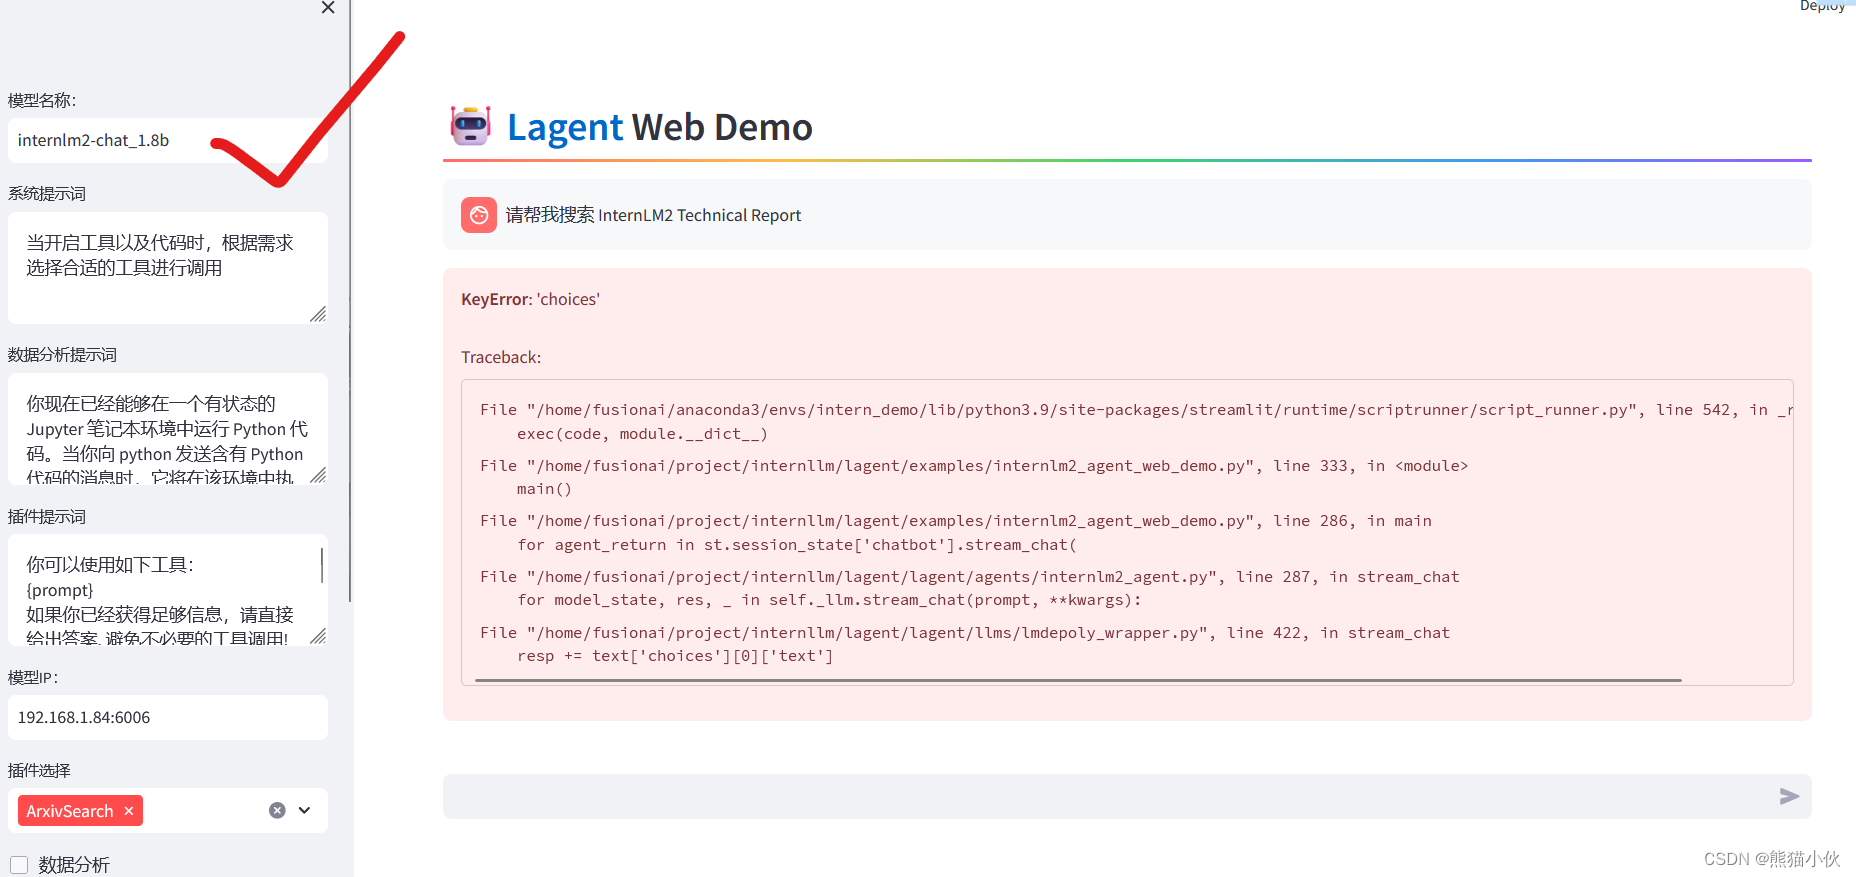
(1) KeyError: 'choices'
Traceback:
File “/home/fusionai/anaconda3/envs/intern_demo/lib/python3.9/site-packages/streamlit/runtime/scriptrunner/script_runner.py”, line 542, in _run_script
exec(code, module.dict)
File “/home/fusionai/project/internllm/lagent/examples/internlm2_agent_web_demo.py”, line 333, in
main()
File “/home/fusionai/project/internllm/lagent/examples/internlm2_agent_web_demo.py”, line 286, in main
for agent_return in st.session_state[‘chatbot’].stream_chat(
File “/home/fusionai/project/internllm/lagent/lagent/agents/internlm2_agent.py”, line 287, in stream_chat
for model_state, res, _ in self._llm.stream_chat(prompt, **kwargs):
File “/home/fusionai/project/internllm/lagent/lagent/llms/lmdepoly_wrapper.py”, line 422, in stream_chat
resp += text[‘choices’][0][‘text’]
模型名称写的前后不对应,查找错误。
server里面的 model-name是什么就写什么,web前端和后面要对应好,最好使用默认的参数 internlm2-chat-7b模型也重下载一个7b的内容。使用1.8b模型搜索不到的。

(2)不能正常显示搜索结果
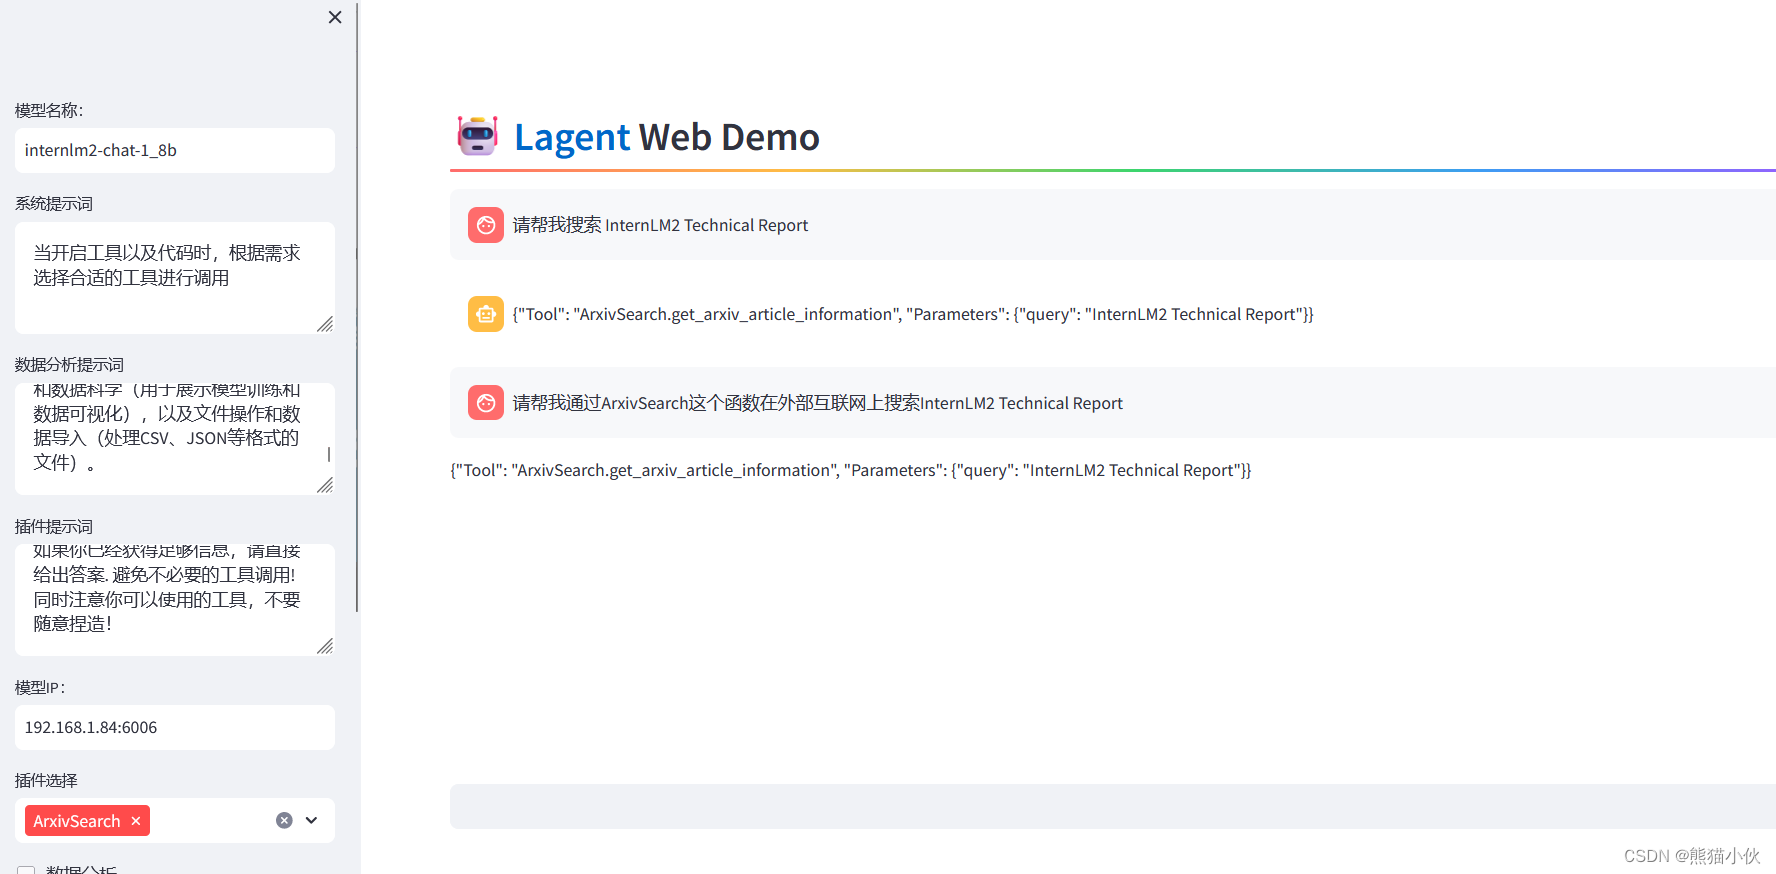 todo:
todo:
更换1.8b之后,根本就搜索不到了,这个有点问题,感觉不像是从axiv搜索。
