https://www.oceanbase.com/docs/common-ocp-1000000000584989
资源
| ip | hostname | cpu | mem | 组件 |
|---|---|---|---|---|
| 192.168.0.71 | obnode-000-071 | 8 | 16 | oceanbase-ce |
| 192.168.0.72 | obnode-000-072 | 8 | 16 | oceanbase-ce |
| 192.168.0.73 | obnode-000-073 | 8 | 16 | oceanbase-ce |
| 192.168.0.74 | obproxy-000-074 | 2 | 4 | obproxy-ce |
| 192.168.0.79 | ocp-000-079 | 4 | 8 -> 64 | ocp-server-ce |
操作系统
关闭透明大页
echo never > /sys/kernel/mm/transparent_hugepage/enabled
关闭防火墙
systemctl disable firewalld
关闭selinux
[root@obnode-000-071 /]# cat /etc/selinux/config

# This file controls the state of SELinux on the system.
# SELINUX= can take one of these three values:
#     enforcing - SELinux security policy is enforced.
#     permissive - SELinux prints warnings instead of enforcing.
#     disabled - No SELinux policy is loaded.
SELINUX=disabled
用户与ssh互信
新增用户
useradd -U admin -d /home/admin -s /bin/bash
mkdir -p /home/admin
passwd admin
给admin增加sudo
vi /etc/sudoers
vim /etc/sudoers
添加如下内容:
Same thing without a password
%wheel        ALL=(ALL)       NOPASSWD: ALL
admin       ALL=(ALL)       NOPASSWD: ALL
目录与属主
mkdir /data
chown -R admin:admin /data
chown -R admin:admin /home/admin
互信
#!/usr/bin/bash

SERVERS=("admin@192.168.0.71" "admin@192.168.0.72" "admin@192.168.0.73" "admin@192.168.0.74" "admin@192.168.0.75" "admin@192.168.0.79")
PASSWORD="abc123456"
keygen() {
sudo yum -y install expect
expect -c "
spawn ssh-keygen -t rsa
expect {
   *(~/.ssh/id_rsa):* { send -- \r;exp_continue}
   *(y/n)* { send -- y\r;exp_continue}
   *Enter* { send -- \r;exp_continue}
   *(y/n)* { send -- y\r;exp_continue}
   *Enter* { send -- \r;exp_continue}
   eof {exit 0}
}
expect eof
"
}
copy(){
expect -c "
set timeout -1
spawn ssh-copy-id $1
expect {
   *(yes/no)* { send -- yes\r; exp_continue }
   *password:* { send -- $PASSWORD\r; exp_continue}
   eof {exit 0}
}
expect eof
"
}
ssh_copy_id_to_all(){
keygen ;
for host in ${SERVERS[@]}
do
   copy $host
done
}
ssh_copy_id_to_all
- 执行结果
[admin@obd-000-070 ~]$ sh ssh.sh
Loaded plugins: fastestmirror, langpacks
Loading mirror speeds from cached hostfile
 * base: mirrors.ustc.edu.cn
 * extras: mirrors.nju.edu.cn
 * updates: mirrors.ustc.edu.cn
Package expect-5.45-14.el7_1.x86_64 already installed and latest version
Nothing to do
spawn ssh-keygen -t rsa
Generating public/private rsa key pair.
Enter file in which to save the key (/home/admin/.ssh/id_rsa):
/home/admin/.ssh/id_rsa already exists.
Overwrite (y/n)? y
Enter passphrase (empty for no passphrase):
Enter same passphrase again:
Your identification has been saved in /home/admin/.ssh/id_rsa.
Your public key has been saved in /home/admin/.ssh/id_rsa.pub.
The key fingerprint is:
SHA256:pm2Lcxoss4aDpt05Y2HwYBfmJ7+rIF6Gd2HrGMBG6a0 admin@obd-000-070
The key's randomart image is:
+---[RSA 2048]----+
|                 |
|  . o            |
| o o .           |
|+ = + .          |
| * * *  S        |
|. + =.++         |
|.E.Bo++.o        |
|o+*oX=o+..       |
|+..===+=.        |
+----[SHA256]-----+
spawn ssh-copy-id admin@192.168.0.71
/bin/ssh-copy-id: INFO: Source of key(s) to be installed: "/home/admin/.ssh/id_rsa.pub"
/bin/ssh-copy-id: INFO: attempting to log in with the new key(s), to filter out any that are already installed
/bin/ssh-copy-id: INFO: 1 key(s) remain to be installed -- if you are prompted now it is to install the new keys
admin@192.168.0.71's password:

Number of key(s) added: 1

Now try logging into the machine, with:   "ssh 'admin@192.168.0.71'"
and check to make sure that only the key(s) you wanted were added.

spawn ssh-copy-id admin@192.168.0.72
/bin/ssh-copy-id: INFO: Source of key(s) to be installed: "/home/admin/.ssh/id_rsa.pub"
/bin/ssh-copy-id: INFO: attempting to log in with the new key(s), to filter out any that are already installed
/bin/ssh-copy-id: INFO: 1 key(s) remain to be installed -- if you are prompted now it is to install the new keys
admin@192.168.0.72's password:

Number of key(s) added: 1

Now try logging into the machine, with:   "ssh 'admin@192.168.0.72'"
and check to make sure that only the key(s) you wanted were added.

spawn ssh-copy-id admin@192.168.0.73
/bin/ssh-copy-id: INFO: Source of key(s) to be installed: "/home/admin/.ssh/id_rsa.pub"
/bin/ssh-copy-id: INFO: attempting to log in with the new key(s), to filter out any that are already installed
/bin/ssh-copy-id: INFO: 1 key(s) remain to be installed -- if you are prompted now it is to install the new keys
admin@192.168.0.73's password:

Number of key(s) added: 1

Now try logging into the machine, with:   "ssh 'admin@192.168.0.73'"
and check to make sure that only the key(s) you wanted were added.
selinux
时间服务器
"/etc/chrony.conf"
替换如下内容
server ntp.cloud.aliyuncs.com minpoll 4 maxpoll 10 iburst
server ntp.aliyun.com minpoll 4 maxpoll 10 iburst
server ntp1.aliyun.com minpoll 4 maxpoll 10 iburst
server ntp1.cloud.aliyuncs.com minpoll 4 maxpoll 10 iburst
server ntp10.cloud.aliyuncs.com minpoll 4 maxpoll 10 iburst
local stratum 10
systemctl enable chronyd --now
[root@obnode-000-071 ~]# chronyc activity
200 OK
2 sources online
0 sources offline
0 sources doing burst (return to online)
0 sources doing burst (return to offline)
3 sources with unknown address
[root@obnode-000-071 ~]# chronyc sources
210 Number of sources = 2
MS Name/IP address         Stratum Poll Reach LastRx Last sample
===============================================================================
^- 203.107.6.88                  2   9   377   493  -4553us[-4779us] +/-   36ms
^* 120.25.115.20                 2   8    43   318   -480us[ -723us] +/- 7733us
[root@obnode-000-071 ~]# chronyc sources -v
210 Number of sources = 2

  .-- Source mode  '^' = server, '=' = peer, '#' = local clock.
 / .- Source state '*' = current synced, '+' = combined , '-' = not combined,
| /   '?' = unreachable, 'x' = time may be in error, '~' = time too variable.
||                                                 .- xxxx [ yyyy ] +/- zzzz
||      Reachability register (octal) -.           |  xxxx = adjusted offset,
||      Log2(Polling interval) --.      |          |  yyyy = measured offset,
||                                \     |          |  zzzz = estimated error.
||                                 |    |           \
MS Name/IP address         Stratum Poll Reach LastRx Last sample
===============================================================================
^- 203.107.6.88                  2   9   377   506  -4553us[-4779us] +/-   36ms
^* 120.25.115.20                 2   8    43   331   -480us[ -723us] +/- 7733us
[root@obnode-000-071 ~]# chronyc tracking
Reference ID    : 78197314 (120.25.115.20)
Stratum         : 3
Ref time (UTC)  : Sat Apr 13 12:56:58 2024
System time     : 0.000044764 seconds slow of NTP time
Last offset     : -0.000242862 seconds
RMS offset      : 0.000326988 seconds
Frequency       : 7.116 ppm fast
Residual freq   : -0.020 ppm
Skew            : 0.671 ppm
Root delay      : 0.012850155 seconds
Root dispersion : 0.002059723 seconds
Update interval : 257.0 seconds
Leap status     : Normal
[root@obnode-000-071 ~]# timedatectl
      Local time: Sat 2024-04-13 21:03:20 CST
  Universal time: Sat 2024-04-13 13:03:20 UTC
        RTC time: Sat 2024-04-13 13:03:21
       Time zone: Asia/Shanghai (CST, +0800)
     NTP enabled: yes
NTP synchronized: yes
 RTC in local TZ: no
      DST active: n/a
limits.conf
vi /etc/security/limits.conf
root soft nofile 655350
root hard nofile 655350
* soft nofile 655350
* hard nofile 655350
* soft stack unlimited
* hard stack unlimited
* soft nproc 655360
* hard nproc 655360
* soft core unlimited
* hard core unlimited
您需查看
/etc/security/limits.d/20-nproc.conf文件中是否存在 nproc 的配置,若存在需同步修改该文件中 nproc 的值
sysctl.conf
vi /etc/sysctl.conf
# for oceanbase
## 修改内核异步 I/O 限制
fs.aio-max-nr=1048576

## 网络优化
net.core.somaxconn = 2048
net.core.netdev_max_backlog = 10000
net.core.rmem_default = 16777216
net.core.wmem_default = 16777216
net.core.rmem_max = 16777216
net.core.wmem_max = 16777216

net.ipv4.ip_local_port_range = 3500 65535
net.ipv4.ip_forward = 0
net.ipv4.conf.default.rp_filter = 1
net.ipv4.conf.default.accept_source_route = 0
net.ipv4.tcp_syncookies = 1
net.ipv4.tcp_rmem = 4096 87380 16777216
net.ipv4.tcp_wmem = 4096 65536 16777216
net.ipv4.tcp_max_syn_backlog = 16384
net.ipv4.tcp_fin_timeout = 15
net.ipv4.tcp_max_syn_backlog = 16384
net.ipv4.tcp_tw_reuse = 1
net.ipv4.tcp_tw_recycle = 1
net.ipv4.tcp_slow_start_after_idle=0

vm.swappiness = 0
vm.min_free_kbytes = 2097152
fs.file-max = 6573688

# 修改进程可以拥有的虚拟内存区域数量
vm.max_map_count = 655360

# 此处为 OceanBase 数据库的 data 目录
kernel.core_pattern = /data/core-%e-%p-%t
软件包准备
wget https://obbusiness-private.oss-cn-shanghai.aliyuncs.com/download-center/opensource/ocp/4.2.2_CE_HF1/ocp-all-in-one-4.2.2-20240329111923.el7.x86_64.tar.gz
tar -zxvf oceanbase-all-in-one-4.3.0.1-100000242024032211.el7.x86_64.tar.gz
cd oceanbase-all-in-one
安装部署程序
cd oceanbase-all-in-one/bin
bash install.sh
[admin@ocp-000-079 ~]$ cd ocp-all-in-one/
[admin@ocp-000-079 ocp-all-in-one]$ ls
bin  obd  README.md  rpms  VERSION
[admin@ocp-000-079 ocp-all-in-one]$ cd bin
[admin@ocp-000-079 bin]$ ls
env.sh  install.sh  uninstall.sh
[admin@ocp-000-079 bin]$ bash install.sh
Found previous obd installed, try upgrade...
name: ob-deploy
version: 2.7.0
release:5.el7
arch: x86_64
md5: a0683dc9bd3499ff0d2c5678b4558e234abfa307
size: 154066376
add /home/admin/ocp-all-in-one/rpms/ob-deploy-2.7.0-5.el7.x86_64.rpm to local mirror
Trace ID: 3c11b110-fb05-11ee-a326-005056213654
If you want to view detailed obd logs, please run: obd display-trace 3c11b110-fb05-11ee-a326-005056213654
No updates detected. OBD is already up to date.
See https://www.oceanbase.com/product/ob-deployer/error-codes .
Trace ID: 3ce8b8e0-fb05-11ee-b2a4-005056213654
If you want to view detailed obd logs, please run: obd display-trace 3ce8b8e0-fb05-11ee-b2a4-005056213654
upgrade finished
name: ob-deploy
version: 2.7.0
release:5.el7
arch: x86_64
md5: a0683dc9bd3499ff0d2c5678b4558e234abfa307
size: 154066376
add /home/admin/ocp-all-in-one/rpms/ob-deploy-2.7.0-5.el7.x86_64.rpm to local mirror
name: obproxy-ce
version: 4.2.1.0
release:11.el7
arch: x86_64
md5: 0aed4b782120e4248b749f67be3d2cc82cdcb70d
size: 677336267
add /home/admin/ocp-all-in-one/rpms/obproxy-ce-4.2.1.0-11.el7.x86_64.rpm to local mirror
name: oceanbase-ce
version: 4.2.1.2
release:102010022023121415.el7
arch: x86_64
md5: 1873bbe80cbbe5d00d5f276a4f7302cfca677fb6
size: 417393091
add /home/admin/ocp-all-in-one/rpms/oceanbase-ce-4.2.1.2-102010022023121415.el7.x86_64.rpm to local mirror
name: oceanbase-ce-libs
version: 4.2.1.2
release:102010022023121415.el7
arch: x86_64
md5: 3d3eeee6694be9b8debb0c3f8b5b6583c06e3b62
size: 468528
add /home/admin/ocp-all-in-one/rpms/oceanbase-ce-libs-4.2.1.2-102010022023121415.el7.x86_64.rpm to local mirror
name: oceanbase-ce-utils
version: 4.2.1.2
release:102010022023121415.el7
arch: x86_64
md5: 8d9490944c0cf35efe36fee39d5b56c622a2c82f
size: 374630384
add /home/admin/ocp-all-in-one/rpms/oceanbase-ce-utils-4.2.1.2-102010022023121415.el7.x86_64.rpm to local mirror
name: oceanbase-diagnostic-tool
version: 1.5.2
release:22024010415.el7
arch: x86_64
md5: 4c0f0551be4ad04bc40a66763f66f76fb8bdf10c
size: 34999198
add /home/admin/ocp-all-in-one/rpms/oceanbase-diagnostic-tool-1.5.2-22024010415.el7.x86_64.rpm to local mirror
name: ocp-agent-ce
version: 4.2.2
release:20240315150922.el7
arch: aarch64
md5: 565b5ab22ff384c246b4a707bab845048274cc04
size: 113808537
add /home/admin/ocp-all-in-one/rpms/ocp-agent-ce-4.2.2-20240315150922.el7.aarch64.rpm to local mirror
name: ocp-agent-ce
version: 4.2.2
release:20240315150922.el7
arch: x86_64
md5: 5d25b0d8b36f66a87ac824a4e04d4966302eaf75
size: 168136171
add /home/admin/ocp-all-in-one/rpms/ocp-agent-ce-4.2.2-20240315150922.el7.x86_64.rpm to local mirror
name: ocp-server-ce
version: 4.2.2
release:20240315150922.el7
arch: noarch
md5: 84a65bf0ec004e73b772938696b2b896a0ef2b2f
size: 644808593
add /home/admin/ocp-all-in-one/rpms/ocp-server-ce-4.2.2-20240315150922.el7.noarch.rpm to local mirror
name: openjdk-jre
version: 1.8.0_322
release:b09.el7
arch: x86_64
md5: 051aa69c5abb8697d15c2f0dcb1392b3f815f7ed
size: 69766947
add /home/admin/ocp-all-in-one/rpms/openjdk-jre-1.8.0_322-b09.el7.x86_64.rpm to local mirror
Trace ID: 3db5224a-fb05-11ee-8da9-005056213654
If you want to view detailed obd logs, please run: obd display-trace 3db5224a-fb05-11ee-8da9-005056213654
Disable remote ok
Trace ID: 50a8d9c8-fb05-11ee-affa-005056213654
If you want to view detailed obd logs, please run: obd display-trace 50a8d9c8-fb05-11ee-affa-005056213654

add auto set env logic to profile: /home/admin/.bash_profile

#########################################################################################
 Install Finished
=========================================================================================
Setup Environment:              source ~/.oceanbase-all-in-one/bin/env.sh
Quick Start:                    obd demo
Use Web Service to install:     obd web
Use Web Service to upgrade:     obd web upgrade
More Details:                   obd -h
=========================================================================================
[admin@ocp-000-079 bin]$ source env.sh
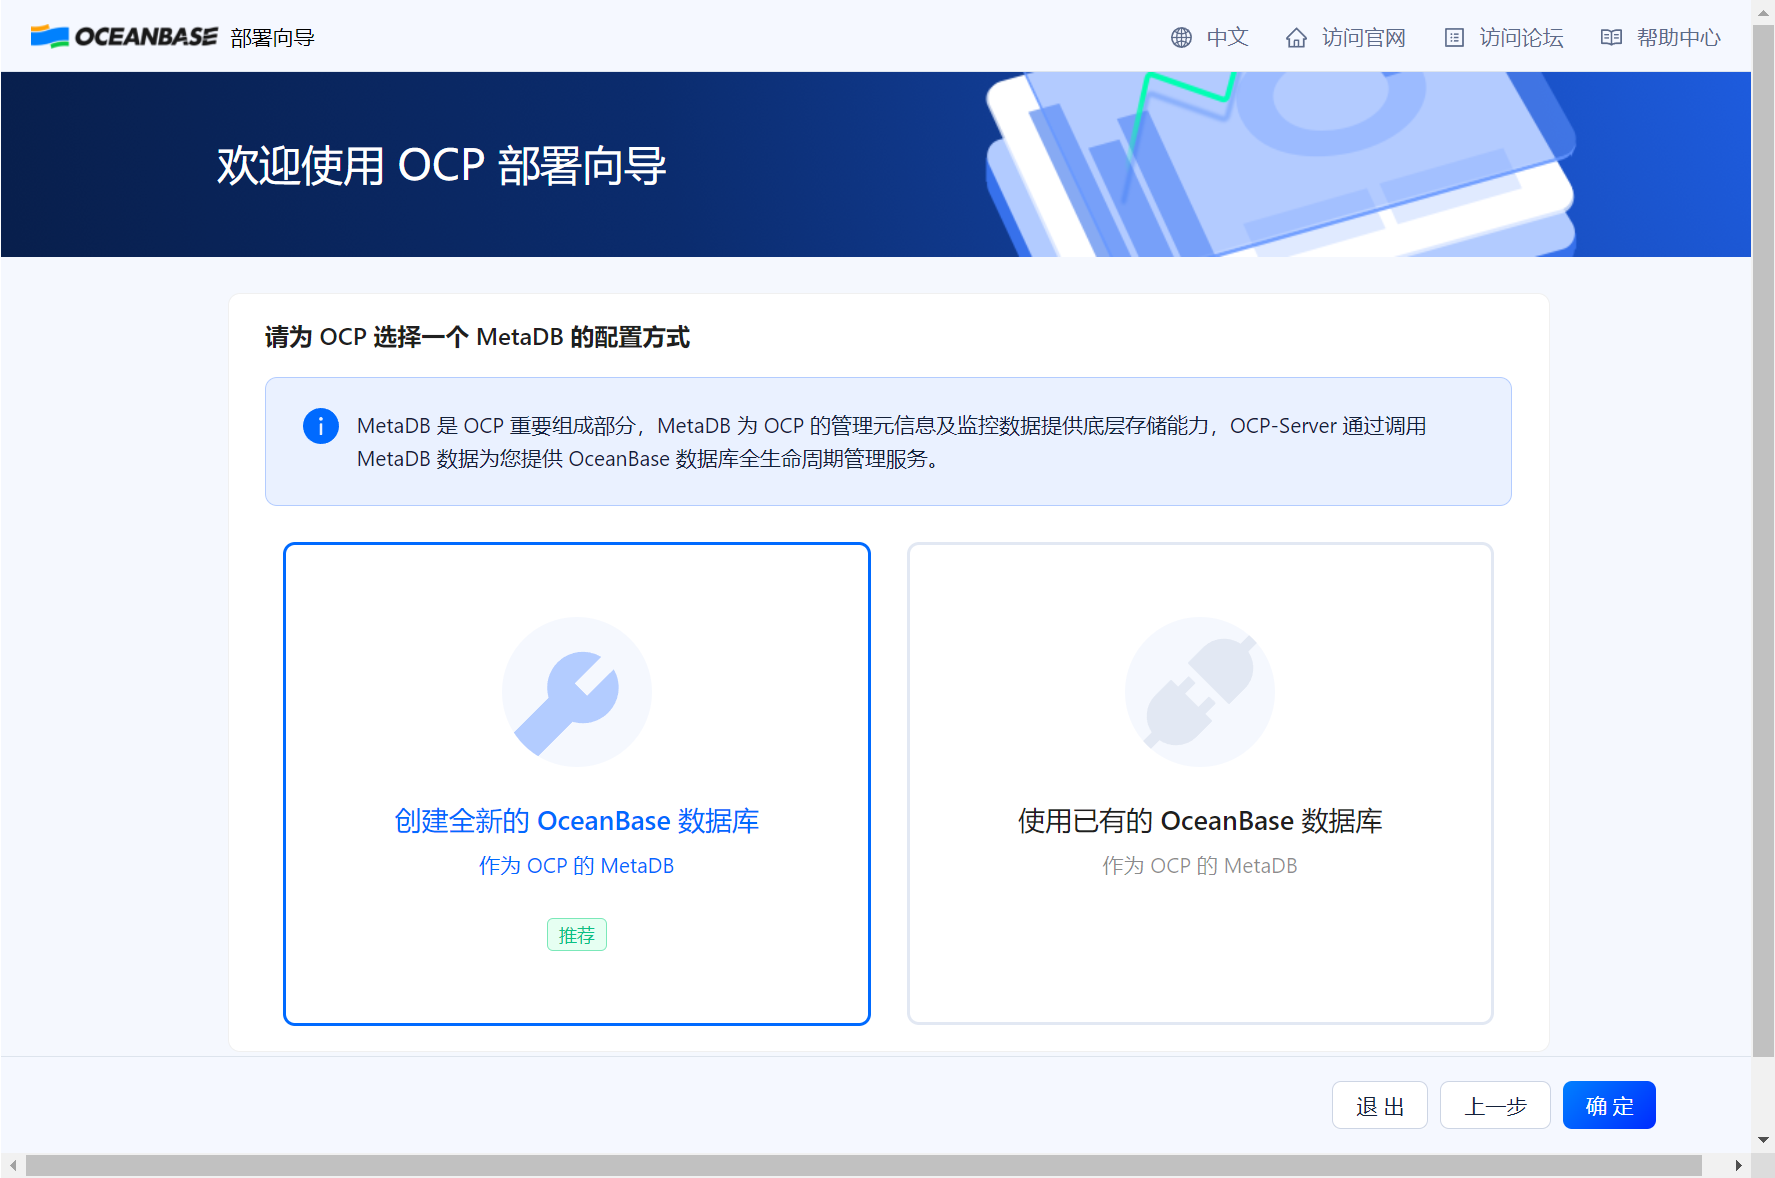
安装
[admin@ocp-000-079 ~]$ obd web install
start OBD WEB in 0.0.0.0:8680
please open http://192.168.0.79:8680


记录信息
{"url":["http://192.168.0.79:8080"],"account":"admin","password":"5fZr0xqlg1Ki+zv1zc3]znV*itV"}

# 连接 oceanbase
obclient -h192.168.0.71 -P2881 -uroot -p'b#x!k6[:.Etn3B%Q)IT-j4N7bzBQ' -Doceanbase -A

# 连接 obproxy
obclient -h192.168.0.74 -P2883 -uroot@proxysys -p'V1jXtOfxqi' -Doceanbase -A
安装后处理
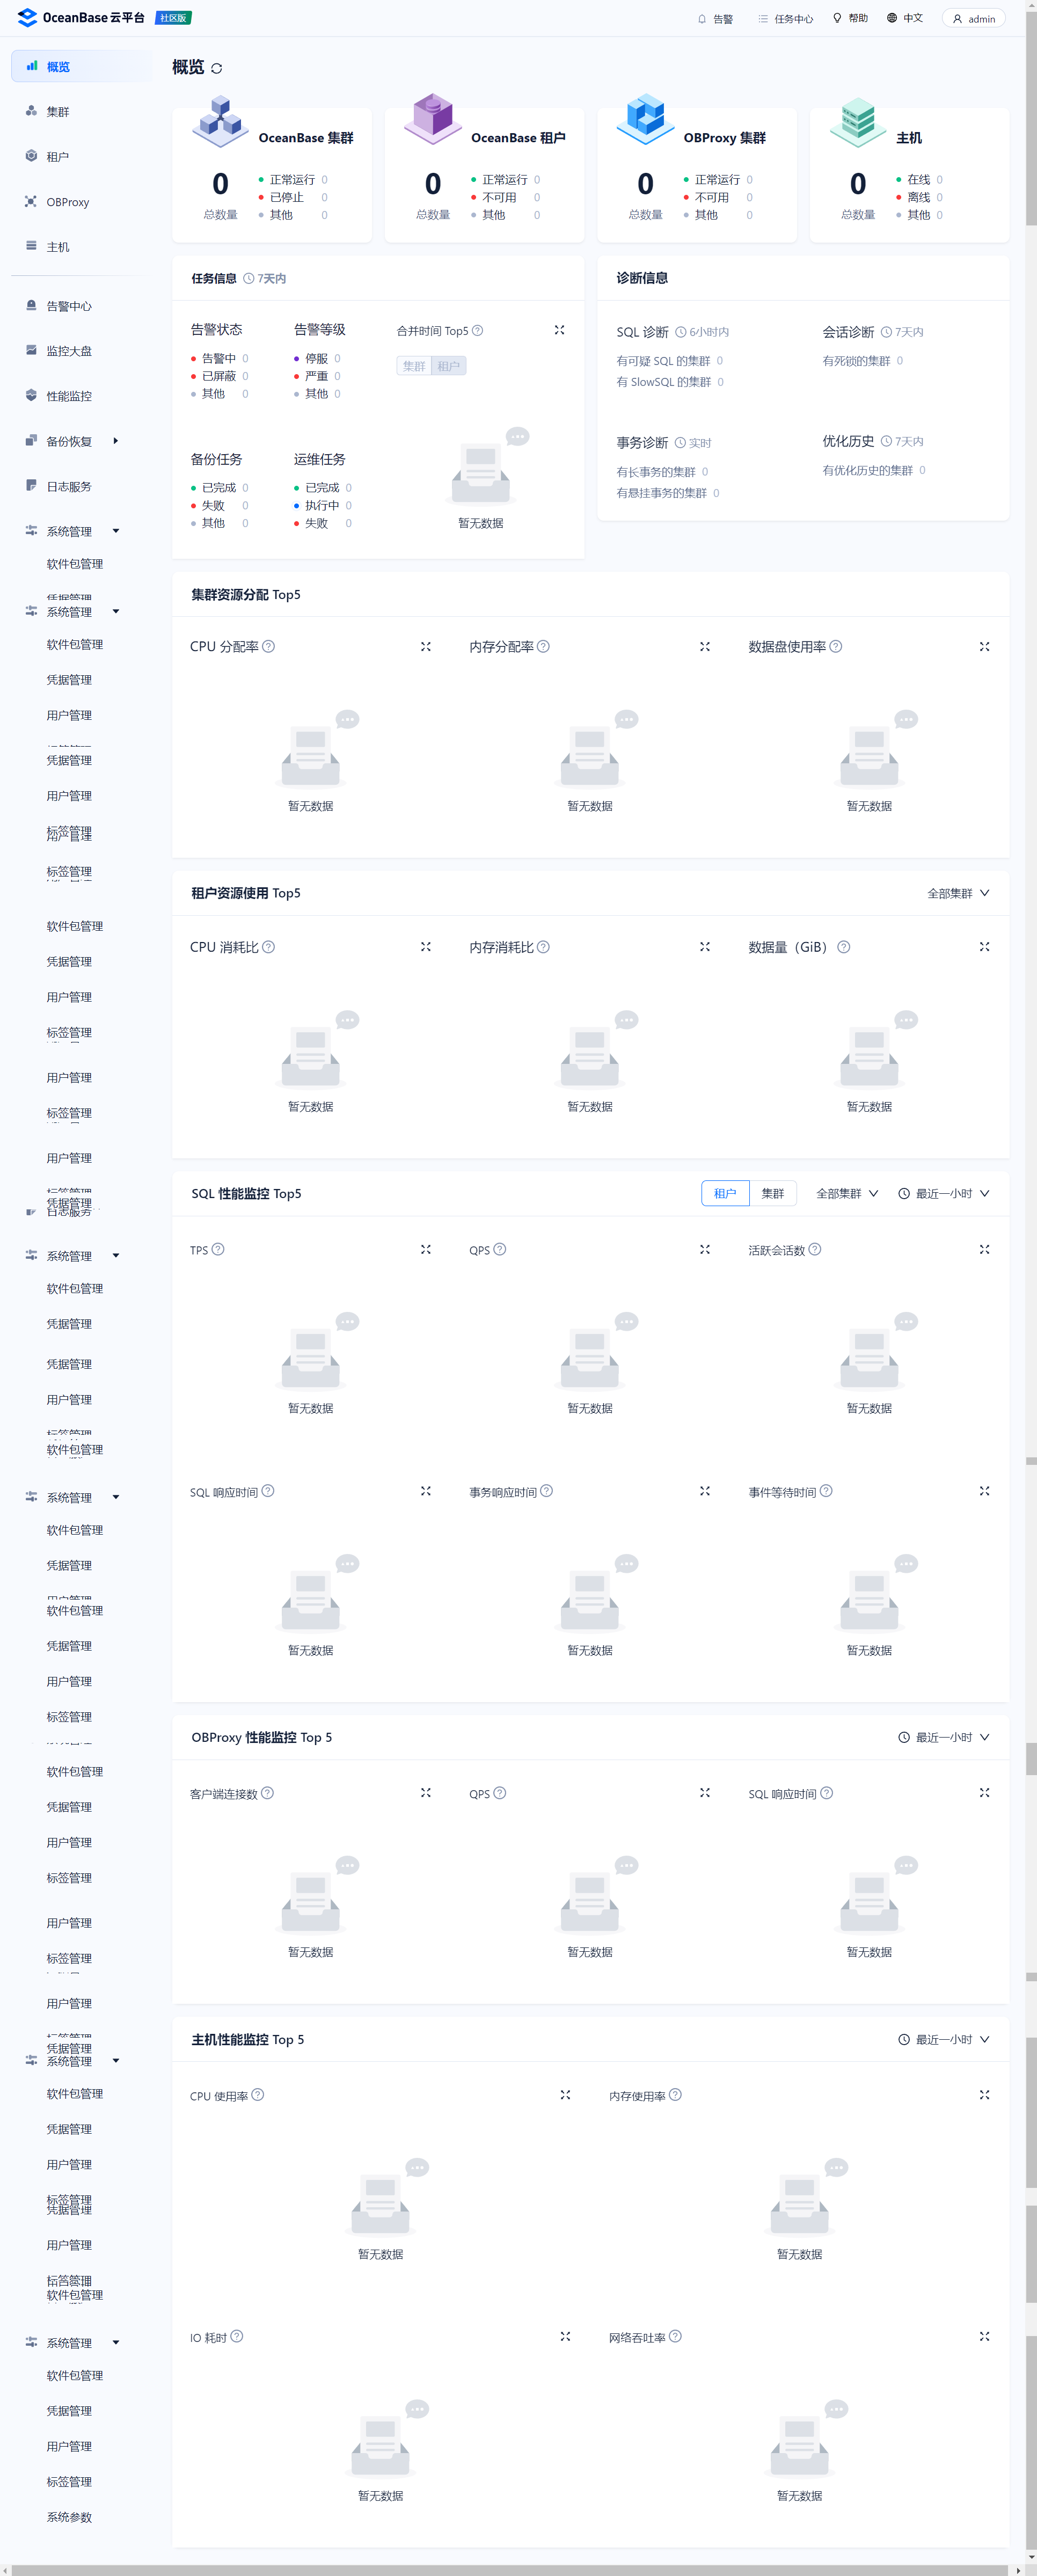
登陆web
http://192.168.0.79:8080/login
用 obd 查看集群信息
[admin@ocp-000-079 ~]$ obd cluster list
+----------------------------------------------------------------------+
|                             Cluster List                             |
+-------------+--------------------------------------+-----------------+
| Name        | Configuration Path                   | Status (Cached) |
+-------------+--------------------------------------+-----------------+
| ocp_cluster | /home/admin/.obd/cluster/ocp_cluster | running         |
+-------------+--------------------------------------+-----------------+
Trace ID: e910f200-fbe0-11ee-8dd4-005056213654
If you want to view detailed obd logs, please run: obd display-trace e910f200-fbe0-11ee-8dd4-005056213654

[admin@ocp-000-079 ~]$ obd cluster display ocp_cluster
Get local repositories and plugins ok
Open ssh connection ok
Cluster status check ok
Connect to observer 192.168.0.71:2881 ok
Wait for observer init ok
+------------------------------------------------+
|                    observer                    |
+--------------+---------+------+-------+--------+
| ip           | version | port | zone  | status |
+--------------+---------+------+-------+--------+
| 192.168.0.71 | 4.3.0.1 | 2881 | zone1 | ACTIVE |
| 192.168.0.72 | 4.3.0.1 | 2881 | zone2 | ACTIVE |
| 192.168.0.73 | 4.3.0.1 | 2881 | zone3 | ACTIVE |
+--------------+---------+------+-------+--------+
obclient -h192.168.0.71 -P2881 -uroot -p'b#x!k6[:.Etn3B%Q)IT-j4N7bzBQ' -Doceanbase -A

Connect to obproxy ok
+------------------------------------------------+
|                    obproxy                     |
+--------------+------+-----------------+--------+
| ip           | port | prometheus_port | status |
+--------------+------+-----------------+--------+
| 192.168.0.74 | 2883 | 2884            | active |
+--------------+------+-----------------+--------+
obclient -h192.168.0.74 -P2883 -uroot@proxysys -p'V1jXtOfxqi' -Doceanbase -A

Connect to ocp-server-ce ok
+----------------------------------------------------------------------------+
|                               ocp-server-ce                                |
+--------------------------+----------+-----------------------------+--------+
| url                      | username | password                    | status |
+--------------------------+----------+-----------------------------+--------+
| http://192.168.0.79:8080 | admin    | 5fZr0xqlg1Ki+zv1zc3]znV*itV | active |
+--------------------------+----------+-----------------------------+--------+
Trace ID: fed55a90-fbe0-11ee-aad7-005056213654
If you want to view detailed obd logs, please run: obd display-trace fed55a90-fbe0-11ee-aad7-005056213654
查看配置文件
cat /home/admin/.obd/cluster/ocp_cluster/config.yaml
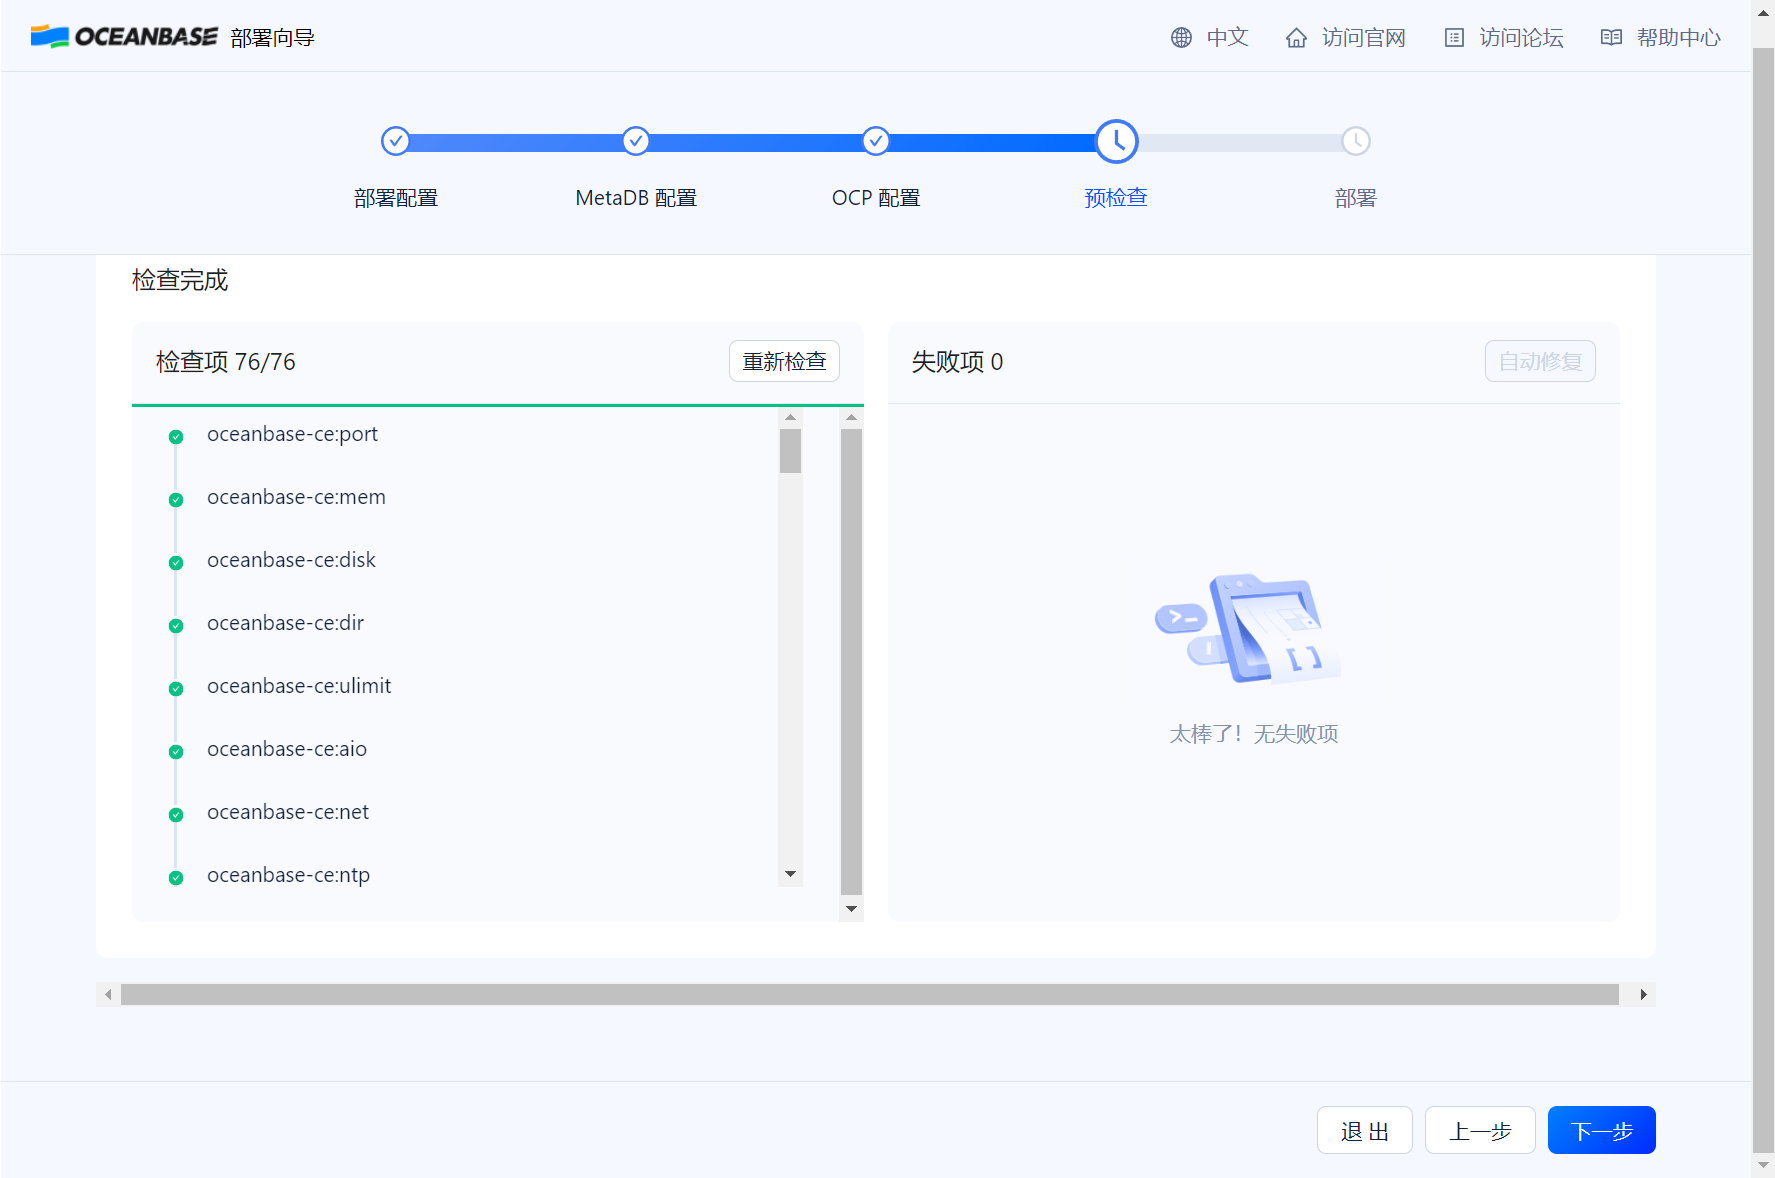
总共安装了3个组件,分别是 oceanbase-ce obproxy-ce ocp-server-ce
[admin@ocp-000-079 ocp_cluster]$ cat /home/admin/.obd/cluster/ocp_cluster/config.yaml
user:
username: admin
password: abc123456
port: 22
oceanbase-ce:
version: 4.3.0.1
release: 100000242024032211.el7
package_hash: 1f2d5c90517c0b11d8aec3ecdc4c295664bf81ef3ae536307433362e76b59e1d
192.168.0.71:
zone: zone1
192.168.0.72:
zone: zone2
192.168.0.73:
zone: zone3
servers:
- 192.168.0.71
- 192.168.0.72
- 192.168.0.73
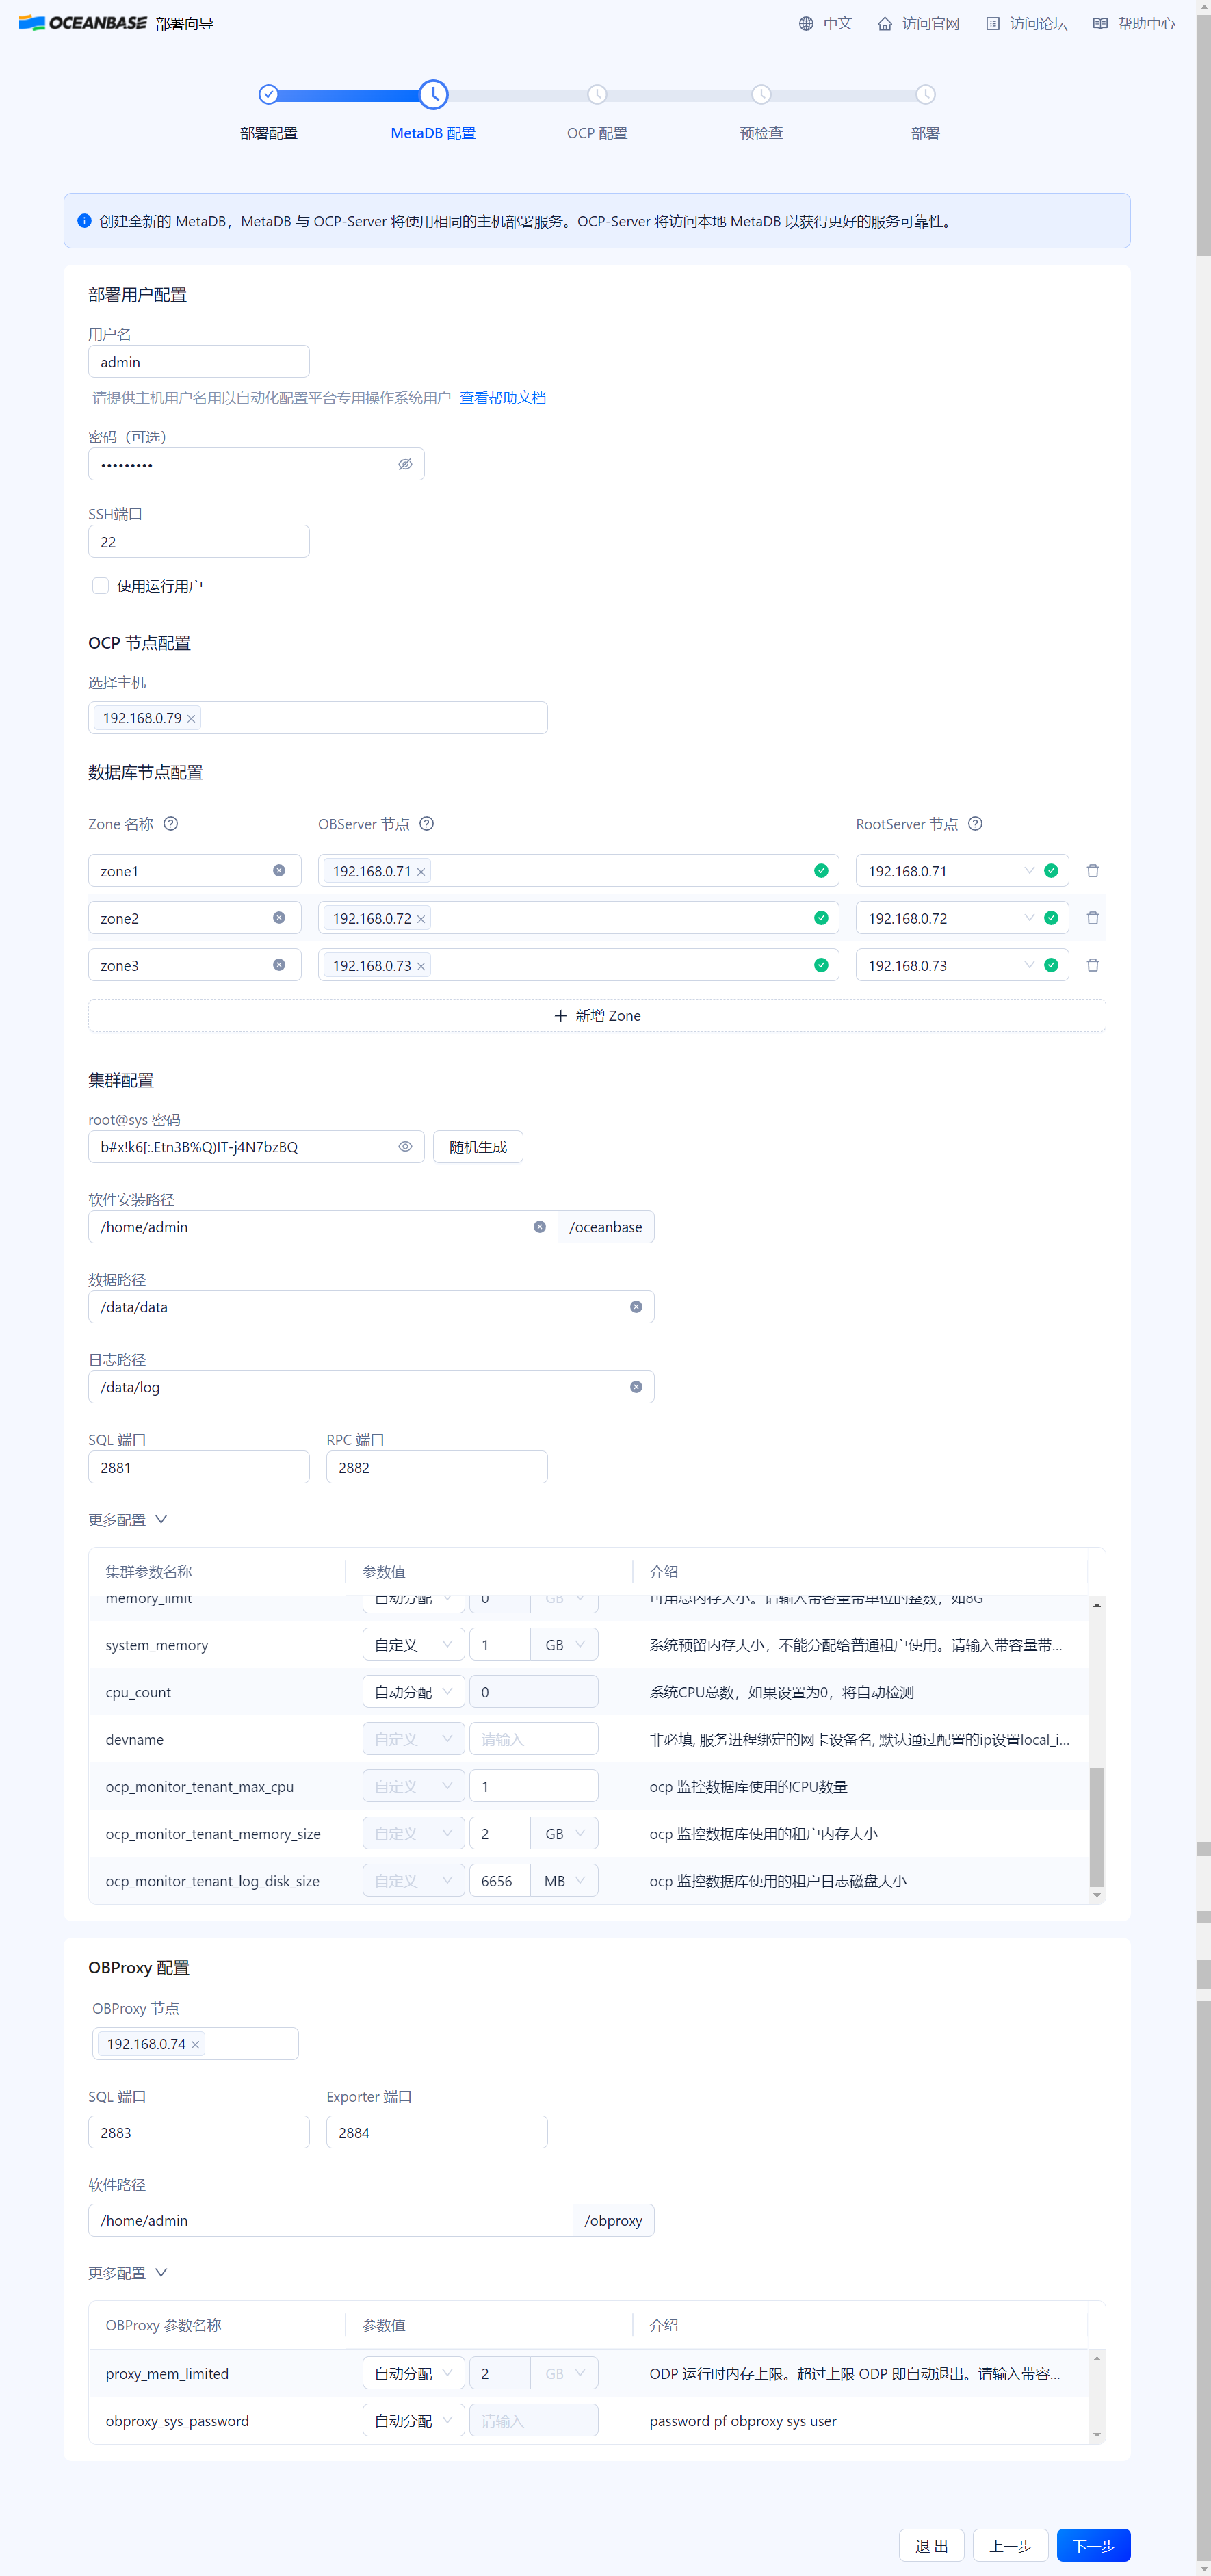
global:
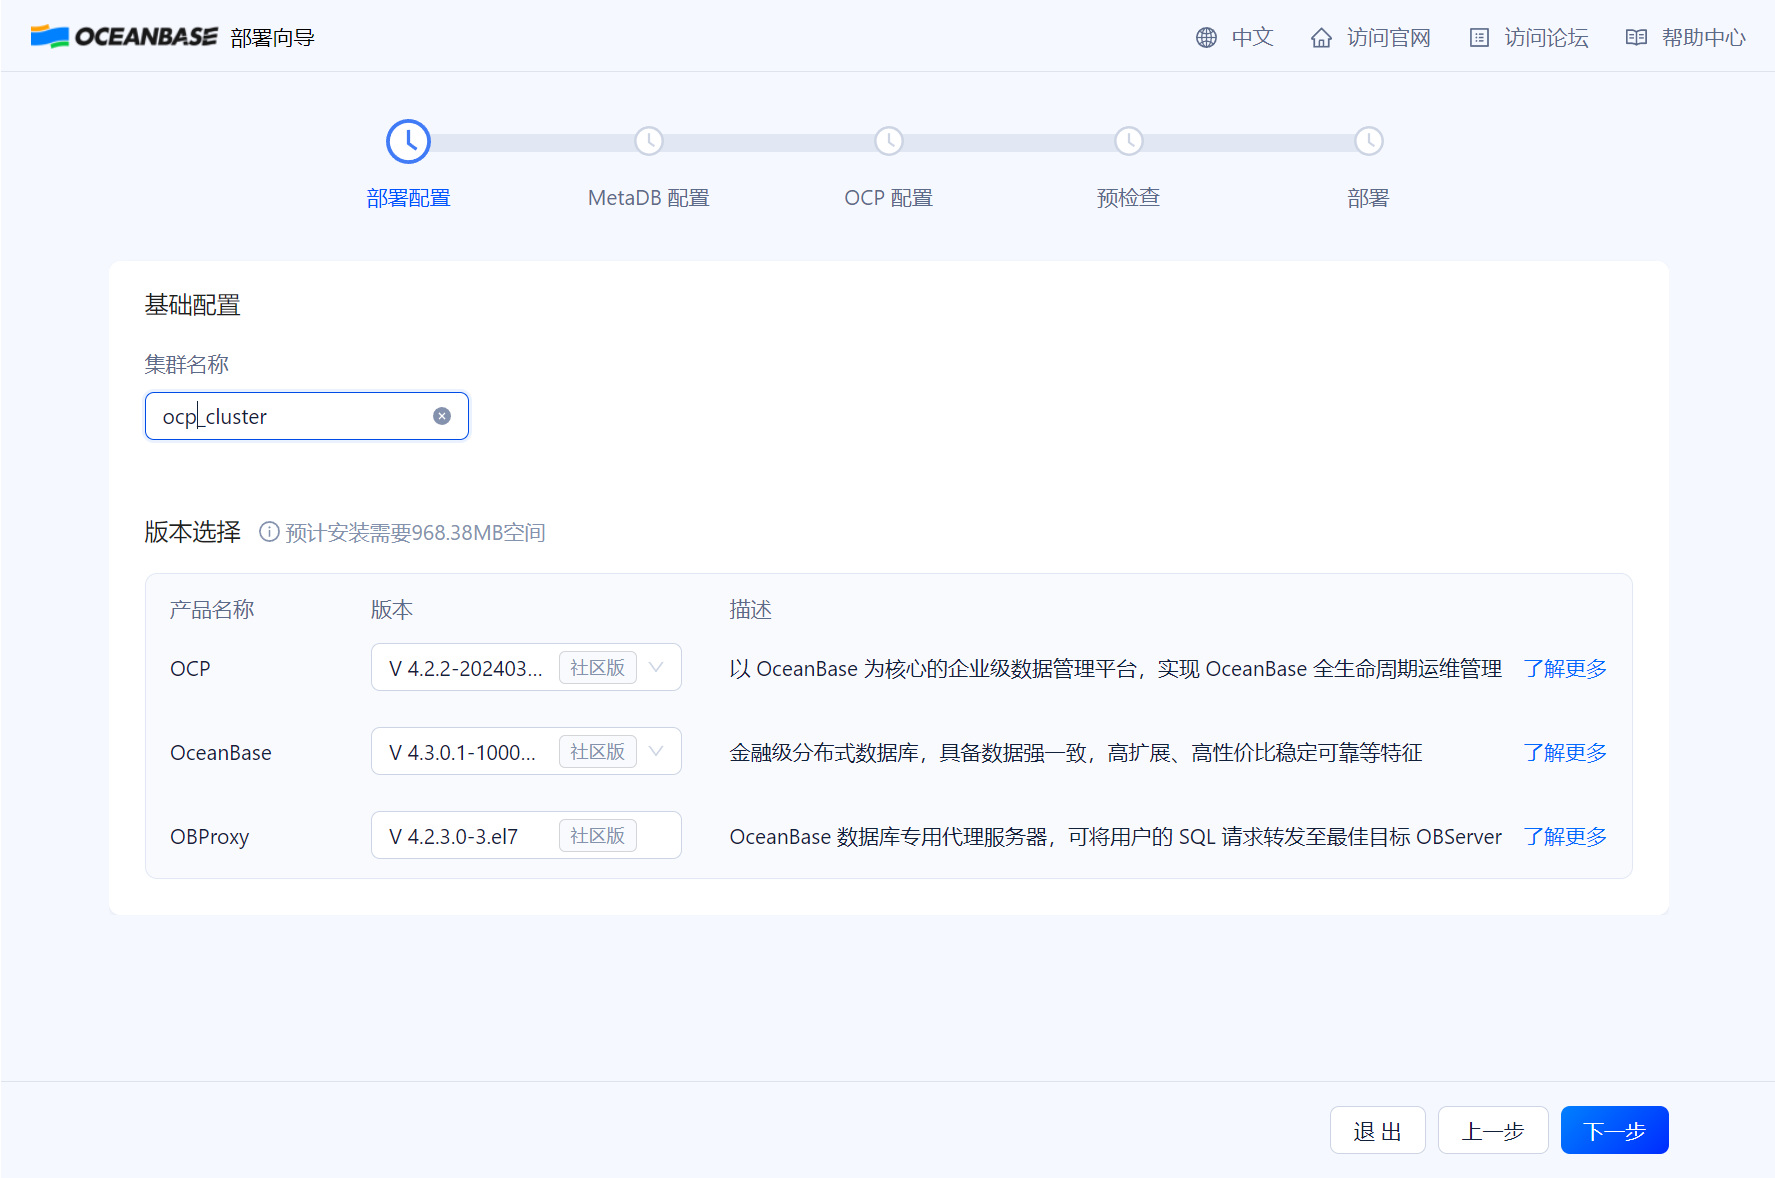
appname: ocp_cluster
root_password: b#x!k6[:.Etn3B%Q)IT-j4N7bzBQ
mysql_port: 2881
rpc_port: 2882
home_path: /home/admin/oceanbase
data_dir: /data/data
redo_dir: /data/log
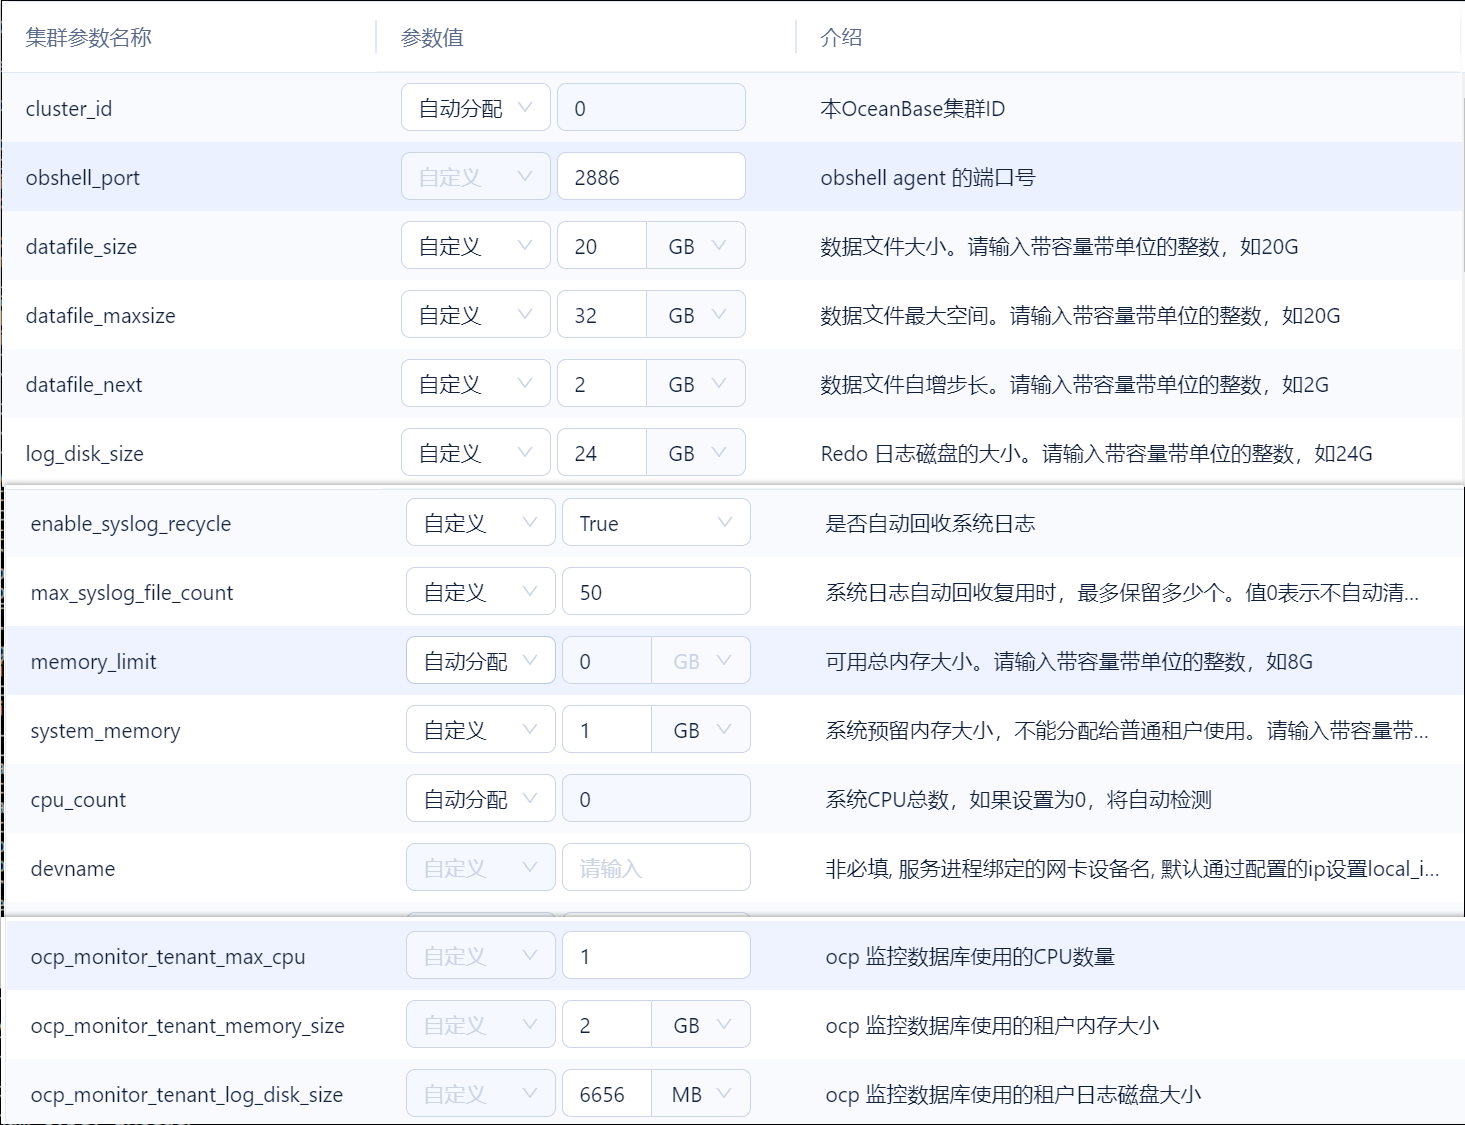
datafile_size: 20GB
datafile_maxsize: 32GB
datafile_next: 2GB
log_disk_size: 24GB
enable_syslog_recycle: 'True'
max_syslog_file_count: '50'
system_memory: 1GB
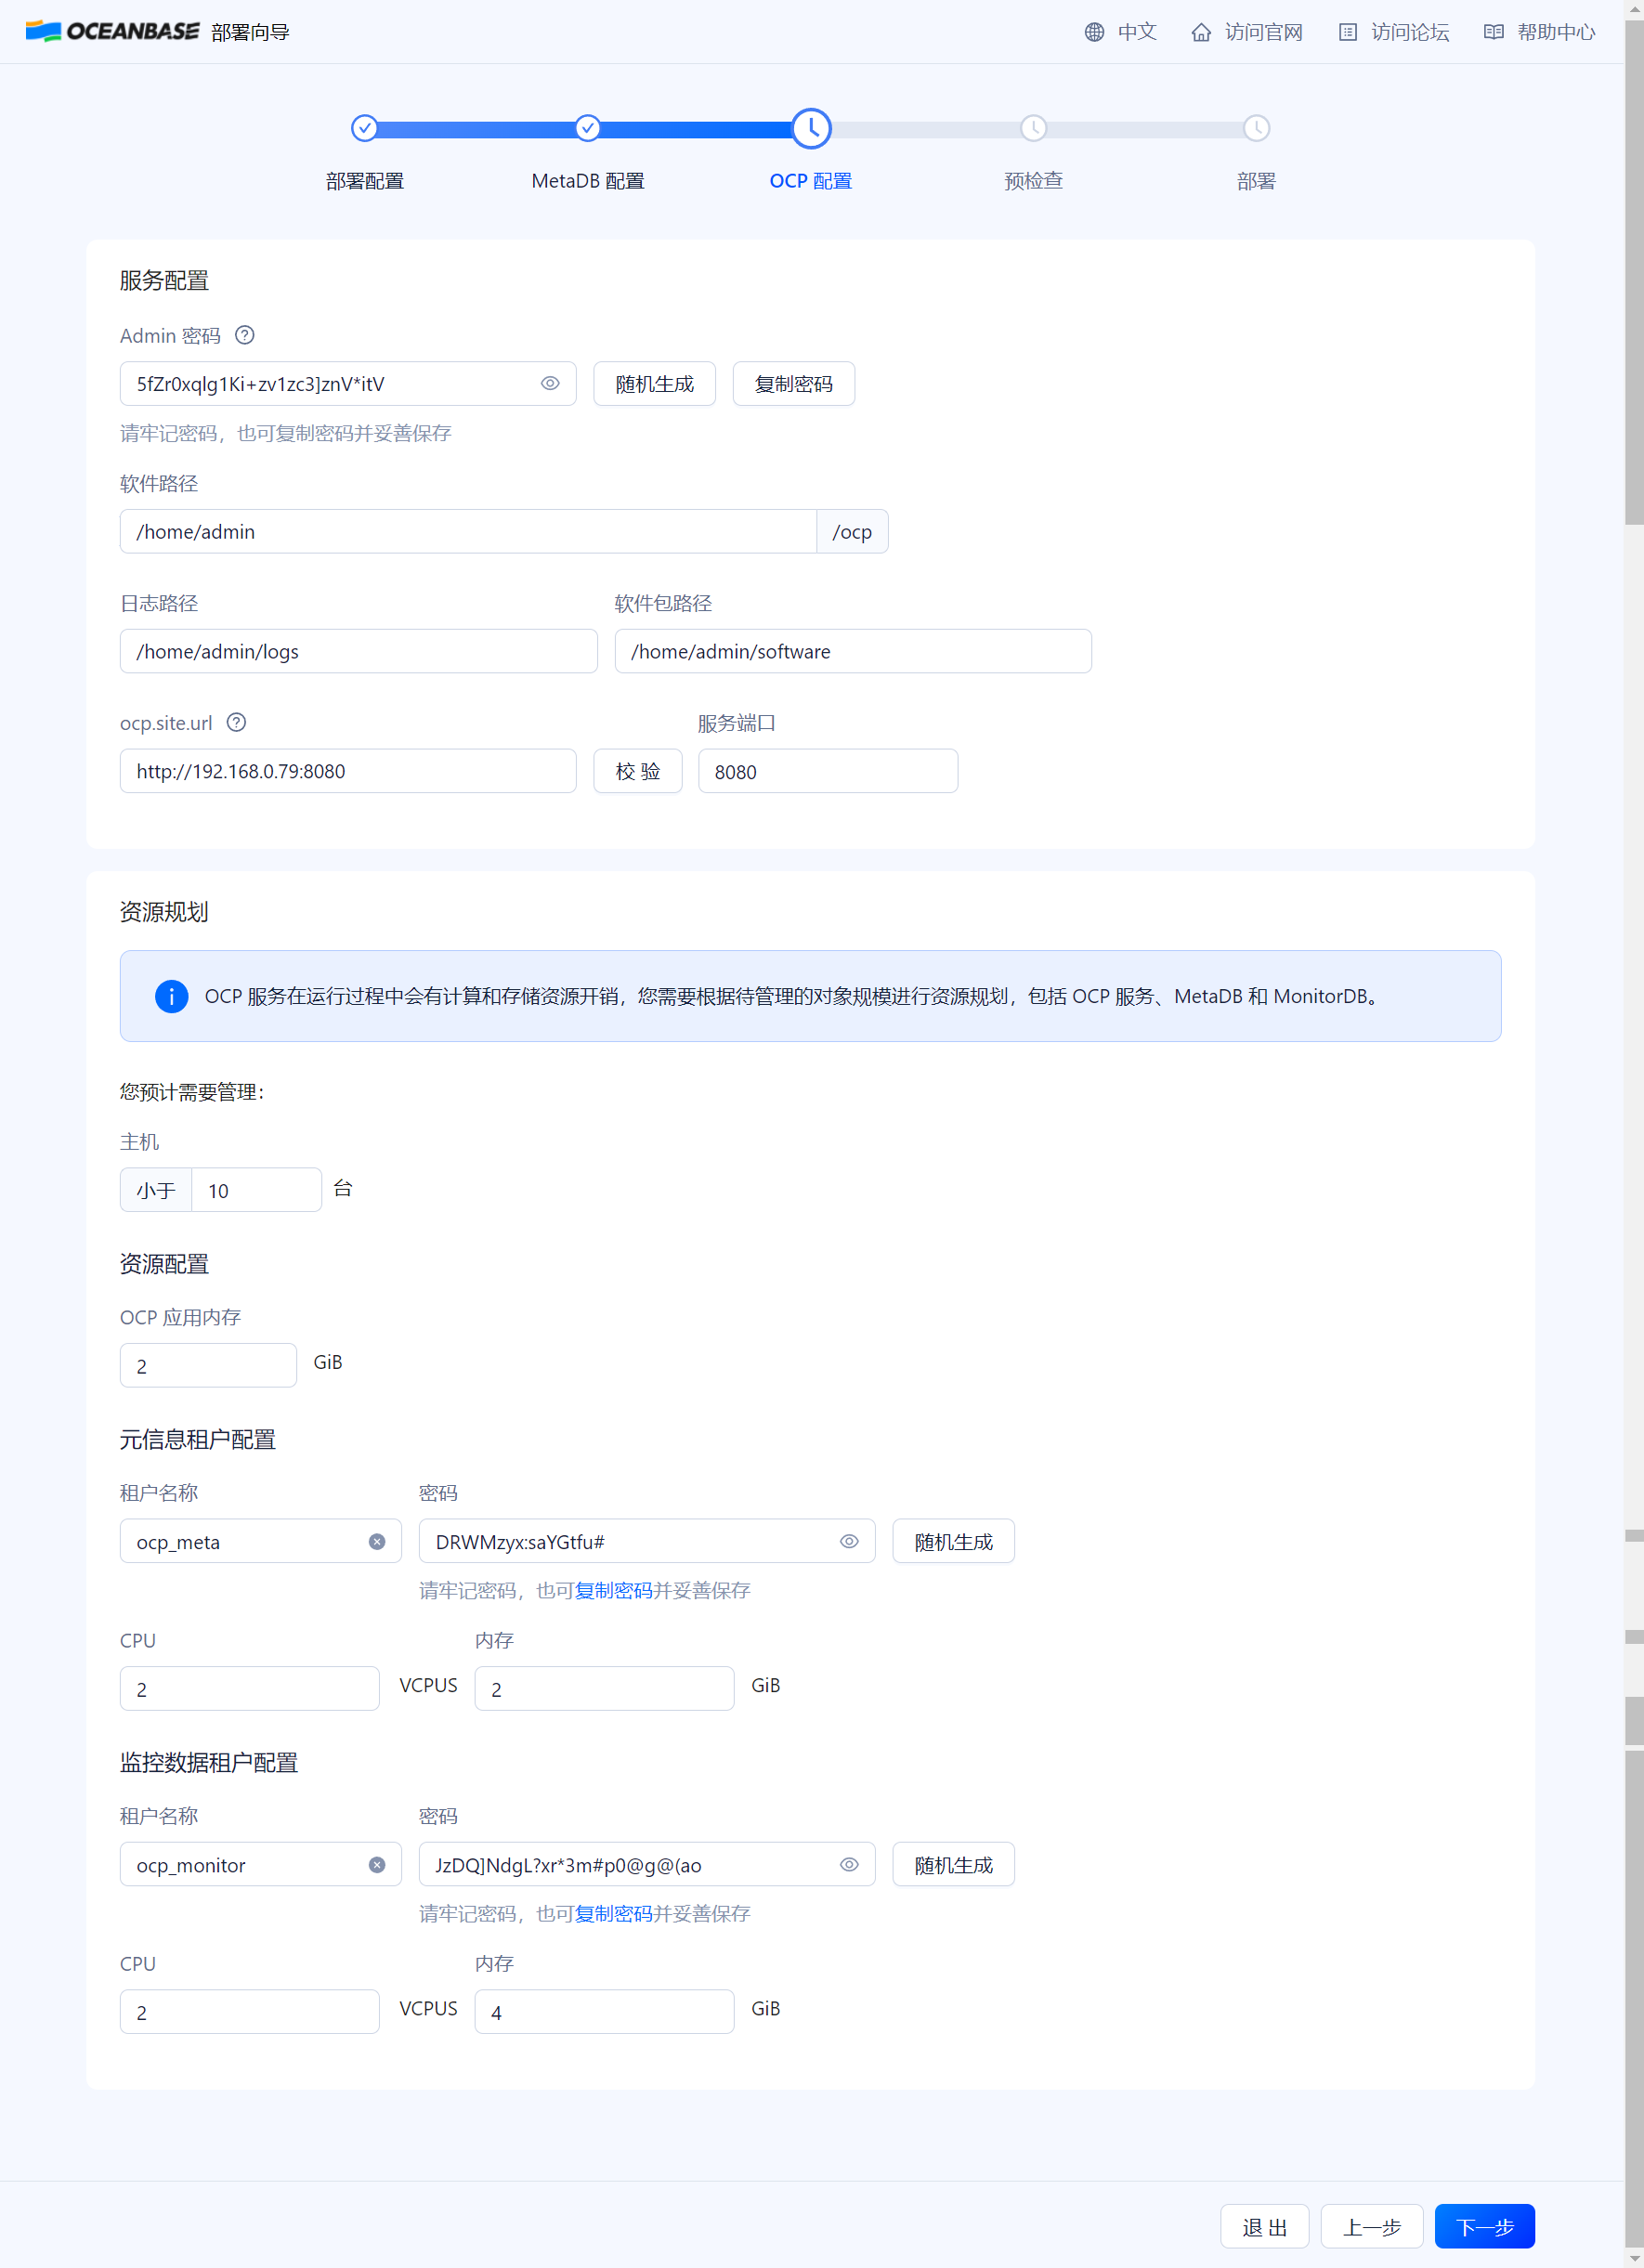
ocp_meta_tenant:
tenant_name: ocp_meta
max_cpu: 2.0
memory_size: 2G
ocp_meta_username: root
ocp_meta_password: DRWMzyx:saYGtfu#
ocp_meta_db: meta_database
ocp_monitor_tenant:
tenant_name: ocp_monitor
max_cpu: 2.0
memory_size: 4G
ocp_monitor_username: root
ocp_monitor_password: JzDQ]NdgL?xr*3m#p0@g@(ao
ocp_monitor_db: monitor_database
cluster_id: 1713263589
proxyro_password: uBleGrE0ws
ocp_root_password: jWnNfVO8jS
ocp_meta_tenant_log_disk_size: 7680M
enable_syslog_wf: false
memory_limit: 13251M
cpu_count: 16
production_mode: false
obproxy-ce:
version: 4.2.3.0
package_hash: 7ca6c000887b90db111093180e6984bf4cf8f7380a948870f3eb2ac30be38f37
release: 3.el7
servers:
- 192.168.0.74
global:
home_path: /home/admin/obproxy
prometheus_listen_port: 2884
listen_port: 2883
obproxy_sys_password: V1jXtOfxqi
skip_proxy_sys_private_check: true
enable_strict_kernel_release: false
enable_cluster_checkout: false
depends:
- oceanbase-ce
192.168.0.74:
proxy_id: 3464
client_session_id_version: 2
ocp-server-ce:
version: 4.2.2
package_hash: 054628eb73797d67e914ff1be365445dc30b4678b26d0ddf4bdfc6d2246ee76d
release: 20240315150922.el7
servers:
- 192.168.0.79
global:
home_path: /home/admin/ocp
soft_dir: /home/admin/software
log_dir: /home/admin/logs
ocp_site_url: http://192.168.0.79:8080
port: 8080
admin_password: 5fZr0xqlg1Ki+zv1zc3]znV*itV
memory_size: 2G
manage_info:
machine: 10
depends:
- oceanbase-ce
- obproxy-ce
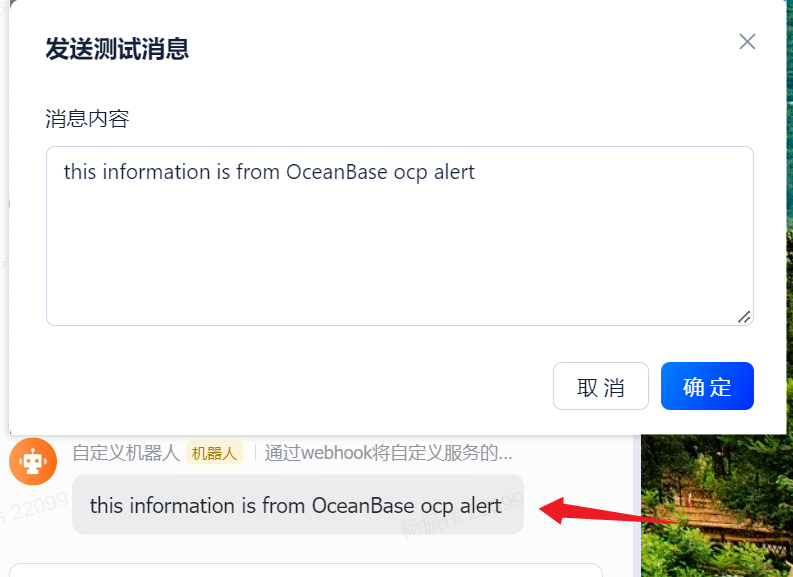
配置告警通道
https://www.oceanbase.com/docs/common-ocp-1000000000584847
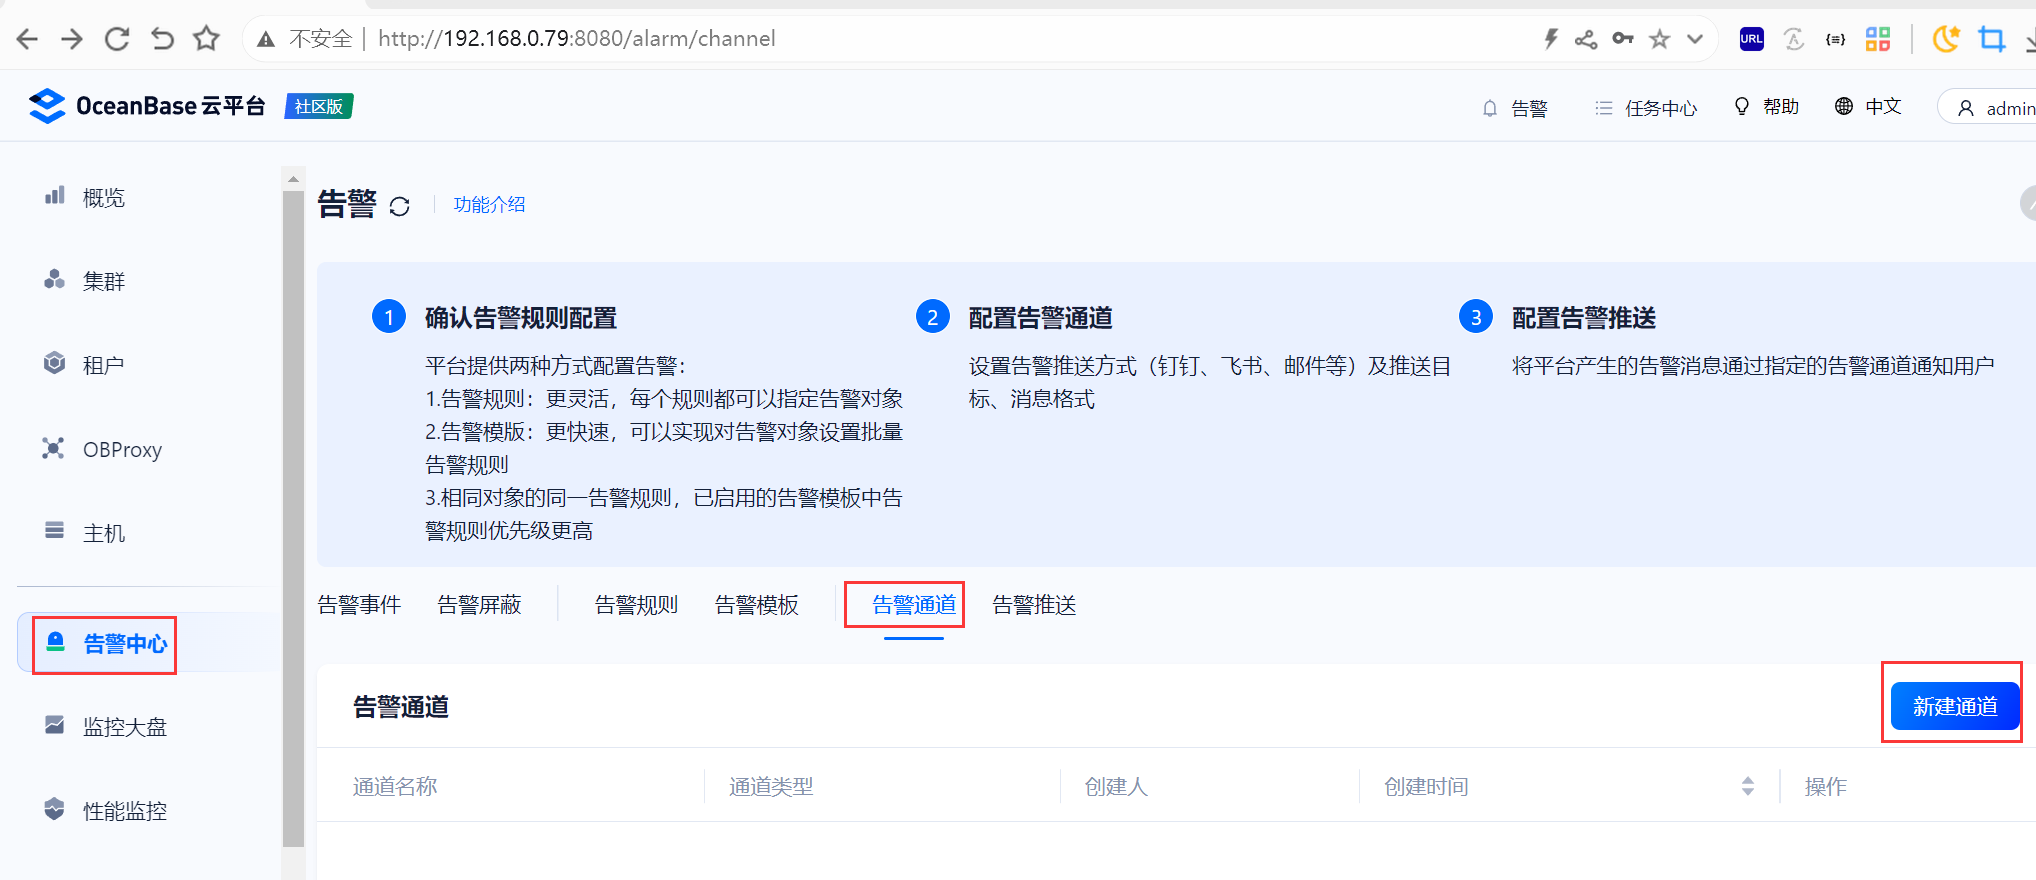
就配置一个飞书群机器人webhook
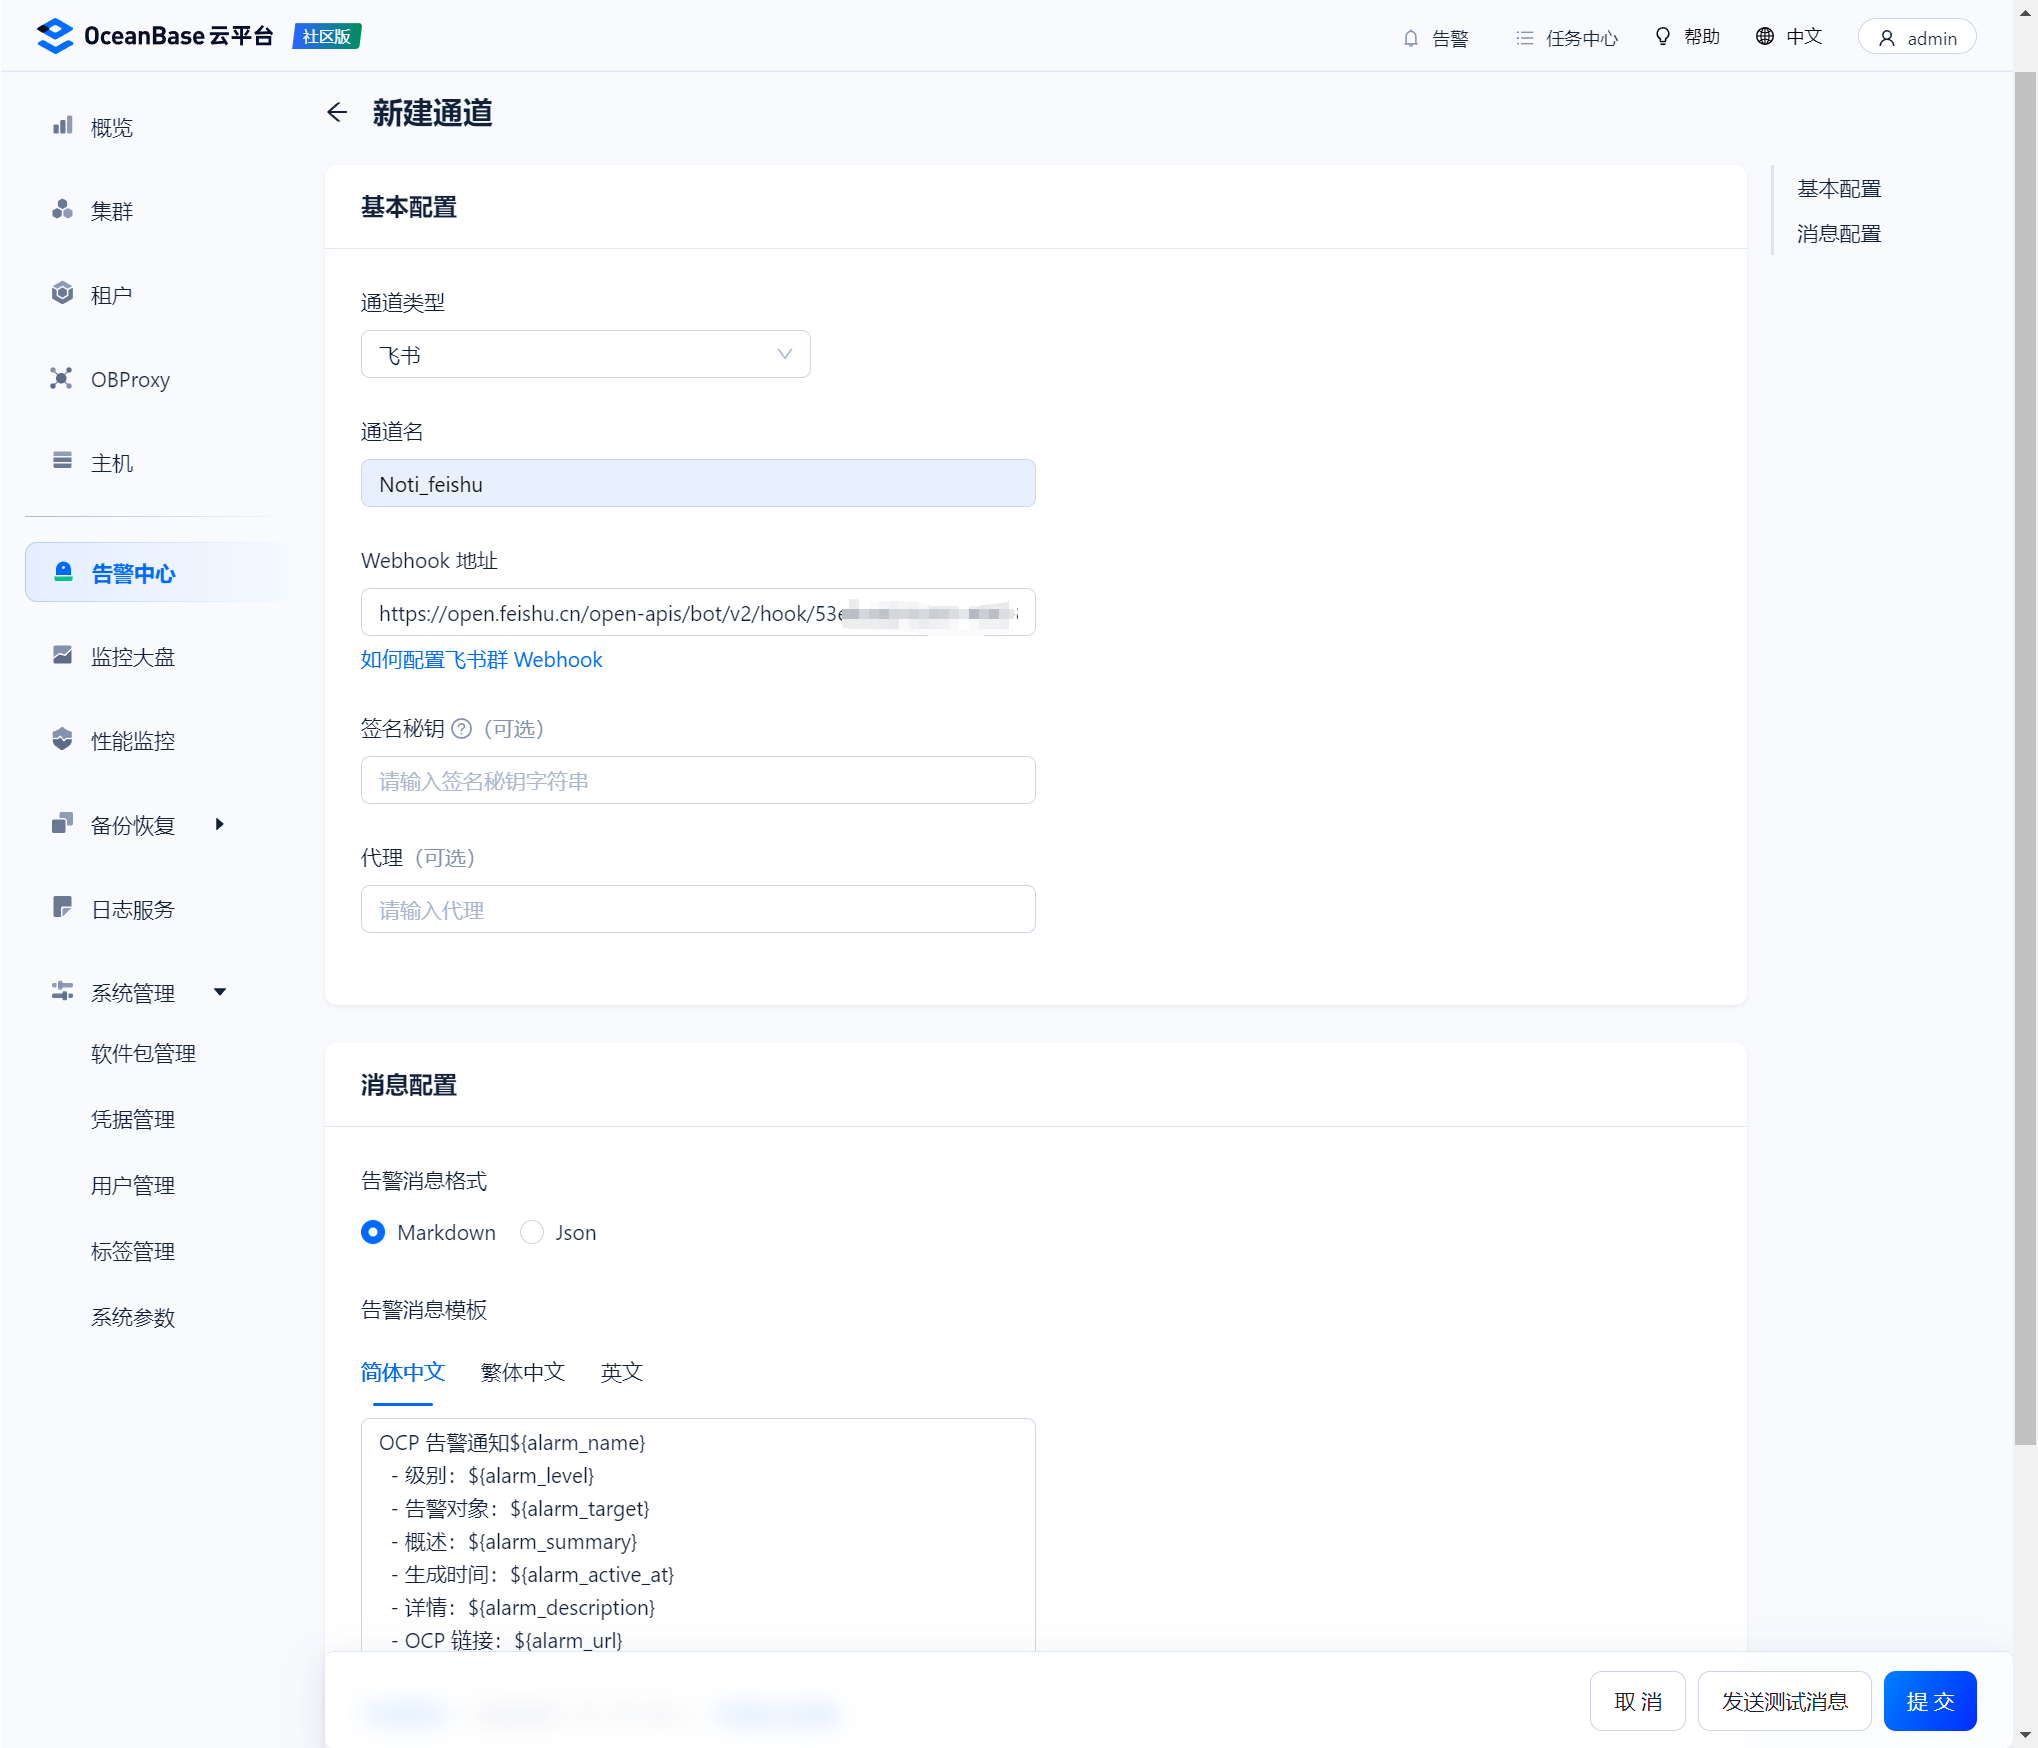
webhook 还是一如既往的好用,测试立马就收到消息了
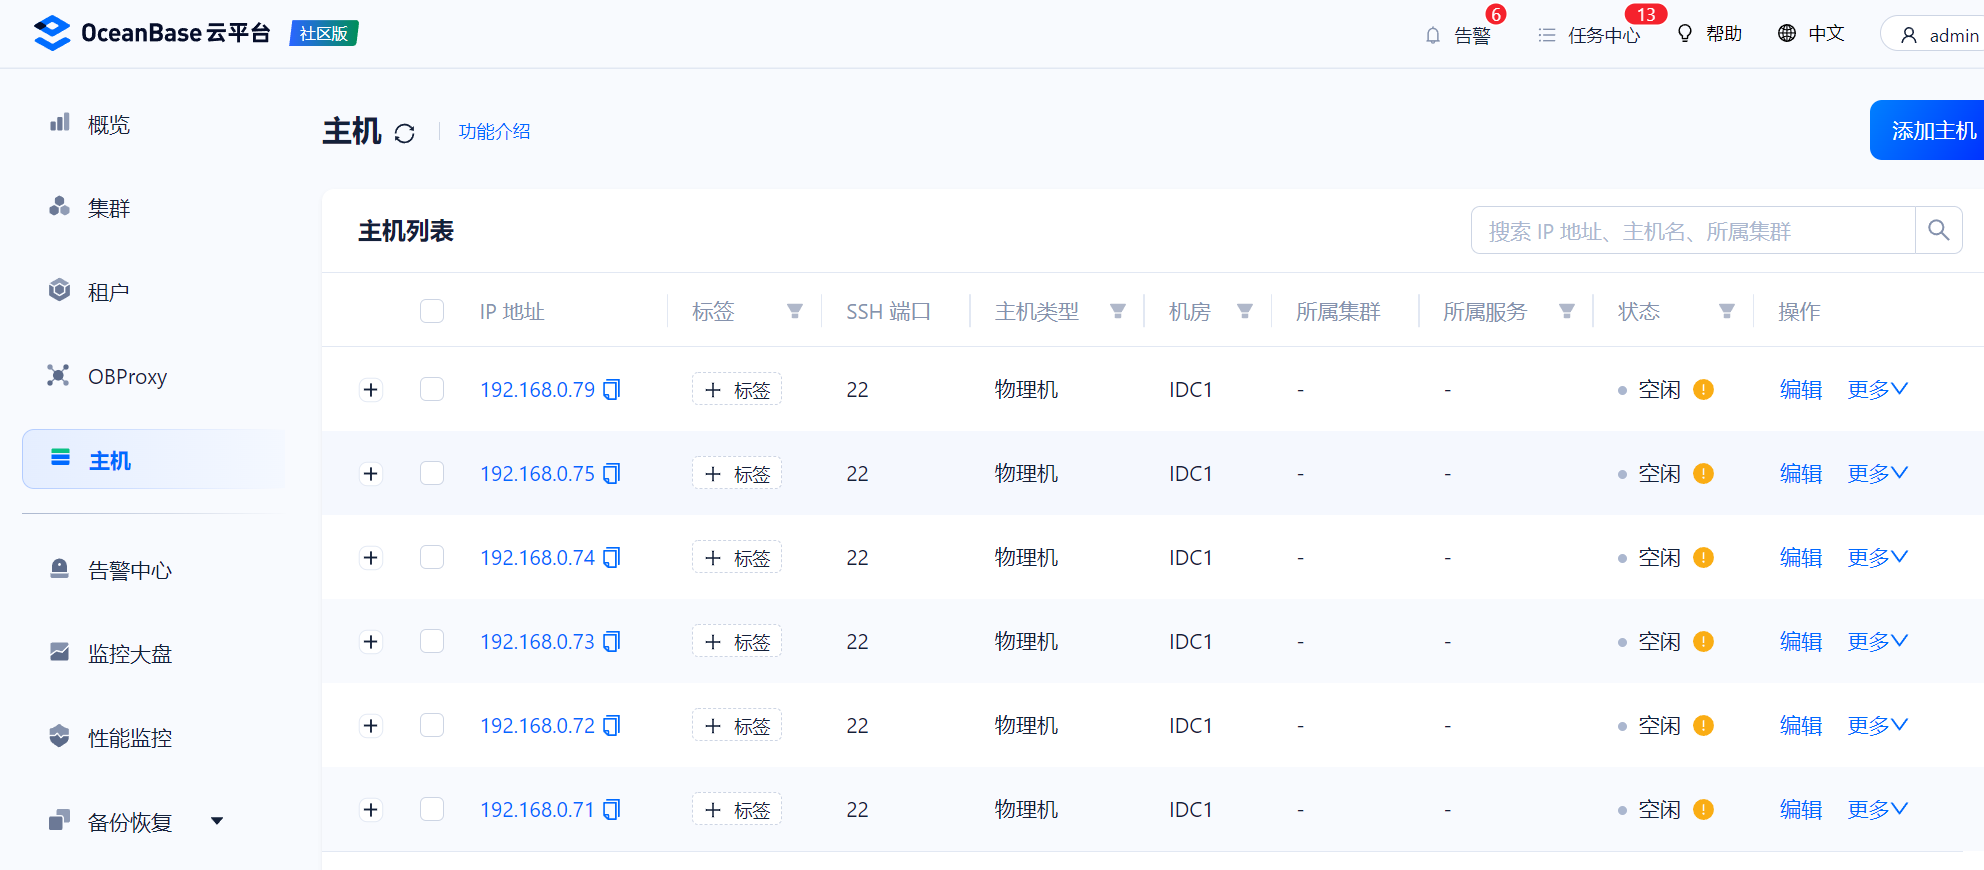
添加主机
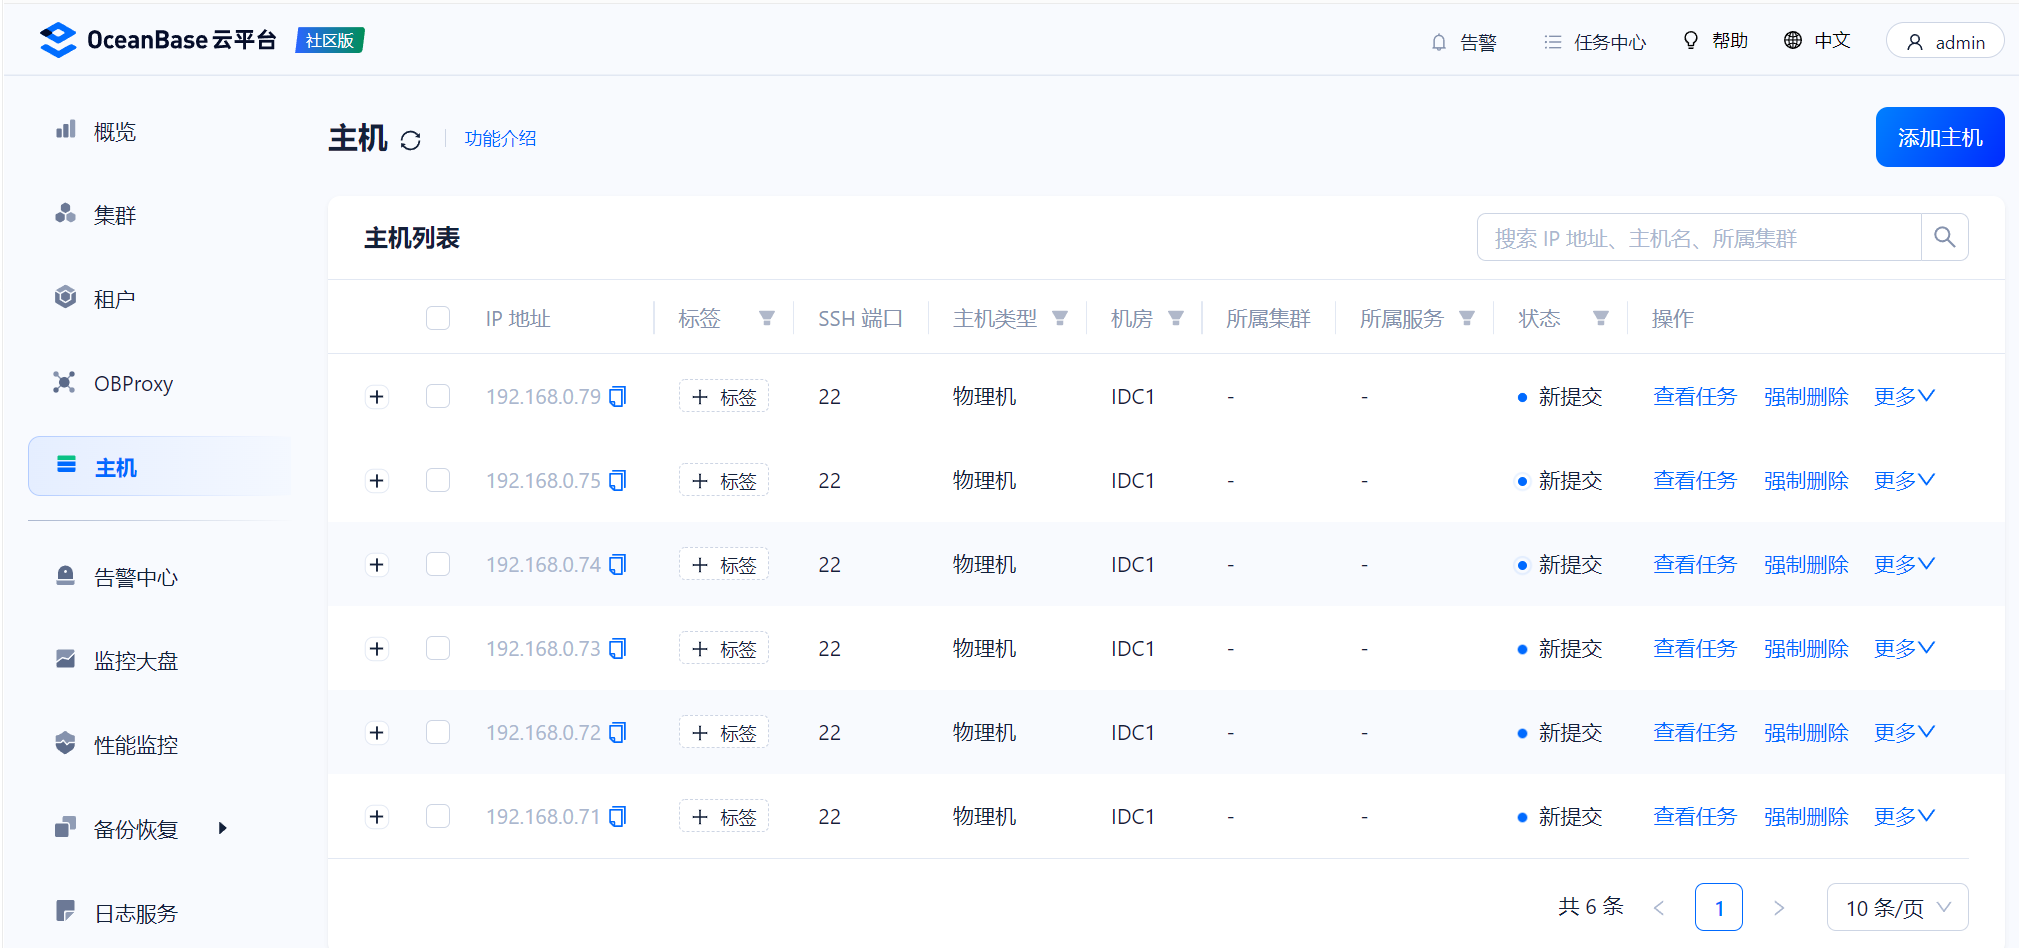
接管集群
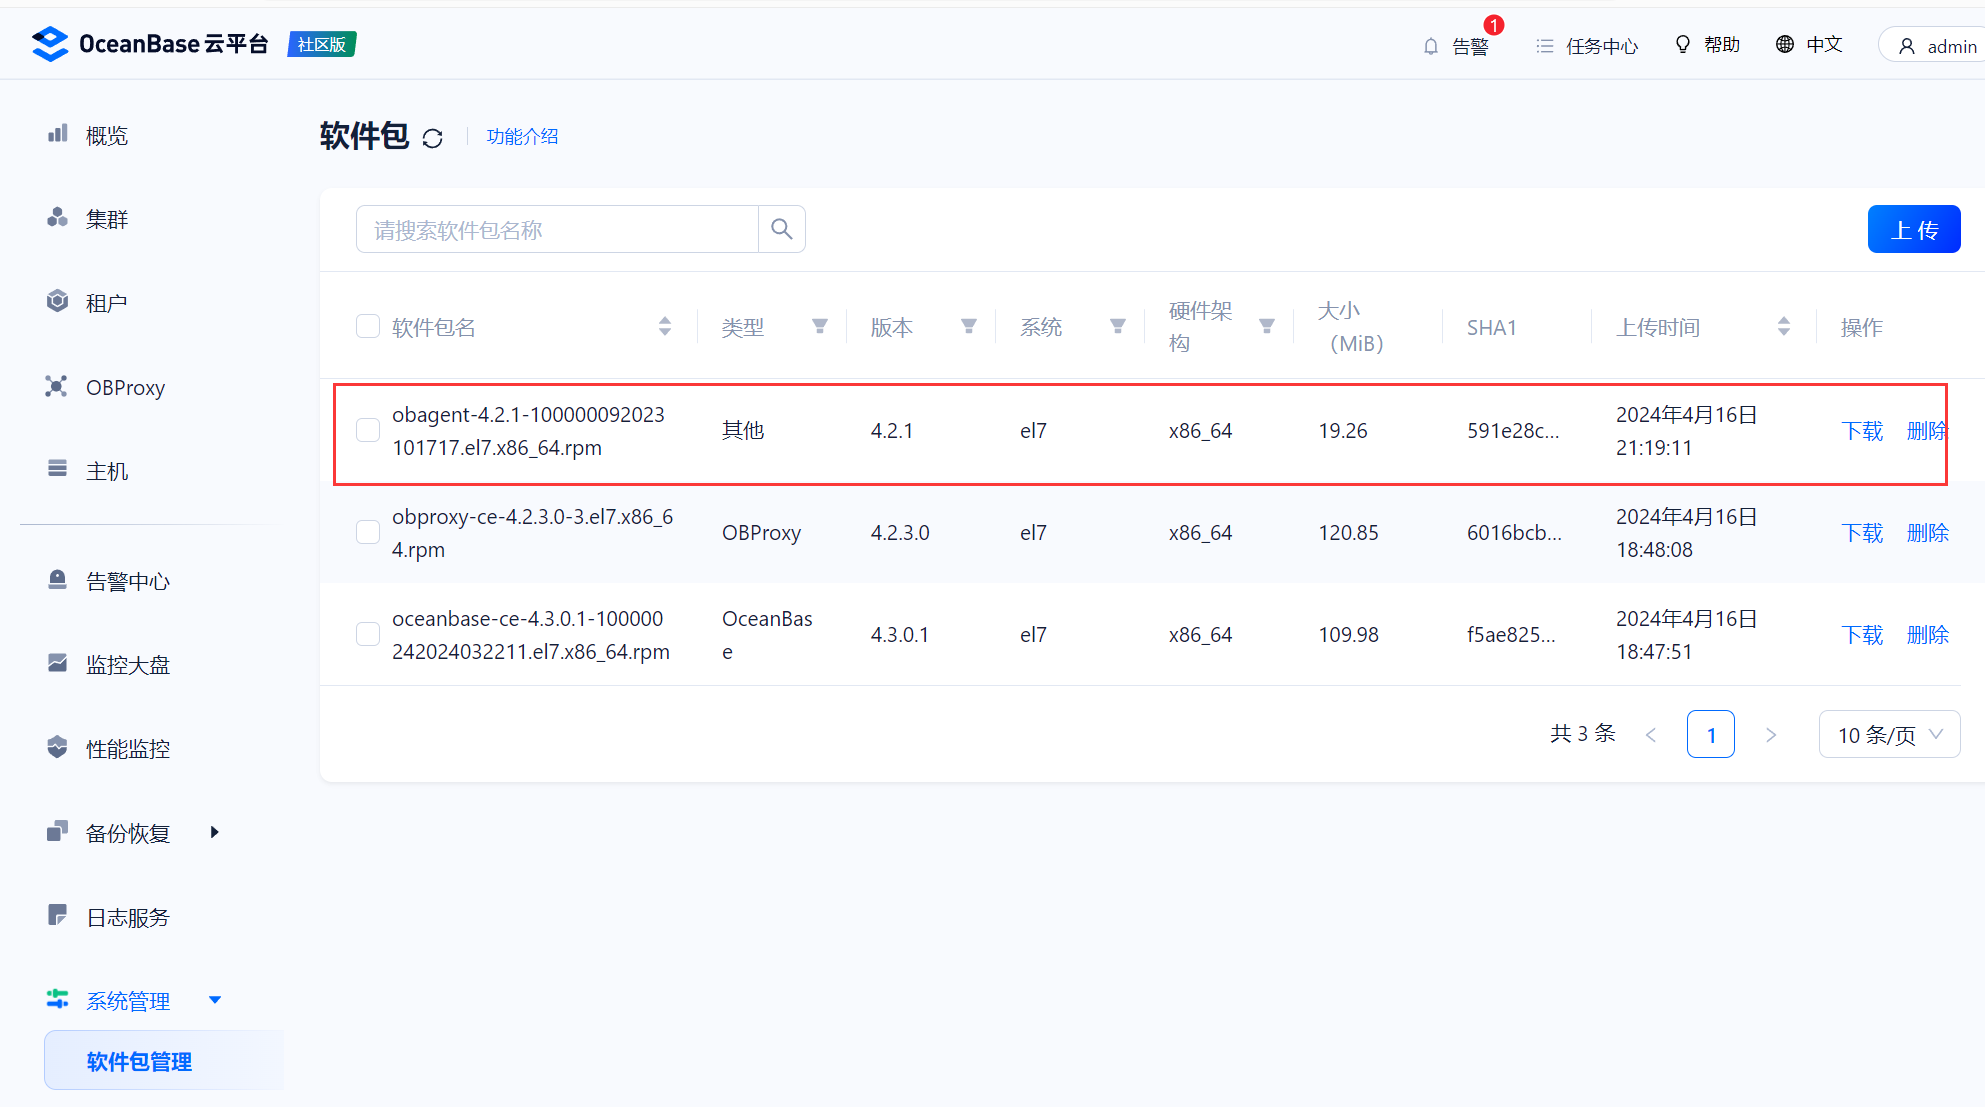
先给每个主机安装 agent
https://www.oceanbase.com/docs/common-ocp-1000000000584687
https://obbusiness-private.oss-cn-shanghai.aliyuncs.com/download-center/opensource/obagent/4.2.1/obagent-4.2.1-100000092023101717.el7.x86_64.rpm
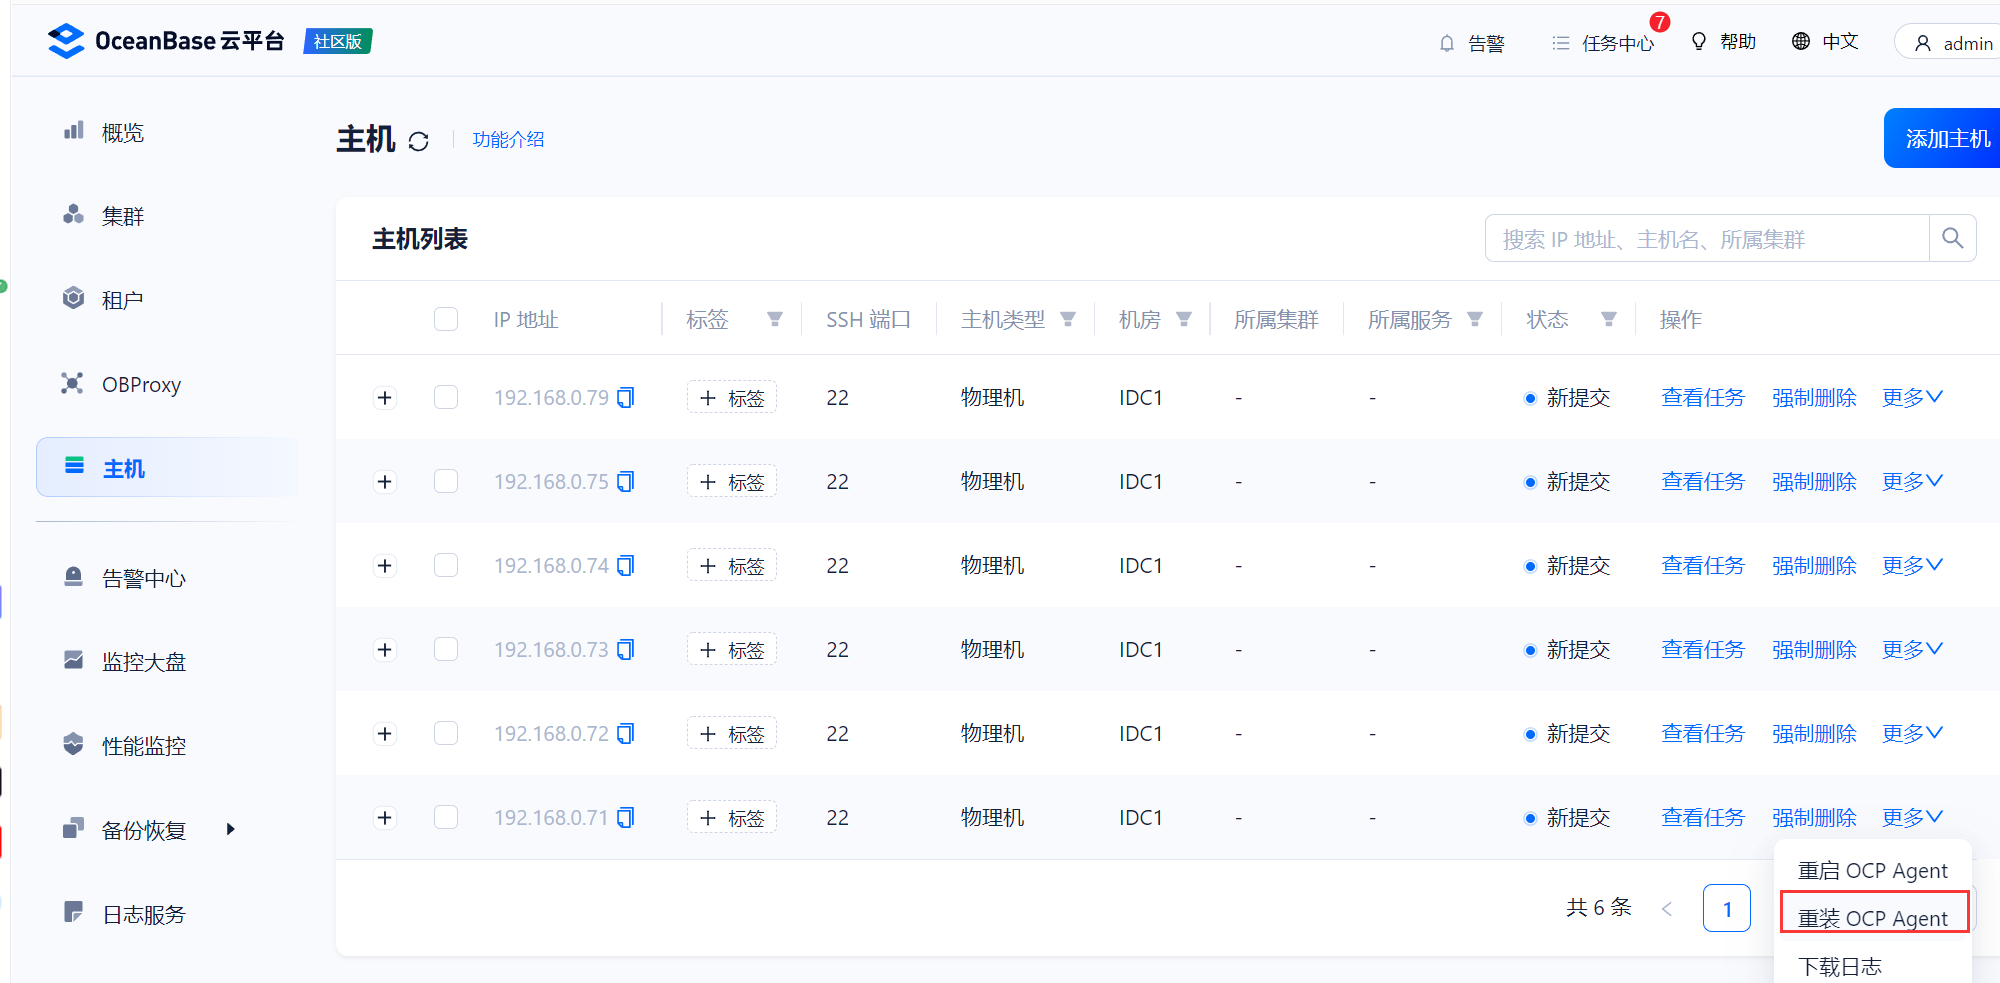
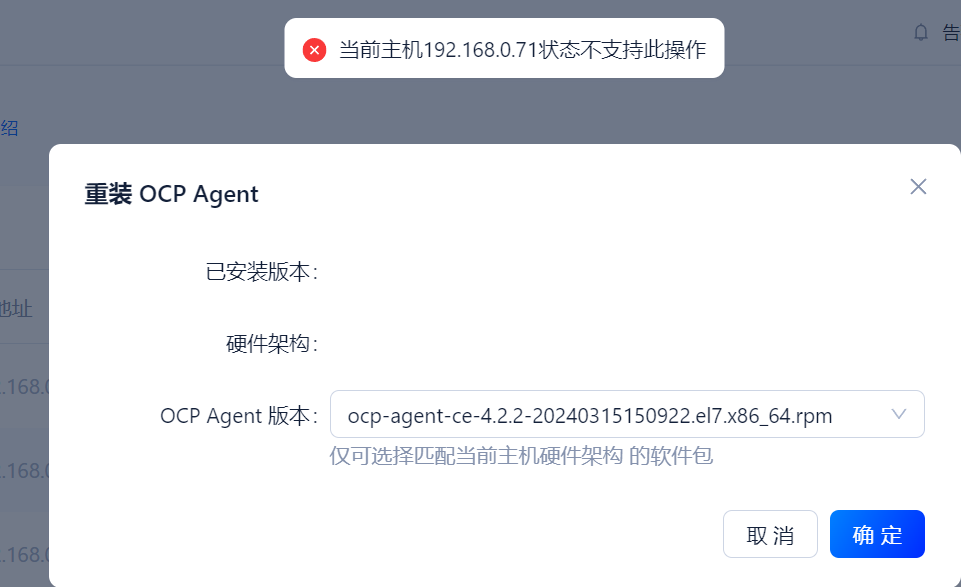
不知道为何 上传后这里选不了agent
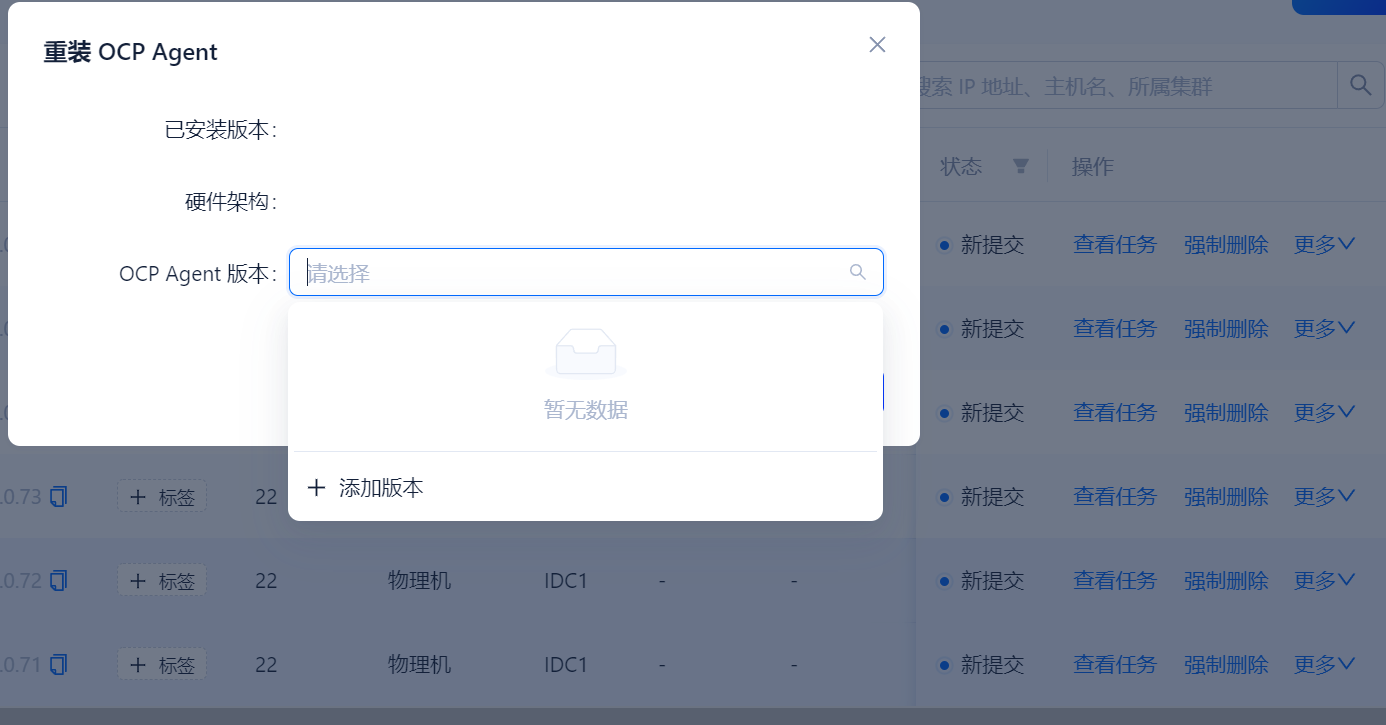
# 重启也看不到
[admin@ocp-000-079 ocp_cluster]$ obd cluster restart ocp_cluster -c ocp-server-ce
Get local repositories and plugins ok
Load cluster param plugin ok
Open ssh connection ok
Cluster status check ok
Check before start ocp-server ok
Stop ocp-server-ce ok
Check before start ocp-server ok
Start ocp-server-ce ok
ocp-server-ce program health check ok
Connect to ocp-server-ce ok
+----------------------------------------------------------------------------+
|                               ocp-server-ce                                |
+--------------------------+----------+-----------------------------+--------+
| url                      | username | password                    | status |
+--------------------------+----------+-----------------------------+--------+
| http://192.168.0.79:8080 | admin    | 5fZr0xqlg1Ki+zv1zc3]znV*itV | active |
+--------------------------+----------+-----------------------------+--------+
succeed
Trace ID: ba0daf66-fbf4-11ee-add1-005056213654
If you want to view detailed obd logs, please run: obd display-trace ba0daf66-fbf4-11ee-add1-005056213654
- 一番折腾,原来是这个包
192.168.0.79:/home/admin/software/sys-package/ocp-agent-ce-4.2.2-20240315150922.el7.x86_64.rpm
- 虽然已经配了
sudo免密,但是还是得在添加主机时使用root用户才行,不然一直处于新提交的状态
这个连接有常用的启停操作命令
https://ask.oceanbase.com/t/topic/35602977?spm=a2c6h.13066369.question.8.6ca85be54W0tmI
重启物理机(init 0关闭所有节点)
重开机后检查集群状态
集群是running
[admin@ocp-000-079 ~]$ obd cluster list
+----------------------------------------------------------------------+
|                             Cluster List                             |
+-------------+--------------------------------------+-----------------+
| Name        | Configuration Path                   | Status (Cached) |
+-------------+--------------------------------------+-----------------+
| ocp_cluster | /home/admin/.obd/cluster/ocp_cluster | running         |
+-------------+--------------------------------------+-----------------+
Trace ID: 127363e2-fcb0-11ee-ac1c-005056213654
If you want to view detailed obd logs, please run: obd display-trace 127363e2-fcb0-11ee-ac1c-005056213654
但其他组件都是停止的状态
[admin@ocp-000-079 ~]$ cluster display ocp_cluster
Get local repositories and plugins ok
Open ssh connection ok
Cluster status check ok
[WARN] 192.168.0.71 oceanbase-ce is stopped
[WARN] 192.168.0.72 oceanbase-ce is stopped
[WARN] 192.168.0.73 oceanbase-ce is stopped
[WARN] 192.168.0.74 obproxy-ce is stopped
[WARN] 192.168.0.79 ocp-server-ce is stopped
Trace ID: 3d7b5234-fcb0-11ee-896c-005056213654
If you want to view detailed obd logs, please run: obd display-trace 3d7b5234-fcb0-11ee-896c-005056213654
启动所有组件
[admin@ocp-000-079 ~]$ obd cluster start ocp_cluster
Get local repositories ok
Search plugins ok
Load cluster param plugin ok
Cluster status check ok
Check before start observer ok


Check before start obproxy ok
Check before start ocp-server ok
Start observer ok
observer program health check ok
obshell program health check ok
Connect to observer 192.168.0.72:2881 ok
Start obproxy ok
obproxy program health check ok
Connect to obproxy ok
Initialize obproxy-ce ok
[ERROR] ocp-server-ce-py_script_start-4.2.1 RuntimeError: (2013, 'Lost connection to MySQL server during query')
[ERROR] ocp-server-ce start failed
Wait for observer init ok
+--------------------------------------------------+
|                     observer                     |
+--------------+---------+------+-------+----------+
| ip           | version | port | zone  | status   |
+--------------+---------+------+-------+----------+
| 192.168.0.71 | 4.3.0.1 | 2881 | zone1 | INACTIVE |
| 192.168.0.72 | 4.3.0.1 | 2881 | zone2 | ACTIVE   |
| 192.168.0.73 | 4.3.0.1 | 2881 | zone3 | ACTIVE   |
+--------------+---------+------+-------+----------+
obclient -h192.168.0.71 -P2881 -uroot -p'b#x!k6[:.Etn3B%Q)IT-j4N7bzBQ' -Doceanbase -A

+------------------------------------------------+
|                    obproxy                     |
+--------------+------+-----------------+--------+
| ip           | port | prometheus_port | status |
+--------------+------+-----------------+--------+
| 192.168.0.74 | 2883 | 2884            | active |
+--------------+------+-----------------+--------+
obclient -h192.168.0.74 -P2883 -uroot@proxysys -p'V1jXtOfxqi' -Doceanbase -A

See https://www.oceanbase.com/product/ob-deployer/error-codes .
Trace ID: 204d9692-fcb8-11ee-803d-005056213654
If you want to view detailed obd logs, please run: obd display-trace 204d9692-fcb8-11ee-803d-005056213654
发现有组件启动失败了,分别是节点1和ocp
[admin@ocp-000-079 ~]$ obd cluster display ocp_cluster
Get local repositories and plugins ok
Open ssh connection ok
Cluster status check ok
[WARN] 192.168.0.71 oceanbase-ce is stopped
Connect to observer 192.168.0.72:2881 ok
Wait for observer init ok
+--------------------------------------------------+
|                     observer                     |
+--------------+---------+------+-------+----------+
| ip           | version | port | zone  | status   |
+--------------+---------+------+-------+----------+
| 192.168.0.71 | 4.3.0.1 | 2881 | zone1 | INACTIVE |
| 192.168.0.72 | 4.3.0.1 | 2881 | zone2 | ACTIVE   |
| 192.168.0.73 | 4.3.0.1 | 2881 | zone3 | ACTIVE   |
+--------------+---------+------+-------+----------+
obclient -h192.168.0.71 -P2881 -uroot -p'b#x!k6[:.Etn3B%Q)IT-j4N7bzBQ' -Doceanbase -A

Connect to obproxy ok
+------------------------------------------------+
|                    obproxy                     |
+--------------+------+-----------------+--------+
| ip           | port | prometheus_port | status |
+--------------+------+-----------------+--------+
| 192.168.0.74 | 2883 | 2884            | active |
+--------------+------+-----------------+--------+
obclient -h192.168.0.74 -P2883 -uroot@proxysys -p'V1jXtOfxqi' -Doceanbase -A

[WARN] 192.168.0.79 ocp-server-ce is stopped
Trace ID: f165f81c-fcba-11ee-9c9a-005056213654
If you want to view detailed obd logs, please run: obd display-trace f165f81c-fcba-11ee-9c9a-005056213654
单独启动主机时发现端口被占用
[admin@ocp-000-079 ~]$ obd cluster start ocp_cluster -c oceanbase-ce -s 192.168.0.71
Get local repositories ok
Search plugins ok
Load cluster param plugin ok
Cluster status check ok
Check before start observer x
[ERROR] OBD-1001: 192.168.0.71:2886 port is already used, Please choose another unoccupied port or terminate the process occupying the port


See https://www.oceanbase.com/product/ob-deployer/error-codes .
Trace ID: 864397d2-fcbb-11ee-8f18-005056213654
If you want to view detailed obd logs, please run: obd display-trace 864397d2-fcbb-11ee-8f18-005056213654
查看该节点的进程
[admin@obnode-000-071 log]$ lsof -i:2886
COMMAND   PID  USER   FD   TYPE DEVICE SIZE/OFF NODE NAME
obshell 10149 admin    9u  IPv4  44764      0t0  TCP obnode-000-071:responselogic (LISTEN)
[admin@obnode-000-071 log]$ ps -ef|grep -i ocean
admin     10102      1  0 20:46 ?        00:00:03 /home/admin/oceanbase/bin/obshell daemon --ip 192.168.0.71 --port 2886
admin     10149  10102  0 20:46 ?        00:00:05 /home/admin/oceanbase/bin/obshell server --ip 192.168.0.71 --port 2886
admin     13757  13401  0 21:15 pts/0    00:00:00 grep --color=auto -i ocean
杀掉后再启动正常
[admin@ocp-000-079 ~]$ obd cluster start ocp_cluster -c oceanbase-ce -s 192.168.0.71
Get local repositories ok
Search plugins ok
Load cluster param plugin ok
Cluster status check ok
Check before start observer ok
[WARN] OBD-1017: (192.168.0.71) The value of the "vm.max_map_count" must be within [327600, 1310720] (Current value: 65530, Recommended value: 655360)
[WARN] OBD-1017: (192.168.0.71) The value of the "fs.file-max" must be greater than 6573688 (Current value: 1552314, Recommended value: 6573688)

Start observer ok
observer program health check ok
obshell program health check ok
Connect to observer 192.168.0.71:2881 ok
succeed
Trace ID: b3dbb250-fcbc-11ee-9593-005056213654
If you want to view detailed obd logs, please run: obd display-trace b3dbb250-fcbc-11ee-9593-005056213654
[admin@obnode-000-071 log]$ ps -ef|grep -i ocean
admin     14224      1 99 21:16 ?        00:10:40 /home/admin/oceanbase/bin/observer -r 192.168.0.71:2882:2881;192.168.0.72:2882:2881;192.168.0.73:2882:2881 -p 2881 -P 2882 -z zone1 -n ocp_cluster -c 1713263589 -d /data/data -I 192.168.0.71 -o __min_full_resource_pool_memory=2147483648,datafile_size=20G,datafile_maxsize=32G,datafile_next=2G,log_disk_size=24G,enable_syslog_recycle=True,max_syslog_file_count=50,system_memory=1G,enable_syslog_wf=False,memory_limit=13251M,cpu_count=16
admin     14303      1  1 21:16 ?        00:00:01 /home/admin/oceanbase/bin/obshell daemon --ip 192.168.0.71 --port 2886
admin     14346  14303  0 21:16 ?        00:00:00 /home/admin/oceanbase/bin/obshell server --ip 192.168.0.71 --port 2886
启动 ocp
[admin@ocp-000-079 ~]$ obd cluster start ocp_cluster -c ocp-server-ce
Get local repositories ok
Search plugins ok
Load cluster param plugin ok
Cluster status check ok
Check before start ocp-server ok
Start ocp-server-ce ok
ocp-server-ce program health check ok
Start ocp-server-ce ok
ocp-server-ce program health check ok
Connect to ocp-server-ce ok
Initialize ocp-server-ce ok
+----------------------------------------------------------------------------+
|                               ocp-server-ce                                |
+--------------------------+----------+-----------------------------+--------+
| url                      | username | password                    | status |
+--------------------------+----------+-----------------------------+--------+
| http://192.168.0.79:8080 | admin    | 5fZr0xqlg1Ki+zv1zc3]znV*itV | active |
+--------------------------+----------+-----------------------------+--------+
succeed
Trace ID: 46516f7a-fcbe-11ee-8cbc-005056213654
If you want to view detailed obd logs, please run: obd display-trace 46516f7a-fcbe-11ee-8cbc-005056213654
ocp_agent 问题
重启主机后,发现有的节点 agent 没有起来
/usr/lib/systemd/system/ocp_agent.service
[root@obnode-000-071 ocp_agent]# systemctl status ocp_agent
● ocp_agent.service - start ocp_agent
   Loaded: loaded (/usr/lib/systemd/system/ocp_agent.service; enabled; vendor preset: disabled)
   Active: failed (Result: exit-code) since Thu 2024-04-18 14:41:20 CST; 1h 2min ago
  Process: 1072 ExecStart=/home/admin/ocp_agent/bin/ocp_agentctl start (code=exited, status=255)

Apr 18 14:40:35 obnode-000-071 systemd[1]: Starting start ocp_agent...
Apr 18 14:41:15 obnode-000-071 ocp_agentctl[1072]: {"successful":false,"message":null,"error":"Module=agent, kind=DEADLINE_...t; "}
Apr 18 14:41:15 obnode-000-071 systemd[1]: ocp_agent.service: control process exited, code=exited status=255
Apr 18 14:41:20 obnode-000-071 systemd[1]: Failed to start start ocp_agent.
Apr 18 14:41:20 obnode-000-071 systemd[1]: Unit ocp_agent.service entered failed state.
Apr 18 14:41:20 obnode-000-071 systemd[1]: ocp_agent.service failed.
Hint: Some lines were ellipsized, use -l to show in full.

# 查看 /var/log/messges
Apr 18 14:40:59 obnode-000-071 systemd: Started Session c1 of user gdm.
Apr 18 14:41:15 obnode-000-071 ocp_agentctl: {"successful":false,"message":null,"error":"Module=agent, kind=DEADLINE_EXCEEDED, code
=wait_for_ready_timeout; "}
Apr 18 14:41:15 obnode-000-071 systemd: ocp_agent.service: control process exited, code=exited status=255
Apr 18 14:41:20 obnode-000-071 systemd: Failed to start start ocp_agent.
Apr 18 14:41:20 obnode-000-071 systemd: Unit ocp_agent.service entered failed state.
Apr 18 14:41:20 obnode-000-071 systemd: ocp_agent.service failed.
重新启动一次即可
● ocp_agent.service - start ocp_agent
   Loaded: loaded (/usr/lib/systemd/system/ocp_agent.service; enabled; vendor preset: disabled)
   Active: active (running) since Thu 2024-04-18 15:46:53 CST; 15s ago
  Process: 7481 ExecStart=/home/admin/ocp_agent/bin/ocp_agentctl start (code=exited, status=0/SUCCESS)
 Main PID: 7495 (ocp_agentd)
    Tasks: 16
   CGroup: /system.slice/ocp_agent.service
           ├─7495 /home/admin/ocp_agent/bin/ocp_agentd -c /home/admin/ocp_agent/conf/agentd.yaml
           └─7507 /home/admin/ocp_agent/bin/ocp_mgragent

Apr 18 15:46:46 obnode-000-071 systemd[1]: Starting start ocp_agent...
Apr 18 15:46:53 obnode-000-071 ocp_agentctl[7481]: {"successful":true,"message":"ok","error":""}
Apr 18 15:46:53 obnode-000-071 systemd[1]: Started start ocp_agent.

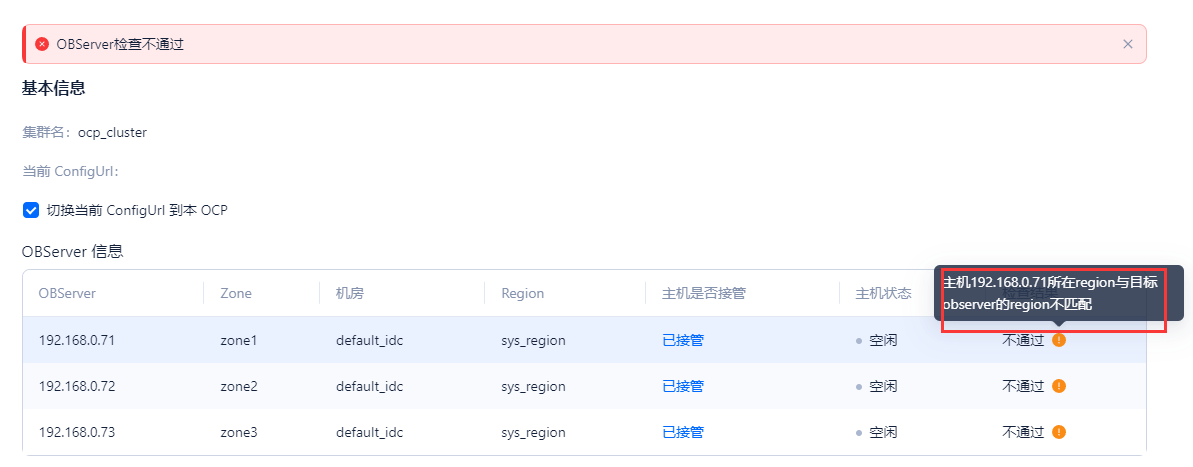
接管 metaDB 集群
发现接管不上,创建主机时新增了一个IDC,IDC的region和这个sys_region不一样
群上说不支持主机所属应用和机房的修改,这就难受了,推倒重新部署一个单节点的ocp再看看
铲了
[root@ocp-000-079 ocp_agent]# su - admin
Last login: Thu Apr 18 15:23:25 CST 2024 on pts/0
[admin@ocp-000-079 ~]$ obd cluster stop ocp_cluster
Get local repositories ok
Search plugins ok
Open ssh connection ok
Stop observer ok
Stop obshell ok
Stop obproxy ok
Stop ocp-server-ce ok
ocp_cluster stopped
Trace ID: 35a23476-fd5d-11ee-b8c7-005056213654
If you want to view detailed obd logs, please run: obd display-trace 35a23476-fd5d-11ee-b8c7-005056213654
[admin@ocp-000-079 ~]$ obd cluster destroy ocp_cluster
Are you sure to destroy the "ocp_cluster" cluster ? [y/n]: y
Get local repositories ok
Open ssh connection ok
Check for standby tenant ok
Search plugins ok
Cluster status check ok
observer work dir cleaning ok
obproxy work dir cleaning ok
ocp-server cleaning ok
ocp_cluster destroyed
Trace ID: 54e846b8-fd5d-11ee-924f-005056213654
If you want to view detailed obd logs, please run: obd display-trace 54e846b8-fd5d-11ee-924f-005056213654
单节点OCP
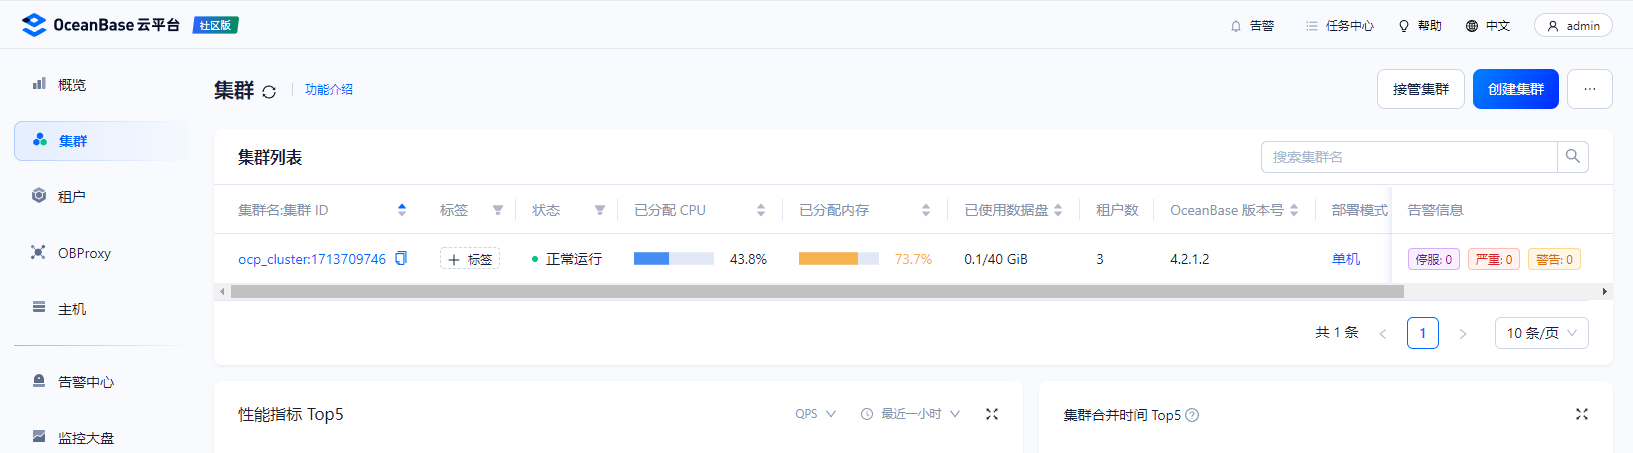
单节点ocp部署后,集群已经接管在OCP
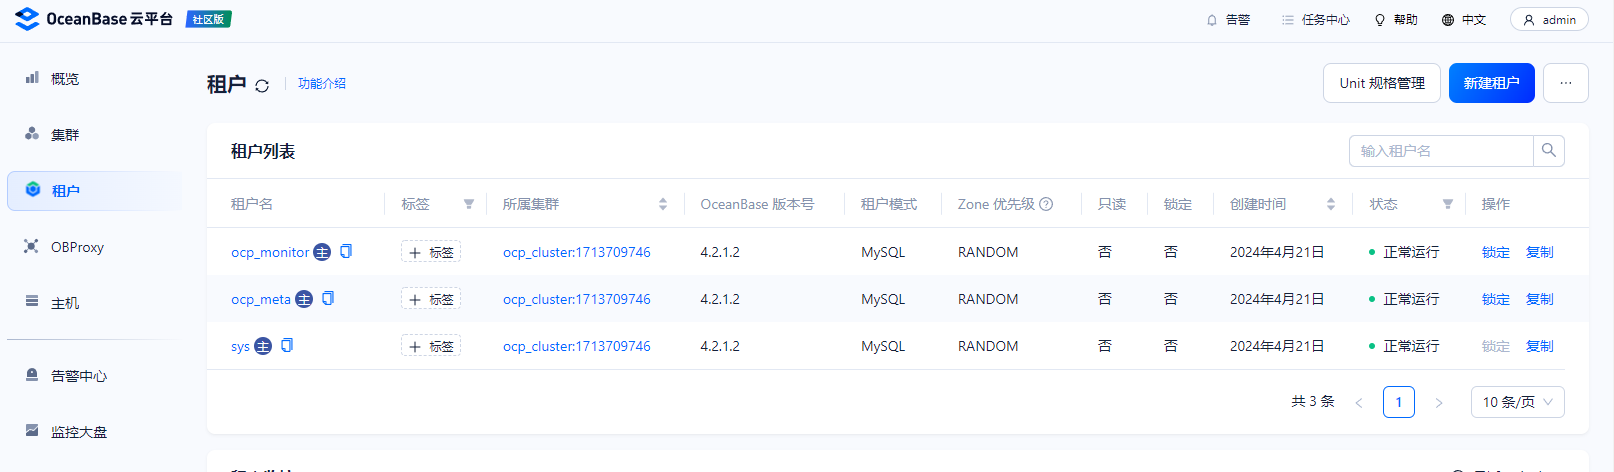
租户正常
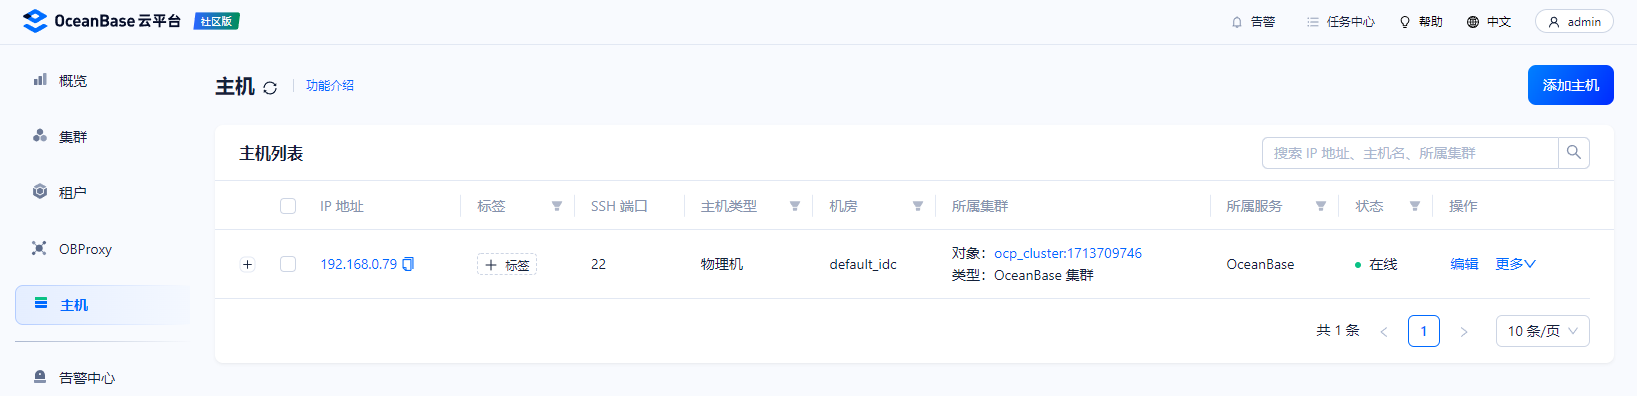
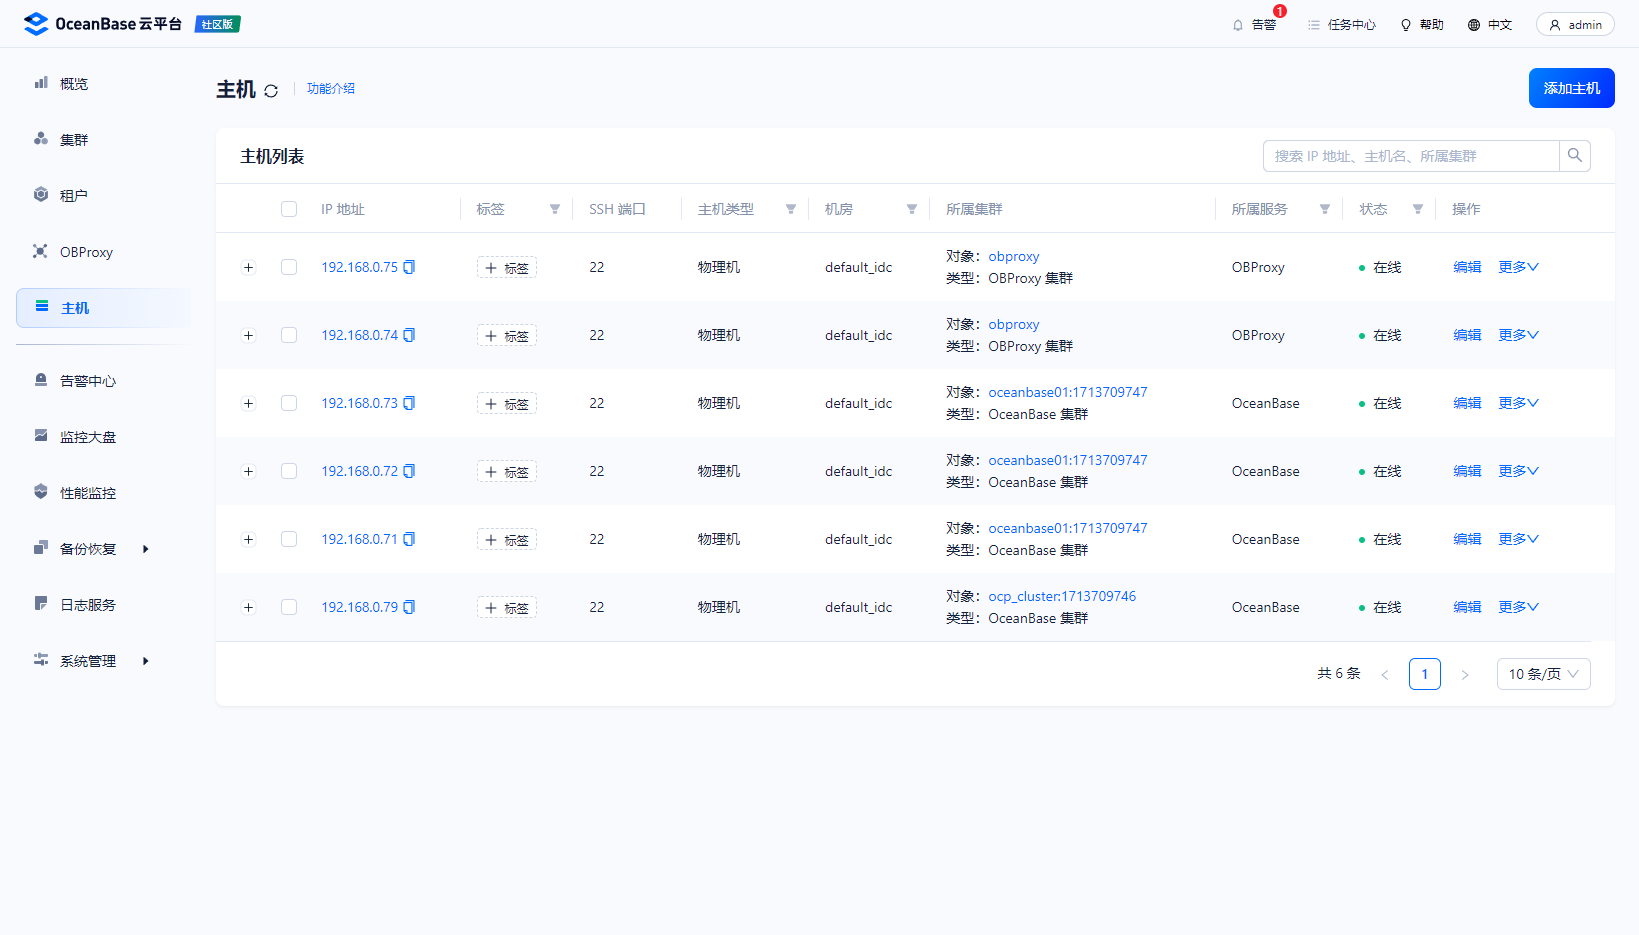
所在主机正常
部署ocp时已经安装proxy,这里无法为ocp的oceanbase在创建一个proxy
创建3节点的oceanbase
添加主机
创建集群
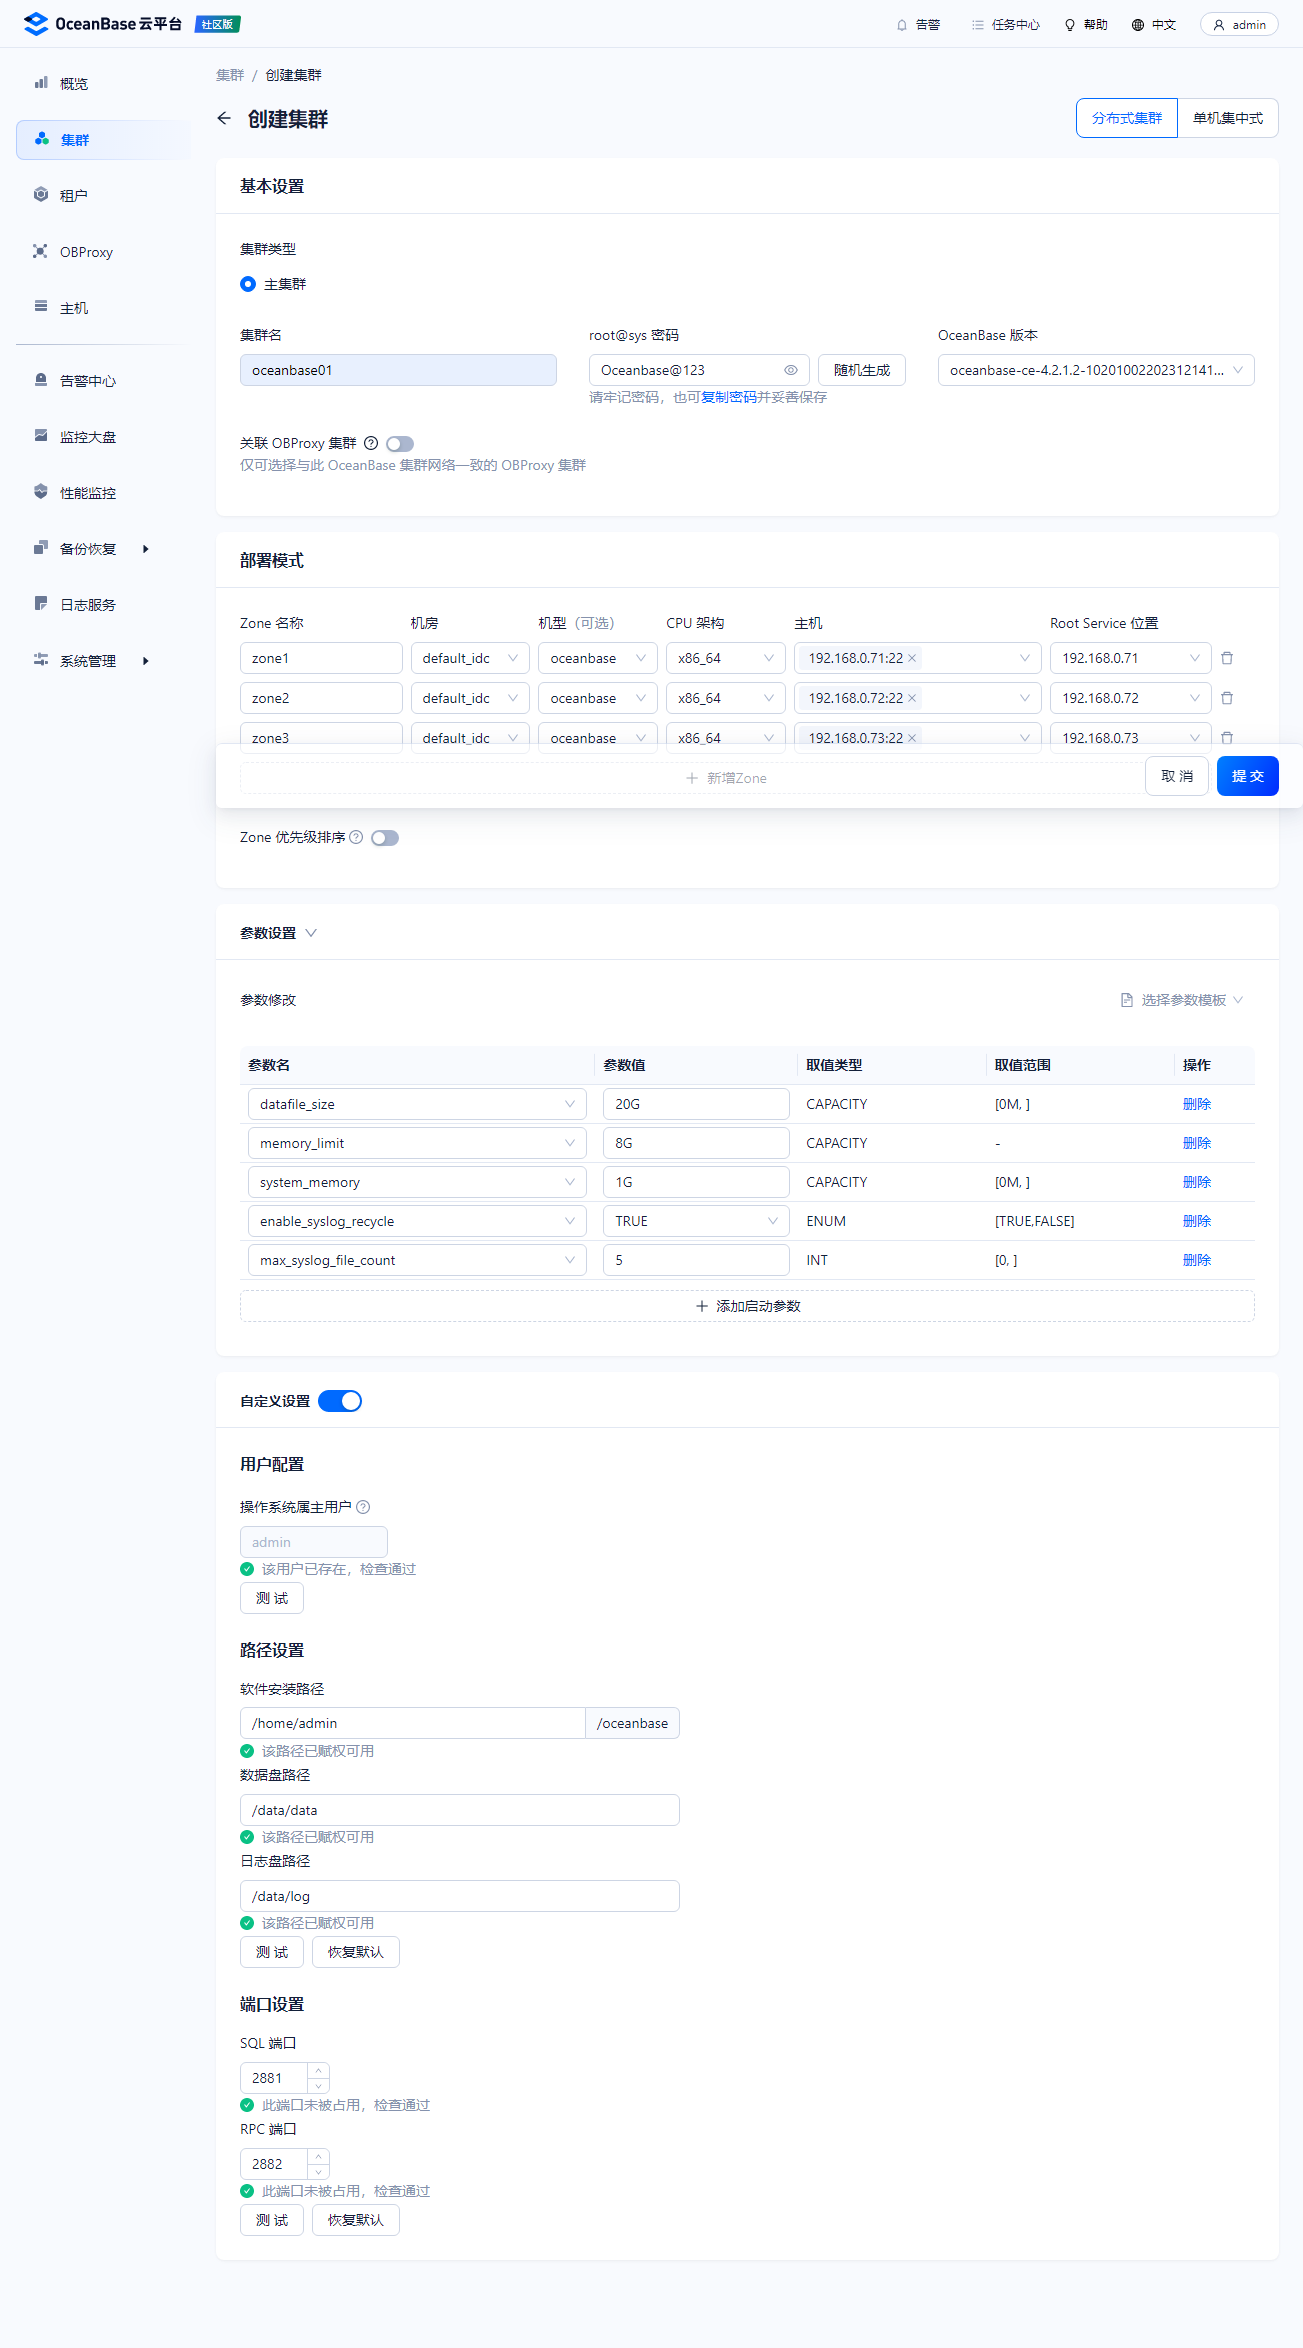
提交集群配置进行创建
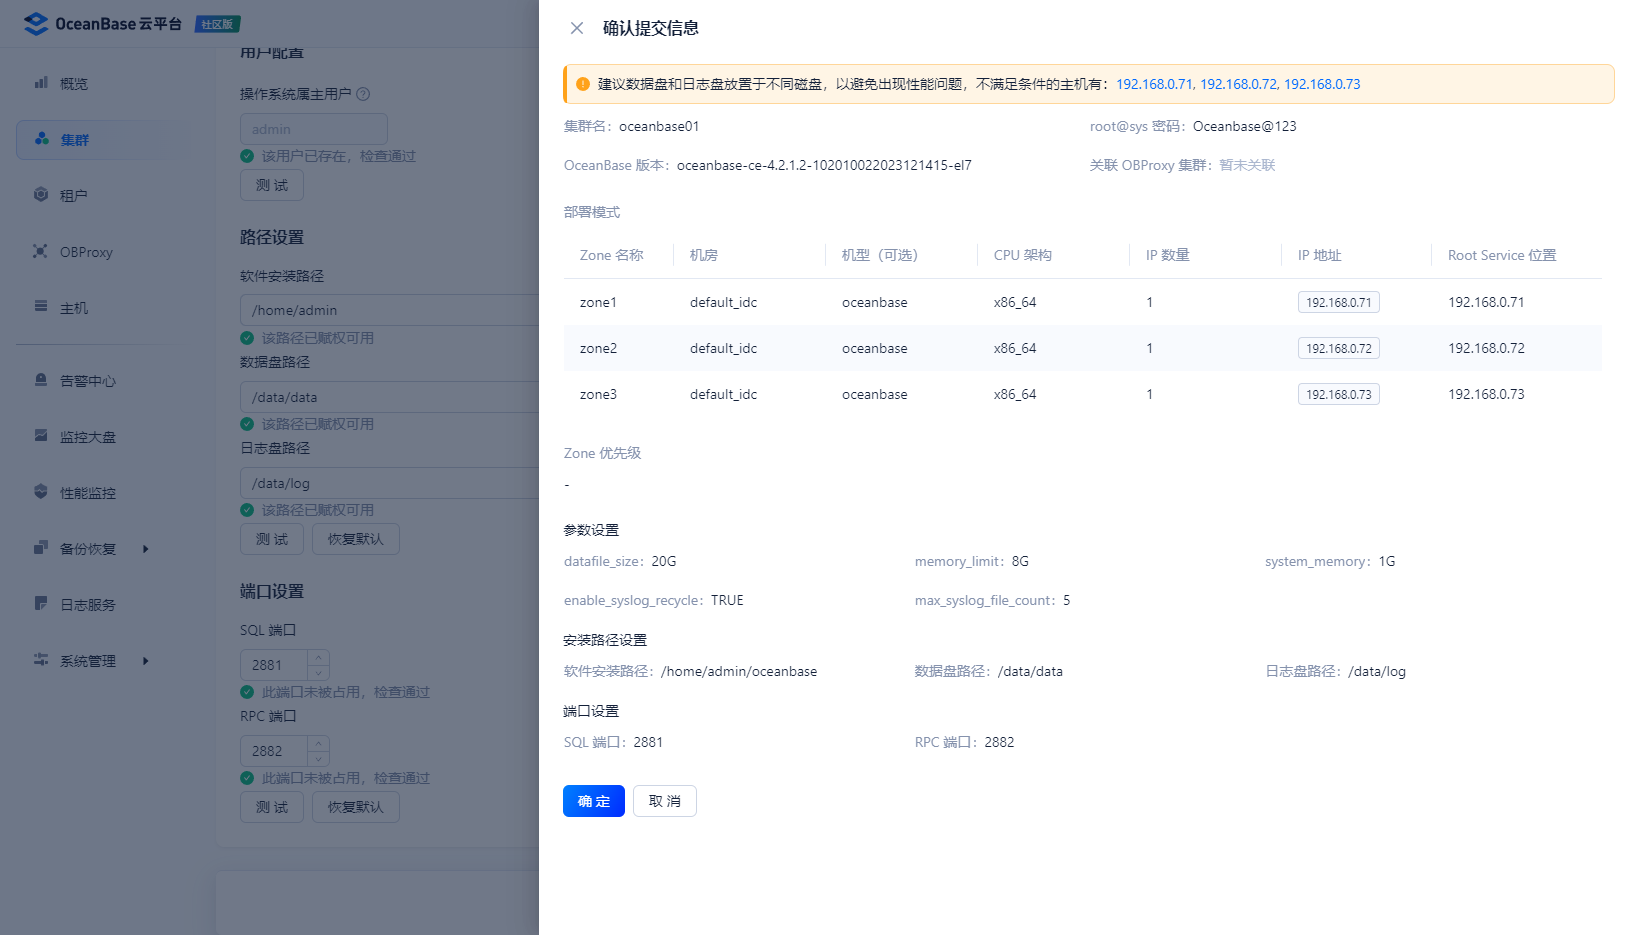
成功创建集群
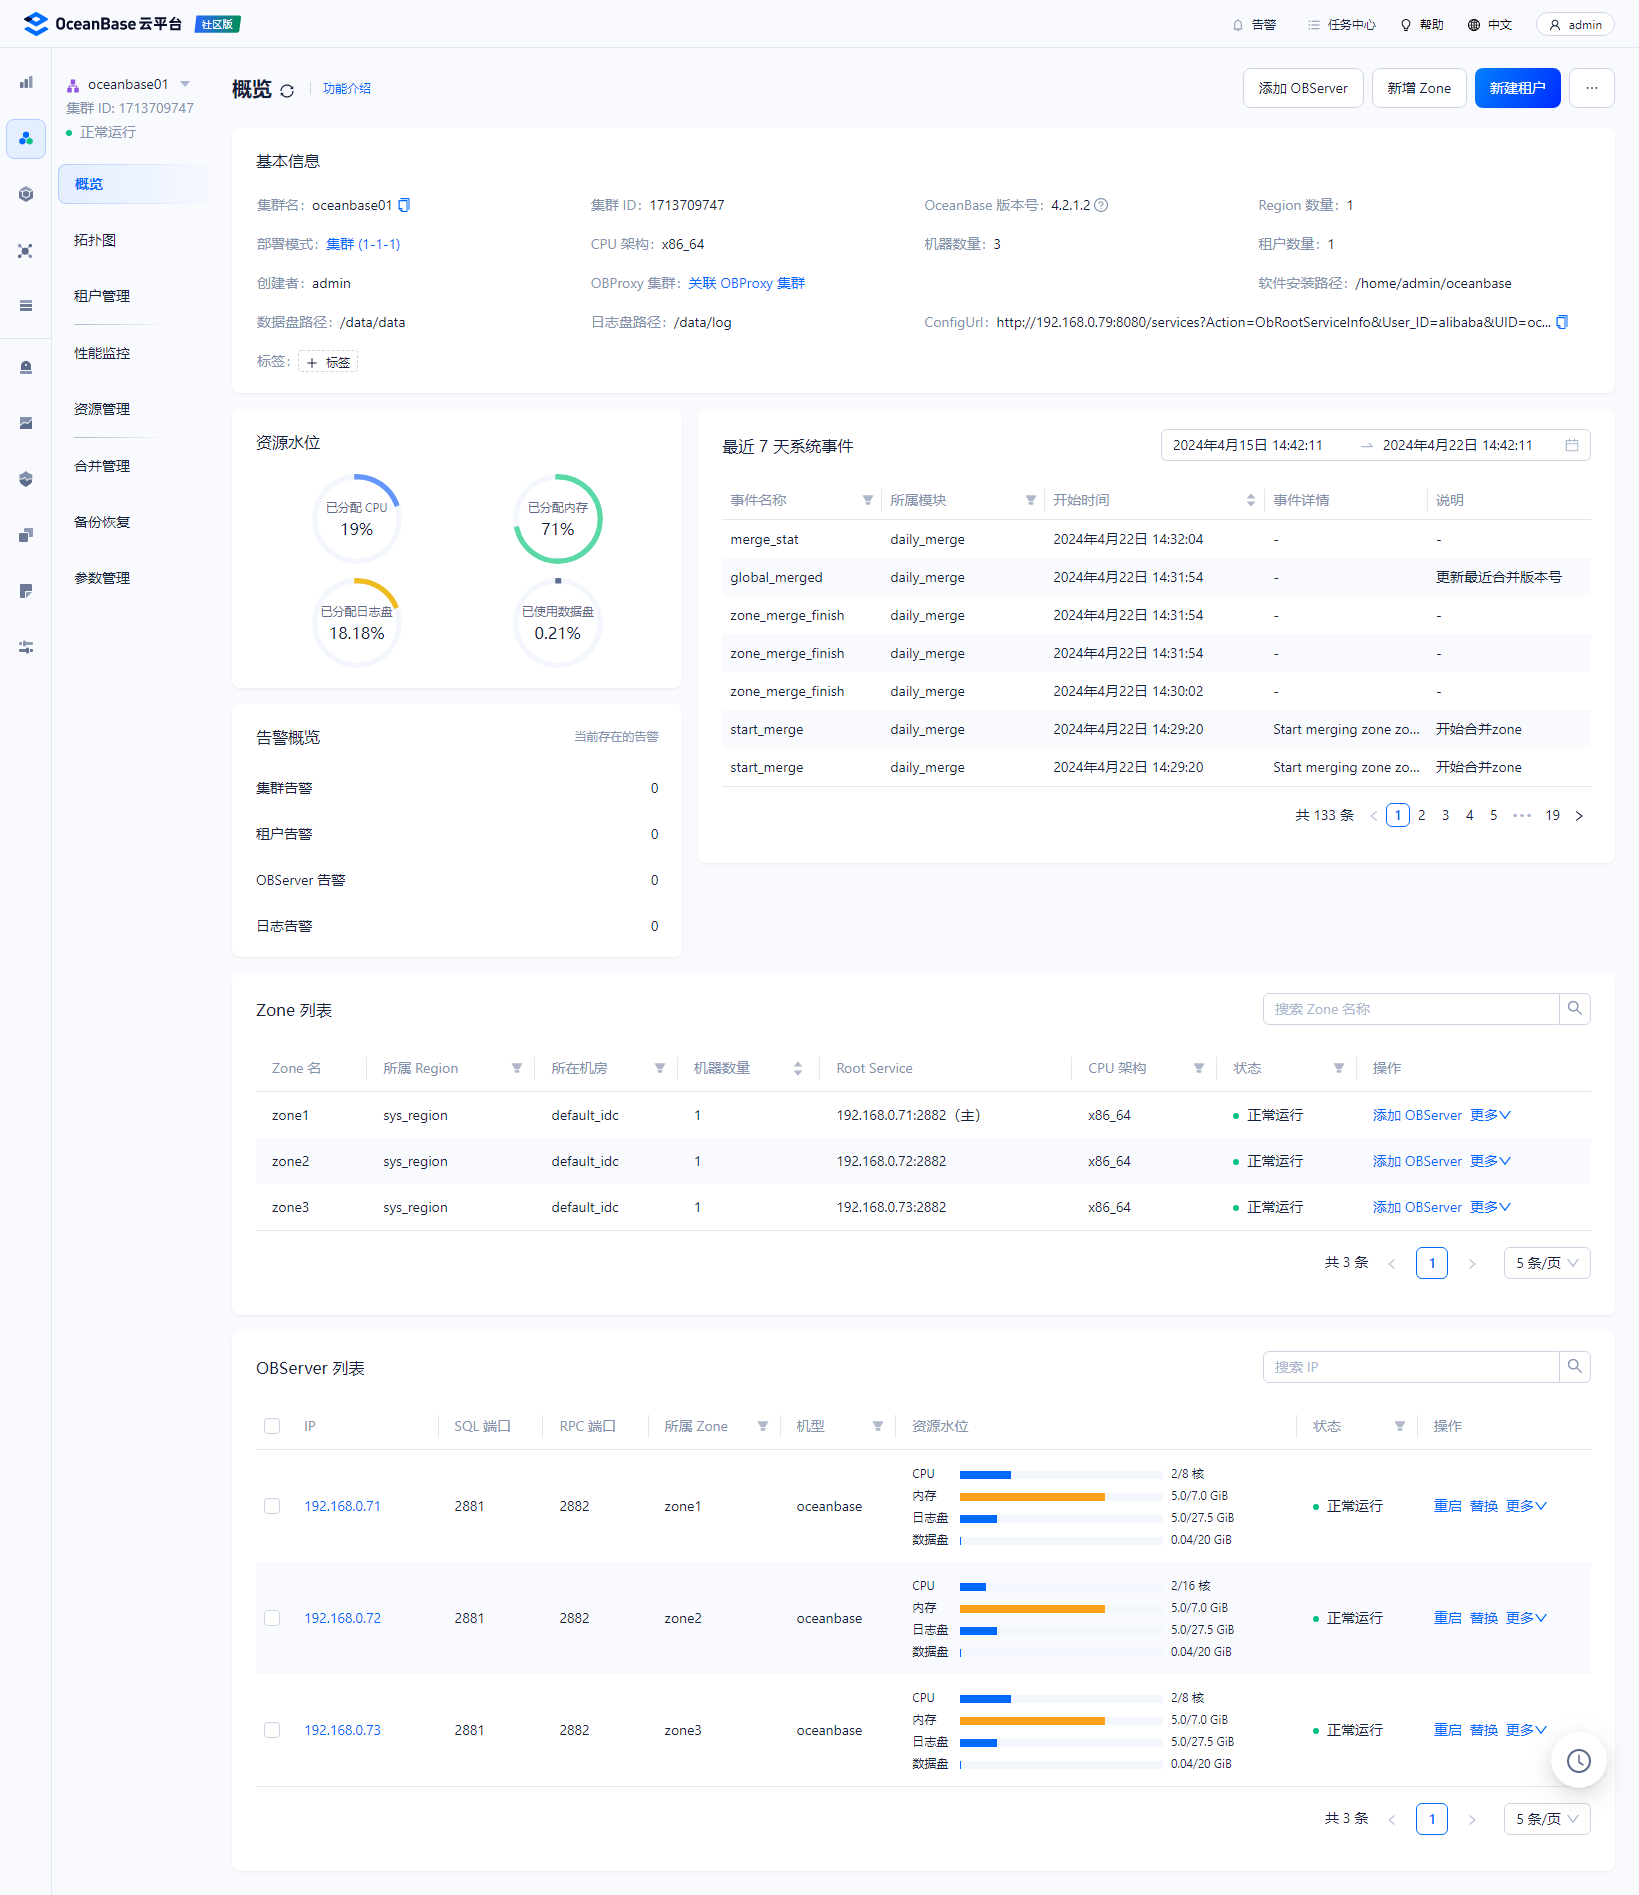
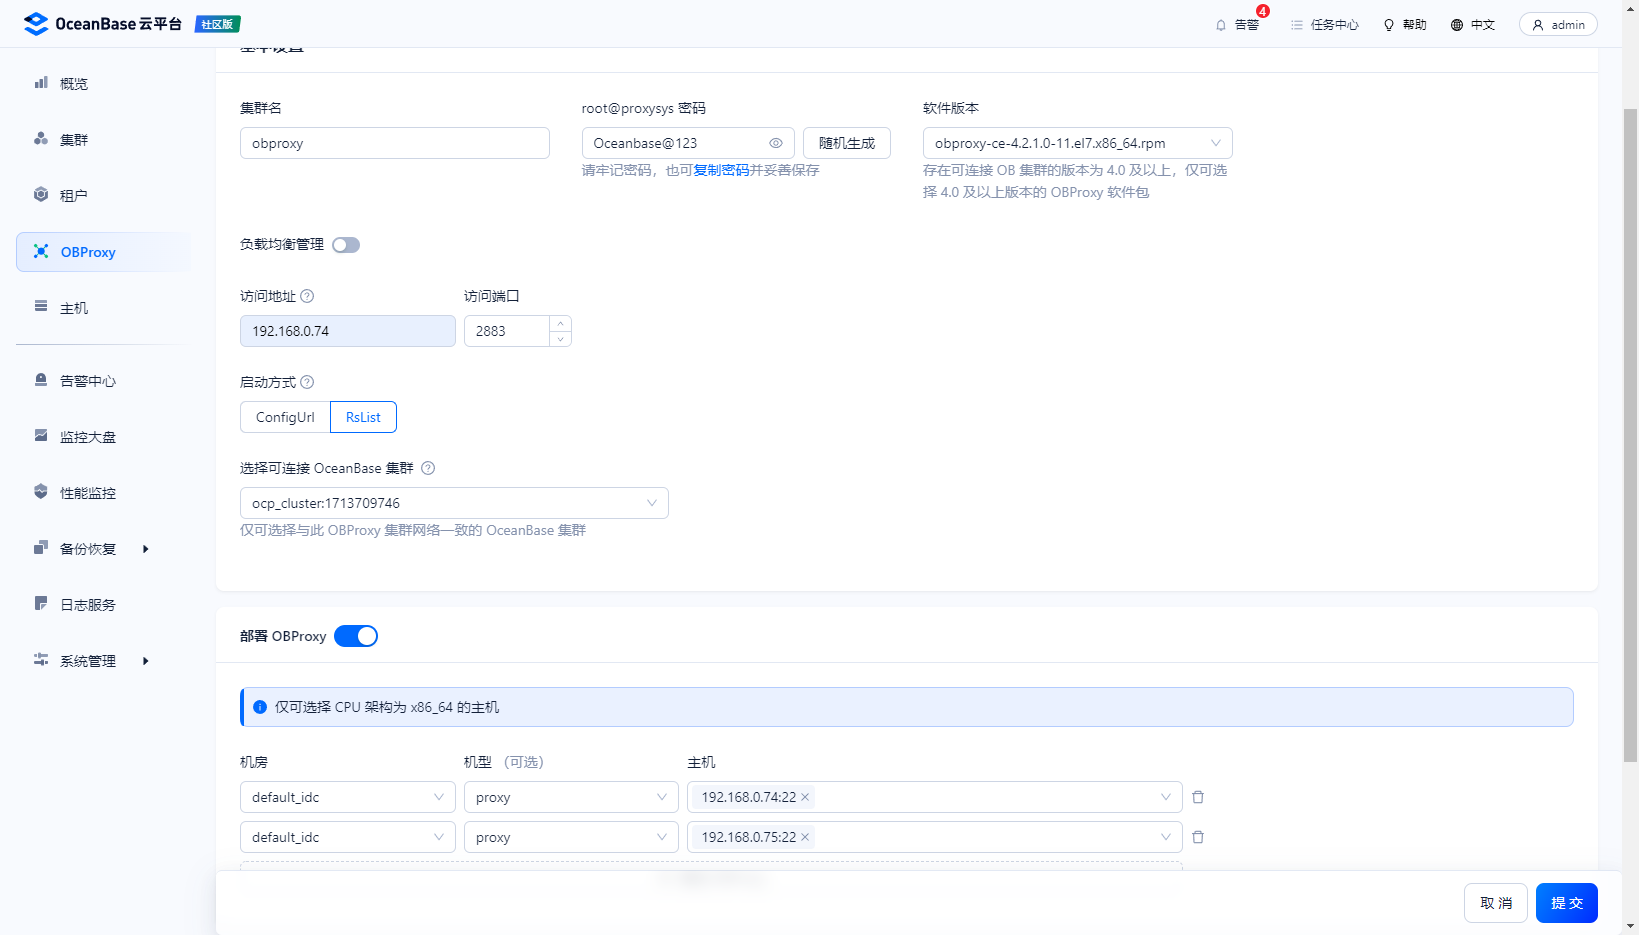
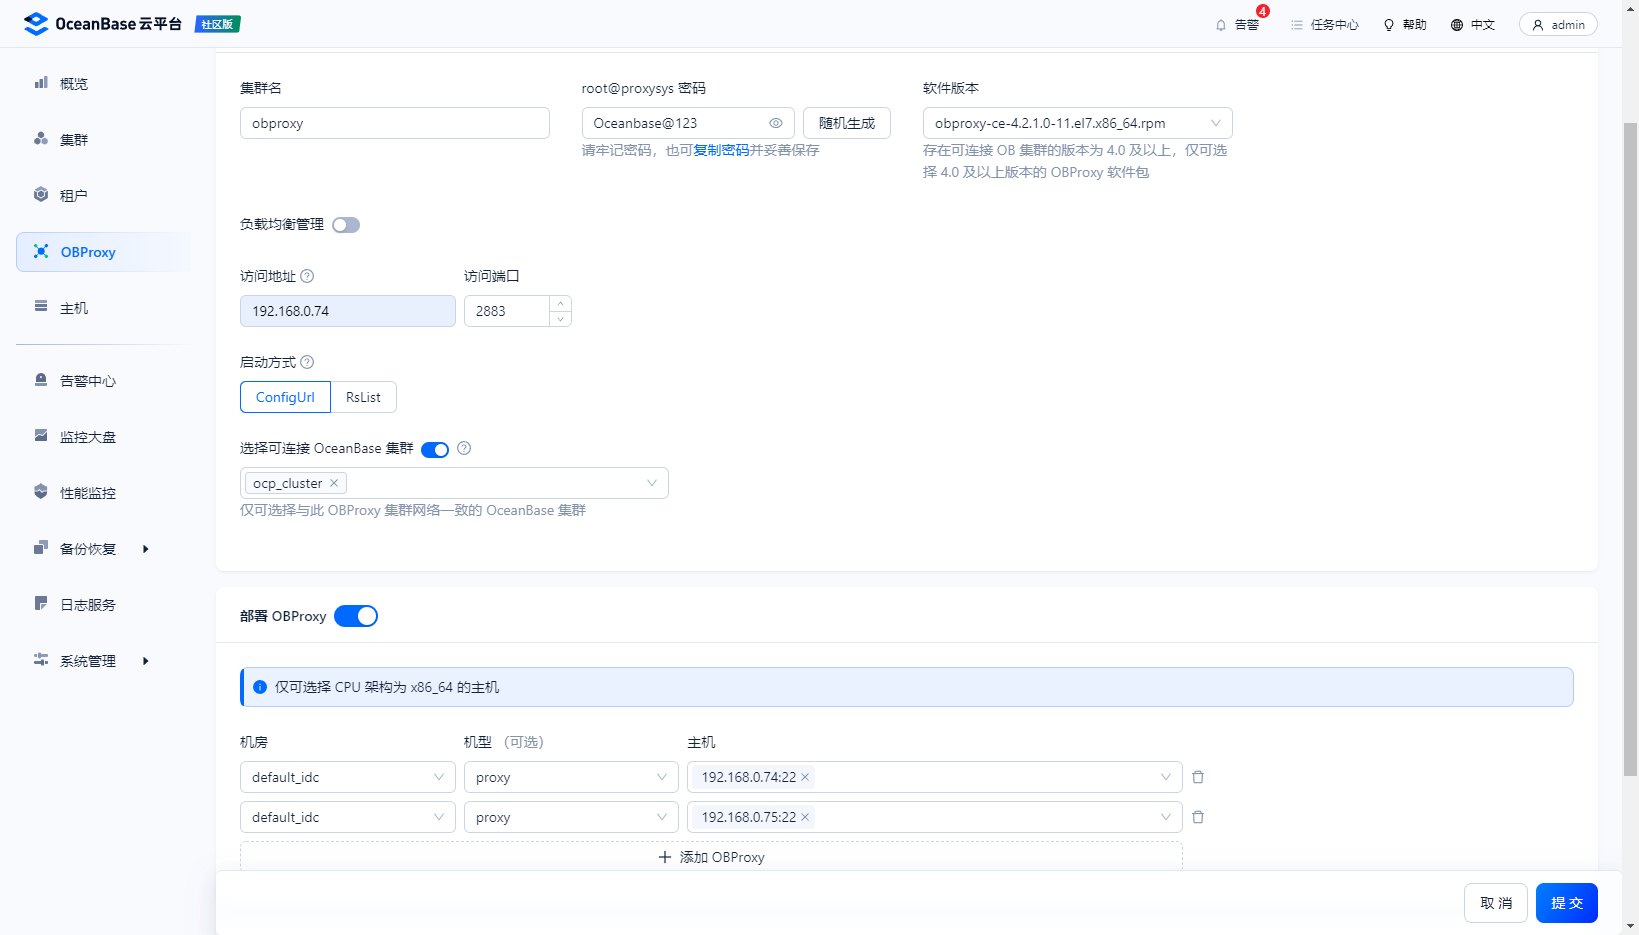
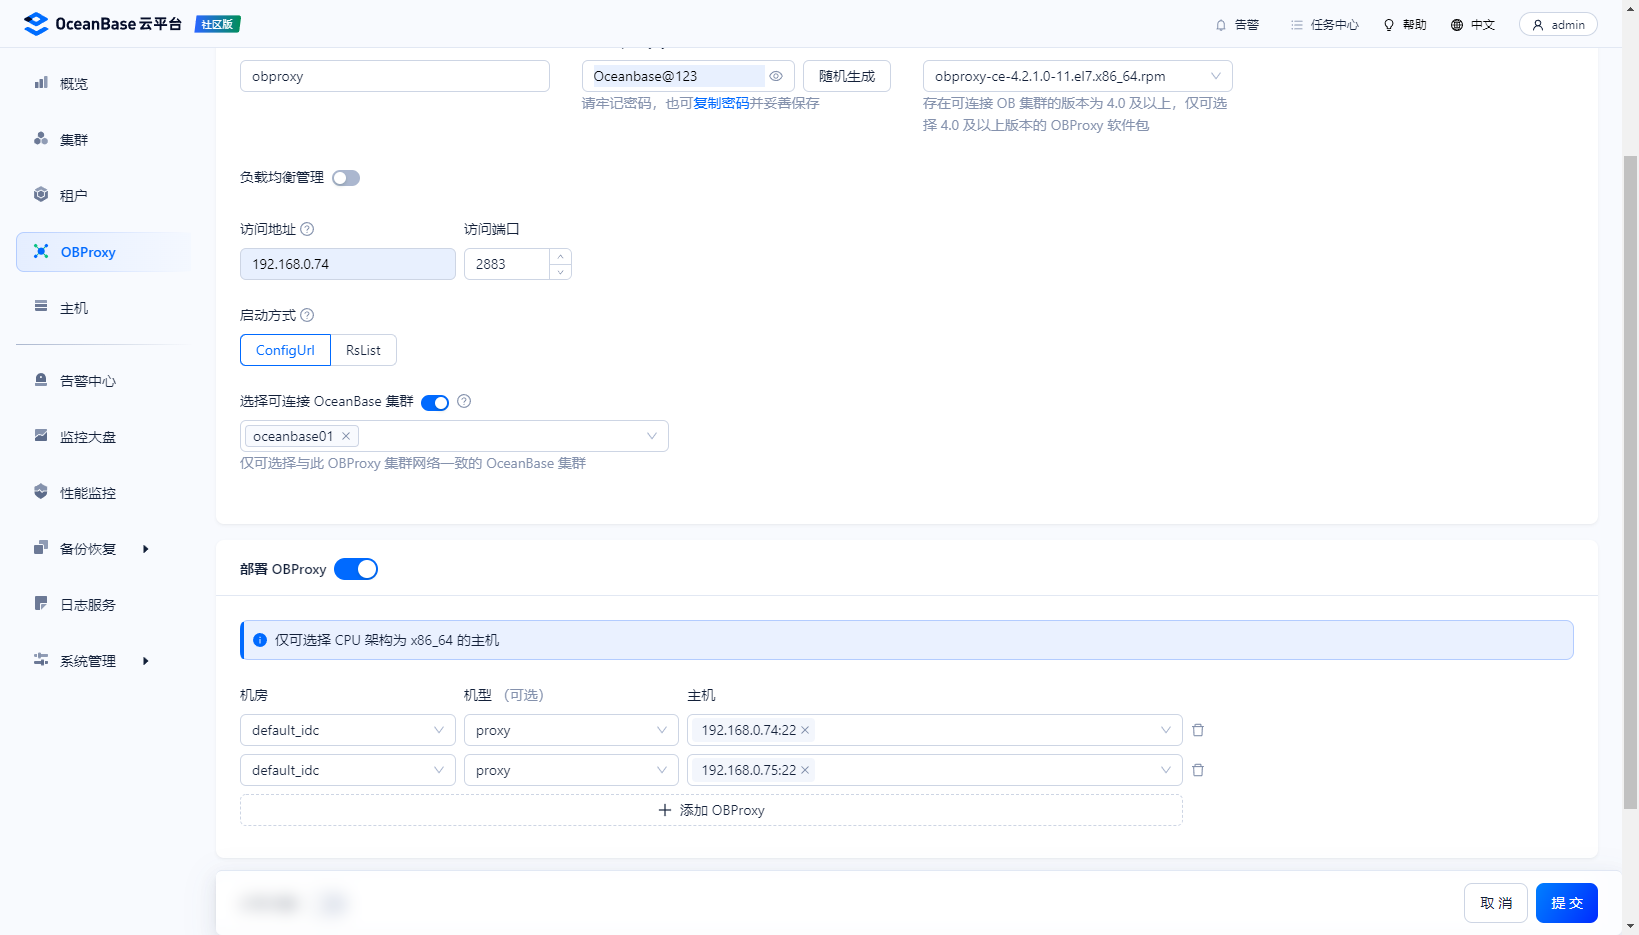
创建obproxy
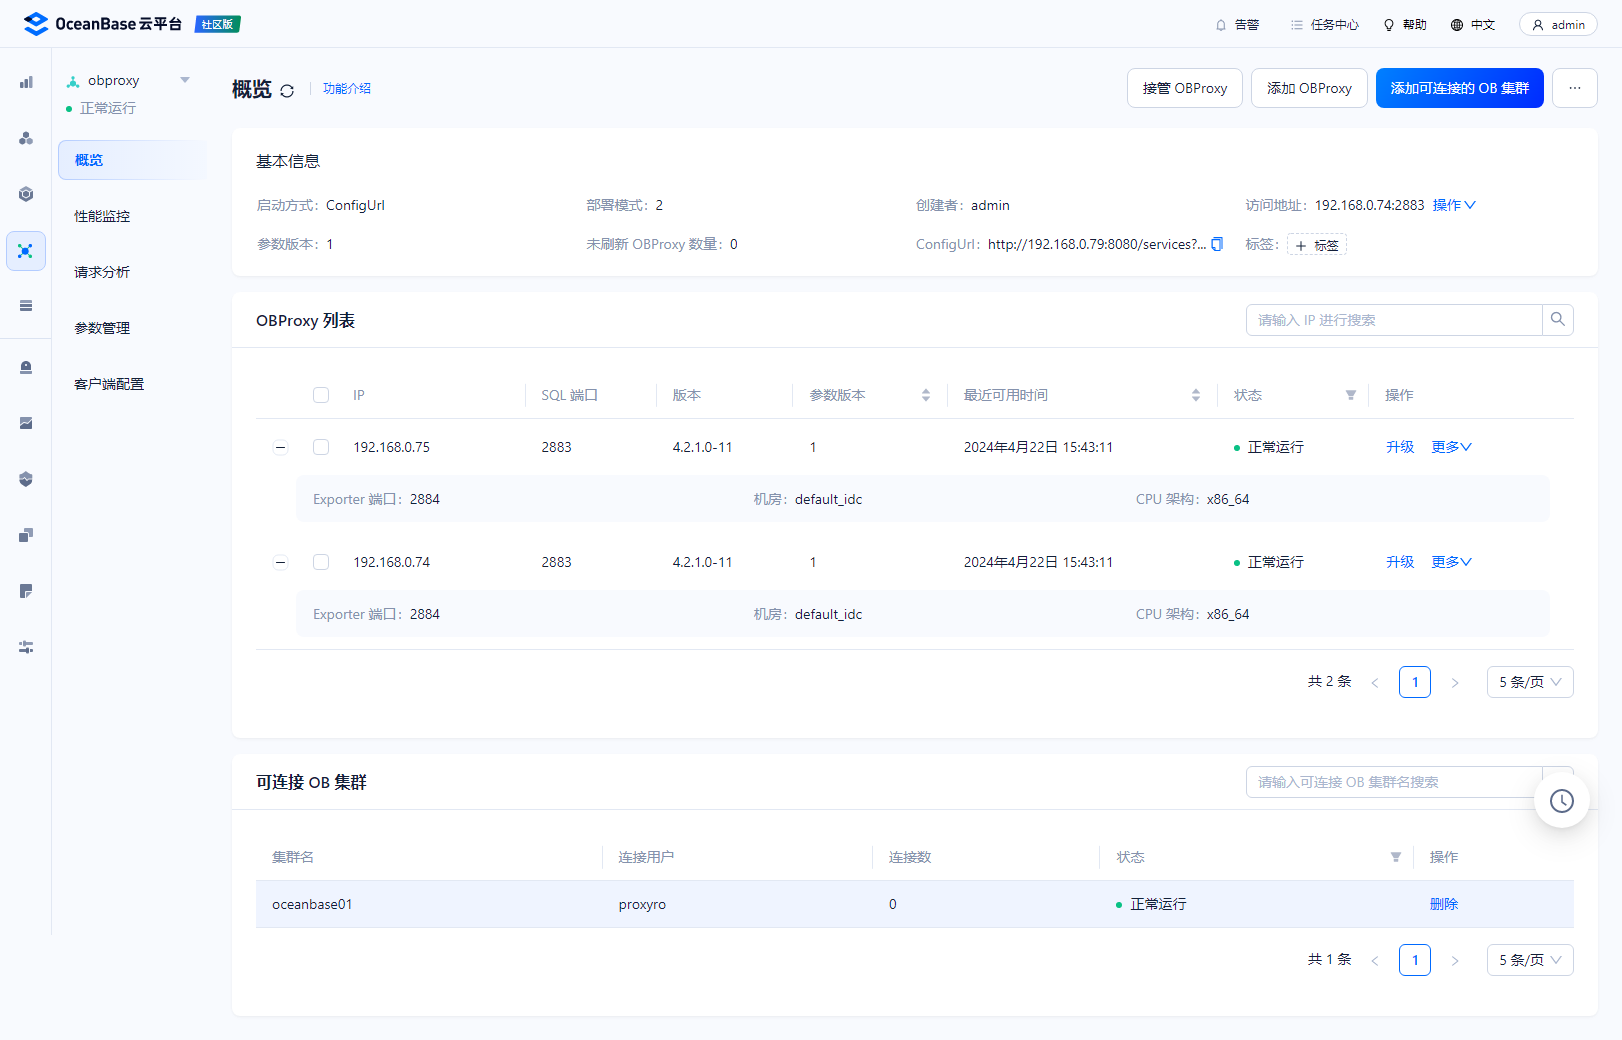
通过obproxy可以登录登录oceanbase
[admin@ocp-000-079 ocp_cluster]$ obclient -h192.168.0.74 -P2883 -uroot@sys#oceanbase01 -p
Enter password:
Welcome to the OceanBase.  Commands end with ; or \g.
Your OceanBase connection id is 2553
Server version: OceanBase_CE 4.2.1.2 (r102010022023121415-f6752332b5001069034f96c6dbb620926dc666f0) (Built Dec 14 2023 15:39:00)

Copyright (c) 2000, 2018, OceanBase and/or its affiliates. All rights reserved.

Type 'help;' or '\h' for help. Type '\c' to clear the current input statement.

obclient [(none)]> show databases;
+--------------------+
| Database           |
+--------------------+
| information_schema |
| LBACSYS            |
| mysql              |
| oceanbase          |
| ocp                |
| ORAAUDITOR         |
| SYS                |
| test               |
+--------------------+
8 rows in set (0.050 sec)

obclient [(none)]> exit
Bye
[admin@ocp-000-079 ocp_cluster]$ obclient -h192.168.0.75 -P2883 -uroot@sys#oceanbase01 -p
Enter password:
Welcome to the OceanBase.  Commands end with ; or \g.
Your OceanBase connection id is 2701
Server version: OceanBase_CE 4.2.1.2 (r102010022023121415-f6752332b5001069034f96c6dbb620926dc666f0) (Built Dec 14 2023 15:39:00)

Copyright (c) 2000, 2018, OceanBase and/or its affiliates. All rights reserved.

Type 'help;' or '\h' for help. Type '\c' to clear the current input statement.

obclient [(none)]> show databases;
+--------------------+
| Database           |
+--------------------+
| information_schema |
| LBACSYS            |
| mysql              |
| oceanbase          |
| ocp                |
| ORAAUDITOR         |
| SYS                |
| test               |
+--------------------+
8 rows in set (0.009 sec)
几个个注意点
部署OCP时,memory_limit设置太小
memory_limit 必须大于 ocp_meta_tenant 和 ocp_monitor_tenant的内存之和
Create tenant ocp_meta ok
Create tenant ocp_monitor x
[ERROR] resource not enough: memory (Avail: 6029M, Need: 8192M)
log_disk_size 太小
https://ask.oceanbase.com/t/topic/35606467
log_disk_size 默认是 memory_limit的3倍,比如我的主机内存是16G,如果选择了自动分配内存,大概是10G左右,那么log_disk_size需要30G,按照页面的提示输入个24GB,后面安装铁定会报错

[ERROR] OBD-5000: create resource pool ocp_monitor_pool unit=‘ocp_monitor_unit’, unit_num=1, zone_list=(‘zone1’,‘zone2’,‘zone3’) execute failed
[ERROR] ocp-server-ce-py_script_start-4.2.1 RuntimeError: (4733, ‘zone ‘zone1’ resource not enough to hold 1 unit. You can check resource info by views: DBA_OB_UNITS, GV$OB_UNITS, GV$OB_SERVERS.\nserver ‘“192.168.1.165:2882”’ LOG_DISK resource not enough\n’)
[ERROR] ocp-server-ce start failed
ocp_agent
在OCP安装agent后,systemctl查看到agent状态是不正确的
[root@obnode-000-072 ~]# systemctl status ocp_agent
● ocp_agent.service - start ocp_agent
   Loaded: loaded (/usr/lib/systemd/system/ocp_agent.service; bad; vendor preset: disabled)
   Active: failed (Result: exit-code) since Mon 2024-04-22 10:11:01 CST; 8h ago
  Process: 1114 ExecStart=/home/admin/ocp_agent/bin/ocp_agentctl start (code=exited, status=255)

Apr 22 10:10:38 obnode-000-072 systemd[1]: Starting start ocp_agent...
Apr 22 10:10:56 obnode-000-072 ocp_agentctl[1114]: {"successful":false,"message":null,"error":"Module=agent, kind...; "}
Apr 22 10:10:56 obnode-000-072 systemd[1]: ocp_agent.service: control process exited, code=exited status=255
Apr 22 10:11:01 obnode-000-072 systemd[1]: Failed to start start ocp_agent.
Apr 22 10:11:01 obnode-000-072 systemd[1]: Unit ocp_agent.service entered failed state.
Apr 22 10:11:01 obnode-000-072 systemd[1]: ocp_agent.service failed.
重启后则正常
[root@obnode-000-072 ~]# systemctl is-enabled ocp_agent
enabled
[root@obnode-000-072 ~]# ps -ef|grep agent
root       1199      1  0 19:06 ?        00:00:00 /home/admin/ocp_agent/bin/ocp_agentd -c /home/admin/ocp_agent/conf/agentd.yaml
root       1234   1199  1 19:06 ?        00:00:00 /home/admin/ocp_agent/bin/ocp_mgragent
root       1235   1199 23 19:06 ?        00:00:10 /home/admin/ocp_agent/bin/ocp_monagent
root       2345   2299  0 19:06 pts/0    00:00:00 grep --color=auto agent
[root@obnode-000-072 ~]# systemctl status ocp_agent
● ocp_agent.service - start ocp_agent
   Loaded: loaded (/usr/lib/systemd/system/ocp_agent.service; enabled; vendor preset: disabled)
   Active: active (running) since Mon 2024-04-22 19:06:10 CST; 53s ago
  Process: 1072 ExecStart=/home/admin/ocp_agent/bin/ocp_agentctl start (code=exited, status=0/SUCCESS)
 Main PID: 1199 (ocp_agentd)
    Tasks: 15
   CGroup: /system.slice/ocp_agent.service
           ├─1199 /home/admin/ocp_agent/bin/ocp_agentd -c /home/admin/ocp_agent/conf/agentd.yaml
           └─1234 /home/admin/ocp_agent/bin/ocp_mgragent

Apr 22 19:06:05 obnode-000-072 systemd[1]: Starting start ocp_agent...
Apr 22 19:06:09 obnode-000-072 sudo[1761]:     root : TTY=unknown ; PWD=/home/admin/ocp_agent ; USER=admin ; COM...erver
Apr 22 19:06:10 obnode-000-072 ocp_agentctl[1072]: {"successful":true,"message":"ok","error":""}
Apr 22 19:06:10 obnode-000-072 systemd[1]: Started start ocp_agent.
Hint: Some lines were ellipsized, use -l to show in full.
服务命令行重启
https://ask.oceanbase.com/t/topic/35602977
export LD_LIBRARY_PATH=$LD_LIBRARY_PATH:/home/admin/oceanbase/lib
cd /home/admin/oceanbase && bin/observer
如果没有lib包报错如下:
[admin@obnode-000-072 oceanbase]$ ./bin/observer
./bin/observer: error while loading shared libraries: libmariadb.so.3: cannot open shared object file: No such file or directory


![【YOLOv8改进[注意力]】YOLOv8添加DAT(Vision Transformer with Deformable Attention)助力涨点](https://img-blog.csdnimg.cn/direct/9876da38ef6a4c8ba1ec51ad6c73145f.png)