支付方式模块代码示例
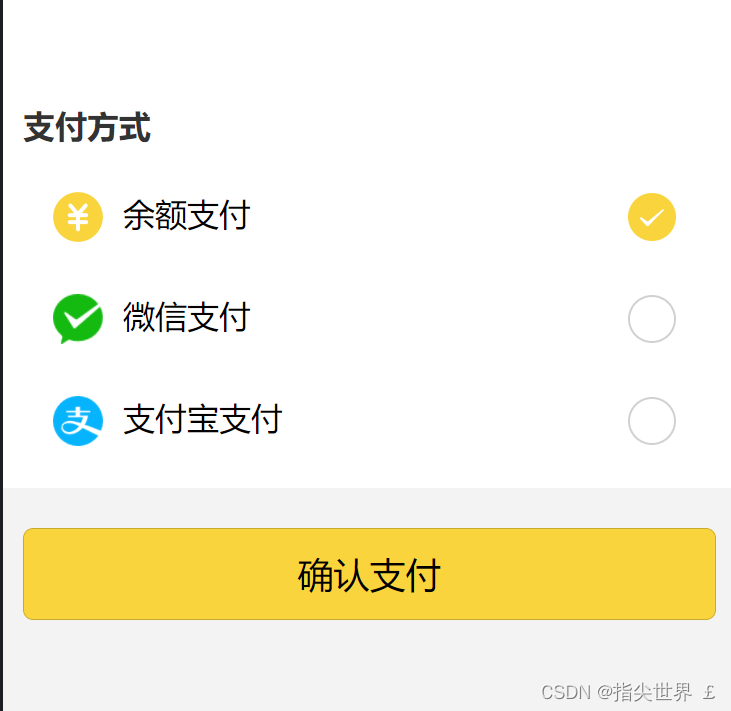
效果展示
<view class="card">
            <uni-title type="h3" title="支付方式"></uni-title>
            <radio-group @change="radioChange">
                <label class="radio">
                    <view class="zf-type p-5">
                        <image src="../../static/yue.png" class="img-icon" mode=""></image>
                        <text>余额支付</text>
                        <radio value="1" class="dxk" color="#F9D43D" :checked="1 === current" />
                    </view>
                </label>

                <label class="radio ">
                    <view class="zf-type p-5">
                        <image src="../../static/payicon/wxpay.png" class="img-icon" mode=""></image>
                        <text>微信支付</text>
                        <radio class="dxk" value="2" color="#F9D43D" :checked="2 === current" />
                    </view>
                </label>


                <label class="radio">
                    <view class="zf-type p-5 xz">
                        <image src="../../static/payicon/zfbpay.png" class="img-icon" mode=""></image>
                        <text class="font-size">支付宝支付</text>
                        <radio class="dxk" value="3" color="#F9D43D" :checked="3 === current" />
                    </view>
                </label>
            </radio-group>
</view>

<button @click="pay()" type="default" class="btn_pay" style="background: #F9D43D;">确认支付</button>

<script>
export default {
        data() {
            return {
                selectedValue: '', // 存储选中的值
                current: 1,
                goodsPrice: ''
            }
        },
        methods: {
            radioChange(e) {
                this.current = e.detail.value
                this.selectedValue = e.detail.value;
            },
            pay() {
                if (this.current == 1) {
                    //余额支付
                    this.js('yue')
                } else if (this.current == 2) {
                    this.js("wxpay");
                    console.log("wx支付")
                } else if (this.current == 3) {
                    this.js('alipay');
                    console.log('支付宝支付')
                }

            }
}
</script>
以上是完整的代码示例,下面是代码解析。
@change
为vue里面的监听事件,当radio-group发生变化时,会调用radioChange该方法。
radioChange()函数解析
ardiChange的主要作用就是在radi-group发生变化时,及时的将变化更新到我们的变量中保存起来。
radioChange(e) {
                this.current = e.detail.value
                this.selectedValue = e.detail.value;
            },
通过 e.detail.value 可以获取到radio-group里面用户所选择的radio里的value的变化







![Java web应用性能分析之服务端慢[网络慢]](https://img-blog.csdnimg.cn/direct/fa95d251a3b8414bbb689f1cea107039.png)

