文章目录
- 摘要
- Abstract
- 文献阅读
- 题目
- 问题
- 贡献
- 方法
- 卷积及池化层
- LSTM层
- CNN-LSTM模型
- 数据集
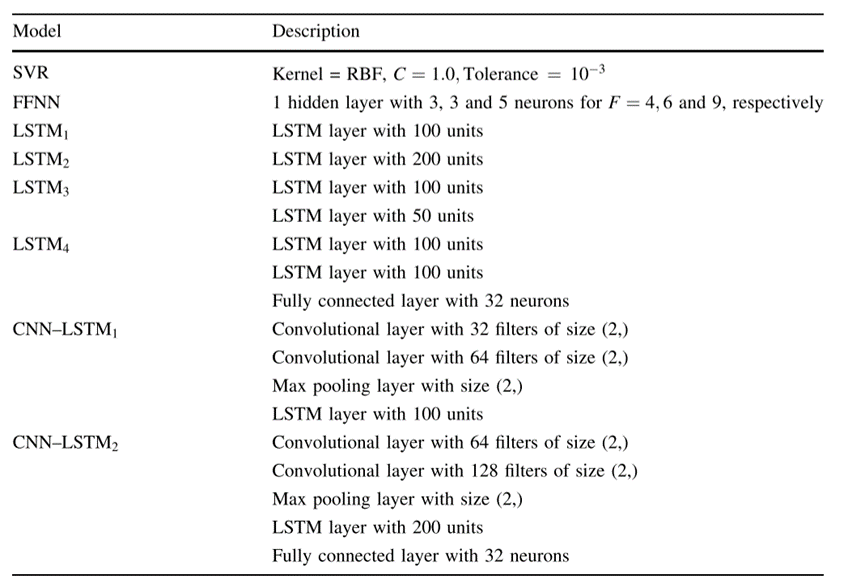
- 参数设置
- 评估指标
- 实验结果
- 深度学习
- 使用GRU和LSTM进行时间预测
- 1.库的导入&数据集
- 2.数据预处理
- 3.模型定义
- 4.训练过程
- 5.模型训练
- 总结
摘要
本周阅读了一篇基于CNN-LSTM黄金价格时间序列预测模型的文章,文中提出了一种新的深度学习预测模型,用于准确预测黄金价格和走势。该模型利用卷积层提取有用知识和学习时间序列数据内部表示的能力,以及长短期记忆(LSTM)层识别短期和长期依赖关系的有效性。实验分析表明,利用LSTM层沿着额外的卷积层可以显著提高预测性能。此外,还使用LSTM以及GRU模型进行时间预测训练,并进行对比。
Abstract
This week, an article based on CNN-LSTM gold price time series forecasting model is readed, and a new deep learning forecasting model is proposed to accurately predict gold price and trend. The model uses the convolution layer to extract useful knowledge and learn the internal representation of time series data, and the long-term and short-term memory (LSTM) layer to identify the short-term and long-term dependencies. Experimental analysis shows that the prediction performance can be significantly improved by using LSTM layer along the additional convolution layer. In addition, LSTM and GRU models are also used for time prediction training and comparison.
文献阅读
题目
A CNN–LSTM model for gold price time-series forecasting
问题
1) 关于黄金价格和走势预测及其影响因素的研究已经进行了几十年,并提出了许多方法。经典的时间序列技术,如多元线性回归和著名的自回归综合移动平均(ARIMA)已被应用于黄金价格预测问题;
2) 除了经典的计量经济学和时间序列方法外,各种机器学习方法也被用来挖掘黄金价格的内在复杂性。然而,统计方法通常需要假设历史数据之间的平稳性和线性相关性;
3) 更复杂的机器学习方法似乎无法识别和捕捉黄金价格时间序列的非线性和复杂行为。因此,所有这些方法都不能保证开发可靠和稳健的预测模型。
贡献
1) 将CNN与LSTM组合,利用先进的深度学习技术预测黄金价格和走势。通过卷积层学习黄金价格数据内部表示的能力,再利用LSTM层来识别短期和长期依赖关系。
2) 为回归和分类问题提供了各种深度学习模型的详细性能评估。
方法
卷积层的特点是能够提取有用的知识并学习时间序列数据的内部表示,而LSTM网络则可以有效地识别短期和长期依赖关系。
提出的称为CNN-LSTM的模型由两个主要组件组成:第一个组件由卷积层和池化层组成,其中执行复杂的数学运算以开发输入数据的特征,而第二个组件利用LSTM和密集层生成特征。
卷积及池化层
卷积:
卷积层在原始输入数据和产生新特征值的卷积核之间应用卷积运算。输入数据必须具有结构化矩阵形式。
卷积核(滤波器)可以被认为是一个微小的窗口(与输入矩阵相比),其中包含矩阵形式的系数值。该窗口在输入矩阵上“滑动",对该指定窗口在输入矩阵上”遇到“的每个子区域(补丁)应用卷积操作。
通过对输入数据应用不同的卷积核,可以生成多个卷积特征,这些特征通常比输入数据的原始初始特征更有用,从而提高了模型的性能。
池化:
卷积层之后通常是非线性激活函数(例如,整流线性单元),然后是池化层。池化层是一种子采样技术,它从卷积特征中提取某些值并产生一个较低维度的矩阵。通过类似的过程,与在卷积层上执行的操作一样,池化层利用小滑动窗口,该小滑动窗口将卷积特征的每个补丁的值作为输入,并输出一个新值,该新值由池化层被定义为要执行的操作指定。
LSTM层
LSTM可以解决RNN梯度消失、无法学习长距离依赖关系等问题,是改进版的RNN。
LSTM的前向以及反向传播如下图所示:
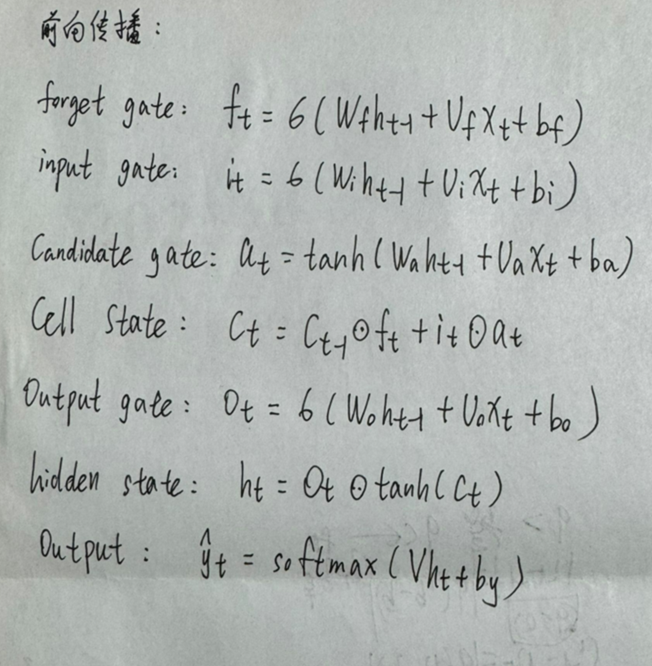
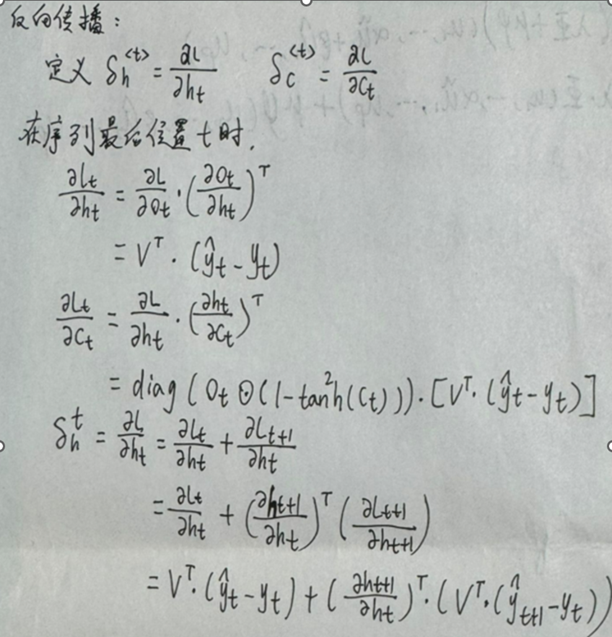
如果几个LSTM层堆叠在一起,每个LSTM层的内存状态ct和隐藏状态ht都作为输入转发到下一个LSTM层。
CNN-LSTM模型
作者提出的CNN-LSTM模型有两个,分别记为CNN-LSTM1和CNN-LSTM2。
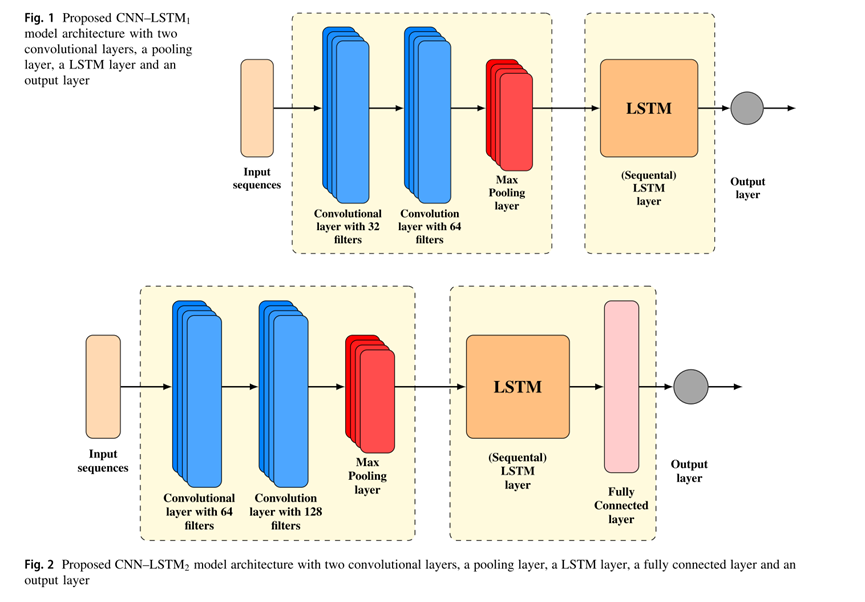
第一个CNN-LSTM 1由两个卷积层组成,分别为32和64个大小为(2,)的滤波器,然后是池化层,LSTM层和一个神经元的输出层。
第二个称为CNN-LSTM 2,由两个卷积层组成,分别为64和128个大小为(2,)的滤波器,然后是一个大小为(2,)的最大池化层,一个200个单元的LSTM层,一个32个神经元的密集层和一个神经元的输出层。
数据集
本研究中使用的数据涉及2014年1月至2018年4月的每日黄金价格(以美元计),这些数据来自http://finance.yahoo.com网站。
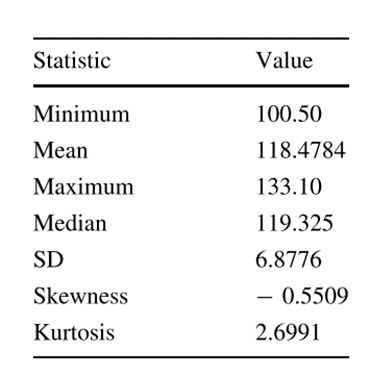
表1列出了描述性统计数据,包括用于描述分布性质的测量值:最小值、平均值、最大值、中位数、标准差(SD)、偏度和峰度:
下图显示了每日黄金价格:
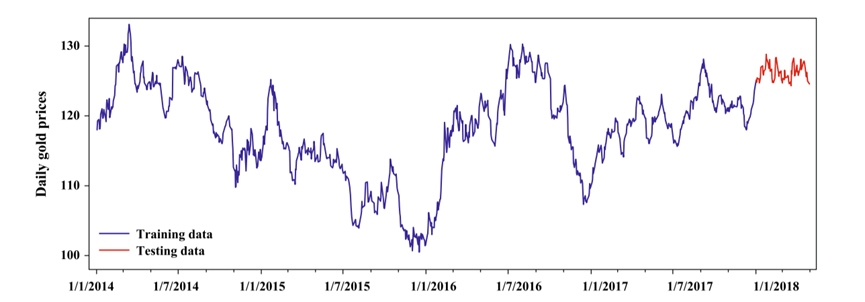
数据分为训练集和测试集。训练集包括2014年1月至2017年12月(4年)的每日黄金价格。
测试集包含2018年1月至2018年4月(4个月)的每日价格。
参数设置
实验所用到的模型的所有参数设置如下表所示:
评估指标
所有评估模型的回归性能通过平均绝对误差(MAE)和均方根误差(RMSE)测量,分别定义为:

其中n是预测的数量,而ai和pi分别是i实例的实际值和预测值。
实验结果
使用了四个性能指标:准确性(Acc)、曲线下面积(AUC)、灵敏度(Sen)和特异性(Spe),下表分别显示了相对于预测范围4、6和9,所提出的CNN-LSTM模型相对于最先进的回归模型的性能。
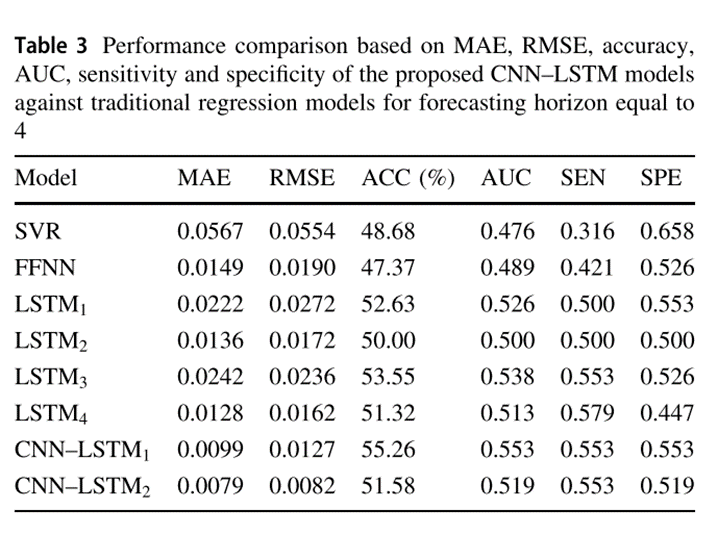
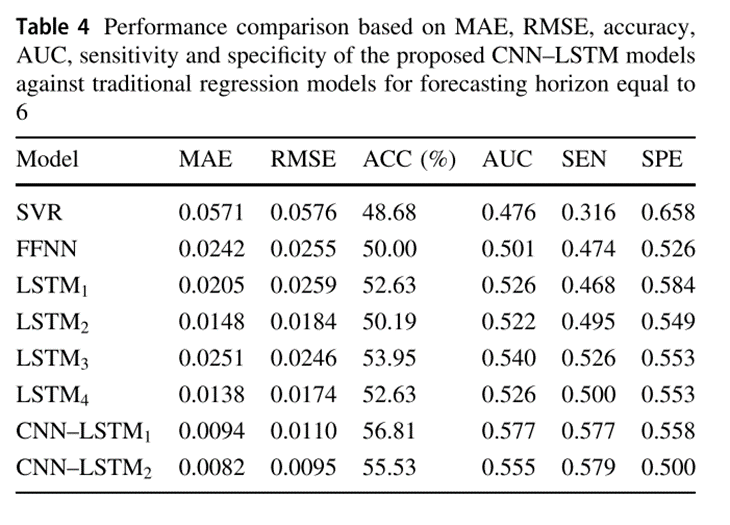
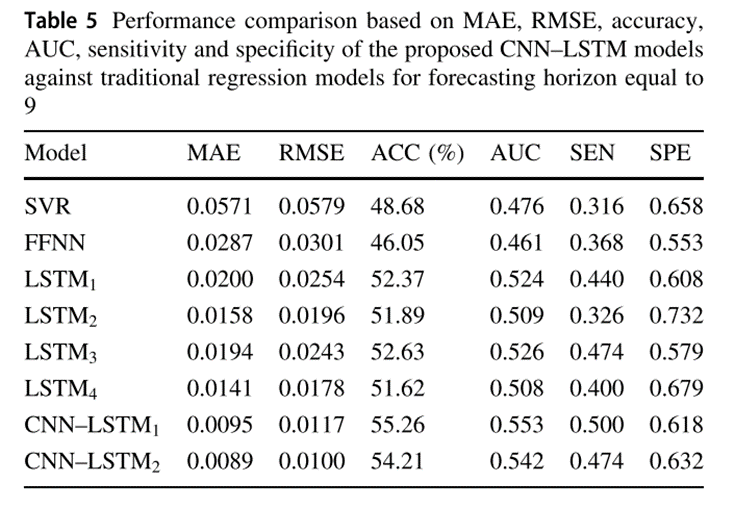
就预测期的所有值而言,CNN-LSTM1和CNN-LSTM2报告的整体表现最好。在金价预测问题上,CNN-LSTM2的预测效果明显优于所有预测模型,MAE和RMSE得分最低,其次是CNN-LSTM1。
深度学习
使用GRU和LSTM进行时间预测
使用的数据集是每小时能源消耗数据集,可以在Kaggle上找到。该数据集包含按小时记录的美国不同地区的电力消耗数据。
目标是创建一个模型,可以根据历史使用数据准确预测下一小时的能源使用情况。使用 GRU 和 LSTM 模型来训练一组历史数据,并在未见过的测试集上评估这两个模型。从特征选择和数据预处理开始,然后定义、训练并最终评估模型。
1.库的导入&数据集
import os
import time

import numpy as np
import pandas as pd
import matplotlib.pyplot as plt

import torch
import torch.nn as nn
from torch.utils.data import TensorDataset, DataLoader

from tqdm import tqdm_notebook
from sklearn.preprocessing import MinMaxScaler

# Define data root directory
data_dir = "./data/"
print(os.listdir(data_dir))

以上为本实验所使用的数据集
pd.read_csv(data_dir + 'AEP_hourly.csv').head()
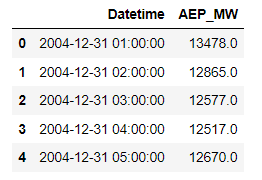
数据集规格如上图
2.数据预处理
按以下顺序读取这些文件并预处理这些数据:
1.获取每个单独时间步的时间数据并对它们进行概括:
一天中的某个小时,即 0 - 23
一周中的某一天,即。1 - 7
月份,即 1 - 12
一年中的某一天,即 1 - 365
2.将数据缩放到 0 到 1 之间的值:
当特征具有相对相似的规模和/或接近正态分布时,算法往往会表现更好或收敛得更快
缩放保留了原始分布的形状并且不会降低异常值的重要性
3.将数据分组为序列,用作模型的输入并存储其相应的标签:
序列长度或回顾周期是模型用于进行预测的历史数据点的数量
标签将是输入序列中最后一个数据点之后的下一个数据点
4.将输入和标签拆分为训练集和测试集。
# The scaler objects will be stored in this dictionary so that our output test data from the model can be re-scaled during evaluation
label_scalers = {}

train_x = []
test_x = {}
test_y = {}

for file in tqdm_notebook(os.listdir(data_dir)):
    # Skipping the files we're not using
    if file[-4:] != ".csv" or file == "pjm_hourly_est.csv":
        continue

    # Store csv file in a Pandas DataFrame
    df = pd.read_csv('{}/{}'.format(data_dir, file), parse_dates=[0])
    # Processing the time data into suitable input formats
    df['hour'] = df.apply(lambda x: x['Datetime'].hour,axis=1)
    df['dayofweek'] = df.apply(lambda x: x['Datetime'].dayofweek,axis=1)
    df['month'] = df.apply(lambda x: x['Datetime'].month,axis=1)
    df['dayofyear'] = df.apply(lambda x: x['Datetime'].dayofyear,axis=1)
    df = df.sort_values("Datetime").drop("Datetime",axis=1)

    # Scaling the input data
    sc = MinMaxScaler()
    label_sc = MinMaxScaler()
    data = sc.fit_transform(df.values)
    # Obtaining the Scale for the labels(usage data) so that output can be re-scaled to actual value during evaluation
    label_sc.fit(df.iloc[:,0].values.reshape(-1,1))
    label_scalers[file] = label_sc

    # Define lookback period and split inputs/labels
    lookback = 90
    inputs = np.zeros((len(data)-lookback,lookback,df.shape[1]))
    labels = np.zeros(len(data)-lookback)

    for i in range(lookback, len(data)):
        inputs[i-lookback] = data[i-lookback:i]
        labels[i-lookback] = data[i,0]
    inputs = inputs.reshape(-1,lookback,df.shape[1])
    labels = labels.reshape(-1,1)

    # Split data into train/test portions and combining all data from different files into a single array
    test_portion = int(0.1*len(inputs))
    if len(train_x) == 0:
        train_x = inputs[:-test_portion]
        train_y = labels[:-test_portion]
    else:
        train_x = np.concatenate((train_x,inputs[:-test_portion]))
        train_y = np.concatenate((train_y,labels[:-test_portion]))
    test_x[file] = (inputs[-test_portion:])
    test_y[file] = (labels[-test_portion:])
数据规模print(train_x.shape):(980185, 90, 5)
为了提高训练速度,批量处理数据,这样模型就不需要频繁更新权重。Torch Dataset和DataLoader类对于将数据拆分为批次并对其进行混洗非常有用。
batch_size = 1024
train_data = TensorDataset(torch.from_numpy(train_x), torch.from_numpy(train_y))
train_loader = DataLoader(train_data, shuffle=True, batch_size=batch_size, drop_last=True)
使用gpu训练
# torch.cuda.is_available() checks and returns a Boolean True if a GPU is available, else it'll return False
is_cuda = torch.cuda.is_available()

# If we have a GPU available, we'll set our device to GPU. We'll use this device variable later in our code.
if is_cuda:
    device = torch.device("cuda")
else:
    device = torch.device("cpu")
3.模型定义
定义GRU以及LSTM模型
class GRUNet(nn.Module):
    def __init__(self, input_dim, hidden_dim, output_dim, n_layers, drop_prob=0.2):
        super(GRUNet, self).__init__()
        self.hidden_dim = hidden_dim
        self.n_layers = n_layers

        self.gru = nn.GRU(input_dim, hidden_dim, n_layers, batch_first=True, dropout=drop_prob)
        self.fc = nn.Linear(hidden_dim, output_dim)
        self.relu = nn.ReLU()

    def forward(self, x, h):
        out, h = self.gru(x, h)
        out = self.fc(self.relu(out[:,-1]))
        return out, h

    def init_hidden(self, batch_size):
        weight = next(self.parameters()).data
        hidden = weight.new(self.n_layers, batch_size, self.hidden_dim).zero_().to(device)
        return hidden

class LSTMNet(nn.Module):
    def __init__(self, input_dim, hidden_dim, output_dim, n_layers, drop_prob=0.2):
        super(LSTMNet, self).__init__()
        self.hidden_dim = hidden_dim
        self.n_layers = n_layers

        self.lstm = nn.LSTM(input_dim, hidden_dim, n_layers, batch_first=True, dropout=drop_prob)
        self.fc = nn.Linear(hidden_dim, output_dim)
        self.relu = nn.ReLU()

    def forward(self, x, h):
        out, h = self.lstm(x, h)
        out = self.fc(self.relu(out[:,-1]))
        return out, h

    def init_hidden(self, batch_size):
        weight = next(self.parameters()).data
        hidden = (weight.new(self.n_layers, batch_size, self.hidden_dim).zero_().to(device),
                  weight.new(self.n_layers, batch_size, self.hidden_dim).zero_().to(device))
        return hidden
两个模型在隐藏状态和层中将具有相同数量的维度,在相同数量的epoch和学习率上进行训练,并在完全相同的数据集上进行训练和测试。
将使用对称平均绝对百分比误差(SMAPE)来评估模型
KaTeX parse error: Unexpected end of input in a macro argument, expected ‘}’ at end of input: …y_i|+|y_i|)/2}
4.训练过程
def train(train_loader, learn_rate, hidden_dim=256, EPOCHS=5, model_type="GRU"):

    # Setting common hyperparameters
    input_dim = next(iter(train_loader))[0].shape[2]
    output_dim = 1
    n_layers = 2
    # Instantiating the models
    if model_type == "GRU":
        model = GRUNet(input_dim, hidden_dim, output_dim, n_layers)
    else:
        model = LSTMNet(input_dim, hidden_dim, output_dim, n_layers)
    model.to(device)

    # Defining loss function and optimizer
    criterion = nn.MSELoss()
    optimizer = torch.optim.Adam(model.parameters(), lr=learn_rate)

    model.train()
    print("Starting Training of {} model".format(model_type))
    epoch_times = []
    # Start training loop
    for epoch in range(1,EPOCHS+1):
        start_time = time.perf_counter()
        h = model.init_hidden(batch_size)
        avg_loss = 0.
        counter = 0
        for x, label in train_loader:
            counter += 1
            if model_type == "GRU":
                h = h.data
            else:
                h = tuple([e.data for e in h])
            model.zero_grad()

            out, h = model(x.to(device).float(), h)
            loss = criterion(out, label.to(device).float())
            loss.backward()
            optimizer.step()
            avg_loss += loss.item()
            if counter%200 == 0:
                print("Epoch {}......Step: {}/{}....... Average Loss for Epoch: {}".format(epoch, counter, len(train_loader), avg_loss/counter))
        current_time = time.perf_counter()
        print("Epoch {}/{} Done, Total Loss: {}".format(epoch, EPOCHS, avg_loss/len(train_loader)))
        print("Time Elapsed for Epoch: {} seconds".format(str(current_time-start_time)))
        epoch_times.append(current_time-start_time)
    print("Total Training Time: {} seconds".format(str(sum(epoch_times))))
    return model

def evaluate(model, test_x, test_y, label_scalers):
    model.eval()
    outputs = []
    targets = []
    start_time = time.perf_counter()
    for i in test_x.keys():
        inp = torch.from_numpy(np.array(test_x[i]))
        labs = torch.from_numpy(np.array(test_y[i]))
        h = model.init_hidden(inp.shape[0])
        out, h = model(inp.to(device).float(), h)
        outputs.append(label_scalers[i].inverse_transform(out.cpu().detach().numpy()).reshape(-1))
        targets.append(label_scalers[i].inverse_transform(labs.numpy()).reshape(-1))
    print("Evaluation Time: {}".format(str(time.perf_counter()-start_time)))
    sMAPE = 0
    for i in range(len(outputs)):
        sMAPE += np.mean(abs(outputs[i]-targets[i])/(targets[i]+outputs[i])/2)/len(outputs)
    print("sMAPE: {}%".format(sMAPE*100))
    return outputs, targets, sMAPE
#time模块在Python 3.x版本中已经将clock()方法废弃。应该使用time.perf_counter()或者time.process_time()方法来代替clock()
5.模型训练
lr = 0.001
gru_model = train(train_loader, lr, model_type="GRU")

lstm_model = train(train_loader, lr, model_type="LSTM")

使用SMAPE评估模型
gru_outputs, targets, gru_sMAPE = evaluate(gru_model, test_x, test_y, label_scalers):
Evaluation Time: 26.02710079999997
sMAPE: 0.33592208657162453%
lstm_outputs, targets, lstm_sMAPE = evaluate(lstm_model, test_x, test_y, label_scalers):
Evaluation Time: 19.92910290000009
sMAPE: 0.38698768153562335%
两者性能相近,lstm较优,但区别不大。
总结
标准LSTM和GRU的差别并不大,但是都比tanh要明显好很多,所以在选择标准LSTM或者GRU的时候还要看具体的任务是什么。
使用LSTM的原因之一是解决RNN Deep Network的Gradient错误累积太多,以至于Gradient归零或者成为无穷大,所以无法继续进行优化的问题。GRU的构造更简单:比LSTM少一个gate,这样就少几个矩阵乘法。在训练数据很大的情况下GRU能节省很多时间。

