Vue2
- 学习笔记:Vue2基础篇_ljtxy.love的博客-CSDN博客
- 学习笔记:Vue2中级篇_ljtxy.love的博客-CSDN博客
- 学习笔记:Vue2高级篇_ljtxy.love的博客-CSDN博客
Vue3
- 学习笔记:Vue3_ljtxy.love的博客)-CSDN博客
文章目录
- 5.Vue CLI(脚手架)
- 5.1概述
- 5.2基本用例-初始化文档(重点)
- 5.3项目目录介绍
- 5.3.1概述
- 5.3.2文件内容
- 5.3.2.1main.Js
- 5.3.2.2.gitignore
- 5.3.2.3babel.config.Js
- 5.3.2.4node_modules
- 5.3.2.5assets
- 5.3.2.6components
- 5.3.2.7index.html
- 5.3.2.8vue.config.js
- 5.4Ref属性(DOM、VC、对象访问)
- 5.4.1概述
- 5.4.2基本用例
- 5.5Props(父子通信)
- 5.5.1概述
- 5.5.2基本用例
- 5.5.3案例-父子互相通信
- 5.6Mixin(共享组件配置)
- 5.6.1概述
- 5.6.2基本用例
- 5.7Plugins(共享方法、指令、过滤器)
- 5.7.1概述
- 5.7.2基本用例
- 5.8Scoped(样式)
- 5.9WebStorage(浏览器缓存)
- 5.9.1概述
- 5.9.2LocalStorage(本地缓存)
- 5.9.2.1概述
- 5.9.2.2基本用例
- 5.9.3SessionStorage(会话存储)
- 5.9.3.1概述
- 5.9.3.2基本用例
- 5.9.4案例-ToodLIst本地缓存
- 5.10自定义事件(子父通信)
- 5.10.1概述
- 5.10.2基本用例
- 5.10.3案例-ToodList子父通信
- 5.11全局事件总线(任意组件间通信)✳
- 5.11.1概述
- 5.11.2基本用例
- 5.11.3案例-ToodList组件通信
- 5.12消息订阅与发布(任意组件间通信)
- 5.12.1概述
- 5.12.2基本用例
- 5.12.3案例-ToodList消息订阅与发布
- 5.13$nextTick(DOM更新后额外操作)
- 5.13.1概述
- 5.13.2基本用例
- 5.13.3案例-ToodList编辑聚焦
- 5.14过渡与动画(组件中DOM元素入离动画)
- 5.14.1概述
- 5.14.2基本用例
- 5.14.3多元素过渡效果
- 5.14.4集成第三方动画
- 5.14.5案例-ToodList过渡动画
- 6.Vue中的Ajax请求
- 6.1概述
- 6.2基本用例-Axios常规使用
- 6.3配置代理(解决跨域)
- 6.3.1概述
- 6.3.2基本用例-代理基本配置
- 6.3.2跨域问题处理
- 6.3.2.1概述
- 6.3.2.2基本用例-跨域问题产生及处理
- 6.3.3代理高级配置
- 6.4案例-GitHub用户搜索
- 6.5Vue-resource(Http请求客户端)(了解)
- 6.5.1概述
- 6.5.2基本用例-简单使用
- 6.6插槽(父子传递不同内容)
- 6.6.1概述
- 6.6.2基本用例-默认插槽
- 6.6.3具名插槽
- 6.6.3.1概述
- 6.6.3.2基本用例
- 6.6.4作用域插槽
- 6.6.4.1概述
- 6.6.4.2基本用例
- 知识加油站
- Vue在绑定样式命名规则
- Computed,methods,watch区别
- 组件化编码流程(通用)
- 获取事件对象中的value值
- 监听,深度监听区别
- Vue规则小结
- Vue中的This
- Vue中的数据通信
- Vue中的数据存储
5.Vue CLI(脚手架)
5.1概述
Vue CLI(command line interface,命令行接口工具)是一个用于快速搭建基于Vue.js的项目的脚手架工具。Vue CLI提供了一组预定义的项目模板和一组命令,使开发者能够更容易地初始化、配置和构建Vue.js项目
参考文档:Home | Vue CLI (vuejs.org)
5.2基本用例-初始化文档(重点)
步骤一:安装脚手架
说明:
若安装过,可跳过
1.全局安装脚手架
npm install -g @vue/cli
说明:
- 全局安装仅第一次执行。
@vue/cli也是包名,只不过比较特殊
补充:
- 下载过程中可能产生警告,可以忽略
- 如出现下载缓慢请配置npm淘宝镜像:
npm config set registry https://registry.npm.taobao.org
2.检测安装与否
vue -V
说明:
若出现脚手架版本则代表安装成功
步骤二:创建项目
- 切换到你要创建项目的目录,然后使用命令创建项目
vue create [name]
说明:
- bable的作用是将ES6 ===> ES5
- eslist的作用是:在将来编译代码时检查代码语法
步骤三:启动项目
npm run serve
说明:结果
补充:
- Vue脚手架隐藏了所有webpack相关的配置,若想查看具体的webpakc配置,请执行
vue inspect > output.js
- webpack会根据webpack的package.js去执行,其中webpack的package.js被vue隐藏,且不能修改。此处仅供查看,修改无效!
5.3项目目录介绍
5.3.1概述
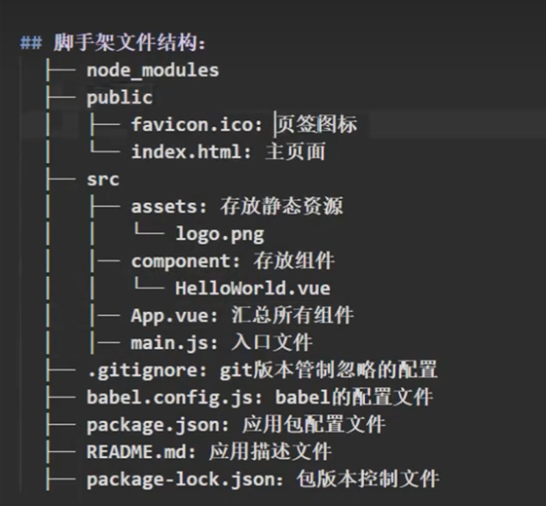
补充:
- 以上目录项目的完整目录,可参考补充
5.3.2文件内容
5.3.2.1main.Js
说明:
该文件是整个项目的入口文件
// 引入VUE
import Vue from 'vue'
// 引入APP组件,它是所有组件的父组件
import App from './App.vue'
// 关闭Vue的生产提示
Vue.config.productionTip = false
// 创建Vue实例对象
new Vue({
    // 将Vue实例对象指向
    el:"#app",
    //将App组件放入容器中
    render: h => h(App),  //此处将render函数换成箭头函数进行挂载
})
说明:程序执行流程
- 当用户执行
npm run serve时,会执行main.js文件- 发现引入
import App from './App.vue',因此执行App组件中代码- 发现
render: h => h(App),因此,将App组件放入public文件夹中的index.html页面的 中
补充:若想在残缺版vue渲染时不报错,则使用render函数。
<script>
render(createElement){
  return createElement("h1","你好啊")
}
//简写
render:h=>h(App)//vue解析时会将app传入并自动解析
</script>
补充:Render函数
- 在main.js中,默认引入残缺版vue
- 残缺版vue不能够解析template。控制台报错
补充:为什么vue这么多版本解释?
- 多版本为了适应不同的部署环境,详细介绍请查看知识加油站
补充:.Vue文件中的template为什么解析不报错?
- 因为项目配置文件中引入了Vue模板解析器
5.3.2.2.gitignore
说明:
配置哪些文件或文件夹不需要被git管理
.Ds_Store
node_modules
/dist

#local env files
.env.local
.env.*.local
# Log files
npm-debug.log*
yarn-debug.log*
yarn-error.log*
pnpm-debug.log*

#Editor directories and files
.idea
.vscode
*.suo
*.ntvs*
*.njsproj
*.s1n
*.sw?
5.3.2.3babel.config.Js
说明:
babel.config.js的主要作用是配置 Babel,以确保项目中的 JavaScript 代码能够被正确地转译为兼容不同浏览器的代码。
补充:
参考文档:Babel是什么?Babel到底可以用来干嘛___一文带你从零开始认识Babel-CSDN博客
module.exports = {
presets:[
'@vue/cli-plugin-babel/preset'
	]
}
说明:
将ES6语法===>转换为ES5语法
5.3.2.4node_modules
说明:
node_modules文件夹存放的是运行Vue所需要的依赖包
补充:
- 这个包很大,打包的时候可以直接删除
- 如果要运行项目,没有依赖包,使用以下命令重新下载依赖包就可以了
npm install
5.3.2.5assets
assets文件夹一般存放静态资源,例如,音频,视频,图片等等
5.3.2.6components
components文件夹一般存放程序员编写的组件
5.3.2.7index.html
说明:
index.html页面是应用的入口页面,通常是整个单页面应用(SPA)的主HTML文件。这个HTML文件是浏览器首先加载的文件,它包含了应用的基本结构和所需的资源链接
<!DOCTYPE html>
<html lang="">
  <head>
    <meta charset="utf-8" />
    <!-- 针对IE浏览器的一个特殊配置,含义是让IE浏览器以最高的渲染级别渲染页面 -->
    <meta http-equiv="X-UA-Compatible" content="IE=edge" />
    <!-- 开启移动端的理想视口 -->
    <meta name="viewport" content="width=device-width,initial-scale=1.0" />
    <!-- 配置网页图标 -->
    <link rel="icon" href="<%= BASE_URL %>favicon.ico" />
    <!-- 导入第三方的css样式库 -->
    <link href="<%= BASE_URL %>css/test01.css" />
    <!-- 配置网页标题 -->
    <title><%= htmlWebpackPlugin.options.title %></title>
  </head>
  <body>
    <!-- 当浏览器不支持js时noscript中的元素就会被渲染 -->
    <noscript>
      <strong>
        We're sorry but <%= htmlWebpackPlugin.options.title %> doesn't work
        properly without JavaScript enabled. Please enable it to continue.
      </strong>
    </noscript>
    <!-- 容器 -->
    <div id="app"></div>
    <!-- built files will be auto injected -->
  </body>
</html>
说明:
<%= BASE_URL %> 指public所在文件夹路径
补充:
<%= htmlWebpackPlugin.options.title %是vue的一个插件功能,如此写法,vue会自动寻找package.json中的name
5.3.2.8vue.config.js
说明:
vue.config.js是用于配置 Vue CLI 项目的配置文件。通过这个文件,你可以对项目的构建过程和开发服务器进行一些自定义配置,例如修改输出目录、配置代理、添加webpack插件等
module.exports ={
  pages:{
    index:{
      //入口
      entry:'src/main.js',
    },
  },
  // 语法检查,防止程序中的一些不规范操作。例如,let a=6, 若不使用,则会报错
  lintOnSave:false	//关闭语法检查,让小白更好的体验Vue
}
说明:
以上内容是Vue2的配置文件写法
5.4Ref属性(DOM、VC、对象访问)
笔记小结:
- 概述:
ref是用于在模板中获取对组件或DOM元素的引用的特殊属性,换句话说,是被用来给元素或子组件注册引用信息(id的替代者)- 作用:应用在html标签上获取的是真实DOM元素,应用在组件标签上是组件实例对象(vc)
- 使用方式:
- 步骤一:打标识:
<h1 ref="xxx"></h1>或<School ref="xxx"></School>- 步骤二:获取:
this.$refs.xxx
5.4.1概述
在Vue.js中,ref 是一个用于在模板中访问或操作 DOM、组件实例或其他对象的特殊属性。ref 的主要作用是在模板中获取对应元素或组件的引用,以便在 Vue 实例中进行操作
5.4.2基本用例
说明:
Ref属性实现DOM、VC、对象访问
步骤一:创建测试组件
说明:
创建Test.Vue组件,便于属性查看展示
<template>
<div class="school">
    <h1>校名:{{ name }}</h1>
    <h1>校龄:{{ age }}</h1>
    </div>
</template>

<script>
    export default {
        name: "Test",
        data() {
            return {
                name: "i工院",
                age: 50,
            };
        },
    };
</script>
步骤二:修改App.Vue入口组件
说明:
在相应的标签和组件上添加ref属性
<template>
<div>
    <h1 ref="name">{{ message }}</h1><!--添加ref属性-->
    <button @click="focus">点我查看属性</button>
    <Test ref="test"></Test><!--添加ref属性-->
    </div>
</template>

<script>
    import Test from "./components/Test.vue";
    export default {
        name: "App",
        data() {
            return {
                message: "Hello,欢迎来到这里!",
            };
        },
        components: {
            Test,
        },
        methods: {
            focus() {
                console.log(this.$refs.name); //返回真实的DOM元素
                console.log(this.$refs.test); //返回由test组件创建的实例对象(vc)
            },
        },
    };
</script>
步骤三:展示

说明:
ref属性应用在html标签上获取的是真实DOM元素,应用在组件标签上是组件实例对象(vc)
5.5Props(父子通信)
笔记小结:
概述:
props是用于从父组件向子组件传递数据的一种机制。这使得组件之间可以更灵活地通信。作用:让组件接收外部传过来的数据,常用于父组件向子组件传值
使用方式:
步骤一:传递数据:
<Demo name="xxx"/>步骤二:接收数据:
数组(只接收):
props:['name']对象(限制数据类型):
props:{name:String}对象嵌套对象(限制类型、限制必要性、指定默认值):
props:{
    name:{
    	type:String, //类型
        required:true, //必要性
        default:'JOJO' //默认值
    }
}
注意: props是只读的,Vue底层会监测你对props的修改,如果进行了修改,就会发出警告,若业务需求确实需要修改,那么请复制props的内容到data中一份,然后去修改data中的数据
5.5.1概述
props 是用于从父组件向子组件传递数据的一种机制。通过在子组件的声明中定义 props,可以接受父组件传递过来的数据,并在子组件中使用这些数据。这使得组件之间可以更灵活地通信。
5.5.2基本用例
说明:
Props实现父子通信
步骤一:创建App.vue父组件
说明:
在App.vue文件中,注册子组件,并通过v-bind进行绑定,并传入name和age属性值
<template>
  <div>
    <Test name="工院" :age="18"></Test><!--此处添加绑定数据-->
      <!--<Test name="建院" key="123"></Test> --> <!--传入数据时,不能够传入key值,因为key值已被Vue使用-->
    <Test name="建院" ></Test>
  </div>
</template>

<script>
import Test from "./components/Test.vue";
export default {
  name: "App",
  data() {
    return {
      message: "Hello,欢迎来到这里!",
    };
  },
  components: {
    Test,
  },

};
</script>
注意:
- 传入数据时,不能够传入key值,因为key值已被Vue自己使用
步骤二:创建Test.vue子组件
说明:
在Test.vue文件中接收App.vue组件所传输的属性
<template>
<div>
    <h1>校名:{{ name }}</h1>
    <!-- 通过中间赋值的方式,实现中转,进行对props传入的值进行更改 -->
    <h1>校龄:{{ myAge }}</h1>
    <button @click="addAge">点我加加</button>
    </div>
</template>

<script>
    export default {
        name: "Test",
        data() {
            return {
                myAge: this.age, // 注意:props的优先级别最高,因此可以通过this找到age属性
                //age:18 //此处不能再次定义age,因为props已经定义过。若想要修改,请参考中间值方式进行修改
            };
        },
        //方式一:简单接受方式
        // props:["name","age"]-使用数组类型接收

        //方式二:接受数据的同时增加限制-使用对象类型接收
        // props:{
        //   name:String,
        //   age:Number
        // }

        //方式三:接受数据的同时:类型限制,默认值限定等
        props: {
            name: {
                type: String,
                required: true,
            },
            age: {
                type: Number,
                default: 99,
            },
        },
        methods: {
            addAge() {
                this.myAge++;
            },
        }
    };
</script>
注意:
- 若data中使用有name,props中导入了name,则会报错。因为当使用时,props的优先级最高
步骤三:演示
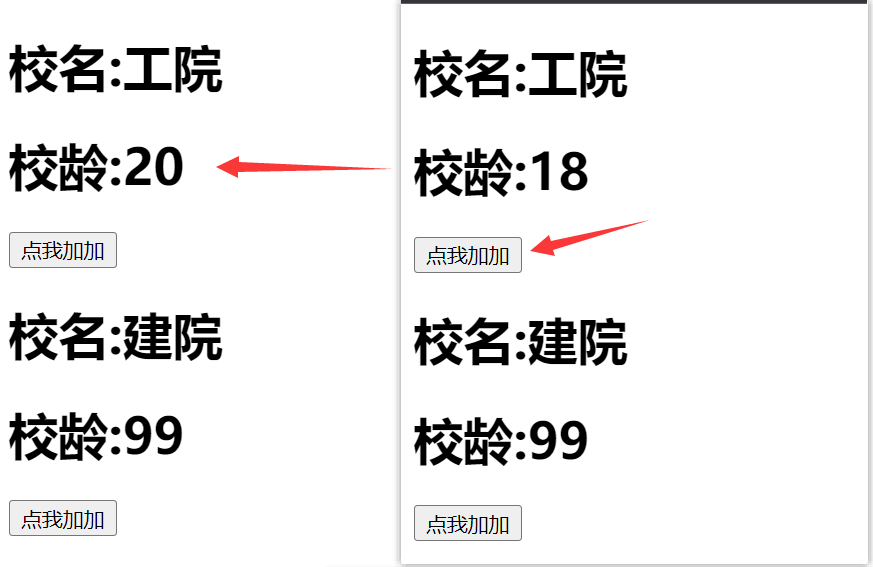
说明:
浏览器控制台不报错,点击子组件事件,方法成功执行
5.5.3案例-父子互相通信
笔记小结:
组件化编码流程:
- 拆分静态组件:组件要按照功能点拆分,命名不要与html元素冲突
- 实现动态组件:考虑好数据的存放位置,数据是一个组件在用,还是一些组件在用:
- 一个组件在用:放在组件自身即可
- 一些组件在用:放在他们共同的父组件上(状态提升)
- 实现交互:从绑定事件开始
props适用于:
- 父组件 ==> 子组件 通信
- 子组件 ==> 父组件 通信(要求父组件先给子组件一个函数)
使用v-model时要切记:v-model绑定的值不能是props传过来的值,因为props是不可以修改的
注意:props传过来的若是对象类型的值,修改对象中的属性时Vue不会报错,但不推荐这样做
说明:完成思路
- App组件中存放数据,Header组件将输入框的数据传回给App组件
- App组件将存放的数据传输给List组件,并将删除和复选的方法传输给List组件
- List组件遍历Item组件,并将删除和复选的方法传输给Item组件
- App组件将清楚任务方法传输给Footer组件
步骤一:入口文件
说明:
修改main.js文件
// 该文件是整个项目的入口文件
// 引入VUE
import Vue from 'vue'
// 引入APP组件,它是所有组件的父组件
import App from './App.vue'
// 步骤一:关闭Vue的生产提示
Vue.config.productionTip = false
// 创建Vue实例对象
new Vue({
  el:"#app",
  render: h => h(App),
})
步骤二:创建组件
1.创建容器组件
说明:
将App.vue组件作为容器组件来存储数据
<template>
  <div>
    <MyHeader :receive="receive"></MyHeader>
    <MyList :todos="todos" :checkTodo="checkTodo" :deleteTodo="deleteTodo"></MyList>
    <MyFooter :todos="todos" :checkAllTodo="checkAllTodo" :clearAllTodo="clearAllTodo"></MyFooter>
  </div>
</template>

<script>
import MyHeader from './components/MyHeader'
import MyList from './components/MyList'
import MyFooter from './components/MyFooter'

export default {
  name: 'App',
  data() {
    return {
      todos: [
        { id: '001', title: '抽烟', done: true },
        { id: '002', title: '喝酒', done: false },
        { id: '003', title: '打麻将', done: true }
      ]
    }
  },
  methods: {
    //接收数据
    receive(x) {
      // console.log('我是APP组件,我收到的数据是', x)
      this.todos.unshift(x)
    },
    //勾选or取消勾选todo
    checkTodo(id) {
      this.todos.forEach((todo) => {
        if (todo.id === id) todo.done = !todo.done
      })
    },
    //删除todo
    deleteTodo(id) {
      //箭头函数简写方法一
      // this.todos = this.todos.filter((todo) => todo.id !== id)
      //箭头函数写法
      this.todos = this.todos.filter((todo) => {
        return todo.id !== id//过滤掉需要删除的id数组对象,并返回除删除的所有数组对象
      })
    },
    //全选or全不选
    checkAllTodo(done) {
      this.todos.forEach((todo) => {
        todo.done = done
      })
    },
    //清除所有done值为true的todo
    clearAllTodo() {
      this.todos = this.todos.filter((todo) => {
        return !todo.done//过滤掉所有选中的数组对象,并返回未选中的所有数组对象
      })
    }
  },

  components: {
    MyHeader,
    MyList,
    MyFooter
  }
  // mounted() {
  //   console.log(this)
  // }
}
</script>
2.创建页面头组件
说明:
将MyHeader.vue组件作为数据收集组件,并将值传输给APP.vue容器组件
<template>
  <div class="todo-header">
    <input type="text" placeholder="请输入你的任务名称,按回车键确认" v-model.trim="title" @keyup.enter="add" />
  </div>
</template>

<script>
import { nanoid } from 'nanoid' //nanoid为函数,格式得正确,用方括号包裹起来
export default {
  name: 'MyHeader',
  data() {
    return {
      title: ''
    }
  },
  props: ['receive'],
  methods: {
    add() {
      //校验数据
      if (this.title === '') return alert('不能输入空值')
      //将用户输入的数据,作为一个对象来保存
      const todoObj = { id: nanoid(), title: this.title, done: false }
      //通知app接收数据
      this.receive(todoObj)
      //清空数据
      this.title = ''
    }
  }
}
</script>

<style>
</style>
补充:
1.如何获得点击事件中的值?
法一:通过点击事情时,接收event值
<template> <div class="todo-header"> <input type="text" placeholder="请输入你的任务名称,按回车健确认" @keyup.enter="add" /> </div> </template> <script> export default { name : " MyHeader", methods: { add(event){ console.log(event.target.value) } } } </script>法二:通过v-model绑定,获取事件对象的value
<template>
<div class="todo-header">
 <input type="text" placeholder="请输入你的任务名称,按回车健确认" v-model="title" @keyup.enter="add" />
 </div>
</template>
<script>
 export default {
     name : " MyHeader",
     data(){
         return{
             title:""
         }
     },
     methods: {
         add(){
             console.log(this.title)
         }
     }
 }
</script>
补充:
Nanoid:随机生成ID的安装与使用
- 安装:在终端输入命令
npm i nanoid
使用:
import { nanoid } from 'nanoid' //nanoid为函数,格式得正确,用方括号包裹起来
const todoObj = { id: nanoid(), title: this.title, done: false }
3.创建列表组件
说明:
创建MyList.vue,作为列表渲染组件
<template>
<ul class="todo-main">
    <MyItem
            v-for="todoObj in todos"
            :key="todoObj.id"
            :todo="todoObj"
            :checkTodo="checkTodo"
            :deleteTodo="deleteTodo"
            ></MyItem>
    </ul>
</template>

<script>
    import MyItem from './MyItem.vue'
    export default {
        name: 'MyList',
        components: {
            MyItem
        },
        props: ['todos', 'checkTodo', 'deleteTodo'],
        mounted() {
            // console.log(this.todos[0])//取得数组对象中的某一个对象
        }
    }
</script>
4.创建列表项组件
说明:
创建MyItem.vue组件,作为列表渲染的选项,并进行细则的调控处理
<template>
<div>
    <li>
        <label>
            <input type="checkbox" :checked="todo.done" @change="handleCheck(todo.id)" />
            <span>{{ todo.title }}</span>
    </label>
        <button class="button" @click="handleDelete(todo.id)">删除</button>
    </li>
    </div>
</template>

<script>
    export default {
        name: 'MyItem',
        props: ['todo', 'checkTodo', 'deleteTodo'],
        methods: {
            handleCheck(id) {
                this.checkTodo(id)
            },
            handleDelete(id) {
                this.deleteTodo(id)
            }
        }
        // mounted() {
        //   console.log(this.todo)
        // }
    }
</script>

<style>
    .button {
        display: none;
    }
    li:hover {
        background-color: aqua;
    }
    li:hover button {
        margin-left: 50%;
        display: inline-block;
    }
</style>
5.创建页面脚组件
说明:
创建MyFooter.vue组件,作为页面脚中事项全选与删除的处理
<template>
  <div class="todo-footer" v-show="Total">
    <label>
      <!-- 法一 -->
      <!-- :checked用于初始值绑定,@change用于交互 -->
      <!-- <input type="checkbox" :checked="isAll" @change="checkAll" /> -->
      <!-- 法二 -->
      <input type="checkbox" v-model="isAll" />
    </label>
    <span>
      <span>已完成{{ doneTotal }}</span> /全部{{ Total }}
      <button @click="clearAll">清除已完成任务</button>
    </span>
  </div>
</template>

<script>
export default {
  name: 'MyFooter',
  props: ['todos', 'checkAllTodo', 'clearAllTodo'],
  // mounted() {
  //   // console.log(this.todos)
  // },
  computed: {
    // doneTotal() {
    //   let i = 0
    //   this.todos.forEach((todo) => {
    //     if (todo.done) i++
    //   })
    //   return i
    // },
    //reduce 专门用来做条件统计
    // doneTotal() {
    //   const x = this.todos.reduce((pre, todo) => {
    //     // console.log('@', pre, todo)
    //     return pre + (todo.done ? 1 : 0)
    //   }, 0)
    //   return x
    // }
    doneTotal() {
          // reduce() 方法对数组中的每个元素按序执行一个提供的 reducer 函数,每一次运行 reducer 会将先前元素的计算结果作为参数传入,最后将其结果汇总为单个返回值
      return this.todos.reduce((pre, current) => {
        return pre + (current.done ? 1 : 0)
      }, 0)//0为初始值
    },
    Total() {
      return this.todos.length
    },
    isAll: {
      get() {
        return this.doneTotal === this.Total && this.Total > 0
      },
      set(value) {
        this.checkAllTodo(value)
      }
    }
  },
  methods: {
    // checkAll(e) {
    //   // console.log(e.target.checked)
    //   this.checkAllTodo(e.target.checked)
    // }
    clearAll() {
      this.clearAllTodo()
    }
  }
}
</script>

<style>
/* button {
  display: inline-block;
} */
</style>
补充:
- Array.prototype.reduce():专门用来做条件统计
- reducer 逐个遍历数组元素,每一步都将当前元素的值与上一步的计算结果相加(上一步的计算结果是当前元素之前所有元素的总和)——直到没有更多的元素被相加。
- 参考链接:Array.prototype.reduce() - JavaScript | MDN (mozilla.org)
5.6Mixin(共享组件配置)
笔记小结:
概述:Mixin 允许你在多个组件中共享一些相同的选项、生命周期钩子、方法。
作用:可以把多个组件共用的配置提取成一个混入对象
使用方式:
步骤一:定义混入
// 1.在src目录下创建Minix.js文件
// 2.编写暴露混入对象(对象名自取)
export const mixin = {
    data(){....},
        methods:{....}
    ....
}
步骤二:使用混入
全局混入:
// 在src目录下的main.js文件下使用混合
Vue.mixin(xxx)
局部混入:
//	在相应的组件内的VC实例中使用mixins数组
mixins: [ "xxx "]
注意:
- 组件和混入对象含有同名选项时,这些选项将以恰当的方式进行“合并”,在发生冲突时以组件优先。
- 同名生命周期钩子将合并为一个数组,因此都将被调用。另外,混入对象的钩子将在组件自身钩子之前调用。
5.6.1概述
Vue Mixins 是一种用于复用 Vue 组件中的逻辑的机制。Mixin 允许你在多个组件中共享一些相同的选项、生命周期钩子、方法等。使用 Mixin 可以提高代码的可维护性和可复用性。
5.6.2基本用例
说明:
Mixin实现组件配置的共享
步骤一:定义混入
说明:
在src目录下,创建
Mixin.js文件
export  const hunhe={
  methods: {
    warn() {
      alert(this.name);
    },
  },
}

export  const hunhe2={
  mounted() {
    console.log("Hello!!")
  },
}
补充:
- 混入里面有mounted()函数(created,mounted)等,自身也有mounted()函数。那么mounted()函数会被合并调用,混合对象里的钩子函数会在组件里的钩子函数之前调用
var mixin = {
  	created () {
    	console.log('混入对象的钩子被调用')
  	}
}

new Vue({
  	mixins: [mixin],
  	created () {
    	console.log('组件钩子被调用')
  	}
})

// => "混入对象的钩子被调用"
// => "组件钩子被调用"
- 混入里面有methods对象(methods,components)等,自身也有methods对象。那么methods对象会被合并调用,键冲突的, 组件会覆盖混入对象的
var mixin = {
	data: function () {
		return {
    		message: 'hello',
            foo: 'abc'
    	}
  	}
}

new Vue({
  	mixins: [mixin],
  	data () {
    	return {
      		message: 'goodbye',
            bar: 'def'
    	}
    },
  	created () {
    	console.log(this.$data)
    	// => { message: "goodbye", foo: "abc", bar: "def" }
  	}
})
注意:
当配置全局混合时,VM以及每个VC都会引用相关混合内容
补充:深入理解Mixin
Vue混入(mixins)理解及应用_明天也要努力的博客-CSDN博客
步骤二:使用混入
方式一:全局混入
- 在mian.js文件中先导入,再使用
// 该文件是整个项目的入口文件
// 引入VUE
import Vue from 'vue'
// 引入APP组件,它是所有组件的父组件
import App from './App.vue'
// 步骤一:全局导入混合
import { hunhe2 } from './mixin'
// 关闭Vue的生产提示
Vue.config.productionTip = false
// 步骤二:使用混合
Vue.mixin(hunhe2)
// 创建Vue实例对象
new Vue({
  el:"#app",
  render: h => h(App),
})
方式二:局部混入
- 在在components的School组件中先导入,再使用
<template>
  <div>
    <h1 @click="warn">学校名称:{{ name }}</h1>
    <h1>学校地址:{{ address }}</h1>
  </div>
</template>

<script>
import { hunhe } from "../mixin.js";// 步骤一:局部导入混合
export default {
  name: "School",
  data() {
    return {
      name: "尚硅谷",
      address: "北京",
    };
  },
  mixins: [hunhe], //步骤二:使用混合
};
</script>
步骤三:展示

说明:
因为混入里面有mounted()函数(created,mounted)等,自身也有mounted()函数。那么mounted()函数会被合并调用,混合对象里的钩子函数会在组件里的钩子函数之前调用,因此这里即使只有三个组件也会打印四个”Hello!“
5.7Plugins(共享方法、指令、过滤器)
笔记小结:
概述:Vue 插件(Plugins)是一种用于为 Vue.js 添加全局功能的方式。
作用:插件通常会为 Vue 添加一些全局方法、指令、过滤器,或者添加全局混入(mixin)等。
使用方式:
步骤一:定义插件(在src目录下创建plugins.js文件)
export default{
    install = function (vue,options){
        //1.添加全局过滤器
        Vue.filter(....)
        //2.添加全局指令Vue.directive(....)
        //3.配置全局混入(合)Vue.mixin(....)
        //4.添加实例方法
        Vue.prototype.$myMethod = function(){....}
        vue.prototype.$myProperty = xXXX
    }
}
步骤二:使用插件(在src目录下修改main.js文件)
vue.use()步骤三:应用插件
……
<h1>学生名称:{{ name | mySlice }}</h1>
……
5.7.1概述
Vue 插件(Plugins)是一种用于为 Vue.js 添加全局功能的方式。插件通常会为 Vue 添加一些全局方法、指令、过滤器,或者添加全局混入(mixin)等。Vue 插件的目的是封装可复用的功能,使其在 Vue 应用中更容易共享和使用。
5.7.2基本用例
说明:
Plugins实现脚手架中组件共享方法、共享指令、共享过滤器
步骤一:定义插件
说明:
在src目录下创建plugins.js文件
export default{

    install(Vue){
        //第一种,全局过滤器
        Vue.filter("mySlice",function(value){
            return value.slice(0,4)
        })

        //第二种,定义全局指令
        Vue.directive('fbind',{
            //指令与元素成功绑定时(一上来)
            bind(element,binding){
                element.value=binding,value
            },
            //指令所在元素被插入页面时
            inserted(element,binding){
                element.focus();
            },
            //指令所在的模板被重新解析时
            update(element,binding){
                element.value=binding.value
            }
        })

        //第三种,定义全局混入
        Vue.mixin({
            data(){
                return{
                    a:520,
                    b:1314
                }
            }
        })

        //第四种,给Vue原型上添加一个方法(VM和Vc就都能用了)
        Vue.prototype.hello=()=>{alert("你好啊!!!")}
    }
}
步骤二:使用插件
说明:
在main.js文件中先导入,后才能在组件中使用
// 该文件是整个项目的入口文件
// 引入VUE
import Vue from 'vue'
// 引入APP组件,它是所有组件的父组件
import App from './App.vue'
import plugins from './plugins'
// 关闭Vue的生产提示
Vue.config.productionTip = false
// 创建Vue实例对象
Vue.use(plugins)
const n = new Vue({
    el: "#app",
    render: h => h(App),
})
console.log(n) // 这里打印一下,Vue实例,便于查看原型链上方法的挂载
步骤三:组件
说明:
在组件上在相应使用位置应用即可
- Student.vue
<template>
    <div>
        <h1>学生名称:{{ name | mySlice }}</h1>
        <h1>学生年龄:{{ age }}</h1>
    </div>
</template>

<script>
export default {
    // eslint-disable-next-line vue/multi-word-component-names
    name: "Student",
    data() {
        return {
            name: "玥玥玥玥玥玥玥玥",
            age: 18,
        };
    },
    mounted() {
        this.hello()
    }
};
</script>
- School.vue
<template>
  <div>
    <h1>学校名称:{{ name }}</h1>
    <h1>学校地址:{{ address }}</h1>
  </div>
</template>

<script>
export default {
  // eslint-disable-next-line vue/multi-word-component-names
  name: "School",
  data() {
    return {
      name: "尚硅谷",
      address: "北京",
    };
  },
};
</script>
步骤四:演示
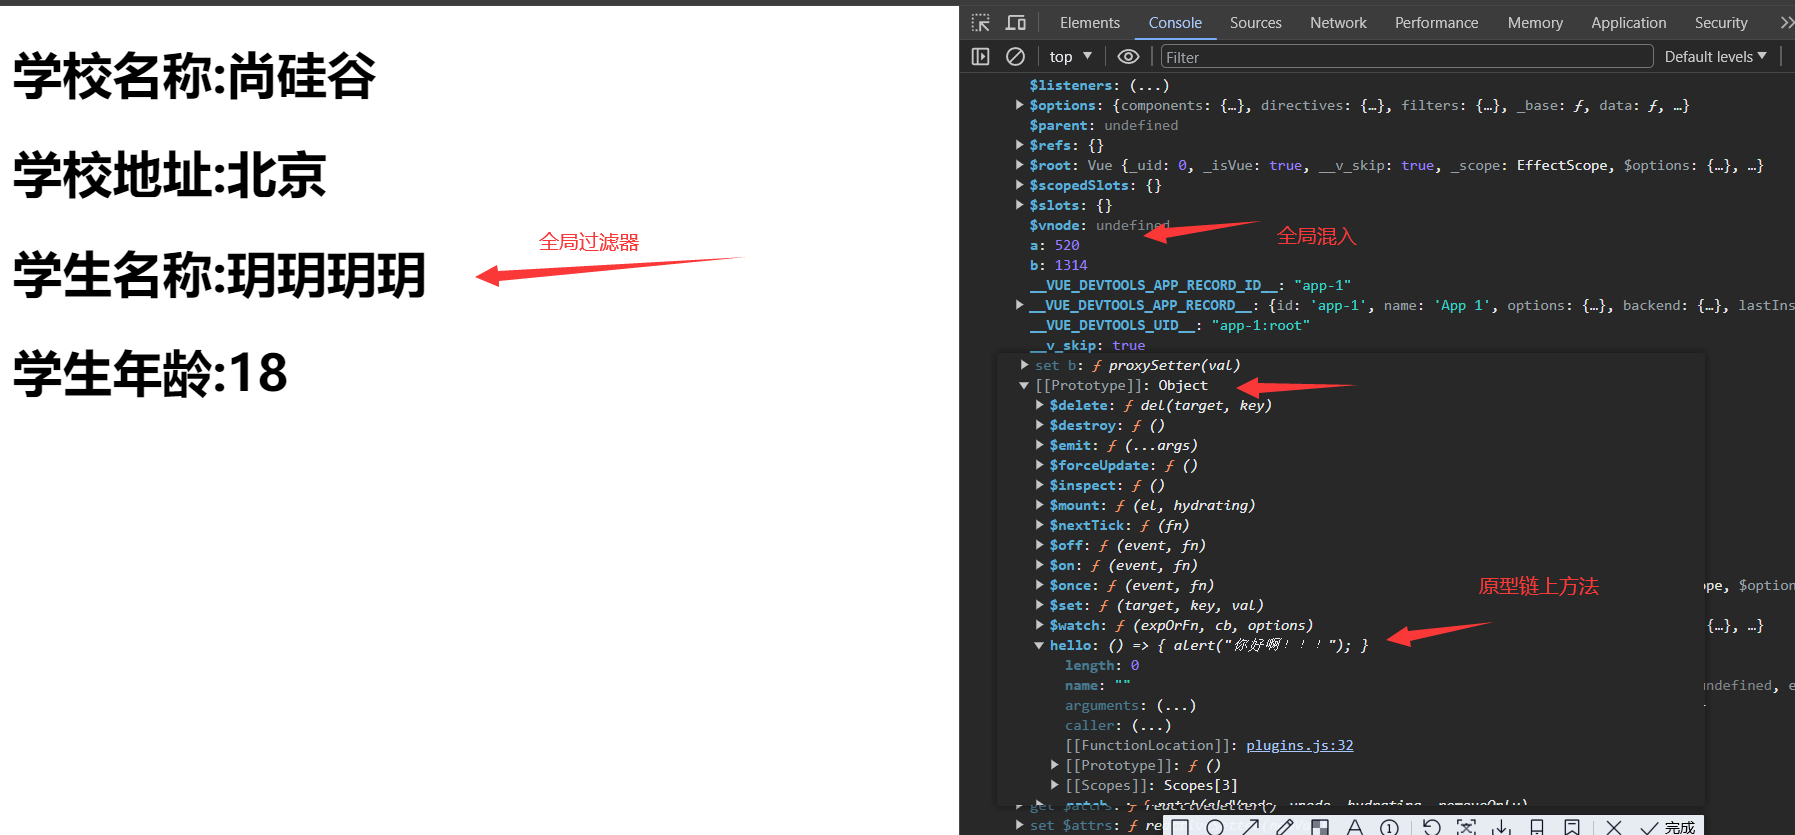
5.8Scoped(样式)
笔记小结:
作用:让样式在局部生效,防止冲突。写法:
当多个组件的样式名冲突时,并绘入一个最终组件APP,会产生冲突,此时加上scoped样式即可限定只再局部生效,可避免样式的冲突
<style scoped>
.example {
  color: red;
}
</style>

<template>
  <div class="example">hi</div>
</template>
说明:
通常来说,在各个组件的style标签上台添加scoped属性即可
5.9WebStorage(浏览器缓存)
笔记小结:
- 概述:在 Vue 中,Web Storage 是指浏览器提供的两种持久性存储机制,分别是 localStorage 和 sessionStorage。
- 补充:存储内容大小一般支持5MB左右(不同浏览器可能还不一样)
- 浏览器端通过Window.sessionStorage和Window.localStorage属性来实现本地存储机制。
- 使用方式:相关API
1.xxxxxStorage.setItem( " key " , “value”);
该方法接受一个键和值作为参数,会把键值对添加到存储中,如果键名存在,则更新其对应的值。
2.xxxxxStorage.getItem( " person" );
该方法接受一个键名作为参数,返回键名对应的值。
3.xxxxxStorage.removeItem( " key" );
该方法接受一个键名作为参数,并把该键名从存储中删除。
4.xxxxxStorage.clear()
该方法会清空存储中的所有数据。- 注意:
- SessionStorage存储的内容会随着浏览器窗口关闭而消失。
- LocalStorage存储的内容,需要手动清除才会消失。
- xxooxxStorage.getItem(xoxox)如果xxx对应的value获取不到,那么getltem的返回值是null。
- JSON.parse(null)的结果依然是null。
5.9.1概述
在 Vue 中,Web Storage 是指浏览器提供的两种持久性存储机制,分别是 localStorage 和 sessionStorage。这两种机制允许开发者在浏览器中存储键值对,并且这些数据可以在不同页面和会话之间保持持久。
5.9.2LocalStorage(本地缓存)
5.9.2.1概述
localStorage 提供了一个简单的键值对存储系统,数据存储在浏览器中,并且在关闭浏览器后依然保留。
5.9.2.2基本用例
说明:
LocalStorage实现浏览器本地缓存
步骤一:新建localStorage.html文件
<!DOCTYPE html>
<html lang="en">
    <head>
        <meta charset="UTF-8" />
        <meta http-equiv="X-UA-Compatible" content="IE=edge" />
        <meta name="viewport" content="width=device-width, initial-scale=1.0" />
        <title>localStorage</title>
    </head>
    <body>
        <h1>localStorage</h1>
        <button onclick="saveChange()">点我保存一个localStorage</button><br />
        <button onclick="readChange()">点我读取一个localStorage</button><br />
        <button onclick="deleteChange()">点我删除一个localStorage</button><br />
        <script>
            var person = { name: "张三", age: 18 };
            function saveChange() {
                console.log(JSON.stringify(person));
                // localStorage.setItem("p", person.toString());//此刻的对象value不可不可显示出来.
                // 此时用到一个方法JSON.stringify转为JSON格式;
                localStorage.setItem("p", JSON.stringify(person));
                localStorage.setItem("Lijie", "ok!!");
                localStorage.setItem("Yueyue", "okk!!");
            }
            function readChange() {
                // 此时用到一个方法JSON.parse解析为对象
                console.log(JSON.parse(localStorage.getItem("p")));
            }
            function deleteChange() {
                localStorage.removeItem("Lijie");
            }
            // 清除所有
            // localStorage.clear();
        </script>
    </body>
</html>
补充:
JSON.stringify将对象转换为JSON字符串(序列化为字符串)
JSON.parse将JSON字符串转换为对象(解析为对象)
补充:
英文:ify,序列化。parse,分析
步骤二:演示

说明:
当点击保存、读取、删除后可以看到开发者工具中的浏览器LocaStorage区域的键值对正常保存、读取、删除
5.9.3SessionStorage(会话存储)
5.9.3.1概述
sessionStorage 也提供了一个键值对存储系统,但数据的生命周期限定在当前会话期间。如果用户关闭了浏览器标签页或浏览器窗口,数据将会被清除。
5.9.3.2基本用例
说明:
SessionStorage实现浏览器会话存储
<!DOCTYPE html>
<html lang="en">
    <head>
        <meta charset="UTF-8" />
        <meta http-equiv="X-UA-Compatible" content="IE=edge" />
        <meta name="viewport" content="width=device-width, initial-scale=1.0" />
        <title>sessionStorage</title>
    </head>
    <body>
        <h1>sessionStorage</h1>
        <button onclick="saveChange()">点我保存一个sessionStorage</button><br />
        <button onclick="readChange()">点我读取一个sessionStorage</button><br />
        <button onclick="deleteChange()">点我删除一个sessionStorage</button><br />
        <script>
            var person = { name: "张三", age: 18 };
            function saveChange() {
                console.log(JSON.stringify(person));
                // sessionStorage.setItem("p", person.toString());//此刻的对象value不可不可显示出来.
                // 此时用到一个方法JSON.stringify转为JSON格式;
                sessionStorage.setItem("p", JSON.stringify(person));
                sessionStorage.setItem("Lijie", "ok!!");
                sessionStorage.setItem("Yueyue", "okk!!");
            }
            function readChange() {
                // 此时用到一个方法JSON.parse解析为对象
                console.log(JSON.parse(sessionStorage.getItem("p")));
            }
            function deleteChange() {
                sessionStorage.removeItem("Lijie");
            }
            // 清除所有
            // sessionStorage.clear();
        </script>
    </body>
</html>
5.9.4案例-ToodLIst本地缓存
说明:
将列表展示案例改为本地缓存的形式
说明:实现思路
在5.5小节中Props(父子通信)中5.5.3小节完成案例的基础上修改App.vue组件,改为本地缓存即可
步骤一:修改App.vue组件
说明:
- 返回todo数据列表时,先查看本地缓存中有无数据,若无则返回为空
- 当todo数据列表中的数据发生变化时,需要重新塞入json序列化的数据
<template>
<div>
    <MyHeader :receive="receive"></MyHeader>
    <MyList
            :todos="todos"
            :checkTodo="checkTodo"
            :deleteTodo="deleteTodo"
            ></MyList>
    <MyFooter
              :todos="todos"
              :checkAllTodo="checkAllTodo"
              :clearAllTodo="clearAllTodo"
              ></MyFooter>
    </div>
</template>

<script>
    import MyHeader from "./components/MyHeader";
    import MyList from "./components/MyList";
    import MyFooter from "./components/MyFooter";

    export default {
        name: "App",
        data() {
            return {
                //若localStorage中存有'todos'则从localStorage中取出,否则初始为空数组
                todos: JSON.parse(localStorage.getItem("todos")) || [],// 解析之后的数据为数组对象
            };
        },
        methods: {
            //接收数据
            receive(x) {
                // console.log('我是APP组件,我收到的数据是', x)
                this.todos.unshift(x);
            },
            //勾选or取消勾选todo
            checkTodo(id) {
                this.todos.forEach((todo) => {
                    if (todo.id === id) todo.done = !todo.done;
                });
            },
            //删除todo
            deleteTodo(id) {
                //箭头函数简写方法一
                // this.todos = this.todos.filter((todo) => todo.id !== id)
                //箭头函数写法二
                this.todos = this.todos.filter((todo) => {
                    return todo.id !== id;
                });
            },
            //全选or全不选
            checkAllTodo(done) {
                this.todos.forEach((todo) => {
                    todo.done = done;
                });
            },
            //清除所有done值为true的todo
            clearAllTodo() {
                this.todos = this.todos.filter((todo) => {
                    return !todo.done;
                });
            },
        },
        watch: {
            // 此时应当换为深度监视,因为函数式的写法只是监视第一层的数据是否为数组,不监视数组里面的属性值的变化
            // todos(value) {
            //   localStorage.setItem("todos", JSON.stringify(value));
            // },
            todos: {
                //由于todos是对象数组,所以必须开启深度监视才能发现数组中对象的变化
                deep: true,
                handler(value) {
                    localStorage.setItem("todos", JSON.stringify(value));//将对象序列化为字符串,数据为Json风格的字符串
                },
            },
        },
        components: {
            MyHeader,
            MyList,
            MyFooter,
        },
        // mounted() {
        //   console.log(this)
        // }
    };
</script>
步骤二:展示

说明:
当新增任务时,本地缓存的数据会正常的塞入与删除
5.10自定义事件(子父通信)
笔记小结:
概述:在 Vue.js 中,组件之间的通信是通过 props 和自定义事件来实现的。自定义组件是一种组件间通信的方式,适用于:子组件向父组件进行通信
使用场景︰A是父组件,B是子组件,B想给A传数据,那么就要在A中给B绑定自定义事件(事件的回调在A中)。
基本用例:
步骤一:绑定自定义事件
方式一:在父组件中使用事件绑定的方式
<Demo @atguigu="test"/>或<Demo v-on:atguigu="test"/>方式二:在父组件中使用ref属性的方式
<Demo ref="demo"></Demo>
export default {
    name: "App",
    components: {School, Student},
    mounted(){
    	this.$refs.demo.$on( 'atguigu ' ,this.test) // 在Vue组件实例中进行属性绑定
    }
};
步骤二:触发自定义事件
this.$emit( 'atguigu ',数据)补充:
- 想让自定义事件只能触发一次,可以使用once修饰符,或
$once方法。- 解绑自定义事件
this.$off( 'atguigu ')- 组件上也可以绑定原生DOM事件,需要使用native修饰符。
注意:
- 通过
this.$refs.xx.$on('atguigu',回调)绑定自定义事件时,回调要么配置在methods中,要么用箭头函数,否则this指向会出问题!
5.10.1概述
在 Vue.js 中,组件之间的通信是通过 props 和自定义事件来实现的。自定义事件允许子组件向父组件发送消息,同时也可以在父组件中监听并响应这些事件。
5.10.2基本用例
说明:
在组件中通过自定义事件实现子父组件间通信
步骤一:在父组件中绑定自定义事件
说明:
创建App.vue组件,在组件中的
mounted()生命周期中,使用this.$ref这个API
补充:
在父组件中有两种绑定自定义事件的方法,建议使用第二种ref属性的方法,可以减少模板区域的代码书写
<template>
    <div class="demo">
        <h1>{{ msg }}</h1>
        <!-- 通过父组件给子组件传递函数props来实现:子给父传递值 -->
        <School :getSchoolName="getSchoolName"></School>
        <!-- 通过父组件给子组件绑定一个自定义事件来实现:子给父传递值(第一种写法,使用@或则v-on) -->
        <!-- <Student v-on:Lijie="getStudentName"></Student> -->
        <!-- 通过父组件给子组件绑定一个自定义事件来实现:子给父传递值(第二种写法,使用ref),此种写法较为灵活,当添加定时器时,方便修改 -->
        <Student ref="student" @click.native="test"></Student>
        <!-- vue会把写在组件上的原生事件当成自定义事件,因此需要加上.native使得解析为原生事件 -->
    </div>
</template>

<script>
import School from "./components/School.vue";
import Student from "./components/Student.vue";

export default {
    name: "App",
    components: {School, Student},
    data() {
        return {
            msg: "你好啊!",
        };
    },
    methods: {
        getSchoolName(name) {
            console.log(name);
        },
        getStudentName(name, ...item) {
            console.log(name, item);
        },
        test() {
            // console.log(this);
            console.log("测试成功!");
        },
    },
    mounted() {
        this.$refs.student.$on("Yueyue", this.getStudentName); //绑定自定义事件
        // this.$refs.student.$once("Yueyue", this.getStudentName); //绑定自定义事件(一次性)
        this.$refs.student.$on("Lijie", this.getStudentName);
        // 此方法可以直接调用haha方法,暂时没有在this上找到实例
        // this.$on("haha", () => {
        //   console.log("hah");
        // });
        // this.$emit("haha");
    },
};
</script>

<style>
.demo {
    background-color: #ccc;
}
</style>
步骤二:在子组件中触发自定义事件
说明:
创建
Student.vue组件,在组件中的相应方法中使用this.$emit这个API
<template>
  <div class="Student">
    <h1>学生姓名:{{ name }}</h1>
    <h1>学生年龄:{{ age }}</h1>
    <h2>当前number值为{{ number }}</h2>
    <button @click="add">点我number+1</button>
    <button @click="sendStudentName">点我传输学生姓名</button>
    <button @click="unbind">点我解绑学生姓名</button>
    <button @click="death">点我销毁实例对象</button>
  </div>
</template>

<script>
export default {
  name: "Student",
  data() {
    return {
      name: "玥玥",
      age: 18,
      number: 0,
    };
  },
  methods: {
    add() {
      console.log("number回调事件被调用了");
      this.number++;
    },
    sendStudentName() {
      // 通过调用Student上的VC实例对象来实现调用
      this.$emit("Yueyue", this.name, 6666, 8888, 9999);
      this.$emit("Lijie", this.name);
      // this.$emit("click");
    },
    unbind() {
      // this.$off("Yueyue"); //解绑单个自定义事件
      // this.$off(["Yueyue", "Lijie"]); //解绑多个自定义事件
      this.$off(); //解绑所有的自定义事件
    },
    death() {
      this.$destroy();
      console.log("销毁成功");
    },
  },
};
</script>
<style>
.Student {
  background-color: pink;
}
</style>
步骤三:演示
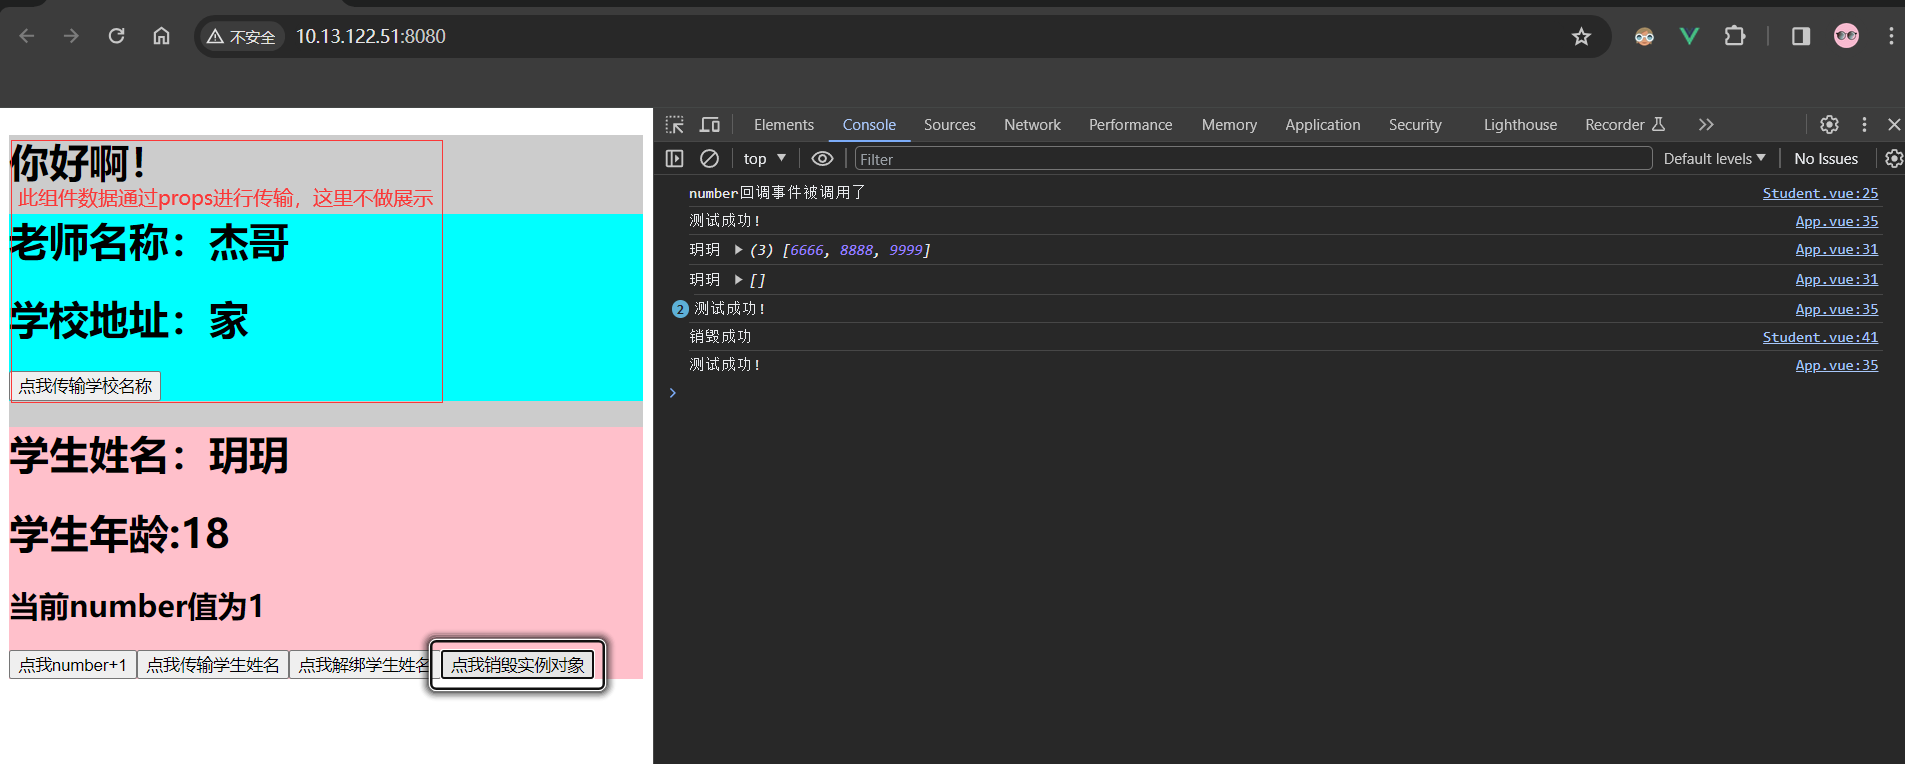
说明:
当依次点击学生组件中的按钮时,数据依次在控制台打印。当解绑学生姓名时,再次点击传输姓名,则无法进行传输
5.10.3案例-ToodList子父通信
说明:
将列表展示案例改为自定义事件的方式实现子父通信
说明:实现思路
在5.9小节中Props(父子通信)中5.9.4小节完成案例的基础上修改App.vue组件,改为本地缓存即可
步骤一:在父组件中绑定自定义事件
说明:
修改App.vue组件,在组件中绑定自定义事件,具体在模板区域中使用
@自定义事件的方式进行绑定
<template>
<div>
    <MyHeader @receive="receive"></MyHeader><!--注意:使用事件绑定的方式进行传递时,需要加入@符号-->
    <MyList
            :todos="todos"
            :checkTodo="checkTodo"
            :deleteTodo="deleteTodo"
            ></MyList>
    <MyFooter
              :todos="todos"
              @checkAllTodo="checkAllTodo"
              @clearAllTodo="clearAllTodo"
              ></MyFooter><!--注意:todos传递的是数据,不涉及函数的回调操作,因此不加入@符号-->	<!--注意:此处传递时加入"@"符号,而不是":"符号-->
    </div>
</template>

<script>
    import MyHeader from "./components/MyHeader";
    import MyList from "./components/MyList";
    import MyFooter from "./components/MyFooter";

    export default {
        name: "App",
        data() {
            return {
                todos: JSON.parse(localStorage.getItem("todos")) || [],
            };
        },
        methods: {
            //接收数据
            receive(x) {
                // console.log('我是APP组件,我收到的数据是', x)
                this.todos.unshift(x);
            },
            //勾选or取消勾选todo
            checkTodo(id) {
                this.todos.forEach((todo) => {
                    if (todo.id === id) todo.done = !todo.done;
                });
            },
            //删除todo
            deleteTodo(id) {
                //箭头函数简写方法一
                // this.todos = this.todos.filter((todo) => todo.id !== id)
                //箭头函数写法二
                this.todos = this.todos.filter((todo) => {
                    return todo.id !== id;
                });
            },
            //全选or全不选
            checkAllTodo(done) {
                this.todos.forEach((todo) => {
                    todo.done = done;
                });
            },
            //清除所有done值为true的todo
            clearAllTodo() {
                this.todos = this.todos.filter((todo) => {
                    return !todo.done;
                });
            },
        },
        watch: {
            // 此时应当换为深度监视,应为函数式的写法只是监视第一层的数据是否为数组,不监视数组里面的属性值的变化
            // todos(value) {
            //   localStorage.setItem("todos", JSON.stringify(value));
            // },
            todos: {
                deep: true,
                handler(value) {
                    localStorage.setItem("todos", JSON.stringify(value));
                },
            },
        },
        components: {
            MyHeader,
            MyList,
            MyFooter,
        },
        // mounted() {
        //   console.log(this)
        // }
    };
</script>
步骤二:在子组件中触发自定义事件
- MyHeader.vue组件
说明:
当用户在MyHeader.vue组件进行数据输入时,使用
this.$emitAPI进行父组件方法的触发,与实现数据的传递
<template>
<div class="todo-header">
    <input
           type="text"
           placeholder="请输入你的任务名称,按回车键确认"
           v-model.trim="title"
           @keyup.enter="add"
           />
    </div>
</template>

<script>
    import {nanoid} from "nanoid"; //nanoid为函数,格式得正确,用方括号包裹起来
    export default {
        name: "MyHeader",
        data() {
            return {
                title: "",
            };
        },
        methods: {
            add() {
                //校验数据
                if (this.title === "") return alert("不能输入空值");
                //将用户输入的数据,作为一个对象来保存
                const todoObj = {id: nanoid(), title: this.title, done: false};
                //通知app组件接收数据
                this.$emit("receive", todoObj);
                //清空数据
                this.title = "";
            },
        },
    };
</script>
<style/>
- MyFooter.vue组件
<template>
  <div class="todo-footer" v-show="Total">
    <label>
      <!-- 法一 -->
      <!-- :checked用于初始值绑定,@change用于交互 -->
      <!-- <input type="checkbox" :checked="isAll" @change="checkAll" /> -->
      <!-- 法二 -->
      <input type="checkbox" v-model="isAll" />
    </label>
    <span>
      <span>已完成{{ doneTotal }}</span> /全部{{ Total }}

      <button @click="clearAll">清除已完成任务</button>
    </span>
  </div>
</template>

<script>
export default {
  name: "MyFooter",
  props: ["todos"],//!此处不在接收checkAllTodo,clearAllTodo
  // mounted() {
  //   // console.log(this.todos)
  // },
  computed: {
    // doneTotal() {
    //   let i = 0
    //   this.todos.forEach((todo) => {
    //     if (todo.done) i++
    //   })
    //   return i
    // },
    //reduce 专门用来做条件统计
    // doneTotal() {
    //   const x = this.todos.reduce((pre, todo) => {
    //     // console.log('@', pre, todo)
    //     return pre + (todo.done ? 1 : 0)
    //   }, 0)
    //   return x
    // }
    doneTotal() {
      return this.todos.reduce((pre, current) => {
        return pre + (current.done ? 1 : 0);
      }, 0);
    },
    Total() {
      return this.todos.length;
    },
    isAll: {
      get() {
        return this.doneTotal === this.Total && this.Total > 0;
      },
      set(value) {
        this.$emit("checkAllTodo", value);//!此处激活并使用
      },
    },
  },
  methods: {
    // checkAll(e) {
    //   // console.log(e.target.checked)
    //   this.checkAllTodo(e.target.checked)
    // }
    clearAll() {
      this.$emit("clearAllTodo");//!此处激活并使用
    },
  },
};
</script>
步骤三:演示
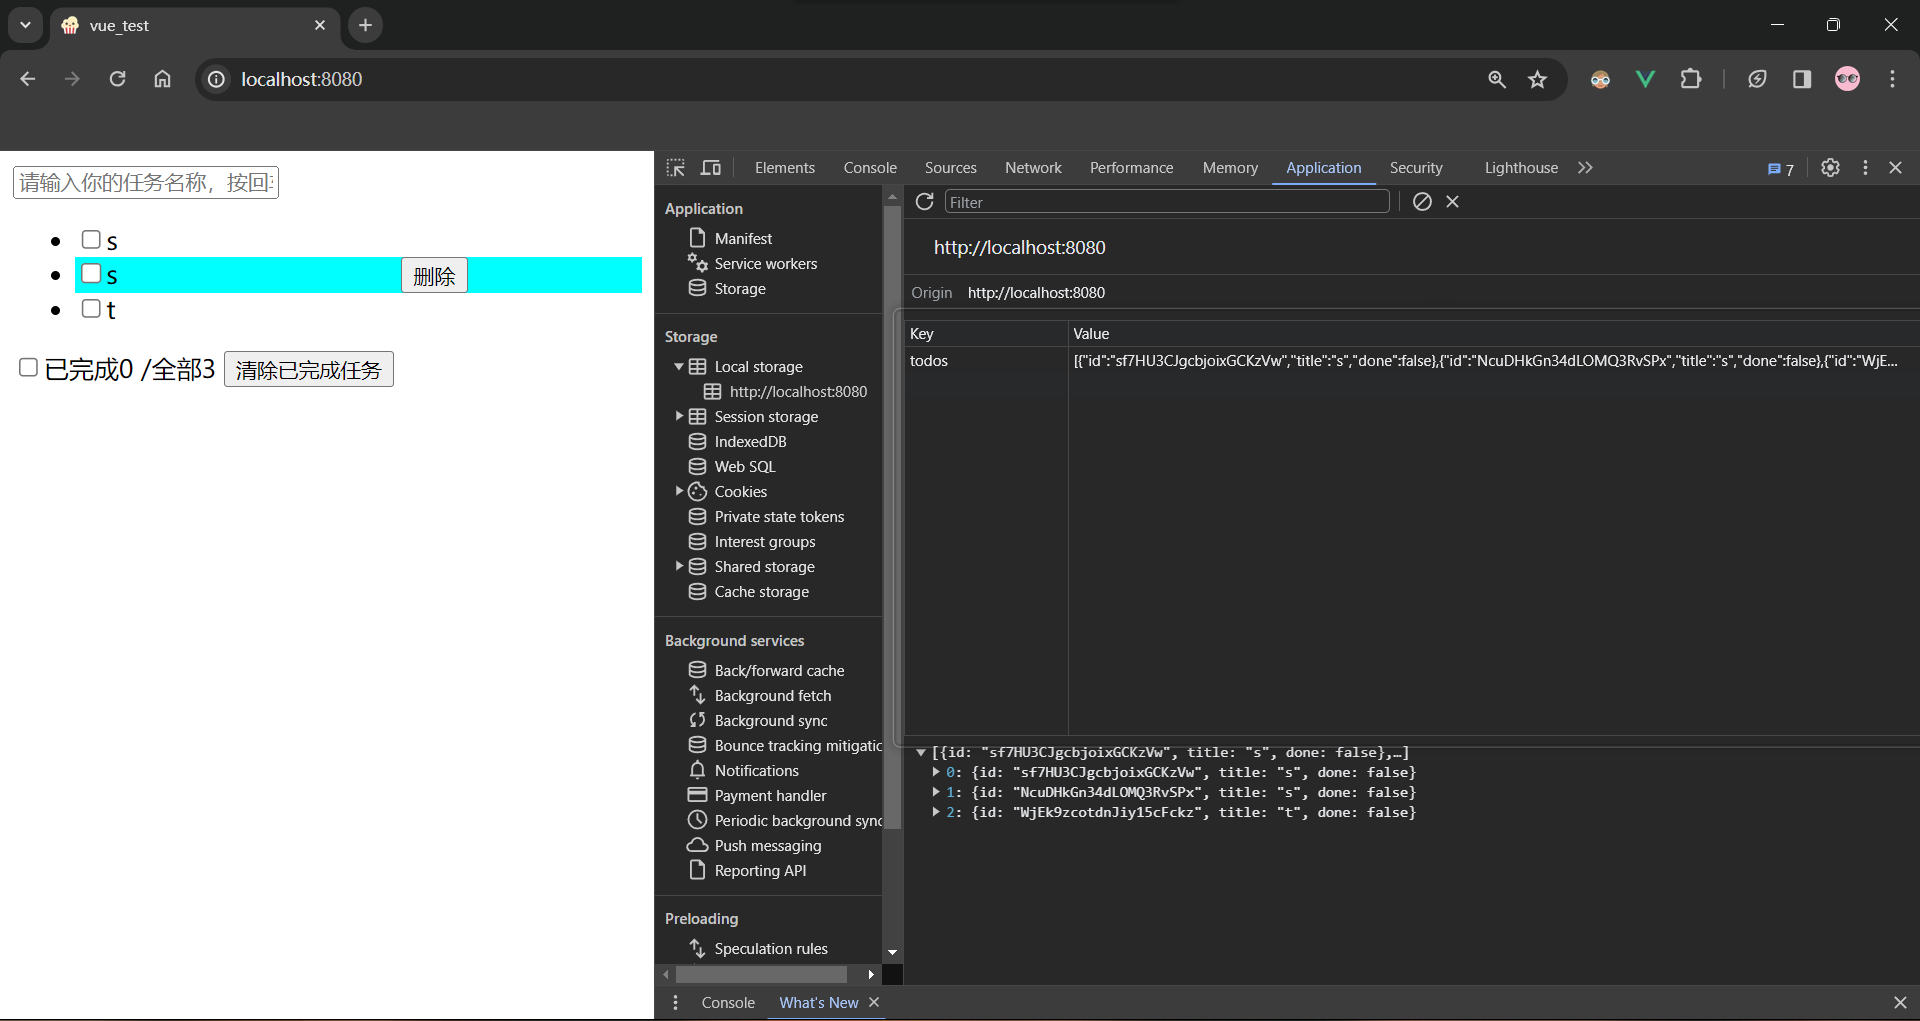
说明:
当在Header组件添加数据时,成功添加。在Footer组件清除数据时,成功清除
5.11全局事件总线(任意组件间通信)✳
笔记小结:
概述:全局事件总线是一种在 Vue.js 中实现任意组件之间通信的简单而强大的模式。
使用场景︰A是任意组件,B是任意组件,B想给A传数据或者A想传数据给B
使用方式:
步骤一:安装全局事件总线
beforeCreate(){
    Vue.prototype.$bus=this// 安装全局事件总线(全局VC,VM都能看到它)
}
步骤二:绑定组件方法
方式一:匿名方法
mounted() {
    this.$bus.$on("hello", (data) => {
		console.log(data)
    });
}
方式二:组件方法
methods(){
   hello(data){......},
}

mounted() {
    this.$bus.$on("hello",this.hello);
}
步骤三:解除组件方法
beforeDestroy() {
    this.$off("hello"); //用完之后直接给hello事件解绑
}
步骤四:触发组件方法
sendMessage() { //通常在其余组件的方法中触发此方法
    this.$bus.$emit("hello", this.name);
}
最好在
beforeDestroy钩子中,用$off去解绑当前组件所用到的事件
5.11.1概述
全局事件总线是一种在 Vue.js 中实现组件之间通信的简单而强大的模式。它基于 Vue 实例作为中央事件总线,允许组件在不直接耦合的情况下进行通信
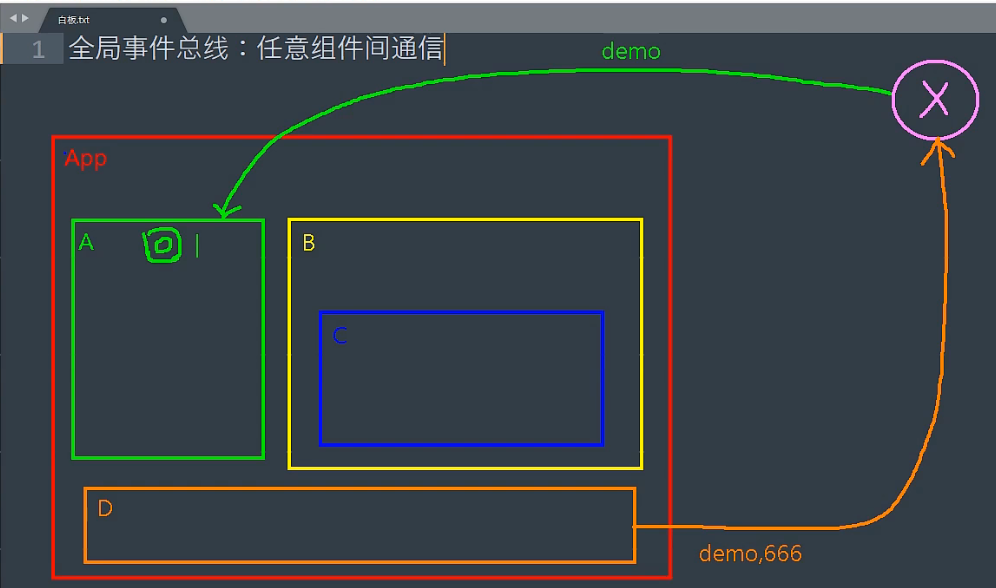
说明:
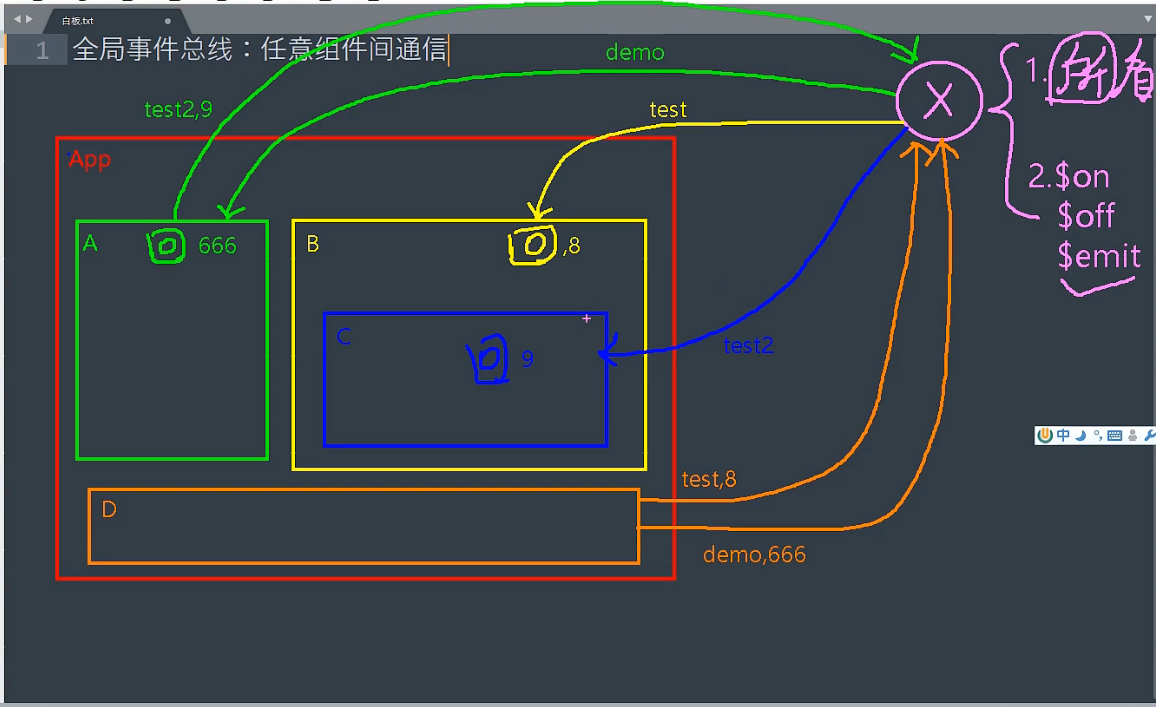
现在有一个方法池X,X不属于任何一个组件 。若组件A和组件B想实现通信,就可以先在组件A身上写一个demo回调函数,并将回调函数添加在方法池X中。然后,组件D在方法池X中找到组件A的demo回调函数,调用即可实现组件间通信
说明:
方法池X可以被Vue中的所有组件给访问到,所以各个组件将自己的回调函数交给方法池X,其余组件调用方法池中相应方法即可
补充:全局总线X所具备的条件
- 必须可以被所有组件给看见
- 需要有
$on,$off,$emit方法
5.11.2基本用例
说明:
全局事件总线实现任意组件间通信
步骤一:安装全局事件总线
说明:
修改项目的main.js文件,并在Vue实例创建之前将事件总线绑定在Vue的原型链上
// 该文件是整个项目的入口文件
// 引入VUE
import Vue from 'vue'
// 引入APP组件,它是所有组件的父组件
import App from './App.vue'
// 关闭Vue的生产提示
Vue.config.productionTip = false
new Vue({
  el:"#app",
  render: h => h(App),
  beforeCreate(){
    Vue.prototype.$bus=this//第一步:安装全局事件总线(全局VC,VM都能看到它)
  }
})
补充:
通过添加全局总线的方式实现vue组件通信原理:
// const Demo=Vue.extend({}) // 这个是VueComponent
// const d=new Demo()// 这个是VueComponent实例对象
// Vue.prototype.x=d //这个是向Vue的原型对象上放一个属性x,属性x的值为d
以上代码符合全局事件总线的条件,但此时有一个标准的规范:
Vue.prototype.$bus=this
步骤二:绑定组件方法
说明:
创建School.vue组件,使用
$on方法为School组件绑定匿名方法,并使用$off方法为School组件解除此方法的绑定
<template>
<div class="School">
    <h1>老师名称:{{ name }}</h1>
    <h1>学校地址:{{ address }}</h1>
    </div>
</template>

<script>
    export default {
        name: "School",
        data() {
            return {
                name: "杰哥",
                address: "家",
            };
        },
        mounted() {
            this.$bus.$on("hello", (data) => {
                console.log("我是School组件,我收到了数据", data);
            });
        },
        beforeDestroy() {
            this.$off("hello"); //用完之后直接给hello事件解绑
        },
    };
</script>
步骤三:触发组件方法
说明:
创建Student.vue组件,在Student组件中实验组件School方法调用,并将Student组件中的数据传输给School组件
<template>
<div class="Student">
    <h1>学生姓名:{{ name }}</h1>
    <h1>学生年龄:{{ age }}</h1>
    <button @click="sendMessage">点击把学生姓名传给李老师</button>
    </div>
</template>

<script>
    export default {
        name: "Student",
        data() {
            return {
                name: "玥玥",
                age: 18,
                number: 0,
            };
        },
        methods: {
            sendMessage() {
                this.$bus.$emit("hello", this.name);
            },
        },
    };
</script>
步骤四:演示
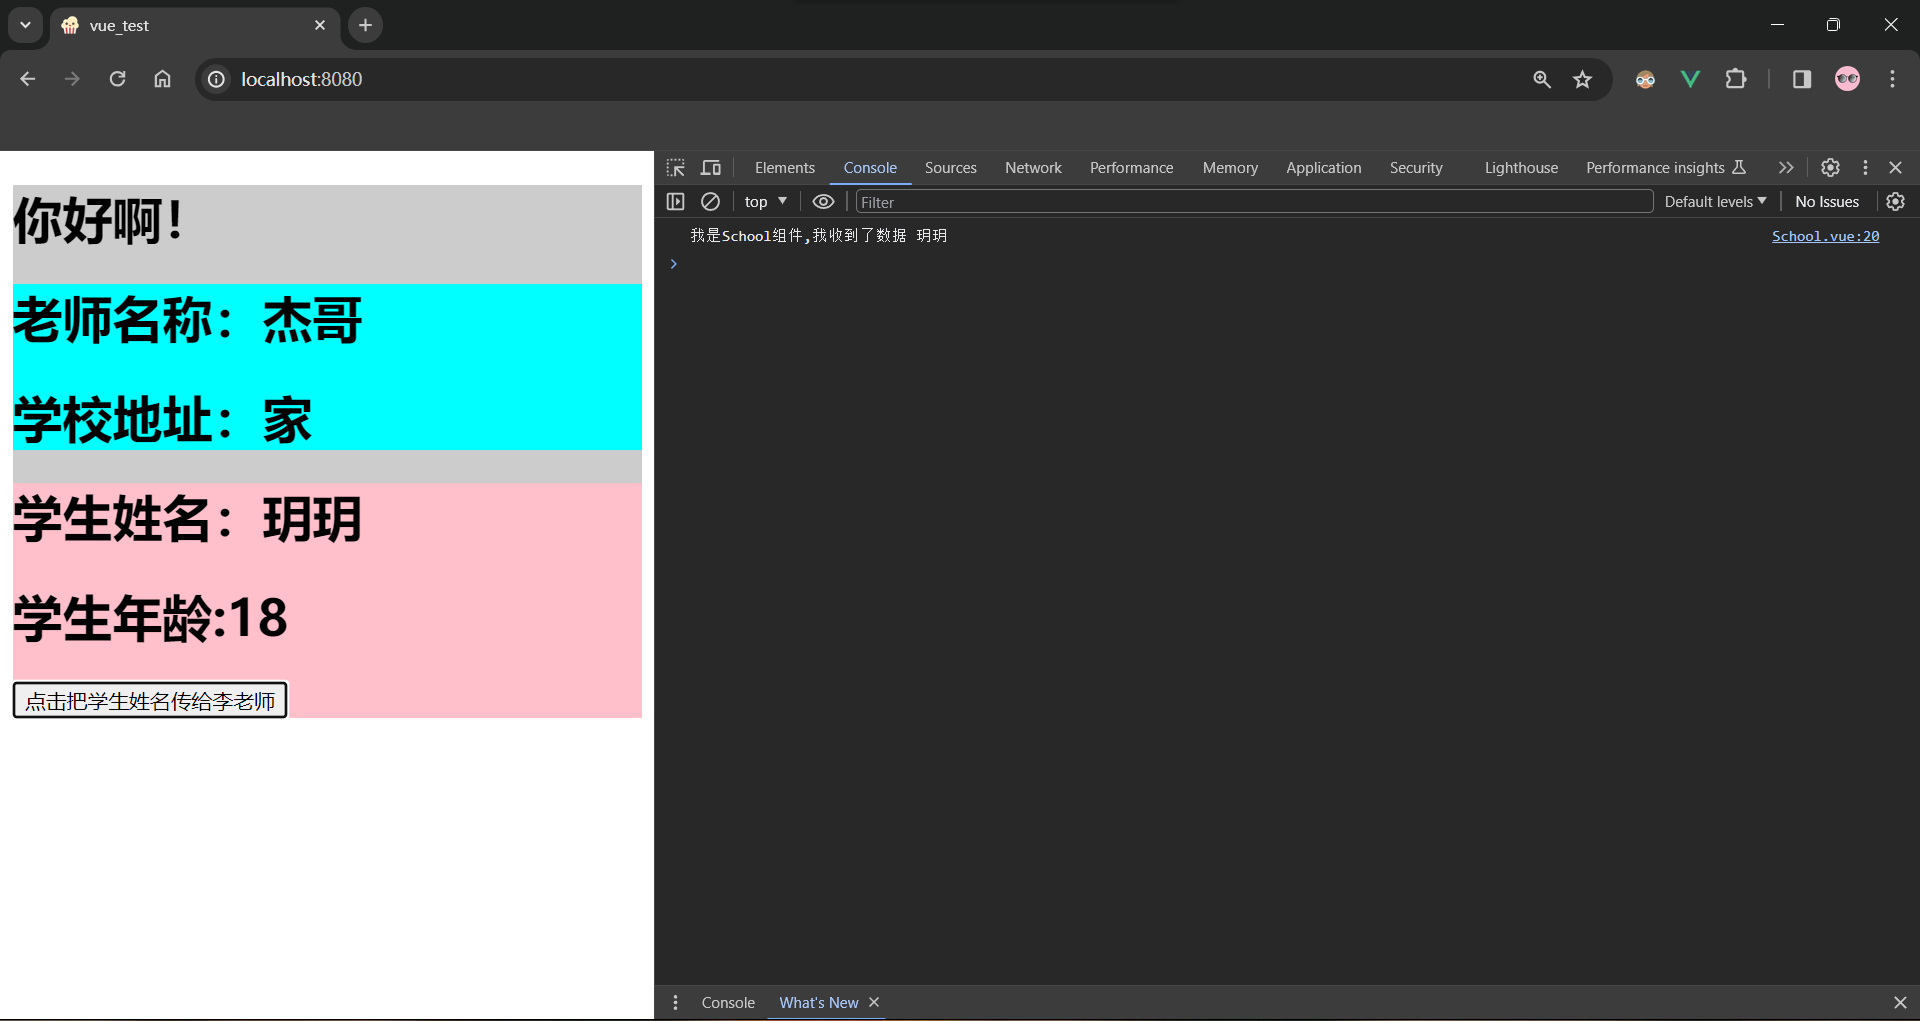
说明:
当点击组件Student中的方法时,成功将组件Student的数据传输到School中
5.11.3案例-ToodList组件通信
说明:实现思路
在5.10小节中自定义事件(父子通信)中5.10.3小节完成案例的基础上修改App.vue组件,将列表展示案例改为全局事件总线的方式实现组件间通信
步骤一:在App组件中绑定组件方法
说明:
修改App.vue组件,在组件中绑定自定义事件,具体在mounted生命周期中使用
$on方法
<template>
<div>
    <MyHeader :receive="receive"></MyHeader>
    <MyList :todos="todos"></MyList>
    <MyFooter
              :todos="todos"
              :checkAllTodo="checkAllTodo"
              :clearAllTodo="clearAllTodo"
              ></MyFooter>
    </div>
</template>

<script>
    import MyHeader from "./components/MyHeader";
    import MyList from "./components/MyList";
    import MyFooter from "./components/MyFooter";

    export default {
        name: "App",
        data() {
            return {
                todos: [
                    { id: "001", title: "抽烟", done: true },
                    { id: "002", title: "喝酒", done: false },
                    { id: "003", title: "打麻将", done: true },
                ],
            };
        },
        methods: {
            //接收数据
            receive(x) {
                // console.log('我是APP组件,我收到的数据是', x)
                this.todos.unshift(x);
            },
            //勾选or取消勾选todo
            checkTodo(id) {
                this.todos.forEach((todo) => {
                    if (todo.id === id) todo.done = !todo.done;
                });
            },
            //删除todo
            deleteTodo(id) {
                //箭头函数简写方法一
                // this.todos = this.todos.filter((todo) => todo.id !== id)
                //箭头函数写法二
                this.todos = this.todos.filter((todo) => {
                    return todo.id !== id;
                });
            },
            //全选or全不选
            checkAllTodo(done) {
                this.todos.forEach((todo) => {
                    todo.done = done;
                });
            },
            //清除所有done值为true的todo
            clearAllTodo() {
                this.todos = this.todos.filter((todo) => {
                    return !todo.done;
                });
            },
        },

        components: {
            MyHeader,
            MyList,
            MyFooter,
        },
        mounted() {
            this.$bus.$on("checkTodo", this.checkTodo);
            this.$bus.$on("deleteTodo", this.deleteTodo);
        },
        beforeDestroy() {
            this.$bus.$off("checkTodo");
            this.$bus.$off("deleteTodo");
        },
    };
</script>
步骤二:在MyItem组件中触发组件方法
- MyItem.vue组件
说明:
当用户在MyItem.vue组件进行数据复选与数据删除时,使用
this.$emitAPI进行组件方法的触发,与实现数据的传递
<template>
<div>
    <li>
        <label>
            <input
                   type="checkbox"
                   :checked="todo.done"
                   @change="handleCheck(todo.id)"
                   />
            <span>{{ todo.title }}</span>
    </label>
        <button class="button" @click="handleDelete(todo.id)">删除</button>
    </li>
    </div>
</template>

<script>
    export default {
        name: "MyItem",
        props: ["todo"],
        methods: {
            handleCheck(id) {
                this.$bus.$emit("checkTodo", id);
            },
            handleDelete(id) {
                this.$bus.$emit("deleteTodo", id);
            },
        },
        // mounted() {
        //   console.log(this.todo)
        // }
    };
</script>

<style>
    .button {
        display: none;
    }
    li:hover {
        background-color: aqua;
    }
    li:hover button {
        margin-left: 50%;
        display: inline-block;
    }
</style>
步骤三:演示

说明:
当点击删除时,事件成功被删除
5.12消息订阅与发布(任意组件间通信)
笔记小结:
概述:消息订阅与发布是一种组件间通信的方式,适用于任意组件间通信
使用场景︰A是任意组件,B是任意组件,B想给A传数据或者A想传数据给B
使用方式:
步骤一:安装pubsub库
npm i pubsub-js步骤二:在组件中引入pubsub库
import pubsub from "pubsub-js"步骤三:订阅消息
methods(){
    demo(data){......},
}

mounted(){
   this.pid = pubsub.subscribe( "xxx" ,this.demo) // 订阅消息
}
步骤四:取消订阅消息
beforeDestroy() {
    pussub.unsubscribe(this.pId);
},// 取消订阅时,需要使用pubsub.subscribe去获取订阅的id
步骤五:发布消息
methods(){
    sendmessage(){
        pubsub.publish( "xxx",data)
    }
}
注意:最好在beforeDestroy钩子中,用PubSub.unsubscribe(pid)去取消订阅。
5.12.1概述
Vue.js本身没有直接提供消息订阅与发布(Pub/Sub)的机制,所以需要使用第三方库来实现组件间通信。消息订阅与发布就是是一种组件间通信的方式,适用于任意组件间通信
- 理解订阅与发布

说明:
消息订阅与发布就像报纸的订阅与发布一样。住宅订阅报纸,邮递员每天早上就会向订阅了报纸的用户送报纸
5.12.2基本用例
说明:
消息订阅与发布实现任意组件间通信
步骤一:安装pubsub库
npm i pubsub-js
步骤二:发布消息
说明:
修改Student组件,在组件中使用
pussub.publish()API进行消息发布
<template>
<div class="School">
    <h1>老师名称:{{ name }}</h1>
    <h1>学校地址:{{ address }}</h1>
    <button @click="sendSchoolName">点我传输学校名称</button>
    </div>
</template>

<script>
    import pussub from "pubsub-js";//安装后导入
    export default {
        name: "School",
        data() {
            return {
                name: "杰哥",
                address: "家",
            };
        },
        methods: {
            sendSchoolName() {
                this.pId = pussub.publish("hello", "杰哥");//发布消息
            },
        },
    };
</script>

<style>
    .School {
        background-color: aqua;
    }
</style>
步骤三:订阅消息
说明:
修改School组件,在组件中使用
pussub.subscribeAPI进行消息订阅和pussub.unsubscribeAPI进行取消订阅
<template>
<div class="Student">
    <h1>学生姓名:{{ name }}</h1>
    <h1>学生年龄:{{ age }}</h1>
    </div>
</template>

<script>
    import pussub from "pubsub-js";//安装后导入
    export default {
        name: "Student",
        data() {
            return {
                name: "玥玥",
                age: 18,
                number: 0,
            }
        },
        methods:{
            demo(msgName,data){//msgName:主题名,data:数据
                console.log("有人在", msgName, "主题上发布了", data, "这样的数据");
            }
        },
        mounted() {
            //方法一
            // this.pId = pussub.subscribe("hello", (msgName, data) => {
            //   console.log("有人在", msgName, "主题上发布了", data, "这样的数据");
            // });
            //方法二
            this.pId = pussub.subscribe("hello", this.demo);
        },
        beforeDestroy() {
            pussub.unsubscribe(this.pId);//在组件销毁前取消订阅
        },
    };
</script>
<style>
    .Student {
        background-color: pink;
    }
</style>
步骤四:演示
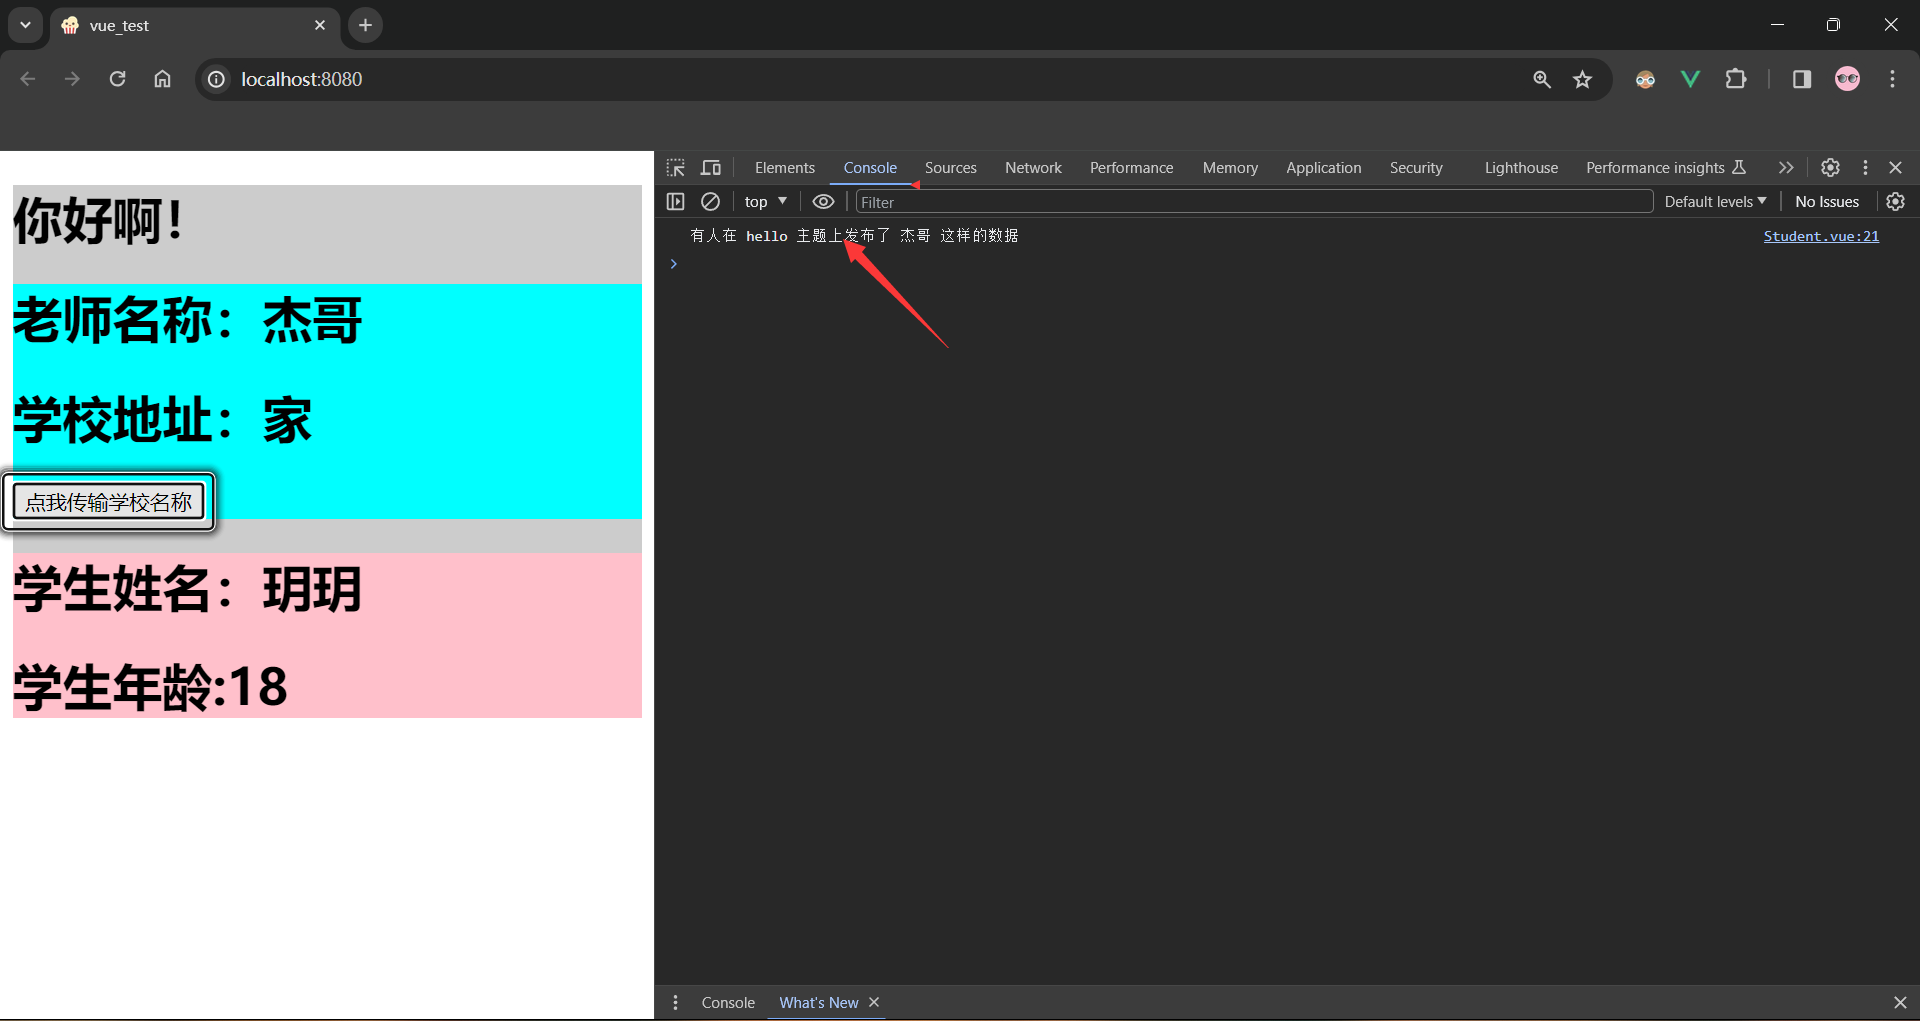
说明:
点击按钮后,消息成功传输
5.12.3案例-ToodList消息订阅与发布
说明:实现思路
在5.11小节中全局事件总线(任意组件间通信)中5.11.3小节完成案例的基础上修改App.vue组件,改为消息订阅与发布通信即可
步骤一:在App组件中绑定组件方法
说明:
修改App.vue组件,在组件中绑定自定义事件,具体在mounted生命周期中使用
pubsub.subscribe方法
<template>
  <div>
    <MyHeader :receive="receive"></MyHeader>
    <MyList :todos="todos"></MyList>
    <MyFooter
      :todos="todos"
      :checkAllTodo="checkAllTodo"
      :clearAllTodo="clearAllTodo"
    ></MyFooter>
  </div>
</template>

<script>
import MyHeader from "./components/MyHeader";
import MyList from "./components/MyList";
import MyFooter from "./components/MyFooter";
import pubsub from "pubsub-js";

export default {
  name: "App",
  data() {
    return {
      todos: [
        { id: "001", title: "抽烟", done: true },
        { id: "002", title: "喝酒", done: false },
        { id: "003", title: "打麻将", done: true },
      ],
    };
  },
  methods: {
    //接收数据
    receive(x) {
      // console.log('我是APP组件,我收到的数据是', x)
      this.todos.unshift(x);
    },
    //勾选or取消勾选todo
    checkTodo(id) {
      this.todos.forEach((todo) => {
        if (todo.id === id) todo.done = !todo.done;
      });
    },
    //删除todo
    deleteTodo(_,id) {//此时需要接收两个参数,第一个可用下划线占位
      //箭头函数简写方法一
      // this.todos = this.todos.filter((todo) => todo.id !== id)
      //箭头函数写法二
      this.todos = this.todos.filter((todo) => {
        return todo.id !== id;
      });
    },
    //全选or全不选
    checkAllTodo(done) {
      this.todos.forEach((todo) => {
        todo.done = done;
      });
    },
    //清除所有done值为true的todo
    clearAllTodo() {
      this.todos = this.todos.filter((todo) => {
        return !todo.done;
      });
    },
  },

  components: {
    MyHeader,
    MyList,
    MyFooter,
  },
  mounted() {
    this.$bus.$on("checkTodo", this.checkTodo);
    // this.$bus.$on("deleteTodo", this.deleteTodo);
    this.subPId=pubsub.subscribe("deleteTodo",this.deleteTodo)
  },
  beforeDestroy() {
    this.$bus.$off("checkTodo");
    // this.$bus.$off("deleteTodo");
    pubsub.unsubscribe(this.subPId)
  },
};
</script>
步骤二:在MyItem组件中触发组件方法
- MyItem.vue组件
说明:
当用户在MyItem.vue组件进行数据复选与数据删除时,使用
pubsub.publishAPI进行组件方法的触发,与实现数据的传递
<template>
<div>
    <li>
        <label>
            <input
                   type="checkbox"
                   :checked="todo.done"
                   @change="handleCheck(todo.id)"
                   />
            <span>{{ todo.title }}</span>
    </label>
        <button class="button" @click="handleDelete(todo.id)">删除</button>
    </li>
    </div>
</template>

<script>
    import pubsub from "pubsub-js";
    export default {
        name: "MyItem",
        props: ["todo"],
        methods: {
            handleCheck(id) {
                this.$bus.$emit("checkTodo", id);
            },
            handleDelete(id) {
                // this.$bus.$emit("deleteTodo", id);
                pubsub.publish("deleteTodo",id)
            },
        },
        // mounted() {
        //   console.log(this.todo)
        // }
    };
</script>

<style>
    .button {
        display: none;
    }
    li:hover {
        background-color: aqua;
    }
    li:hover button {
        margin-left: 50%;
        display: inline-block;
    }
</style>
5.13$nextTick(DOM更新后额外操作)
笔记小结:
概述:
this.$nextTick是 Vue.js 提供的一个异步方法,用于在 DOM 更新之后执行回调函数。也就是会在模板解析完成之后再执行使用方式:
this.$nextTick(() => { this.$refs.input.focus(); });什么时候用:当改变数据后,要基于更新后的新DOM进行某些操作时,要在nextTick所指定的回调函数中执行。
5.13.1概述
this.$nextTick 是 Vue.js 提供的一个异步方法,用于在 DOM 更新之后执行回调函数。它的主要作用是确保在更新 Vue 组件之后立即执行一些操作,以确保操作在 DOM 更新之后生效。
5.13.2基本用例
说明:
this.$nextTick基本用法演示
<template>
  <div>
    <p>{{ message }}</p>
    <button @click="updateMessage">Update Message</button>
  </div>
</template>

<script>
export default {
  data() {
    return {
      message: 'Initial Message'
    };
  },
  methods: {
    updateMessage() {
      this.message = 'Updated Message';

      // 在数据更新后,使用 $nextTick 来确保在 DOM 更新之后执行回调函数
      this.$nextTick(function() {
        console.log('Message updated after DOM update:', this.message);
      });
    }
  }
}
</script>
说明:
$nextTick回调函数,就是确保DOM更新之后执行回调函数,实现额外的操作
5.13.3案例-ToodList编辑聚焦
说明:实现思路
在5.12小节中消息订阅与发布(任意组件间通信)中5.12.3小节完成案例的基础上修改MyItem.vue组件
步骤一:聚焦编辑
说明:
修改MyItem.vue组件。为事项的编辑功能添加一个isEdite属性,并在点击编辑按钮后,光标能够对输入框聚焦显示
<template>
<div>
    <li>
        <label>
            <input
                   type="checkbox"
                   :checked="todo.done"
                   @change="handleCheck(todo.id)"
                   />
            <span v-show="!todo.isEdite">{{ todo.title }}</span>
            <input
                   v-show="todo.isEdite"
                   type="text"
                   :value="todo.title"
                   @blur="handBlur(todo, $event)"
                   ref="input"
                   /><!-- 事件的处理,处理焦点时,传入相应的$event,以便修改值 -->
    </label>
        <div class="left"><!-- 按钮 -->
            <button v-show="!todo.isEdite" class="button" @click="handlEdite(todo)">
                编辑
    </button>
            <button class="button" @click="handleDelete(todo.id)">删除</button>
    </div>
    </li>
    </div>
</template>

<script>
    import { nextTick } from "vue";
    export default {
        name: "MyItem",
        props: ["todo", "checkTodo", "deleteTodo"],
        methods: {
            handleCheck(id) {
                this.checkTodo(id);
            },
            handleDelete(id) {
                this.deleteTodo(id);
            },
            handlEdite(todo) {
                if (todo.hasOwnProperty("isEdite")) {//hasOwnProperty用法
                    todo.isEdite = true;
                } else {
                    console.log("没有isEdite属性");
                    this.$set(todo, "isEdite", true);//注意使用Vue.$set方式进行属性追加,才能进行数据代理
                }
                // Vue在进行回调函数解析时,会将此函数里面的所有内容执行完整,再次解析模板。也就是先执行fcous,但此时模板中页面的内容还未加载到页面,因此需要设置恰当的时间延时
                //方式一:定时器
                // setTimeout(() => {
                //   this.$refs.input.focus();
                // }, 200);
                //方式二:$nextTick
                //直到页面的Dom元素解析完成后再执行$nextTick里面的内容
                this.$nextTick(() => {
                    this.$refs.input.focus();
                });
            },
            //失去焦点完成编辑
            handBlur(todo, e) {
                todo.isEdite = false;
                if (!e.target.value.trim()) return alert("输入不能为空!");//健壮性判断
                this.$bus.$emit("updataTodo", todo.id, e.target.value);
            },
        },
    };
</script>

<style>
    .left {
        margin-right: 50%;
        float: right;
    }
    li:hover {
        background-color: aqua;
    }
    li:hover button {
        display: inline-block;
    }
</style>
步骤二:演示

说明:
当新增事项时,事项并没有isEdite属性,但点击编辑按钮后光标成功聚焦在输入框内。若不使用
$nextTick回调函数,则光标无法在新增事项中的输入框中聚焦
5.14过渡与动画(组件中DOM元素入离动画)
笔记小结:
概述:过渡和动画是用于在元素进入或离开 DOM 的过程中添加效果的一种机制。
作用:在插入、更新或移除DOM元素时,在合适的时候给元素添加样式类名。
使用方式:
实现JS原生动画(了解)
多元素过渡效果(了解)
集成第三方动画(重点)
步骤一:使用npm包管理工具进行安装
npm install animate.css --save步骤二:在文件中导入
import 'animate.css';步骤三:添加属性
方式一:单元素使用
<transition-group name="animate__animated animate__bounce">An animated element</transition-group> 方式二:多元素使用
<transition-group
                  name="animate__animated animate__bounce"
                  enter-active-class="animate__bounce"
                  leave-active-class="animate__backOutDown"
                  appear
                  >
</transition-group>
5.14.1概述
在 Vue.js 中,过渡和动画是用于在元素进入或离开 DOM 的过程中添加效果的一种机制。Vue 提供了 <transition> 组件和一些内置的 CSS 类名,以方便你在 CSS 中定义过渡和动画效果。

说明:
v-enter进入起点、v-enter-to进入终点
5.14.2基本用例
说明:
使用JS原生动画实现组件中的元素的加载
步骤一:实现JS原生动画
说明:
添加Test.vue组件,并通过
<transition></transition>标签以及v-show属性进行联合使用以实现动画效果的添加
<template>
    <div>
        <button @click="isShow = !isShow">显示/隐藏</button>
        <!--被transition包裹的元素没有形成一个真正的DOM元素-->
        <transition name="hello" appear>    <!-- 单独写一个appear为DOM元素一加载完成,就出现一次 -->
            <!--写法一(简写):<transition name="hello" appear> -->
            <!--写法二(绑定写法):<transition name="hello" :appear="true">-->

            <!-- 注意:联合使用transition动画标签时,v-show属性需要加在所控制标签的身上 -->
            <h1 v-show="isShow">{{ msg }}</h1>
        </transition>
    </div>
</template>

<script>
export default {
    data() {
        return {
            msg: "hello",
            isShow: true,
        };
    },
};
</script>

<style>
h1 {
    background-color: yellow;
}

/* 如果transition动画标签有name属性,则讲下面的字母v为name的属性值 */
/* v-enter-active {
  animation: show 1s linear;
} */

.hello-enter-active {
    animation: show 1s linear;
}

.hello-leave-active {
    animation: show 1s reverse;
}

@keyframes show {
    from {
        transform: translateX(-100%);
    }
    to {
        transform: translateX(0);
    }
}
</style>
说明:
- 被transition包裹的元素没有形成一个真正的元素
步骤二:演示

说明:
当点击“显示/隐藏”按钮时,动画正常从左往右进出
5.14.3多元素过渡效果
步骤一:实现JS原生动画
说明:
添加Test2.vue组件,并通过
<transition-group></transition-group>标签以及v-show属性进行联合使用以实现动画效果的添加
<template>
<div>
    <button @click="isShow = !isShow">显示/隐藏</button>
    <transition-group name="hello" appear><!--多元素过度效果,需要使用transition-group包裹起来,并且所控制的标签需要有key属性-->
        <h1 v-show="!isShow" key="01">{{ msg }}</h1>
        <h1 v-show="isShow" key="02">{{ msg2 }}</h1>
    </transition-group>
    </div>
</template>

<script>
    export default {
        data() {
            return {
                msg: "hello",
                msg2: "玥玥",
                isShow: true,
            };
        },
    };
</script>

<style>
    h1 {
        background-color: yellow;
    }
    /* 进入的起点,离开的终点 */
    .hello-enter,
    .hello-leave-to {
        transform: translateX(-100%);
    }
    /* 进入,离开的过程 */
    .hello-enter-active,
    .hello-leave-active {
        transition: 0.5s linear;
    }
    /* 进入的终点。离开的起点 */
    .hello-enter-to,
    .hello-leave {
        transform: translateX(0);
    }
</style>
说明:
因为进入的起点、离开的终点动画一致,所以我们可以对css类选择器用“,”进行分隔表示同时应用同一属性
注意:
多元素过度效果,需要用包裹起来,不应用
否则控制台报错:
- 并且包裹的标签需要有一个key属性
步骤二:演示

说明:
当点击按钮后,会出现两个动画,一进一出
5.14.4集成第三方动画
前提:
安装过
animate.css库,使用npm install animate.css --save进行安装
步骤一:导入animate库
import 'animate.css';
步骤二:实现第三方动画导入
说明:
添加Test3.vue组件,并通过`<transition-group></transition-group>`标签以及相应属性和v-show属性进行联合使用以实现动画效果的添加
<template>
<div>
    <button @click="isShow = !isShow">显示/隐藏</button>
    <transition-group
                      name="animate__animated animate__bounce"
                      appear
                      enter-active-class="animate__bounce"
                      leave-active-class="animate__backOutDown"
                      >
        <!-- 使用此库的属性名 -->
        <h1 v-show="!isShow" key="01">{{ msg }}</h1>
        <!--<h1 v-show="isShow" key="02">{{ msg2 }}</h1>-->
    </transition-group>
    </div>
</template>

<script>
    import "animate.css"; //不用from因为导入的是css样式库,不是js
    export default {
        data() {
            return {
                msg: "hello",
                msg2: "玥玥",
                isShow: true,
            };
        },
    };
</script>

<style>
    h1 {
        background-color: yellow;
    }
</style>
步骤三:演示

说明:
当点击按钮后,动画效果正常演示
5.14.5案例-ToodList过渡动画
说明:实现思路
在5.13小节中**$nextTick(DOM更新后操作)中5.13.2小节**完成案例的基础上修改MyItem.vue组件
补充:参考官网
Animate.css官网:Animate.css | A cross-browser library of CSS animations.
步骤一:添加事项组件动画
说明:
修改MyItem.vue组件。为事项的编辑功能添加一个
<transition></transition>标签,并实现进入或退出动画
<template>
<!-- 定义名称为todo -->
<transition name="todo" appear>
    <li>
        <label>
            <input
                   type="checkbox"
                   :checked="todo.done"
                   @change="handleCheck(todo.id)"
                   />
            <span v-show="!todo.isEdite">{{ todo.title }}</span>
            <input
                   v-show="todo.isEdite"
                   type="text"
                   :value="todo.title"
                   @blur="handBlur(todo, $event)"
                   ref="input"
                   />
    </label>
        <div class="left">
            <button v-show="!todo.isEdite" class="button" @click="handlEdite(todo)">
                编辑
    </button>
            <button class="button" @click="handleDelete(todo.id)">删除</button>
    </div>
    </li>
    </transition>
</template>

<script>
    import { nextTick } from "vue";
    export default {
        name: "MyItem",
        props: ["todo", "checkTodo", "deleteTodo"],
        methods: {
            handleCheck(id) {
                this.checkTodo(id);
            },
            handleDelete(id) {
                this.deleteTodo(id);
            },
            handlEdite(todo) {
                if (todo.hasOwnProperty("isEdite")) {
                    todo.isEdite = true;
                } else {
                    console.log("没有isEdite属性");
                    this.$set(todo, "isEdite", true);
                }
                this.$nextTick(() => {
                    this.$refs.input.focus();
                });
            },
            handBlur(todo, e) {
                todo.isEdite = false;
                if (!e.target.value.trim()) return alert("输入不能为空!");
                this.$bus.$emit("updataTodo", todo.id, e.target.value);
            },
        },

    };
</script>

<style>
    .left {
        margin-right: 50%;
        float: right;
    }
    li:hover {
        background-color: aqua;
    }
    li:hover button {
        display: inline-block;
    }
    /* 名name为todo */
    .todo-enter-active {
        animation: show 1s linear;
    }
    .todo-leave-active {
        animation: show 1s reverse;
    }
    @keyframes show {
        from {
            transform: translateX(-100%);
        }
        to {
            transform: translateX(0);
        }
    }
</style>
步骤二:演示

说明:
当点击删除功能按钮后,动画效果成功执行
6.Vue中的Ajax请求
笔记小结:
- 概述:Ajax(Asynchronous JavaScript and XML)是一种在 Web 开发中用于创建异步请求的技术。在 Vue.js 中进行 Ajax 请求通常会使用 Vue 提供的插件,比较常用的插件有 Axios
- 其余内容详细查看各个小节
6.1概述
在 Vue.js 中进行 Ajax 请求通常会使用 Vue 提供的插件,比较常用的插件有 Axios 和 Vue Resource(Vue1.0常用,现已弃用)。
补充:
Ajax(Asynchronous JavaScript and XML)是一种在 Web 开发中用于创建异步 Web 应用的技术。它允许在不重新加载整个页面的情况下,通过 JavaScript 向服务器发起 HTTP 请求,并接收和处理服务器返回的数据。Ajax 技术的核心是通过 XMLHttpRequest 对象进行异步通信。
补充:常用的发送ajax的请求方式有哪些?
xhr new XMLHttpRequest() xhr.open() xhr.send()jQuery $.get $.postaxios(重点)fetch
6.2基本用例-Axios常规使用
说明:
Axios的基本使用与演示
步骤一:安装Axios库
npm install axios
步骤二:在组件中使用Axios库
说明:
在任意组件使用
axios.get可发送get请求,并使用.then和.catch进行请求的处理
// 1.导入 Axios
import axios from 'axios';

export default {
  methods: {
    fetchData() {
      // 2.发送 GET 请求
      axios.get('https://api.example.com/data')
        .then(response => {
          // 3.请求成功处理
          console.log(response.data);
        })
        .catch(error => {
          // 4.请求失败处理
          console.error('Error fetching data:', error);
        });
    }
  }
};
说明:
通过
.get可以向此域名“https://api.example.com/data”发送请求,通过.then可以对响应成功的请求做处理,通过.catch可以对响应失败的请求做处理
6.3配置代理(解决跨域)
笔记小结:
概述:Vue 脚手架(Vue CLI)提供了一个开发服务器,它允许你在开发环境中使用代理来转发 API 请求。
使用方式:
步骤一:配置代理(了解即可,常用代理高级配置)
module.exports = {
    pages: {
        index: {
            //入口
            entry: 'src/main.js',
        },
    },
    lintOnSave: false, //关闭语法检查
    // 开启代理服务器 (方式一)
    devServer: {
        proxy: 'http://localhost:8081'
    },
}
/*
说明:
	1.优点:配置简单,请求资源时直接发给前端(8080)即可。
	2.缺点:不能配置多个代理,不能灵活的控制请求是否走代理。
	3.工作方式:若按照上述配置代理,当请求了前端不存在的资源时,那么该请求会转发给服务器(优先匹配前端资源)
	*/
步骤二:访问资源
axios
    .get("/students.txt")  //发送AJAX请求的时候,会优先查找自己的服务器中的“students.txt”资源,如果找不到,就会走代理,然后去"http://localhost:8081"上找“students.txt”资源
    .then(
    (response) => {
        console.log("请求成功了", response.data);
    },
    (error) => {
        console.log("请求失败了", error.message);
    }
);
跨域处理请查看相应小节
代理高级配置
步骤一:配置代理
module.exports ={
  pages:{
    index:{
      //入口
      entry:'src/main.js',
    },
  },
  lintOnSave:false,//关闭语法检查
  //开启代理服务器 (方式二)
  devServer: {
    proxy: {
      '/api': {//请求前缀
        target: 'http://localhost:8081',
        pathRewrite:{"^/api":""},//将以api的前缀换为空
        ws: true,//用于支持websocket(在vue,cll中默认开启)
        changeOrigin: true//用于控制请求头中的host(在vue,cll中默认开启)
      },
      '/demo': {//请求前缀
        target: 'http://localhost:8082',
        pathRewrite:{"^/demo":""},//将以demo的前缀换为空
      }
    }
  }
步骤二:访问资源
axios
    .get("api/students")  // 在发送请求时需要添加请求前缀来区分此请求到底走代理的哪条规则
    .then(
    (response) => {
        console.log("请求成功了", response.data);
    },
    (error) => {
        console.log("请求失败了", error.message);
    }
);
6.3.1概述
Vue 脚手架(Vue CLI)提供了一个开发服务器,它允许你在开发环境中使用代理来转发 API 请求。这是非常有用的,因为在开发过程中,前端项目通常需要与后端服务进行通信,而在开发环境下,通常前端和后端服务可能运行在不同的端口上。代理机制可以解决跨域请求的问题,避免浏览器的同源策略导致的限制。
6.3.2基本用例-代理基本配置
说明:
理解Vue脚手架提供的配置代理的作用:当用户访问前端服务资源不存在时,就会通过代理来访问代理所指向的服务资源
前提:
- 本地有一个后端服务器,并且提供服务的地址为,“http://localhost:8081/students.txt",其内容为如下:
我是后端服务器,我的学生有“玥玥”
- 本地前端服务器的public目录下存放了**“students.txt”**,其内容为如下:
我是前端服务,我的学生有“玥玥”
步骤一:配置代理
说明:
修改脚手架的"vue.config.js"文件,并添加代理服务器的配置
module.exports = {
    pages: {
        index: {
            //入口
            entry: 'src/main.js',
        },
    },
    lintOnSave: false, //关闭语法检查
  	// 开启代理服务器 (方式一)
    devServer: {
        proxy: 'http://localhost:8081'
    },
}
说明:
这里填写"proxy"的值的时候,需要填写后端服务访问路径
补充:
- 此方式不能配置多个代理
- 不能灵活的控制是否要走代理
步骤二:访问本地资源
说明:
新建App.vue,并向本地的“http://localhost:8080/student”发送Get请求
<template>
    <div>
        <button @click="getStudents">点击获取学生数据</button>
    </div>
</template>

<script>
//npm i axios
import axios from "axios";

export default {
    name: "App",
    methods: {
        getStudents() {
            axios
            // .get("http://localhost:8080/students.txt")
            // 当前按钮这个页面就是在8080服务器上的,又去访问8080服务器上的资源,所以“http://localhost:8080/”可以省略
           		.get("/students.txt")
                .then(
                    (response) => {
                        console.log("请求成功了", response.data);
                    },
                    (error) => {
                        console.log("请求失败了", error.message);
                    }
                );
        },
    },
};
</script>
步骤三:演示

说明:
当点击按钮时,前端数据响应成功
步骤四:访问远程资源
1.删除本地服务器public文件夹中的students.txt资源
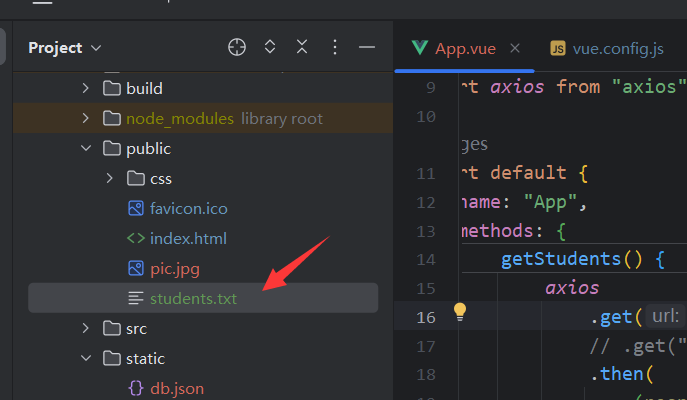
2.再次访问本地资源
<template>
    <div>
        <button @click="getStudents">点击获取学生数据</button>
    </div>
</template>

<script>
//npm i axios
import axios from "axios";

export default {
    name: "App",
    methods: {
        getStudents() {
            axios
             .get("/students.txt")  // 注意1.此处的代码访问,无需写后端的服务地址,否则会出现跨域问题,这里只做了解,后面解答 2.发送AJAX请求的时候,会优先查找自己的服务器中的“students.txt”资源,如果找不到,就会走代理,然后去"http://localhost:8081"上找“students.txt”资源
                .then(
                    (response) => {
                        console.log("请求成功了", response.data);
                    },
                    (error) => {
                        console.log("请求失败了", error.message);
                    }
                );
        },
    },
};
</script>
步骤五:演示

说明:
可以看到,本次请求结果由后端响应。换句话说,当用户访问前端服务资源不存在时,就会通过代理来访问代理所指向的服务资源
6.3.2跨域问题处理
笔记小结:
概述:
- 含义:跨域(Cross-Origin)是指在 Web 开发中,由于浏览器的同源策略(Same-Origin Policy)的限制,一个域下的文档或脚本试图去请求另一个域下的资源时,请求会被阻止。
- 同源策略:
- 协议相同
- 域名相同
- 端口相同
跨域处理
- 步骤一:添加代理配置
- 步骤二:发送请求
注:跨域问题处理跟“基本用例-代理基本配置”一致,此处不做过多介绍
使用代理跨域处理的原理:
- 前端使用Ajax发送请求,请求被Vue CLI提供的代理进行拦截并使用Http请求转发给后台服务器
6.3.2.1概述
跨域(Cross-Origin)是指在 Web 开发中,由于浏览器的同源策略(Same-Origin Policy)的限制,**一个域下的文档或脚本试图去请求另一个域下的资源时,请求会被阻止。**同源策略是一种安全机制,它确保一个页面的脚本只能读取来自同一源的窗口和文档的属性。
同源策略要求:1.协议相同:请求的协议必须与页面的协议一致。2.域名相同:请求的域名必须与页面的域名一致。3.端口相同:请求的端口必须与页面的端口一致。
说明:解决跨域常见方法
1.JSONP(JSON with Padding):通过动态创建
<script>标签,以 GET 方式请求数据,服务器返回的数据需要包裹在一个回调函数中。(平时不常用,但面试中常问✳)说明:
- 需要前后端配合
- 仅能解决get请求post请求等不能解决
2.CORS(Cross-Origin Resource Sharing):是一种基于 HTTP 头的机制,通过服务器设置响应头来允许或拒绝浏览器跨域请求。
说明:
- 需要后端配合
- 后端接收所有来源的请求即可
3.代理服务器:在同源的服务器上设置一个代理,让这个代理去请求不同源的资源,然后再返回给前端。
4.WebSocket:WebSocket 不受同源策略限制,可以在不同源之间建立双向通信。
5.使用前端框架提供的代理配置:例如,Vue CLI 提供的代理配置,允许在开发环境中将前端的请求代理到后端服务,避免跨域问题。
说明:
- 红色8080为前端,粉色8080为服务器,蓝色5000为服务器。因为前端与服务器打交道是通过Ajax来发送请求受同源策略限制,而服务器与服务器打交道是通过Http请求不受同源策略限制,所以通过服务器在中间做请求转发即可实现跨域问题的处理
6.3.2.2基本用例-跨域问题产生及处理
步骤一:跨域问题产生
前提:
- 后端“http://localhost:8081/”服务提供"student"资源。例如向“http://localhost:8081/student”发送get请求,并且成功请求并响应如下JSON数据:
{"name":"玥玥","sex":"女","age":17}
说明:
修改App.vue,当前端服务向后端服务直接发送请求时,会出现跨域问题
<template>
    <div>
        <button @click="getStudents">点击获取学生数据</button>
    </div>
</template>

<script>

import axios from "axios";

export default {
    name: "App",
    methods: {
        getStudents() {
            axios
                .get("http://localhost:8081/student")
                .then(
                    (response) => {
                        console.log("请求成功了", response.data);
                    },
                    (error) => {
                        console.log("请求失败了", error.message);
                    }
                );
        },
    },
};
</script>
说明:
- 因为前端服务向后端服务发送请求时违背了同源策略,同源策略要求“协议”、“域名”、“端口”,相同,但此时端口不同,因此违背同源策略
步骤二:跨域问题处理
说明:
使用Vue CLI脚手架提供的代理配置
1.添加代理配置
说明:
修改脚手架的"vue.config.js"文件,并添加代理服务器的配置
module.exports = {
    pages: {
        index: {
            //入口
            entry: 'src/main.js',
        },
    },
    lintOnSave: false, //关闭语法检查
    //开启代理服务器
    devServer: {
        proxy: 'http://localhost:8081'
    },
}
说明:
这里填写"proxy"的值的时候,需要填写后端服务访问路径
2.发送请求
<template>
    <div>
        <button @click="getStudents">点击获取学生数据</button>
    </div>
</template>

<script>
//npm i axios
import axios from "axios";

export default {
    name: "App",
    methods: {
        getStudents() {
            axios
			// 发送AJAX请求的时候,会优先查找自己的服务器中的“students”资源,如果找不到,就会走代理,然后去"http://localhost:8081"上找“students”资源
               .get("/student")
                .then(
                    (response) => {
                        console.log("请求成功了", response.data);
                    },
                    (error) => {
                        console.log("请求失败了", error.message);
                    }
                );
        },
    },
};
</script>
步骤三:演示

说明:
此时,当前端向后端发送数据时,后端成功响应数据到前端
补充:
当用户点击了前端按钮时,前端服务就会向Vue CLI脚手架提供的代理服务机制来进行请求的转发,而成功获取到后端的JSON数据并返回给前端
6.3.3代理高级配置
说明:
在 Vue CLI 中,代理的高级配置允许你更灵活地处理不同情况下的代理需求。通过高级配置,你可以为不同的请求设置不同的代理规则,甚至可以对请求进行动态修改。
步骤一:添加高级配置
说明:
修改脚手架的**“vue.config.js”**文件,并添加代理服务器的配置
module.exports ={
  pages:{
    index:{
      //入口
      entry:'src/main.js',
    },
  },
  lintOnSave:false,//关闭语法检查
  //开启代理服务器 (方式二)
  devServer: {
    proxy: {
      '/api': {//请求前缀
        target: 'http://localhost:8081',
        pathRewrite:{"^/api":""},//将以api的前缀换为空
        ws: true,//用于支持websocket(在vue,cll中默认开启)
        changeOrigin: true//用于控制请求头中的host(在vue,cll中默认开启)
      },
      '/demo': {//请求前缀
        target: 'http://localhost:8082',
        pathRewrite:{"^/demo":""},//将以demo的前缀换为空
      }
    }
  }
}
说明:
配置代理时使用对象式写法
补充:额外常用写法
// vue.config.js

module.exports = {
 devServer: {
     proxy: {
         '/api': {
             target: 'http://localhost:3000',
             changeOrigin: true,
             pathRewrite: {
                 '^/api': ''
             },
             onProxyReq: function(proxyReq, req, res) {
                 // 在发送代理请求时可以对请求进行动态修改
                 proxyReq.setHeader('Authorization', 'Bearer YOUR_ACCESS_TOKEN');
             },
             onProxyRes: function(proxyRes, req, res) {
                 // 在收到代理响应时可以对响应进行动态修改
                 proxyRes.headers['x-added-header'] = 'added header value';
             }
         },
         '/uploads': {
             target: 'http://localhost:8000',
             changeOrigin: true,
             // 对文件上传请求进行特殊处理
             onProxyReq: function(proxyReq, req, res) {
                 if (req.headers['content-type'] && req.headers['content-type'].startsWith('multipart/form-data')) {
                     // 如果是文件上传请求,则修改请求头
                     proxyReq.setHeader('Content-Type', req.headers['content-type']);
                 }
             }
         }
     }
 }
};
步骤二:发送请求
说明:
修改App.vue文件,使用axios的
.get发送请求时
<template>
    <div>
        <button @click="getStudents">点击获取学生数据</button>
    </div>
</template>

<script>
//npm i axios
import axios from "axios";

export default {
    name: "App",
    methods: {
        getStudents() {
            axios
                .get("api/student")
                .then(
                    (response) => {
                        console.log("请求成功了", response.data);
                    },
                    (error) => {
                        console.log("请求失败了", error.message);
                    }
                );
        },
    },
};
</script>
说明:
加上前缀走代理,不加前缀则不走代理
步骤三:演示


说明:
可以看到加上前缀后请求成功响应,没有加上前缀请求响应失败
6.4案例-GitHub用户搜索
说明:
搜索用户,并在前端中进行页面展示
步骤一:编写页面总体样式
说明:
修改项目
public/index.html文件,并为其添加link三方样式
<!DOCTYPE html>
<html lang="">
  <head>
    <meta charset="utf-8" />
    <!-- 针对IE浏览器的一个特殊配置,含义是让IE浏览器以最高的渲染级别渲染页面 -->
    <meta http-equiv="X-UA-Compatible" content="IE=edge" />
    <!-- 开启移动端的理想视口 -->
    <meta name="viewport" content="width=device-width,initial-scale=1.0" />
    <!-- 配置网页图标 -->
    <link rel="icon" href="<%= BASE_URL %>favicon.ico" /><!-- <%= BASE_URL %> 指public所在文件夹路径-->
    <!-- 导入第三方的css样式库 -->
    <link href="<%= BASE_URL %>css/test01.css" />
    <!-- 配置网页标题 -->
    <title><%= htmlWebpackPlugin.options.title %></title>
  </head>
  <body>
    <!-- 当浏览器不支持js时noscript中的元素就会被渲染 -->
    <noscript>
      <strong>
        We're sorry but <%= htmlWebpackPlugin.options.title %> doesn't work
        properly without JavaScript enabled. Please enable it to continue.
      </strong>
    </noscript>
    <!-- 容器 -->
    <div id="app"></div>
    <!-- built files will be auto injected -->
  </body>
</html>
补充:
- 若要导入第三方的CSS样式库,需要在标签中的中导入
 <!-- 导入第三方的css样式库 -->
 <link href="<%= BASE_URL %>css/test01.css" />
- 若导入没有效果,则可以使用常规方式
<link href="./css/myBootstrap.css" />
步骤二:安装全局事件总线
说明:
修改main.js文件,并使用
beforeCreate()方法安装全局事件总线,以便实现搜索组件和列表组件的通信与页面展示
// 该文件是整个项目的入口文件
// 引入VUE
import Vue from 'vue'
// 引入APP组件,它是所有组件的父组件
import App from './App.vue'
// 关闭Vue的生产提示
Vue.config.productionTip = false

// 创建Vue实例对象
new Vue({
  el:"#app",
  render: h => h(App),
  //安装全局事件总线
  beforeCreate(){
   Vue.prototype.$bus=this
  }
})
补充:
安装全局事件总线是任意组件间的通信方式,也是最常用的通信方式
步骤三:注册组件
说明:
修改
App.vue组件,实现搜索组件和列表展示组件的注册
<template>
	<div>
        <Search></Search> <!--用于搜索内容-->
        <List></List><!--用于展示页面信息-->
    </div>
</template>

<script>
    import Search from "@/components/Search.vue";
    import List from "@/components/List.vue";

    export default {
        name: "App",
        methods: {},
        components: {
            Search,
            List,
        },
    };
</script>
步骤四:添加搜索组件
说明:
创建
Search.vue组件,并利用全局事件总线来控制页面内容展示是初始状态、加载状态、错误状态、展示状态
<template>
<div>
<div>get GitHub</div>
<input type="text" placeholder="请输入地址" v-model="KeyWords" />
<button @click="getUsers">点我搜索</button>
</div>
</template>
<script>
import axios from "axios";
export default {
name: "Search",
data() {
return {
KeyWords: "",
};
},
methods: {
getUsers() {
// 1.发送请求时展示请求状态
this.$bus.$emit("updataList", {
isWellcome: false,//初始状态,点击按钮后,不展示欢迎词
isLoadding: true,//加载状态,点击按钮后,展示加载中
error: "",//错误状态,点击按钮后,无错误信息
users: [],//展示状态,点击按钮后,无用户信息
});
// 2.发送axios请求
axios.get(`https://api.github.com/search/users?q=${this.KeyWords}`).then(
(response) => {
// 2.1请求响应成功后展示用户信息
this.$bus.$emit("updataList", { //补充:对象方式的写法,里面的属性顺序是可以变换的
// isWellcome: false,//请求成功后,不再展示欢迎词。初始状态值为false或省略
isLoadding: false,//请求成功后,不展示记载中。加载状态值为false
error: "",//请求成功后,无错误信息。错误状态值为空
users: response.data.items,//请求成功后,返回用户信息。展示状态值为响应内容
});
},
(error) => {
this.$bus.$emit("updataList", {
// 2.2请求响应失败后展示错误信息
// isWellcome: false,//请求失败后,不再展示欢迎词。初始状态值为false或省略
isLoadding: false,//请求失败后,不展示记载中。加载状态值为false
error: error.message,//请求失败后,返回错误信息。错误状态值为错误原因
users: [],//请求失败后,无用户信息。展示状态值为空
});
}
);
},
},
};
</script>
<style>
</style>
步骤五:添加列表组件
说明:
创建
List.vue组件,并配合Search.vue组件,利用全局事件总线来控制页面内容展示是初始状态、加载状态、错误状态、展示状态
<template>
	<div>
        <div
             v-show="objectData.users.length"
             v-for="user in objectData.users"
             :key="user.login"
             > <!--控制页面是否展示组件时,巧用对象长度值来进行控制--><!--当使用v-show时,建议使用:key属性以防止出现列表渲染顺序出现问题 -->
            <a :href="user.html_url">
                <img :src="user.avatar_url" alt="" height="100" width="80"/>
        	</a>
            <p>{{ user.login }}</p>
        </div>
        <!--巧用objectData对象的值来控制页面展示内容-->
        <!-- 展示欢迎词 -->
        <div v-show="objectData.isWellcome">欢迎您!</div>
        <!-- 展示加载中 -->
        <div v-show="objectData.isLoadding">加载中……</div>
        <!-- 展示错误信息 -->
        <div v-show="objectData.error">{{ objectData.error }}</div>
    </div>
</template>

<script>
    export default {
        name: "List",
        data() {
            return {
                // 控制页面初始状态,并展示相应的状态
                objectData: {
                    isWellcome: true,//页面为初始状态,展示欢迎词
                    isLoadding: false,//页面为初始状态,不展示加载中
                    error: "",//页面为初始状态,无错误信息
                    users: [],//页面为初始状态,无用户信息
                },
            };
        },
        mounted() {
            // 方式一
            // 这种方式,过于麻烦,因为传参已函数的方式,一:降低了代码的易读性。二:代码维护时,编写顺序不能乱(此法为函数式写法)
            // this.$bus.$on("updataList", (isWellcome, isLoadding, error, users) => {
            //   this.users = users;
            //   this.isWellcome = isWellcome;
            //   this.isLoadding = isLoadding;
            //   this.error = error;
            // });
            // 方式二
            this.$bus.$on("updataList", (objectData) => {
                // this.objectData=objectData;
                this.objectData = {...this.objectData, ...objectData};//通过字面量的形式去合并对象(将this.objectData里面的属性放进来,objectData里面的属性放进来,当属性重名时以objectData属性替换为主)
            });
        },
    };
</script>

<style>
</style>
补充:
1.这段代码使用了对象的解构和扩展语法,目的是将两个对象合并,并以 objectData 中的属性为主
this.objectData = { ...this.objectData, ...objectData };2.详细解释:
...this.objectData: 这部分使用对象的解构语法,将this.objectData对象中的所有属性复制到一个新的对象中。这确保了新对象包含了this.objectData中所有的属性。...objectData: 同样使用对象的解构语法,将objectData对象中的所有属性复制到同一个新的对象中。如果有和this.objectData中相同的属性,将会覆盖前面的属性值。{ ...this.objectData, ...objectData }: 最终得到的是一个合并了两个对象的新对象。在合并时,如果有属性冲突,objectData中的属性值会覆盖this.objectData中的对应属性值。this.objectData = {...}: 最后,将新合并的对象赋值给this.objectData,完成对象的合并操作。
步骤六:演示
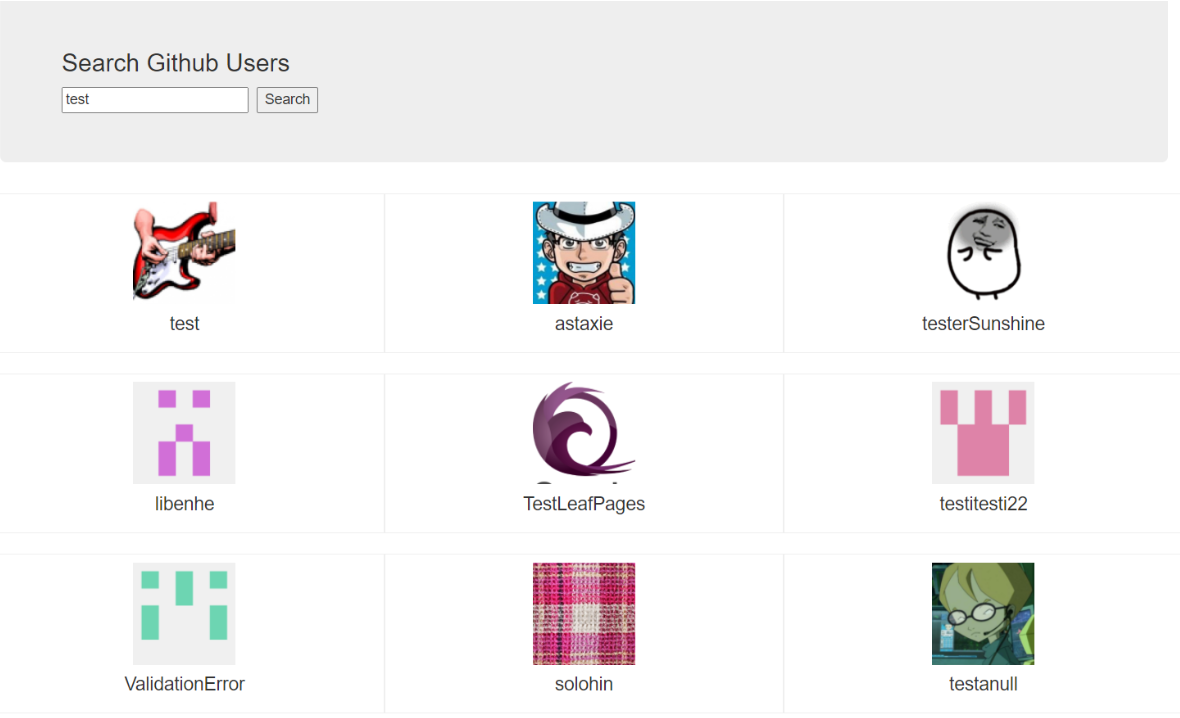
说明:
当搜索页面内容时,状态加载成功,并展示
6.5Vue-resource(Http请求客户端)(了解)
6.5.1概述
Vue-resource 是 Vue.js 1.x 版本时官方推荐的 HTTP 客户端库,用于在 Vue.js 应用中进行网络请求。然而,从 Vue.js 2.0 开始,官方不再推荐使用 Vue-resource,而是更推荐使用更通用且功能更强大的 Axios 库。
6.5.2基本用例-简单使用
说明:
Vue-resource已被axios取代,此处只做简单了解即可
步骤一:安装vue-resource库
npm i vue-resource
步骤二:引入插件库
说明:
修改项目的
main.js文件,并导入插件
import Vue from 'vue'
import App from './App.vue'
//引入插件库
import VueResource from 'vue-resource'
Vue.config.productionTip = false
//插件一定记得导入后使用
Vue.use(VueResource)
new Vue({
  el:"#app",
  render: h => h(App),
  beforeCreate(){
   Vue.prototype.$bus=this
  }
})
步骤三:查看属性
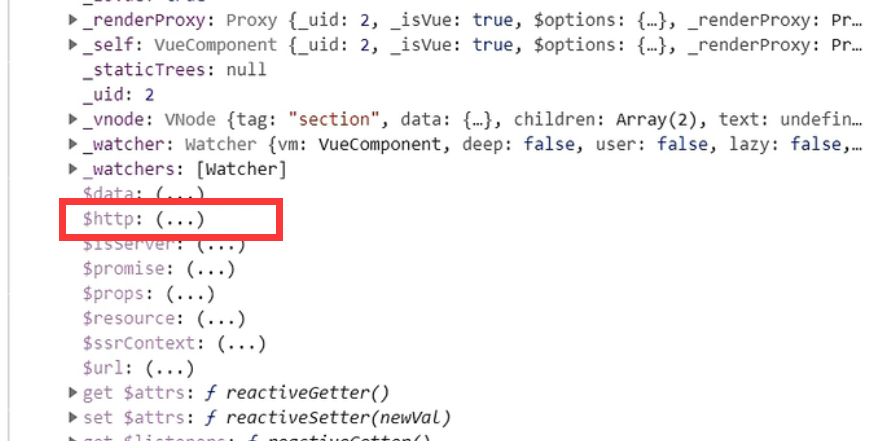
说明:
当main.js文件引入后,会在所有的Vue实例(VM),组件实例(VC)身上多一个
$http的属性以便请求的发送
6.6插槽(父子传递不同内容)
笔记小结:
概述:允许同一父组件向多个同一子组件传递不同内容。插槽使得组件更加灵活,可以在不同的上下文中使用相同的组件并提供不同的内容。
分类:默认插槽、具名插槽、作用域插槽
使用方式:
默认插槽
<!--父组件中:-->
        <Category>
           	<div>html结构1</div>
        </Category>
<!--子组件中:-->
        <template>
            <div>
               	<slot>插槽默认内容...</slot>
            </div>
        </template>
具名插槽(插槽多了name属性,便于父组件通过name属性向子组件不同插槽位置插入数据)
<!--父组件中:-->
        <Category>
            <template slot="center">
             	 <div>html结构1</div>
            </template>

            <template v-slot:footer>
               	<div>html结构2</div>
            </template>
        </Category>
<!--子组件中:-->
        <template>
            <div>
               	<slot name="center">插槽默认内容...</slot>
                <slot name="footer">插槽默认内容...</slot>
            </div>
        </template>
作用域插槽(数据在子组件的自身,但根据数据生成的结构需要父组件来决定。)
<!--父组件中:-->
		<Category>
			<template scope="scopeData">
				<!-- 生成的是ul列表 -->
				<ul>
					<li v-for="g in scopeData.games" :key="g">{{g}}</li>
				</ul>
			</template>
		</Category>

		<Category>
			<template slot-scope="scopeData"><!--推荐使用slot-scope属性-->
				<!-- 生成的是h4标题 -->
				<h4 v-for="g in scopeData.games" :key="g">{{g}}</h4>
			</template>
		</Category>
<!--子组件中:-->
        <template>
            <div>
                <slot :games="games"></slot>
            </div>
        </template>

        <script>
            export default {
                name:'Category',
                props:['title'],
                //数据在子组件自身
                data() {
                    return {
                        games:['红色警戒','穿越火线','劲舞团','超级玛丽']
                    }
                },
            }
        </script>
6.6.1概述
在 Vue.js 中,插槽(Slot)是一种强大的组件化机制,它允许父组件向子组件传递内容。插槽使得组件更加灵活,可以在不同的上下文中使用相同的组件并提供不同的内容。
作用:让父组件可以向子组件指定位置插入HTMl结构,也是一种组件间的通信方式,适用于主组件===》子组件
说明:
简单说,就是往组件的标签体内填写内容。
换句话说,插槽使用者往插槽里面赛东西。
6.6.2基本用例-默认插槽
说明:
默认插槽是最基本的插槽形式,用于传递父组件中的内容到子组件中。在子组件中使用
<slot>元素来定义插槽的位置。
步骤一:创建父组件
说明:
创建
App.vue父组件,并分别插入三个同一子组件并展示不同的内容
<template>
	<div class="container">
        <Category title="游戏">
            <img src="http://s3.ax1x.com/2021/01/16/srJ1q0.jpg" alt="" />
        </Category>
        <Category title="美食">
            <ul>
                <!--技巧:遇到遍历时,使用:key加上index -->
                <li v-for="(g, index) in games" :key="index">{{ g }}</li>
       		</ul>
        </Category>
        <Category title="电影">
            <video controls src="http://vorwaerts-gmbh.de/big_buck_bunny.mp4"></video>
            <!--video标签一定要加上controls才能有控制面板 -->
        </Category>
    </div>
</template>

<script>
    import Category from "@/components/Category.vue";

    export default {
        name: "App",
        data() {
            return {
                foods: ["火锅", "烧烤','小龙虾", "牛排"],
                games: ["红色警戒", "穿越火线", "劲舞团", "超级玛丽"],
                films: ["《教父》", "《拆弹专家》", "《你好,李焕英》", "《尚硅谷》"],
            };
        },
        methods: {},
        components: {
            Category,
        },
    };
</script>
<style scoped>
    .container {
        display: flex;
        justify-content: space-around;
    }
</style>
补充:
当需要使用插槽功能的时候,需要在父组件中插入子组件标签并在其子组件内部编写HTML结构的标签
步骤二:创建子组件
说明:
创建
Category.vue子组件,并在子组件中添加插槽标签
<template>
	<div class="Cataegrory">
        <h3>{{ title }}分类</h3>
        <!-- slot会自动进行解析,若省略slot,Vue则会不知道在哪插入Category内标签体里的内容 -->
        <!-- 将主键要传入的东西放到此处(挖一个坑,等着组件的使用者进行填充) -->
        <slot></slot>
    </div>
</template>

<script>
    export default {
        name: "Category",
        props: ["title"],
    };
</script>

<style>
    h3 {
        text-align: center;
        background-color: yellow;
    }
    .Cataegrory {
        height: 300px;
        width: 200px;
        background-color: pink;
    }
    video {
        width: 100%;
    }
    img {
        width: 100%;
    }
</style>
说明:
被作为插槽功能的子组件需要添加插槽标签
步骤三:演示

说明:
可以看到父组件中展示了三个同一子组件,而子组件展示的不同的内容
6.6.3具名插槽
6.6.3.1概述
具名插槽是 Vue.js 中插槽(Slot)的一种形式,它允许你在父组件中为子组件的不同插槽位置传递内容。通过为插槽分配名称,你可以控制父组件中的内容如何被插入到子组件中的具体位置
6.6.3.2基本用例
步骤一:创建父组件
说明:
创建
App.vue父组件,并分别插入三个同一子组件并展示不同的内容,并将不同的内容展示在不同的插槽中。所以使用插槽时指定子组件中的name属性值即可。
<template>
    <div class="container">
        <Category title="游戏">
            <!-- 填坑的时候说明一下名字 -->
            <img
                    slot="center"
                    src="http://s3.ax1x.com/2021/01/16/srJ1q0.jpg"
                    alt=""
            />
            <div slot="footer">
                <a href="http://baidu.com">更多美食!</a>
            </div>
        </Category>
        <Category title="美食">
            <ul slot="center">
                <!-- 遇到遍历,加上index -->
                <li v-for="(g, index) in games" :key="index">{{ g }}</li>
            </ul>
            <div slot="footer" class="foot">
                <a href="http://baidu.com">更多游戏!</a>
                <a href="http://baidu.com">网络游戏!</a>
            </div>
        </Category>
        <Category title="电影">
            <video
                    slot="center"
                    controls
                    src="http://vorwaerts-gmbh.de/big_buck_bunny.mp4"
            ></video>
            <div slot="footer">
                <!-- <template v-slot:footer> -->
                <!-- v-slot仅仅只被使用在template上,否则报错 -->
                <div class="foot">
                    <a href="http://baidu.com">经典</a>
                    <a href="http://baidu.com">热门</a>
                    <a href="http://baidu.com">推荐</a>
                </div>
                <h4>欢迎您来观看电影!</h4>
                <!--</template》-->
            </div>
            <!-- 一定要加上controls才可控制 -->
        </Category>
    </div>
</template>

<script>
import Category from "@/1_具名插槽/components/Category.vue";

export default {
    name: "App",
    data() {
        return {
            foods: ["火锅", "烧烤','小龙虾", "牛排"],
            games: ["红色警戒", "穿越火线", "劲舞团", "超级玛丽"],
            films: ["《教父》", "《拆弹专家》", "《你好,李焕英》", "《尚硅谷》"],
        };
    },
    methods: {},
    components: {
        Category,
    },
};
</script>
<style scoped>
.container,
.foot {
    display: flex;
    justify-content: space-around;
}

h4 {
    text-align: center;
}
</style>
步骤二:创建子组件
说明:
创建
Category.vue子组件,并在子组件中添加插槽标签,并为标签添加name属性
<template>
  <div class="Cataegrory">
    <h3>{{ title }}分类</h3>
    <!-- 将主键要传入的东西放到此处 -->
    <!-- 当Vue模板解析完成之后,发现组件中有两个插槽。如果不写入name属性区别名称,则会出现问题 -->
    <!-- 挖坑的时候,附加一个名字 -->
    <slot name="center">我是一些默认值,当使用者没有传递具体结构时,我会出现1</slot>
    <slot name="footer">我是一些默认值,当使用者没有传递具体结构时,我会出现2</slot>
  </div>
</template>

<script>
export default {
  name: "Category",
  props: ["title"],
};
</script>

<style>
h3 {
  text-align: center;
  background-color: yellow;
}
.Cataegrory {
  height: 300px;
  width: 200px;
  background-color: pink;
}
video {
  width: 100%;
}
img {
  width: 100%;
}
</style>
步骤三:演示
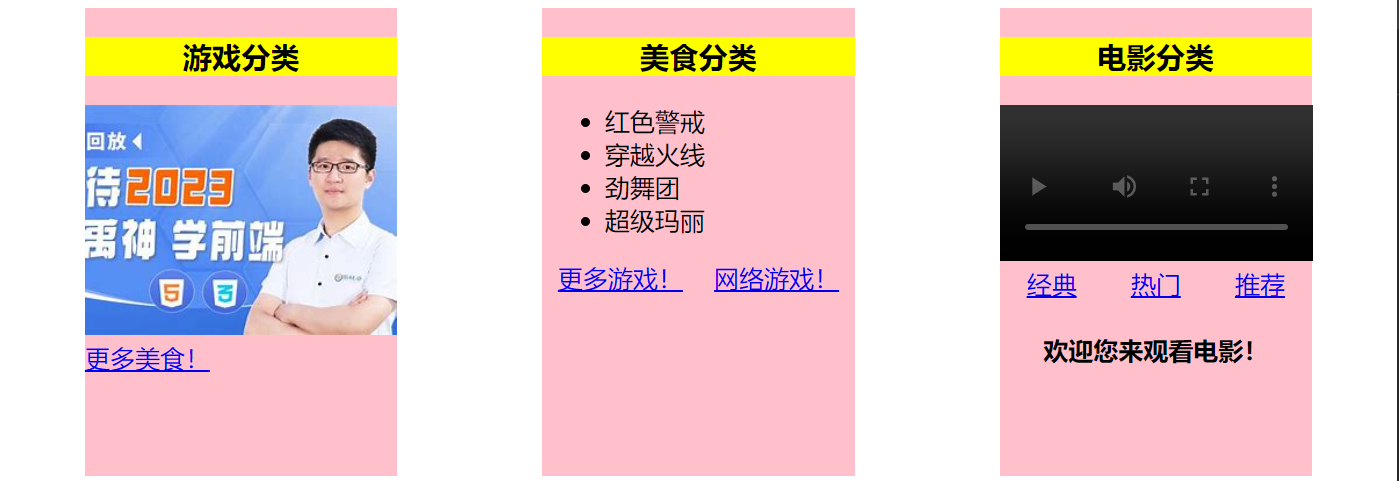
说明:
可以看到具名插槽比默认插槽可以更多的展示父组件传递回来的内容
6.6.4作用域插槽
6.6.4.1概述
作用域插槽确实是一种机制,允许组件的使用者在父组件中决定插槽内容的结构,而数据仍然由组件内部提供。
6.6.4.2基本用例
步骤一:创建子组件
说明:
创建
Category.vue子组件,并在子组件中添加插槽标签,在插槽标签上绑定数据对象
<template>
  <div class="Cataegrory">
    <h3>{{ title }}分类</h3>
    <!-- 挖坑时,需要绑定数据,是插槽传递数据的写法 -->
    <slot :games="games"></slot>
  </div>
</template>

<script>
export default {
  name: "Category",
  props: ["title"],
  data() {
    return {
      games: ["红色警戒", "穿越火线", "劲舞团", "超级玛丽"],
    };
  },
};
</script>

<style>
h3 {
  text-align: center;
  background-color: yellow;
}
.Cataegrory {
  height: 300px;
  width: 200px;
  background-color: pinkccha
}
video {
  width: 100%;
}
img {
  width: 100%;
}
</style>
说明:
插槽传递数据的写法,类似于Props的父组将向子组件传递数据,不过这里的传递是写在子组件上
步骤二:创建父组件
说明:
创建
App.vue父组件,并通过不同的方式来接收来自子组件的传值,也就是通过<template slot-scope="games">来接收子组件插槽所传递给父组件的数据
<!-- 作用域插槽的特点,根据使用者的习性改变其输出模式————数据存入Category组件,App组件想怎么用就怎么用 -->
<template>
  <div class="container">
    <Category title="游戏">
      <!--
		  想要通过插槽获取诗句,此处必须使用template。
		  此处scope是为了接收Category组件的数据,是插槽传递数据的写法。
		  scope里面属性值可以自定义,不影响。
		  注意不是scoped
	-->
      <template scope="games">
        <!-- 此处可以输出一下games,方便查看里面的值类型,结果为对象 {"games":["红色警戒", "穿越火线", "劲舞团", "超级玛丽"]} -->
        <!-- {{ games }} -->
        <ul>
          <li v-for="(g, index) in games.games" :key="index">{{ g }}</li>
        </ul>
      </template>
    </Category>

    <Category title="游戏">
      <!-- Es6写法,因为所传入的参数为对象,因此可以用对象接收 -->
      <template scope="{games}">
        <!-- {{ games }} -->
        <ol>
          <li v-for="(g, index) in games" :key="index">{{ g }}</li>
        </ol>
      </template>
    </Category>

    <Category title="游戏">
      <template slot-scope="games">
        <!-- 跟<template scope="games">作用相同,slot-scope为新api写法 -->
        <h4 v-for="(g, index) in games.games" :key="index">{{ g }}</h4>
      </template>
    </Category>
  </div>
</template>

<script>
import Category from "@/components/Category.vue";

export default {
  name: "App",

  methods: {},
  components: {
    Category,
  },
};
</script>
<style scoped>
/* scoped为style属性,注意不是scoped */
.container,
.foot {
  display: flex;
  justify-content: space-around;
}
h4 {
  text-align: center;
}
</style>
补充:
作用域插槽,新API写法 slot-scope属性:
步骤三:演示
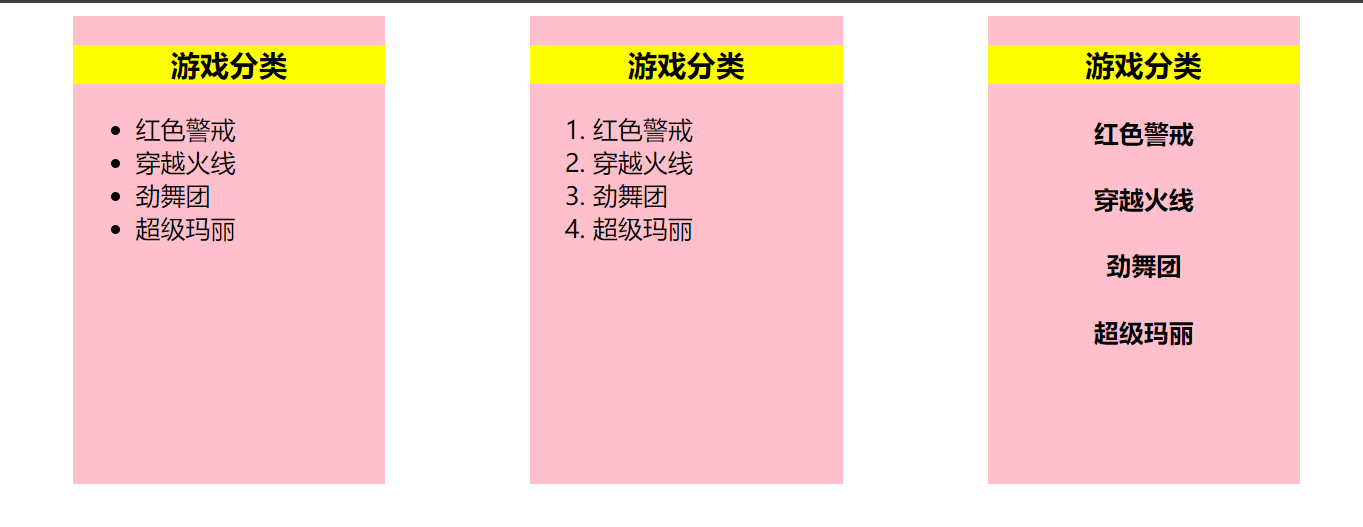
说明:
可以看到,通过不同的方式来接收数据,并且数据在页面上成功展示
知识加油站
Vue在绑定样式命名规则
在style样式中将css采用小驼峰命名法
若遇到了例如background-color,font-size这种类似的写法,那么在vue中就写为小驼峰写法例如:fontSize,或者backgroundColor
<script>
    styleobj:{
	fontSize: '40px',
	color: 'red',I
	backgroundcolor:1
}
</script>
Computed,methods,watch区别
1 . computed 属性的结果会被缓存,除非依赖的响应式属性变化才会重新计算。主要当作属性来使用;computed能完成的功能,watch都可以完成。
2 . methods 方法表示一个具体的操作,主要书写业务逻辑;
3 . watch 一个对象,键是需要观察的表达式,值是对应回调函数。主要用来监听某些特定数据的变化,从而进行某些具体的业务逻辑操作;可以看作是 computed 和 methods 的结合体;watch能完成的功能,computed不一定能完成,例如: watch可以进行异步操作,也就是延迟操作。
缓存:其核心作用就是对一些服务端未更新的资源进行复用
两个重要的小原则:
1.所被Vue管理的函数,最好写成普通函数,这样this的指向才是vm或组件实例对象。
2.所有不被Vue管理的函数**(定时器的回调函数、ajax的回调函数等、Promise的回调函数)**,最好写成箭头函数,这样this的指向才是vm或组件实例对象。
组件化编码流程(通用)
1.实现静态组件:抽取组件,使用组件实现静态页面效果
2展示动态数据:
2.1.数据的类型、名称是什么?
2.2.数据保存在哪个纽件?
3.交互——从绑定事件监听开始
获取事件对象中的value值
如何获得点击事件中的值?
法一
<template>
    <div class="todo-header">
    	<input type="text" placeholder="请输入你的任务名称,按回车健确认" @keyup.enter="add" />
    </div>
</template>
<script>
export default {
    name : " MyHeader",
    methods: {
			add(event){
				console.log(event.target.value)
            }
    }
}
</script>
通过获取事件对象的value
法二
<template>
    <div class="todo-header">
    	<input type="text" placeholder="请输入你的任务名称,按回车健确认" v-model="title" @keyup.enter="add" />
    </div>
</template>
<script>
export default {
    name : " MyHeader",
    data(){
        return{
            title:""
        }
    },
    methods: {
			add(){
				console.log(this.title)
            }
    }
}
</script>
获取事件对象的value值
监听,深度监听区别
 watch: {
    // 此时应当换为深度监视,因为函数式的写法只是监视第一层的数据是否为数组,不监视数组里面的属性值的变化
    // todos(value) {
    //   localStorage.setItem("todos", JSON.stringify(value));
    // },
    todos: {
      deep: true,
      handler(value) {
        localStorage.setItem("todos", JSON.stringify(value));
      },
    },
  },
Vue规则小结
当设计到数据改变时:
运用计算属性,通常不会手动创建一个data属性,且有返回值return。(因为计算,不存在模型数据)
运用监听方法,通常手动创建一个data属性并且无返回值。(因为监听,存在模型数据)
运用函数,函数一般都有返回值,除非空
vue.filter,vue.directive,Vue.component,Vue.mixin(xxx)
data模型中,方法directives,methods,directives,components,mixins
m o u n t , mount, mount,set, w a t c h , t h i s . watch,this. watch,this.ref, n e x t T i c k , t h i s . nextTick,this. nextTick,this.set
加:传的是js表达式,不加:传的是字符串
Vue中的This
Vue里this指向_cc蒲公英的博客-CSDN博客_vue this
Vue中的数据通信
主===》子:组件自定义事件,Slot插槽
主《===》子:全局事件总线,消息订阅与发布
Vue中的数据存储
浏览器本地缓存
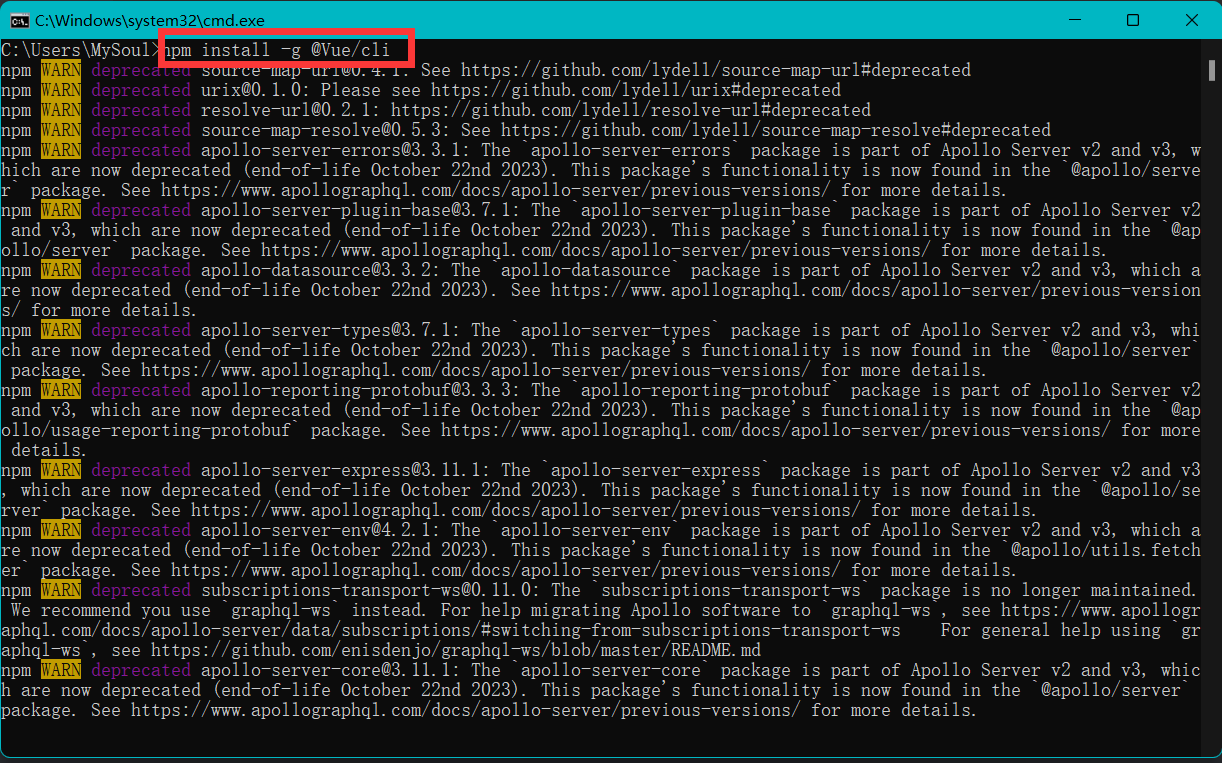


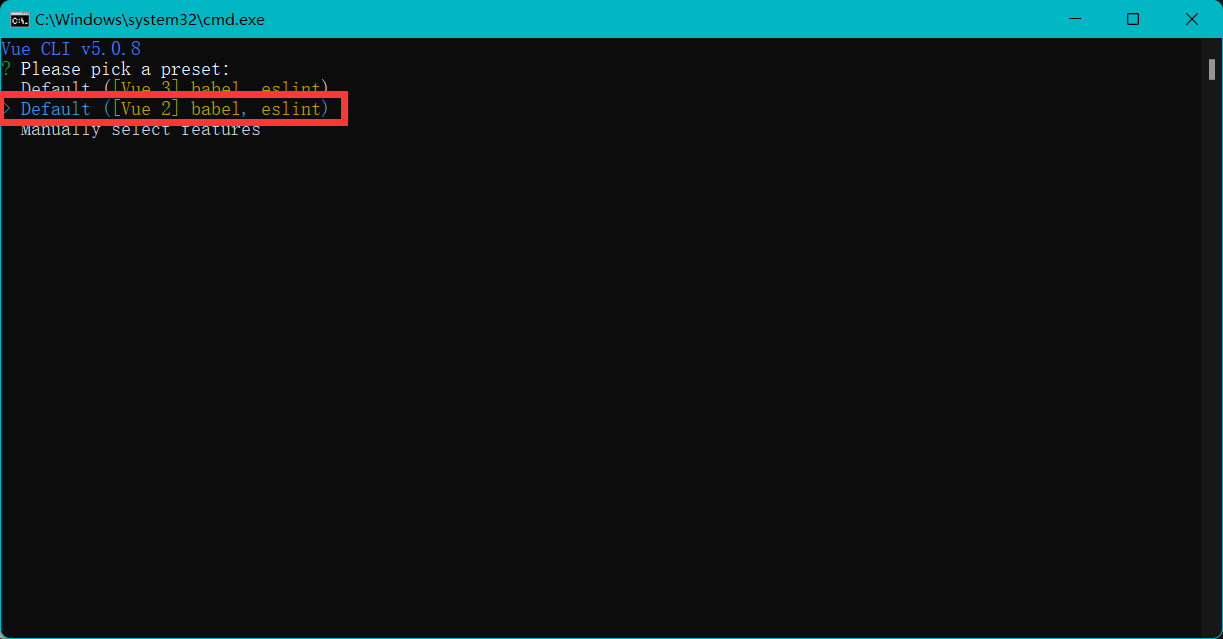

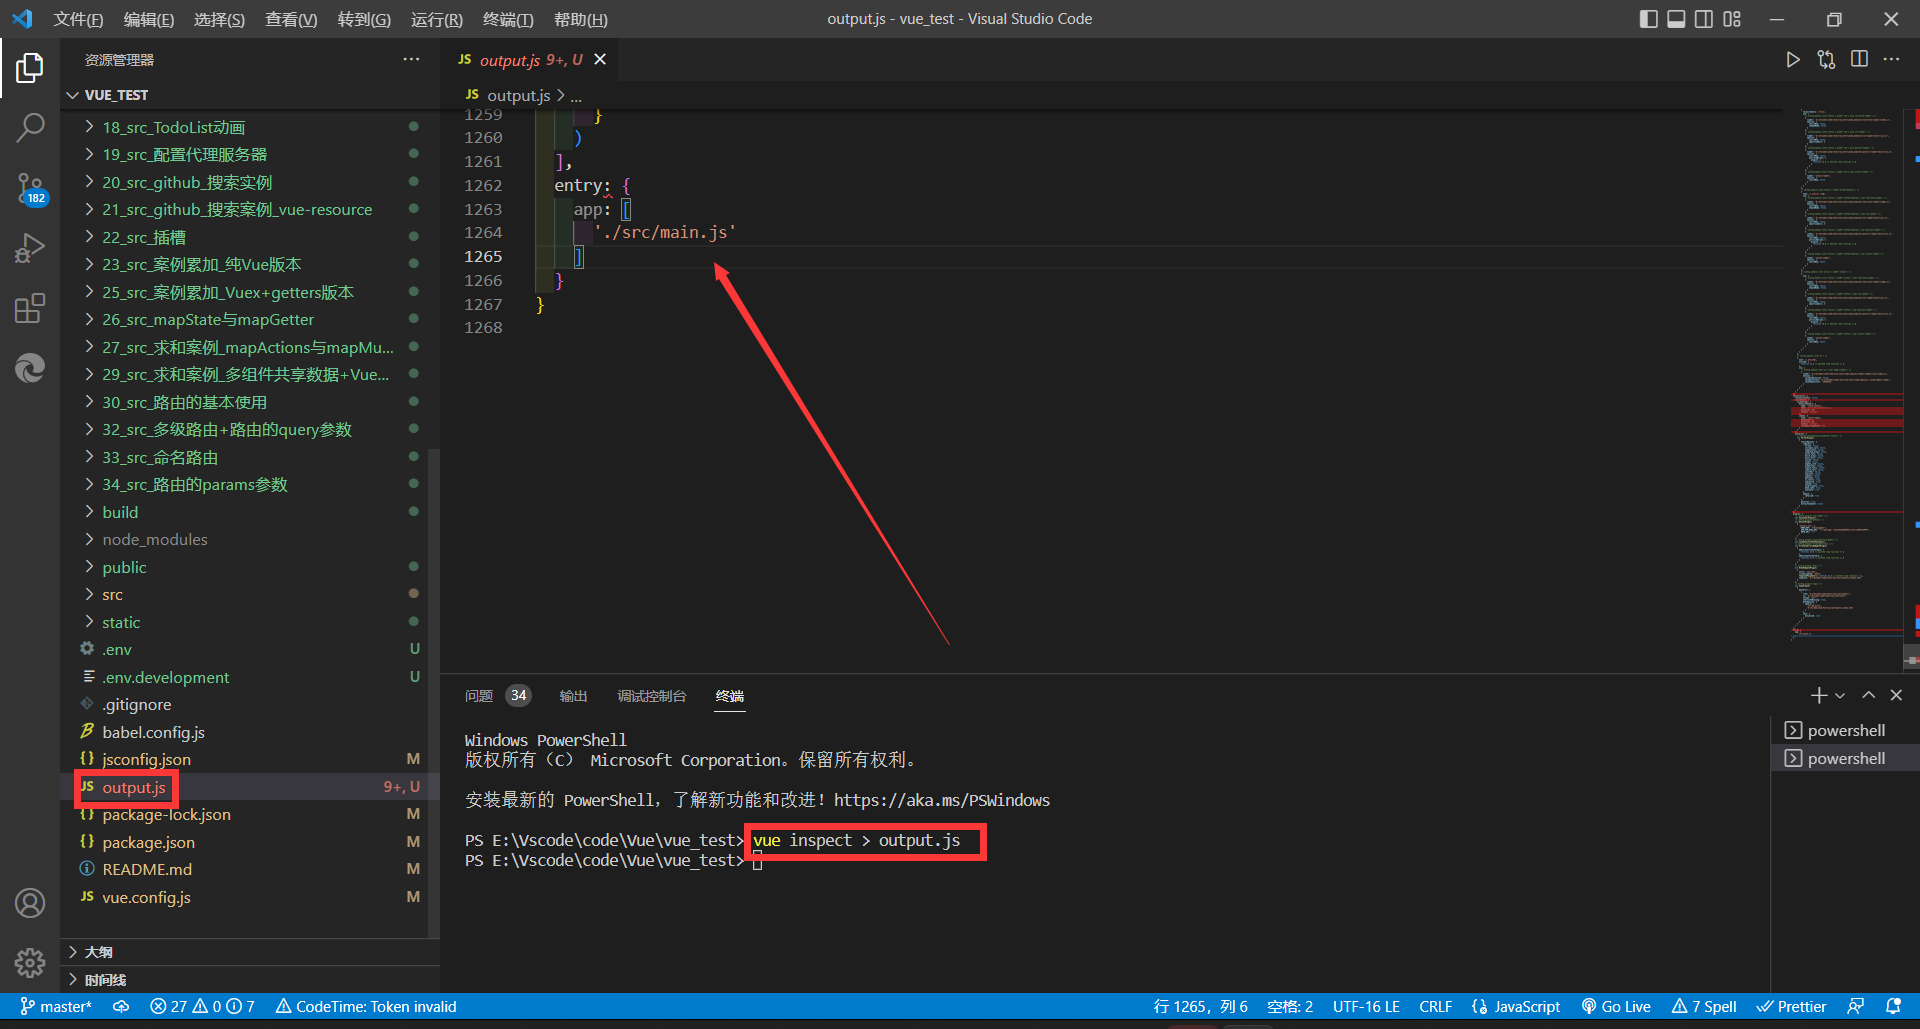
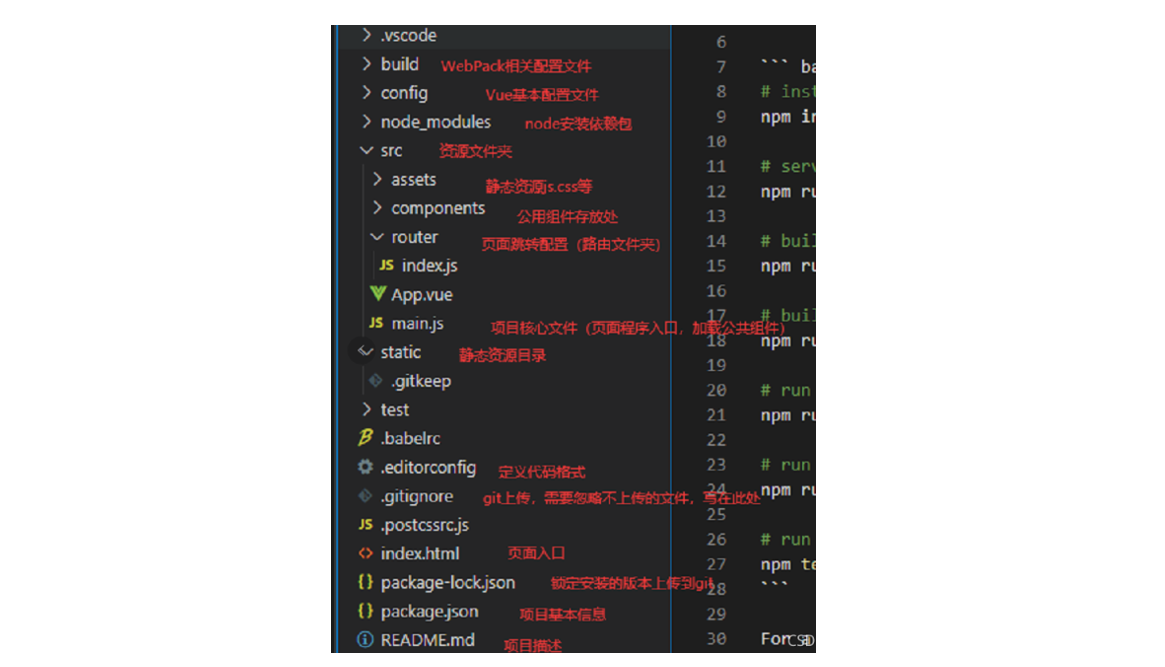
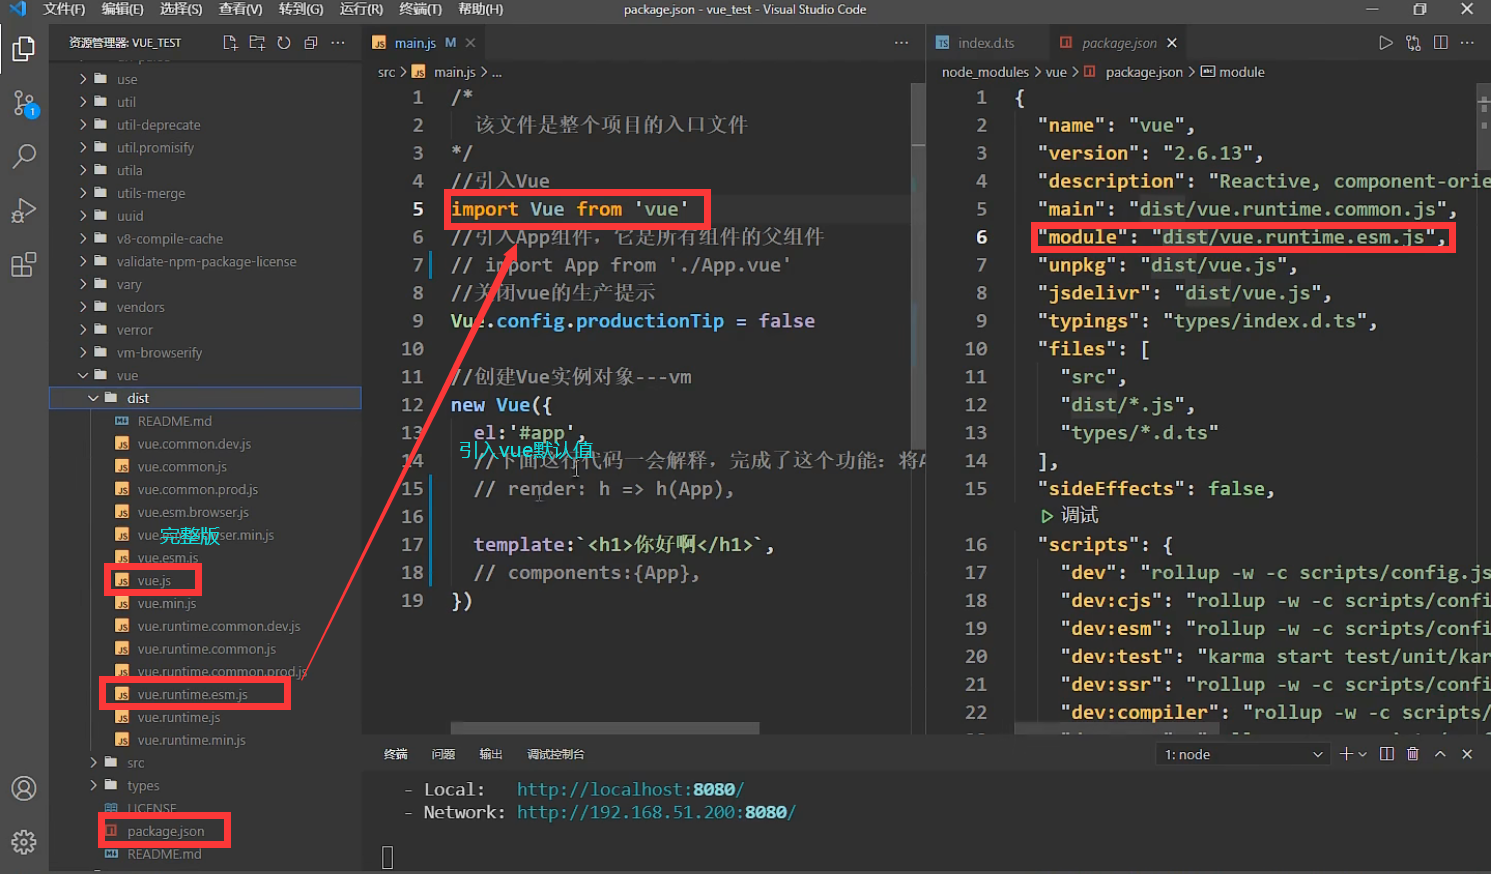


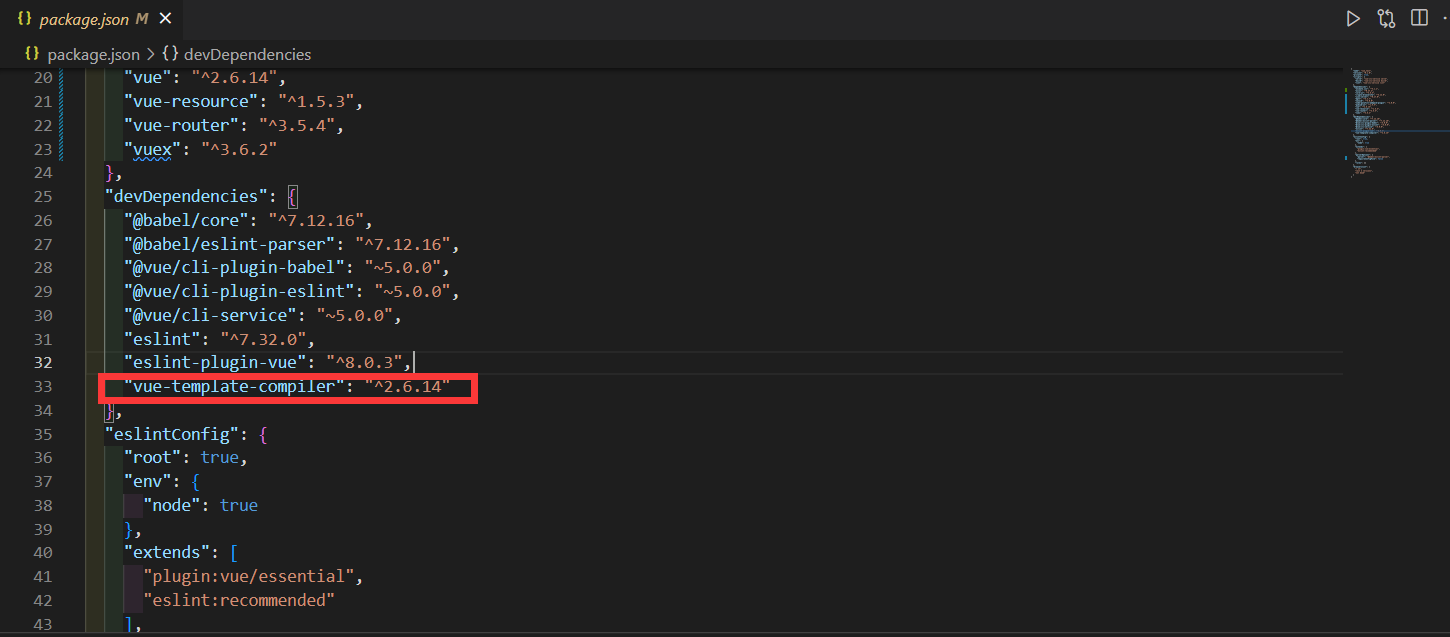


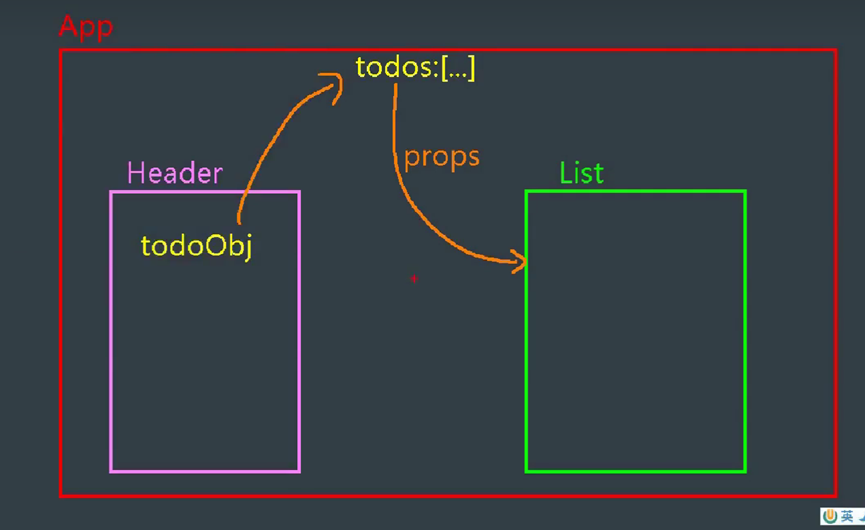
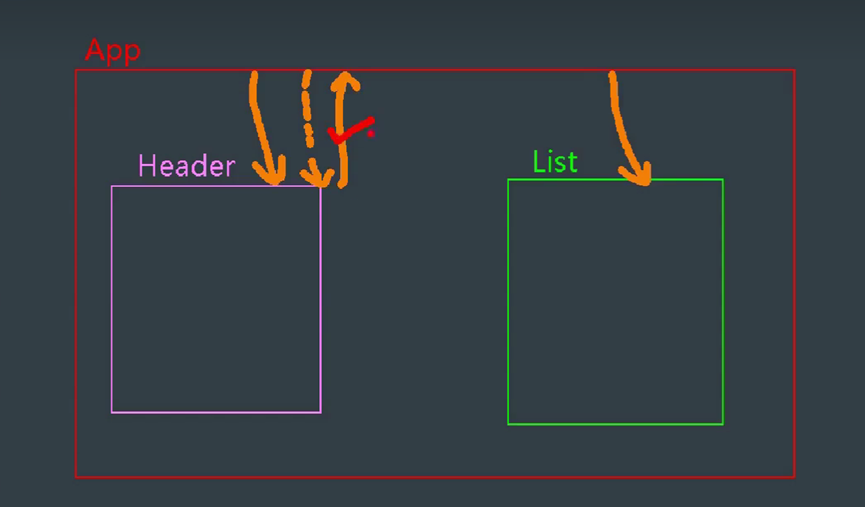


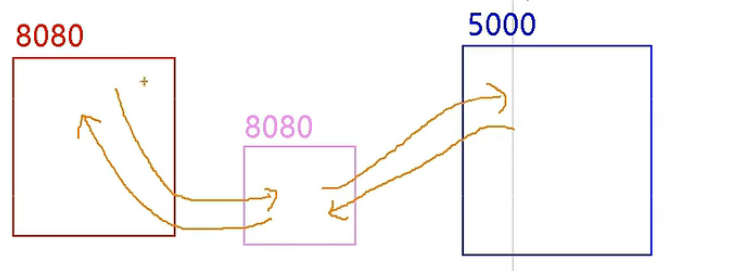
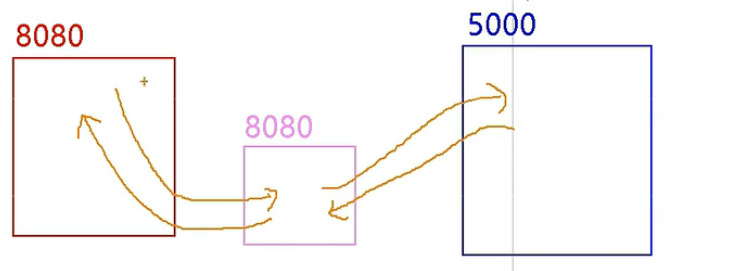




![[数字人]唇形驱动,不生成头部动作算法总结](https://img-blog.csdnimg.cn/direct/ae77ad70a10c45bda8d71267e1298843.png)

