布局:
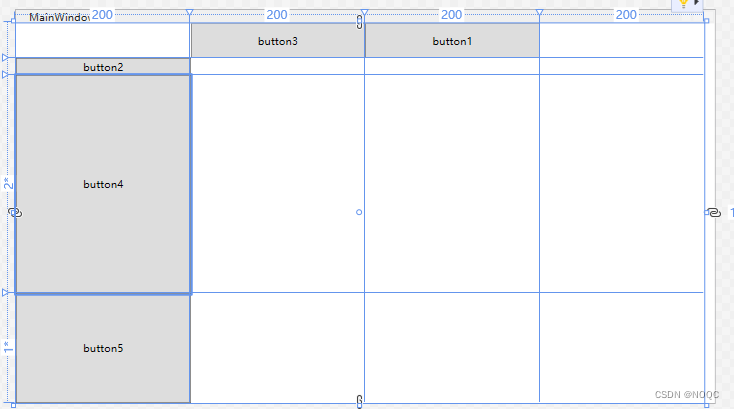
1、Grid:
<Window x:Class="WpfApp2.MainWindow"
xmlns="http://schemas.microsoft.com/winfx/2006/xaml/presentation"
xmlns:x="http://schemas.microsoft.com/winfx/2006/xaml"
xmlns:d="http://schemas.microsoft.com/expression/blend/2008"
xmlns:mc="http://schemas.openxmlformats.org/markup-compatibility/2006"
xmlns:local="clr-namespace:WpfApp2"
mc:Ignorable="d"
Title="MainWindow" Height="450" Width="800">
<Grid Margin="0,0,12,0">
<!--布局容器-->
<Grid.RowDefinitions>
<!--定义它的行以及它的高度-->
<RowDefinition Height="40"></RowDefinition>
<RowDefinition Height="Auto"></RowDefinition>
<RowDefinition Height="2*"></RowDefinition>
<RowDefinition Height="*"></RowDefinition>
</Grid.RowDefinitions>
<Grid.ColumnDefinitions>
<!--定义它的列以及它的宽度-->
<ColumnDefinition Width="200"></ColumnDefinition>
<ColumnDefinition Width="200"></ColumnDefinition>
<ColumnDefinition Width="200"></ColumnDefinition>
<ColumnDefinition Width="200"></ColumnDefinition>
</Grid.ColumnDefinitions>
<Button Grid.Row="0" Grid.Column="2" Content="button1"></Button>
<!--第0行第二列-->
<Button Grid.Row="0" Grid.Column="1" Content="button3"></Button>
<!--第0行第1列-->
<Button Grid.Row="1" Content="button2"></Button>
<!--第一行-->
<Button Grid.Row="2" Content="button4"></Button>
<!--//第二行-->
<Button Grid.Row="3" Content="button5"></Button>
<!--//第三行-->
</Grid>
</Window>
StackPanel:按行按列排序

<Window x:Class="WpfApp2.MainWindow"
xmlns="http://schemas.microsoft.com/winfx/2006/xaml/presentation"
xmlns:x="http://schemas.microsoft.com/winfx/2006/xaml"
xmlns:d="http://schemas.microsoft.com/expression/blend/2008"
xmlns:mc="http://schemas.openxmlformats.org/markup-compatibility/2006"
xmlns:local="clr-namespace:WpfApp2"
mc:Ignorable="d"
Title="MainWindow" Height="450" Width="800">
2、 <Grid>
<StackPanel Name="Stcak1" Orientation="Horizontal">
<Button Content="button1"/>
<Button Content="button2"/>
</StackPanel>
<StackPanel x:Name="Stack2" Orientation="Vertical">
<Button Content="button3"></Button>
<Button Content="button4"></Button>
<Button Content="button5"></Button>
</StackPanel>
<StackPanel Name="stack3" Orientation="Horizontal" FlowDirection="RightToLeft">
<Button Content="button6"></Button>
<Button Content="button7"></Button>
</StackPanel>
</Grid>
3、WrapPanel://自动换行环列

<Window x:Class="WpfApp2.MainWindow"
xmlns="http://schemas.microsoft.com/winfx/2006/xaml/presentation"
xmlns:x="http://schemas.microsoft.com/winfx/2006/xaml"
xmlns:d="http://schemas.microsoft.com/expression/blend/2008"
xmlns:mc="http://schemas.openxmlformats.org/markup-compatibility/2006"
xmlns:local="clr-namespace:WpfApp2"
mc:Ignorable="d"
Title="MainWindow" Height="450" Width="800">
<WrapPanel Orientation="Horizontal">
<Button Content="button 150" Width="150"></Button>
<Button Content="button 200" Width="200"></Button>
<Button Content="button 150" Width="150"></Button>
<Button Content="button 200" Width="200"></Button>
<Button Content="button 150" Width="150"></Button>
</WrapPanel>
</Window>
DockPanel:

<DockPanel>
<Button Content="左" DockPanel.Dock="Left"></Button>
<Button Content="下" DockPanel.Dock="Bottom" ></Button>
<Button Content="右" DockPanel.Dock="Right"></Button>
<Button Content="上" DockPanel.Dock="Top" ></Button>
</DockPanel>
4、UniformGrid://按照输入顺序排列到容器当中

<UniformGrid >
<Button Content="Button"></Button>
<Button Content="Button1"></Button>
<Button Content="Button2"></Button>
<Button Content="Button3"></Button>
<Button Content="Button4"></Button>
</UniformGrid>

<Window x:Class="WpfApp2.MainWindow"
xmlns="http://schemas.microsoft.com/winfx/2006/xaml/presentation"
xmlns:x="http://schemas.microsoft.com/winfx/2006/xaml"
xmlns:d="http://schemas.microsoft.com/expression/blend/2008"
xmlns:mc="http://schemas.openxmlformats.org/markup-compatibility/2006"
xmlns:local="clr-namespace:WpfApp2"
mc:Ignorable="d"
Title="MainWindow" Height="450" Width="800">
<Grid>
<Canvas>
<Button Content="Button1" Canvas.Left="50" Canvas.Top="50"></Button>
<Button Content="Button2" Canvas.Right="50" Canvas.Top="50" ></Button>
<Button Content="Button3" Canvas.Left="50" Canvas.Bottom="50" ></Button>
<Button Content="Button3" Canvas.Left="50" Canvas.Bottom="50" ></Button>
</Canvas>
</Grid>
</Window>
ScrollViewer:滑动框

<ScrollViewer HorizontalScrollBarVisibility="Auto" VerticalScrollBarVisibility="Auto">
<Button Content="Button" Width="800" Height="800"></Button>
</ScrollViewer>
ViewBox:
<Grid>
<Grid.ColumnDefinitions>
<ColumnDefinition></ColumnDefinition>
</Grid.ColumnDefinitions>
<Grid.RowDefinitions>
<RowDefinition></RowDefinition>
</Grid.RowDefinitions>
<Viewbox Grid.Row="0" Grid.Column="0" Stretch="None">
<Button Width="100" Height="50" Content="None"></Button>
</Viewbox>
<Viewbox Grid.Row="0" Grid.Column="1" Stretch="Uniform">
<Button Width="100" Height="50" Content="Uniform"></Button>
</Viewbox>
</Grid>
样式:

内部样式:
<Window x:Class="WpfApp2.MainWindow"
xmlns="http://schemas.microsoft.com/winfx/2006/xaml/presentation"
xmlns:x="http://schemas.microsoft.com/winfx/2006/xaml"
xmlns:d="http://schemas.microsoft.com/expression/blend/2008"
xmlns:mc="http://schemas.openxmlformats.org/markup-compatibility/2006"
xmlns:local="clr-namespace:WpfApp2"
mc:Ignorable="d"
Title="MainWindow" Height="450" Width="800">
<Window.Resources>
<Style TargetType="Button">/设置样式的类型,全局样式
<Setter Property="Background" Value="WhiteSmoke"></Setter>//设置背景属性的样式
<Setter Property="FontSize" Value="20"></Setter>//设置文本字体的样式
<Setter Property="Margin" Value="10, 20"></Setter>//设置边框的外部样式
</Style>
<Style x:Key="loginStyle" TargetType="Button" BasedOn="{StaticResource {x:Type Button}}">//绑定单个样式
<Setter Property="Background" Value="CadetBlue"></Setter>
</Style>
</Window.Resources>
<Grid>
<Grid.ColumnDefinitions>
<ColumnDefinition></ColumnDefinition>
<ColumnDefinition></ColumnDefinition>
<ColumnDefinition></ColumnDefinition>
</Grid.ColumnDefinitions>
<Grid.RowDefinitions>
<RowDefinition></RowDefinition>
<RowDefinition></RowDefinition>
<RowDefinition></RowDefinition>
</Grid.RowDefinitions>
<Button Style="{StaticResource loginStyle}" Content="Button1" Grid.Column="0" Grid.Row="1" Width="Auto" Height="Auto" ></Button>
<Button Content="Button1" Grid.Column="0" Grid.Row="2" Width="Auto" Height="Auto" ></Button>
<Button Content="Button1" Grid.Column="0" Grid.Row="0" Width="Auto" Height="Auto" ></Button>
</Grid>
</Window>
外部样式:
首先创建一个xaml文件

<ResourceDictionary xmlns="http://schemas.microsoft.com/winfx/2006/xaml/presentation"
xmlns:x="http://schemas.microsoft.com/winfx/2006/xaml">
<Style TargetType="Button">
<Setter Property="Background" Value="WhiteSmoke"></Setter>
<Setter Property="FontSize" Value="20"></Setter>
<Setter Property="Margin" Value="10, 20"></Setter>
</Style>
<Style x:Key="loginStyle" TargetType="Button" BasedOn="{StaticResource {x:Type Button}}">
<Setter Property="Background" Value="CadetBlue"></Setter>
</Style>
</ResourceDictionary>
然后在App.xaml种添加
引用路径
<Application x:Class="WpfApp2.App"
xmlns="http://schemas.microsoft.com/winfx/2006/xaml/presentation"
xmlns:x="http://schemas.microsoft.com/winfx/2006/xaml"
xmlns:local="clr-namespace:WpfApp2"
StartupUri="MainWindow.xaml">
<Application.Resources>
<ResourceDictionary>
<ResourceDictionary.MergedDictionaries>
<ResourceDictionary Source="/WpfApp2;component/Dictionary1.xaml"/>
</ResourceDictionary.MergedDictionaries>
</ResourceDictionary>
</Application.Resources>
</Application>

<Window x:Class="WpfApp2.MainWindow"
xmlns="http://schemas.microsoft.com/winfx/2006/xaml/presentation"
xmlns:x="http://schemas.microsoft.com/winfx/2006/xaml"
xmlns:d="http://schemas.microsoft.com/expression/blend/2008"
xmlns:mc="http://schemas.openxmlformats.org/markup-compatibility/2006"
xmlns:local="clr-namespace:WpfApp2"
mc:Ignorable="d"
Title="MainWindow" Height="450" Width="800">
<Grid>
<Grid.ColumnDefinitions>
<ColumnDefinition></ColumnDefinition>
<ColumnDefinition></ColumnDefinition>
<ColumnDefinition></ColumnDefinition>
</Grid.ColumnDefinitions>
<Grid.RowDefinitions>
<RowDefinition></RowDefinition>
<RowDefinition></RowDefinition>
<RowDefinition></RowDefinition>
</Grid.RowDefinitions>
<Button Style="{StaticResource loginStyle}" Content="Button1" Grid.Column="0" Grid.Row="1" Width="Auto" Height="Auto" ></Button>
<Button Content="Button1" Grid.Column="0" Grid.Row="2" Width="Auto" Height="Auto" ></Button>
<Button Content="Button1" Grid.Column="0" Grid.Row="0" Width="Auto" Height="Auto" ></Button>
</Grid>
</Window>
自定义样式模板及触发器
<Window x:Class="WpfApp2.MainWindow"
xmlns="http://schemas.microsoft.com/winfx/2006/xaml/presentation"
xmlns:x="http://schemas.microsoft.com/winfx/2006/xaml"
xmlns:d="http://schemas.microsoft.com/expression/blend/2008"
xmlns:mc="http://schemas.openxmlformats.org/markup-compatibility/2006"
xmlns:local="clr-namespace:WpfApp2"
mc:Ignorable="d"
Title="MainWindow" Height="450" Width="800">
<Grid>
<Button Content="自定义按钮" Height="100" Width="200" Background="#0078d4" FontSize="50" Foreground="WhiteSmoke" BorderBrush="Aqua" BorderThickness="1">
<Button.Template>
<ControlTemplate TargetType="{x:Type Button}">
<Border Background="{TemplateBinding Background}" BorderBrush="{TemplateBinding BorderBrush}" BorderThickness="{TemplateBinding BorderThickness}" CornerRadius="20">
<ContentPresenter HorizontalAlignment="Center" VerticalAlignment="Center"/>
</Border>
</ControlTemplate>
</Button.Template>
</Button>
</Grid>
</Window>

<Window x:Class="WpfApp2.MainWindow"
xmlns="http://schemas.microsoft.com/winfx/2006/xaml/presentation"
xmlns:x="http://schemas.microsoft.com/winfx/2006/xaml"
xmlns:d="http://schemas.microsoft.com/expression/blend/2008"
xmlns:mc="http://schemas.openxmlformats.org/markup-compatibility/2006"
xmlns:local="clr-namespace:WpfApp2"
mc:Ignorable="d"
Title="MainWindow" Height="450" Width="800">
<Grid>
<Button Content="自定义按钮" Height="100" Width="200" Background="#0078d4" FontSize="50" Foreground="WhiteSmoke" BorderBrush="Aqua" BorderThickness="1">
<Button.Template>
<ControlTemplate TargetType="{x:Type Button}">
<Border Background="{TemplateBinding Background}" BorderBrush="{TemplateBinding BorderBrush}" BorderThickness="{TemplateBinding BorderThickness}" CornerRadius="20">
<TextBlock Text="{TemplateBinding Content}" HorizontalAlignment="Center" VerticalAlignment="Center"/>
</Border>
</ControlTemplate>
</Button.Template>
</Button>
</Grid>
</Window>
触发器绑定:
<Window x:Class="WpfApp2.MainWindow"
xmlns="http://schemas.microsoft.com/winfx/2006/xaml/presentation"
xmlns:x="http://schemas.microsoft.com/winfx/2006/xaml"
xmlns:d="http://schemas.microsoft.com/expression/blend/2008"
xmlns:mc="http://schemas.openxmlformats.org/markup-compatibility/2006"
xmlns:local="clr-namespace:WpfApp2"
mc:Ignorable="d"
Title="MainWindow" Height="450" Width="800">
<Grid>
<Button Content="自定义按钮" Height="100" Width="200" Background="#0078d4" FontSize="50" Foreground="WhiteSmoke" BorderBrush="Aqua" BorderThickness="1">
<Button.Template>
<ControlTemplate TargetType="{x:Type Button}">
<Border x:Name="boder" Background="{TemplateBinding Background}" BorderBrush="{TemplateBinding BorderBrush}" BorderThickness="{TemplateBinding BorderThickness}" CornerRadius="20">
<TextBlock x:Name="txt" Text="{TemplateBinding Content}" HorizontalAlignment="Center" VerticalAlignment="Center"/>
</Border>
<ControlTemplate.Triggers>
<Trigger Property="IsMouseOver" Value="true">//绑定鼠标移动
<Setter TargetName="boder" Property="Background" Value="Blue"/>
<Setter TargetName="txt" Property="FontSize" Value="20"/>
</Trigger>
<Trigger Property="IsPressed" Value="true">//绑定鼠标点下去的
<Setter TargetName="txt" Property="Background" Value="red"/>
<Setter TargetName="txt" Property="FontSize" Value="20"/>
</Trigger>
</ControlTemplate.Triggers>
</ControlTemplate>
</Button.Template>
</Button>
</Grid>
</Window>


![【Hadoop】- MapReduce YARN的部署[8]](https://img-blog.csdnimg.cn/direct/2db7663582ac4a1fa825037da60fc7d6.png)
![【Hadoop】- MapReduce YARN 初体验[9]](https://img-blog.csdnimg.cn/direct/f09935e8bade4d16a28d0d5ce9f9e616.png)