前言
上一章节我们介绍了搭建Elasticsearch集群相关的知识。那么又该如何来操作Elasticsearch集群呢?在ES官网中提供了各种语言的客户端,我们在项目开发过程中有多种Elasticsearch版本和连接客户端可以选择,那么他们有什么区别?这一章节袁老师带领大家来学习Elasticsearch客户端相关的内容。

一. ES客户端介绍
在Elasticsearch官网中提供了各种语言的客户端:Elasticsearch Clients | Elastic。
|
| 优点 | 缺点 | 说明 |
| Java Low Level Rest Client | 与ES版本之间没有关系,适用于作为所有版本ES的客户端 | 低级别的REST客户端,通过HTTP与集群交互,用户需自己编组请求JSON串,及解析响应JSON串 | 不建议使用 |
| Java High Level Rest Client | 官方推出的,版本与ES同步更新 | 使用的版本需要保持和ES服务端的版本一致,否则会有版本问题 | 强烈推荐使用。基于Low Level Rest Client,它提供了更多的接口。注意:7.15版本之后将被弃用 |
| TransportClient | 启动速度快,轻量级,可创建极多连接,与应用程序解耦;推荐使用原生的,ES本身就很简单,灵活性很高 | JAR包版本需与ES集群版本一致,ES集群升级,客户端也跟着升级到相同版本 | 不建议使用。过时产品,7版本之后不再支持 |
| Elasticsearch Java API Client | 最新的ES客户端。Elasticsearch Java API Client通过API的方式来组装请求数据,避免直接编写JSON字符串 | 文档少 | 使用人较少 |
注意点击进入后,选择版本到6.2.4版本 ,因为我们之前按照的都是6.2.4版本讲解的。进入后可以通过官方文档了解和学习Java客户端相关的知识。
二. 搭建工程环境
1.创建一个Spring Initalizr类型的项目,项目名称设置为【es-client】。

2.创建项目时,勾选Lombok、Spring Boot DevTools和Spring Web依赖。
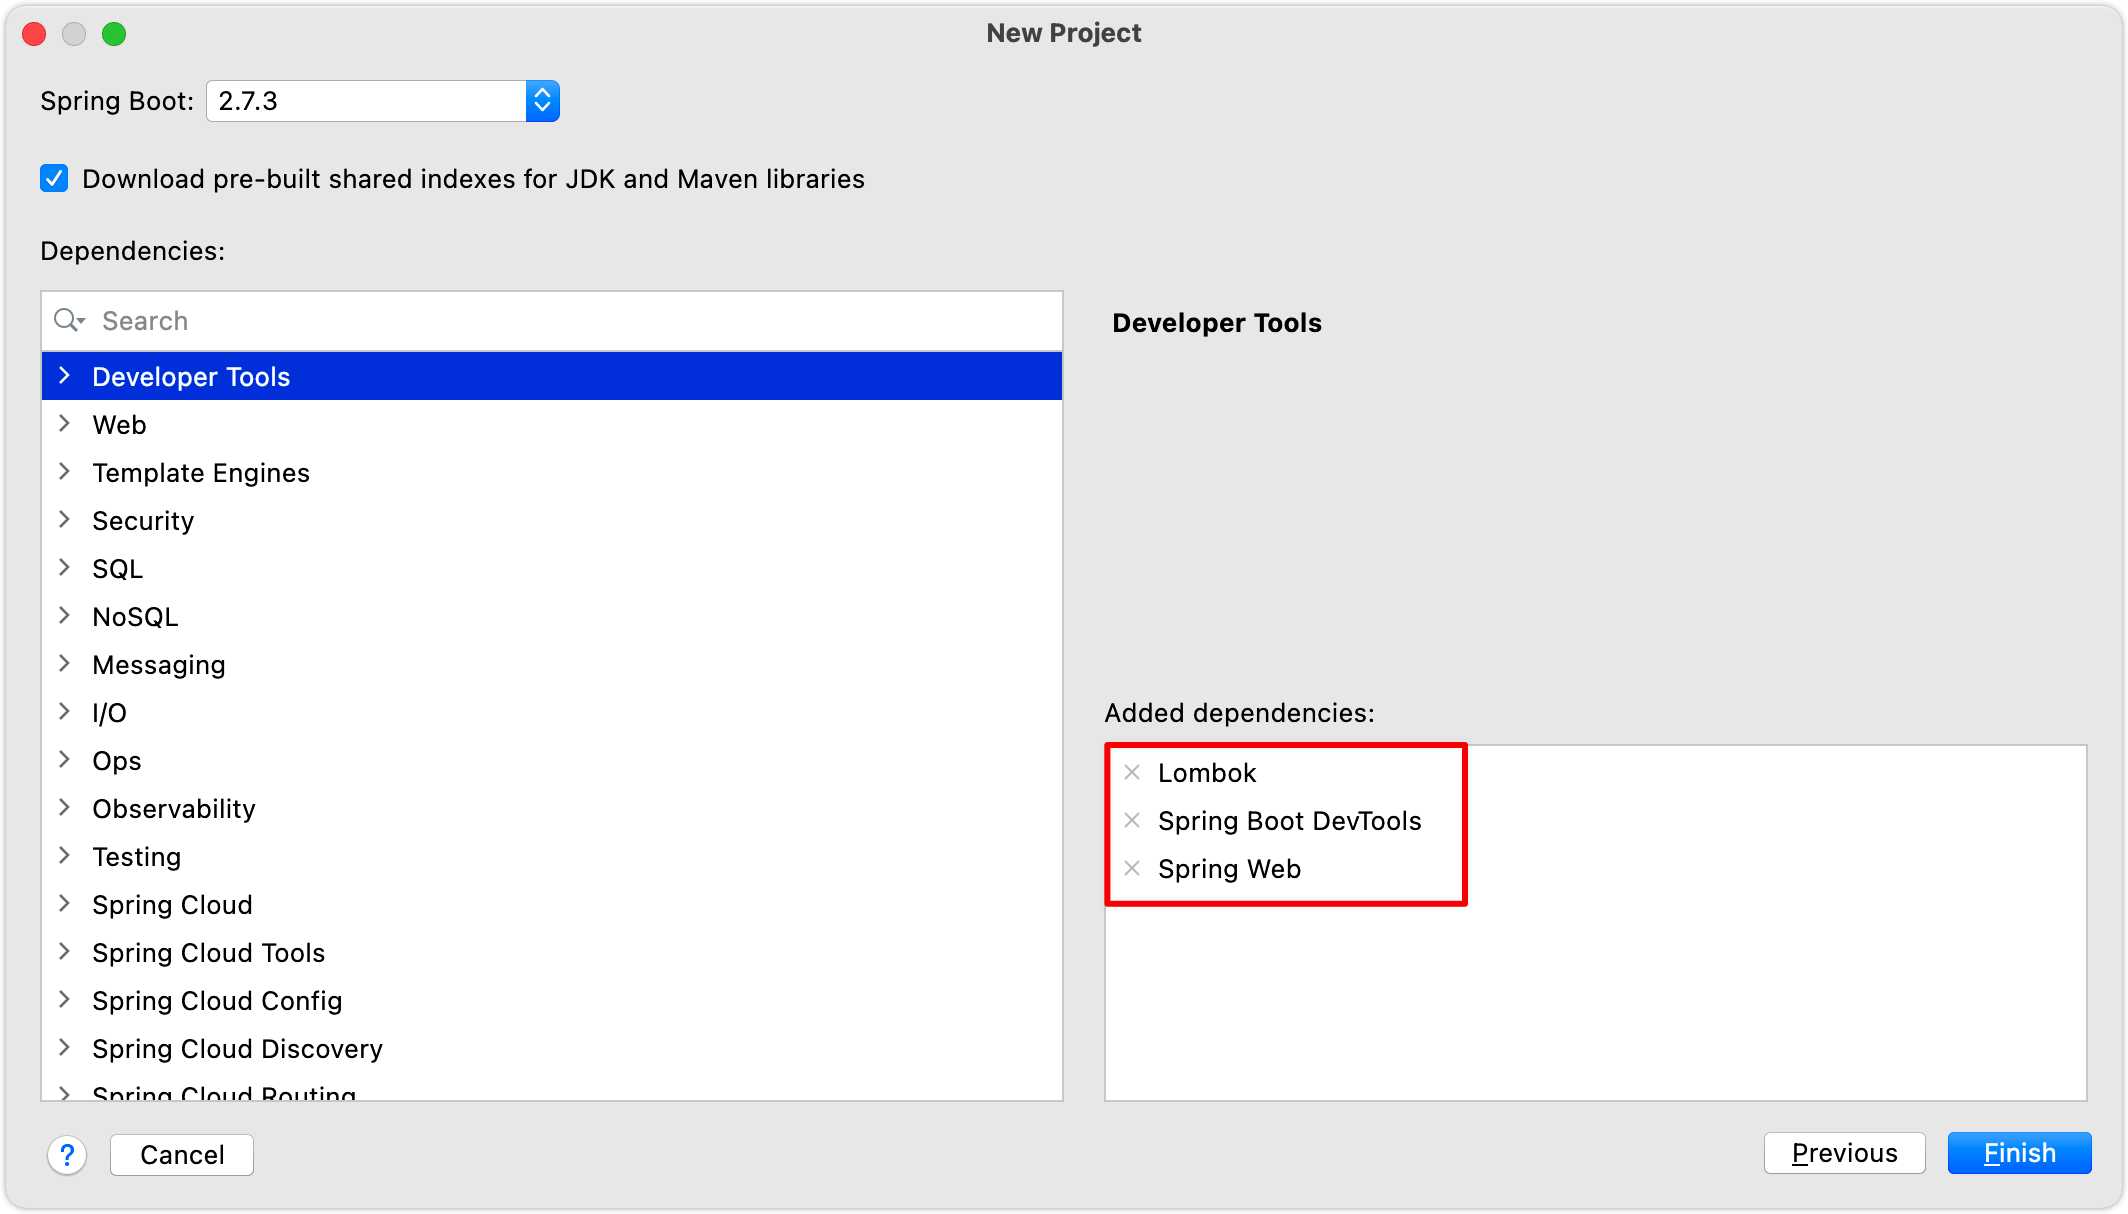
注意:这里我们直接导入了SpringBoot的启动器,方便后续讲解。
3.将resource目录下自动生成的application.properties文件修改成application.yml。
4.在项目的pom.xml文件中手动引入Elasticsearch的High-level-Rest-Client等相关的依赖。
<?xml version="1.0" encoding="UTF-8"?>
<project xmlns="http://maven.apache.org/POM/4.0.0" xmlns:xsi="http://www.w3.org/2001/XMLSchema-instance"
         xsi:schemaLocation="http://maven.apache.org/POM/4.0.0 https://maven.apache.org/xsd/maven-4.0.0.xsd">
    <modelVersion>4.0.0</modelVersion>
    <parent>
        <groupId>org.springframework.boot</groupId>
        <artifactId>spring-boot-starter-parent</artifactId>
        <version>2.7.6</version>
        <relativePath/> <!-- lookup parent from repository -->
    </parent>
    <groupId>com.yx</groupId>
    <artifactId>es-client</artifactId>
    <version>0.0.1-SNAPSHOT</version>
    <name>es-client</name>
    <description>es-client</description>
    <properties>
        <java.version>11</java.version>
    </properties>

    <dependencies>

        <dependency>
            <groupId>org.springframework.boot</groupId>
            <artifactId>spring-boot-starter-web</artifactId>
        </dependency>

        <dependency>
            <groupId>org.springframework.boot</groupId>
            <artifactId>spring-boot-devtools</artifactId>
            <scope>runtime</scope>
            <optional>true</optional>
        </dependency>

        <dependency>
            <groupId>org.projectlombok</groupId>
            <artifactId>lombok</artifactId>
            <optional>true</optional>
        </dependency>

        <dependency>
            <groupId>org.springframework.boot</groupId>
            <artifactId>spring-boot-starter-test</artifactId>
            <scope>test</scope>
        </dependency>

        <dependency>
            <groupId>org.springframework.boot</groupId>
            <artifactId>spring-boot-starter-logging</artifactId>
        </dependency>

        <dependency>
            <groupId>com.google.code.gson</groupId>
            <artifactId>gson</artifactId>
            <version>2.8.5</version>
        </dependency>

        <dependency>
            <groupId>org.apache.commons</groupId>
            <artifactId>commons-lang3</artifactId>
            <version>3.8.1</version>
        </dependency>

        <!-- Apache开源组织提供的用于操作Java Bean的工具包 -->
        <dependency>
            <groupId>commons-beanutils</groupId>
            <artifactId>commons-beanutils</artifactId>
            <version>1.9.1</version>
        </dependency>

        <!-- ES高级Rest Client -->
        <dependency>
            <groupId>org.elasticsearch.client</groupId>
            <artifactId>elasticsearch-rest-high-level-client</artifactId>
            <version>6.4.3</version>
        </dependency>

        <dependency>
            <groupId>org.elasticsearch</groupId>
            <artifactId>elasticsearch</artifactId>
            <version>6.4.3</version>
        </dependency>

        <dependency>
            <groupId>junit</groupId>
            <artifactId>junit</artifactId>
            <version>4.13.2</version>
            <scope>test</scope>
        </dependency>

    </dependencies>

    <build>
        <plugins>
            <plugin>
                <groupId>org.springframework.boot</groupId>
                <artifactId>spring-boot-maven-plugin</artifactId>
                <configuration>
                    <excludes>
                        <exclude>
                            <groupId>org.projectlombok</groupId>
                            <artifactId>lombok</artifactId>
                        </exclude>
                    </excludes>
                </configuration>
            </plugin>
        </plugins>
    </build>

</project>
三. 索引库及映射
创建索引库的同时,我们也会创建type及其映射关系,但是这些操作不建议使用Java客户端完成,原因如下:
- 索引库和映射往往是初始化时完成,不需要频繁操作,不如提前配置好。
- 官方提供的创建索引库及映射API非常繁琐,需要通过字符串拼接JSON结构。
因此,这些操作建议还是使用我们之前学习的Rest风格API去实现。
在项目的com.yx.pojo包下创建Product商品类,以这样一个商品数据为例来创建索引库。
package com.yx.pojo;
import lombok.AllArgsConstructor;
import lombok.Data;
import lombok.NoArgsConstructor;

@Data
@NoArgsConstructor
@AllArgsConstructor
public class Product {
    private Long id; // 主键
    private String title; // 标题
    private String category; // 分类
    private String brand; // 品牌
    private Double price; // 价格
    private String images; // 图片地址
}
分析一下数据结构:
| 属性 | 描述 |
| id | 可以认为是主键,将来判断数据是否重复的标识,不分词,可以使用keyword类型 |
| title | 搜索字段,需要分词,可以用text类型 |
| category | 商品分类,这个是整体,不分词,可以使用keyword类型 |
| brand | 品牌,与分类类似,不分词,可以使用keyword类型 |
| price | 价格,这个是double类型 |
| images | 图片,用来展示的字段,不搜索,index为false,不分词,可以使用keyword类型 |
使用Kibana控制台向集群中创建yx索引库并编写映射配置(如果之前创建过yx索引库则先删除)。
PUT /yx
{
  "settings": {
    "number_of_shards": 3,
    "number_of_replicas": 1
  },
  "mappings": {
    "product": {
      "properties": {
        "id": {
          "type": "keyword"
        },
        "title": {
          "type": "text",
          "analyzer": "ik_max_word"
        },
        "category": {
          "type": "keyword"
        },
        "brand": {
          "type": "keyword"
        },
        "price": {
          "type": "double"
        },
        "images": {
          "type": "keyword",
          "index":  false
        }
      }
    }
  }
}
四. 索引数据操作
有了索引库之后,我们接下来看看如何对索引库中的数据进行增删改查操作。操作MySQL数据库:
1.获取数据库连接。
2.完成数据的增删改查操作。
3.释放资源。
1.初始化客户端
对索引库做任何操作,都需要通过RestHighLevelClient客户端来完成。
1.在项目的test测试文件夹下创建com.yx.es包,并在该包下创建一个ElasticsearchTests测试类。
2.然后在ElasticsearchTests类中编写RestHighLevelClient客户端的初始化方法init()和关闭方法close()。
package com.yx.es;
import com.google.gson.Gson;
import org.apache.http.HttpHost;
import org.elasticsearch.client.RestClient;
import org.elasticsearch.client.RestClientBuilder;
import org.elasticsearch.client.RestHighLevelClient;
import org.junit.After;
import org.junit.Before;
import org.springframework.boot.test.context.SpringBootTest;
import java.io.IOException;

@SpringBootTest
public class ElasticsearchTests {
    private RestHighLevelClient restHighLevelClient;
    // JSON工具
    private Gson gson = new Gson();

    /** 初始化客户端 */
    @Before
    public void init() {
        RestClientBuilder restClientBuilder = RestClient.builder(
            new HttpHost("127.0.0.1", 9201, "http"),
            new HttpHost("127.0.0.1", 9202, "http"),
            new HttpHost("127.0.0.1", 9203, "http")
        );
        restHighLevelClient = new RestHighLevelClient(restClientBuilder);
    }

    /** 关闭客户端 */
    @After
    public void close() throws IOException {
        // 关闭客户端
        restHighLevelClient.close();
    }
}
2.新增文档
新增文档的实现是,先将数据封装到POJO对象中,然后通过restHighLevelClient对象来向索引库中新增数据。
2.1.新增文档实现
1.在ElasticsearchTests类中编写新增文档的insert()方法。
/** 新增文档 */
@Test
public void insert() throws IOException {
    // 1.文档数据
    Product product = new Product();
    product.setId(1L);
    product.setTitle("华为P60震撼发布");
    product.setCategory("手机");
    product.setBrand("华为");
    product.setPrice(6999.99);
    product.setImages("http://image.huawei.com/1.jpg");

    // 2.将文档数据转换为JSON格式
    String source = gson.toJson(product);

    // 3.创建索引请求对象,访问哪个索引库、哪个type、指定文档ID
    IndexRequest request = new IndexRequest("yx", "product", product.getId().toString());
    request.source(source, XContentType.JSON);

    // 4.发送请求
    IndexResponse response = restHighLevelClient.index(request, RequestOptions.DEFAULT);
    System.err.println(response);
}
2.运行insert()方法,输出结果见下:
IndexResponse[index=yx,type=product,id=1,version=2,result=updated,seqNo=1,primaryTerm=1,shards={"total":2,"successful":2,"failed":0}]3.运行insert()方法可能会报错,具体解决方案见下。
2.2.新增文档异常
1.如果导入Elasticsearch依赖时不指定其版本,可能导致找不到XContentType类。解决的方案就是在pom.xml文件中手动添加Elasticsearch对应版本的依赖,比如手动指定Elasticsearch的版本为6.4.3。如果没有这个问题,则忽略此步骤。
<dependency>
  <groupId>org.elasticsearch</groupId>
  <artifactId>elasticsearch</artifactId>
  <version>6.4.3</version>
</dependency>
2.如果运行insert()方法提示java.lang.NullPointerException空指针异常,则可能的原因是@Test注解的包导入错误,注意导入的包是org.junit.Test而非org.junit.jupiter.api.Test。
3.查看文档
根据Rest风格,查看文档是根据文档id进行GET查询操作,难点是对结果的解析。
1.在ElasticsearchTests类中编写查看文档的select()方法。
/** 查看文档 */
@Test
public void select() throws IOException {
    // 创建GET请求并指定id
    GetRequest request = new GetRequest("yx", "product", "1");
    // 查询,得到响应
    GetResponse response = restHighLevelClient.get(request, RequestOptions.DEFAULT);
    // 获得响应结果数据
    String source = response.getSourceAsString();
    // 转化为JSON数据
    Product product = gson.fromJson(source, Product.class);

    System.err.println(product);
}
2.运行select()方法,输出结果见下:
Product(id=1, title=华为P60震撼发布, category=手机, brand=华为, price=6999.99, images=http://image.huawei.com/1.jpg)4.修改文档
新增文档时,如果传递的id是已经存在的,则会完成修改文档操作,如果id不存在,则是新增文档操作。
1.在ElasticsearchTests类中编写修改文档的update()方法。
/** 修改文档 */
@Test
public void update() throws IOException {
    // 1.文档数据
    Product product = new Product();
    product.setId(1L); // id存在则为修改操作
    product.setTitle("华为P60直降1000");
    product.setPrice(5999.99);

    // 2.将文档数据转换为JSON格式
    String source = gson.toJson(product);

    // 3.创建索引请求对象,访问哪个索引库、哪个type、指定文档ID
    IndexRequest request = new IndexRequest("yx", "product", product.getId().toString());
    request.source(source, XContentType.JSON);

	// 4.发送请求
    IndexResponse response = restHighLevelClient.index(request, RequestOptions.DEFAULT);
    System.err.println(response);
}
2.运行update()方法,输出结果见下:
IndexResponse[index=yx,type=product,id=1,version=2,result=updated,seqNo=1,primaryTerm=1,shards={"total":2,"successful":2,"failed":0}]5.删除文档
根据id删除文档。
1.在ElasticsearchTests类中编写删除文档的delete()方法。
/** 删除文档 */
@Test
public void delete() throws IOException {
    // 准备删除的请求,参数为id
    DeleteRequest request = new DeleteRequest("yx", "product", "1");
    // 发起请求
    DeleteResponse response = restHighLevelClient.delete(request, RequestOptions.DEFAULT);
    System.err.println(response);
}
2.运行delete()方法,输出结果见下:
DeleteResponse[index=yx,type=product,id=1,version=3,result=deleted,shards=ShardInfo{total=2, successful=2, failures=[]}]
五. 结语
Elasticsearch客户端基础部分的内容袁老师就给大家介绍完了。回顾下这一章节我们学习的主要内容,介绍了ES客户端项目工程搭建、索引库及映射、索引数据操作,主要重点介绍了索引数据的增删改查操纵。关于ES客户端基础部分的内容就介绍到这里,下一章节袁老师带领大家学习Elasticsearch客户端高级操作部分的内容。
今天的内容就分享到这里吧。关注「袁庭新」,干货天天都不断!
