C#版Facefusion:让你的脸与世界融为一体!-02 获取人脸关键点

目录
说明
效果
模型信息
项目
代码
下载
说明
C#版Facefusion一共有如下5个步骤:
1、使用yoloface_8n.onnx进行人脸检测
2、使用2dfan4.onnx获取人脸关键点
3、使用arcface_w600k_r50.onnx获取人脸特征值
4、使用inswapper_128.onnx进行人脸交换
5、使用gfpgan_1.4.onnx进行人脸增强
本文分享使用2dfan4.onnx实现C#版Facefusion第二步:获取人脸关键点。
效果

模型信息
Inputs
-------------------------
name:input
tensor:Float[1, 3, 256, 256]
---------------------------------------------------------------
Outputs
-------------------------
name:landmarks_xyscore
tensor:Float[1, 68, 3]
name:heatmaps
tensor:Float[1, 68, 64, 64]
---------------------------------------------------------------
项目
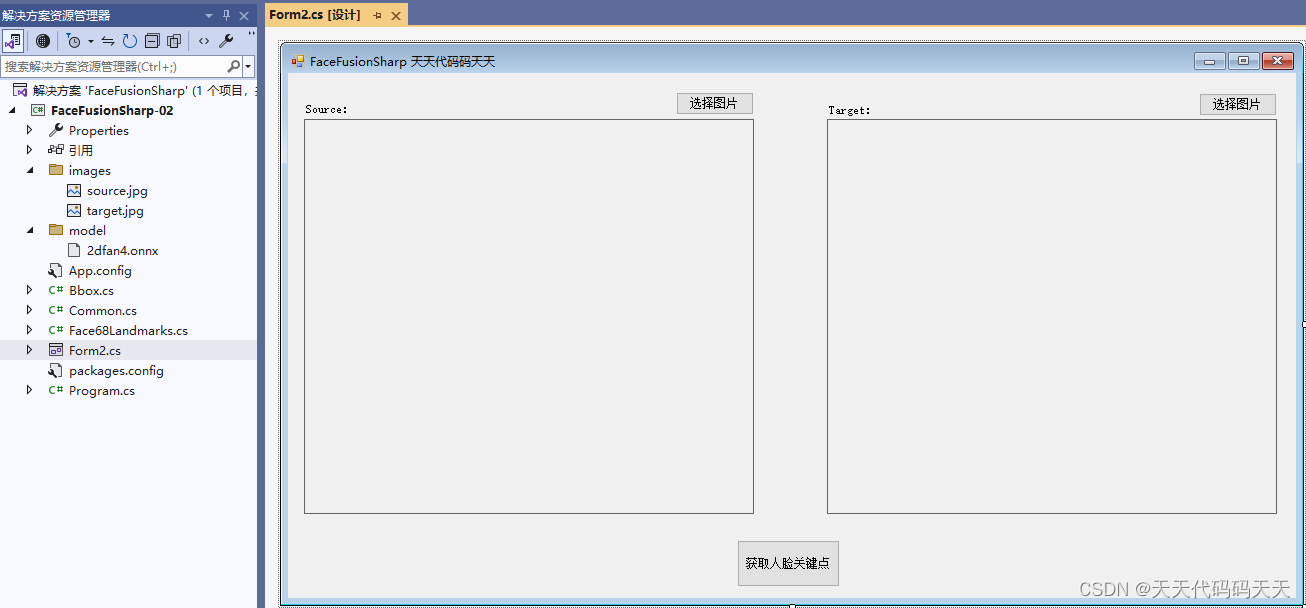
代码
Form2.cs
using Newtonsoft.Json;
using OpenCvSharp;
using OpenCvSharp.Extensions;
using System;
using System.Collections.Generic;
using System.Drawing;
using System.Windows.Forms;

namespace FaceFusionSharp
{
    public partial class Form2 : Form
    {
        public Form2()
        {
            InitializeComponent();
        }

        string fileFilter = "*.*|*.bmp;*.jpg;*.jpeg;*.tiff;*.tiff;*.png";

        string source_path = "";
        string target_path = "";

        Face68Landmarks detect_68landmarks;

        private void button2_Click(object sender, EventArgs e)
        {
            OpenFileDialog ofd = new OpenFileDialog();
            ofd.Filter = fileFilter;
            if (ofd.ShowDialog() != DialogResult.OK) return;

            pictureBox1.Image = null;

            source_path = ofd.FileName;
            pictureBox1.Image = new Bitmap(source_path);
        }

        private void button3_Click(object sender, EventArgs e)
        {
            OpenFileDialog ofd = new OpenFileDialog();
            ofd.Filter = fileFilter;
            if (ofd.ShowDialog() != DialogResult.OK) return;

            pictureBox2.Image = null;

            target_path = ofd.FileName;
            pictureBox2.Image = new Bitmap(target_path);
        }

        private void button1_Click(object sender, EventArgs e)
        {
            if (pictureBox1.Image == null || pictureBox2.Image == null)
            {
                return;
            }

            button1.Enabled = false;
            Application.DoEvents();

            Mat source_img = Cv2.ImRead(source_path);

            List<Bbox> boxes= new List<Bbox>();
            string boxesStr = "[{\"xmin\":261.8998,\"ymin\":192.045776,\"xmax\":821.1629,\"ymax\":936.720032}]";
            boxes = JsonConvert.DeserializeObject<List<Bbox>>(boxesStr);

            int position = 0; //一张图片里可能有多个人脸,这里只考虑1个人脸的情况
            List<Point2f> face68landmarks = detect_68landmarks.detect(source_img, boxes[position]);

            //绘图
            foreach (Point2f item in face68landmarks)
            {
                Cv2.Circle(source_img, (int)item.X, (int)item.Y, 8, new Scalar(0, 255, 0), -1);
            }
            pictureBox1.Image = source_img.ToBitmap();

            Mat target_img = Cv2.ImRead(target_path);
            boxesStr = "[{\"xmin\":413.807,\"ymin\":1.377529,\"xmax\":894.659,\"ymax\":645.6737}]";
            boxes = JsonConvert.DeserializeObject<List<Bbox>>(boxesStr);

            position = 0; //一张图片里可能有多个人脸,这里只考虑1个人脸的情况
            List<Point2f> target_landmark_5;
            target_landmark_5 = detect_68landmarks.detect(target_img, boxes[position]);

            //绘图
            foreach (Point2f item in target_landmark_5)
            {
                Cv2.Circle(target_img, (int)item.X, (int)item.Y, 8, new Scalar(0, 255, 0), -1);
            }
            pictureBox2.Image = target_img.ToBitmap();

            button1.Enabled = true;

        }

        private void Form1_Load(object sender, EventArgs e)
        {
            detect_68landmarks = new Face68Landmarks("model/2dfan4.onnx");

            target_path = "images/target.jpg";
            source_path = "images/source.jpg";

            pictureBox1.Image = new Bitmap(source_path);
            pictureBox2.Image = new Bitmap(target_path);
        }
    }
}
using Newtonsoft.Json;
using OpenCvSharp;
using OpenCvSharp.Extensions;
using System;
using System.Collections.Generic;
using System.Drawing;
using System.Windows.Forms;
namespace FaceFusionSharp
{
public partial class Form2 : Form
{
public Form2()
{
InitializeComponent();
}
string fileFilter = "*.*|*.bmp;*.jpg;*.jpeg;*.tiff;*.tiff;*.png";
string source_path = "";
string target_path = "";
Face68Landmarks detect_68landmarks;
private void button2_Click(object sender, EventArgs e)
{
OpenFileDialog ofd = new OpenFileDialog();
ofd.Filter = fileFilter;
if (ofd.ShowDialog() != DialogResult.OK) return;
pictureBox1.Image = null;
source_path = ofd.FileName;
pictureBox1.Image = new Bitmap(source_path);
}
private void button3_Click(object sender, EventArgs e)
{
OpenFileDialog ofd = new OpenFileDialog();
ofd.Filter = fileFilter;
if (ofd.ShowDialog() != DialogResult.OK) return;
pictureBox2.Image = null;
target_path = ofd.FileName;
pictureBox2.Image = new Bitmap(target_path);
}
private void button1_Click(object sender, EventArgs e)
{
if (pictureBox1.Image == null || pictureBox2.Image == null)
{
return;
}
button1.Enabled = false;
Application.DoEvents();
Mat source_img = Cv2.ImRead(source_path);
List<Bbox> boxes= new List<Bbox>();
string boxesStr = "[{\"xmin\":261.8998,\"ymin\":192.045776,\"xmax\":821.1629,\"ymax\":936.720032}]";
boxes = JsonConvert.DeserializeObject<List<Bbox>>(boxesStr);
int position = 0; //一张图片里可能有多个人脸,这里只考虑1个人脸的情况
List<Point2f> face68landmarks = detect_68landmarks.detect(source_img, boxes[position]);
//绘图
foreach (Point2f item in face68landmarks)
{
Cv2.Circle(source_img, (int)item.X, (int)item.Y, 8, new Scalar(0, 255, 0), -1);
}
pictureBox1.Image = source_img.ToBitmap();
Mat target_img = Cv2.ImRead(target_path);
boxesStr = "[{\"xmin\":413.807,\"ymin\":1.377529,\"xmax\":894.659,\"ymax\":645.6737}]";
boxes = JsonConvert.DeserializeObject<List<Bbox>>(boxesStr);
position = 0; //一张图片里可能有多个人脸,这里只考虑1个人脸的情况
List<Point2f> target_landmark_5;
target_landmark_5 = detect_68landmarks.detect(target_img, boxes[position]);
//绘图
foreach (Point2f item in target_landmark_5)
{
Cv2.Circle(target_img, (int)item.X, (int)item.Y, 8, new Scalar(0, 255, 0), -1);
}
pictureBox2.Image = target_img.ToBitmap();
button1.Enabled = true;
}
private void Form1_Load(object sender, EventArgs e)
{
detect_68landmarks = new Face68Landmarks("model/2dfan4.onnx");
target_path = "images/target.jpg";
source_path = "images/source.jpg";
pictureBox1.Image = new Bitmap(source_path);
pictureBox2.Image = new Bitmap(target_path);
}
}
}Face68Landmarks.cs
using Microsoft.ML.OnnxRuntime;
using Microsoft.ML.OnnxRuntime.Tensors;
using OpenCvSharp;
using System;
using System.Collections.Generic;
using System.Linq;

namespace FaceFusionSharp
{
    internal class Face68Landmarks
    {
        float[] input_image;
        int input_height;
        int input_width;
        Mat inv_affine_matrix = new Mat();

        SessionOptions options;
        InferenceSession onnx_session;

        public Face68Landmarks(string modelpath)
        {
            input_height = 256;
            input_width = 256;

            options = new SessionOptions();
            options.LogSeverityLevel = OrtLoggingLevel.ORT_LOGGING_LEVEL_INFO;
            options.AppendExecutionProvider_CPU(0);// 设置为CPU上运行

            // 创建推理模型类,读取本地模型文件
            onnx_session = new InferenceSession(modelpath, options);

        }

        void preprocess(Mat srcimg, Bbox bounding_box)
        {
            float sub_max = Math.Max(bounding_box.xmax - bounding_box.xmin, bounding_box.ymax - bounding_box.ymin);
            float scale = 195.0f / sub_max;
            float[] translation = new float[] { (256.0f - (bounding_box.xmax + bounding_box.xmin) * scale) * 0.5f, (256.0f - (bounding_box.ymax + bounding_box.ymin) * scale) * 0.5f };
            //python程序里的warp_face_by_translation函数
            Mat affine_matrix = new Mat(2, 3, MatType.CV_32FC1, new float[] { scale, 0.0f, translation[0], 0.0f, scale, translation[1] });
            Mat crop_img = new Mat();
            Cv2.WarpAffine(srcimg, crop_img, affine_matrix, new Size(256, 256));
            //python程序里的warp_face_by_translation函数
            Cv2.InvertAffineTransform(affine_matrix, inv_affine_matrix);

            Mat[] bgrChannels = Cv2.Split(crop_img);
            for (int c = 0; c < 3; c++)
            {
                bgrChannels[c].ConvertTo(bgrChannels[c], MatType.CV_32FC1, 1 / 255.0);
            }

            Cv2.Merge(bgrChannels, crop_img);

            foreach (Mat channel in bgrChannels)
            {
                channel.Dispose();
            }

            input_image = Common.ExtractMat(crop_img);
            crop_img.Dispose();
        }

        internal List<Point2f> detect(Mat srcimg, Bbox bounding_box)
        {
            preprocess(srcimg, bounding_box);

            Tensor<float> input_tensor = new DenseTensor<float>(input_image, new[] { 1, 3, input_height, input_width });
            List<NamedOnnxValue> input_container = new List<NamedOnnxValue>
            {
                NamedOnnxValue.CreateFromTensor("input", input_tensor)
            };
            var ort_outputs = onnx_session.Run(input_container).ToArray();

            float[] pdata = ort_outputs[0].AsTensor<float>().ToArray(); //形状是(1, 68, 3), 每一行的长度是3,表示一个关键点坐标x,y和置信度
            int num_points = 68;
            List<Point2f> face_landmark_68 = new List<Point2f>();
            for (int i = 0; i < num_points; i++)
            {
                face_landmark_68.Add(new Point2f((float)(pdata[i * 3] / 64.0 * 256.0), (float)(pdata[i * 3 + 1] / 64.0 * 256.0)));
            }

            var face_landmark_68_Points = new Mat(face_landmark_68.Count, 1, MatType.CV_32FC2, face_landmark_68.ToArray());

            Mat face68landmarks_Points = new Mat();
            Cv2.Transform(face_landmark_68_Points, face68landmarks_Points, inv_affine_matrix);

            Point2f[] face68landmarks;
            face68landmarks_Points.GetArray<Point2f>(out face68landmarks);

            //python程序里的convert_face_landmark_68_to_5函数
            Point2f[] face_landmark_5of68 = new Point2f[5];
            float x = 0, y = 0;
            for (int i = 36; i < 42; i++) // left_eye
            {
                x += face68landmarks[i].X;
                y += face68landmarks[i].Y;
            }
            x /= 6;
            y /= 6;
            face_landmark_5of68[0] = new Point2f(x, y); // left_eye

            x = 0;
            y = 0;
            for (int i = 42; i < 48; i++) // right_eye
            {
                x += face68landmarks[i].X;
                y += face68landmarks[i].Y;
            }
            x /= 6;
            y /= 6;
            face_landmark_5of68[1] = new Point2f(x, y); // right_eye

            face_landmark_5of68[2] = face68landmarks[30]; // nose
            face_landmark_5of68[3] = face68landmarks[48]; // left_mouth_end
            face_landmark_5of68[4] = face68landmarks[54]; // right_mouth_end
            //python程序里的convert_face_landmark_68_to_5函数
            return face_landmark_5of68.ToList();
        }
    }
}
下载
源码下载
