文章目录
- 1. Spring概述
- 2. 控制反转(IoC)
- 2.1 Spring声明Bean对象的方式
- 2.2 Spring的Bean容器:BeanFactory
- 2.3 Spring的Bean生命周期
- 2.4 Spring的Bean的注入方式
- 3. Spring的事件监听器(Event Listener)
- 3.1 Spring内置事件监听器
- 3.2 自主发布事件与监听
- 4. Spring的面向切面编程(AOP)
- 4.1 AOP简介
- 4.2 静态代理与动态代理
- 4.3 使用Spring AOP
- 4.4 Pointcut的声明
- 参考资料
1. Spring概述
Spring的主要目的是为了简化Java EE的企业级应用开发。
Spring框架主要提供了两个基础功能:
- 控制反转(Ioc):也称为依赖注入(Dependency Injection, DI)
- 面向切面编程(Aspect Oriented Programming, AOP)
2. 控制反转(IoC)
控制反转(Inversion of Control, IoC):将对象的控制权交由Spring管理,而不是自己管理。体验上就是:在需要用到对象(称为Bean对象)时(例如某个业务处理对象,连接池对象等),不需要自己去new,而是从Spring的容器中直接拿就行了。对于Spring如何初始化对象,可以由开发者指定,也可以使用Spring提供的默认初始化方式。
依赖注入(Dependency Injection):控制反转功能也可以称为依赖注入。即当我们要使用某个对象时,直接通过Spring注入即可,不需要显示的获取。体验上就是:在需要注入的对象变量上增加@Autowired注解
2.1 Spring声明Bean对象的方式
要进行依赖注入bean对象,首先要声明Bean,即告诉Spring如何初始化该Bean。
Spring声明Bean有如下几种方式:
-
XML 配置方式:通过在 XML 配置文件中使用
<bean>元素声明对象。(Spring Boot出现后,该方式基本淘汰)<bean id="myBean" class="com.example.MyBean"/> -
基于注解的方式:使用注解来标记类,告诉 Spring 在运行时将其作为 Bean 进行管理。常用的注解包括
@Component、@Service、@Repository和@Controller。@Component public class MyBean { ... }@Component:最通用的注解,用于标记任何类作为 Spring Bean,如工具类或者没有明确分类的类。@Repository:通常用于标记数据访问层(DAO 层)的类。@Service:通常用于标记业务逻辑层(Service 层)的类。@Controller:通常用于标记控制器层的类(如 Spring MVC 中的控制器)。
这些注解名字不同的原因:①(主要原因)用于语义区分;② Spring会进行一些特殊处理。例如:
@Repository将底层的数据访问异常转换为 Spring 的 DataAccessException。 -
JavaConfig 配置方式:通过 Java 类来配置 Spring Bean。可以使用
@Configuration注解标记配置类,并在方法上使用@Bean注解声明 Bean。@Configuration public class AppConfig { @Bean public MyBean myBean() { return new MyBean(); } // 可以配置多个Bean。通常将一组相关的Bean配置在一个Config类下 }对于
@Bean的配置方式,需要通过@ComponentScan注解来启用扫描,这样才能被Spring管理。例如:@ComponentScan("com.example") // 通常加在启动类上
2.2 Spring的Bean容器:BeanFactory
当Spring将Bean初始化后之后,需要一个容器来存储这些Bean。这个容器就是BeanFactory。
BeanFactory是一个接口,里面定义了几个重要的getBean(...)方法,让用户可以方便的通过名字、XXX.class等方式获取Bean对象。
在SpringBoot的Web程序中,使用的BeanFactory的实现类为AnnotationConfigServletWebServerApplicationContext。它的继承关系如下图:
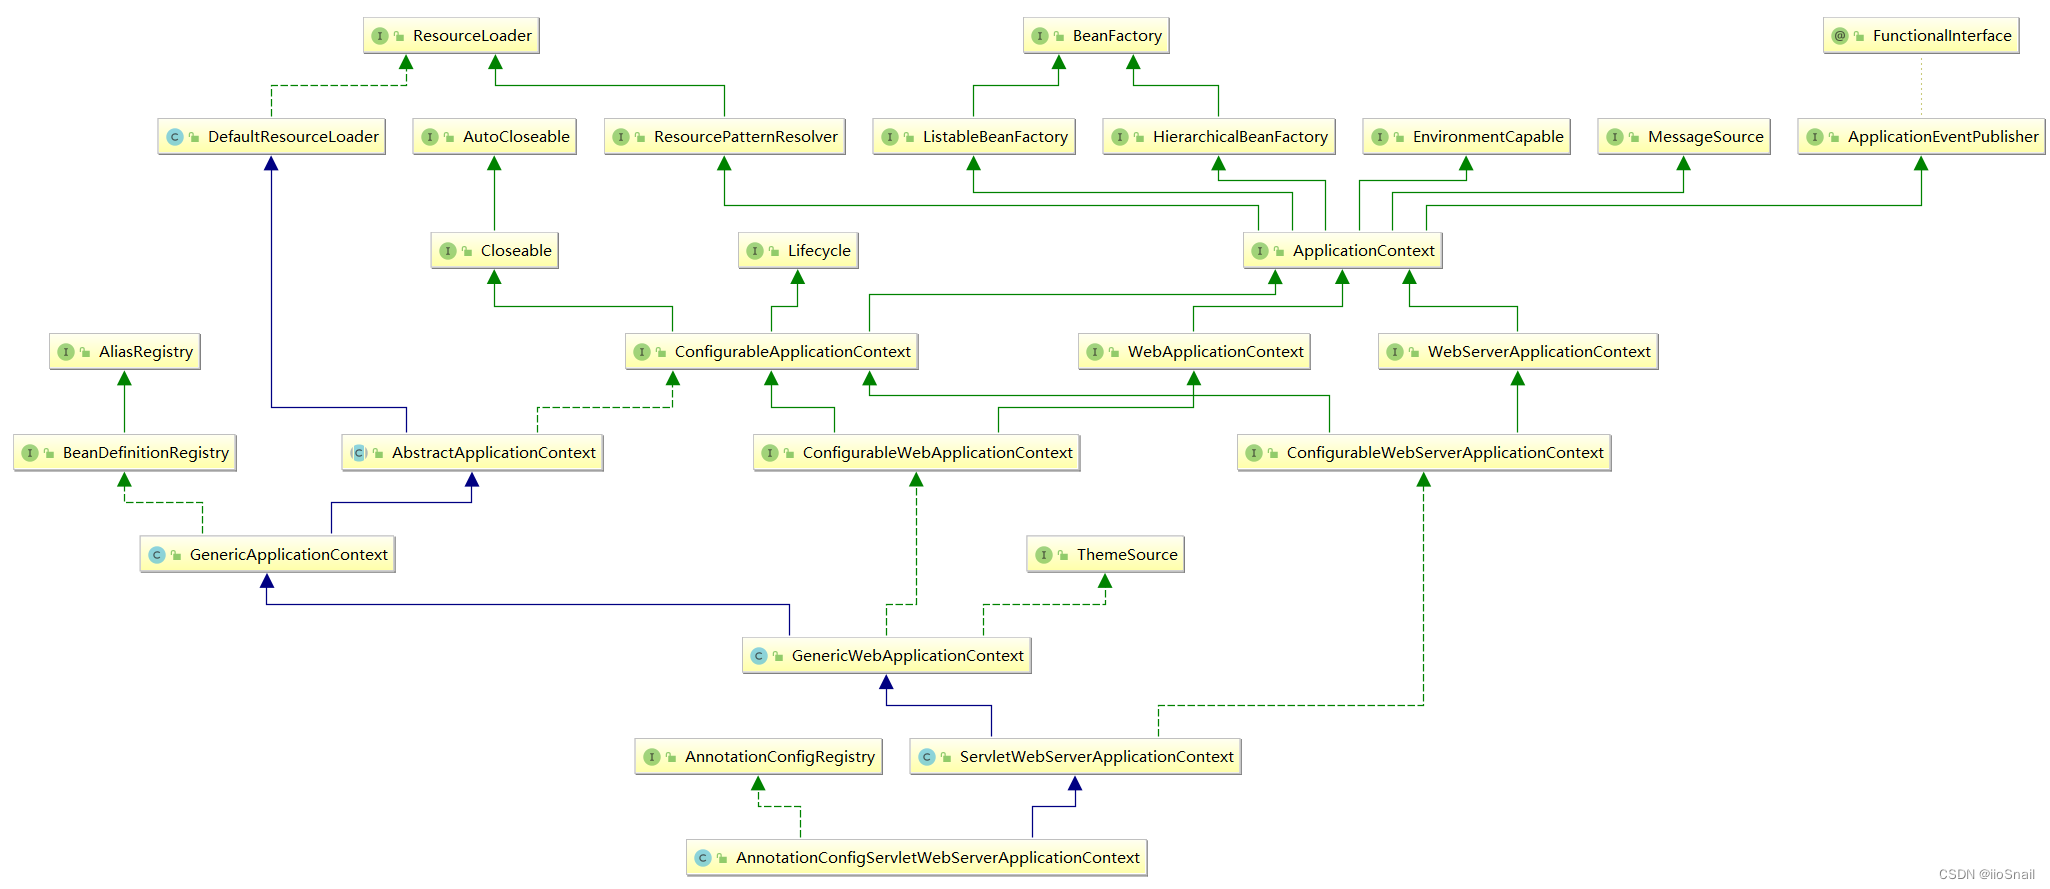
从上到下,比较重要的类/接口如下:
- BeanFactory:最基本的容器接口,提供了最基本的 IoC(Inverse of Control)功能。
- ApplicationContext:BeanFactory 的子接口,扩展了 BeanFactory 的功能,提供了更完整的国际化、事件传播、资源访问、AOP 支持等功能。
- WebApplicationContext:专门用于 Web 应用程序的 ApplicationContext 接口。在ApplicationContext的基础上,增加了一些针对 Web 开发的功能,例如 Servlet 上下文的生命周期管理、Servlet 属性的访问、Web 应用中 Servlet 和 Filter 的注册等。
- ConfigurableWebApplicationContext: WebApplicationContext 的子接口,提供了一些额外的配置和定制能力。
- ServletWebServerApplicationContext:用于 Web 应用程序的 ApplicationContext 的特定实现类,它与 Servlet 容器集成(例如 Tomcat),负责配置和启动 Servlet 容器,并提供了一些特定于 Servlet 容器的功能,例如设置上下文路径、配置 SSL、处理错误页面等
- AnnotationConfigServletWebServerApplicationContext:ServletWebServerApplicationContext的子类,使用基于 Java 注解的配置来管理 Web 应用程序的 Bean,通过扫描指定的包(
@ComponentScan注解)来查找和注册带有特定注解的 Bean 定义,然后将它们装配到容器中。
在非SpringBoot或非Web程序中,也会用到一些其他的BeanFactory的实现。例如:
XmlBeanFactory、FileSystemXmlApplicationContext、ClassPathXmlApplicationContext等
2.3 Spring的Bean生命周期
Spring的Bean从出生到死亡一共会经历以下三个主要阶段:
- 实例化(Instantiation):当容器启动时,根据配置文件或注解等方式,Spring会实例化Bean,也就是执行Bean的构造方法。
- 依赖注入(Dependency Injection):完成实例化后,若该Bean依赖其他的Bean,会将其他的Bean注入进来,因为后续的初始化过程可能会用。
- 初始化(Initialization):执行用户定义的初始化方法。有如下方式:① 实现
InitializingBean接口并实现其中的afterPropertiesSet()方法;② 在Bean的初始化方法上添加@PostConstruct注解;③@Bean注解上指定初始化方法 - 使用(In Use):初始化结束后,Bean就会存储在Bean容器中,运行期间就可以获取并使用。
- 销毁(Destruction):销毁阶段是在Bean不再需要时执行的(通常为正常退出程序时执行)。Spring提供了两种方式来定义销毁方法:① 实现
DisposableBean接口并实现其中的destroy()方法;② 在Bean的销毁方法上添加@PreDestroy注解。
示例1(@Component的Bean各个阶段使用注解):
@Component
public class MyBean1 {

    @Autowired
    private RestTemplate restTemplate;

    public MyBean1() {
        System.out.println("MyBean1实例化!restTemplate:" + restTemplate);  // restTemplate为null
    }

    @PostConstruct  // post construct(在构造之后)
    public void init() {
        System.out.println("MyBean1初始化!restTemplate:" + restTemplate);  // restTemplate已经被注入
    }

    @PreDestroy  // pre destroy(在销毁之前)
    public void destroy() {
        System.out.println("MyBean1销毁");
    }

}
输出:
// 启动SpringBoot程序
MyBean1实例化!restTemplate:null
MyBean1初始化!restTemplate:org.springframework.web.client.RestTemplate@5effc15d
// 关闭SpringBoot程序
MyBean1销毁
示例2(@Component的Bean各个阶段使用实现接口):
@Component
public class MyBean2 implements InitializingBean, DisposableBean {

    @Autowired
    private RestTemplate restTemplate;

    public MyBean2() {
        System.out.println("MyBean2实例化!restTemplate:" + restTemplate);  // restTemplate为null
    }

    @Override
    public void afterPropertiesSet() throws Exception {
        System.out.println("MyBean2初始化!restTemplate:" + restTemplate);  // restTemplate已经被注入
    }

    @Override
    public void destroy() {
        System.out.println("MyBean2销毁");
    }
}
输出:
// 启动SpringBoot程序
MyBean2实例化!restTemplate:null
MyBean2初始化!restTemplate:org.springframework.web.client.RestTemplate@5effc15d
// 关闭SpringBoot程序
MyBean2销毁
示例3(@Bean注解):
class MyBean3 {

    @Autowired
    public RestTemplate restTemplate;

    public MyBean3() {
        System.out.println("MyBean3实例化!restTemplate:" + restTemplate);  // restTemplate为null
    }

    private void init() {
        System.out.println("MyBean3初始化!restTemplate:" + restTemplate);  // restTemplate已经被注入
    }

    private void destroy() {
        System.out.println("MyBean3销毁");
    }
}

@Configuration
public class MyBeanConfiguration {

    @Bean(initMethod="init", destroyMethod="destroy")
    public MyBean3 myBean() {
        return new MyBean3();
    }
}
输出:
// 启动SpringBoot程序
MyBean3实例化!restTemplate:null
MyBean3初始化!restTemplate:org.springframework.web.client.RestTemplate@5effc15d
// 关闭SpringBoot程序
MyBean3销毁
对于Bean的生命周期,可能大部分人在网上看到的是这张图:
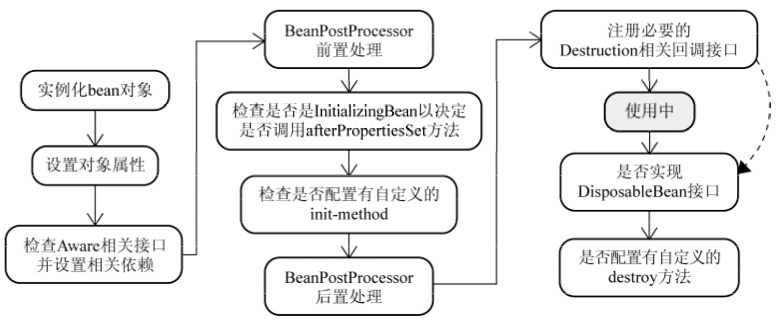
这张图其实就是把上面的几种方式揉到一起复杂化了。但开发者其实不用关注哪种方式谁先谁后,正常也不会一起用。
2.4 Spring的Bean的注入方式
当我们声明好Bean后,就可以在需要它们的地方进行注入了。Spring为我们提供了以下注入方式:
假设我们有一个配置类配置了如下Bean:
@Configuration
public class TestConfiguration {

    @Bean(name = "restTemplate1")  // 有两个RestTemplate的Bean,名字不同
    public RestTemplate restTemplate1() {
        return new RestTemplate();
    }

    @Bean(name = "restTemplate2")
    public RestTemplate restTemplate2() {
        return new RestTemplate();
    }

    @Bean // 有一个Random类的Bean
    public Random random() {
        return new Random();
    }
}
-
使用注解方式注入:通过在代码中使用注解来实现依赖注入,包括
@Autowired、@Resource等注解。@Autowired:Spring提供的注解,自动根据类型装配。若需要根据名称,则需要配合@Qualifier注解。@Resource:Java EE提供的注解。可以通过参数来指定根据名称或类型进行注入。
@Component public class MyBean1 { @Autowired // 查找Random类型的Bean,必须唯一 private Random random1; @Resource(type = Random.class) // 根据类型注入 private Random random2; // @Autowired // 加入这个启动失败,因为有两个RestTemplate类型的Bean // private RestTemplate restTemplate; @Autowired @Qualifier("restTemplate1") // 根据名称注入 private RestTemplate restTemplate1; @Resource(name = "restTemplate2") // 根据类型注入 private RestTemplate restTemplate2; @PostConstruct public void init() { System.out.println("random1:" + random1); System.out.println("random2:" + random2); System.out.println("restTemplate1:" + restTemplate1); System.out.println("restTemplate2:" + restTemplate2); } } -
使用构造方法注入:直接将你需要注入的Bean配在构造方法上
@Component
public class MyBean1 {

    private Random random1;
    private Random random2;
    private RestTemplate restTemplate1;
    private RestTemplate restTemplate2;

    private MyBean1(Random random1,
                    Random random2,
                    @Qualifier("restTemplate1") RestTemplate restTemplate1,  // 使用@Qualifier指定要注入bean的名称
                    RestTemplate restTemplate2  // 这里居然不报错,且能正常注入。我的版本是spring-beans5.3.9
    ) {
        this.random1 = random1;
        this.random2 = random2;
        this.restTemplate1 = restTemplate1;
        this.restTemplate2 = restTemplate2;
    }

    @PostConstruct
    public void init() {
        System.out.println("random1:" + random1);
        System.out.println("random2:" + random2);
        System.out.println("restTemplate1:" + restTemplate1);
        System.out.println("restTemplate2:" + restTemplate2);
    }
}
输出:
random1:java.util.Random@738a1324 random2:java.util.Random@738a1324 // 因为只有一个Random,所以两个是一个Bean restTemplate1:org.springframework.web.client.RestTemplate@65a86de0 // restTemplate1 restTemplate2:org.springframework.web.client.RestTemplate@745e1fb7 // restTemplate2 -
使用Aware接口注入:Spring提供了一些
XxxxxAware的接口,通过这些接口可以注入ApplicationContext、BeanFactory等系统Bean。(不过也可以用@Autowired注入)@Component public class MyBean1 implements ApplicationContextAware, ResourceLoaderAware { private ApplicationContext applicationContext; private ResourceLoader resourceLoader; @Override public void setApplicationContext(ApplicationContext applicationContext) throws BeansException { this.applicationContext = applicationContext; } @Override public void setResourceLoader(ResourceLoader resourceLoader) { this.resourceLoader = resourceLoader; } @Autowired // 也可以使用@Autowired注入 private ApplicationContext applicationContext2; @Autowired private ResourceLoader resourceLoader2; @PostConstruct public void init() { System.out.println("applicationContext: " + applicationContext); System.out.println("resourceLoader: " + resourceLoader); System.out.println("applicationContext2: " + applicationContext2); System.out.println("resourceLoader2: " + resourceLoader2); } }输出:
// 这里输出的四个对象是同一个,因为在SpringBoot的wen程序中,这ResourceLoader和Application就是同一个实现,即AnnotationConfigServletWebServerApplicationContext
applicationContext: ... AnnotationConfigServletWebServerApplicationContext@1dc76fa1 ...
resourceLoader: ... AnnotationConfigServletWebServerApplicationContext@1dc76fa1 ...
applicationContext2: ... AnnotationConfigServletWebServerApplicationContext@1dc76fa1 ...
resourceLoader2: ... AnnotationConfigServletWebServerApplicationContext@1dc76fa1 ...
3. Spring的事件监听器(Event Listener)
Spring框架为用户提供了一套基于观察者模式的事件发布与监听机制。
事件监听器包含三个部分:
- 事件(Event):对应观察者模式中的消息。事件发布者发布事件,事件监听者来监听消息。
- 事件发布者(Event Publisher):对应观察者模式中的主体(被观察者)。通常,Spring会在自己的上下文状态变更的时候发布事件。用户也可以发布自己的事件。
- 事件监听者(Event Listener):对应观察者模式中的观察者。一般由用户实现,来监听Spring发布的上下文变更事件。
用户想要监听事件,只需要写一个类,继承ApplicationListener<E extends ApplicationEvent>类,其中泛型为要监听的实践。例如:
@Component
public class MyListener implements ApplicationListener<ContextRefreshedEvent> {

    @Override
    public void onApplicationEvent(ContextRefreshedEvent event) {
        System.out.println("onApplicationEvent:" + event.getSource());
    }
}
3.1 Spring内置事件监听器
Spring为用户内置许多事件监听器,当Spring的上下文等的状态发生变化时,Spring会发布事件。如果用户注册了相应的监听器,就可以进行相应的处理。
你也可以把它理解成Spring生命周期中的钩子函数。
Spring提供的常用内置监听器事件有(ApplicationListener类的):
- ContextRefreshedEvent监听器:当ApplicationContext被初始化或刷新时触发。这个事件通常用于执行应用程序初始化或者加载缓存等操作。
- ContextStartedEvent监听器:当ApplicationContext启动时触发。可以在这个事件中执行一些需要在应用程序启动时完成的任务。
- ContextStoppedEvent监听器:当ApplicationContext停止时触发。可以在这个事件中执行一些清理工作或者资源释放操作。
- ContextClosedEvent监听器:当ApplicationContext关闭时触发。这个事件通常用于执行一些清理工作或者释放资源的操作。
- RequestHandledEvent监听器:在Spring MVC中,每次处理HTTP请求完成时都会触发该事件。这个事件通常用于收集请求处理的统计信息或者日志记录。
此外,在SpringBoot等中,还有一些其他的监听器类,例如:
- ServletContextListener:监听ServletContext的生命周期事件。
- HttpSessionListener:监听HTTP会话的生命周期
- ServletRequestListener:监听HTTP请求的生命周期事件,如请求创建和销毁事件。
- SpringApplicationRunListener:监听Spring Boot应用程序的的生命周期事件。
示例1(ApplicationListener事件):
@Component
public class MyListener1 implements ApplicationListener<ContextRefreshedEvent> {

    @Override
    public void onApplicationEvent(ContextRefreshedEvent event) {
        System.out.println("ContextRefreshedEvent");
    }
}
@Component
public class MyListener2 implements ApplicationListener<ContextClosedEvent> {

    @Override
    public void onApplicationEvent(ContextClosedEvent event) {
        System.out.println("ContextClosedEvent");
    }
}
@Component
public class MyListener3 implements ApplicationListener<ContextStartedEvent> {

    @Override
    public void onApplicationEvent(ContextStartedEvent event) {
        System.out.println("ContextStartedEvent");
    }
}
输出:
ContextRefreshedEvent
...
ContextRefreshedEvent
// 这里关闭SpringBoot程序
ContextClosedEvent
不同的Spring容器监听的事件不同。例如,在我的SpringBoot程序中,
ContextStartedEvent和ContextStoppedEvent是不会被触发的。需要使用ApplicationStartedEvent和ApplicationStoppedEvent事件
示例2(SpringApplicationRunListener):
public class MySpringBootListener implements SpringApplicationRunListener {

	// 构造函数必须这么写
    public MySpringBootListener(SpringApplication application, String[] args) {
        System.out.println("SpringApplicationRunListener constructor");
    }

    @Override
    public void starting(ConfigurableBootstrapContext bootstrapContext) {
        System.out.println("SpringApplicationRunListener starting:" + bootstrapContext);
    }

    @Override
    public void environmentPrepared(ConfigurableBootstrapContext bootstrapContext, ConfigurableEnvironment environment) {
        System.out.println("SpringApplicationRunListener environmentPrepared:" + bootstrapContext);
    }

    @Override
    public void contextPrepared(ConfigurableApplicationContext context) {
        System.out.println("SpringApplicationRunListener contextPrepared:" + context);
    }

    @Override
    public void contextLoaded(ConfigurableApplicationContext context) {
        System.out.println("SpringApplicationRunListener contextLoaded:" + context);
    }

    @Override
    public void started(ConfigurableApplicationContext context) {
        System.out.println("SpringApplicationRunListener started:" + context);
    }

    @Override
    public void running(ConfigurableApplicationContext context) {
        System.out.println("SpringApplicationRunListener running:" + context);
    }

    @Override
    public void failed(ConfigurableApplicationContext context, Throwable exception) {
        System.out.println("SpringApplicationRunListener failed:" + context);
    }
}
在src/resource/META-INF/spring.factories文件中增加一条配置:
# 写对应路径
org.springframework.boot.SpringApplicationRunListener=com.example.MySpringBootListener
输出:
SpringApplicationRunListener constructor
SpringApplicationRunListener starting:org.springframework.boot.DefaultBootstrapContext@2a898881
SpringApplicationRunListener environmentPrepared:org.springframework.boot.DefaultBootstrapContext@2a898881
SpringApplicationRunListener contextPrepared:org.springframework.context.annotation.AnnotationConfigApplicationContext@585811a4
SpringApplicationRunListener contextLoaded:org.springframework.context.annotation.AnnotationConfigApplicationContext@585811a4
SpringApplicationRunListener started:org.springframework.context.annotation.AnnotationConfigApplicationContext@585811a4
SpringApplicationRunListener running:org.springframework.context.annotation.AnnotationConfigApplicationContext@585811a4
3.2 自主发布事件与监听
除了使用内置的监听器外,我们也可以自己发布事件,然后监听自己的事件。
自己发布事件需要做如下三件事:
- 定义事件类:需要继承
ApplicationEvent - 在需要的地方发布事件:通过
ApplicationEventPublisher.publishEvent(...)方法可以发布事件 - 定义监听器监听事件:定义监听类,实现
ApplicationListener<你的事件类>。
示例:
-
定义事件类:
public class CustomEvent extends ApplicationEvent { public String anyArg; public CustomEvent(Object source, String anyArg) { super(source); this.anyArg = anyArg; } } -
定义监听器:
@Component public class CustomEventListener implements ApplicationListener<CustomEvent> { @Override public void onApplicationEvent(CustomEvent event) { System.out.println("CustomEvent:" + event.anyArg); } } -
在合适的地方发布事件。这里我使用Controller接口进行测试:
@RestController
@RequestMapping("test")
public class TestController {

    @Autowired
    private ApplicationEventPublisher eventPublisher;

    @GetMapping("/eventTest")
    public void eventTest() {
        eventPublisher.publishEvent(new CustomEvent(this, "myEvent"));
    }
}
当我调用eventTest接口后,控制台就会执行监听器方法,输出:
CustomEvent:myEvent
4. Spring的面向切面编程(AOP)
4.1 AOP简介
面向对象处理的痛点:在面向对象编程中,我们会有许多业务处理模块(例如:创建订单、查询订单、派发工单等)。对于这些模块,需要一些公共的处理逻辑(例如:日志记录、权限校验等),如果为每一个方法都在前后增加额外的代码进行这些逻辑的处理,对业务系统的侵入性太高了,会造成代码的严重耦合。
面向切面编程(Aspect-Oriented Programming,AOP)可以解决上述痛点,其主要思想是通过将横切关注点从业务逻辑中分离出来,然后在需要的时候将其插入到应用程序的特定点上,而不是将其分散在整个应用程序代码中。这样做可以使得应用程序的核心逻辑更加清晰,同时也提高了代码的可维护性和可重用性。
AOP的实现其实就是代理模式,通过一个代理类来调用业务逻辑的方法,从而在其前后增加逻辑处理。
如图所示:
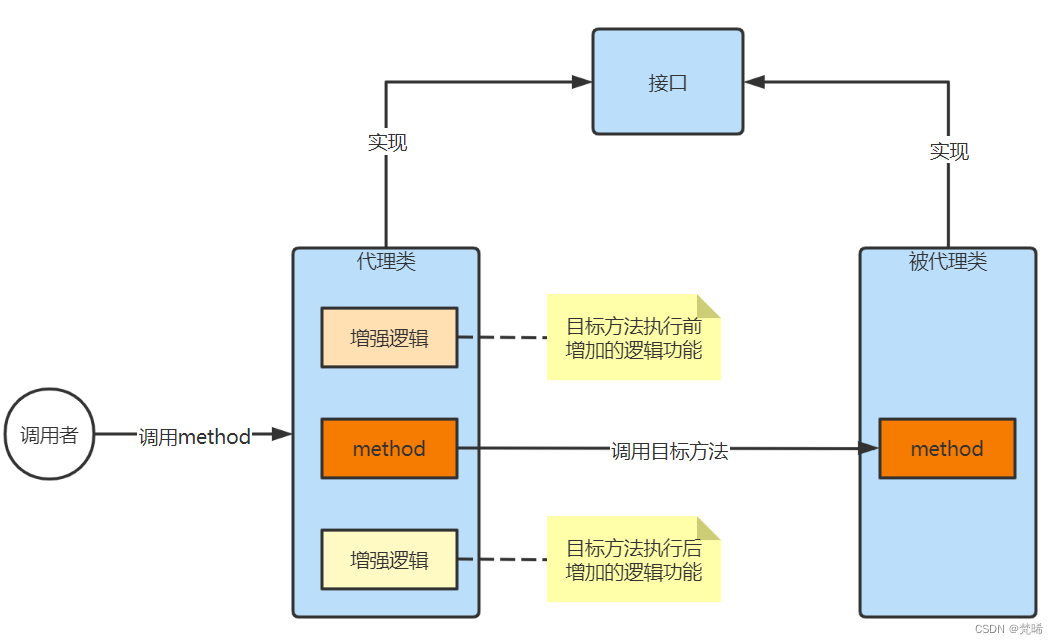
注意,代理模式会实打实的生成一个代理类。例如,我们有一个
XxxxService.class类,若使用了AOP,就会生成一个XxxxService$Proxy.class类。而在调用时,你实际调用的是代理类。
4.2 静态代理与动态代理
Java中要实现AOP(或者说代理模式),通常有两种方式,即静态代理和动态代理。
- 静态代理:在编译期就已经确定下来代理类和代理方式。代理类可以是用户自己编写的,也可以使用框架(例如
AspectJ)在编译期生成的。- 优点:性能高。编译期生成代理类,JVM直接加载就能用。
- 缺点:不够灵活。无法在运行期更改切入点。
- 动态代理(Spring AOP采用):利用反射和动态字节码技术(CGLIB库),在运行期动态构建字节码的class文件,以此来生成代理类。
- 优点:灵活。可以运行期随时调整代理类,切入点等。
- 缺点:性能差(其实还好)。由于是动态生成class类,相比静态代理JVM直接载入类,性能要差一下。不过Spring会在启动时将代理类都生成好,运行时就直接用,所以还好。这也是为什么Spring项目启动慢的原因之一。
4.3 使用Spring AOP
在Spring中使用AOP只需要做以下三点即可:
- 定义切面类:新建一个类,作为切面类,用于处理一些事务(例如:日志打印)。需要在类上增加
@Component和@Aspect注解。 - 定义切点(Pointcut):定义该切面需要给“哪些方法”前后增加逻辑。需要使用
@Pointcut注解来声明。 - 定义通知(Advice):就是定义你要增加的前后逻辑的方法。需要使用
@Before、@After和@Around注解来标注通知方式。
示例:
import org.aspectj.lang.JoinPoint;
import org.aspectj.lang.ProceedingJoinPoint;
import org.aspectj.lang.annotation.After;
import org.aspectj.lang.annotation.Around;
import org.aspectj.lang.annotation.Aspect;
import org.aspectj.lang.annotation.Before;
import org.aspectj.lang.annotation.Pointcut;
import org.springframework.stereotype.Component;

@Aspect  // 告诉Spring这个类是切面类
@Component  // 告诉Spring这个类要被你管理起来
public class LogAspect {

	// 定义切入点,即告诉Spring哪些方法要增加切面。
	// 切点定义支持不同的方式,详见:https://docs.spring.io/spring-framework/reference/core/aop/ataspectj/pointcuts.html
	// 也可以不定义Pointcut,而是直接写到@Before等注解上
    @Pointcut("execution(* com.*.MyService.*(..))")
    public void logPointcut() {
    }

	// 前置通知。在方法执行前被调用
    @Before("logPointcut()")  // 指定Pointcut
    public void beforeAdviceLog(JoinPoint joinPoint) {
        System.out.println("beforeAdviceLog");
    }

	// 后置通知。在方法执行后被调用
    @After("logPointcut()")
    public void afterAdviceLog(JoinPoint joinPoint) {
        System.out.println("afterAdviceLog");
    }

	// 环绕通知。自主决定在哪执行方法。
    @Around("logPointcut()")
    public Object aroundAdviceLog(ProceedingJoinPoint joinPoint) throws Throwable {
        System.out.println("Around beforeAdviceLog");
        Object result = null;
        try {
            result = joinPoint.proceed();  // 执行业务方法,并保存返回值
        } catch (Throwable throwable) {
            // 切点方法报错的处理。一般会处理后重新抛出去
            System.out.println("Around Exception");
            throw throwable;
        }

        System.out.println("Around afterAdviceLog");
        return result;  // 返回方法执行的返回值
    }

}
业务类如下:
@Service
public class MyService {

    public void doSomething() {
        System.out.println("do something...");
    }

}
当执行业务类的doSomething后的输出:
Around beforeAdviceLog
beforeAdviceLog
do something...
afterAdviceLog
Around afterAdviceLog
通常只需要使用Around就行了
4.4 Pointcut的声明
Pointcut提供了不同的声明方式(称为表达式),几乎覆盖了人们的应用场景。
主要有以下几种(官方链接):
- execution:按方法签名进行模糊匹配。表达式为:
execution(modifiers-pattern? return-type-pattern declaring-type-pattern? method-name-pattern(param-pattern) throws-pattern?)- 样例1:
execution(public * com.example.service.*.*(..))。匹配com.example.service包下的所有public方法。 - 样例2:
execution(* com.example.service.UserService.*(..))。匹配UserService类的所有方法 - 样例3:
execution(* com.example.service.*.*(java.lang.String, int))。根据方法参数匹配service包下所有匹配该参数的方法。 - 样例4:
execution(* com.example.service.*.*() throws java.io.IOException)。匹配service包下,所有抛出IOException异常的方法。 - 样例5:
execution(public static * com.example.service.*.*(..))。匹配service包下的所有public的静态方法。
- 样例1:
- within:按类进行匹配。表达式为:
within(type-pattern)。粗粒度相比execution较粗,建议使用execution。 - annotation:按注解进行匹配。表达式为:
@annotation(annotation-type)。- 样例1:
@annotation(org.springframework.transaction.annotation.Transactional)。匹配加了注解@Transactional注解的方法。
- 样例1:
- bean:按bean名称,匹配该bean下的所有方法。
- 样例1:
bean(accountService*)。匹配bean名称以accountService类下的所有方法。若我们有一个AccountServiceImpl,那么该类下面的所有方法都会被切面。
- 样例1:
此外,Pointcut可以使用&&、||和!表达式。
示例1:
@Pointcut("execution(* com.example.service.*.*(..)) && within(com.example.controller.*)")
@Pointcut("execution(* com.example.service.*.*(..)) || execution(* com.example.dao.*.*(..))")
@Pointcut("execution(* com.example.service.*.*(..)) && !execution(* com.example.service.internal.*.*(..))")
参考资料
- Spring解密(王福强 著)


![[移动通讯]【无线感知-P1】[从菲涅尔区模型到CSI模型-2]](https://img-blog.csdnimg.cn/direct/73b3786a1a38434a89c82bec5e588fc3.png)