thymeleaf模板引擎的使用
在早期开发的时候,我们完成的都是静态页面也就是html页面,随着时间轴的发展,慢慢的引入了jsp页面,当在后端服务查询到数据之后可以转发到jsp页面,可以轻松的使用jsp页面来实现数据的显示及交互,jsp有非常强大的功能,但是,在使用springboot的时候,整个项目是以jar包的方式运行而不是war包,而且还嵌入了tomcat容器,因此,在默认情况下是不支持jsp页面的。如果直接以纯静态页面的方式会给我们的开发带来很大的麻烦,springboot推荐使用模板引擎。
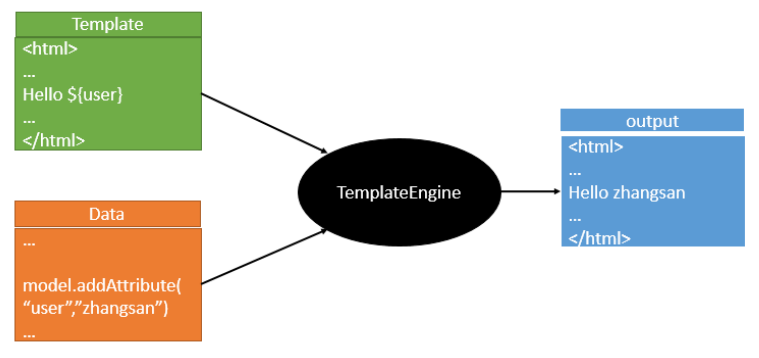
模板引擎有很多种,jsp,freemarker,thymeleaf,模板引擎的作用就是我们来写一个页面模板,比如有些值呢,是动态的,我们写一些表达式。而这些值,从哪来呢,我们来组装一些数据,我们把这些数据找到。然后把这个模板和这个数据交给我们模板引擎,模板引擎按照我们这个数据帮你把这表达式解析、填充到我们指定的位置,然后把这个数据最终生成一个我们想要的内容给我们写出去,这就是我们这个模板引擎,不管是jsp还是其他模板引擎,都是这个思想。只不过不同的模板引擎语法不同而已,下面重点学习下springboot推荐使用的thymeleaf模板引擎,语法简单且功能强大
1、thymeleaf的介绍
官网地址:https://www.thymeleaf.org/
thymeleaf在github的地址:https://github.com/thymeleaf/thymeleaf
中文网站:https://raledong.gitbooks.io/using-thymeleaf/content/
导入依赖:
        <!--thymeleaf模板-->
        <dependency>
            <groupId>org.thymeleaf</groupId>
            <artifactId>thymeleaf-spring5</artifactId>
        </dependency>
        <dependency>
            <groupId>org.thymeleaf.extras</groupId>
            <artifactId>thymeleaf-extras-java8time</artifactId>
        </dependency>
在springboot中有专门的thymeleaf配置类:ThymeleafProperties
@ConfigurationProperties(prefix = "spring.thymeleaf")
public class ThymeleafProperties {
	private static final Charset DEFAULT_ENCODING = StandardCharsets.UTF_8;
	public static final String DEFAULT_PREFIX = "classpath:/templates/";
	public static final String DEFAULT_SUFFIX = ".html";
	/**
	 * Whether to check that the template exists before rendering it.
	 */
	private boolean checkTemplate = true;
	/**
	 * Whether to check that the templates location exists.
	 */
	private boolean checkTemplateLocation = true;
	/**
	 * Prefix that gets prepended to view names when building a URL.
	 */
	private String prefix = DEFAULT_PREFIX;
	/**
	 * Suffix that gets appended to view names when building a URL.
	 */
	private String suffix = DEFAULT_SUFFIX;
	/**
	 * Template mode to be applied to templates. See also Thymeleaf's TemplateMode enum.
	 */
	private String mode = "HTML";
	/**
	 * Template files encoding.
	 */
	private Charset encoding = DEFAULT_ENCODING;
	/**
	 * Whether to enable template caching.
	 */
	private boolean cache = true;
2、thymeleaf使用模板
在java代码中写入如下代码:
    @RequestMapping("/hello")
    public String hello(Model model){
        model.addAttribute("msg","Hello");
        //classpath:/templates/hello.html
        return "hello";
    }
html页面中写入如下代码:
<!DOCTYPE html>
<html lang="en" xmlns:th="http://www.thymeleaf.org">
<body>
<h1>Hello</h1>
<div th:text="${msg}"></div>
</body>
</html>
3、thymeleaf的表达式语法
Simple expressions:
	Variable Expressions: ${...}
	Selection Variable Expressions: *{...}
	Message Expressions: #{...}
	Link URL Expressions: @{...}
	Fragment Expressions: ~{...}
Literals
	Text literals: 'one text', 'Another one!',…
	Number literals: 0, 34, 3.0, 12.3,…
	Boolean literals: true, false
	Null literal: null
	Literal tokens: one, sometext, main,…
Text operations:
	String concatenation: +
	Literal substitutions: |The name is ${name}|
Arithmetic operations:
	Binary operators: +, -, *, /, %
	Minus sign (unary operator): -
	Boolean operations:
	Binary operators: and, or
	Boolean negation (unary operator): !, not
Comparisons and equality:
	Comparators: >, <, >=, <= (gt, lt, ge, le)
	Equality operators: ==, != (eq, ne)
	Conditional operators:
	If-then: (if) ? (then)
	If-then-else: (if) ? (then) : (else)
	Default: (value) ?: (defaultvalue)
Special tokens:
	No-Operation: _
4、thymeleaf实例演示
1、th的常用属性值
一、th:text :设置当前元素的文本内容,相同功能的还有th:utext,两者的区别在于前者不会转义html标签,后者会。优先级不高:order=7
二、th:value:设置当前元素的value值,类似修改指定属性的还有th:src,th:href。优先级不高:order=6
三、th:each:遍历循环元素,和th:text或th:value一起使用。注意该属性修饰的标签位置,详细往后看。优先级很高:order=2
四、th:if:条件判断,类似的还有th:unless,th:switch,th:case。优先级较高:order=3
五、th:insert:代码块引入,类似的还有th:replace,th:include,三者的区别较大,若使用不恰当会破坏html结构,常用于公共代码块提取的场景。优先级最高:order=1
六、th:fragment:定义代码块,方便被th:insert引用。优先级最低:order=8
七、th:object:声明变量,一般和*{}一起配合使用,达到偷懒的效果。优先级一般:order=4
八、th:attr:修改任意属性,实际开发中用的较少,因为有丰富的其他th属性帮忙,类似的还有th:attrappend,th:attrprepend。优先级一般:order=5
thymeleaf.html
<!DOCTYPE html>
<html lang="en" xmlns:th="http://www.thymeleaf.org">
<head>
    <meta charset="UTF-8">
    <title>Title</title>
</head>
<body>
    <p th:text="${thText}"></p>
    <p th:utext="${thUText}"></p>
    <input type="text" th:value="${thValue}">
    <div th:each="message:${thEach}">
        <p th:text="${message}"></p>
    </div>
    <div>
        <p th:text="${message}" th:each="message:${thEach}"></p>
    </div>
    <p th:text="${thIf}" th:if="${not #strings.isEmpty(thIf)}"></p>
    <div th:object="${thObject}">
        <p>name:<span th:text="*{name}"/></p>
        <p>age:<span th:text="*{age}"/></p>
        <p>gender:<span th:text="*{gender}"/></p>
    </div>

</body>
</html>
ThymeleafController.java
package com.mashibing.controller;

import com.mashibing.entity.Person;
import org.springframework.stereotype.Controller;
import org.springframework.ui.ModelMap;
import org.springframework.web.bind.annotation.RequestMapping;

@Controller
public class ThymeleafController {

    @RequestMapping("thymeleaf")
    public String thymeleaf(ModelMap map){

        map.put("thText","th:text设置文本内容 <b>加粗</b>");
        map.put("thUText","th:utext 设置文本内容 <b>加粗</b>");
        map.put("thValue","thValue 设置当前元素的value值");
        map.put("thEach","Arrays.asList(\"th:each\", \"遍历列表\")");
        map.put("thIf","msg is not null");
        map.put("thObject",new Person("zhangsan",12,"男"));
        return "thymeleaf";
    }
}
2、标准表达式语法
${…} 变量表达式,Variable Expressions
*{…} 选择变量表达式,Selection Variable Expressions
一、可以获取对象的属性和方法
二、可以使用ctx,vars,locale,request,response,session,servletContext内置对象
session.setAttribute("user","zhangsan");
th:text="${session.user}"
三、可以使用dates,numbers,strings,objects,arrays,lists,sets,maps等内置方法
standardExpression.html
<!--
一、strings:字符串格式化方法,常用的Java方法它都有。比如:equals,equalsIgnoreCase,length,trim,toUpperCase,toLowerCase,indexOf,substring,replace,startsWith,endsWith,contains,containsIgnoreCase等

二、numbers:数值格式化方法,常用的方法有:formatDecimal等

三、bools:布尔方法,常用的方法有:isTrue,isFalse等

四、arrays:数组方法,常用的方法有:toArray,length,isEmpty,contains,containsAll等

五、lists,sets:集合方法,常用的方法有:toList,size,isEmpty,contains,containsAll,sort等

六、maps:对象方法,常用的方法有:size,isEmpty,containsKey,containsValue等

七、dates:日期方法,常用的方法有:format,year,month,hour,createNow等
-->
<!DOCTYPE html>
<html lang="en" xmlns:th="http://www.thymeleaf.org">
<head>
    <meta charset="UTF-8">
    <title>thymeleaf内置方法</title>
</head>
<body>
    <h3>#strings </h3>
    <div th:if="${not #strings.isEmpty(Str)}" >
        <p>Old Str : <span th:text="${Str}"/></p>
        <p>toUpperCase : <span th:text="${#strings.toUpperCase(Str)}"/></p>
        <p>toLowerCase : <span th:text="${#strings.toLowerCase(Str)}"/></p>
        <p>equals : <span th:text="${#strings.equals(Str, 'blog')}"/></p>
        <p>equalsIgnoreCase : <span th:text="${#strings.equalsIgnoreCase(Str, 'blog')}"/></p>
        <p>indexOf : <span th:text="${#strings.indexOf(Str, 'r')}"/></p>
        <p>substring : <span th:text="${#strings.substring(Str, 2, 4)}"/></p>
        <p>replace : <span th:text="${#strings.replace(Str, 'it', 'IT')}"/></p>
        <p>startsWith : <span th:text="${#strings.startsWith(Str, 'it')}"/></p>
        <p>contains : <span th:text="${#strings.contains(Str, 'IT')}"/></p>
    </div>
    <h3>#numbers </h3>
    <div>
        <p>formatDecimal 整数部分随意,小数点后保留两位,四舍五入: <span th:text="${#numbers.formatDecimal(Num, 0, 2)}"/></p>
        <p>formatDecimal 整数部分保留五位数,小数点后保留两位,四舍五入: <span th:text="${#numbers.formatDecimal(Num, 5, 2)}"/></p>
    </div>

    <h3>#bools </h3>
    <div th:if="${#bools.isTrue(Bool)}">
        <p th:text="${Bool}"></p>
    </div>

    <h3>#arrays </h3>
    <div th:if="${not #arrays.isEmpty(Array)}">
        <p>length : <span th:text="${#arrays.length(Array)}"/></p>
        <p>contains : <span th:text="${#arrays.contains(Array,2)}"/></p>
        <p>containsAll : <span th:text="${#arrays.containsAll(Array, Array)}"/></p>
    </div>
    <h3>#lists </h3>
    <div th:if="${not #lists.isEmpty(List)}">
        <p>size : <span th:text="${#lists.size(List)}"/></p>
        <p>contains : <span th:text="${#lists.contains(List, 0)}"/></p>
        <p>sort : <span th:text="${#lists.sort(List)}"/></p>
    </div>
    <h3>#maps </h3>
    <div th:if="${not #maps.isEmpty(hashMap)}">
        <p>size : <span th:text="${#maps.size(hashMap)}"/></p>
        <p>containsKey : <span th:text="${#maps.containsKey(hashMap, 'thName')}"/></p>
        <p>containsValue : <span th:text="${#maps.containsValue(hashMap, '#maps')}"/></p>
    </div>
    <h3>#dates </h3>
    <div>
        <p>format : <span th:text="${#dates.format(Date)}"/></p>
        <p>custom format : <span th:text="${#dates.format(Date, 'yyyy-MM-dd HH:mm:ss')}"/></p>
        <p>day : <span th:text="${#dates.day(Date)}"/></p>
        <p>month : <span th:text="${#dates.month(Date)}"/></p>
        <p>monthName : <span th:text="${#dates.monthName(Date)}"/></p>
        <p>year : <span th:text="${#dates.year(Date)}"/></p>
        <p>dayOfWeekName : <span th:text="${#dates.dayOfWeekName(Date)}"/></p>
        <p>hour : <span th:text="${#dates.hour(Date)}"/></p>
        <p>minute : <span th:text="${#dates.minute(Date)}"/></p>
        <p>second : <span th:text="${#dates.second(Date)}"/></p>
        <p>createNow : <span th:text="${#dates.createNow()}"/></p>
    </div>
</body>
</html>
ThymeleafController.java
 @RequestMapping("standardExpression")
    public String standardExpression(ModelMap map){
        map.put("Str", "Blog");
        map.put("Bool", true);
        map.put("Array", new Integer[]{1,2,3,4});
        map.put("List", Arrays.asList(1,3,2,4,0));
        Map hashMap = new HashMap();
        hashMap.put("thName", "${#...}");
        hashMap.put("desc", "变量表达式内置方法");
        map.put("Map", hashMap);
        map.put("Date", new Date());
        map.put("Num", 888.888D);
        return "standardExpression";
    }
@{…} 链接表达式,Link URL Expressions
<!--
不管是静态资源的引用,form表单的请求,凡是链接都可以用@{...} 。这样可以动态获取项目路径,即便项目名变了,依然可以正常访问
链接表达式结构
无参:@{/xxx}
有参:@{/xxx(k1=v1,k2=v2)} 对应url结构:xxx?k1=v1&k2=v2
引入本地资源:@{/项目本地的资源路径}
引入外部资源:@{/webjars/资源在jar包中的路径}
-->
<link th:href="@{/webjars/bootstrap/4.0.0/css/bootstrap.css}" rel="stylesheet">
<link th:href="@{/main/css/123.css}" rel="stylesheet">
<form class="form-login" th:action="@{/user/login}" th:method="post" >
<a class="btn btn-sm" th:href="@{/login.html(l='zh_CN')}">中文</a>
<a class="btn btn-sm" th:href="@{/login.html(l='en_US')}">English</a>
#{…} 消息表达式,Message Expressions
<!--
消息表达式一般用于国际化的场景。结构:th:text="#{msg}"
-->
~{…} 代码块表达式,Fragment Expressions
fragment.html
<!--
支持两种语法结构
推荐:~{templatename::fragmentname}
支持:~{templatename::#id}
templatename:模版名,Thymeleaf会根据模版名解析完整路:/resources/templates/templatename.html,要注意文件的路径。
fragmentname:片段名,Thymeleaf通过th:fragment声明定义代码块,即:th:fragment="fragmentname"
id:HTML的id选择器,使用时要在前面加上#号,不支持class选择器。
代码块表达式的使用
代码块表达式需要配合th属性(th:insert,th:replace,th:include)一起使用。
th:insert:将代码块片段整个插入到使用了th:insert的HTML标签中,
th:replace:将代码块片段整个替换使用了th:replace的HTML标签中,
th:include:将代码块片段包含的内容插入到使用了th:include的HTML标签中,
-->
<!DOCTYPE html>
<html lang="en" xmlns:th="http://www.thymeleaf.org">
<head>
<meta charset="UTF-8">
<title>Title</title>
</head>
<body>
<!--th:fragment定义代码块标识-->
<footer th:fragment="copy">
2019 The Good Thymes Virtual Grocery
</footer>
<!--三种不同的引入方式-->
<div th:insert="fragment::copy"></div>
<div th:replace="fragment::copy"></div>
<div th:include="fragment::copy"></div>
<!--th:insert是在div中插入代码块,即多了一层div-->
<div>
<footer>
© 2011 The Good Thymes Virtual Grocery
</footer>
</div>
<!--th:replace是将代码块代替当前div,其html结构和之前一致-->
<footer>
© 2011 The Good Thymes Virtual Grocery
</footer>
<!--th:include是将代码块footer的内容插入到div中,即少了一层footer-->
<div>
© 2011 The Good Thymes Virtual Grocery
</div>
</body>
</html>
5、国际化的配置
在很多应用场景下,我们需要实现页面的国际化,springboot对国际化有很好的支持, 下面来演示对应的效果。
1、在idea中设置统一的编码格式,file->settings->Editors->File Encoding,选择编码格式为utf-8
2、在resources资源文件下创建一个i8n的目录,创建一个login.properties的文件,还有login_zh_CN.properties,idea会自动识别国际化操作
3、创建三个不同的文件,名称分别是:login.properties,login_en_US.properties,login_zh_CN.properties
内容如下:
#login.properties
login.password=密码1
login.remmber=记住我1
login.sign=登录1
login.username=用户名1
#login_en_US.properties
login.password=Password
login.remmber=Remember Me
login.sign=Sign In
login.username=Username
#login_zh_CN.properties
login.password=密码~
login.remmber=记住我~
login.sign=登录~
login.username=用户名~
4、配置国际化的资源路径
spring:
  messages:
    basename: i18n/login
5、编写html页面
初始html页面
<!DOCTYPE html>
<html lang="en" xmlns:th="http://www.thymeleaf.org">
    <head>
        <meta charset="UTF-8"/>
        <title>Title</title>
    </head>
    <body>
        <form action="" method="post">

            <label >Username</label>
            <input type="text"  name="username"  placeholder="Username" >
            <label >Password</label>
            <input type="password" name="password" placeholder="Password" >
            <br> <br>
            <div>
                <label>
                    <input type="checkbox" value="remember-me"/> Remember Me
                </label>
            </div>
            <br>
            <button  type="submit">Sign in</button>
            <br> <br>
            <a>中文</a>
            <a>English</a>
        </form>
    </body>
</html>

修改后的页面
<!DOCTYPE html>
<html lang="en" xmlns:th="http://www.thymeleaf.org">
    <head>
        <meta charset="UTF-8"/>
        <title>Title</title>
    </head>
    <body>
        <form action="" method="post">
            <label th:text="#{login.username}">Username</label>
            <input type="text"  name="username"  placeholder="Username" th:placeholder="#{login.username}">
            <label th:text="#{login.password}">Password</label>
            <input type="password" name="password" placeholder="Password" th:placeholder="#{login.password}">
            <br> <br>
            <div>
                <label>
                    <input type="checkbox" value="remember-me"/> [[#{login.remmber}]]
                </label>
            </div>
            <br>
            <button  type="submit" th:text="#{login.sign}">Sign in</button>
            <br> <br>
            <a>中文</a>
            <a>English</a>
        </form>
    </body>
</html>
可以看到通过浏览器的切换语言已经能够实现,想要通过超链接实现的话,如下所示:
添加WebMVCConfig.java代码
package com.mashibing.config;

import org.springframework.context.annotation.Bean;
import org.springframework.context.annotation.Configuration;
import org.springframework.util.StringUtils;
import org.springframework.web.servlet.LocaleResolver;
import org.springframework.web.servlet.config.annotation.ViewControllerRegistry;
import org.springframework.web.servlet.config.annotation.WebMvcConfigurer;

import javax.servlet.http.HttpServletRequest;
import javax.servlet.http.HttpServletResponse;
import java.util.Locale;

@Configuration
public class WebMVCConfig implements WebMvcConfigurer {

    @Override
    public void addViewControllers(ViewControllerRegistry registry) {
        registry.addViewController("/").setViewName("login");
        registry.addViewController("/login.html").setViewName("login");
    }

    @Bean
    public LocaleResolver localeResolver(){
        return new NativeLocaleResolver();
    }

    protected static class NativeLocaleResolver implements LocaleResolver{

        @Override
        public Locale resolveLocale(HttpServletRequest request) {
            String language = request.getParameter("language");
            Locale locale = Locale.getDefault();
            if(!StringUtils.isEmpty(language)){
                String[] split = language.split("_");
                locale = new Locale(split[0],split[1]);
            }
            return locale;
        }

        @Override
        public void setLocale(HttpServletRequest request, HttpServletResponse response, Locale locale) {

        }
    }
}
login.html页面修改为:
<!DOCTYPE html>
<html lang="en" xmlns:th="http://www.thymeleaf.org">
<head>
    <meta charset="UTF-8"/>
    <title>Title</title>
</head>
<body>
<form action="" method="post">
    <label th:text="#{login.username}">Username</label>
    <input type="text"  name="username"  placeholder="Username" th:placeholder="#{login.username}">
    <label th:text="#{login.password}">Password</label>
    <input type="password" name="password" placeholder="Password" th:placeholder="#{login.password}">
    <br> <br>
    <div>
        <label>
            <input type="checkbox" value="remember-me"/> [[#{login.remmber}]]
        </label>
    </div>
    <br>
    <button  type="submit" th:text="#{login.sign}">Sign in</button>
    <br> <br>
    <a th:href="@{/login.html(language='zh_CN')}">中文</a>
    <a th:href="@{/login.html(language='en_US')}">English</a>
</form>
</body>
</html>
国际化的源码解释:
//MessageSourceAutoConfiguration
public class MessageSourceAutoConfiguration {
    private static final Resource[] NO_RESOURCES = new Resource[0];

    public MessageSourceAutoConfiguration() {
    }

    @Bean
    @ConfigurationProperties(prefix = "spring.messages") //我们的配置文件可以直接放在类路径下叫: messages.properties, 就可以进行国际化操作了
    public MessageSourceProperties messageSourceProperties() {
        return new MessageSourceProperties();
    }

    @Bean
    public MessageSource messageSource(MessageSourceProperties properties) {
        ResourceBundleMessageSource messageSource = new ResourceBundleMessageSource();
        if (StringUtils.hasText(properties.getBasename())) {
        //设置国际化文件的基础名(去掉语言国家代码的)
            messageSource.setBasenames(StringUtils.commaDelimitedListToStringArray(StringUtils.trimAllWhitespace(properties.getBasename())));
        }

        if (properties.getEncoding() != null) {
            messageSource.setDefaultEncoding(properties.getEncoding().name());
        }

        messageSource.setFallbackToSystemLocale(properties.isFallbackToSystemLocale());
        Duration cacheDuration = properties.getCacheDuration();
        if (cacheDuration != null) {
            messageSource.setCacheMillis(cacheDuration.toMillis());
        }

        messageSource.setAlwaysUseMessageFormat(properties.isAlwaysUseMessageFormat());
        messageSource.setUseCodeAsDefaultMessage(properties.isUseCodeAsDefaultMessage());
        return messageSource;
    }
}


//WebMvcAutoConfiguration
		@Bean
		@ConditionalOnMissingBean
		@ConditionalOnProperty(prefix = "spring.mvc", name = "locale")
		public LocaleResolver localeResolver() {
			if (this.mvcProperties.getLocaleResolver() == WebMvcProperties.LocaleResolver.FIXED) {
				return new FixedLocaleResolver(this.mvcProperties.getLocale());
			}
			AcceptHeaderLocaleResolver localeResolver = new AcceptHeaderLocaleResolver();
			localeResolver.setDefaultLocale(this.mvcProperties.getLocale());
			return localeResolver;
		}

//AcceptHeaderLocaleResolver
	@Override
	public Locale resolveLocale(HttpServletRequest request) {
		Locale defaultLocale = getDefaultLocale();
		if (defaultLocale != null && request.getHeader("Accept-Language") == null) {
			return defaultLocale;
		}
		Locale requestLocale = request.getLocale();
		List<Locale> supportedLocales = getSupportedLocales();
		if (supportedLocales.isEmpty() || supportedLocales.contains(requestLocale)) {
			return requestLocale;
		}
		Locale supportedLocale = findSupportedLocale(request, supportedLocales);
		if (supportedLocale != null) {
			return supportedLocale;
		}
		return (defaultLocale != null ? defaultLocale : requestLocale);
	}


