文章目录
- 1 玩家配置
- 2 物体配置
- 3 添加视觉效果
- 4 添加文字
- 5 其他操作
- 5.1 双面渲染
- 5.2 替换图片
在开始操作前,我们导入先前配置好的预制体 MyOVRCameraRig,相关介绍在 《2024-04-03 NO.4 Quest3 手势追踪抓取物体-CSDN博客》 文章中。
1 玩家配置
(1)在 Project 窗口下找到 HandPokeInteractor 预制体,将其拖拽为 HandInteractorsLeft 的子物体。对 HandInteractorsRight 进行同样的操作。

(2)分别展开 HandInteractorsLeft 和 HandInteractorsRight 下 HandPokeInteractor 的子物体,将 Visuals 下的两个子物体激活,并关联对应的引用。
- HandPokeLimiter
- Synthetic Hand
<--OVRLeftHandSynthetic。
- Synthetic Hand
- HandPokeOvershootGlow
- Hand Visual
<--OVRLeftHandSynthetic > OVRLeftHandVisual。 - Hand Renderer
<--OVRLeftHandSynthetic > OVRLeftHandVisual > OculusHand_L > l_handMeshNode。 - Material Editor
<--OVRLeftHandSynthetic > OVRLeftHandVisual > OculusHand_L > l_handMeshNode。
- Hand Visual
注意右手也是同样的操作,但关联的是 Right 对应的物体。


(3)最后,将 HandPokeInteractor 关联到 Interactors 列表下。

2 物体配置
在 Project 窗口下找到官方提供的 UI 按钮,即 HoverButtons 预制体,将其拖拽入场景。此时运行程序,可以与按钮进行交互。接下来我们模仿该预制体,创建自己的按钮。
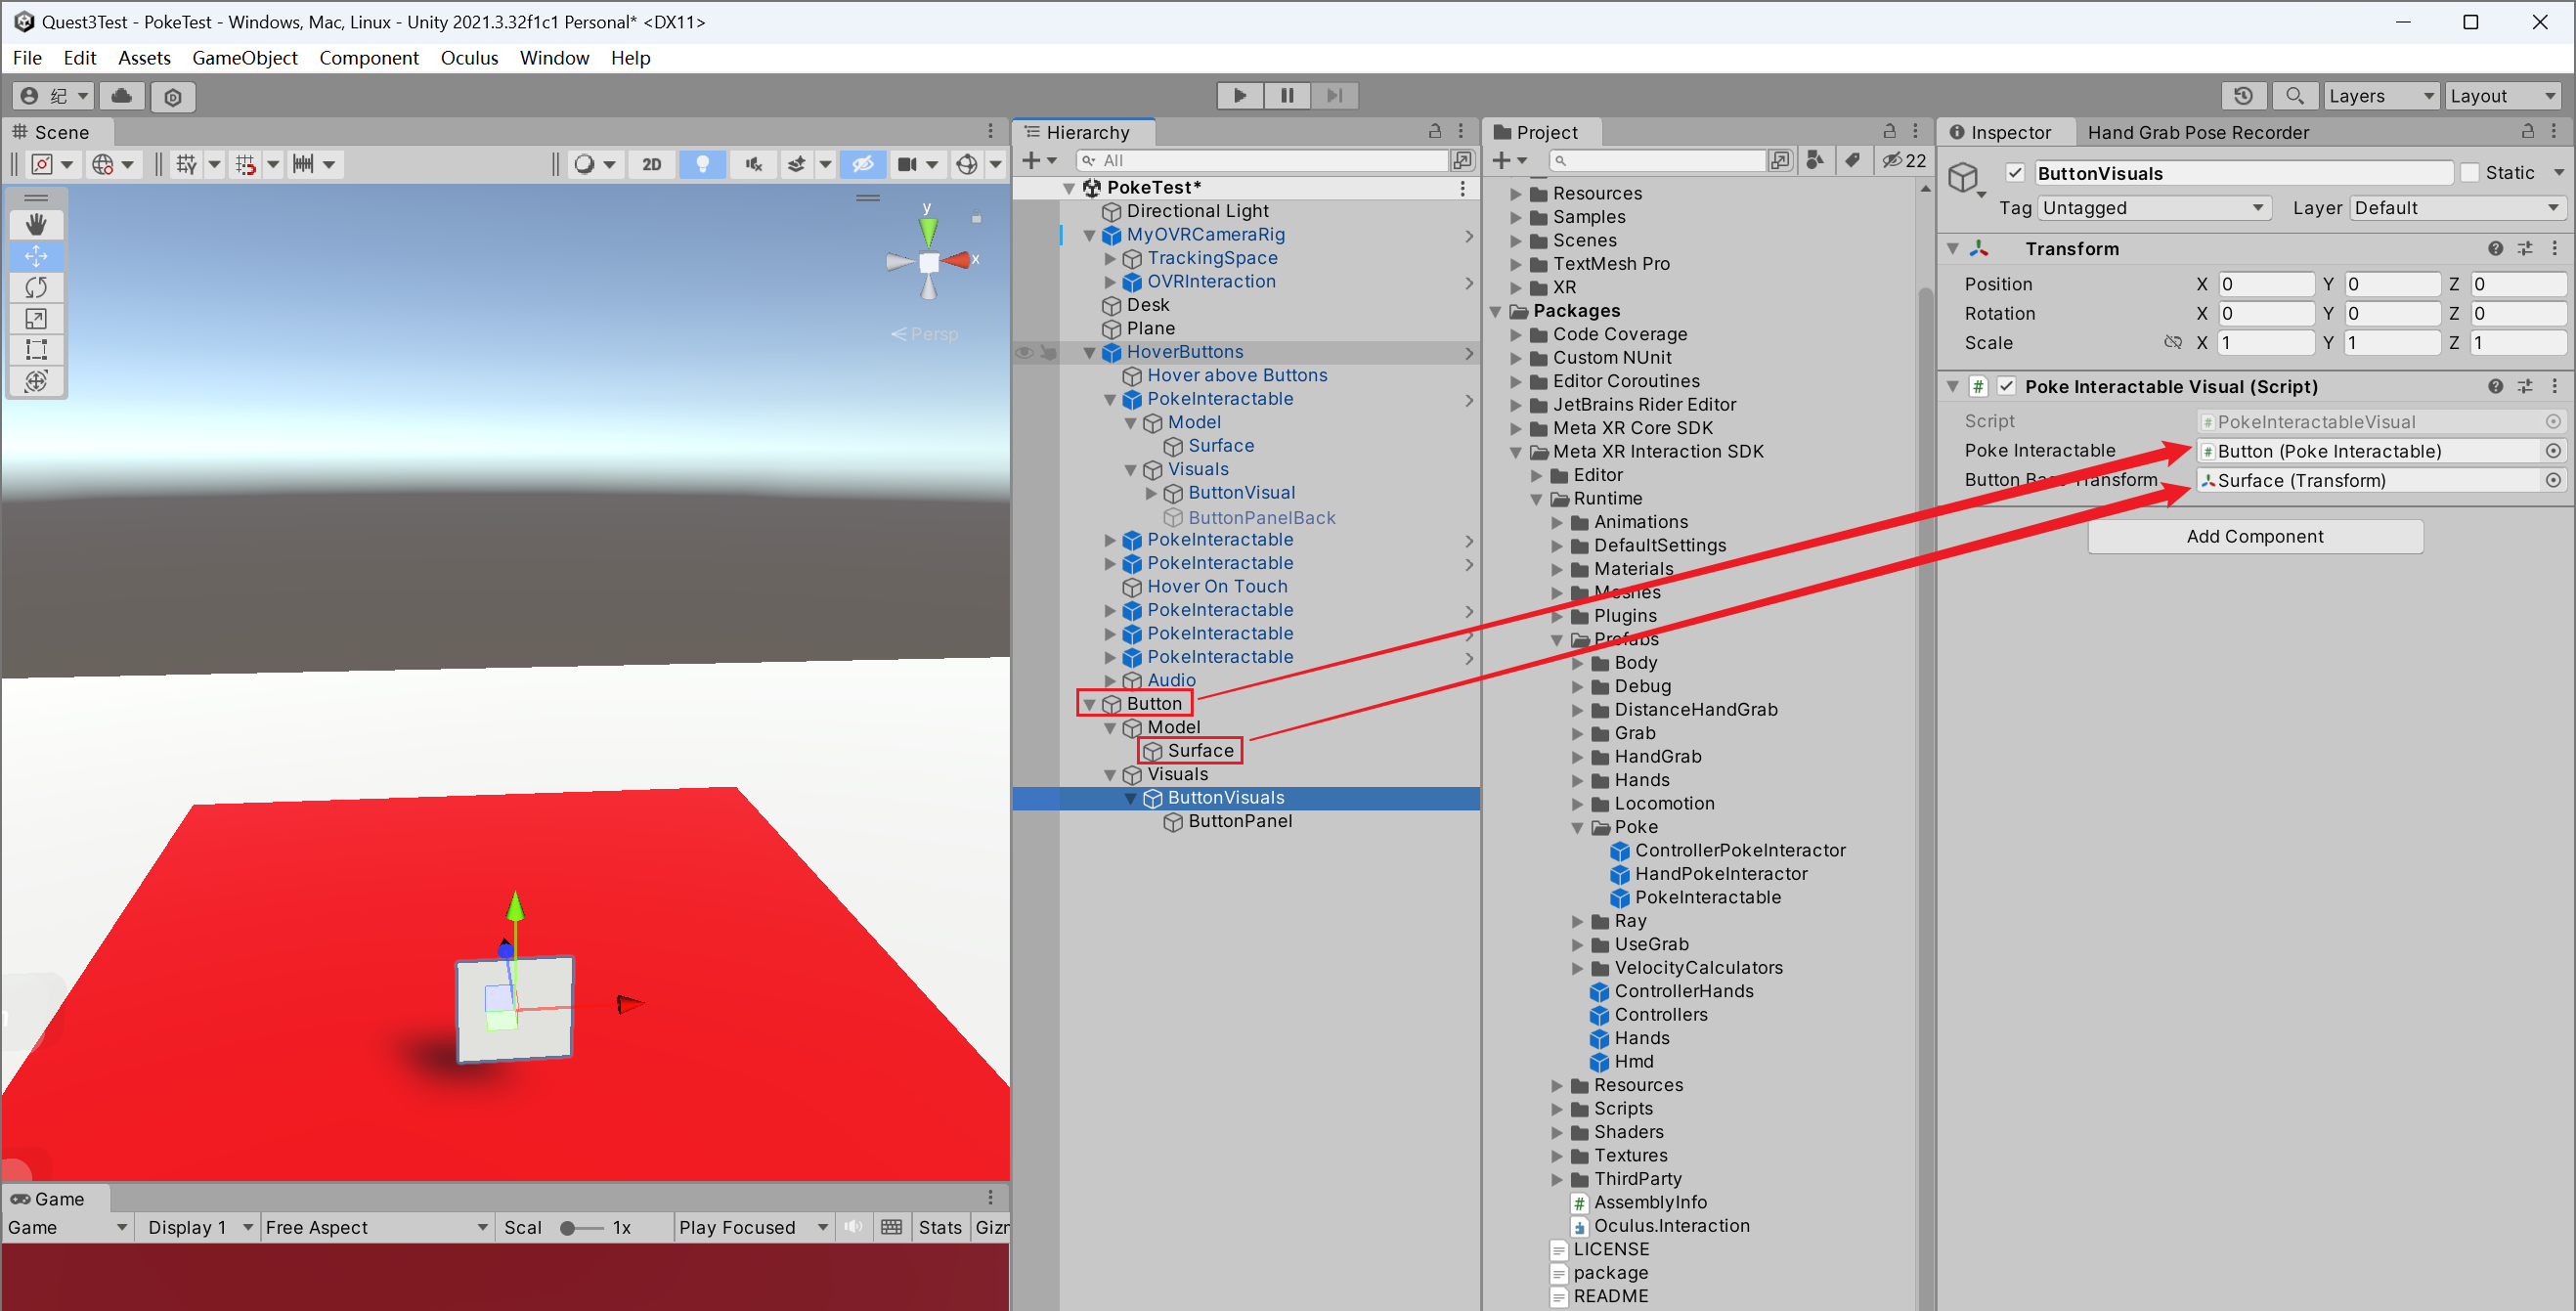
(1)依次创建如下物体,层级表示了对应的父子关系。
- Button(空物体)
- Model(空物体)
- Surface(空物体):按钮能按到最下方的底部平面。
- Visuals(空物体)
- ButtonVisuals(空物体)
- ButtonPanel(3D Quad 物体):按钮所在平面。
- ButtonVisuals(空物体)
- Model(空物体)

官方给的预制体中,ButtonVisuals 下还有一个 ButtonPanelBack 物体,该物体负责渲染按钮底部的平面(按钮下方具有浅黑色阴影),这里就不添加该物体了。
(2)为如下物体依次添加对应的脚本。
- Button:“Poke Interactable”。
- Model
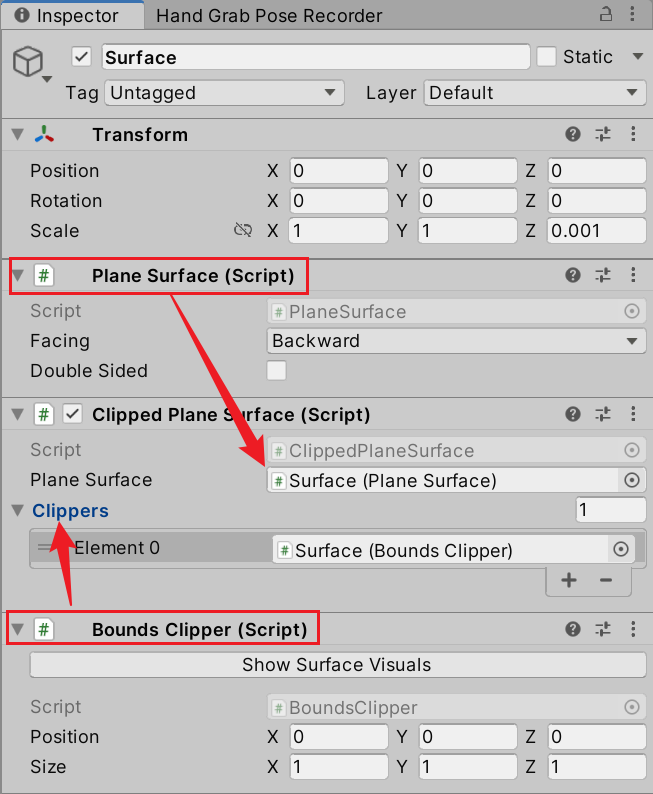
- Surface:“Plane Surface”、“Clipped Plane Surface”、“Bounds Clipper”。
- Visuals
- ButtonVisuals:“Poke Interactable Visual”。
- ButtonPanel:将其碰撞体移除。
- ButtonVisuals:“Poke Interactable Visual”。
- Model
(3)关联对应引用。
- ButtonVisuals
- Poke Interactable
<--Button。 - Button Base Transform
<--Surface。
- Poke Interactable
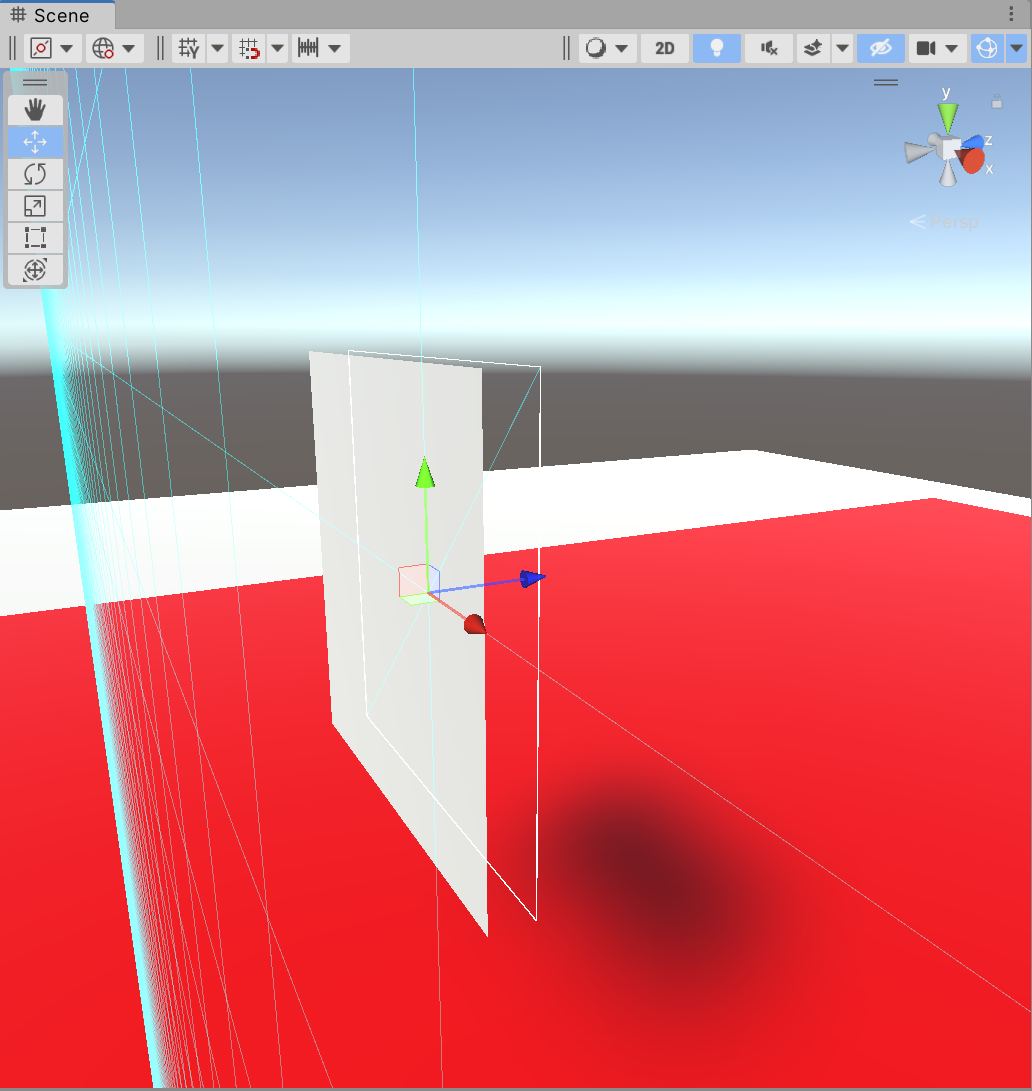
- 选中 Surface,可以看到场景上有白色线框的立方体,更改 Surface 的 Z 轴缩放为 0.001 以将其压为平面。

- Surface
- Plane Surface
<--“Plane Surface” 脚本。 - Clippers
<--“Bounds Clipper” 脚本。
- Plane Surface
最后,更改 Button 的 3 轴缩放大小为 0.1,缩小按钮。并将 ButtonVisuals 向前移出一小段距离,以达到按钮可以被推动的效果。
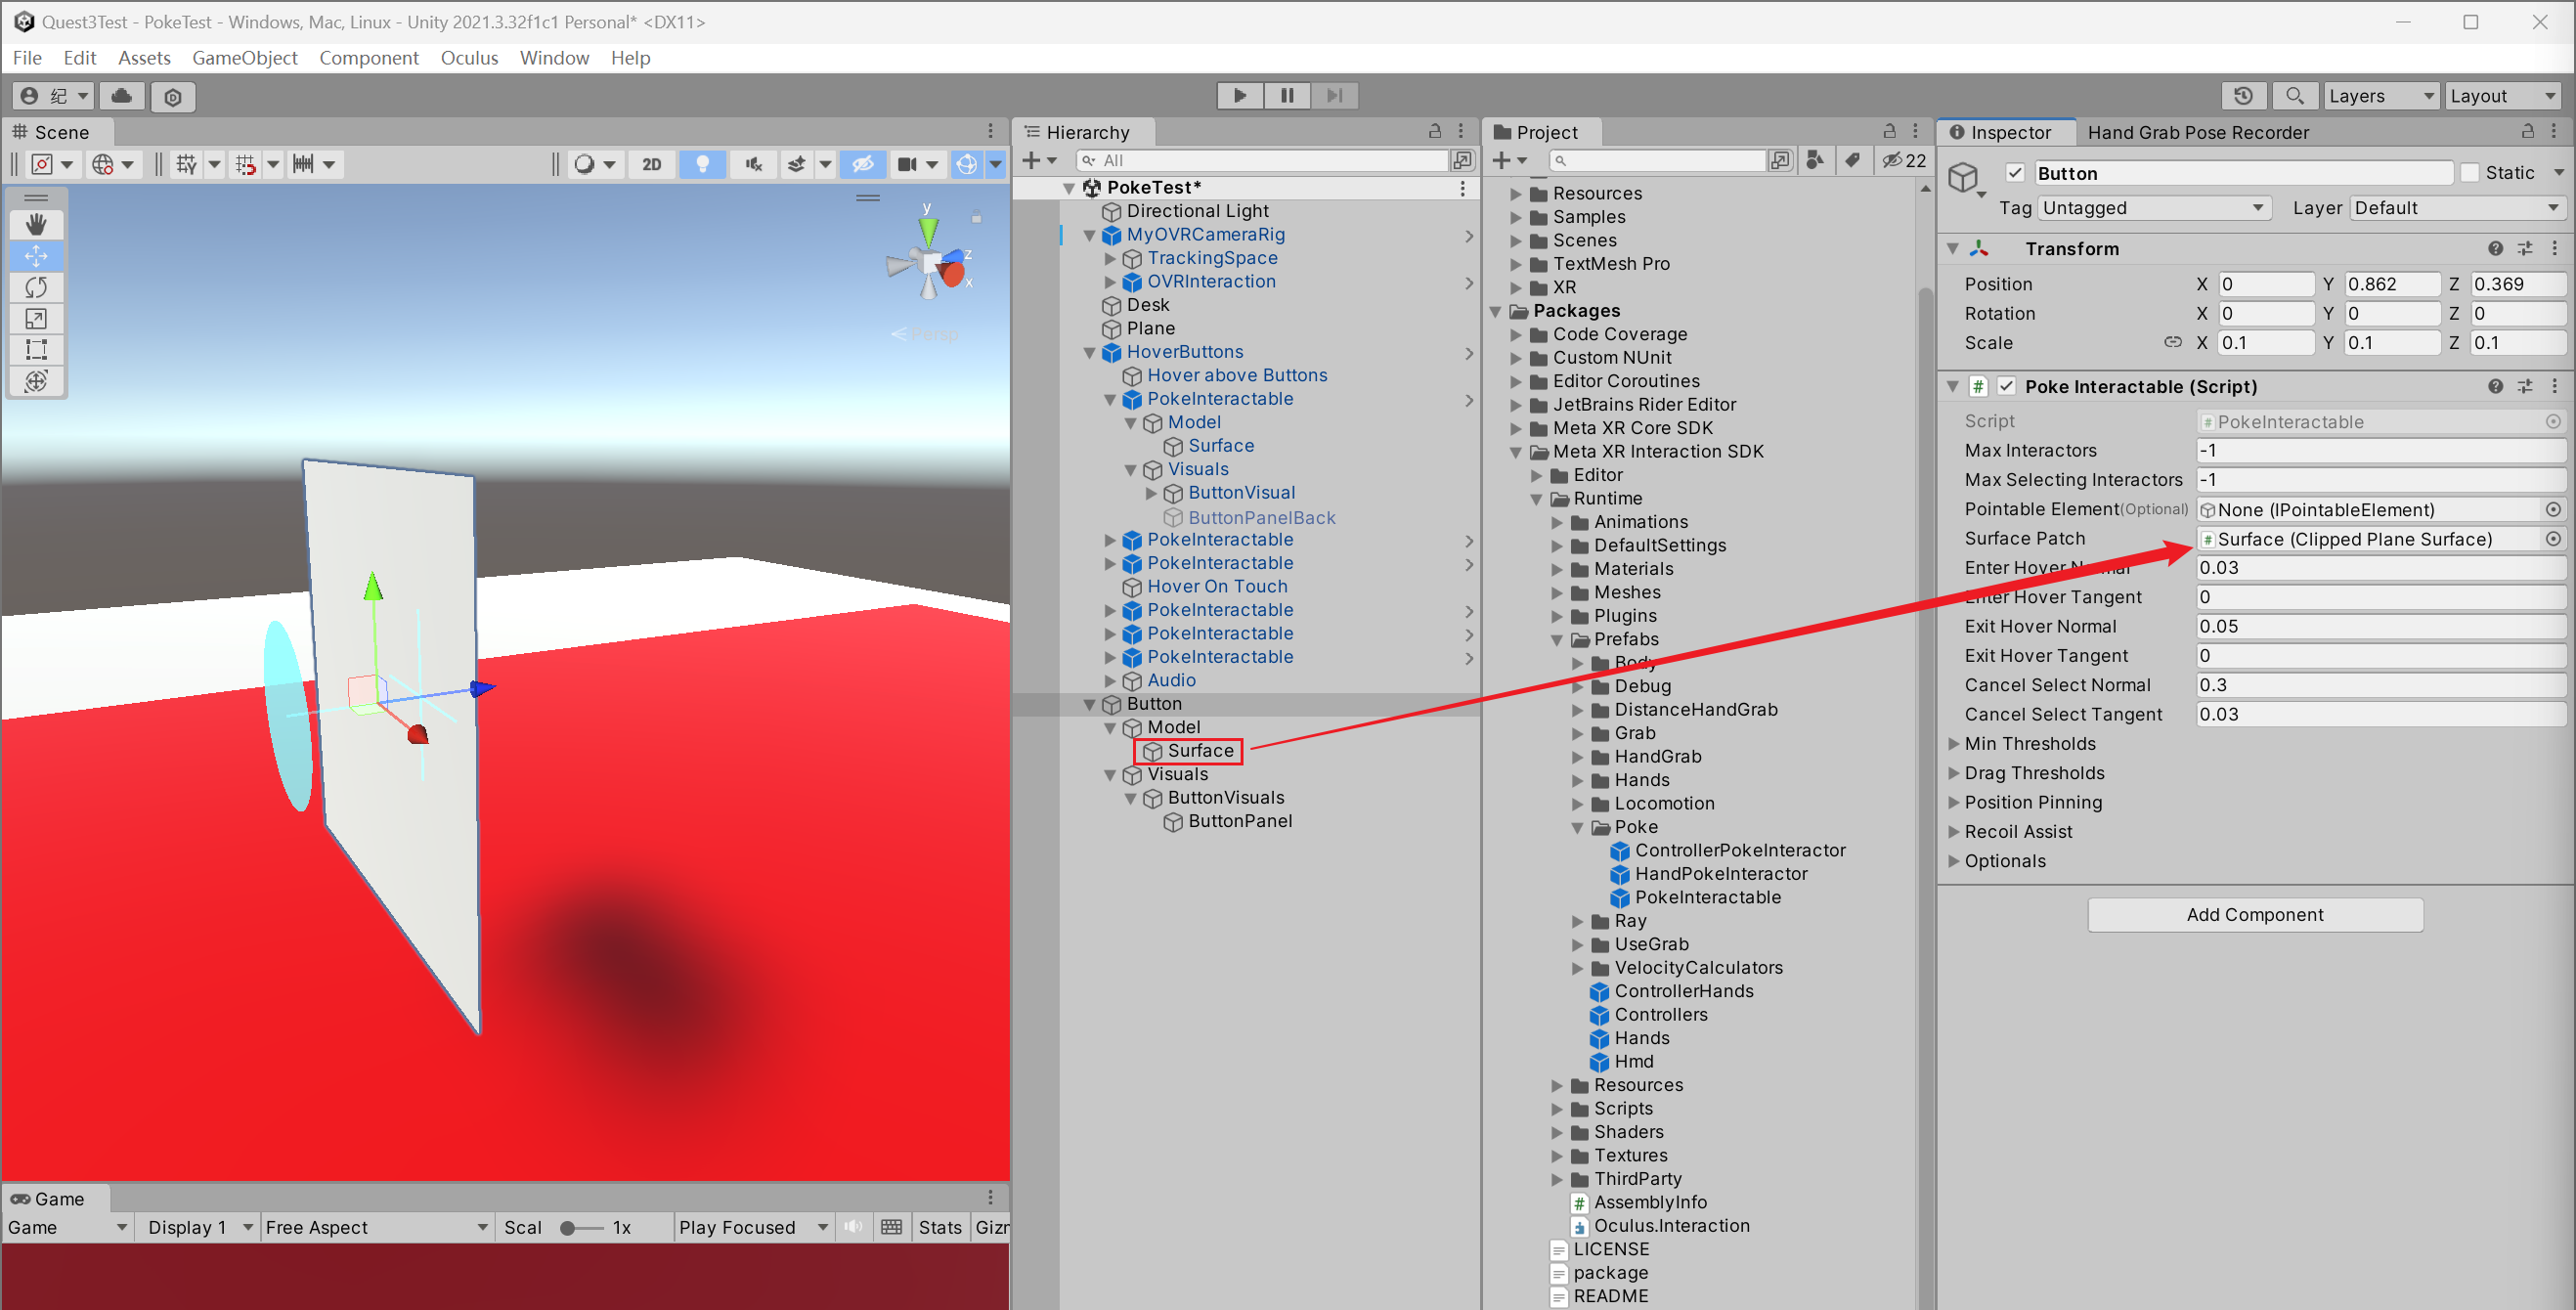
- Button
- Surface Patch
<--Surface。
- Surface Patch
此时运行程序,即可用手指推动按钮,且按到底部后不会穿模。需要注意的是,Poke Interaction 限定了只能用食指与按钮交互。
3 添加视觉效果
首先复制一份上述完成好的按钮。
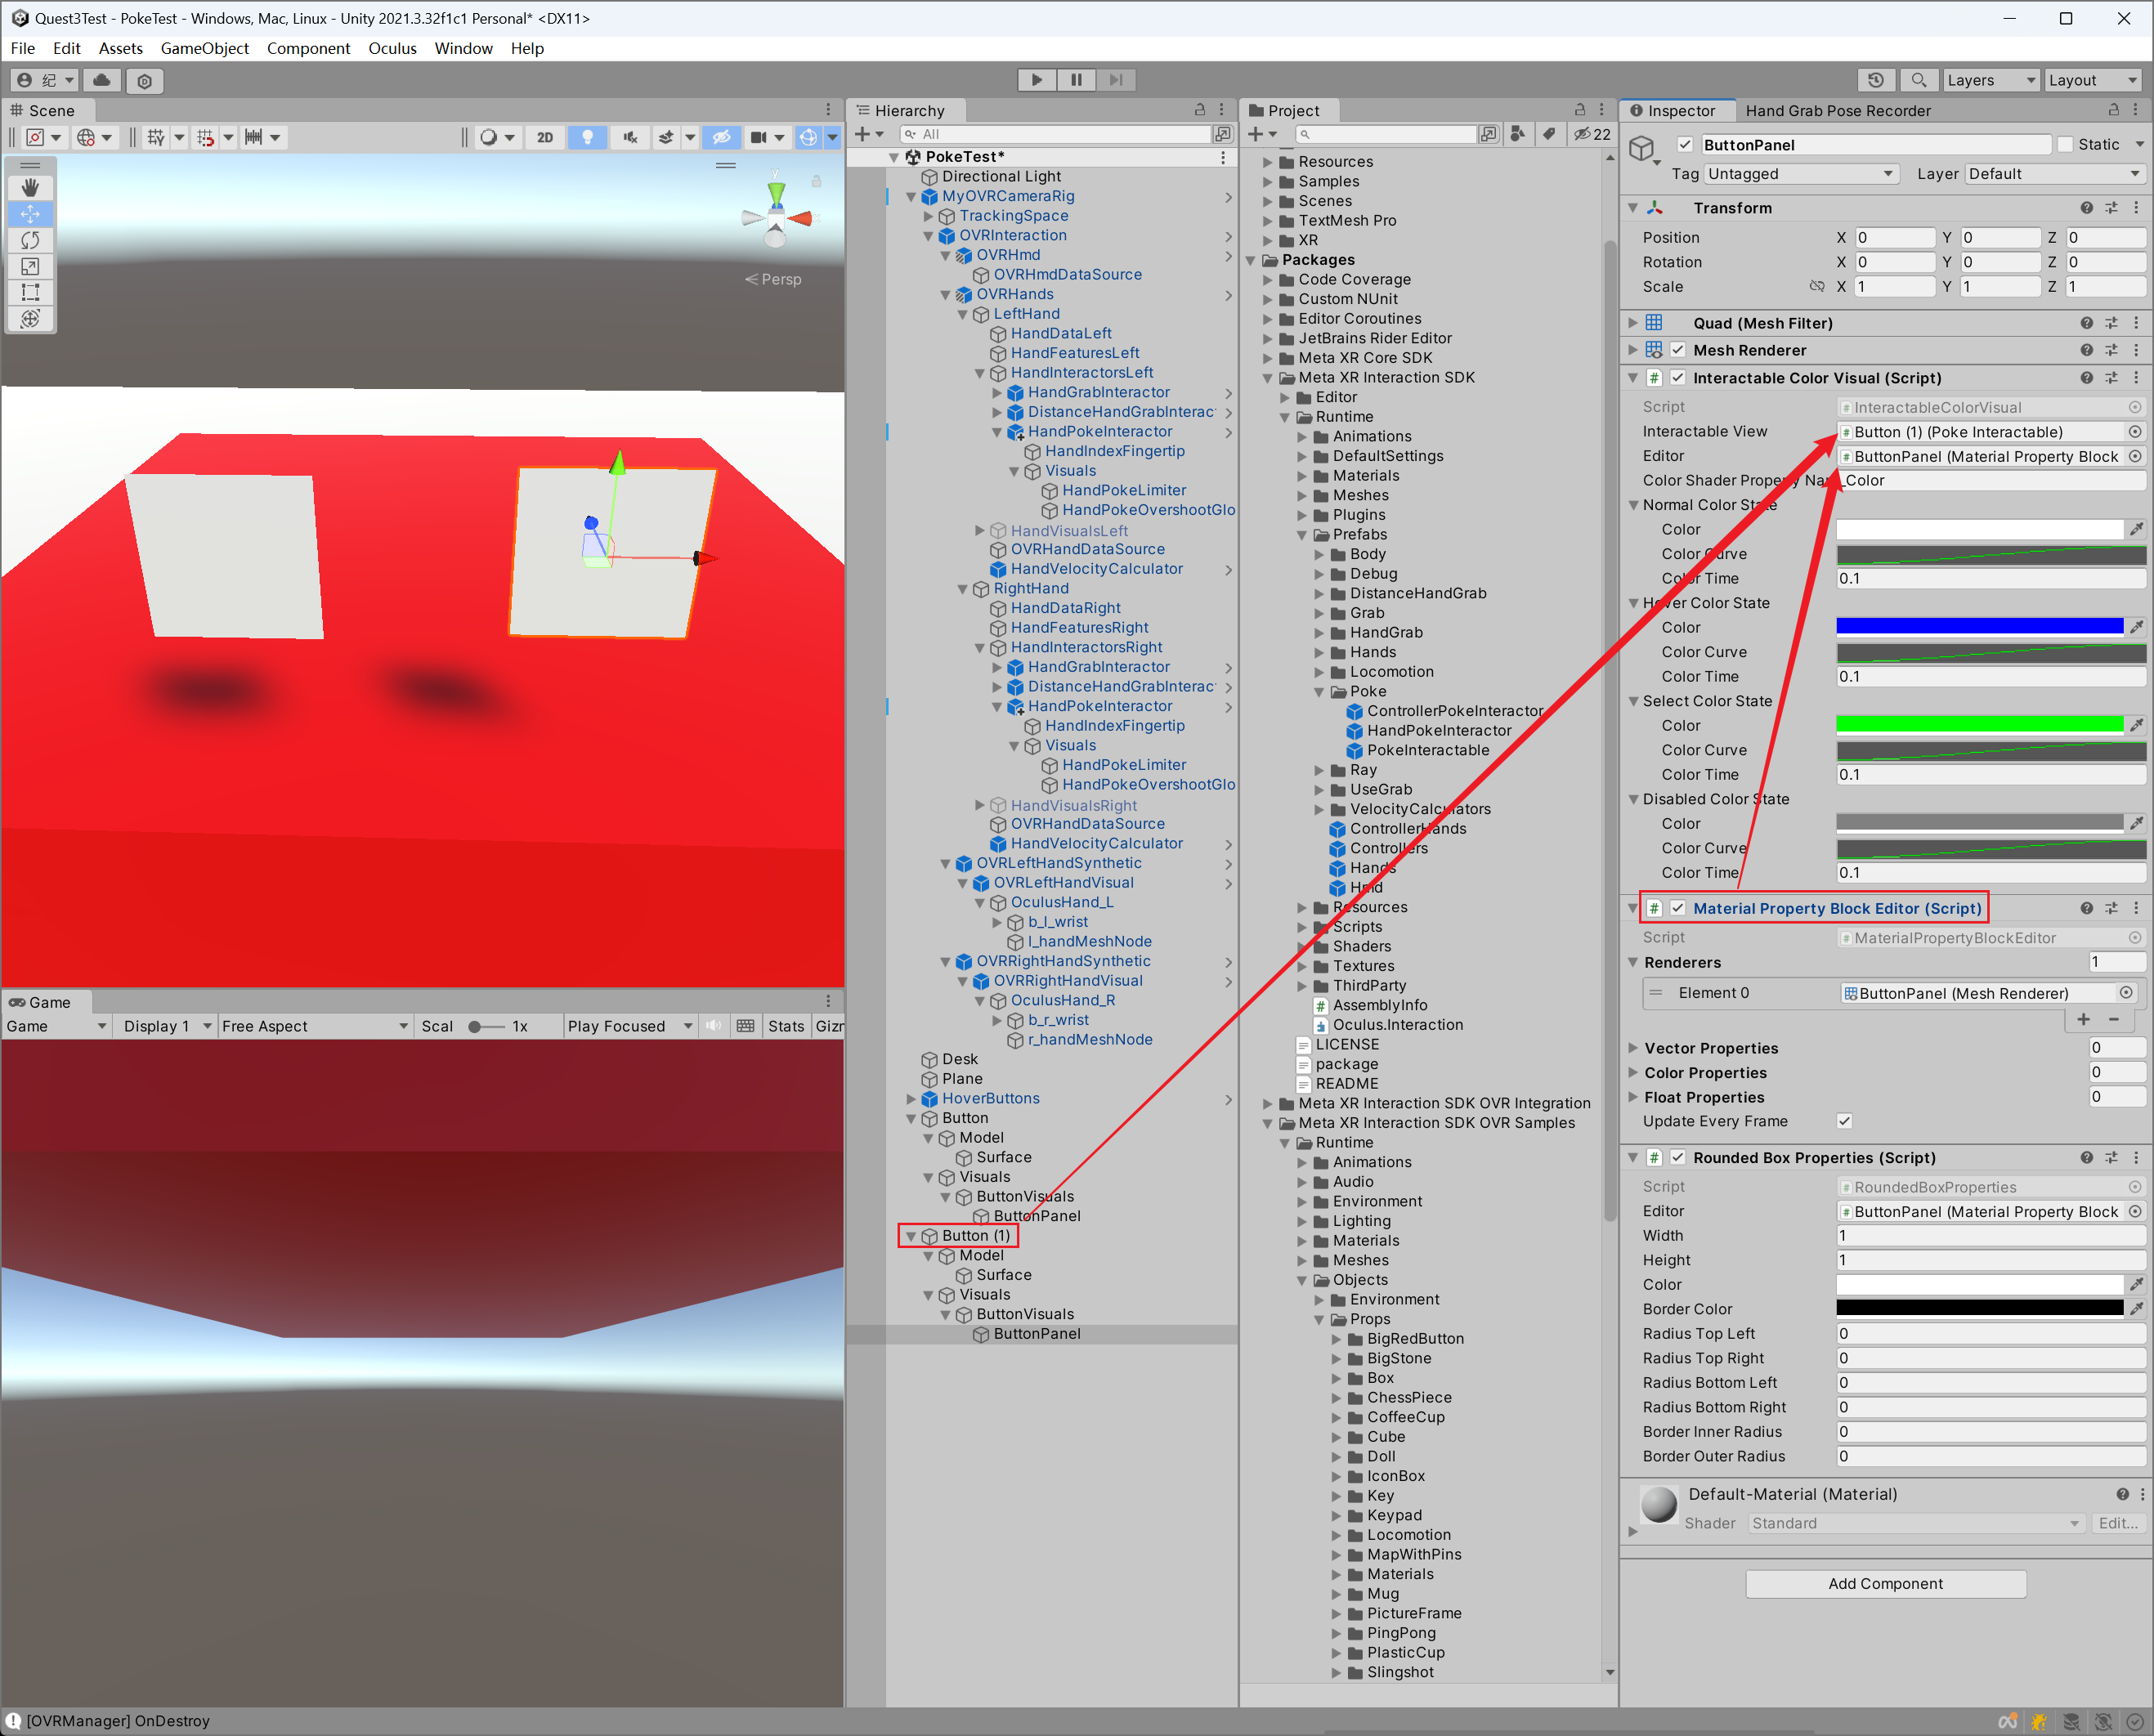
(1)为 ButtonPanel 依次添加以下脚本。
- “Interactable Color Visual”。
- “Material Property Block Editor”
- “Rounded Box Properties”。
(2)为 “Interactable Color Visual” 关联引用。
- Interactable View
<--Button (1) - Editor
<--“Material Property Block Editor” 脚本。
(3)更改 ButtonPanel 上 Mesh Renderer 的材质为 RoundedBoxUnit。这里需要将 Project 窗口下的材质球进行手动拖拽。

(4)修改 “Rounded Box Properties” 脚本的参数,按钮的边缘会发生变化。为了实现官方按钮的效果,我们将官方按钮上的参数进行复制。
注意:Width 和 Height 参数会自动同步更改当前物体的缩放大小。

然后粘贴到我们的按钮上。

完成后,重新将 “Material Property Block Editor” 脚本拖入到 Editor 引用上,即可刷新按钮界面,完成一样的效果。

最后,赋值官方按钮中 “Interactable Color Visual” 脚本上的颜色,即可完成复现。注意,复制完成后确保 Interactable View 和 Editor 引用不变。
4 添加文字
(1)为 ButtonVisuals 添加子物体 Text MeshPro。

(2)修改其字体大小为 4,更改文字内容,并调整对齐方式。

5 其他操作
5.1 双面渲染
使用 Quad 充当按钮模型会只渲染正面,从背面看时会消失。
此时使用 Cube 替换 Quad 即可,将 Cube 的 Z 轴缩放设置为 0.001,即可充当一个平面。


5.2 替换图片
如果想要为按钮定制 UI 图片,可将 ButtonPanel 上的 Mesh Renderer 和 Mesh Filter 组件删除,更换为 Sprite Renderer 组件,并关联需要的图片即可。注意,图片需要更换为 Sprite 类型,且不要挂载以下脚本。
- “Interactable Color Visual”。
- “Material Property Block Editor”
- “Rounded Box Properties”。

调整大小时,可更改父物体 ButtonVisuals 的缩放大小。
![[数据结构]双向带头循环链表制作](https://img-blog.csdnimg.cn/direct/d7a3f2063c8d4caab458d44767556cd3.png)