在过去的一年里,大型语言模型(llm)有了飞速的发展,在本文中,我们将探讨几种(量化)的方式,除此以外,还会介绍分片及不同的保存和压缩策略。
说明:每次加载LLM示例后,建议清除缓存,以防止出现OutOfMemory错误。
del model, tokenizer, pipe

import torch
torch.cuda.empty_cache()
如果在jupyter中无法释放显存,请重启这个jupyter notebook。
模型加载
加载LLM的最直接、最普通的方式是通过 Transformers。HuggingFace已经创建了一个套件,我们能够直接使用
pip install git+https://github.com/huggingface/transformers.git
pip install accelerate bitsandbytes xformers
安装完成后,我们可以使用以下管道轻松加载LLM:
from torch import bfloat16
from transformers import pipeline

# Load in your LLM without any compression tricks
pipe = pipeline(
    "text-generation",
    model="HuggingFaceH4/zephyr-7b-beta",
    torch_dtype=bfloat16,
    device_map="auto"
)
我们这里使用zephyr-7b-beta作为示例
这种加载LLM的方法通常不会执行任何压缩技巧。我们来做个使用的示例
messages = [
    {
        "role": "system",
        "content": "You are a friendly chatbot.",
    },
    {
        "role": "user",
        "content": "Tell me a funny joke about Large Language Models."
    },
]
prompt = pipe.tokenizer.apply_chat_template(
    messages,
    tokenize=False,
    add_generation_prompt=True
)
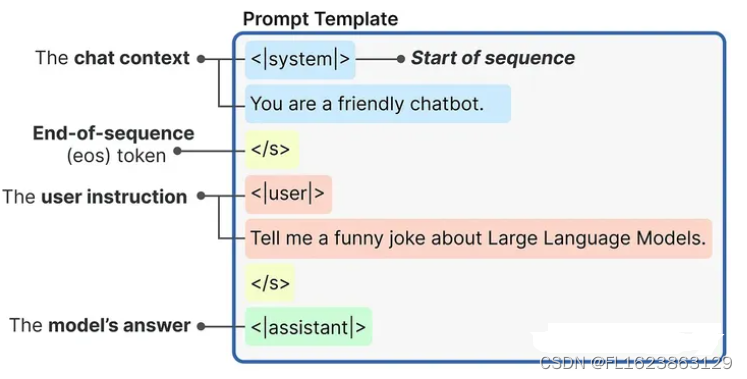
使用内部提示模板生成的提示是这样构造的:
然后,我们可将提示传递给LLM来生成答案:
outputs = pipe(
    prompt,
    max_new_tokens=256,
    do_sample=True,
    temperature=0.1,
    top_p=0.95
)
print(outputs[0]["generated_text"])
这是一个最直接的使用流程,但是对于纯推理,这种方法效率是最低的,因为在没有任何压缩或量化策略的情况下加载整个模型。
分片
在我们进入量化策略之前,我们先介绍一个前置的方法:分片。通过分片可以将模型分割成小块,每个分片包含模型的较小部分,通过在不同设备上分配模型权重来解决GPU内存限制。
虽然它没有任何的压缩和量化,但是这种方法算是一个最简单的加载大模型的方案。
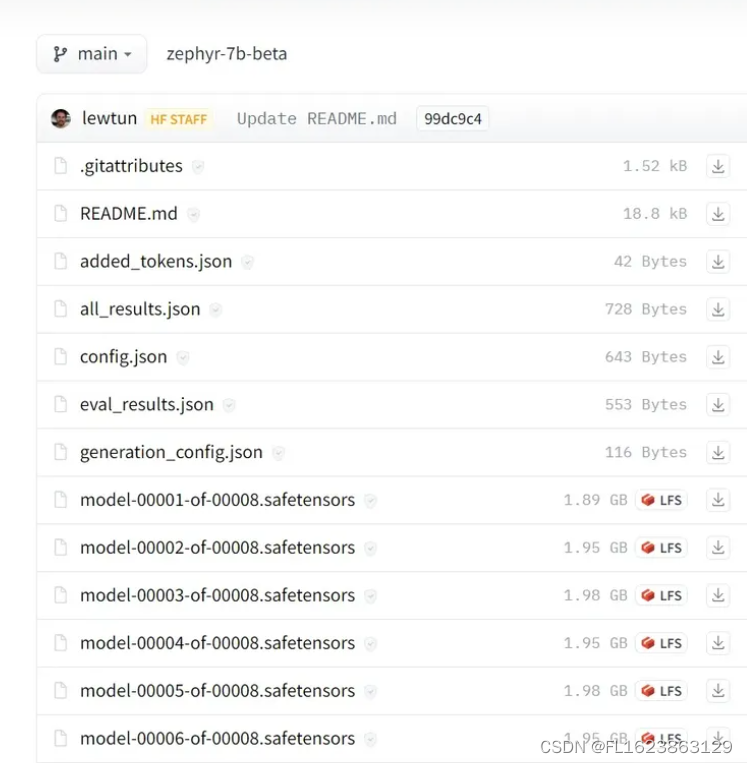
比如Zephyr-7B-β,实际上已经分片了!如果进入模型并点击“Files and versions”链接,可以看到模型被分成了8个部分。
模型的分片非常简单,可以直接使用Accelerate 包:
from accelerate import Accelerator

# Shard our model into pieces of 1GB
accelerator = Accelerator()
accelerator.save_model(
    model=pipe.model,
    save_directory="/content/model",
    max_shard_size="4GB"
)
这样将模型分成4GB的分片

量化
大型语言模型由一堆权重和激活表示。这些值通常由通常的32位浮点(float32)数据类型表示。
比特的数量告诉你它可以表示多少个值。Float32可以表示1.18e-38和3.4e38之间的值,相当多的值!比特数越少,它能表示的值就越少。

如果我们选择较低的位大小,那么模型就会变得不那么准确,但它表示更少的值,从而降低其大小和内存需求。
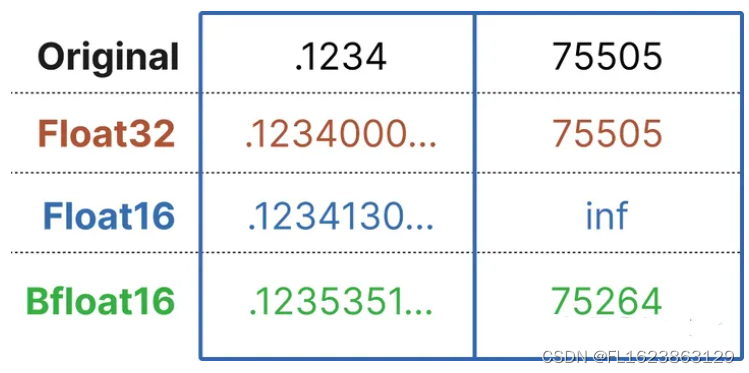
量化是指将LLM从其原始Float32表示转换为更小的表示。我们不希望简单地使用较小的位变体,而是希望在不丢失太多信息的情况下将较大的位表示映射到较小的位。
所以一般情况下,我们经常使用一种名为4bit-NormalFloat (NF4)的新格式来实现这一点。这个数据类型做了一些特殊的技巧,以便有效地表示更大的位数据类型。它包括三个步骤:
归一化:将模型的权重归一化,以便我们期望权重落在一定范围内。这允许更有效地表示更常见的值。
量化:将权重量化为4位。在NF4中,量化级别相对于归一化权重是均匀间隔的,从而有效地表示原始的32位权重。
去量化:虽然权重以4位存储,但它们在计算期间被去量化,从而在推理期间提高性能。
我们可以直接使用Bitsandbytes库进行量化操作:
from transformers import BitsAndBytesConfig
from torch import bfloat16

# Our 4-bit configuration to load the LLM with less GPU memory
bnb_config = BitsAndBytesConfig(
    load_in_4bit=True,  # 4-bit quantization
    bnb_4bit_quant_type='nf4',  # Normalized float 4
    bnb_4bit_use_double_quant=True,  # Second quantization after the first
    bnb_4bit_compute_dtype=bfloat16  # Computation type
)
上面的配置指定要使用的量化级别。比如4位量化表示权重,但用16位进行推理。
然后在管道中加载模型就很简单了:
from transformers import AutoTokenizer, AutoModelForCausalLM, pipeline

# Zephyr with BitsAndBytes Configuration
tokenizer = AutoTokenizer.from_pretrained("HuggingFaceH4/zephyr-7b-alpha")
model = AutoModelForCausalLM.from_pretrained(
    "HuggingFaceH4/zephyr-7b-alpha",
    quantization_config=bnb_config,
    device_map='auto',
)

# Create a pipeline
pipe = pipeline(model=model, tokenizer=tokenizer, task='text-generation')
接下来使用与之前相同的提示:
outputs = pipe(
    prompt,
    max_new_tokens=256,
    do_sample=True,
    temperature=0.7,
    top_p=0.95
)
print(outputs[0]["generated_text"])
量化是一种强大的技术,可以减少模型的内存需求,同时保持性能相似。它允许更快的加载、使用和微调llm,即使使用较小的gpu。
预量化(GPTQ、AWQ、GGUF)
我们已经探索了分片和量化技术。但是量化是在每次加载模型时进行的,这是非常耗时的操作,有没有办法直接保存量化后的模型,并且在使用时直接加载呢?
TheBloke是HuggingFace上的一个用户,它为我们执行了一系列量化操作,我想用过大模型的人一定对它非常的熟悉吧
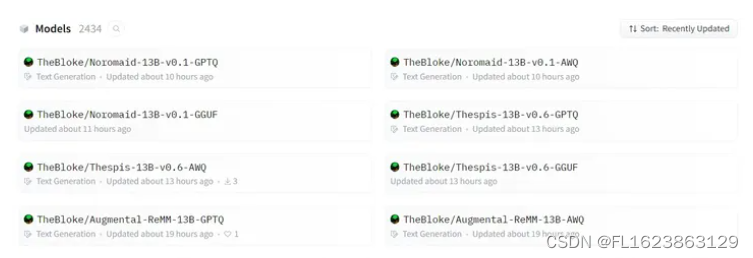
这些量化模型包含了很多格式GPTQ、GGUF和AWQ,我们来进行介绍
1、GPTQ: Post-Training Quantization for GPT Models
GPTQ是一种4位量化的训练后量化(PTQ)方法,主要关注GPU推理和性能。
该方法背后的思想是,尝试通过最小化该权重的均方误差将所有权重压缩到4位。在推理过程中,它将动态地将其权重去量化为float16,以提高性能,同时保持低内存。
我们需要在HuggingFace Transformers中的gptq类模型中加载:
pip install optimum
pip install auto-gptq --extra-index-url https://huggingface.github.io/autogptq-index/whl/cu118/
然后找到需要加载的模型,比如“TheBloke/zephyr-7B-beta-GPTQ”,进行加载
from transformers import AutoModelForCausalLM, AutoTokenizer, pipeline

# Load LLM and Tokenizer
model_id = "TheBloke/zephyr-7B-beta-GPTQ"
tokenizer = AutoTokenizer.from_pretrained(model_id, use_fast=True)
model = AutoModelForCausalLM.from_pretrained(
    model_id,
    device_map="auto",
    trust_remote_code=False,
    revision="main"
)

# Create a pipeline
pipe = pipeline(model=model, tokenizer=tokenizer, task='text-generation')
尽管我们安装了一些额外的依赖项,但我们可以使用与之前相同的管道,也就是是不需要修改代码,这是使用GPTQ的一大好处。
GPTQ是最常用的压缩方法,因为它针对GPU使用进行了优化。但是如果你的GPU无法处理如此大的模型,那么从GPTQ开始切换到以cpu为中心的方法(如GGUF)是绝对值得的。
2、GPT-Generated Unified Format
尽管GPTQ在压缩方面做得很好,但如果没有运行它的硬件,那么就需要使用其他的方法。
GGUF(以前称为GGML)是一种量化方法,允许用户使用CPU来运行LLM,但也可以将其某些层加载到GPU以提高速度。
虽然使用CPU进行推理通常比使用GPU慢,但对于那些在CPU或苹果设备上运行模型的人来说,这是一种非常好的格式。
使用GGUF非常简单,我们需要先安装ctransformers包:
pip install ctransformers[cuda]然后加载模型“TheBloke/zephyr-7B-beta-GGUF”,
from ctransformers import AutoModelForCausalLM
from transformers import AutoTokenizer, pipeline

# Load LLM and Tokenizer
# Use `gpu_layers` to specify how many layers will be offloaded to the GPU.
model = AutoModelForCausalLM.from_pretrained(
    "TheBloke/zephyr-7B-beta-GGUF",
    model_file="zephyr-7b-beta.Q4_K_M.gguf",
    model_type="mistral", gpu_layers=50, hf=True
)
tokenizer = AutoTokenizer.from_pretrained(
    "HuggingFaceH4/zephyr-7b-beta", use_fast=True
)

# Create a pipeline
pipe = pipeline(model=model, tokenizer=tokenizer, task='text-generation')
加载模型后,我们可以运行如下提示:
outputs = pipe(prompt, max_new_tokens=256)
print(outputs[0]["generated_text"])
如果你想同时利用CPU和GPU, GGUF是一个非常好的格式。
3、AWQ: Activation-aware Weight Quantization
除了上面两种以外,一种新格式是AWQ(激活感知权重量化),它是一种类似于GPTQ的量化方法。AWQ和GPTQ作为方法有几个不同之处,但最重要的是AWQ假设并非所有权重对LLM的性能都同等重要。
也就是说在量化过程中会跳过一小部分权重,这有助于减轻量化损失。所以他们的论文提到了与GPTQ相比的可以由显著加速,同时保持了相似的,有时甚至更好的性能。
该方法还是比较新的,还没有被采用到GPTQ和GGUF的程度。
对于AWQ,我们将使用vLLM包:
pip install vllm使用vLLM可以直接加载模型:
from vllm import LLM, SamplingParams

# Load the LLM
sampling_params = SamplingParams(temperature=0.0, top_p=1.0, max_tokens=256)
llm = LLM(
    model="TheBloke/zephyr-7B-beta-AWQ",
    quantization='awq',
    dtype='half',
    gpu_memory_utilization=.95,
    max_model_len=4096
)
然后使用.generate运行模型:
output = llm.generate(prompt, sampling_params)
print(output[0].outputs[0].text)
就是这样
![[BT]BUUCTF刷题第13天(4.1)](https://img-blog.csdnimg.cn/direct/ec814b81531c41e893cba457b535895c.png)

