文章目录
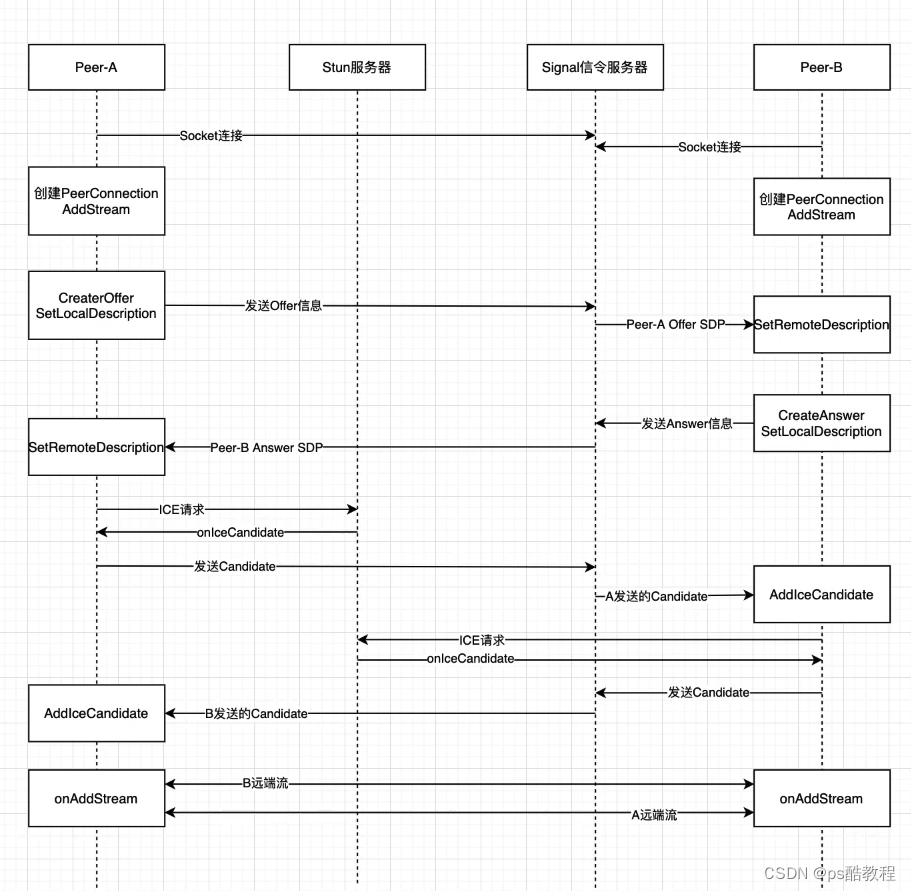
- webrtcP2P通话流程
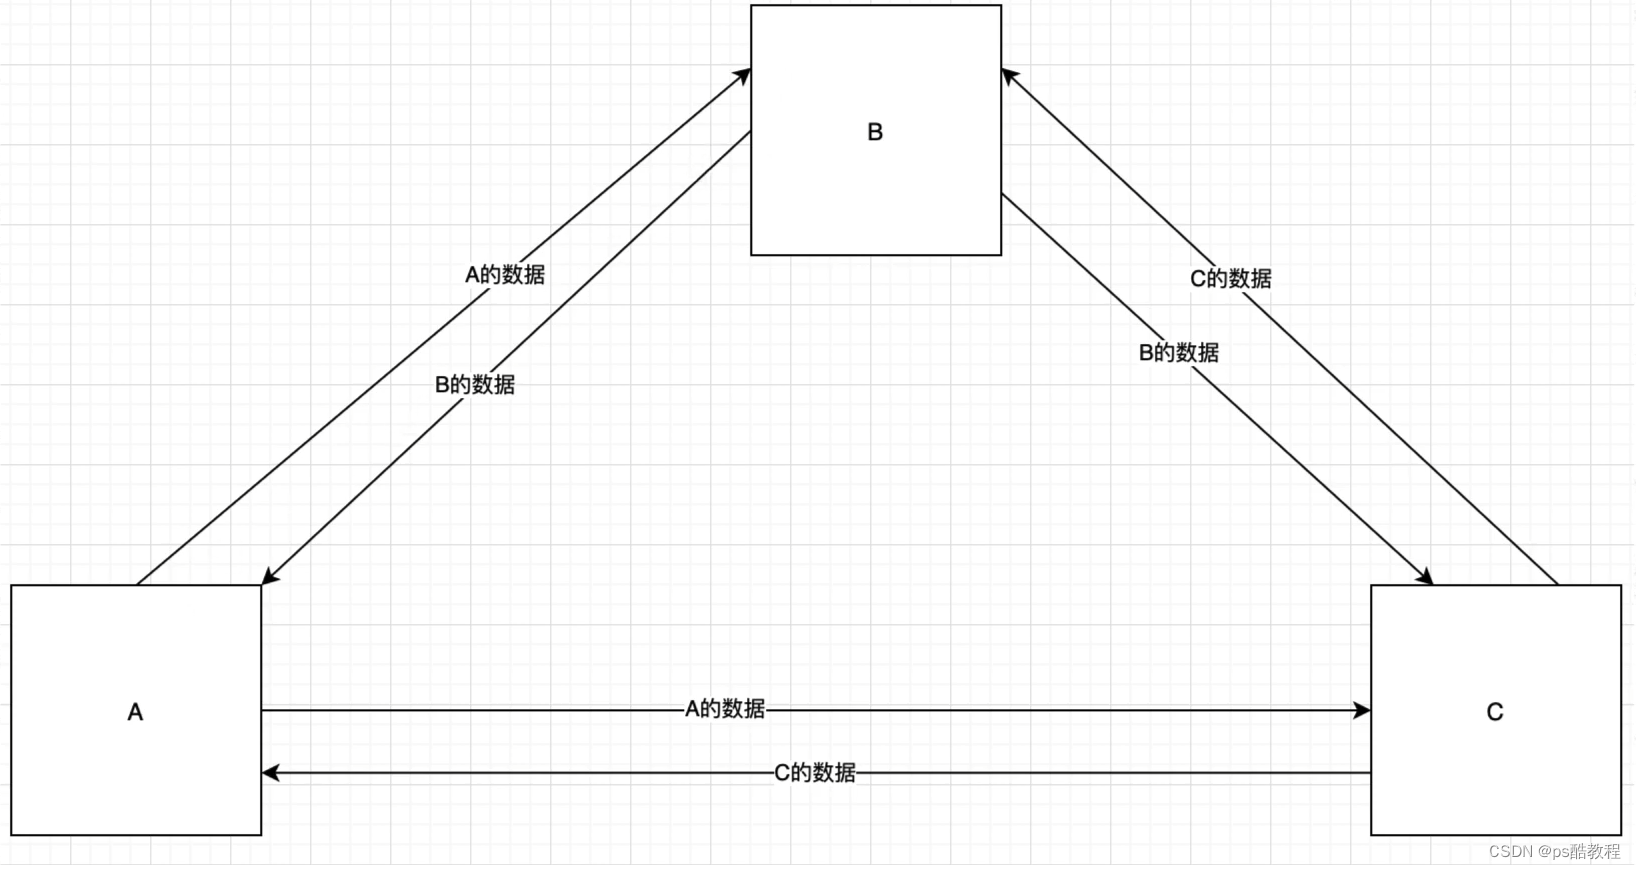
- webrtc多对多 mesh方案
- webrtc多对多 mcu方案
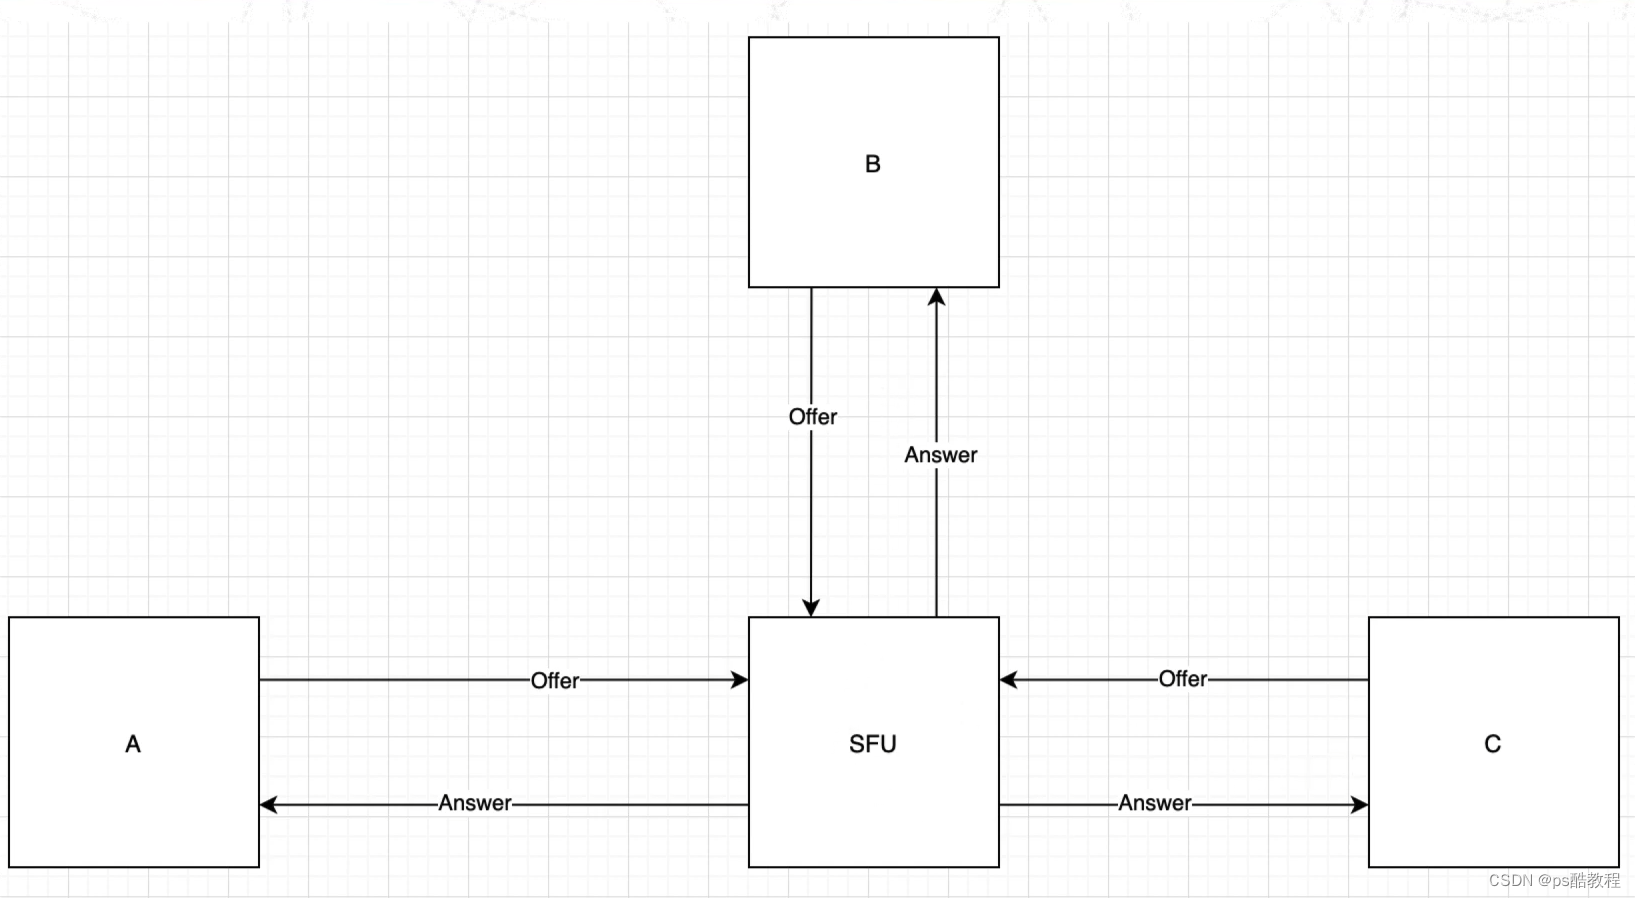
- webrtc多对多 sfu方案
- webrtc案例测试
- getUserMedia
- getUserMedia基础示例-打开摄像头
- getUserMedia + canvas - 截图
- 打开共享屏幕
webrtcP2P通话流程
在这里,stun服务器包括stun服务和turn转发服务。信令服服务还包括im等功能
webrtc多对多 mesh方案
适合人数较少的场景
webrtc多对多 mcu方案
(multipoint control point)将上行的视频/音频合成,然后分发。对客户端来说压力不大,但对服务器消耗较大,但节省带宽。适合开会人多会议场景。

webrtc多对多 sfu方案
(selective forwarding unit)对服务器压力小,不需要太高配置,但对带宽要求较高,流量消耗大。

在sfu中,它们的通信过程如下
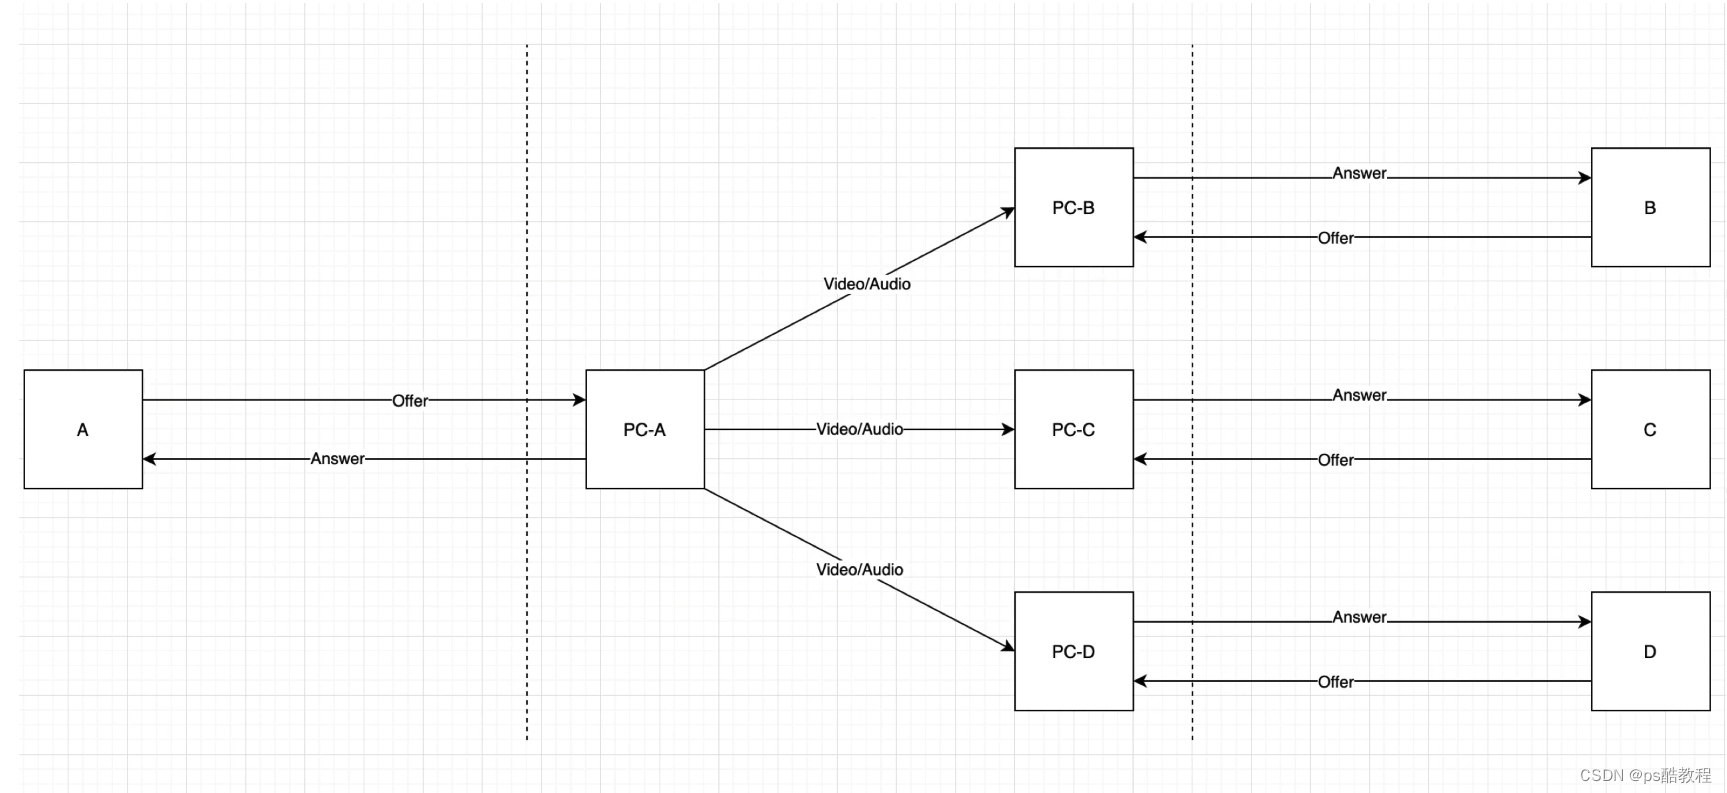
再单独看下客户端与sfu的通信过程,并且在sfu内部的流媒体转发过程
webrtc案例测试
samples代码 https://github.com/webrtc/samples?tab=readme-ov-file
案例页面地址
要注意的一点是,如果不是本机地址,那就需要https,否则获取媒体的方法会调用不了
里面有不少示例,需要花时间看看
<!DOCTYPE html>
<!--
 *  Copyright (c) 2015 The WebRTC project authors. All Rights Reserved.
 *
 *  Use of this source code is governed by a BSD-style license
 *  that can be found in the LICENSE file in the root of the source
 *  tree.
-->
<html>
<head>

    <meta charset="utf-8">
    <meta name="description" content="WebRTC Javascript code samples">
    <meta name="viewport" content="width=device-width, user-scalable=yes, initial-scale=1, maximum-scale=1">
    <meta itemprop="description" content="Client-side WebRTC code samples">
    <meta itemprop="image" content="src/images/webrtc-icon-192x192.png">
    <meta itemprop="name" content="WebRTC code samples">
    <meta name="mobile-web-app-capable" content="yes">
    <meta id="theme-color" name="theme-color" content="#ffffff">

    <base target="_blank">

    <title>WebRTC samples</title>

    <link rel="icon" sizes="192x192" href="src/images/webrtc-icon-192x192.png">
    <link href="https://fonts.googleapis.com/css?family=Roboto:300,400,500,700" rel="stylesheet" type="text/css">
    <link rel="stylesheet" href="src/css/main.css"/>

    <style>
        h2 {
            font-size: 1.5em;
            font-weight: 500;
        }

        h3 {
            border-top: none;
        }

        section {
            border-bottom: 1px solid #eee;
            margin: 0 0 1.5em 0;
            padding: 0 0 1.5em 0;
        }

        section:last-child {
            border-bottom: none;
            margin: 0;
            padding: 0;
        }
    </style>
</head>

<body>
<div id="container">

    <h1>WebRTC samples</h1>

    <section>

        <p>
            This is a collection of small samples demonstrating various parts of the <a
                href="https://developer.mozilla.org/en-US/docs/Web/API/WebRTC_API">WebRTC APIs</a>. The code for all
            samples are available in the <a href="https://github.com/webrtc/samples">GitHub repository</a>.
        </p>

        <p>Most of the samples use <a href="https://github.com/webrtc/adapter">adapter.js</a>, a shim to insulate apps
            from spec changes and prefix differences.</p>

        <p><a href="https://webrtc.org/getting-started/testing" title="Command-line flags for WebRTC testing">https://webrtc.org/getting-started/testing</a>
            lists command line flags useful for development and testing with Chrome.</p>

        <p>Patches and issues welcome! See <a href="https://github.com/webrtc/samples/blob/gh-pages/CONTRIBUTING.md">CONTRIBUTING.md</a>
            for instructions.</p>

        <p class="warning"><strong>Warning:</strong> It is highly recommended to use headphones when testing these
            samples, as it will otherwise risk loud audio feedback on your system.</p>
    </section>

    <section>

        <h2 id="getusermedia"><a href="https://developer.mozilla.org/en-US/docs/Web/API/MediaDevices/getUserMedia">getUserMedia():</a>
        </h2>
        <p class="description">Access media devices</p>
        <ul>
            <li><a href="src/content/getusermedia/gum/">Basic getUserMedia demo</a></li>

            <li><a href="src/content/getusermedia/canvas/">Use getUserMedia with canvas</a></li>

            <li><a href="src/content/getusermedia/filter/">Use getUserMedia with canvas and CSS filters</a></li>

            <li><a href="src/content/getusermedia/resolution/">Choose camera resolution</a></li>

            <li><a href="src/content/getusermedia/audio/">Audio-only getUserMedia() output to local audio element</a>
            </li>

            <li><a href="src/content/getusermedia/volume/">Audio-only getUserMedia() displaying volume</a></li>

            <li><a href="src/content/getusermedia/record/">Record stream</a></li>

            <li><a href="src/content/getusermedia/getdisplaymedia/">Screensharing with getDisplayMedia</a></li>

            <li><a href="src/content/getusermedia/pan-tilt-zoom/">Control camera pan, tilt, and zoom</a></li>

            <li><a href="src/content/getusermedia/exposure/">Control exposure</a></li>
        </ul>
        <h2 id="devices">Devices:</h2>
        <p class="description">Query media devices</p>
        <ul>
            <li><a href="src/content/devices/input-output/">Choose camera, microphone and speaker</a></li>

            <li><a href="src/content/devices/multi/">Choose media source and audio output</a></li>
        </ul>

        <h2 id="capture">Stream capture:</h2>
        <p class="description">Stream from canvas or video elements</p>
        <ul>

            <li><a href="src/content/capture/video-video/">Stream from a video element to a video element</a></li>

            <li><a href="src/content/capture/video-pc/">Stream from a video element to a peer connection</a></li>

            <li><a href="src/content/capture/canvas-video/">Stream from a canvas element to a video element</a></li>

            <li><a href="src/content/capture/canvas-pc/">Stream from a canvas element to a peer connection</a></li>

            <li><a href="src/content/capture/canvas-record/">Record a stream from a canvas element</a></li>

            <li><a href="src/content/capture/video-contenthint/">Guiding video encoding with content hints</a></li>
        </ul>

        <h2 id="peerconnection"><a href="https://developer.mozilla.org/en-US/docs/Web/API/RTCPeerConnection">RTCPeerConnection:</a>
        </h2>
        <p class="description">Controlling peer connectivity</p>
        <ul>
            <li><a href="src/content/peerconnection/pc1/">Basic peer connection demo in a single tab</a></li>

            <li><a href="src/content/peerconnection/channel/">Basic peer connection demo between two tabs</a></li>

            <li><a href="src/content/peerconnection/perfect-negotiation/">Peer connection using Perfect Negotiation</a></li>

            <li><a href="src/content/peerconnection/audio/">Audio-only peer connection demo</a></li>

            <li><a href="src/content/peerconnection/bandwidth/">Change bandwidth on the fly</a></li>

            <li><a href="src/content/peerconnection/change-codecs/">Change codecs before the call</a></li>

            <li><a href="src/content/peerconnection/upgrade/">Upgrade a call and turn video on</a></li>

            <li><a href="src/content/peerconnection/multiple/">Multiple peer connections at once</a></li>

            <li><a href="src/content/peerconnection/multiple-relay/">Forward the output of one PC into another</a></li>

            <li><a href="src/content/peerconnection/munge-sdp/">Munge SDP parameters</a></li>

            <li><a href="src/content/peerconnection/pr-answer/">Use pranswer when setting up a peer connection</a></li>

            <li><a href="src/content/peerconnection/constraints/">Constraints and stats</a></li>

            <li><a href="src/content/peerconnection/old-new-stats/">More constraints and stats</a></li>

            <li><a href="src/content/peerconnection/per-frame-callback/">RTCPeerConnection and requestVideoFrameCallback()</a></li>

            <li><a href="src/content/peerconnection/create-offer/">Display createOffer output for various scenarios</a>
            </li>

            <li><a href="src/content/peerconnection/dtmf/">Use RTCDTMFSender</a></li>

            <li><a href="src/content/peerconnection/states/">Display peer connection states</a></li>

            <li><a href="src/content/peerconnection/trickle-ice/">ICE candidate gathering from STUN/TURN servers</a>
            </li>

            <li><a href="src/content/peerconnection/restart-ice/">Do an ICE restart</a></li>

            <li><a href="src/content/peerconnection/webaudio-input/">Web Audio output as input to peer connection</a>
            </li>

            <li><a href="src/content/peerconnection/webaudio-output/">Peer connection as input to Web Audio</a></li>
            <li><a href="src/content/peerconnection/negotiate-timing/">Measure how long renegotiation takes</a></li>
            <li><a href="src/content/extensions/svc/">Choose scalablilityMode before call - Scalable Video Coding (SVC) Extension </a></li>
        </ul>
        <h2 id="datachannel"><a
                href="https://developer.mozilla.org/en-US/docs/Web/API/RTCDataChannel">RTCDataChannel:</a></h2>
        <p class="description">Send arbitrary data over peer connections</p>
        <ul>
            <li><a href="src/content/datachannel/basic/">Transmit text</a></li>

            <li><a href="src/content/datachannel/filetransfer/">Transfer a file</a></li>

            <li><a href="src/content/datachannel/datatransfer/">Transfer data</a></li>

            <li><a href="src/content/datachannel/channel/">Basic datachannel demo between two tabs</a></li>

            <li><a href="src/content/datachannel/messaging/">Messaging</a></li>
        </ul>

        <h2 id="videoChat">Video chat:</h2>
        <p class="description">Full featured WebRTC application</p>
        <ul>

            <li><a href="https://github.com/webrtc/apprtc/">AppRTC video chat client</a> that you can run out of a Docker image</li>

        </ul>

        <h2 id="capture">Insertable Streams:</h2>
        <p class="description">API for processing media</p>
        <ul>
            <li><a href="src/content/insertable-streams/endtoend-encryption">End to end encryption using WebRTC Insertable Streams</a></li> (Experimental)
            <li><a href="src/content/insertable-streams/video-analyzer">Video analyzer using WebRTC Insertable Streams</a></li> (Experimental)
            <li><a href="src/content/insertable-streams/video-processing">Video processing using MediaStream Insertable Streams</a></li> (Experimental)
            <li><a href="src/content/insertable-streams/audio-processing">Audio processing using MediaStream Insertable Streams</a></li> (Experimental)
            <li><a href="src/content/insertable-streams/video-crop">Video cropping using MediaStream Insertable Streams in a Worker</a></li> (Experimental)
            <li><a href="src/content/insertable-streams/webgpu">Integrations with WebGPU for custom video rendering:</a></li> (Experimental)
        </ul>

    </section>

</div>

<script src="src/js/lib/ga.js"></script>

</body>
</html>
getUserMedia
getUserMedia基础示例-打开摄像头
<template>
    <video ref="videoRef" autoplay playsinline></video>
    <button @click="openCamera">打开摄像头</button>
    <button @click="closeCamera">关闭摄像头</button>
</template>

<script lang="ts" setup name="gum">

import { ref } from 'vue';

const videoRef = ref()

let stream = null

// 打开摄像头
const openCamera = async function () {

    stream = await navigator.mediaDevices.getUserMedia({
        audio: false,
        video: true
    });

    const videoTracks = stream.getVideoTracks();
    console.log(`Using video device: ${videoTracks[0].label}`);

    videoRef.value.srcObject = stream

}

// 关闭摄像头
const closeCamera = function() {
    const videoTracks = stream.getVideoTracks();
    stream.getTracks().forEach(function(track) {
        track.stop();
    });
}

</script>
getUserMedia + canvas - 截图
<template>
    <video ref="videoRef" autoplay playsinline></video>
    <button @click="shootScreen">截图</button>
    <button @click="closeCamera">关闭摄像头</button>

    <canvas ref="canvasRef"></canvas>
</template>

<script lang="ts" setup name="gum">

import { ref, onMounted } from 'vue';

const videoRef = ref()
const canvasRef = ref()
let stream = null


onMounted(() => {

    canvasRef.value.width = 480;
    canvasRef.value.height = 360;


    // 打开摄像头
    const openCamera = async function () {

        stream = await navigator.mediaDevices.getUserMedia({
            audio: false,
            video: true
        });

        const videoTracks = stream.getVideoTracks();
        console.log(`Using video device: ${videoTracks[0].label}`);

        videoRef.value.srcObject = stream

    }
    openCamera()

})

// 截图
const shootScreen = function () {
    canvasRef.value.width = videoRef.value.videoWidth;
    canvasRef.value.height = videoRef.value.videoHeight;
    canvasRef.value.getContext('2d').drawImage(videoRef.value, 0, 0, canvasRef.value.width, canvasRef.value.height);
}

// 关闭摄像头
const closeCamera = function() {
    const videoTracks = stream.getVideoTracks();
    stream.getTracks().forEach(function(track) {
        track.stop();
    });
}
</script>
打开共享屏幕
<template>
    <video ref="myVideoRef" autoPlay playsinline  width="50%"></video>
    <button @click="openCarmera">打开共享屏幕</button>
</template>

<script lang="ts" setup name="App">

    import {ref} from 'vue'

    const myVideoRef = ref()

    // 打开共享屏幕的代码
    const openScreen = async ()=>{
        const constraints = {video: true}
        try{
            const stream = await navigator.mediaDevices.getDisplayMedia(constraints);
            const videoTracks = stream.getTracks();
            console.log('使用的设备是: ' + videoTracks[0].label)
            myVideoRef.value.srcObject = stream
        }catch(error) {

        }
    }

</script>

![MSF永恒之蓝漏洞利用详解[漏洞验证利用及后渗透]【详细版】](https://img-blog.csdnimg.cn/direct/fdb42af48fb746709be668159bed03c0.png)
