目录
基于k8s的高性能综合web服务器搭建
项目描述:
项目规划图:
项目环境: k8s, docker centos7.9 nginx prometheus grafana flask ansible Jenkins等
1.规划设计整个集群的架构,k8s单master的集群环境(单master,双worker),部署dashboard监视集群资源
规划好IP地址
关闭selinux和firewalld
2.部署ansible完成相关业务的自动化运维工作,同时部署防火墙服务器和堡垒机,提升整个集群的安全性。
3.部署堡垒机和防火墙
部署堡垒机仅需两步快速安装 JumpServer:准备一台 2核4G (最低)且可以访问互联网的 64 位 Linux 主机;以 root 用户执行如下命令一键安装 JumpServer。
##出现这个就表示你的jumpserver初步部署完成
##部署防火墙
#编写脚本,实现iptables
4.部署nfs服务器,为整个web集群提供数据存储服务,让所有的web业务pod都取访问,通过pv和pvc、卷挂载实现。
5..使用go语言搭建一个简易的镜像,启动nginx,采用HPA技术,当cpu使用率达到60%的时候,进行水平扩缩,最小10个,最多40个pod。
##访问测试,表示服务启动
#下面开始制作镜像,打标签,登录harbor仓库,上传,其他节点拉取镜像
#使用水平扩缩技术
5.构建CI/CD环境,安装gitlab、Jenkins、harbor实现相关的代码发布、镜像制作、数据备份等流水线工作
部署Jenkins
#接下来部署harbor
简单测试harbor仓库是否可以使用
7.部署promethues+grafana对集群里的所有服务器(cpu,内存,网络带宽,磁盘IO等)进行常规性能监控,包括k8s集群节点服务器。
#安装grafana,绘制优美的图片,方便我们进行观察
#我将密码修改为123456
编辑
8.使用ingress给web业务做基于域名的负载均衡
拓展小知识
部署过程
9.使用探针(liveless、readiness、startup)的httpGet和exec方法对web业务pod进行监控,一旦出现问题马上重启,增强业务pod的可靠性。
10.使用ab工具对整个k8s集群里的web服务进行压力测试
基于k8s的高性能综合web服务器搭建
项目描述:
模拟企业里的k8s测试环境,部署web,mysql,nfs,harbor,Prometheus,gitlab,Jenkins等应用,构建一个高可用高性能的web系统,同时能监控整个k8s集群的使用,部署了CICD的一套系统。
项目规划图:
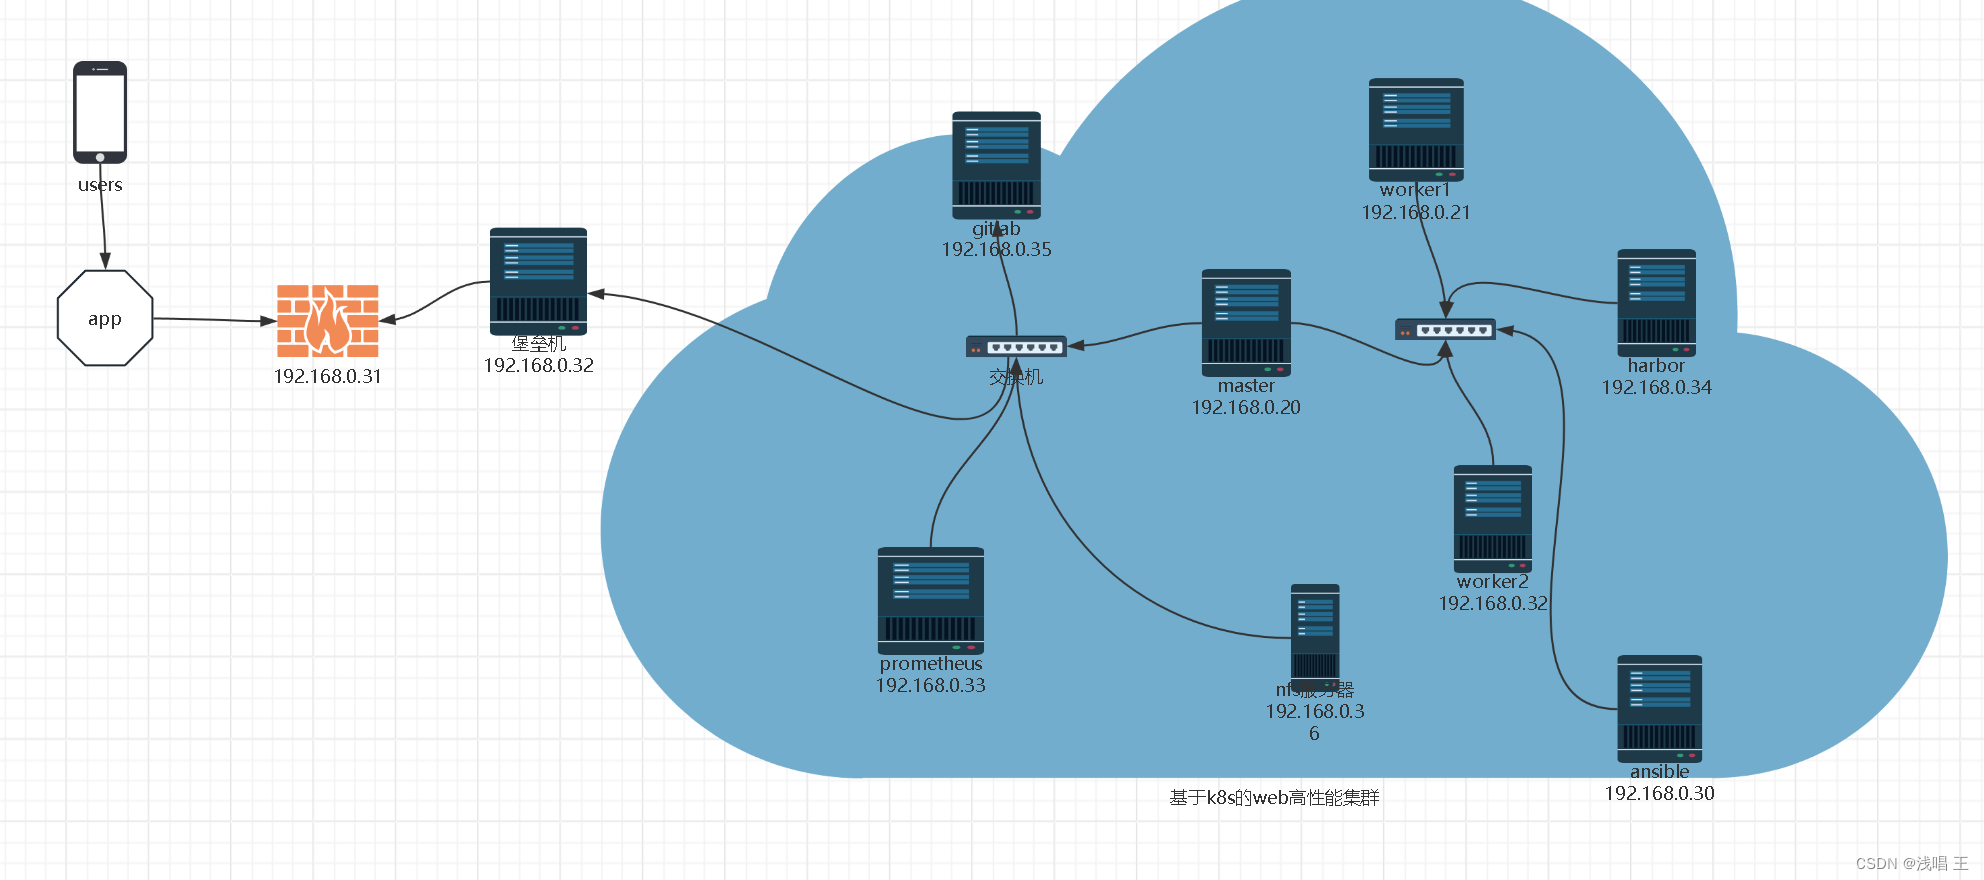
项目环境: k8s, docker centos7.9 nginx prometheus grafana flask ansible Jenkins等
步骤:
1.规划设计整个集群的架构,k8s单master的集群环境(单master,双worker),部署dashboard监视集群资源
规划好IP地址
master jekens 192.168.0.20
Slave1 192.168.0.21
slave2 192.168.0.22
ansible 192.168.0.30
防火墙 192.168.0.31
堡垒机(jumpserver代理) 192.168.0.32
prometheus 192.168.0.33
harbor 192.168.0.34
gitlab 192.168.0.35
nfs服务器 192.168.0.36
#修改主机名,改为master
hostnamectl set-hostname master

su ##切换用户
关闭selinux和firewalld
#关闭防火墙,和selinux
[root@ansible ~]# systemctl stop firewalld
[root@ansible ~]# systemctl disable firewalld
[root@ansible ~]# getenforce
Disabled

[root@ansible ~]# cat /etc/selinux/config
# This file controls the state of SELinux on the system.
# SELINUX= can take one of these three values:
#     enforcing - SELinux security policy is enforced.
#     permissive - SELinux prints warnings instead of enforcing.
#     disabled - No SELinux policy is loaded.
SELINUX=disabled

##其他所有机器关闭
#IP地址规划
[root@ansible ~]# vim /etc/sysconfig/network-scripts/ifcfg-ens33
BOOTPROTO=none
NAME=ens33
DEVICE=ens33
ONBOOT=yes
IPADDR=192.168.0.30
GATEWAY=192.168.0.2
DNS1=8.8.8.8
DNS2=114.114.114.114
##其他机器合适规划IP地址
2.部署ansible完成相关业务的自动化运维工作,同时部署防火墙服务器和堡垒机,提升整个集群的安全性。
#在kubernetes集群里面,和ansible建立免密通道
#一直回车就好,就是用默认的就好
[root@ansible ~]# ssh-keygen
Generating public/private rsa key pair.
Enter file in which to save the key (/root/.ssh/id_rsa):
Created directory '/root/.ssh'.
Enter passphrase (empty for no passphrase):
Enter same passphrase again:
Your identification has been saved in /root/.ssh/id_rsa.
Your public key has been saved in /root/.ssh/id_rsa.pub.
The key fingerprint is:
SHA256:BT7myvQ1r1QoEJgurdR4MZxdCulsFbyC3S4j/08xT5E root@ansible
The key's randomart image is:
+---[RSA 2048]----+
|   ..Booo        |
|    O.++ . .     |
|   X =o.+ E      |
|  = @ o+ o o     |
| . = o. S = .    |
|  o oo.o B +     |
|   o oo o o .    |
|    .  . . .     |
|     .... .      |
+----[SHA256]-----+
##传递ansible的id_rsa.pub 到其他的master集群上
[root@ansible ~]# ssh-copy-id master
/usr/bin/ssh-copy-id: INFO: Source of key(s) to be installed: "/root/.ssh/id_rsa.pub"
The authenticity of host 'master (192.168.0.20)' can't be established.
ECDSA key fingerprint is SHA256:xactOuiFsm9merQVjdeiV4iZwI4rXUnviFYTXL2h8fc.
ECDSA key fingerprint is MD5:69:58:6b:ab:c4:8c:27:e2:b2:7c:31:bb:63:20:81:61.
Are you sure you want to continue connecting (yes/no)? yes
/usr/bin/ssh-copy-id: INFO: attempting to log in with the new key(s), to filter out any that are already installed
/usr/bin/ssh-copy-id: INFO: 1 key(s) remain to be installed -- if you are prompted now it is to install the new keys
root@master's password:
Permission denied, please try again.
root@master's password:

Number of key(s) added: 1

Now try logging into the machine, with:   "ssh 'master'"
and check to make sure that only the key(s) you wanted were added.

[root@ansible .ssh]# ls
id_rsa  id_rsa.pub  known_hosts

#前面配置好这个IP地址
[root@ansible .ssh]# cat /etc/hosts
127.0.0.1   localhost localhost.localdomain localhost4 localhost4.localdomain4
::1         localhost localhost.localdomain localhost6 localhost6.localdomain6
192.168.0.20 master
192.168.0.21 worker1
192.168.0.22 worker2
192.168.0.30 ansible
##ansible的/etc/hosts文件的内容是要多一点,管理的节点更多

##测试登录
[root@ansible ~]# ssh worker1
Last login: Wed Apr  3 11:11:49 2024 from ansible
[root@worker1 ~]#
同理测试
[root@ansible ~]# ssh worker2
[root@ansible ~]# ssh master

#安装ansible
[root@ansible .ssh]# yum install epel-release -y
[root@ansible .ssh]# yum  install ansible -y

#编写主机清单
#主机清单
[master]
192.168.0.20
[workers]
192.168.0.21
192.168.0.22
[nfs]
192.168.0.36
[gitlab]
192.168.0.35
[harbor]
192.168.0.34
[promethus]
192.168.0.33
3.部署堡垒机和防火墙
部署堡垒机
仅需两步快速安装 JumpServer:
准备一台 2核4G (最低)且可以访问互联网的 64 位 Linux 主机;
以 root 用户执行如下命令一键安装 JumpServer。
curl -sSL https://resource.fit2cloud.com/jumpserver/jumpserver/releases/latest/download/quick_start.sh | bash##这个是安装完成的提示提示符号
>>> 安装完成了
1. 可以使用如下命令启动, 然后访问
cd /opt/jumpserver-installer-v3.10.7
./jmsctl.sh start
2. 其它一些管理命令
./jmsctl.sh stop
./jmsctl.sh restart
./jmsctl.sh backup
./jmsctl.sh upgrade
更多还有一些命令, 你可以 ./jmsctl.sh --help 来了解
3. Web 访问
http://192.168.0.32:80
默认用户: admin 默认密码: admin
4. SSH/SFTP 访问
ssh -p2222 admin@192.168.0.32
sftp -P2222 admin@192.168.0.32
##出现这个就表示你的jumpserver初步部署完成
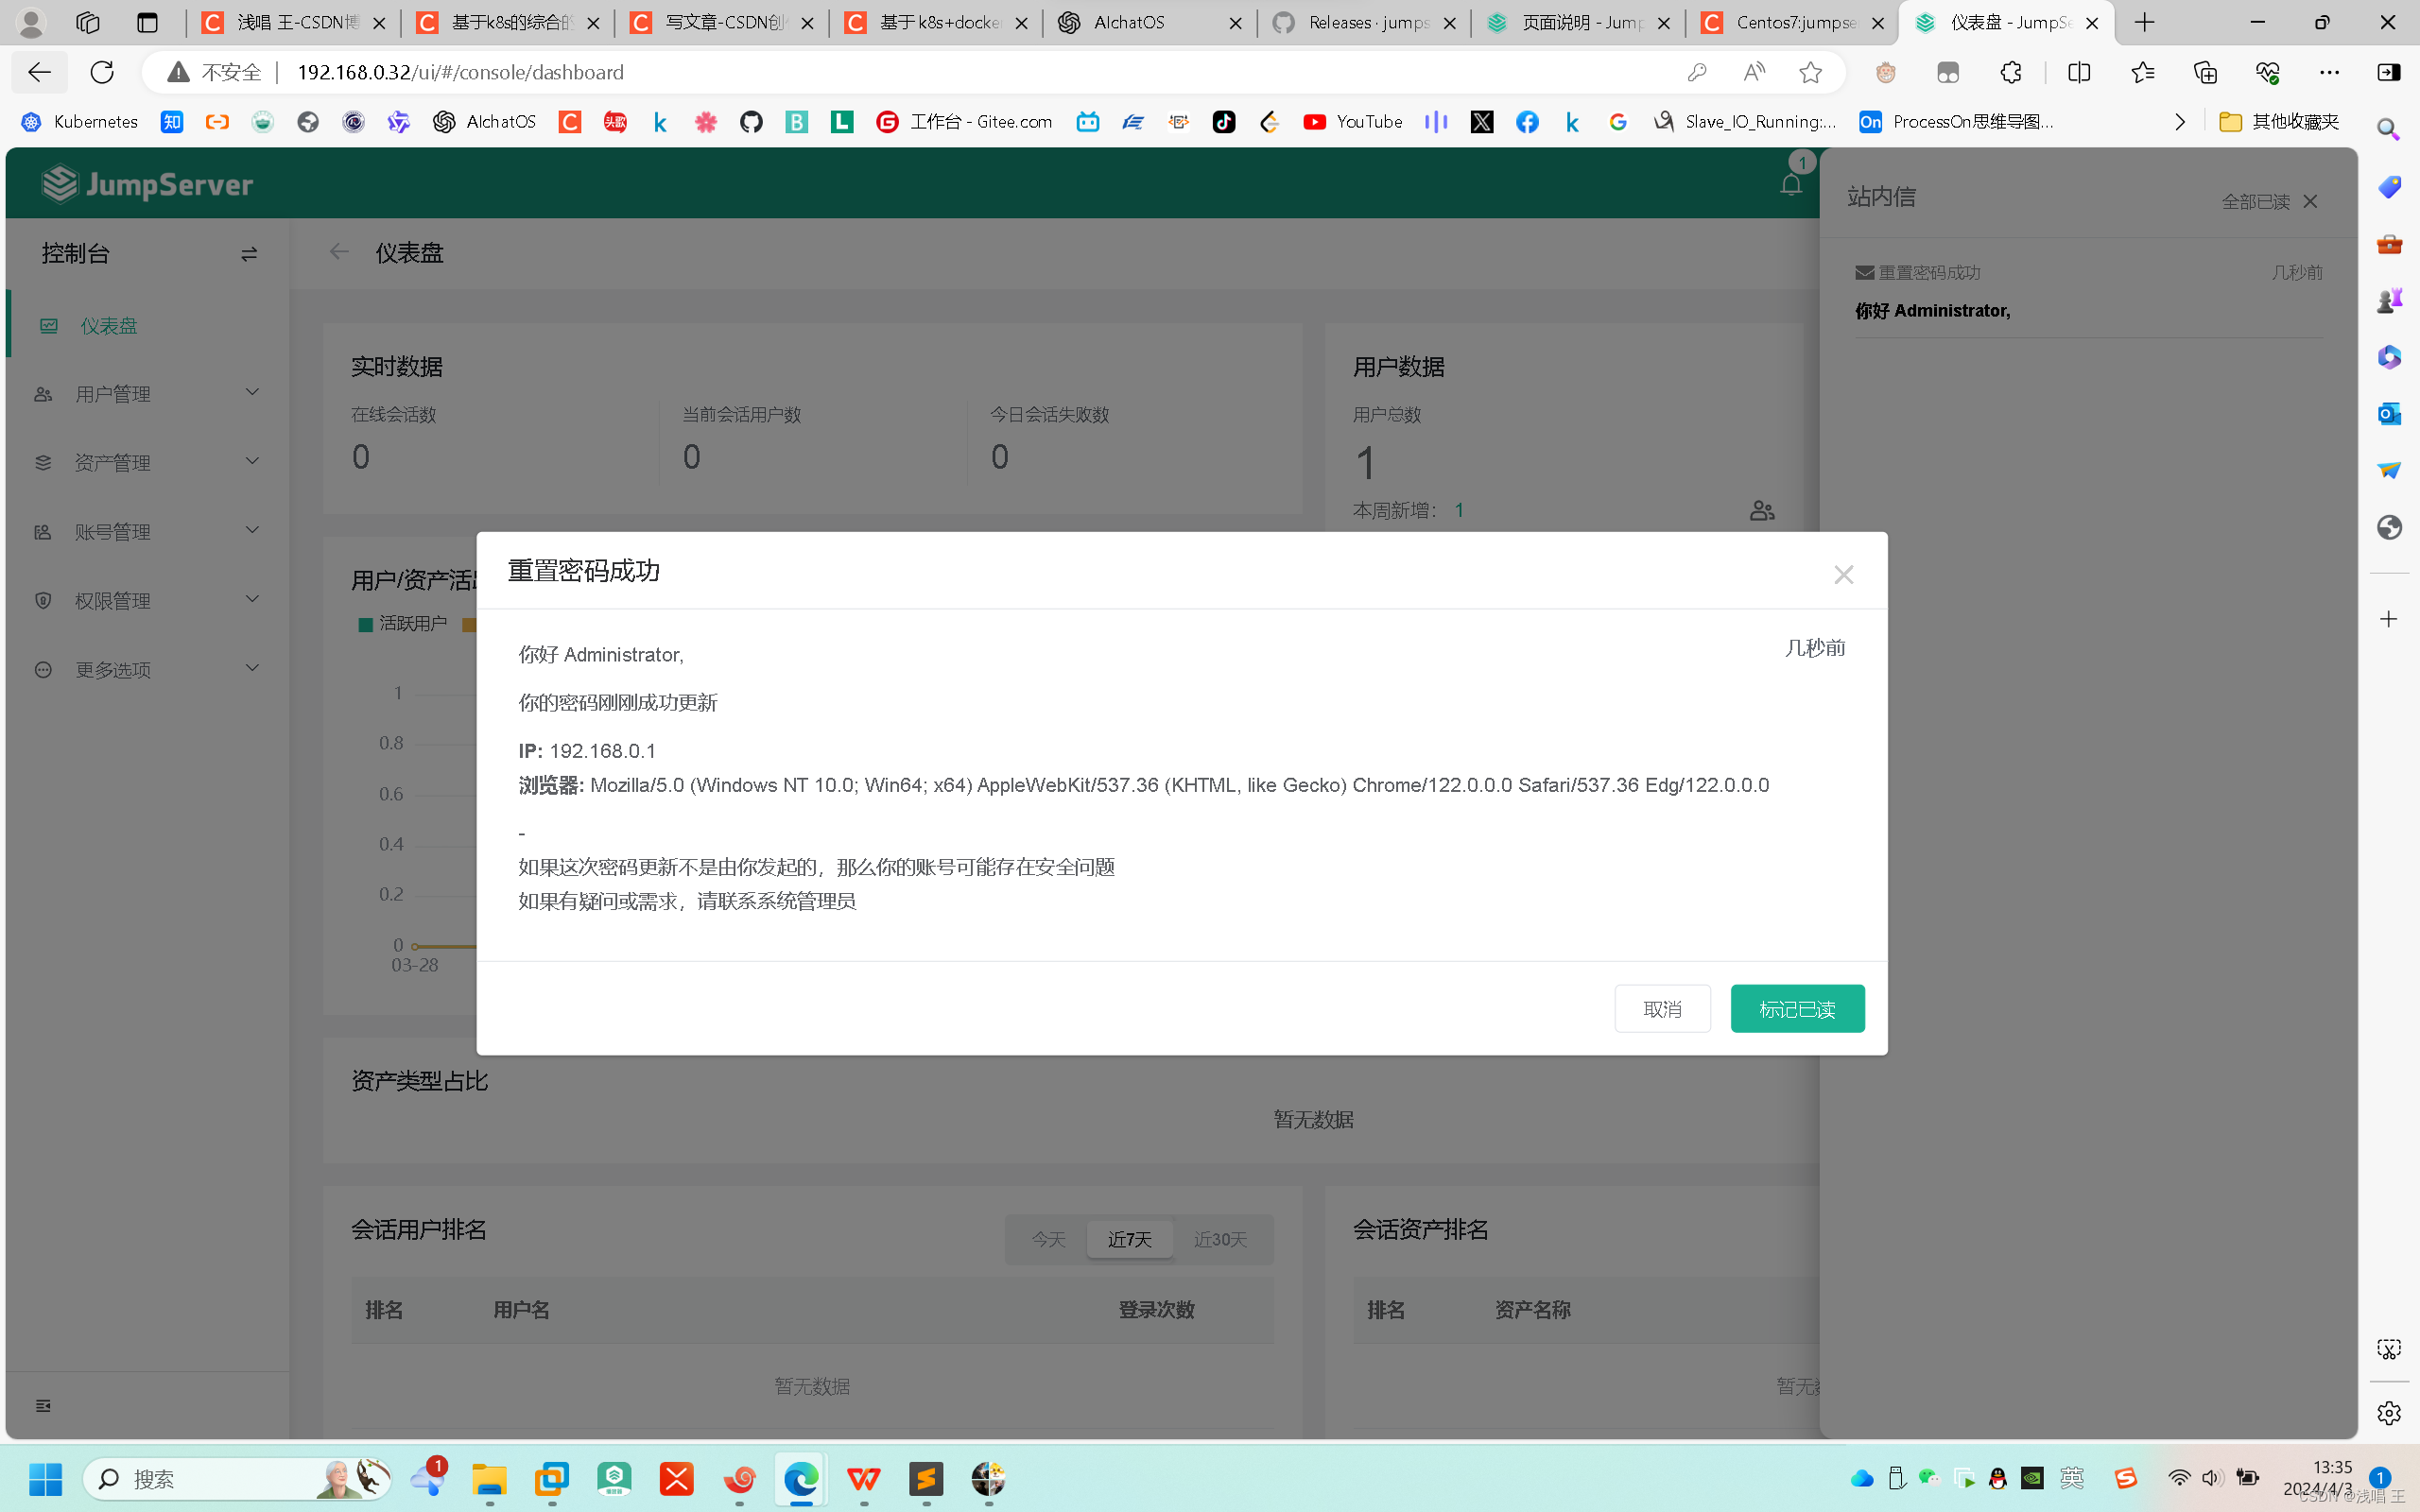
##部署防火墙
#防火墙的配置 WAN口是ens36,LAN是ens33
[root@firewalld ~]# ip a
1: lo: <LOOPBACK,UP,LOWER_UP> mtu 65536 qdisc noqueue state UNKNOWN group default qlen 1000
    link/loopback 00:00:00:00:00:00 brd 00:00:00:00:00:00
    inet 127.0.0.1/8 scope host lo
       valid_lft forever preferred_lft forever
    inet6 ::1/128 scope host
       valid_lft forever preferred_lft forever
2: ens33: <BROADCAST,MULTICAST,UP,LOWER_UP> mtu 1500 qdisc pfifo_fast state UP group default qlen 1000
    link/ether 00:0c:29:e7:7d:f3 brd ff:ff:ff:ff:ff:ff
    inet 192.168.0.31/24 brd 192.168.0.255 scope global noprefixroute ens33
       valid_lft forever preferred_lft forever
    inet6 fe80::20c:29ff:fee7:7df3/64 scope link
       valid_lft forever preferred_lft forever
3: ens36: <BROADCAST,MULTICAST,UP,LOWER_UP> mtu 1500 qdisc pfifo_fast state UP group default qlen 1000
    link/ether 00:0c:29:e7:7d:fd brd ff:ff:ff:ff:ff:ff
    inet 192.168.1.5/24 brd 192.168.1.255 scope global noprefixroute dynamic ens36
       valid_lft 5059sec preferred_lft 5059sec
    inet6 fe80::347c:1701:c765:777b/64 scope link noprefixroute
       valid_lft forever preferred_lft forever


#本地的服务器可以是将网关设置成防火墙的IP地址--》当做LAN口
[root@nfs ~]# cat /etc/sysconfig/network-scripts/ifcfg-ens33
BOOTPROTO=none
NAME=ens33
DEVICE=ens33
ONBOOT=yes
GATEWAY=192.168.0.31
IPADDR=192.168.0.36
DNS1=8.8.8.8
#查看路由
[root@nfs ~]# ip route
default via 192.168.1.5 dev ens33 proto static metric 100
192.168.0.0/24 dev ens33 proto kernel scope link src 192.168.0.36 metric 100
192.168.1.5 dev ens33 proto static scope link metric 100
#编写脚本,实现iptables
#脚本4.部署nfs服务器,为整个web集群提供数据存储服务,让所有的web业务pod都取访问,通过pv和pvc、卷挂载实现。
##在所有的k8s集群上,部署nfs服务器,设置pv,pvc,实现卷的永久挂载
[root@nfs ~]# yum install nfs-utils -y
[root@worker1 ~]# yum install nfs-utils -y
[root@worker2 ~]# yum install nfs-utils -y
[root@master ~]# yum install nfs-utils -y


#设置共享目录
[root@nfs ~]# vim  /etc/exports
[root@nfs ~]# cat /etc/exports
/web/data  192.168.0.0/24(rw,root squashing,sync)

##root squashing--》当做root用户--》可以读写
#输出共享目录
[root@nfs data]# exportfs -rv
exporting 192.168.0.0/24:/web/data


#创建共享目录
[root@nfs /]# cd web/
[root@nfs web]# ls
data
[root@nfs web]# cd data
[root@nfs data]# ls
index.html
[root@nfs data]# cat index.html ##编写网页头文件
welcome to sanchuang !!! \n
welcome to sanchuang !!!
0000000000000000000000
welcome to sanchuang !!!
welcome to sanchuang !!!
welcome to sanchuang !!!
666666666666666666 !!!
777777777777777777 !!!

##刷新服务
[root@nfs data]# service nfs restart

#设置nfs服务开机启动
[root@nfs web]# systemctl restart nfs && systemctl enable nfs
Created symlink from /etc/systemd/system/multi-user.target.wants/nfs-server.service to /usr/lib/systemd/system/nfs-server.service.

#在k8s集群里面挂载
在k8s集群里的任意一个节点服务器上测试能否挂载nfs服务器共享的目录
[root@k8snode1 ~]# mkdir /worker1_nfs
[root@worker1 ~]# mount 192.168.0.36:/web /worker1_nfs
[root@worker1 ~]# df -Th|grep nfs
192.168.0.36:/web       nfs4       50G  3.8G   47G    8% /worker1_nfs
##master
192.168.0.36:/web       nfs4       54G  4.1G   50G    8% /master_nfs
#worker2
[root@worker2 ~]# df -Th|grep nfs
192.168.0.36:/web       nfs4       50G  3.8G   47G    8% /worker2_nfs

##创建pv-pvc目录,存放对整个系统的pv-pvc
[root@master ~]# cd /pv-pvc/
[root@master pv-pvc]# ls
nfs-pvc-yaml  nfs-pv.yaml
[root@master pv-pvc]# kubectl apply -f nfs-pv.yaml
persistentvolume/pv-web created
[root@master pv-pvc]# kubectl apply -f nfs-pvc-yaml
persistentvolumeclaim/pvc-web created
[root@master pv-pvc]# cat nfs-pv.yaml
apiVersion: v1
kind: PersistentVolume
metadata:
  name: pv-web
  labels:
    type: pv-web
spec:
  capacity:
    storage: 10Gi
  accessModes:
    - ReadWriteMany
  storageClassName: nfs         # pv对应的名字
  nfs:
    path: "/web"       # nfs共享的目录
    server: 192.168.0.36   # nfs服务器的ip地址
    readOnly: false   # 访问模式

[root@master pv-pvc]# cat nfs-pvc.yaml
cat: nfs-pvc.yaml: 没有那个文件或目录
[root@master pv-pvc]# cat nfs-pvc-yaml
apiVersion: v1
kind: PersistentVolumeClaim
metadata:
  name: pvc-web
spec:
  accessModes:
  - ReadWriteMany
  resources:
     requests:
       storage: 1Gi
  storageClassName: nfs #使用nfs类型的pv

#效果图
[root@master pv-pvc]# kubectl get pvc
NAME      STATUS   VOLUME   CAPACITY   ACCESS MODES   STORAGECLASS   AGE
pvc-web   Bound    pv-web   10Gi       RWX            nfs            2m44s

##创建pod 使用pvc
[root@master pv-pvc]# cat nginx-deployment.yaml
apiVersion: apps/v1
kind: Deployment
metadata:
  name: nginx-deployment
  labels:
    app: nginx
spec:
  replicas: 3
  selector:
    matchLabels:
      app: nginx
  template:
    metadata:
      labels:
        app: nginx
    spec:
      volumes:
        - name: sc-pv-storage-nfs
          persistentVolumeClaim:
            claimName: pvc-web
      containers:
        - name: sc-pv-container-nfs
          image: nginx
          imagePullPolicy: IfNotPresent
          ports:
            - containerPort: 80
              name: "http-server"
          volumeMounts:
            - mountPath: "/usr/share/nginx/html"
              name: sc-pv-storage-nfs
#启动pod
[root@master pv-pvc]# kubectl apply -f nginx-deployment.yaml
deployment.apps/nginx-deployment created
[root@master pv-pvc]# kubectl get pod -o wide
NAME                               READY   STATUS    RESTARTS   AGE    IP               NODE      NOMINATED NODE   READINESS GATES
nginx-deployment-d4c8d4d89-9spwk   1/1     Running   0          111s   10.224.235.133   worker1   <none>           <none>
nginx-deployment-d4c8d4d89-lk4mb   1/1     Running   0          111s   10.224.189.70    worker2   <none>           <none>
nginx-deployment-d4c8d4d89-ml8l7   1/1     Running   0          111s   10.224.189.69    worker2   <none>           <none>

[root@master pv-pvc]# kubectl apply -f nfs-pv.yaml
persistentvolume/pv-web created
[root@master pv-pvc]# kubectl apply -f nfs-pvc.yaml
persistentvolumeclaim/pvc-web created
[root@master pv-pvc]# kubectl apply -f nginx-deployment.yaml
deployment.apps/nginx-deployment created
[root@master pv-pvc]# kubectl get pod -o wide
NAME                               READY   STATUS    RESTARTS   AGE   IP               NODE      NOMINATED NODE   READINESS GATES
nginx-deployment-d4c8d4d89-2xh6w   1/1     Running   0          12s   10.224.235.134   worker1   <none>           <none>
nginx-deployment-d4c8d4d89-c64c4   1/1     Running   0          12s   10.224.189.71    worker2   <none>           <none>
nginx-deployment-d4c8d4d89-fhvfd   1/1     Running   0          12s   10.224.189.72    worker2   <none>           <none>

##连接测试发现成功了
[root@master pv-pvc]# curl 10.224.235.134
welcome to sanchuang !!! \n
welcome to sanchuang !!!
0000000000000000000000
welcome to sanchuang !!!
welcome to sanchuang !!!
welcome to sanchuang !!!
666666666666666666 !!!
777777777777777777 !!!
5..使用go语言搭建一个简易的镜像,启动nginx,采用HPA技术,当cpu使用率达到60%的时候,进行水平扩缩,最小10个,最多40个pod。
#使用go语言制作简易镜像,上传到本地harbor仓库,让其他的节点下载,启动web服务
[root@harbor harbor]# mkdir go
[root@harbor harbor]# cd go
[root@harbor go]# pwd
/harbor/go
[root@harbor go]# ls
apiserver.tar.gz
[root@harbor go]#
安装go语言的环境
[root@harbor yum.repos.d]# yum install epel-release -y
[root@harbor yum.repos.d]# yum install golang -y
[root@harbor go]# vim server.go
package main

//server.go是主运行文件

import (
    "net/http"
    "github.com/gin-gonic/gin"
)

//gin-->go中的web框架

//入口函数
func main(){
    //创建一个web服务器
    r:=gin.Default()
    // 当访问/sc=>返回{"message":"hello, sanchuang"}
    r.GET("/",func(c *gin.Context){
        //200,返回的数据
        c.JSON(http.StatusOK,gin.H{
            "message":"hello,sanchuanger 2024 nice",
        })
    })

    //运行web服务
    r.Run()
}
[root@harbor go]# cat Dockerfile
FROM centos:7
WORKDIR /go
COPY . /go
RUN ls /go && pwd
ENTRYPOINT ["/go/scweb"]

#上传apiserver,这个是k8s里面的重要组件
[root@harbor go]# ls
apiserver.tar.gz  server.go
[root@harbor go]# vim server.go
[root@harbor go]# go env -w  GOPROXY=https://goproxy.cn,direct
[root@harbor go]# go mod init web
go: creating new go.mod: module web
go: to add module requirements and sums:
	go mod tidy
[root@harbor go]# go mod tidy
go: finding module for package github.com/gin-gonic/gin
go: downloading github.com/gin-gonic/gin v1.9.1
go: found github.com/gin-gonic/gin in github.com/gin-gonic/gin v1.9.1
go: downloading github.com/gin-contrib/sse v0.1.0
go: downloading github.com/mattn/go-isatty v0.0.19
go: downloading golang.org/x/net v0.10.0
go: downloading github.com/stretchr/testify v1.8.3
go: downloading google.golang.org/protobuf v1.30.0
go: downloading github.com/go-playground/validator/v10 v10.14.0
go: downloading github.com/pelletier/go-toml/v2 v2.0.8
go: downloading github.com/ugorji/go/codec v1.2.11
go: downloading gopkg.in/yaml.v3 v3.0.1
go: downloading github.com/bytedance/sonic v1.9.1
go: downloading github.com/goccy/go-json v0.10.2
go: downloading github.com/json-iterator/go v1.1.12
go: downloading golang.org/x/sys v0.8.0
go: downloading github.com/davecgh/go-spew v1.1.1
go: downloading github.com/pmezard/go-difflib v1.0.0
go: downloading github.com/gabriel-vasile/mimetype v1.4.2
go: downloading github.com/go-playground/universal-translator v0.18.1
go: downloading github.com/leodido/go-urn v1.2.4
go: downloading golang.org/x/crypto v0.9.0
go: downloading golang.org/x/text v0.9.0
go: downloading github.com/go-playground/locales v0.14.1
go: downloading github.com/modern-go/reflect2 v1.0.2
go: downloading github.com/modern-go/concurrent v0.0.0-20180306012644-bacd9c7ef1dd
go: downloading github.com/chenzhuoyu/base64x v0.0.0-20221115062448-fe3a3abad311
go: downloading golang.org/x/arch v0.3.0
go: downloading github.com/twitchyliquid64/golang-asm v0.15.1
go: downloading github.com/klauspost/cpuid/v2 v2.2.4
go: downloading github.com/go-playground/assert/v2 v2.2.0
go: downloading github.com/google/go-cmp v0.5.5
go: downloading gopkg.in/check.v1 v0.0.0-20161208181325-20d25e280405
go: downloading golang.org/x/xerrors v0.0.0-20191204190536-9bdfabe68543
[root@harbor go]# go run server.go
[GIN-debug] [WARNING] Creating an Engine instance with the Logger and Recovery middleware already attached.

[GIN-debug] [WARNING] Running in "debug" mode. Switch to "release" mode in production.
 - using env:	export GIN_MODE=release
 - using code:	gin.SetMode(gin.ReleaseMode)

[GIN-debug] GET    /                         --> main.main.func1 (3 handlers)
[GIN-debug] [WARNING] You trusted all proxies, this is NOT safe. We recommend you to set a value.
Please check https://pkg.go.dev/github.com/gin-gonic/gin#readme-don-t-trust-all-proxies for details.
[GIN-debug] Environment variable PORT is undefined. Using port :8080 by default
[GIN-debug] Listening and serving HTTP on :8080

运行代码,默认监听的是8080,这个步骤只是测试我们的server.go能否正常运行
#将这个server.go编写成一个二进制可以执行文件
[root@harbor go]# go build -o k8s-web  .
[root@harbor go]# ls
apiserver.tar.gz  go.mod  go.sum  k8s-web  server.go
##访问测试,表示服务启动

[root@harbor go]# ./k8s-web
[GIN-debug] [WARNING] Creating an Engine instance with the Logger and Recovery middleware already attached.
[GIN-debug] [WARNING] Running in "debug" mode. Switch to "release" mode in production.
- using env: export GIN_MODE=release
- using code: gin.SetMode(gin.ReleaseMode)
[GIN-debug] GET / --> main.main.func1 (3 handlers)
[GIN-debug] [WARNING] You trusted all proxies, this is NOT safe. We recommend you to set a value.
Please check https://pkg.go.dev/github.com/gin-gonic/gin#readme-don-t-trust-all-proxies for details.
[GIN-debug] Environment variable PORT is undefined. Using port :8080 by default
[GIN-debug] Listening and serving HTTP on :8080
[GIN] 2024/04/04 - 12:38:39 | 200 | 120.148?s | 192.168.0.1 | GET "/"
#下面开始制作镜像,打标签,登录harbor仓库,上传,其他节点拉取镜像
[root@harbor go]# cat Dockerfile
FROM centos:7
WORKDIR /harbor/go
COPY  .  /harbor/go
RUN ls  /harbor/go && pwd
ENTRYPOINT ["/harbor/k8s-web"]

[root@harbor go]# docker pull centos:7
7: Pulling from library/centos
2d473b07cdd5: Pull complete
Digest: sha256:9d4bcbbb213dfd745b58be38b13b996ebb5ac315fe75711bd618426a630e0987
Status: Downloaded newer image for centos:7
docker.io/library/centos:7
[root@harbor go]# vim Dockerfile
[root@harbor go]# docker build  -t scmyweb:1.1 .
[+] Building 2.5s (9/9) FINISHED                                                docker:default
 => [internal] load build definition from Dockerfile                                      0.0s
 => => transferring dockerfile: 147B                                                      0.0s
 => [internal] load metadata for docker.io/library/centos:7                               0.0s
 => [internal] load .dockerignore                                                         0.0s
 => => transferring context: 2B                                                           0.0s
 => [1/4] FROM docker.io/library/centos:7                                                 0.0s
 => [internal] load build context                                                         0.1s
 => => transferring context: 295B                                                         0.0s
 => [2/4] WORKDIR /harbor/go                                                              0.4s
 => [3/4] COPY  .  /harbor/go                                                             0.4s
 => [4/4] RUN ls  /harbor/go && pwd                                                       1.4s
 => exporting to image                                                                    0.1s
 => => exporting layers                                                                   0.1s
 => => writing image sha256:fed4a30515b10e9f15c6dd7ba092b553658d3c7a33466bf38a20762bde68  0.0s
 => => naming to docker.io/library/scmyweb:1.1                                            0.0s
[root@harbor go]# docker tag scmyweb:1.1 192.168.0.34:5001/k8s-web/web:v1
[root@harbor go]# docker image ls | grep web
192.168.0.34:5001/k8s-web/web      v1        fed4a30515b1   3 minutes ago   221MB

##将镜像上传到harbor仓库,然后让worker1和worker2来拉取镜像
[root@worker1 ~]# docker pull 192.168.0.34:5001/k8s-web/web:v1
[root@worker2 ~]# docker pull 192.168.0.34:5001/k8s-web/web:v1
#检查一下
[root@worker2 ~]# docker images|grep web
192.168.0.34:5001/k8s-web/web                                                  v1         fed4a
#使用水平扩缩技术
# 采用HPA技术,当cpu使用率达到50%的时候,进行水平扩缩,最小1个,最多10个pod
# HorizontalPodAutoscaler(简称 HPA )自动更新工作负载资源(例如Deployment),目的是自动扩缩# 工作负载以满足需求。
https://kubernetes.io/zh-cn/docs/tasks/run-application/horizontal-pod-autoscale-walkthrough/

# 1.安装metrics server
# 下载components.yaml配置文件
wget https://github.com/kubernetes-sigs/metrics-server/releases/latest/download/components.yaml

# 替换image
        image: registry.aliyuncs.com/google_containers/metrics-server:v0.6.0
        imagePullPolicy: IfNotPresent
        args:
#        // 新增下面两行参数
        - --kubelet-insecure-tls
        - --kubelet-preferred-address-types=InternalDNS,InternalIP,ExternalDNS,ExternalIP,Hostname

[root@master metrics]# docker load -i metrics-server-v0.6.3.tar
d0157aa0c95a: Loading layer  327.7kB/327.7kB
6fbdf253bbc2: Loading layer   51.2kB/51.2kB
1b19a5d8d2dc: Loading layer  3.185MB/3.185MB
ff5700ec5418: Loading layer  10.24kB/10.24kB
d52f02c6501c: Loading layer  10.24kB/10.24kB
e624a5370eca: Loading layer  10.24kB/10.24kB
1a73b54f556b: Loading layer  10.24kB/10.24kB
d2d7ec0f6756: Loading layer  10.24kB/10.24kB
4cb10dd2545b: Loading layer  225.3kB/225.3kB
ebc813d4c836: Loading layer  66.45MB/66.45MB
Loaded image: registry.k8s.io/metrics-server/metrics-server:v0.6.3
[root@master metrics]# vim components.yaml
[root@master mysql]# kubectl top nodes
NAME      CPU(cores)   CPU%   MEMORY(bytes)   MEMORY%
master    343m         17%    1677Mi          45%
worker1   176m         8%     1456Mi          39%
worker2   184m         9%     1335Mi          36%
#部署服务,开启HPA
##创建nginx服务,开启水平扩缩功能最少3个,最多20个,CPU大于70,就开始水平扩缩
[root@master nginx]# kubectl apply -f web-hpa.yaml
deployment.apps/ab-nginx created
service/ab-nginx-svc created
horizontalpodautoscaler.autoscaling/ab-nginx created
[root@master nginx]# cat web-hpa.yaml

apiVersion: apps/v1
kind: Deployment
metadata:
  name: ab-nginx
spec:
  selector:
    matchLabels:
      run: ab-nginx
  template:
    metadata:
      labels:
        run: ab-nginx
    spec:
      #nodeName: node-2 #取消指定
      containers:
      - name: ab-nginx
        image: nginx
        imagePullPolicy: IfNotPresent
        ports:
        - containerPort: 80
        resources:
          limits:
            cpu: 100m
          requests:
            cpu: 50m
---
apiVersion: v1
kind: Service
metadata:
  name: ab-nginx-svc
  labels:
    run: ab-nginx-svc
spec:
  type: NodePort
  ports:
  - port: 80
    targetPort: 80
    nodePort: 31000
  selector:
    run: ab-nginx
---
apiVersion: autoscaling/v1
kind: HorizontalPodAutoscaler
metadata:
  name: ab-nginx
spec:
  scaleTargetRef:
    apiVersion: apps/v1
    kind: Deployment
    name: ab-nginx
  minReplicas: 3
  maxReplicas: 20
  targetCPUUtilizationPercentage: 70

[root@master nginx]# kubectl get deploy
NAME                READY   UP-TO-DATE   AVAILABLE   AGE
ab-nginx            3/3     3            3           2m10s
[root@master nginx]# kubectl get hpa
NAME       REFERENCE             TARGETS         MINPODS   MAXPODS   REPLICAS   AGE
ab-nginx   Deployment/ab-nginx   0%/70%          3         20        3          2m28s
##访问成功
[root@master nginx]# curl 192.168.0.20:31000
<!DOCTYPE html>
<html>
<head>
<title>Welcome to nginx!</title>
<style>
html { color-scheme: light dark; }
body { width: 35em; margin: 0 auto;
font-family: Tahoma, Verdana, Arial, sans-serif; }
</style>
</head>
<body>
<h1>Welcome to nginx!</h1>
<p>If you see this page, the nginx web server is successfully installed and
working. Further configuration is required.</p>

<p>For online documentation and support please refer to
<a href="http://nginx.org/">nginx.org</a>.<br/>
Commercial support is available at
<a href="http://nginx.com/">nginx.com</a>.</p>

<p><em>Thank you for using nginx.</em></p>
</body>
</html>
#开启MySQL的pod,为web业务提供数据库服务支持。
1.编写yaml文件,包括了deployment、service
[root@master ~]# mkdir /mysql
[root@master ~]# cd /mysql/
[root@master mysql]# vim mysql.yaml

apiVersion: apps/v1
kind: Deployment
metadata:
    labels:
        app: mysql
    name: mysql
spec:
    replicas: 1
    selector:
        matchLabels:
            app: mysql
    template:
        metadata:
            labels:
                app: mysql
        spec:
            containers:
            - image: mysql:latest
              name: mysql
              imagePullPolicy: IfNotPresent
              env:
              - name: MYSQL_ROOT_PASSWORD
                value: "123456"  #mysql的密码
              ports:
              - containerPort: 3306
---
apiVersion: v1
kind: Service
metadata:
  labels:
    app: svc-mysql
  name: svc-mysql
spec:
  selector:
    app: mysql
  type: NodePort
  ports:
  - port: 3306
    protocol: TCP
    targetPort: 3306
    nodePort: 30007

2.部署
[root@master mysql]# kubectl apply -f mysql.yaml
deployment.apps/mysql created
service/svc-mysql created
[root@master mysql]# kubectl get svc
NAME         TYPE        CLUSTER-IP      EXTERNAL-IP   PORT(S)          AGE
kubernetes   ClusterIP   10.96.0.1       <none>        443/TCP          23h
php-apache   ClusterIP   10.96.134.145   <none>        80/TCP           21h
svc-mysql    NodePort    10.109.190.20   <none>        3306:30007/TCP   9s
[root@master mysql]# kubectl  get pod
NAME                                READY   STATUS              RESTARTS      AGE
mysql-597ff9595d-tzqzl              0/1     ContainerCreating   0             27s
nginx-deployment-794d8c5666-dsxkq   1/1     Running             1 (15m ago)   22h
nginx-deployment-794d8c5666-fsctm   1/1     Running             1 (15m ago)   22h
nginx-deployment-794d8c5666-spkzs   1/1     Running             1 (15m ago)   22h
php-apache-7b9f758896-2q44p         1/1     Running             1 (15m ago)   21h

[root@master mysql]# kubectl exec -it mysql-597ff9595d-tzqzl    -- bash
root@mysql-597ff9595d-tzqzl:/# mysql -uroot -p123456    #容器内部进入mysql

mysql: [Warning] Using a password on the command line interface can be insecure.
Welcome to the MySQL monitor.  Commands end with ; or \g.
Your MySQL connection id is 8
Server version: 8.0.27 MySQL Community Server - GPL

Copyright (c) 2000, 2021, Oracle and/or its affiliates.

Oracle is a registered trademark of Oracle Corporation and/or its
affiliates. Other names may be trademarks of their respective
owners.

Type 'help;' or '\h' for help. Type '\c' to clear the current input statement.

mysql>
5.构建CI/CD环境,安装gitlab、Jenkins、harbor实现相关的代码发布、镜像制作、数据备份等流水线工作
#配置gitlub服务器
[root@localhost ~]# hostnamectl set-hostname gitlab
[root@localhost ~]# su
[root@gitlab ~]#
#部署过程
# 1.安装和配置必须的依赖项
yum install -y curl policycoreutils-python openssh-server perl

# 2.配置极狐GitLab 软件源镜像
[root@gitlab ~]# curl -fsSL https://packages.gitlab.cn/repository/raw/scripts/setup.sh | /bin/bash
==> Detected OS centos

==> Add yum repo file to /etc/yum.repos.d/gitlab-jh.repo

[gitlab-jh]
name=JiHu GitLab
baseurl=https://packages.gitlab.cn/repository/el/$releasever/
gpgcheck=0
gpgkey=https://packages.gitlab.cn/repository/raw/gpg/public.gpg.key
priority=1
enabled=1

==> Generate yum cache for gitlab-jh

==> Successfully added gitlab-jh repo. To install JiHu GitLab, run "sudo yum/dnf install gitlab-jh".

[root@gitlab ~]# yum install gitlab-jh -y
Thank you for installing JiHu GitLab!
GitLab was unable to detect a valid hostname for your instance.
Please configure a URL for your JiHu GitLab instance by setting `external_url`
configuration in /etc/gitlab/gitlab.rb file.
Then, you can start your JiHu GitLab instance by running the following command:
  sudo gitlab-ctl reconfigure

For a comprehensive list of configuration options please see the Omnibus GitLab readme
https://jihulab.com/gitlab-cn/omnibus-gitlab/-/blob/main-jh/README.md

Help us improve the installation experience, let us know how we did with a 1 minute survey:
https://wj.qq.com/s2/10068464/dc66

[root@gitlab ~]# vim /etc/gitlab/gitlab.rb
external_url 'http://myweb.first.com'

[root@gitlab ~]# gitlab-ctl reconfigure
Notes:
Default admin account has been configured with following details:
Username: root
Password: You didn't opt-in to print initial root password to STDOUT.
Password stored to /etc/gitlab/initial_root_password. This file will be cleaned up in first reconfigure run after 24 hours.
NOTE: Because these credentials might be present in your log files in plain text, it is highly recommended to reset the password following https://docs.gitlab.com/ee/security/reset_user_password.html#reset-your-root-password.
gitlab Reconfigured!
# 查看密码
[root@gitlab ~]# cat /etc/gitlab/initial_root_password
# WARNING: This value is valid only in the following conditions
#          1. If provided manually (either via `GITLAB_ROOT_PASSWORD` environment variable or via `gitlab_rails['initial_root_password']` setting in `gitlab.rb`, it was provided before database was seeded for the first time (usually, the first reconfigure run).
#          2. Password hasn't been changed manually, either via UI or via command line.
#
#          If the password shown here doesn't work, you must reset the admin password following https://docs.gitlab.com/ee/security/reset_user_password.html#reset-your-root-password.

Password: mzYlWEzJG6nzbExL6L25J7jhbup0Ye8QFldcD/rXNqg=

# NOTE: This file will be automatically deleted in the first reconfigure run after 24 hours.

# 可以登录后修改语言为中文
# 用户的profile/preferences

# 修改密码

[root@gitlab ~]# gitlab-rake gitlab:env:info

System information
System:
Proxy:      no
Current User:   git
Using RVM:  no
Ruby Version:   3.0.6p216
Gem Version:    3.4.13
Bundler Version:2.4.13
Rake Version:   13.0.6
Redis Version:  6.2.11
Sidekiq Version:6.5.7
Go Version: unknown

GitLab information
Version:    16.0.4-jh
Revision:   c2ed99db36f
Directory:  /opt/gitlab/embedded/service/gitlab-rails
DB Adapter: PostgreSQL
DB Version: 13.11
URL:        http://myweb.first.com
HTTP Clone URL: http://myweb.first.com/some-group/some-project.git
SSH Clone URL:  git@myweb.first.com:some-group/some-project.git
Elasticsearch:  no
Geo:        no
Using LDAP: no
Using Omniauth: yes
Omniauth Providers:

GitLab Shell
Version:    14.20.0
Repository storages:
- default:  unix:/var/opt/gitlab/gitaly/gitaly.socket
GitLab Shell path:      /opt/gitlab/embedded/service/gitlab-shell
部署Jenkins
# Jenkins部署到k8s里
# 1.安装git软件
[root@master jenkins]# yum install git -y

# 2.下载相关的yaml文件
[root@master jenkins]# git clone https://github.com/scriptcamp/kubernetes-jenkins
正克隆到 'kubernetes-jenkins'...
remote: Enumerating objects: 16, done.
remote: Counting objects: 100% (7/7), done.
remote: Compressing objects: 100% (7/7), done.
remote: Total 16 (delta 1), reused 0 (delta 0), pack-reused 9
Unpacking objects: 100% (16/16), done.
[root@k8smaster jenkins]# ls
kubernetes-jenkins
[root@master jenkins]# cd kubernetes-jenkins/
[root@master kubernetes-jenkins]# ls
deployment.yaml  namespace.yaml  README.md  serviceAccount.yaml  service.yaml  volume.yaml

# 3.创建命名空间
[root@master kubernetes-jenkins]# cat namespace.yaml
apiVersion: v1 kubectl apply -f namespace.yaml
kind: Namespace
metadata:
  name: devops-tools
[root@master kubernetes-jenkins]# kubectl apply -f namespace.yaml
namespace/devops-tools created

[root@master kubernetes-jenkins]# kubectl get ns
NAME                   STATUS   AGE
default                Active   22h
devops-tools           Active   19s
ingress-nginx          Active   139m
kube-node-lease        Active   22h
kube-public            Active   22h
kube-system            Active   22h

# 4.创建服务账号,集群角色,绑定
[root@k8smaster kubernetes-jenkins]# cat serviceAccount.yaml
---
apiVersion: rbac.authorization.k8s.io/v1
kind: ClusterRole
metadata:
  name: jenkins-admin
rules:
  - apiGroups: [""]
    resources: ["*"]
    verbs: ["*"]

---
apiVersion: v1
kind: ServiceAccount
metadata:
  name: jenkins-admin
  namespace: devops-tools

---
apiVersion: rbac.authorization.k8s.io/v1
kind: ClusterRoleBinding
metadata:
  name: jenkins-admin
roleRef:
  apiGroup: rbac.authorization.k8s.io
  kind: ClusterRole
  name: jenkins-admin
subjects:
- kind: ServiceAccount
  name: jenkins-admin

[root@k8smaster kubernetes-jenkins]# kubectl apply -f serviceAccount.yaml
clusterrole.rbac.authorization.k8s.io/jenkins-admin created
serviceaccount/jenkins-admin created
clusterrolebinding.rbac.authorization.k8s.io/jenkins-admin created

# 5.创建卷,用来存放数据
[root@k8smaster kubernetes-jenkins]# cat volume.yaml
kind: StorageClass
apiVersion: storage.k8s.io/v1
metadata:
  name: local-storage
provisioner: kubernetes.io/no-provisioner
volumeBindingMode: WaitForFirstConsumer

---
apiVersion: v1
kind: PersistentVolume
metadata:
  name: jenkins-pv-volume
  labels:
    type: local
spec:
  storageClassName: local-storage
  claimRef:
    name: jenkins-pv-claim
    namespace: devops-tools
  capacity:
    storage: 10Gi
  accessModes:
    - ReadWriteOnce
  local:
    path: /mnt
  nodeAffinity:
    required:
      nodeSelectorTerms:
      - matchExpressions:
        - key: kubernetes.io/hostname
          operator: In
          values:
          - k8snode1   # 需要修改为k8s里的node节点的名字

---
apiVersion: v1
kind: PersistentVolumeClaim
metadata:
  name: jenkins-pv-claim
  namespace: devops-tools
spec:
  storageClassName: local-storage
  accessModes:
    - ReadWriteOnce
  resources:
    requests:
      storage: 3Gi

[root@k8smaster kubernetes-jenkins]# kubectl apply -f volume.yaml
storageclass.storage.k8s.io/local-storage created
persistentvolume/jenkins-pv-volume created
persistentvolumeclaim/jenkins-pv-claim created

[root@k8smaster kubernetes-jenkins]# kubectl get pv
NAME                CAPACITY   ACCESS MODES   RECLAIM POLICY   STATUS   CLAIM                           STORAGECLASS    REASON   AGE
jenkins-pv-volume   10Gi       RWO            Retain           Bound    devops-tools/jenkins-pv-claim   local-storage            33s
pv-web              10Gi       RWX            Retain           Bound    default/pvc-web                 nfs                      21h

[root@k8smaster kubernetes-jenkins]# kubectl describe pv jenkins-pv-volume
Name:              jenkins-pv-volume
Labels:            type=local
Annotations:       <none>
Finalizers:        [kubernetes.io/pv-protection]
StorageClass:      local-storage
Status:            Bound
Claim:             devops-tools/jenkins-pv-claim
Reclaim Policy:    Retain
Access Modes:      RWO
VolumeMode:        Filesystem
Capacity:          10Gi
Node Affinity:
  Required Terms:
    Term 0:        kubernetes.io/hostname in [k8snode1]
Message:
Source:
    Type:  LocalVolume (a persistent volume backed by local storage on a node)
    Path:  /mnt
Events:    <none>

# 6.部署Jenkins
[root@k8smaster kubernetes-jenkins]# cat deployment.yaml
apiVersion: apps/v1
kind: Deployment
metadata:
  name: jenkins
  namespace: devops-tools
spec:
  replicas: 1
  selector:
    matchLabels:
      app: jenkins-server
  template:
    metadata:
      labels:
        app: jenkins-server
    spec:
      securityContext:
            fsGroup: 1000
            runAsUser: 1000
      serviceAccountName: jenkins-admin
      containers:
        - name: jenkins
          image: jenkins/jenkins:lts
          imagePullPolicy: IfNotPresent
          resources:
            limits:
              memory: "2Gi"
              cpu: "1000m"
            requests:
              memory: "500Mi"
              cpu: "500m"
          ports:
            - name: httpport
              containerPort: 8080
            - name: jnlpport
              containerPort: 50000
          livenessProbe:
            httpGet:
              path: "/login"
              port: 8080
            initialDelaySeconds: 90
            periodSeconds: 10
            timeoutSeconds: 5
            failureThreshold: 5
          readinessProbe:
            httpGet:
              path: "/login"
              port: 8080
            initialDelaySeconds: 60
            periodSeconds: 10
            timeoutSeconds: 5
            failureThreshold: 3
          volumeMounts:
            - name: jenkins-data
              mountPath: /var/jenkins_home
      volumes:
        - name: jenkins-data
          persistentVolumeClaim:
              claimName: jenkins-pv-claim

[root@k8smaster kubernetes-jenkins]# kubectl apply -f deployment.yaml
deployment.apps/jenkins created

[root@k8smaster kubernetes-jenkins]# kubectl get deploy -n devops-tools
NAME      READY   UP-TO-DATE   AVAILABLE   AGE
jenkins   1/1     1            1           5m36s

[root@k8smaster kubernetes-jenkins]# kubectl get pod -n devops-tools
NAME                       READY   STATUS    RESTARTS   AGE
jenkins-7fdc8dd5fd-bg66q   1/1     Running   0          19s

# 7.启动服务发布Jenkins的pod
[root@k8smaster kubernetes-jenkins]# cat service.yaml
apiVersion: v1
kind: Service
metadata:
  name: jenkins-service
  namespace: devops-tools
  annotations:
      prometheus.io/scrape: 'true'
      prometheus.io/path:   /
      prometheus.io/port:   '8080'
spec:
  selector:
    app: jenkins-server
  type: NodePort
  ports:
    - port: 8080
      targetPort: 8080
      nodePort: 32000

[root@k8smaster kubernetes-jenkins]# kubectl apply -f service.yaml
service/jenkins-service created

[root@k8smaster kubernetes-jenkins]# kubectl get svc -n devops-tools
NAME              TYPE       CLUSTER-IP      EXTERNAL-IP   PORT(S)          AGE
jenkins-service   NodePort   10.104.76.252   <none>        8080:32000/TCP   24s

# 8.在Windows机器上访问Jenkins,宿主机ip+端口号
http://192.168.0.20:32000

# 9.进入pod里获取登录的密码
[root@master kubernetes-jenkins]# kubectl exec -it jenkins-b96f7764f-znvfj -n devops-tools  -- bash
jenkins@jenkins-b96f7764f-znvfj:/$ cat /var/jenkins_home/secrets/initialAdminPassword
bbb283b8dc35449bbdb3d6824f12446c

# 修改密码

[root@k8smaster kubernetes-jenkins]# kubectl get pod -n devops-tools
NAME                       READY   STATUS    RESTARTS   AGE
jenkins-7fdc8dd5fd-5nn7m   1/1     Running   0          91s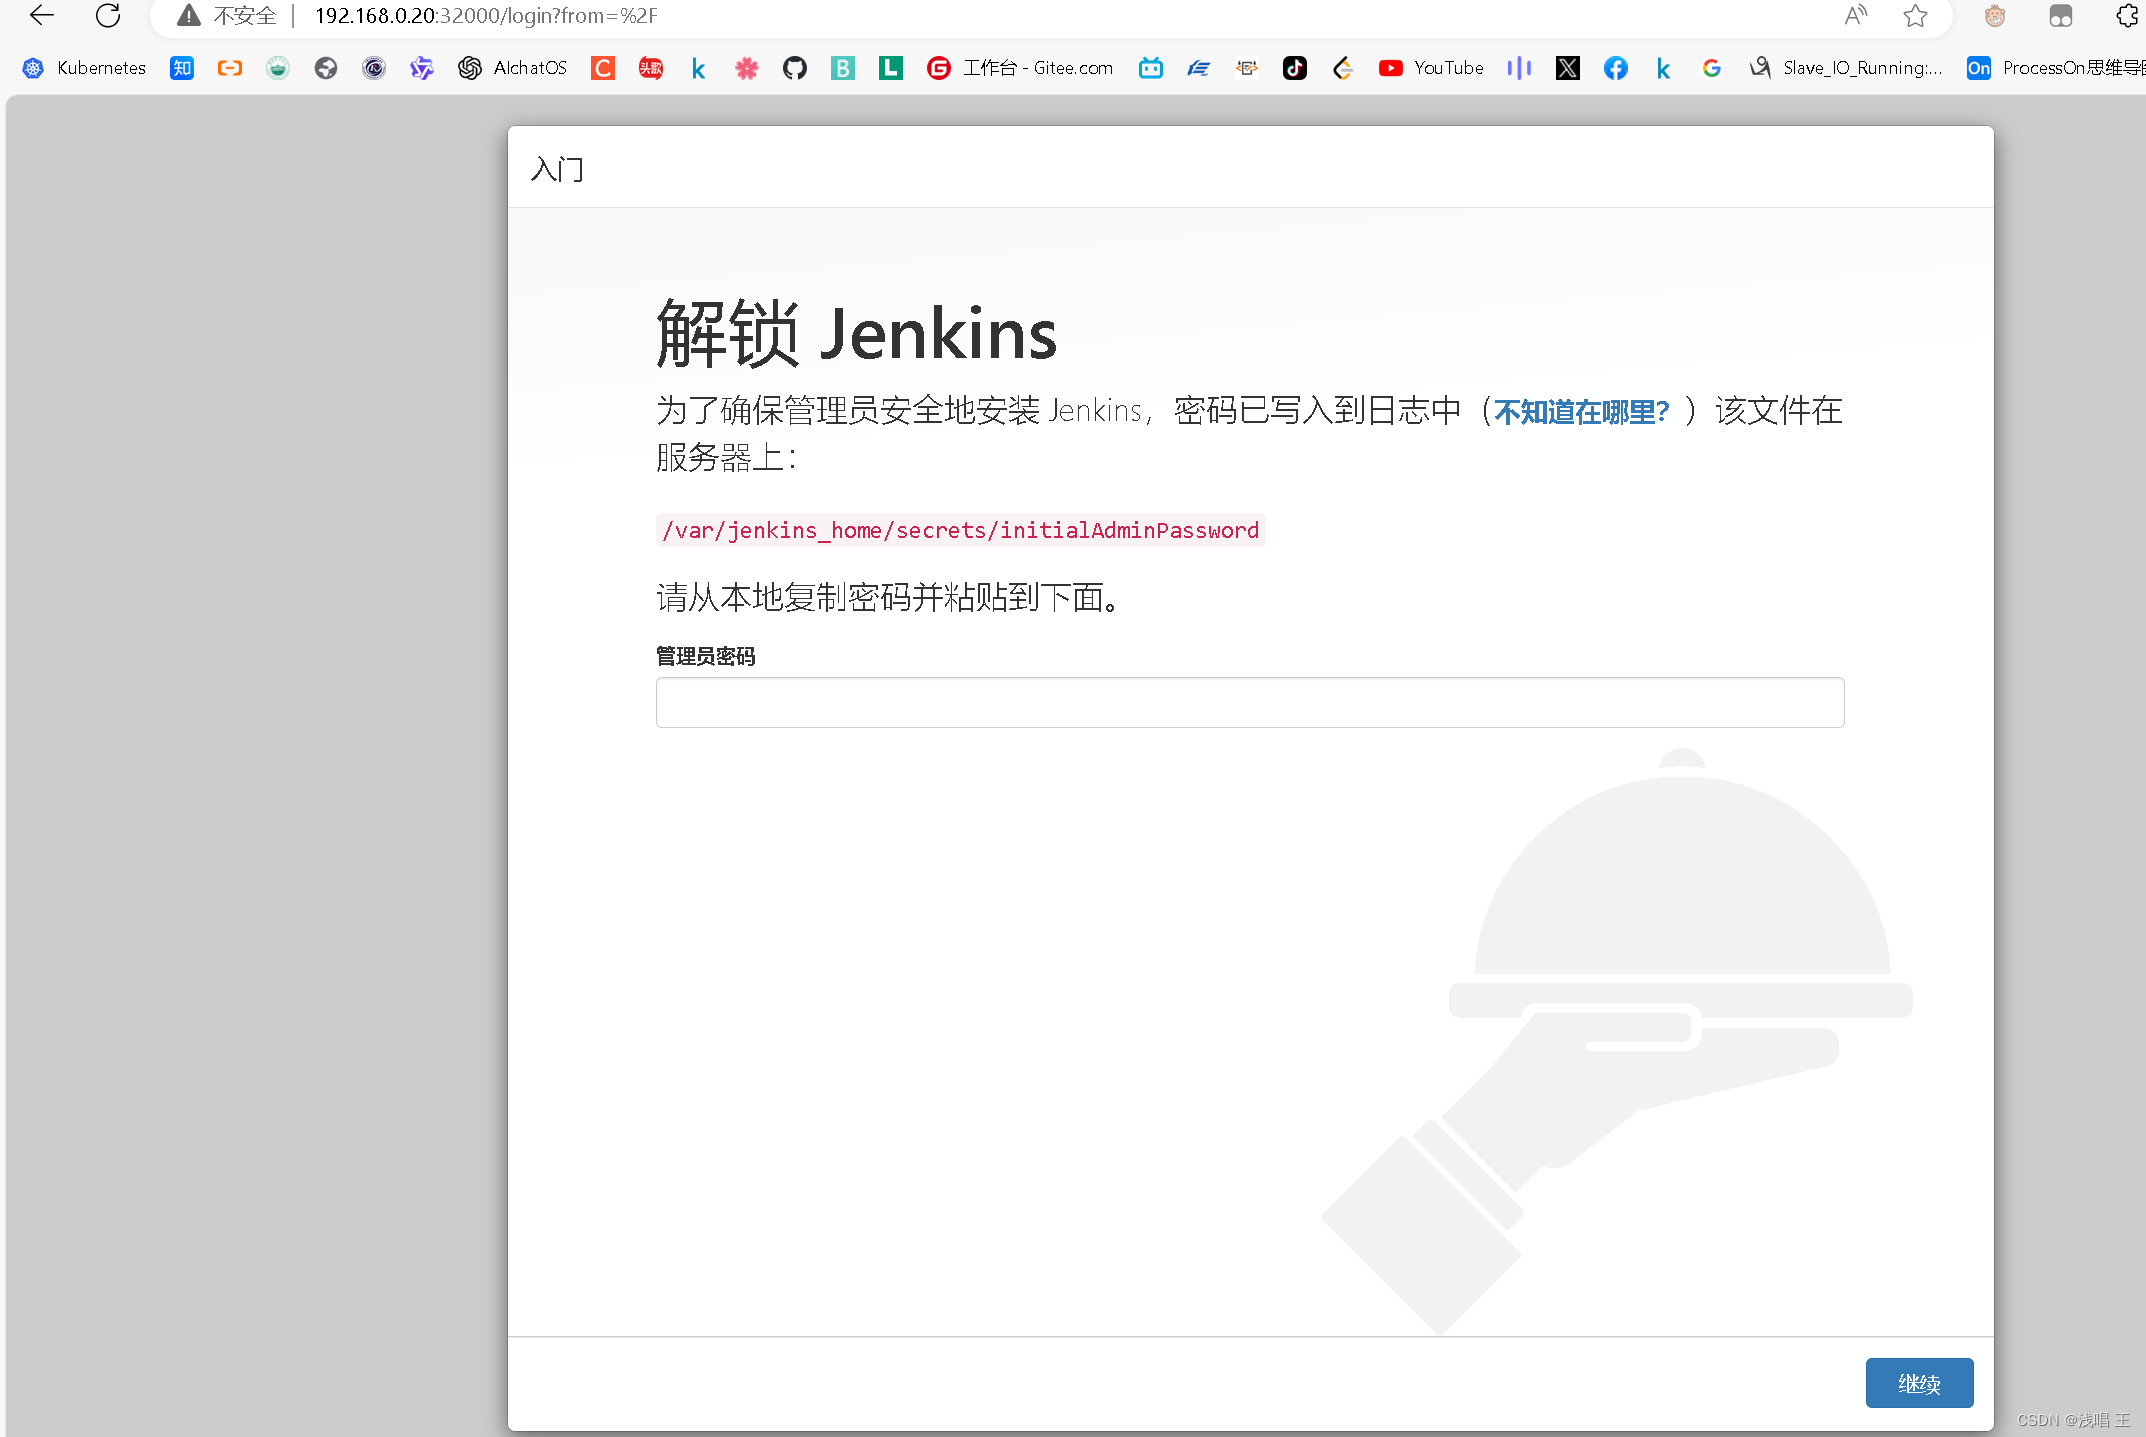
出现这个图片表是你安装成功
#接下来部署harbor
[root@harbor ~]# yum install -y yum-utils
[root@harbor ~]# yum-config-manager --add-repo http://mirrors.aliyun.com/docker-ce/linux/centos/docker-ce.repo
[root@harbor ~]# yum install docker-ce-20.10.6 -y
[root@harbor ~]# systemctl start docker && systemctl enable docker.service
Created symlink from /etc/systemd/system/multi-user.target.wants/docker.service to /usr/lib/systemd/system/docker.service.
查看docker版本,docker compose版本
[root@harbor ~]# docker version
Client: Docker Engine - Community
 Version:           24.0.2
 API version:       1.41 (downgraded from 1.43)
 Go version:        go1.20.4
 Git commit:        cb74dfc
 Built:             Thu May 25 21:55:21 2023
 OS/Arch:           linux/amd64
 Context:           default
[root@harbor ~]# docker compose version
Docker Compose version v2.25.0
##开始安装harbor
[root@harbor harbor]# vim harbor.yml.tmpl
# Configuration file of Harbor

# The IP address or hostname to access admin UI and registry service.
# DO NOT use localhost or 127.0.0.1, because Harbor needs to be accessed by external clients.
hostname: 192.168.0.34

# http related config
http:
  # port for http, default is 80. If https enabled, this port will redirect to https port
  port: 123

# https related config
#https:
  # https port for harbor, default is 443
 # port: 1234
  # The path of cert and key files for nginx
  #certificate: /your/certificate/path
  #private_key: /your/private/key/path

##注意要把https的部分注释掉,不然会出问题
# 配置开机自启
[root@harbor harbor]# vim /etc/rc.local
[root@harbor harbor]# cat /etc/rc.local
#!/bin/bash
# THIS FILE IS ADDED FOR COMPATIBILITY PURPOSES
#
# It is highly advisable to create own systemd services or udev rules
# to run scripts during boot instead of using this file.
#
# In contrast to previous versions due to parallel execution during boot
# this script will NOT be run after all other services.
#
# Please note that you must run 'chmod +x /etc/rc.d/rc.local' to ensure
# that this script will be executed during boot.

touch /var/lock/subsys/local
/usr/local/sbin/docker-compose -f /root/harbor/harbor/docker-compose.yml up -d


# 设置权限
[root@harbor harbor]# chmod +x /etc/rc.local /etc/rc.d/rc.local
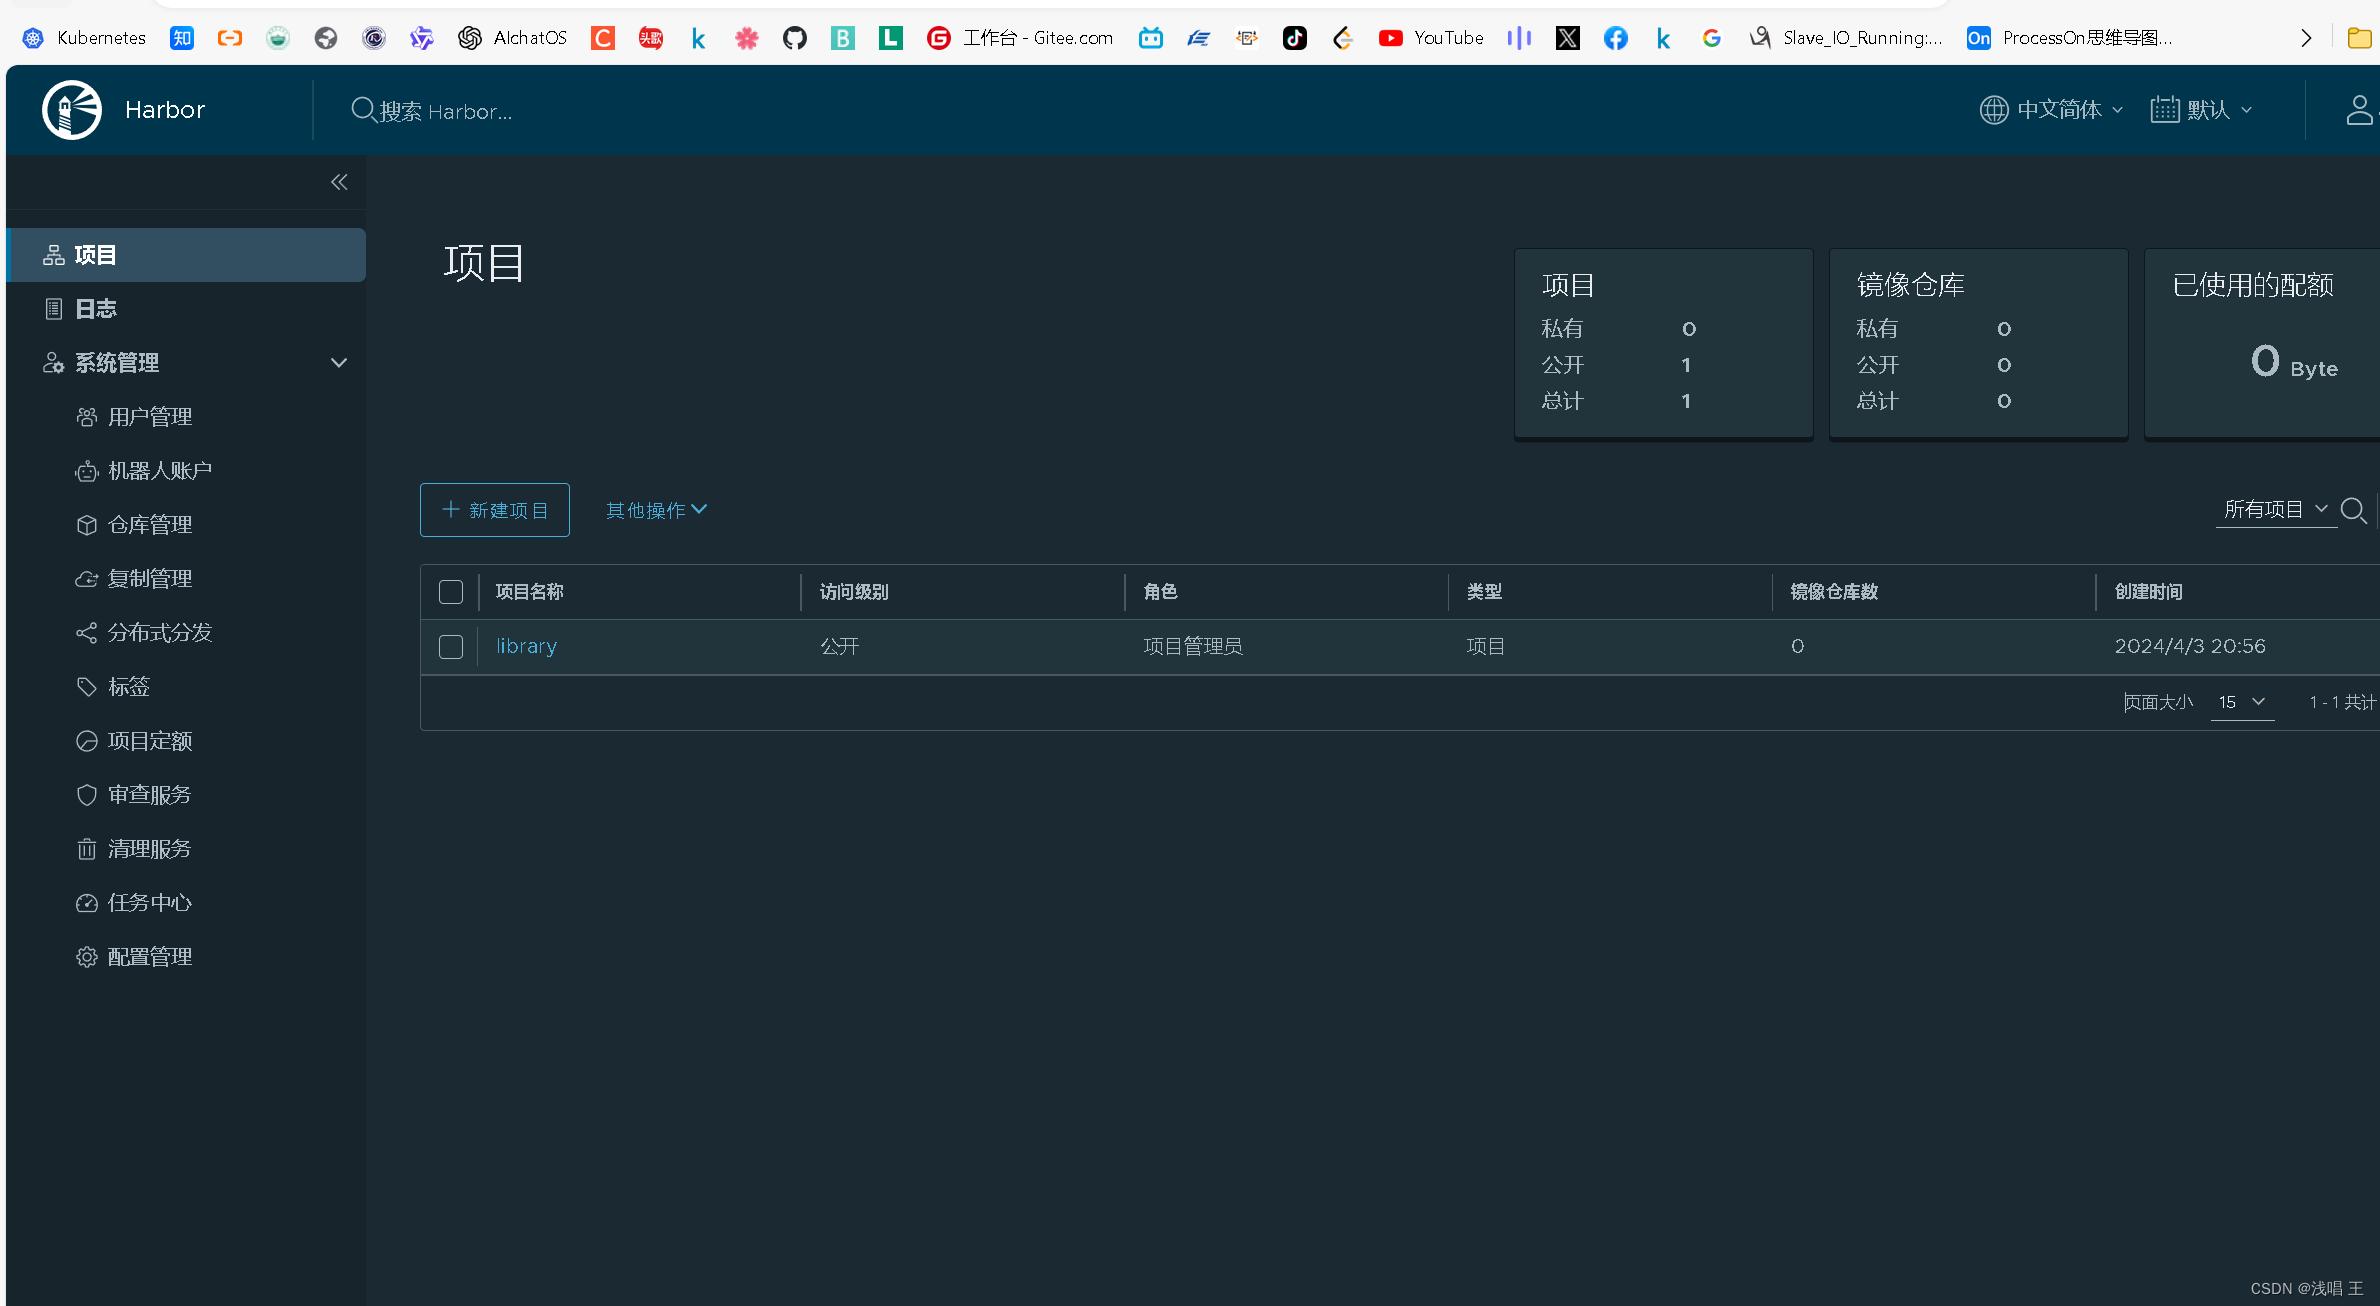

添加harbor仓库到k8s集群上
master机器:
[root@master ~]# vim /etc/docker/daemon.json
{
  "registry-mirrors": ["https://ruk1gp3w.mirror.aliyuncs.com"],
  "insecure-registries" : ["192.168.0.34:5001"]
}
然后重启docker
[root@master ~]# systemctl daemon-reload
[root@master ~]# systemctl restart docker

worker1机器:
[root@worker1 ~]# vim /etc/docker/daemon.json
{
  "registry-mirrors": ["https://ruk1gp3w.mirror.aliyuncs.com"],
  "insecure-registries" : ["192.168.0.34:5001"]
}
然后重启docker
[root@worker1~]# systemctl daemon-reload
[root@worker1 ~]# systemctl restart docker
worker2机器:
[root@worker2 ~]# vim /etc/docker/daemon.json
{
  "registry-mirrors": ["https://ruk1gp3w.mirror.aliyuncs.com"],
  "insecure-registries" : ["192.168.0.34:5001"]
}
然后重启docker
[root@mworker2 ~]# systemctl daemon-reload
[root@worker2~]# systemctl restart docker
简单测试harbor仓库是否可以使用
[root@master ~]# docker login 192.168.0.34:5001
Authenticating with existing credentials...
WARNING! Your password will be stored unencrypted in /root/.docker/config.json.
Configure a credential helper to remove this warning. See
https://docs.docker.com/engine/reference/commandline/login/#credentials-store

Login Succeeded
1.编写yaml文件,包括了deployment、service
[root@master ~]# cd service/
[root@master service]# ls
mysql  nginx
[root@master service]# cd mysql/
[root@master mysql]# ls
[root@master mysql]# vim mysql.yaml
[root@master mysql]# ls
mysql.yaml
[root@master mysql]# docker pull mysql:latest
latest: Pulling from library/mysql
72a69066d2fe: Pull complete
93619dbc5b36: Pull complete
99da31dd6142: Pull complete
626033c43d70: Pull complete
37d5d7efb64e: Pull complete
ac563158d721: Pull complete
d2ba16033dad: Pull complete
688ba7d5c01a: Pull complete
00e060b6d11d: Pull complete
1c04857f594f: Pull complete
4d7cfa90e6ea: Pull complete
e0431212d27d: Pull complete
Digest: sha256:e9027fe4d91c0153429607251656806cc784e914937271037f7738bd5b8e7709
Status: Downloaded newer image for mysql:latest
docker.io/library/mysql:latest
[root@master mysql]# cat mysql.yaml
apiVersion: apps/v1
kind: Deployment
metadata:
    labels:
        app: mysql
    name: mysql
spec:
    replicas: 1
    selector:
        matchLabels:
            app: mysql
    template:
        metadata:
            labels:
                app: mysql
        spec:
            containers:
            - image: mysql:latest
              name: mysql
              imagePullPolicy: IfNotPresent
              env:
              - name: MYSQL_ROOT_PASSWORD
                value: "123456"  #mysql的密码
              ports:
              - containerPort: 3306
---
apiVersion: v1
kind: Service
metadata:
  labels:
    app: svc-mysql
  name: svc-mysql
spec:
  selector:
    app: mysql
  type: NodePort
  ports:
  - port: 3306 #服务的端口,服务映射到集群里面的端口
    protocol: TCP
    targetPort: 3306 #pod映射端口
    nodePort: 30007 #宿主机的端口,服务暴露在外面的端口


2.部署
[root@master mysql]# kubectl apply -f mysql.yaml
deployment.apps/mysql created
service/svc-mysql created
[root@master mysql]# kubectl get svc
NAME         TYPE        CLUSTER-IP       EXTERNAL-IP   PORT(S)          AGE
kubernetes   ClusterIP   10.96.0.1        <none>        443/TCP          37h
svc-mysql    NodePort    10.110.192.240   <none>        3306:30007/TCP   9s
[root@master mysql]# kubectl  get pod
NAME                               READY   STATUS              RESTARTS      AGE
mysql-597ff9595d-lhsgp             0/1     ContainerCreating   0             56s
nginx-deployment-d4c8d4d89-2xh6w   1/1     Running             2 (15h ago)   20h
nginx-deployment-d4c8d4d89-c64c4   1/1     Running             2 (15h ago)   20h
nginx-deployment-d4c8d4d89-fhvfd   1/1     Running             2 (15h ago)   20h


[root@master mysql]# kubectl exec -it mysql-597ff9595d-lhsgp     -- bash
root@mysql-597ff9595d-tzqzl:/# mysql -uroot -p123456    #容器内部进入mysql

mysql: [Warning] Using a password on the command line interface can be insecure.
Welcome to the MySQL monitor.  Commands end with ; or \g.
Your MySQL connection id is 8
Server version: 8.0.27 MySQL Community Server - GPL

Copyright (c) 2000, 2021, Oracle and/or its affiliates.

Oracle is a registered trademark of Oracle Corporation and/or its
affiliates. Other names may be trademarks of their respective
owners.

Type 'help;' or '\h' for help. Type '\c' to clear the current input statement.

mysql> 7.部署promethues+grafana对集群里的所有服务器(cpu,内存,网络带宽,磁盘IO等)进行常规性能监控,包括k8s集群节点服务器。
prometheus监控系统,grafana出图
监控对象:master,worker1,worker2,nfs服务器,gitlab服务器,harbor服务器,
ansible中控机
提前下载prometheus监控系统所需要的软件#准备工作
[root@prometheus ~]# mkdir /prom
[root@prometheus ~]# cd /prom
[root@prometheus prom]# ls
grafana-enterprise-9.1.2-1.x86_64.rpm prometheus-2.43.0.linux-amd64.tar.gz
node_exporter-1.4.0-rc.0.linux-amd64.tar.gz
[root@prometheus prom]# tar xf prometheus-2.43.0.linux-amd64.tar.gz
[root@prometheus prom]# ls
grafana-enterprise-9.1.2-1.x86_64.rpm prometheus-2.43.0.linux-amd64
node_exporter-1.4.0-rc.0.linux-amd64.tar.gz prometheus-2.43.0.linux-amd64.tar.gz
[root@prometheus prom]# mv prometheus-2.43.0.linux-amd64 prometheus
[root@prometheus prom]# ls
grafana-enterprise-9.1.2-1.x86_64.rpm prometheus
node_exporter-1.4.0-rc.0.linux-amd64.tar.gz prometheus-2.43.0.linux-amd64.tar.gz
临时和永久修改PATH变量,添加prometheus的路径
[root@prometheus prom]# PATH=/prom/prometheus:$PATH
[root@prometheus prom]# echo 'PATH=/prom/prometheus:$PATH' >>/etc/profile
[root@prometheus prom]# which prometheus
/prom/prometheus/prometheus
把prometheus做成一个服务来进行管理,非常方便日后维护和使用
[root@prometheus prom]# vim /usr/lib/systemd/system/prometheus.service
[Unit]
Description=prometheus
[Service]
ExecStart=/prom/prometheus/prometheus --config.file=/prom/prometheus/prometheus.yml
ExecReload=/bin/kill -HUP $MAINPID
KillMode=process
Restart=on-failure
[Install]
WantedBy=multi-user.target
重新加载systemd相关的服务,识别Prometheus服务的配置文件
[root@prometheus prom]# systemctl daemon-reload
[root@prometheus prom]#
启动Prometheus服务
[root@prometheus prom]# systemctl start prometheus
[root@prometheus prom]# systemctl restart prometheus
[root@prometheus prom]# ps aux|grep prome
root 2166 1.1 3.7 798956 37588 ? Ssl 13:53 0:00 /prom/prometheus/prometheus --config.file=/prom/prometheus/prometheus.yml
root 2175 0.0 0.0 112824 976 pts/0 S+ 13:53 0:00 grep --color=auto prome
#设置开启启动
[root@prometheus prom]# systemctl enable prometheus
Created symlink from /etc/systemd/system/multi-user.target.wants/prometheus.service to /usr/lib/systemd/system/prometheus.service.
[root@prometheus prom]# ip a
1: lo: <LOOPBACK,UP,LOWER_UP> mtu 65536 qdisc noqueue state UNKNOWN group default qlen 1000
link/loopback 00:00:00:00:00:00 brd 00:00:00:00:00:00
inet 127.0.0.1/8 scope host lo
valid_lft forever preferred_lft forever
inet6 ::1/128 scope host
valid_lft forever preferred_lft forever
2: ens33: <BROADCAST,MULTICAST,UP,LOWER_UP> mtu 1500 qdisc pfifo_fast state UP group default qlen 1000
link/ether 00:0c:29:37:86:3b brd ff:ff:ff:ff:ff:ff
inet 192.168.0.33/24 brd 192.168.0.255 scope global noprefixroute ens33
valid_lft forever preferred_lft forever
#修改prometheus,yml文件
- job_name: "prometheus"
static_configs:
- targets: ["192.168.0.33:9090"]
- job_name: "master"
static_configs:
- targets: ["192.168.0.20:9090"]
- job_name: "worker1"
static_configs:
- targets: ["192.168.0.21:9090"]
- job_name: "worker2"
static_configs:
- targets: ["192.168.0.22:9090"]
- job_name: "ansible"
static_configs:
- targets: ["192.168.0.30:9090"]
- job_name: "gitlab"
static_configs:
- targets: ["192.168.0.35:9090"]
- job_name: "harbor"
static_configs:
- targets: ["192.168.0.34:9090"]
- job_name: "nfs"
static_configs:
- targets: ["192.168.0.36:9090"]
安装exporter
~
使用xftp工具上传node_exporter软件,也可以使用ansible上传到被监控的服务器上
[root@prometheus prom]# scp ./node_exporter-1.4.0-rc.0.linux-amd64.tar.gz 192.168.0.30:/root
The authenticity of host '192.168.0.30 (192.168.0.30)' can't be established.
ECDSA key fingerprint is SHA256:xactOuiFsm9merQVjdeiV4iZwI4rXUnviFYTXL2h8fc.
ECDSA key fingerprint is MD5:69:58:6b:ab:c4:8c:27:e2:b2:7c:31:bb:63:20:81:61.
Are you sure you want to continue connecting (yes/no)? yes
Warning: Permanently added '192.168.0.30' (ECDSA) to the list of known hosts.
root@192.168.0.30's password:
node_exporter-1.4.0-rc.0.linux-amd64.tar.gz 100% 9507KB 40.0MB/s 00:00
[root@ansible ~]# ls
anaconda-ks.cfg node_exporter-1.4.0-rc.0.linux-amd64.tar.gz
#检查进程是否启动
[root@master ~]# ps -aux|grep node
root 2231 2.7 2.2 828488 85208 ? Ssl 11:48 4:12 kue --authentication-kubeconfig=/etc/kubernetes/controller-manager.conntroller-manager.conf --bind-address=127.0.0.1 --client-ca-file=/etc0/16 --cluster-name=kubernetes --cluster-signing-cert-file=/etc/kubetc/kubernetes/pki/ca.key --controllers=*,bootstrapsigner,tokencleaneer.conf --leader-elect=true --requestheader-client-ca-file=/etc/kubetc/kubernetes/pki/ca.crt --service-account-private-key-file=/etc/kub0.96.0.0/12 --use-service-account-credentials=true
root 3403 0.0 0.0 4236 416 ? Ss 11:49 0:00 ru
root 3408 2.8 1.2 1672716 47712 ? Sl 11:49 4:22 ca
root 3409 0.0 1.0 1524740 41652 ? Sl 11:49 0:01 ca
root 3410 0.0 0.9 1156080 36288 ? Sl 11:49 0:00 ca
root 3411 0.0 0.9 1155824 36972 ? Sl 11:49 0:00 ca
root 3413 0.0 1.0 1156080 39968 ? Sl 11:49 0:00 ca
root 3414 0.0 0.8 1229812 34732 ? Sl 11:49 0:00 ca
root 121582 0.1 0.4 717696 16676 ? Ssl 14:20 0:00 /n 0.0.0.0:9090
##访问本机的9090端口就行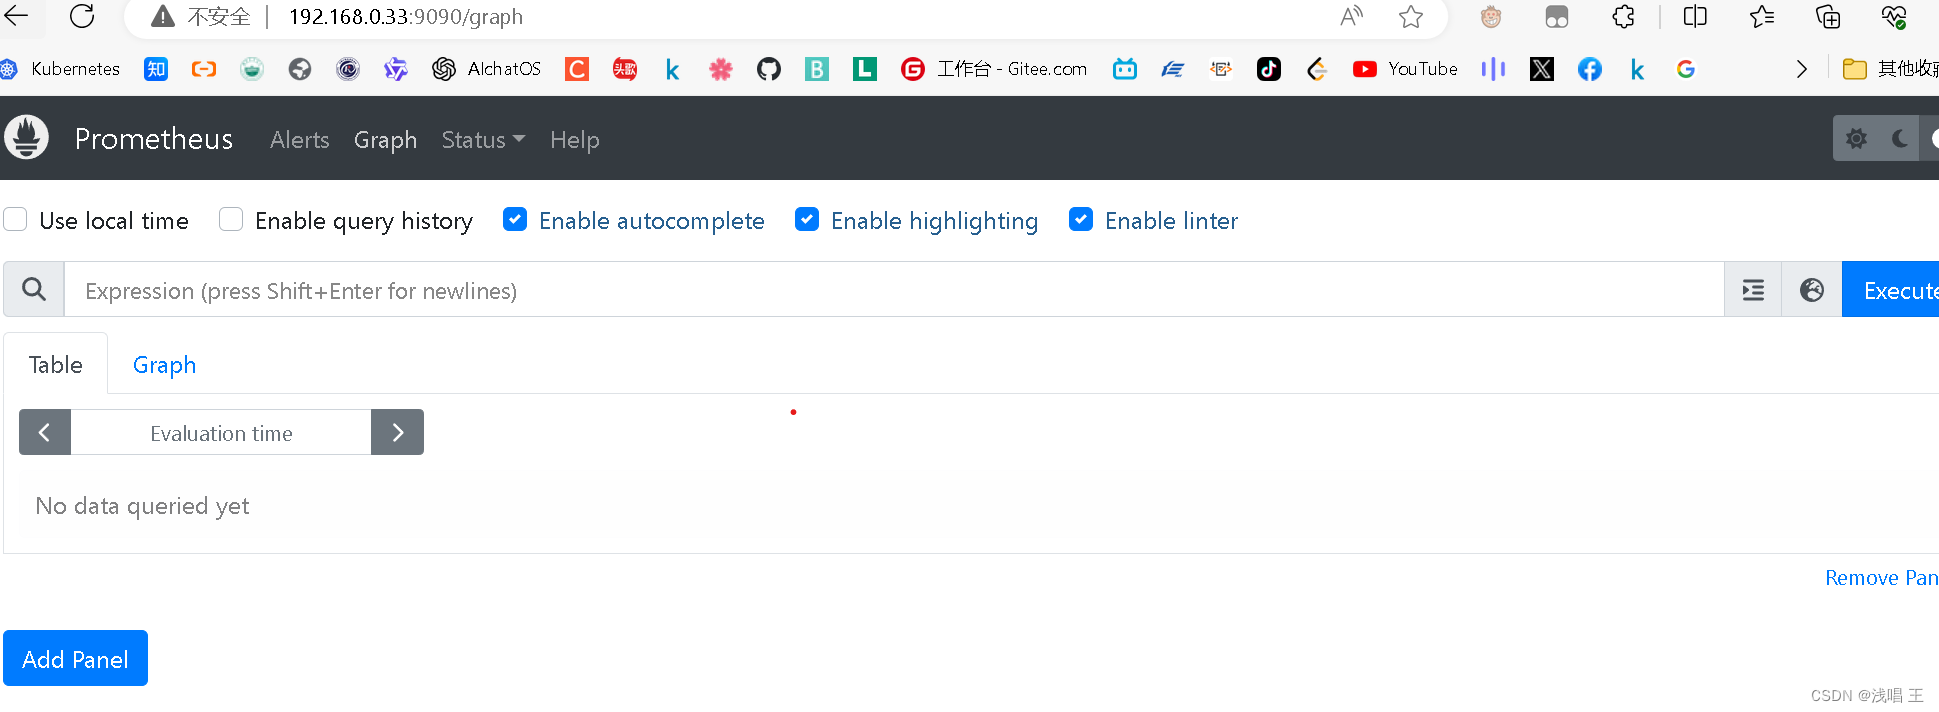
实现了对整个集群的监控。
#安装grafana,绘制优美的图片,方便我们进行观察
##只要在安装了prometheus的机器上安装就行
[root@prometheus prom]# ls
grafana-enterprise-9.1.2-1.x86_64.rpm
install_node_exporter.sh
node_exporter-1.4.0-rc.0.linux-amd64.tar.gz
prometheus
prometheus-2.43.0.linux-amd64.tar.gz
[root@prometheus prom]#  yum install grafana-enterprise-9.1.2-1.x86_64.rpm -y
[root@prometheus prom]#  systemctl start grafana-server
[root@prometheus prom]#  systemctl enable grafana-server
Created symlink from /etc/systemd/system/multi-user.target.wants/grafana-server.service to /usr/lib/systemd/system/grafana-server.service.
[root@prometheus prom]# ps aux|grep grafana
grafana    1410  8.9  7.1 1137704 71040 ?       Ssl  15:12   0:01 /usr/sbin/grafana-server --config=/etc/grafana/grafana.ini --pidfile=/var/run/grafana/grafana-server.pid --packaging=rpm cfg:default.paths.logs=/var/log/grafana cfg:default.paths.data=/var/lib/grafana cfg:default.paths.plugins=/var/lib/grafana/plugins cfg:default.paths.provisioning=/etc/grafana/provisioning
root       1437  0.0  0.0 112824   976 pts/0    S+   15:13   0:00 grep --color=auto grafana
#安装成功
监听3000端口

登录,在浏览器里登录
http://192.168.203.135:3000
默认的用户名和密码是
用户名admin
密码admin
#我将密码修改为123456
#添加数据源

添加数据,修改仪表盘
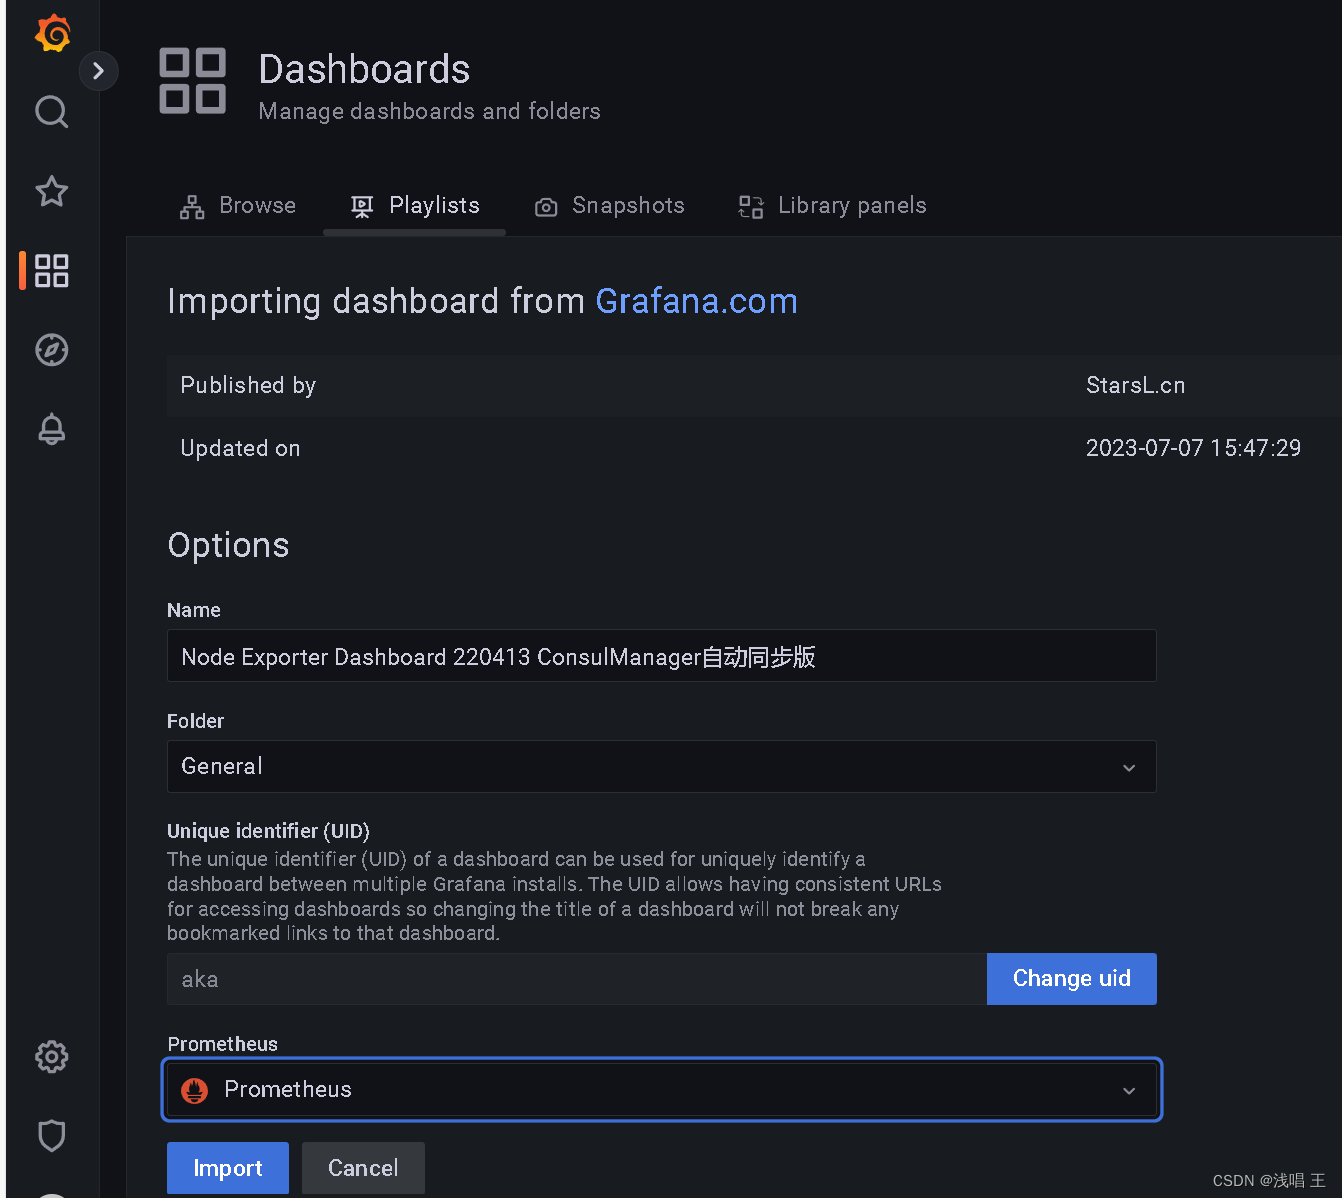
#实现了对整个集群的性能监控
8.使用ingress给web业务做基于域名的负载均衡
拓展小知识
在 Kubernetes 集群中监控容器和集群资源的时候,通常会考虑使用 cAdvisor(Container Advisor)和 Metrics Server 这两个工具。它们各自有不同的特点和适用场景:
-
cAdvisor (Container Advisor):
- 特点:
- cAdvisor 是 Kubernetes 官方提供的一个容器资源使用和性能分析工具。
- 它可以监控容器的资源使用情况,包括 CPU、内存、网络和磁盘等方面的指标。
- cAdvisor 运行在每个节点上,通过监控 Docker 容器的 cgroups 和命名空间来获取容器的统计信息。
- 可以通过 cAdvisor 提供的 API 接口或者直接访问 cAdvisor 的 Web UI 来查看容器的监控数据。
- 适用场景:
- 适用于需要基本的容器资源监控和性能分析的场景。
- 对于单个节点上的容器监控比较适用,但对于跨节点的集群级别监控需要其他工具配合。
- 特点:
-
Metrics Server:
- 特点:
- Metrics Server 是 Kubernetes 官方提供的用于聚合和提供资源指标的 API 服务器。
- 它可以提供节点级别和集群级别的资源指标,包括 CPU 使用率、内存使用量等。
- Metrics Server 获取节点和容器的指标数据,并将其暴露为 Kubernetes API 的一部分,可以通过 kubectl top 命令来查看资源使用情况。
- 通常作为 Kubernetes Dashboard 和 Horizontal Pod Autoscaler 等功能的基础。
- 适用场景:
- 适用于需要查看集群级别资源使用情况的场景,如监控整个集群的 CPU、内存等指标。
- 用于 Kubernetes Dashboard、Horizontal Pod Autoscaler 等需要使用资源指标的功能。
- 特点:
综合来看,一般来说,cAdvisor 更适合单个节点上的容器监控和性能分析,而 Metrics Server 更适合集群级别的资源指标聚合和 API 访问。在实际使用中,您可以根据具体需求和场景来选择合适的监控工具或者将它们结合使用。
部署过程
第1大步骤:  安装ingress controller
1.将镜像scp到所有的node节点服务器上
#准备好所有需要的文件
[root@ansible ~]# ls
[root@ansible ~]# ls
hpa-example.tar  ##hpa水平扩缩
ingress-controller-deploy.yaml #ingress controller
ingress-nginx-controllerv1.1.0.tar.gz    #ingress-nginx-controller镜像
install_node_exporter.sh
kube-webhook-certgen-v1.1.0.tar.gz     # kube-webhook-certgen镜像
nfs-pvc.yaml
nfs-pv.yaml
nginx-deployment-nginx-svc-2.yaml
node_exporter-1.4.0-rc.0.linux-amd64.tar.gz
sc-ingress-url.yaml  #基于URL的负载均衡
sc-ingress.yaml
sc-nginx-svc-1.yaml  #创建service1 和相关pod
sc-nginx-svc-3.yaml  #创建service3 和相关pod
sc-nginx-svc-4.yaml  #创建service4 和相关pod

#kube-webhook-certgen镜像主要用于生成Kubernetes集群中用于Webhook的证书。
#kube-webhook-certgen镜像生成的证书,可以确保Webhook服务在Kubernetes集群中的安全通信和身份验证
[root@ansible ~]# ansible nodes -m copy -a "src=./ingress-nginx-controllerv1.1.0.tar.gz dest=/root/"
192.168.0.22 | CHANGED => {
    "ansible_facts": {
        "discovered_interpreter_python": "/usr/bin/python"
    },
    "changed": true,
    "checksum": "090f67aad7867a282c2901cc7859bc16856034ee",
    "dest": "/root/ingress-nginx-controllerv1.1.0.tar.gz",
    "gid": 0,
    "group": "root",
    "md5sum": "5777d038007f563180e59a02f537b155",
    "mode": "0644",
    "owner": "root",
    "size": 288980480,
    "src": "/root/.ansible/tmp/ansible-tmp-1712220848.65-1426-256601085523400/source",
    "state": "file",
    "uid": 0
}
##类似这样就是成功了
[root@worker2 ~]# ls
anaconda-ks.cfg
ingress-nginx-controllerv1.1.0.tar.gz
install_node_exporter.sh
node_exporter-1.4.0-rc.0.linux-amd64.tar.gz

导入镜像,在所有的worker服务器上进行
[root@worker1 ~]# docker load -i ingress-nginx-controllerv1.1.0.tar.gz
[root@worker1 ~]# docker load -i kube-webhook-certgen-v1.1.0.tar.gz
[root@worker2 ~]# docker load -i ingress-nginx-controllerv1.1.0.tar.gz
[root@worker2 ~]# docker load -i kube-webhook-certgen-v1.1.0.tar.gz
[root@worker1 ~]# docker load -i ingress-nginx-controllerv1.1.0.tar.gz
e2eb06d8af82: Loading layer  65.54
e2eb06d8af82: Loading layer   3.08
e2eb06d8af82: Loading layer  5.865MB/5.865MB
ab1476f3fdd9: Loading layer  557.1
ab1476f3fdd9: Loading layer  6.128
ab1476f3fdd9: Loading layer  10.58
ab1476f3fdd9: Loading layer  15.04
ab1476f3fdd9: Loading layer   23.4
ab1476f3fdd9: Loading layer  32.87
ab1476f3fdd9: Loading layer  38.99
ab1476f3fdd9: Loading layer  41.78
ab1476f3fdd9: Loading layer  44.01
ab1476f3fdd9: Loading layer  45.68
ab1476f3fdd9: Loading layer  49.58
ab1476f3fdd9: Loading layer  55.71
ab1476f3fdd9: Loading layer  62.39
ab1476f3fdd9: Loading layer   71.3
ab1476f3fdd9: Loading layer  79.66
ab1476f3fdd9: Loading layer  88.57
ab1476f3fdd9: Loading layer  97.48
ab1476f3fdd9: Loading layer  105.8
ab1476f3fdd9: Loading layer  114.2
ab1476f3fdd9: Loading layer  120.9
ab1476f3fdd9: Loading layer  120.9MB/120.9MB
ad20729656ef: Loading layer  4.096
ad20729656ef: Loading layer  4.096kB/4.096kB
0d5022138006: Loading layer  393.2
0d5022138006: Loading layer  12.98
0d5022138006: Loading layer  20.84
0d5022138006: Loading layer  28.31
0d5022138006: Loading layer  35.39
0d5022138006: Loading layer  36.57
0d5022138006: Loading layer  38.09MB/38.09MB
8f757e3fe5e4: Loading layer  229.4
8f757e3fe5e4: Loading layer  10.09
8f757e3fe5e4: Loading layer  15.83
8f757e3fe5e4: Loading layer  18.12
8f757e3fe5e4: Loading layer  19.04
8f757e3fe5e4: Loading layer  21.42MB/21.42MB
a933df9f49bb: Loading layer  65.54
a933df9f49bb: Loading layer  1.573
a933df9f49bb: Loading layer   2.49
a933df9f49bb: Loading layer  3.411MB/3.411MB
7ce1915c5c10: Loading layer  32.77
7ce1915c5c10: Loading layer  309.8
7ce1915c5c10: Loading layer  309.8
986ee27cd832: Loading layer  6.141
b94180ef4d62: Loading layer  38.37
d36a04670af2: Loading layer  2.754
2fc9eef73951: Loading layer  4.096
1442cff66b8e: Loading layer  51.67
1da3c77c05ac: Loading layer  3.584Loaded image: registry.cn-hangzhou.aliyuncs.com/google_containers/nginx-ingress-controller:v1.1.0


[root@worker1 ~]# ls
anaconda-ks.cfg
ingress-nginx-controllerv1.1.0.tar.gz
install_node_exporter.sh
node_exporter-1.4.0-rc.0.linux-amd64.tar.gz
[root@worker1 ~]# docker load -i kube-webhook-certgen-v1.1.0.tar.gz
c0d270ab7e0d: Loading layer  3.697MB/3.697MB
ce7a3c1169b6: Loading layer  45.38MB/45.38MB
Loaded image: registry.cn-hangzhou.aliyuncs.com/google_containers/kube-webhook-certgen:v1.1.1
[root@master ingress]# kubectl get ns
NAME                   STATUS   AGE
default                Active   42h
devops-tools           Active   21h
ingress-nginx          Active   18m
kube-node-lease        Active   42h
kube-public            Active   42h
kube-system            Active   42h
kubernetes-dashboard   Active   41h
[root@master ingress]# kubectl get svc -n ingress-nginx
NAME                                 TYPE        CLUSTER-IP      EXTERNAL-IP   PORT(S)                      AGE
ingress-nginx-controller             NodePort    10.101.22.116   <none>        80:32140/TCP,443:30268/TCP   18m
ingress-nginx-controller-admission   ClusterIP   10.106.82.248   <none>        443/TCP                      18m
[root@master ingress]# kubectl get pod -n ingress-nginx
NAME                                        READY   STATUS      RESTARTS   AGE
ingress-nginx-admission-create-lvbmf        0/1     Completed   0          18m
ingress-nginx-admission-patch-h24bx         0/1     Completed   1          18m
ingress-nginx-controller-7cd558c647-ft9gx   1/1     Running     0          18m
ingress-nginx-controller-7cd558c647-t2pmg   1/1     Running     0          18m
第2大步骤:  创建pod和暴露pod的服务

##启动nginx服务pod--》启动两个pod,实现dns域名解析轮询
[root@master ingress]#  kubectl apply -f sc-nginx-svc-3.yaml
deployment.apps/sc-nginx-deploy-3 unchanged
service/sc-nginx-svc-3 unchanged
[root@master ingress]#  kubectl apply -f sc-nginx-svc-4.yaml
deployment.apps/sc-nginx-deploy-4 unchanged
service/sc-nginx-svc-4 unchanged

[root@master ingress]# kubectl get svc
NAME             TYPE        CLUSTER-IP       EXTERNAL-IP   PORT(S)          AGE
kubernetes       ClusterIP   10.96.0.1        <none>        443/TCP          43h
sc-nginx-svc-3   ClusterIP   10.102.96.68     <none>        80/TCP           19m
sc-nginx-svc-4   ClusterIP   10.100.36.98     <none>        80/TCP           19m
svc-mysql        NodePort    10.110.192.240   <none>        3306:30007/TCP   5h51m

查看服务器的详细信息,查看Endpoints对应的pod的ip和端口是否正常
[root@master ingress]# kubectl describe svc sc-nginx-svc
Name:              sc-nginx-svc-3
Namespace:         default
Labels:            app=sc-nginx-svc-3
Annotations:       <none>
Selector:          app=sc-nginx-feng-3
Type:              ClusterIP
IP Family Policy:  SingleStack
IP Families:       IPv4
IP:                10.102.96.68
IPs:               10.102.96.68
Port:              name-of-service-port  80/TCP
TargetPort:        80/TCP
Endpoints:         10.224.189.95:80,10.224.189.96:80,10.224.235.150:80
Session Affinity:  None
Events:            <none>

Name:              sc-nginx-svc-4
Namespace:         default
Labels:            app=sc-nginx-svc-4
Annotations:       <none>
Selector:          app=sc-nginx-feng-4
Type:              ClusterIP
IP Family Policy:  SingleStack
IP Families:       IPv4
IP:                10.100.36.98
IPs:               10.100.36.98
Port:              name-of-service-port  80/TCP
TargetPort:        80/TCP
Endpoints:         10.224.189.97:80,10.224.189.98:80,10.224.235.151:80
Session Affinity:  None
Events:            <none>

[root@master ingress]# curl 10.224.189.95:80 ##内部pod的IP地址
wang6666666
10.224.189.96:80##10.224.235.150:80
第3大步骤: 启用ingress 关联ingress controller 和service


[root@master ingress]# kubectl apply -f sc-ingress.yaml
ingress.networking.k8s.io/sc-ingress created
过几分钟可以看到 有宿主机的ip地址
[root@master ingress]# kubectl get ingress
NAME         CLASS   HOSTS                       ADDRESS   PORTS   AGE
sc-ingress   nginx   www.feng.com,www.wang.com             80      8s
[root@master ingress]# cat sc-ingress-url.yaml
apiVersion: networking.k8s.io/v1
kind: Ingress
metadata:
  name: simple-fanout-example
  annotations:
    kubernets.io/ingress.class: nginx
spec:
  ingressClassName: nginx
  rules:
  - host: www.wang.com  #设置域名
    http:
      paths:
      - path: /wang1  #内部pod里面的地址
        pathType: Prefix
        backend:
          service:
            name: sc-nginx-svc-3
            port:
              number: 80
      - path: /wang2
        pathType: Prefix
        backend:
          service:
            name: sc-nginx-svc-4
            port:
              number: 80
[root@master ingress]# kubectl apply -f sc-ingress-url.yaml
[root@master ingress]# kubectl exec -it sc-nginx-deploy-4-7d4b5c487f-8l7wr  -- bash
root@sc-nginx-deploy-4-7d4b5c487f-8l7wr:/# cd /usr/share/nginx/html/
root@sc-nginx-deploy-4-7d4b5c487f-8l7wr:/usr/share/nginx/html# ls
50x.html  index.html  wang2
root@sc-nginx-deploy-4-7d4b5c487f-8l7wr:/usr/share/nginx/html# ls
50x.html  index.html  wang2
root@sc-nginx-deploy-4-7d4b5c487f-8l7wr:/usr/share/nginx/html# cat index.html
wang11111111
root@sc-nginx-deploy-4-7d4b5c487f-8l7wr:/usr/share/nginx/html# cp index.html ./wang2/
root@sc-nginx-deploy-4-7d4b5c487f-8l7wr:/usr/share/nginx/html# ls
50x.html  index.html  wang2
root@sc-nginx-deploy-4-7d4b5c487f-8l7wr:/usr/share/nginx/html# cd wang2/
root@sc-nginx-deploy-4-7d4b5c487f-8l7wr:/usr/share/nginx/html/wang2# ls
index.html
root@sc-nginx-deploy-4-7d4b5c487f-8l7wr:/usr/share/nginx/html/wang2# exit
exit
[root@master ingress]# kubectl exec -it sc-nginx-deploy-3-5c4b975ffc-d8hwk  -- bash
root@sc-nginx-deploy-3-5c4b975ffc-d8hwk:/# cd /usr/share/nginx/html/
root@sc-nginx-deploy-3-5c4b975ffc-d8hwk:/usr/share/nginx/html# ls
50x.html  index.html  wang1
root@sc-nginx-deploy-3-5c4b975ffc-d8hwk:/usr/share/nginx/html# cp index.html ./wang1/
root@sc-nginx-deploy-3-5c4b975ffc-d8hwk:/usr/share/nginx/html# ls
50x.html  index.html  wang1
root@sc-nginx-deploy-3-5c4b975ffc-d8hwk:/usr/share/nginx/html# cat ./wang1/index.html
wang6666666
root@sc-nginx-deploy-3-5c4b975ffc-d8hwk:/usr/share/nginx/html# exit
exit

##先在pod里面创建好文件index.html和文件夹
#需要分别在service3和service4上面创建好

第4步: 查看ingress controller 里的nginx.conf 文件里是否有ingress对应的规则
[root@master ingress]# kubectl get pod -n ingress-nginx
NAME                                        READY   STATUS      RESTARTS   AGE
ingress-nginx-admission-create-lvbmf        0/1     Completed   0          29m
ingress-nginx-admission-patch-h24bx         0/1     Completed   1          29m
ingress-nginx-controller-7cd558c647-ft9gx   1/1     Running     0          29m
ingress-nginx-controller-7cd558c647-t2pmg   1/1     Running     0          29m


获取ingress controller对应的service暴露宿主机的端口,访问宿主机和相关端口,就可以验证ingress controller是否能进行负载均衡

[root@k8smaster 4-4]# kubectl get svc -n ingress-nginx
NAME                                 TYPE        CLUSTER-IP     EXTERNAL-IP   PORT(S)                      AGE
ingress-nginx-controller             NodePort    10.99.160.10   <none>        80:30092/TCP,443:30263/TCP   37m
ingress-nginx-controller-admission   ClusterIP   10.99.138.23   <none>        443/TCP                      37m

在其他的宿主机或者windows机器上使用域名进行访问


因为我们是基于域名做的负载均衡的配置,所有必须要在浏览器里使用域名去访问,不能使用ip地址
同时ingress controller做负载均衡的时候是基于http协议的,7层负载均衡
[root@nfs ~]# cat /etc/hosts
127.0.0.1   localhost localhost.localdomain localhost4 localhost4.localdomain4
::1         localhost localhost.localdomain localhost6 localhost6.localdomain6
192.168.0.21 www.wang.com
192.168.0.22 www.wang.com
192.168.0.20 master
[root@nfs ~]# curl  www.wang.com/wang1/index.html
wang6666666
[root@nfs ~]# curl  www.wang.com/wang2/index.html
<html>
<head><title>404 Not Found</title></head>
<body>
<center><h1>404 Not Found</h1></center>
<hr><center>nginx/1.21.5</center>
</body>
</html>
[root@nfs ~]# curl  www.wang.com/wang2/index.html
wang11111111

##DNS,这个采用的是轮询算法,需要多试几次就行了
#部署pv和pvc,对系统资源的管理
第5步:启动第2个服务和pod,使用了pv+pvc+nfs
需要提前准备好nfs服务器+创建pv和pvc
[root@k8smaster 4-4]# ls
ingress-controller-deploy.yaml         nfs-pvc.yaml                       sc-ingress.yaml
ingress-nginx-controllerv1.1.0.tar.gz  nfs-pv.yaml                        sc-nginx-svc-1.yaml
kube-webhook-certgen-v1.1.0.tar.gz     nginx-deployment-nginx-svc-2.yaml

[root@master ingress]# cat nfs-pv.yaml
apiVersion: v1
kind: PersistentVolume
metadata:
  name: sc-nginx-pv
  labels:
    type: sc-nginx-pv
spec:
  capacity:
    storage: 10Gi
  accessModes:
    - ReadWriteMany
  storageClassName: nfs
  nfs:
    path: "/web"       #nfs共享的目录
    server: 192.168.0.36   #nfs服务器的ip地址
    readOnly: false

[root@k8smaster 4-4]# kubectl apply -f nfs-pv.yaml
persistentvolume/sc-nginx-pv configured
[root@master ingress]# cat nfs-pvc.yaml
apiVersion: v1
kind: PersistentVolumeClaim
metadata:
  name: sc-nginx-pvc
spec:
  accessModes:
  - ReadWriteMany
  resources:
     requests:
       storage: 1Gi
  storageClassName: nfs #使用nfs类型的pv


[root@master ingress]# kubectl apply -f nfs-pvc.yaml
persistentvolumeclaim/sc-nginx-pvc created
[root@master ingress]# kubectl get pv
NAME                CAPACITY   ACCESS MODES   RECLAIM POLICY   STATUS   CLAIM                           STORAGECLASS    REASON   AGE
jenkins-pv-volume   10Gi       RWO            Retain           Bound    devops-tools/jenkins-pv-claim   local-storage            22h
pv-web              10Gi       RWX            Retain           Bound    default/pvc-web                 nfs                      24h
sc-nginx-pv         10Gi       RWX            Retain           Bound    default/sc-nginx-pvc            nfs                      76s


[root@master ingress]# cat  nginx-deployment-nginx-svc-2.yaml
apiVersion: apps/v1
kind: Deployment
metadata:
  name: nginx-deployment
  labels:
    app: nginx
spec:
  replicas: 3
  selector:
    matchLabels:
      app: sc-nginx-feng-2
  template:
    metadata:
      labels:
        app: sc-nginx-feng-2
    spec:
      volumes:
        - name: sc-pv-storage-nfs
          persistentVolumeClaim:
            claimName: sc-nginx-pvc
      containers:
        - name: sc-pv-container-nfs
          image: nginx
          imagePullPolicy: IfNotPresent
          ports:
            - containerPort: 80
              name: "http-server"
          volumeMounts:
            - mountPath: "/usr/share/nginx/html"
              name: sc-pv-storage-nfs
---
apiVersion: v1
kind: Service
metadata:
  name:  sc-nginx-svc-2
  labels:
    app: sc-nginx-svc-2
spec:
  selector:
    app: sc-nginx-feng-2
  ports:
  - name: name-of-service-port
    protocol: TCP
    port: 80
    targetPort: 80
[root@k8smaster 4-4]#


[root@k8smaster 4-4]# kubectl apply -f nginx-deployment-nginx-svc-2.yaml
deployment.apps/nginx-deployment created
service/sc-nginx-svc-2 created


[root@master ingress]# kubectl get svc
NAME             TYPE        CLUSTER-IP       EXTERNAL-IP   PORT(S)          AGE
kubernetes       ClusterIP   10.96.0.1        <none>        443/TCP          42h
sc-nginx-svc     ClusterIP   10.108.143.45    <none>        80/TCP           20m
sc-nginx-svc-2   ClusterIP   10.109.241.58    <none>        80/TCP           16s
svc-mysql        NodePort    10.110.192.240   <none>        3306:30007/TCP   4h45m

[root@master ingress]#  kubectl get svc -n ingress-nginx
NAME                                 TYPE        CLUSTER-IP      EXTERNAL-IP   PORT(S)                      AGE
ingress-nginx-controller             NodePort    10.101.22.116   <none>        80:32140/TCP,443:30268/TCP   44m
ingress-nginx-controller-admission   ClusterIP   10.106.82.248   <none>        443/TCP                      44m

[root@master ingress]# kubectl get ingress
NAME         CLASS   HOSTS                       ADDRESS                     PORTS   AGE
sc-ingress   nginx   www.feng.com,www.wang.com   192.168.0.21,192.168.0.22   80      16m

访问宿主机暴露的端口号30092或者80都可以
##访问成功了
[root@ansible ~]# curl www.wang.com
welcome to sanchuang !!! \n
welcome to sanchuang !!!
0000000000000000000000
welcome to sanchuang !!!
welcome to sanchuang !!!
welcome to sanchuang !!!
666666666666666666 !!!
777777777777777777 !!!
9.使用探针(liveless、readiness、startup)的httpGet和exec方法对web业务pod进行监控,一旦出现问题马上重启,增强业务pod的可靠性。
[root@master ingress]# vim my-web.yaml
[root@master ingress]# cat my-web.yaml
apiVersion: apps/v1
kind: Deployment
metadata:
  labels:
    app: myweb
  name: myweb
spec:
  replicas: 3
  selector:
    matchLabels:
      app: myweb
  template:
    metadata:
      labels:
        app: myweb
    spec:
      containers:
      - name: myweb
        image: nginx:latest
        imagePullPolicy: IfNotPresent
        ports:
        - containerPort: 8000
        resources:
          limits:
            cpu: 300m
          requests:
            cpu: 100m
        livenessProbe:
          exec:
            command:
            - ls
            - /
          initialDelaySeconds: 5
          periodSeconds: 5
        readinessProbe:
          exec:
            command:
            - ls
            - /
          initialDelaySeconds: 5
          periodSeconds: 5
        startupProbe:
          httpGet:
            path: /
            port: 8000
          failureThreshold: 30
          periodSeconds: 10
---
apiVersion: v1
kind: Service
metadata:
  labels:
    app: myweb-svc
  name: myweb-svc
spec:
  selector:
    app: myweb
  type: NodePort
  ports:
  - port: 8000
    protocol: TCP
    targetPort: 8000
    nodePort: 30001
[root@master ingress]# kubectl describe pod myweb-b69f9bc6-ht2vw
Name:         myweb-b69f9bc6-ht2vw
Namespace:    default
Priority:     0
Node:         worker2/192.168.0.22
Start Time:   Thu, 04 Apr 2024 20:06:43 +0800
Labels:       app=myweb
              pod-template-hash=b69f9bc6
Annotations:  cni.projectcalico.org/containerID: 8c2aed8a822bab4162d7d8cce6933cf058ecddb3d33ae8afa3eee7daa8a563be
              cni.projectcalico.org/podIP: 10.224.189.110/32
              cni.projectcalico.org/podIPs: 10.224.189.110/32
Status:       Running
IP:           10.224.189.110
IPs:
  IP:           10.224.189.110
Controlled By:  ReplicaSet/myweb-b69f9bc6
Containers:
  myweb:
    Container ID:   docker://64d91f5ae0c61770e2dc91ee6cfc46f029a7af25f2119ea9ea047407ae072969
    Image:          nginx:latest
    Image ID:       docker-pullable://nginx@sha256:0d17b565c37bcbd895e9d92315a05c1c3c9a29f762b011a10c54a66cd53c9b31
    Port:           8000/TCP
    Host Port:      0/TCP
    State:          Running
      Started:      Thu, 04 Apr 2024 20:06:44 +0800
    Ready:          False
    Restart Count:  0
    Limits:
      cpu:  300m
    Requests:
      cpu:        100m
    Liveness:     exec [ls /] delay=5s timeout=1s period=5s #success=1 #failure=3
    Readiness:    exec [ls /] delay=5s timeout=1s period=5s #success=1 #failure=3
    Startup:      http-get http://:8000/ delay=0s timeout=1s period=10s #success=1 #failure=30
    Environment:  <none>
    Mounts:
      /var/run/secrets/kubernetes.io/serviceaccount from kube-api-access-bhvf6 (ro)
10.使用ab工具对整个k8s集群里的web服务进行压力测试
安装http-tools工具得到ab软件
[root@nfs-server ~]# yum install httpd-tools -y

模拟访问
[root@nfs-server ~]# ab  -n 1000  -c50  http://192.168.220.100:31000/index.html

root@master hpa]# kubectl get hpa --watch

增加并发数和请求总数

[root@gitlab ~]# ab  -n 5000  -c100  http://192.168.0.21:80/index.html
This is ApacheBench, Version 2.3 <$Revision: 1430300 $>
Copyright 1996 Adam Twiss, Zeus Technology Ltd, http://www.zeustech.net/
Licensed to The Apache Software Foundation, http://www.apache.org/

Benchmarking 192.168.0.21 (be patient)
Completed 500 requests
Completed 1000 requests
Completed 1500 requests
Completed 2000 requests
Completed 2500 requests
Completed 3000 requests
Completed 3500 requests
Completed 4000 requests
Completed 4500 requests
Completed 5000 requests
Finished 5000 requests


Server Software:
Server Hostname:        192.168.0.21
Server Port:            80

Document Path:          /index.html
Document Length:        146 bytes

Concurrency Level:      100
Time taken for tests:   2.204 seconds
Complete requests:      5000
Failed requests:        0
Write errors:           0
Non-2xx responses:      5000
Total transferred:      1370000 bytes
HTML transferred:       730000 bytes
Requests per second:    2268.42 [#/sec] (mean)
Time per request:       44.084 [ms] (mean)
Time per request:       0.441 [ms] (mean, across all concurrent requests)
Transfer rate:          606.98 [Kbytes/sec] received

Connection Times (ms)
              min  mean[+/-sd] median   max
Connect:        0    3   4.1      1      22
Processing:     1   40  30.8     38     160
Waiting:        0   39  30.7     36     160
Total:          1   43  30.9     41     162

Percentage of the requests served within a certain time (ms)
  50%     41
  66%     54
  75%     63
  80%     69
  90%     83
  95%    100
  98%    115
  99%    129
 100%    162 (longest request)

##监控方式

1.kubectl top pod  ##本地top 查看
2.http://192.168.0.33:3000/  #使用grafana
3.http://192.168.0.33:9090/targets  #使用prometheus
项目心得:
- 1.更加深入的了解了k8s的各个功能
- 2.对各个服务(Prometheus,nfs等)深入了解
- 3.自己的故障处理能力得到提升
- 4.对负载均衡和高可用,自动扩缩有了认识
- 5.更加了解开发和运维的关系


