📣📣📣
哈喽!大家好,我是【IT邦德】,江湖人称jeames007,10余年DBA及大数据工作经验
一位上进心十足的【大数据领域博主】!😜😜😜
中国DBA联盟(ACDU)成员,目前服务于工业互联网
擅长主流Oracle、MySQL、PG、高斯及Greenplum运维开发,
备份恢复,安装迁移,性能优化、故障应急处理等。
📣📣📣
文章目录
- 📣 1.版本说
- 📣 2.新特性介绍
- 📣 3.安装包下载
- 📣 4.部署前准备
- ✨ 4.1 关闭安全服务
- ✨ 4.2 防火墙关闭
- ✨ 4.3 host配置
- ✨ 4.4 安装依赖包
- ✨ 4.5 安装python3
- 📣 5.单机安装
- ✨ 5.1 前提条件
- ✨ 5.2 安装包解压
- ✨ 5.3 XML配置文件
- ✨ 5.4 用户及组创建
- ✨ 5.5 初始化安装
- ✨ 5.6 正式安装
- 📣 6.安装验证
- ✨ 6.1 DB状态检查
- ✨ 6.2 数据库登陆
- ✨ 6.3 DB启动及关闭
- 📣 7.总结及故障处理
openGauss 6.0.0-RC1 是社区最新发布的创新版本,版本生命周期为 0.5 年
📣 1.版本说
openGauss社区版本分为长期支持版本和创新版本:
长期支持版本 (LTS) :规模上线使用,openGauss 6.0.0 LTS及后续LTS版本发布间隔周期为2年,社区提供3年支持,社区OGSP伙伴提供3年以后维护支持服务。
创新版本 (RCx) :作为LTS版本发布前的阶段性特性体验版本,仅供联创测试使用,提供6个月社区支持。
openGauss 6.0.0-RC1 是社区最新发布的创新版本,版本生命周期为 0.5 年。(创新版本命名:由原方案 XX.1.0 Preview (例:5.1.0 preview),调整为现方案 XX.0.0-RCx),本次发布包含 2 个数据库服务端安装版本:企业版、轻量版,用户可根据使用场景需要下载不同版本,并基于此进行场景化验证,提前发现问题并反馈社区,社区将在下个 LTS 版本发布前进行问题修复,openGauss 6.0.0 LTS 版本将在 2024 年 9 月 30 日进行发布。
openGauss社区版本生命周期管理如下

📣 2.新特性介绍
1.内核能力增强
企业级特性:存储过程增强
内核四高能力:高性能、高可用、高智能、高安全
2.DataPod 三层资源池化架构持续创新
支持 SPQ 多机并行查询框架
新增 DMS 资源统计视图
DSS 功能增强
容灾能力增强
3.DataKit 数据全生命周期管理平台能力增强
迁移能力、对象管理、智能运维、安装部署
4.生态兼容性增强
MySQL 兼容
📣 3.安装包下载
更多具体发行说明请参考官网:
https://docs-opengauss.osinfra.cn/zh/docs/latest/docs/ReleaseNotes/Releasenotes.html
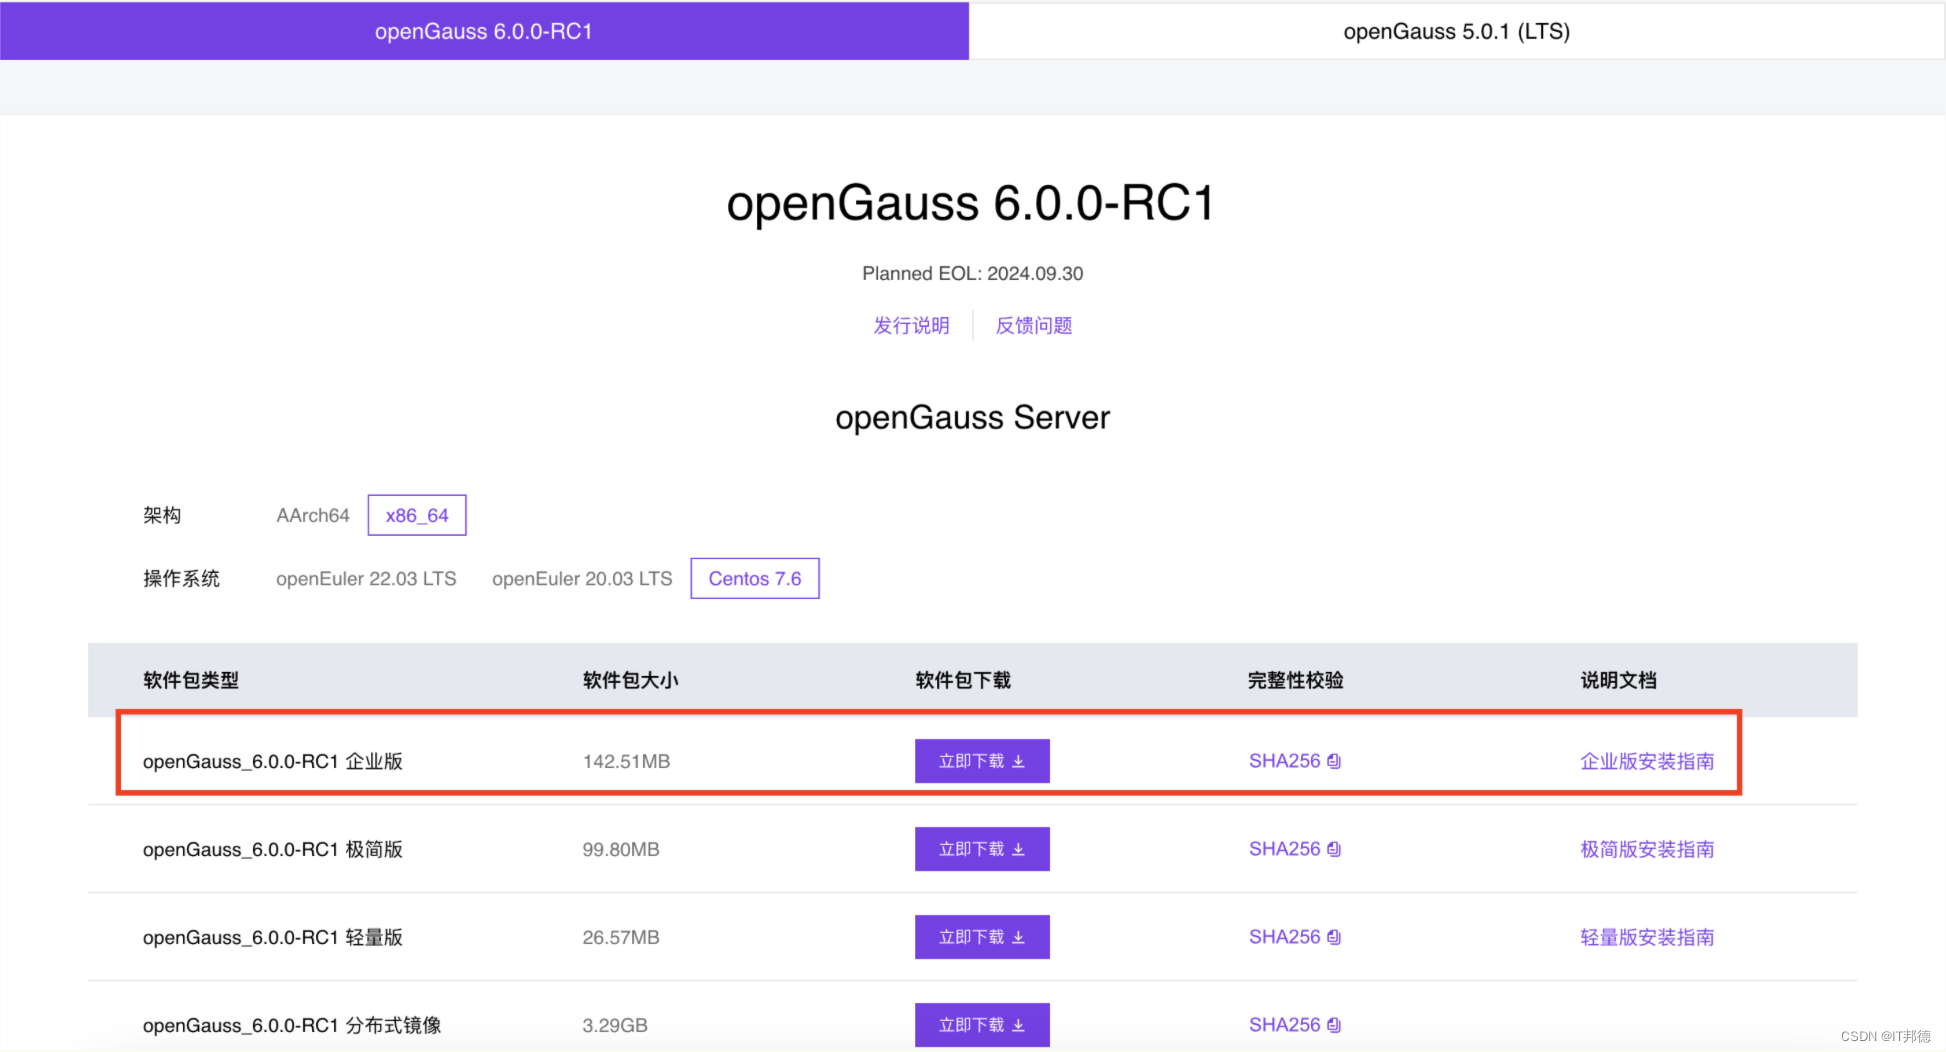
6.0.0 RC1版本下载地址
https://opengauss.org/zh/download/
6.0.0 RC1安装包
openGauss-6.0.0-RC1-CentOS-64bit-all.tar.gz
📣 4.部署前准备
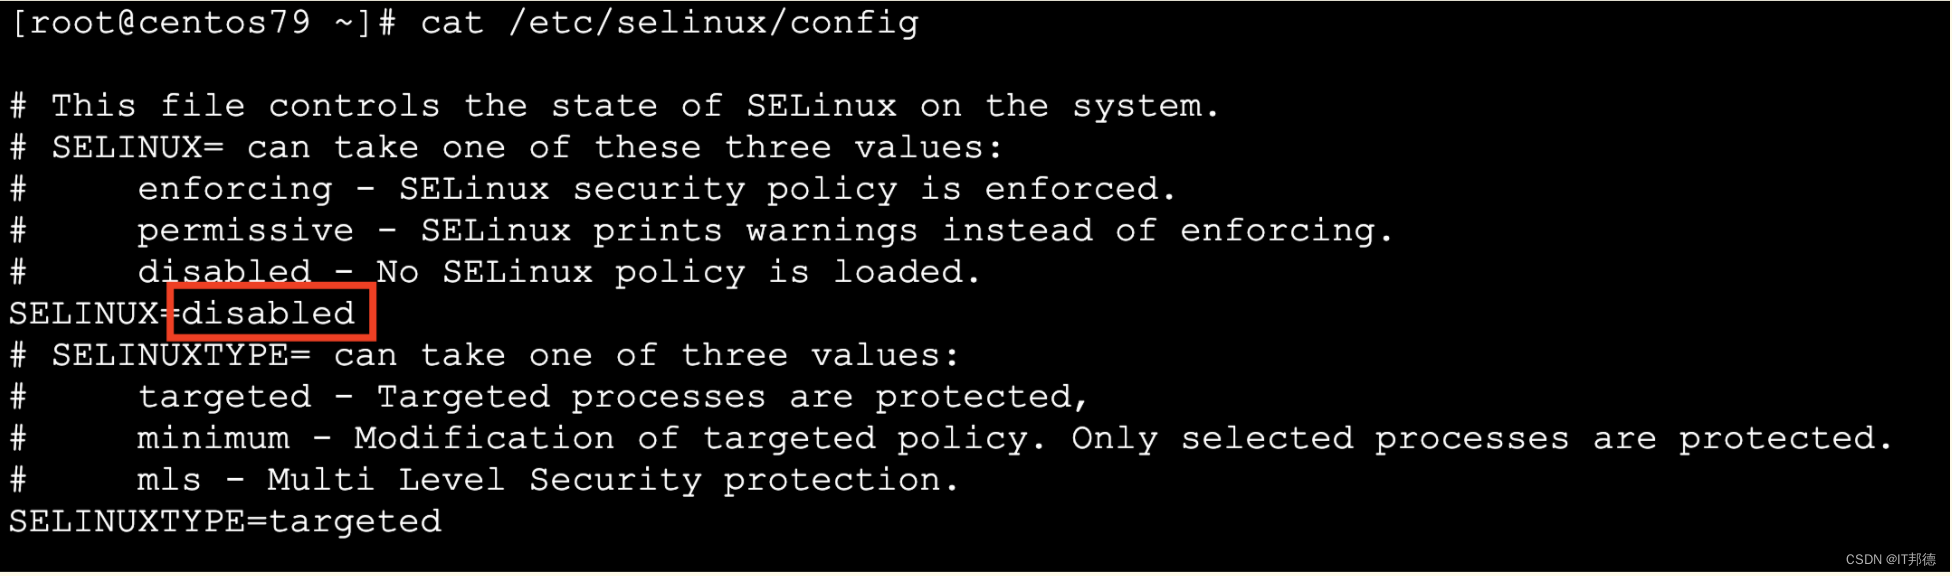
✨ 4.1 关闭安全服务
修改/etc/selinux/config文件中的“SELINUX”值为“disabled”。
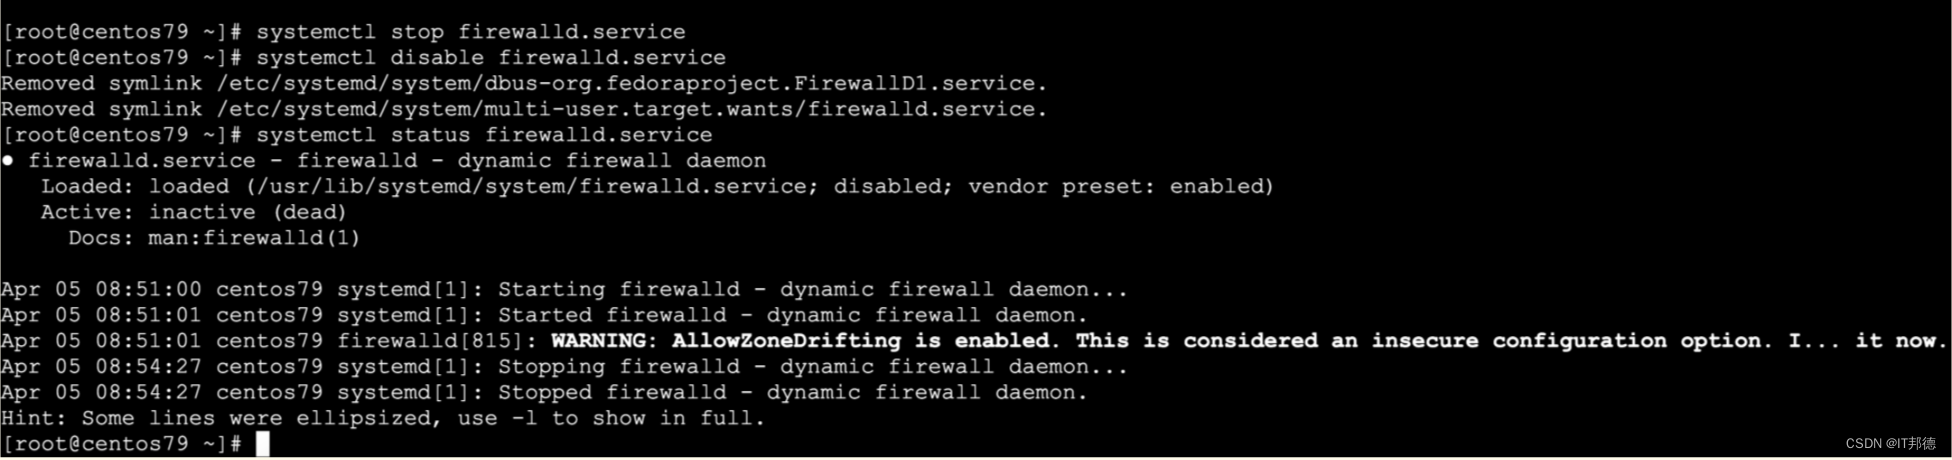
✨ 4.2 防火墙关闭
systemctl status firewalld
若防火墙状态显示为active (running),则表示防火墙未关闭,请关闭防火墙。
systemctl stop firewalld.service
systemctl disable firewalld.service
systemctl status firewalld.service
临时关闭selinux
setenforce 0
查看selinux状态
getenforce
✨ 4.3 host配置
[root@centos79 ~]# cat /etc/hosts
127.0.0.1 localhost localhost.localdomain localhost4 localhost4.localdomain4
::1 localhost localhost.localdomain localhost6 localhost6.localdomain6
192.168.6.20 centos79
✨ 4.4 安装依赖包
##创建挂载目录
mkdir /cdrom
##挂载目录
mount -t iso9660 -o ro /dev/cdrom /cdrom
##yum源配置文件
cd /etc/yum.repos.d/
mkdir bak
mv CentOS* bak
##配置yum文件
vi local.repo
cat>/etc/yum.repos.d/local.repo<<EOF
[base-local]
name=CentOS7-local
baseurl=file:///cdrom
enabled=1
gpgcheck=0
EOF
#清空并重载yum
yum clean all
yum makecache
##安装依赖
yum -y install libaio-devel flex bison ncurses-devel
glibc-devel patch redhat-lsb-core readline-devel openssl-devel sqlite-devel libnsl
✨ 4.5 安装python3
Python3安装还依赖zlib,如果没有先安装依赖,这里我们安装python3.6的版本
[root@centos79 ~]# yum install -y zlib
[root@centos79 ~]# rpm -qa | grep zlib
zlib-devel-1.2.7-18.el7.x86_64
zlib-1.2.7-18.el7.x86_64
python官网 https://www.python.org/downloads/release/python-3615/下载安装包即可
安装包为:Python-3.6.15.tgz
[root@centos79 ~]# tar -zxvf Python-3.6.15.tgz
[root@centos79 ~]# cd Python-3.6.15/
[root@centos79 ~]# ./configure --prefix=/usr/local/python3 --enable-shared
[root@centos79 ~]# make
[root@centos79 ~]# make install
注意:make编译时间比较长,耐心等待
如果有此报错,configure: error: no acceptable C compiler found in $PATH
yum install gcc
注意此时还需要设置下OS上python的软连接
[root@centos79 ~]# ln -s /usr/local/python3/bin/python3.6 /usr/bin/python3
[root@centos79 ~]# ln -s /usr/local/python3/bin/pip3 /usr/bin/pip
[root@centos79 Python-3.6.15]# python -V
python: error while loading shared libraries: libpython3.6m.so.1.0: cannot open shared object file: No such file or directory
[root@centos79 Python-3.6.15]# find / -name libpython3.6m.so.1.0
/usr/local/python3/lib/libpython3.6m.so.1.0
/opt/Python-3.6.15/libpython3.6m.so.1.0
cp /opt/Python-3.6.15/libpython3.6m.so.1.0 /usr/lib64/
[root@centos79 Python-3.6.15]# python
Python 3.6.15 (default, Apr 5 2024, 09:38:03)
[GCC 4.8.5 20150623 (Red Hat 4.8.5-44)] on linux
Type “help”, “copyright”, “credits” or “license” for more information.
📣 5.单机安装
✨ 5.1 前提条件
前提条件:
已完成用户组和普通用户的创建。
所有服务器操作系统和网络均正常运行。
普通用户必须有数据库包解压路径、安装路径的读、写和执行操作权限,并且安装路径必须为空。
普通用户对下载的openGauss压缩包有执行权限。
安装前请检查指定的openGauss端口矩阵中所有端口是否被占用,如果被占用请更改端口或者停止当前使用端口进程。
✨ 5.2 安装包解压
注意:上传安装包到服务器/opt/openGauss
mkdir -p /opt/openGauss
–openGauss安装目录
mkdir -p /openGauss
##解压安装包
chmod 755 -R /opt/openGauss
cd /opt/openGauss
[root@centos79 openGauss]# tar -zxvf openGauss-6.0.0-RC1-CentOS-64bit-all.tar.gz
[root@centos79 openGauss]# ll
openGauss-6.0.0-RC1-CentOS-64bit-cm.tar.gz
openGauss-6.0.0-RC1-CentOS-64bit-om.tar.gz
openGauss-6.0.0-RC1-CentOS-64bit.tar.bz2
openGauss-6.0.0-RC1-CentOS-64bit-cm.sha256
openGauss-6.0.0-RC1-CentOS-64bit-om.sha256
openGauss-6.0.0-RC1-CentOS-64bit.sha256
upgrade_sql.tar.gz
upgrade_sql.sha256
[root@centos79 openGauss]# tar -zxvf openGauss-6.0.0-RC1-CentOS-64bit-om.tar.gz
[root@centos79 openGauss]# ll
total 293256
drwxr-xr-x. 19 root root 4096 Mar 31 12:15 lib
-rwxr-xr-x. 1 root root 149449208 Apr 5 09:31 openGauss-6.0.0-RC1-CentOS-64bit-all.tar.gz
-rw-r–r–. 1 root root 109 Mar 31 12:16 openGauss-6.0.0-RC1-CentOS-64bit-cm.sha256
-rw-r–r–. 1 root root 22466710 Mar 31 12:16 openGauss-6.0.0-RC1-CentOS-64bit-cm.tar.gz
-rw-r–r–. 1 root root 65 Mar 31 12:15 openGauss-6.0.0-RC1-CentOS-64bit-om.sha256
-rw-r–r–. 1 root root 23122340 Mar 31 12:15 openGauss-6.0.0-RC1-CentOS-64bit-om.tar.gz
-rw-r–r–. 1 root root 65 Mar 31 12:16 openGauss-6.0.0-RC1-CentOS-64bit.sha256
-rw-r–r–. 1 root root 104672194 Mar 31 12:16 openGauss-6.0.0-RC1-CentOS-64bit.tar.bz2
drwxr-xr-x. 11 root root 4096 Mar 31 12:15 script
-rw-------. 1 root root 65 Mar 31 12:14 upgrade_sql.sha256
-rw-------. 1 root root 541779 Mar 31 12:14 upgrade_sql.tar.gz
-rw-r–r–. 1 root root 36 Mar 31 12:15 version.cfg
✨ 5.3 XML配置文件
安装openGauss前需要创建cluster_config.xml文件。
cluster_config.xml文件包含部署openGauss的服务器信息、安装路径、IP地址以及端口号等。
本次部署以单节点配置的方式创建XML配置文件
编辑配置XML文件:
vi /opt/openGauss/db_config.xml
<?xml version="1.0" encoding="UTF-8"?>
<ROOT>
    <!-- openGauss整体信息 -->
    <CLUSTER>
        <!-- 数据库名称 -->
        <PARAM name="clusterName" value="dbCluster" />
        <!-- 数据库节点名称(hostname) -->
        <PARAM name="nodeNames" value="centos79" />
        <!-- 数据库安装目录-->
        <PARAM name="gaussdbAppPath" value="/openGauss/app" />
        <!-- 日志目录-->
        <PARAM name="gaussdbLogPath" value="/openGauss/log/omm" />
        <!-- 临时文件目录-->
        <PARAM name="tmpMppdbPath" value="/openGauss/tmp" />
        <!-- 数据库工具目录-->
        <PARAM name="gaussdbToolPath" value="/openGauss/om" />
        <!-- 数据库core文件目录-->
        <PARAM name="corePath" value="/openGauss/corefile" />
        <!-- 节点IP,与数据库节点名称列表一一对应 -->
        <PARAM name="backIp1s" value="192.168.6.20"/>
    </CLUSTER>
    <!-- 每台服务器上的节点部署信息 -->
    <DEVICELIST>
        <!-- 节点1上的部署信息 -->
        <DEVICE sn="centos79">
            <!-- 节点1的主机名称 -->
            <PARAM name="name" value="centos79"/>
            <!-- 节点1所在的AZ及AZ优先级 -->
            <PARAM name="azName" value="AZ1"/>
            <PARAM name="azPriority" value="1"/>
            <!-- 节点1的IP,如果服务器只有一个网卡可用,将backIP1和sshIP1配置成同一个IP -->
            <PARAM name="backIp1" value="192.168.6.20"/>
            <PARAM name="sshIp1" value="192.168.6.20"/>

	    <!--dbnode-->
	    <PARAM name="dataNum" value="1"/>
	    <PARAM name="dataPortBase" value="15400"/>
	    <PARAM name="dataNode1" value="/openGauss/data/dn"/>
            <PARAM name="dataNode1_syncNum" value="0"/>
        </DEVICE>
    </DEVICELIST>
</ROOT>
✨ 5.4 用户及组创建
##创建用户组dbgrp
[root@centos79 ~]# groupadd dbgroup
##创建用户组dbgroup下的普通用户omm,并设置密码为Gauss_123
useradd -g dbgroup omm
✨ 5.5 初始化安装
chmod 775 /openGauss -R
chown omm:dbgroup /openGauss -R
[root@centos79 ~]# cd /opt/openGauss/script
[root@centos79 ~]# export LD_LIBRARY_PATH=/opt/openGauss/script/gspylib/clib:$LD_LIBRARY_PATH
[root@centos79 script]# ./gs_preinstall -U omm -G dbgroup -X /opt/openGauss/db_config.xml
安装集群过程中,输入omm用户密码:Gauss_123
[root@centos79 script]# /opt/openGauss/script/gs_checkos -i A -h centos79 --detail
Checking items:
    A1. [ OS version status ]                                   : Normal
        [centos79]
        centos_7.9.2009_64bit

    A2. [ Kernel version status ]                               : Normal
        The names about all kernel versions are same. The value is "3.10.0-1160.el7.x86_64".
    A3. [ Unicode status ]                                      : Normal
        The values of all unicode are same. The value is "LANG=en_US.UTF-8".
    A4. [ Time zone status ]                                    : Normal
        The informations about all timezones are same. The value is "+0800".
    A5. [ Swap memory status ]                                  : Warning
        [centos79]
SwapMemory 5238681600 TotalMemory 3953942528

    A6. [ System control parameters status ]                    : Warning
        [centos79]
        Warning reason: variable 'net.ipv4.tcp_retries1' RealValue '3' ExpectedValue '5'.
        Warning reason: variable 'net.ipv4.tcp_syn_retries' RealValue '6' ExpectedValue '5'.
        Check_SysCtl_Parameter warning.

    A7. [ File system configuration status ]                    : Warning
        [centos79]
        Warning reason: variable 'open files' RealValue '1024' ExpectedValue '1000000'
        Warning reason: variable 'max user processes' RealValue '14950' ExpectedValue 'unlimited'

    A8. [ Disk configuration status ]                           : Normal
        The value about XFS mount parameters is correct.
    A9. [ Pre-read block size status ]                          : Normal
        The value about Pre-read block size is correct.
    A10.[ IO scheduler status ]                                 : Normal
        The value of IO scheduler is correct.
    A11.[ Network card configuration status ]                   : Warning
        [centos79]
BondMode Null
        Warning reason: network 'ens33' 'mtu' RealValue '1500' ExpectedValue '8192'

    A12.[ Time consistency status ]                             : Warning
        [centos79]
        The NTPD not detected on machine and local time is "2024-04-05 09:57:04".

    A13.[ Firewall service status ]                             : Normal
        The firewall service is stopped.
    A14.[ THP service status ]                                  : Normal
        The THP service is stopped.
Total numbers:14. Abnormal numbers:0. Warning numbers:5.
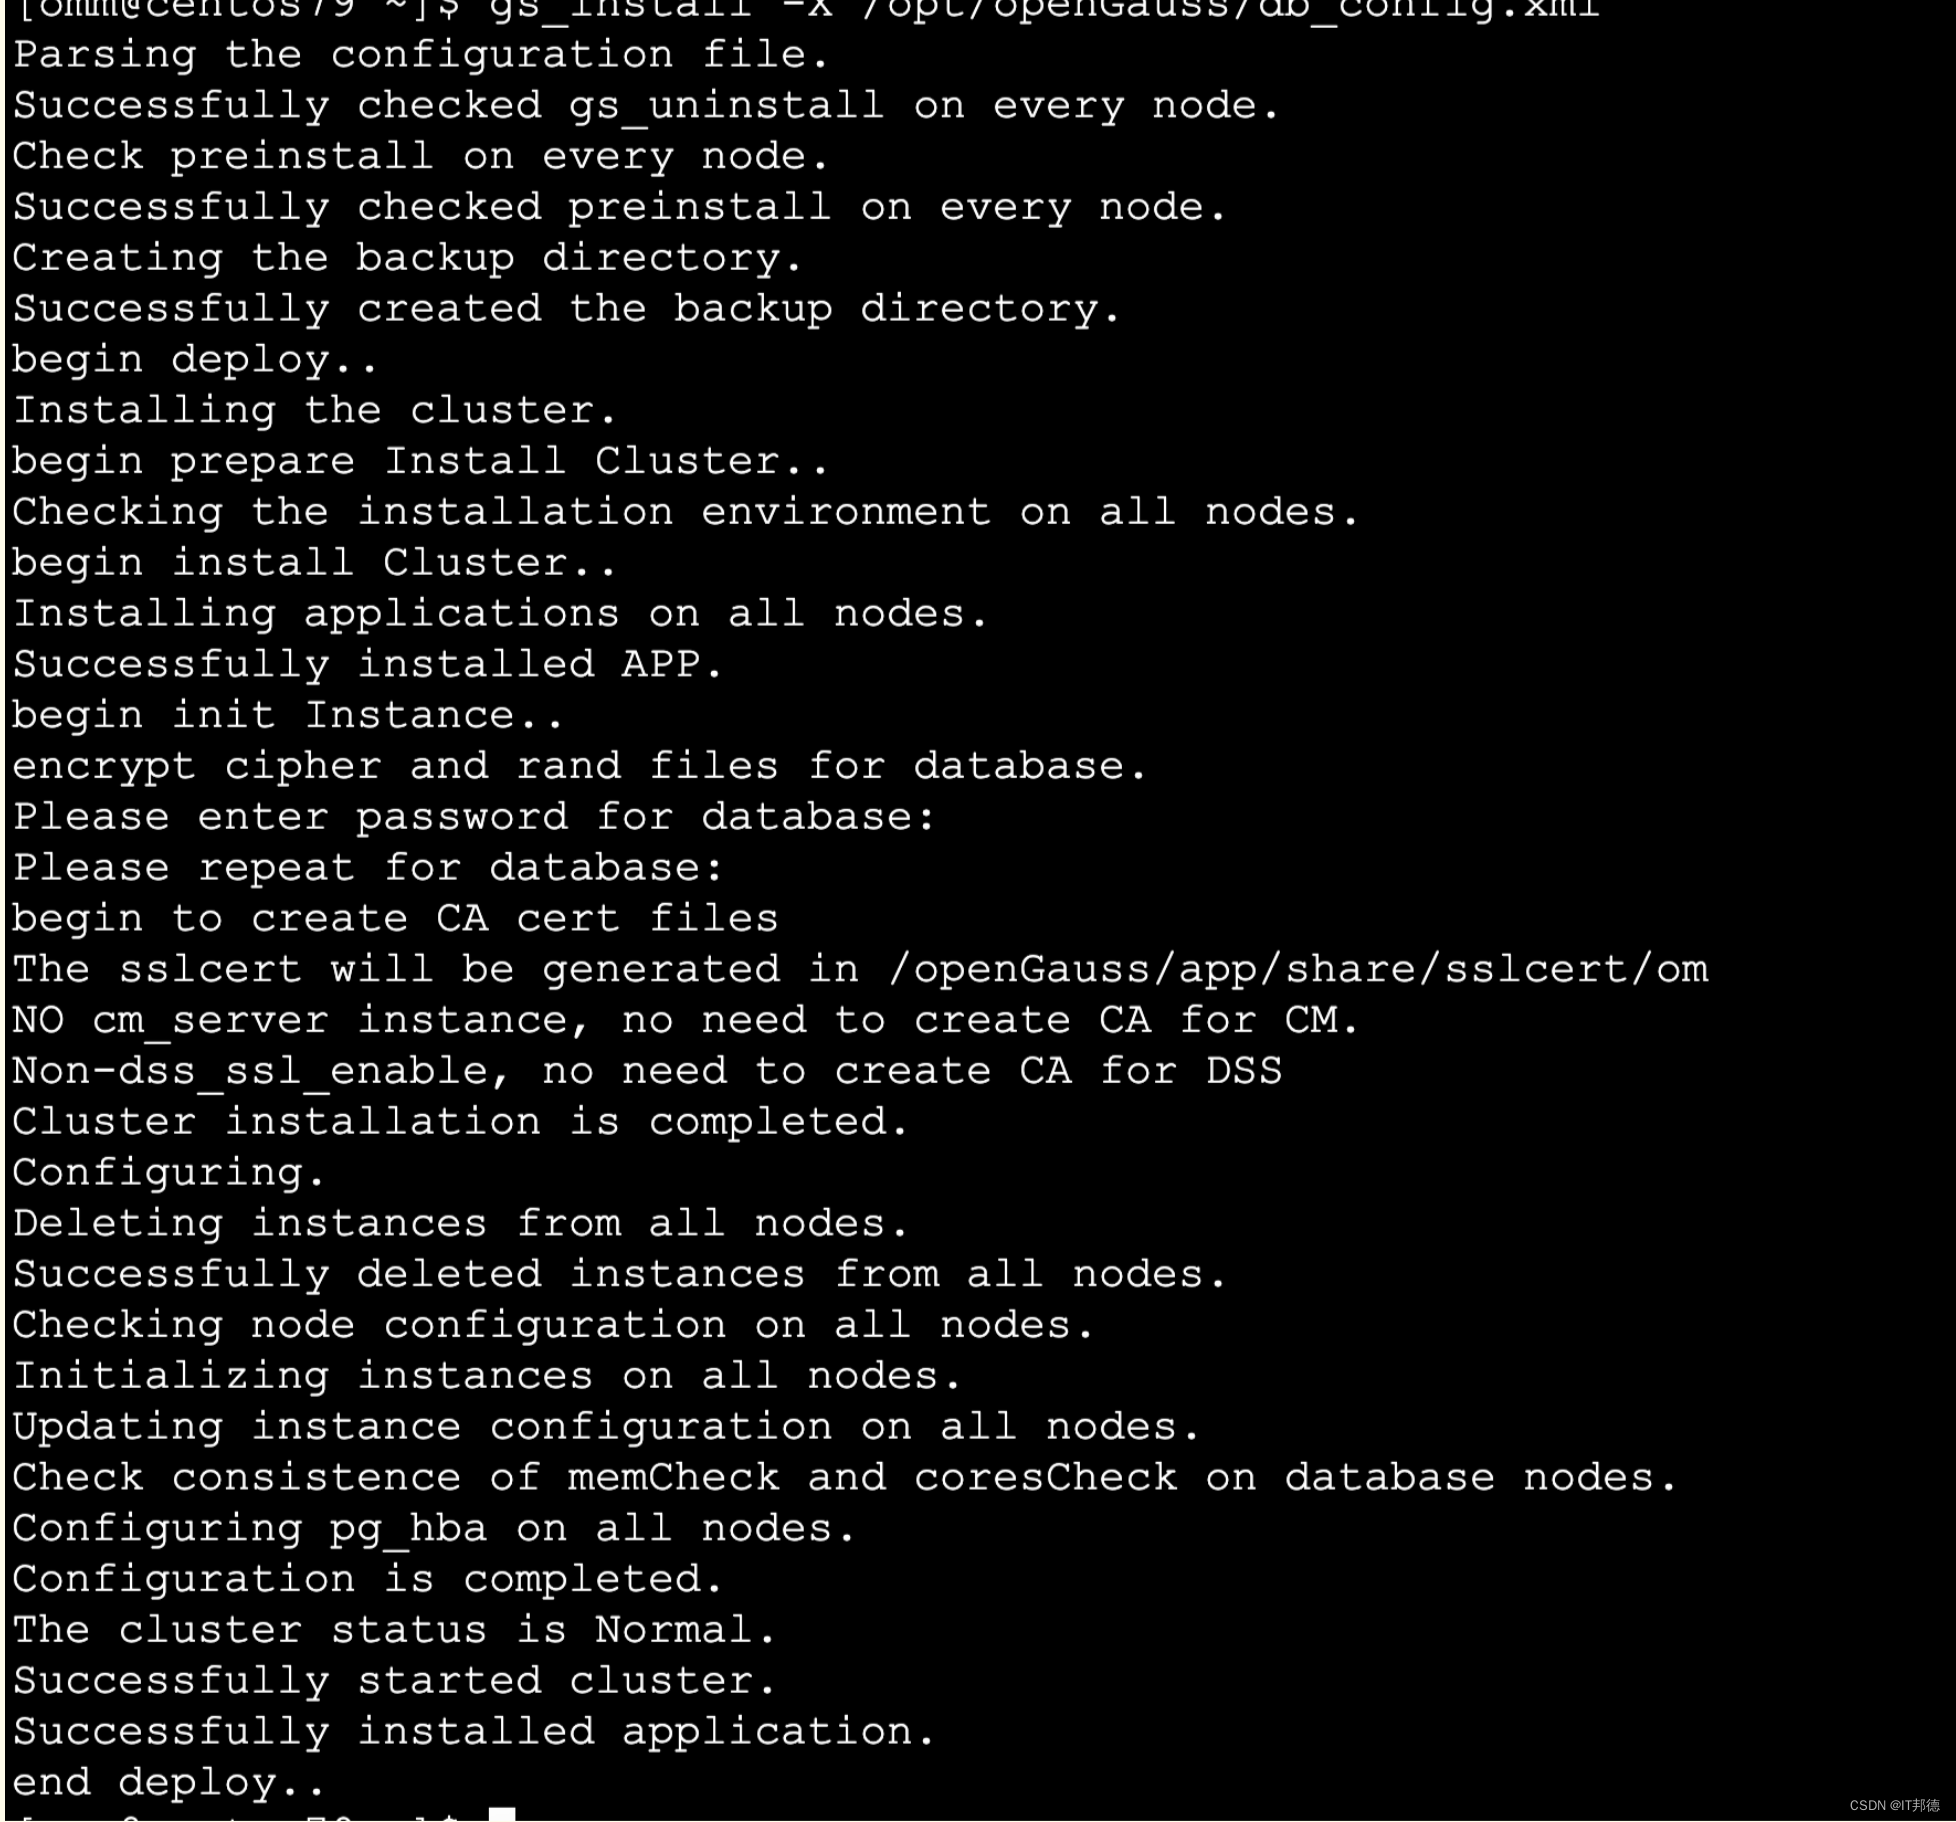
✨ 5.6 正式安装
#切换到omm用户
[root@centos79 ~]# su - omm
[omm@centos79 ~]$ gs_install -X /opt/openGauss/db_config.xml
此处指定数据库密码:Gauss_123
📣 6.安装验证
✨ 6.1 DB状态检查
通过openGauss提供的gs_om工具可以完成数据库状态检查
以omm用户身份登录服务器。
执行如下命令检查数据库状态是否正常,"cluster_state"显示"Normal"表示数据库可正常使用
[root@centos79 ~]# su - omm
[omm@centos79 ~]$ gs_om -t status
-----------------------------------------------------------------------

cluster_name    : dbCluster
cluster_state   : Normal
redistributing  : No

-----------------------------------------------------------------------

[omm@centos79 ~]$ gs_om -t status --detail
[   Cluster State   ]

cluster_state   : Normal
redistributing  : No
current_az      : AZ_ALL

[  Datanode State   ]

    node    node_ip         port      instance                   state
--------------------------------------------------------------------------------------
1  centos79 192.168.6.20    15400      6001 /openGauss/data/dn   P Primary Normal
✨ 6.2 数据库登陆
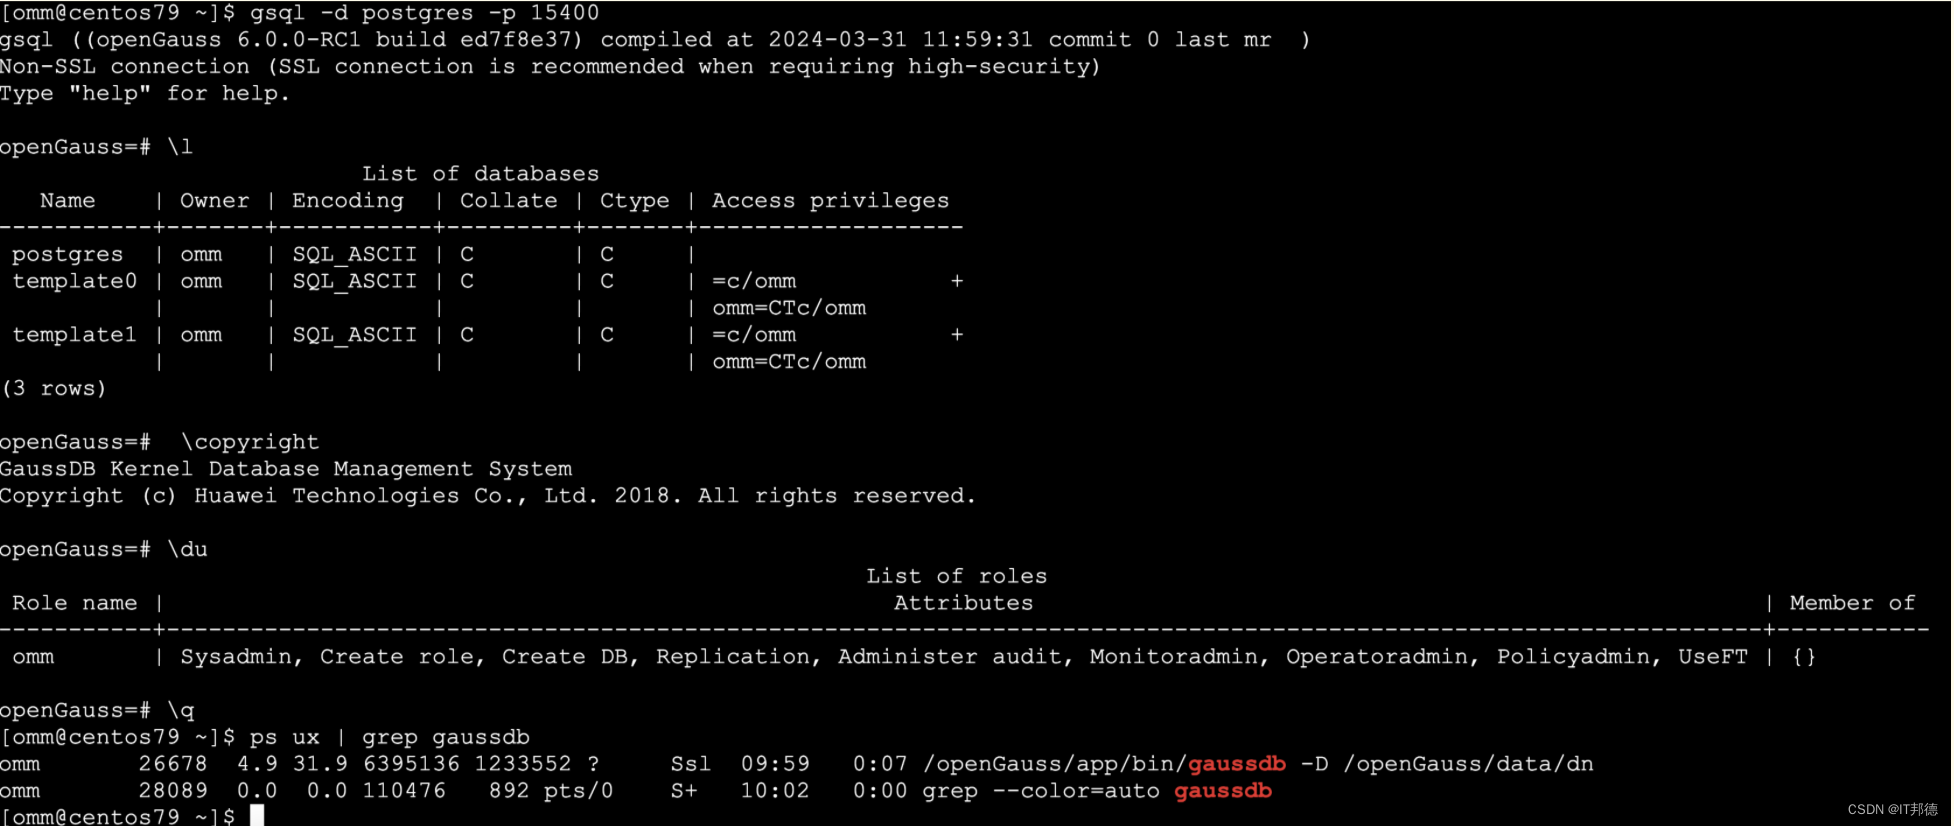
[omm@centos79 ~]$ gsql -d postgres -p 15400
gsql ((openGauss 6.0.0-RC1 build ed7f8e37) compiled at 2024-03-31 11:59:31 commit 0 last mr )
Non-SSL connection (SSL connection is recommended when requiring high-security)
Type “help” for help.
openGauss=# \l
List of databases
Name | Owner | Encoding | Collate | Ctype | Access privileges
-----------±------±----------±--------±------±------------------
postgres | omm | SQL_ASCII | C | C |
template0 | omm | SQL_ASCII | C | C | =c/omm +
| | | | | omm=CTc/omm
template1 | omm | SQL_ASCII | C | C | =c/omm +
| | | | | omm=CTc/omm
(3 rows)
[omm@centos79 ~]$ gsql -V
gsql (openGauss 6.0.0-RC1 build ed7f8e37) compiled at 2024-03-31 11:59:31 commit 0 last mr
✨ 6.3 DB启动及关闭
[omm@centos79 ~]$ gs_om -t stop
Stopping cluster.
=========================================
Successfully stopped cluster.
=========================================
End stop cluster.
[omm@centos79 ~]$ gs_om -t start
Starting cluster.
=========================================
[SUCCESS] centos79
2024-04-05 10:03:40.426 660f5bfc.1 [unknown] 139722610186880 [unknown] 0 dn_6001 01000  0 [BACKEND] WARNING:  could not create any HA TCP/IP sockets
2024-04-05 10:03:40.426 660f5bfc.1 [unknown] 139722610186880 [unknown] 0 dn_6001 01000  0 [BACKEND] WARNING:  could not create any HA TCP/IP sockets
2024-04-05 10:03:40.428 660f5bfc.1 [unknown] 139722610186880 [unknown] 0 dn_6001 01000  0 [BACKEND] WARNING:  Failed to initialize the memory protect for g_instance.attr.attr_storage.cstore_buffers (1024 Mbytes) or shared memory (3540 Mbytes) is larger.
=========================================
Successfully started.
[omm@centos79 ~]$ gs_om -t status --detail
[   Cluster State   ]

cluster_state   : Normal
redistributing  : No
current_az      : AZ_ALL

[  Datanode State   ]

    node    node_ip         port      instance                   state
--------------------------------------------------------------------------------------
1  centos79 192.168.6.20    15400      6001 /openGauss/data/dn   P Primary Normal
📣 7.总结及故障处理
1.python3安装后报错
[root@centos79 ~]# python3 -V
python3: error while loading shared libraries: libpython3.6m.so.1.0: cannot open shared object file: No such file or directory
出现以上报错处理方法,libpython3.6m.so.1.0复制到/usr/lib64/目录下即可
[root@centos79 ~]# find / -name libpython3.6m.so.1.0
/usr/local/python3/lib/libpython3.6m.so.1.0
/opt/Python-3.6.15/libpython3.6m.so.1.0
[root@centos79 ~]# cp /usr/local/python3/lib/libpython3.6m.so.1.0 /usr/lib64
2./usr/bin/env: python3: No such file or directory
注意此时还需要设置下OS上python的软连接
[root@centos79 ~]# ln -s /usr/local/python3/bin/python3.6 /usr/bin/python3
[root@centos79 ~]# ln -s /usr/local/python3/bin/pip3 /usr/bin/pip