yolact不算是很新的实例分割方法,但好在易上手,且像YOLO系列一样,在持续更新中, 所以作为示例分割的开篇,就以yolact作为第一篇开始学习吧!
目录
🐸🐸1.YOLACT是什么?
🙋🙋2.YOLACT能做什么?
💖💖3.准备环境
⭐3.1数据准备
⭐3.2yolact模型训练自己的数据集准备
修改处1:
修改处2:
修改处3:
⭐3.3其他参数设置
🍌🍌4.模型训练
🔔🔔5.模型推理测试
⭐5.1COCO 格式的定量测试结果
⭐5.2COCO格式 的定性测试结果
⭐5.3COCO 数据集测试
⭐5.4测试图片
⭐5.5测试视频
整理不易,欢迎一键三连!!!
🐸🐸1.YOLACT是什么?
YOLACT:You Only Look At CoefficienTs的缩写,是一种实时实例分割全卷积网络。
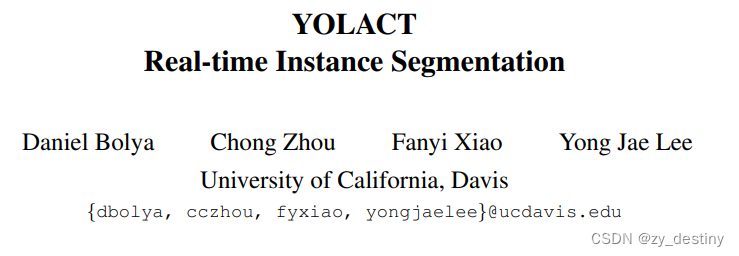
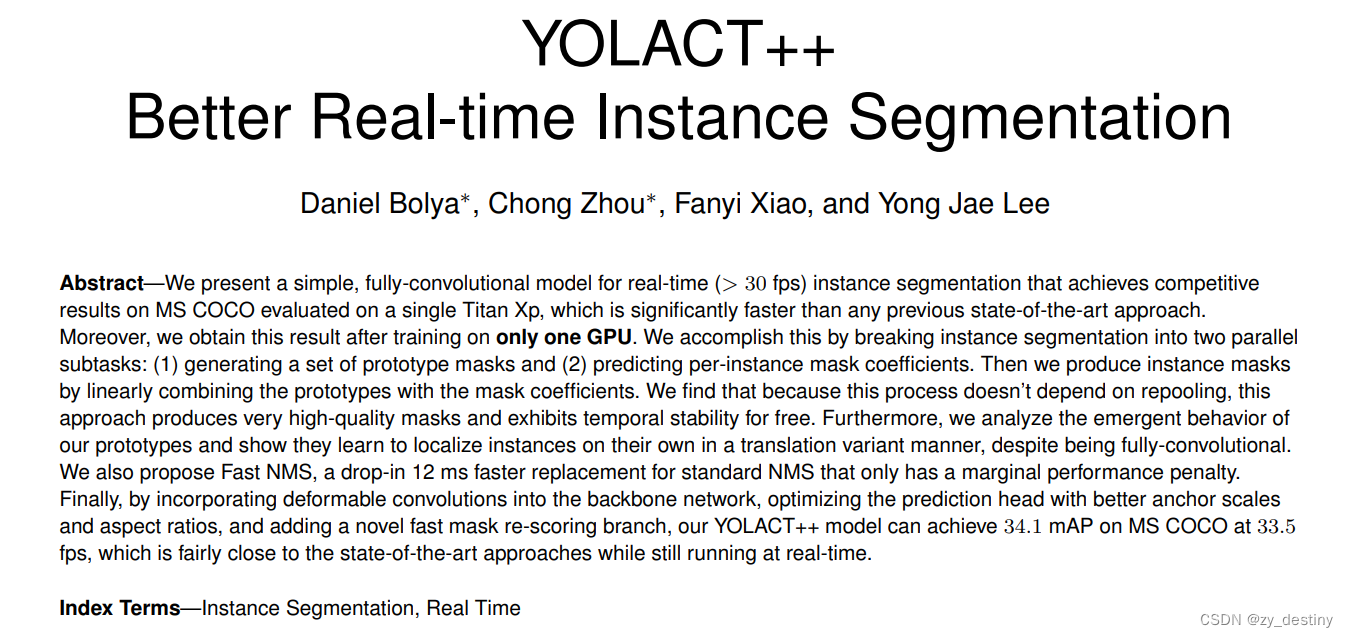
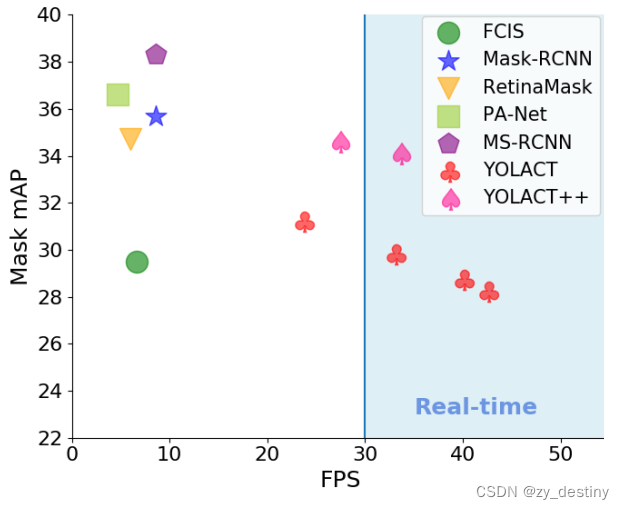
yolact网络做实时实例分割(分割+目标检测),支持图像和视频的训练及推理。
- 论文:paper
- 代码:code
🙋🙋2.YOLACT能做什么?
视频链接:youtube
视频中的部分截图如下,可以对图像中不同对象进行像素级标注(实例分割)和目标框标注(目标检测)。
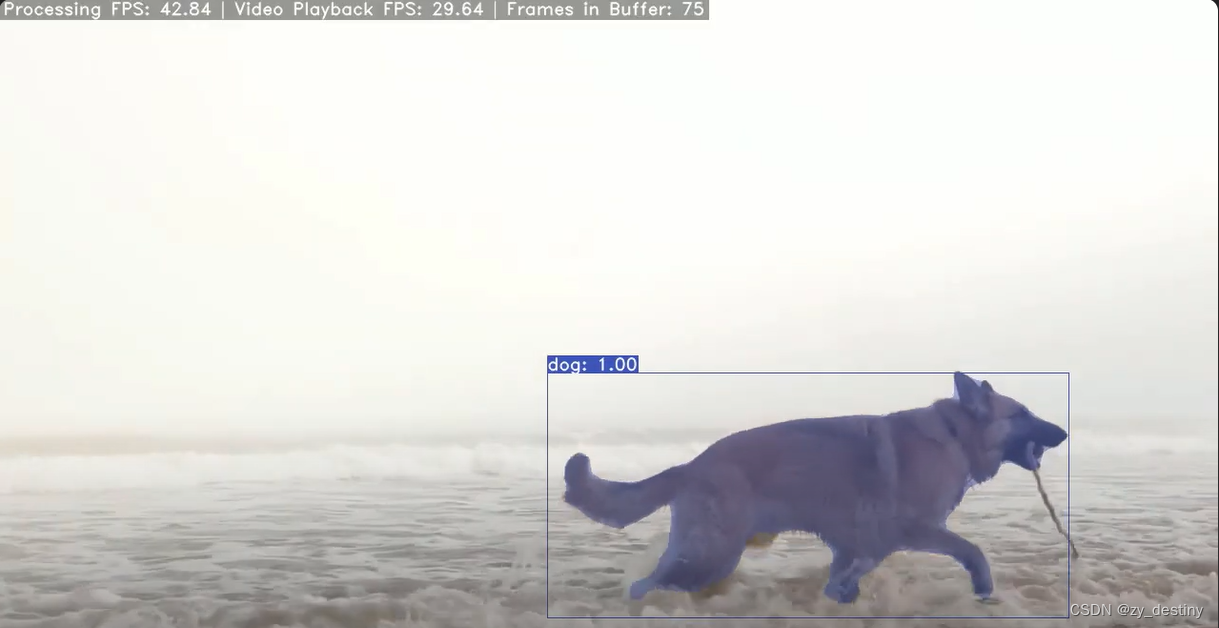
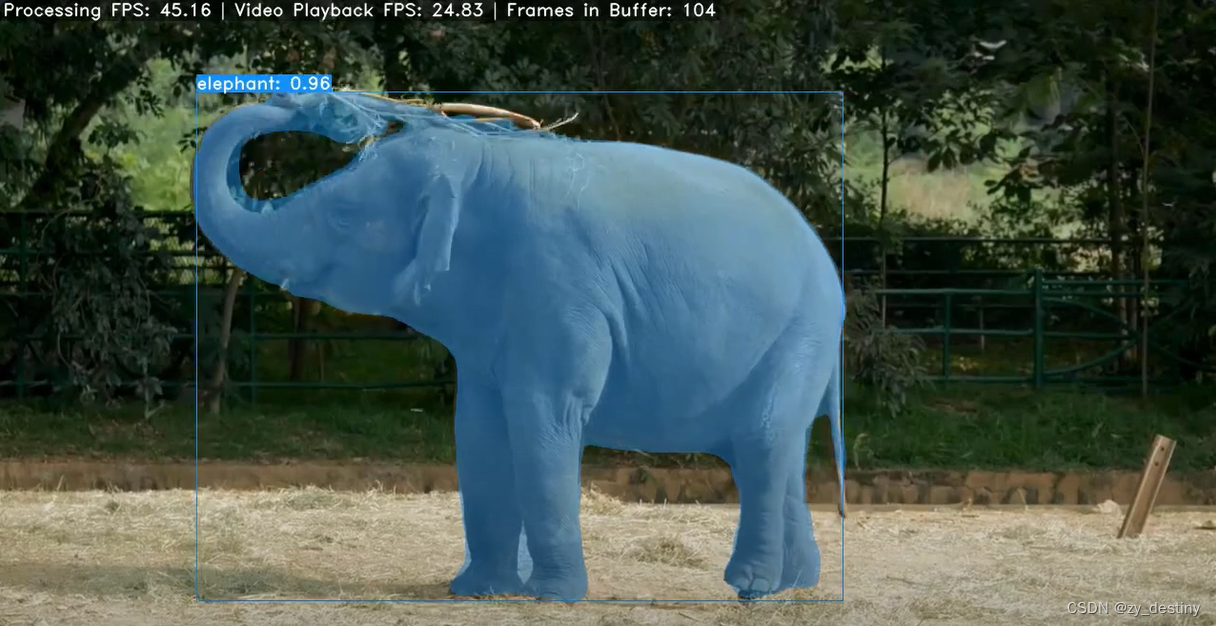
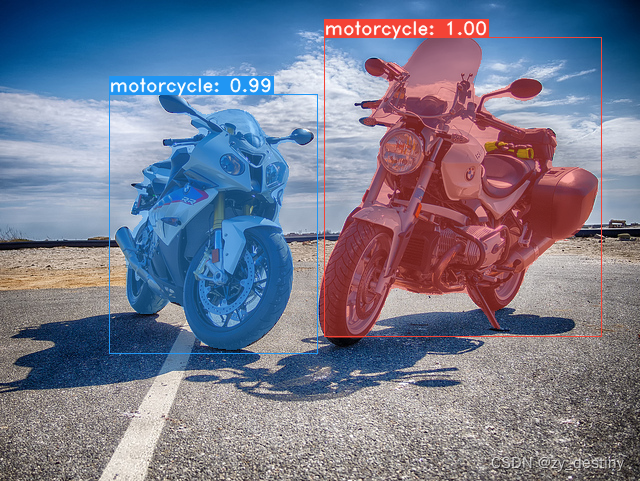
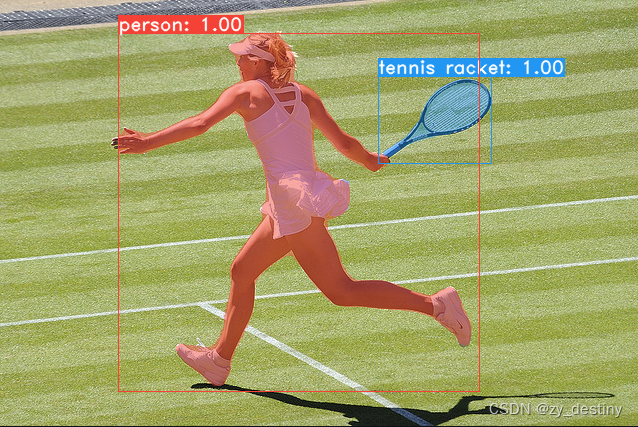
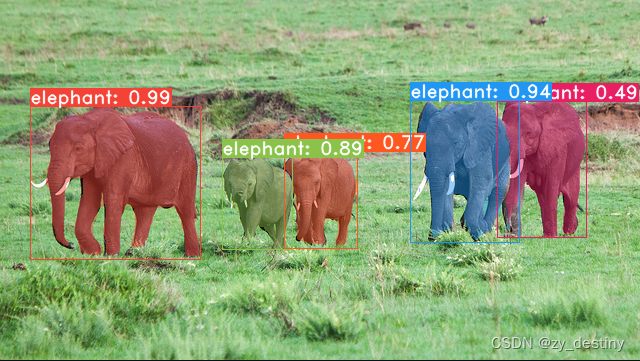
可以看到,实例分割与语义分割的主要区别是,实例分割将同类型的目标(大象)区分成不同的个体,语义分割,则是用相同像素来表示同类型目标,不会区分个体,也就是实例。
💖💖3.准备环境
主要的环境就是pytorch,并且pytorch版本要求高于1.0.1,其他环境如下:
name: yolact-env
#prefix: /your/custom/path/envs/yolact-env
channels:
  - conda-forge
  - pytorch
  - defaults
dependencies:
  - python==3.7
  - pip
  - cython
  - pytorch::torchvision
  - pytorch::pytorch >=1.0.1
  - cudatoolkit
  - cudnn
  - pytorch::cuda100
  - matplotlib
  - git # to download COCO dataset
  - curl # to download COCO dataset
  - unzip # to download COCO dataset
  - conda-forge::bash # to download COCO dataset
  - pip:
    - opencv-python
    - pillow <7.0 # bug PILLOW_VERSION in torchvision, must be < 7.0 until torchvision is upgraded
    - pycocotools
    - PyQt5 # needed on KDE/Qt envs for matplotlib
⭐3.1数据准备
- 如果你想训练 YOLACT,请下载 COCO 数据集和 2014/2017 注释。请注意,此脚本需要一段时间才能将 21GB 的文件转储到
./data/coco.sh data/scripts/COCO.sh - 如果您想在coco上评估 YOLACT
test-dev,请test-dev使用此脚本下载。sh data/scripts/COCO_test.sh - 如果您想使用 YOLACT++,请编译可变形卷积层(来自DCNv2)。确保您已从NVidia 网站安装了最新的 CUDA 工具包。
cd external/DCNv2
python setup.py build develop
如果你想训练自己的数据集,需要按照COCO数据集的实例分割格式进行数据准备,其中包含两部分内容:
- 一个是images文件夹,包含所有的影像文件,格式可支持常见的影像数据格式(tif 、png 、JPEG等)
- 另一个就是包含了所有影像文件的实例分割标注label文件,格式为coco格式的JSON文件。
⭐3.2yolact模型训练自己的数据集准备
要进行训练,请获取经过 imagenet 预训练的模型并将其放入
./weights.- 对于 Resnet101,请
resnet101_reducedfc.pth从此处下载。 - 对于 Resnet50,请
resnet50-19c8e357.pth从此处下载。 - 对于 Darknet53,请
darknet53.pth从此处下载。
- 请注意,您可以在训练时按 ctrl+c,它将
*_interrupt.pth在当前迭代中保存文件。 - 所有权重默认保存在
./weights目录中,文件名为<config>_<epoch>_<iter>.pth
如果要训练自己的数据集,只需要修改数据加载的位置即可,具体来说,找到./data/config.py目录修改处1:
COCO_CLASSES = ('person', 'bicycle', 'car', 'motorcycle', 'airplane', 'bus',
                'train', 'truck', 'boat', 'traffic light', 'fire hydrant',
                'stop sign', 'parking meter', 'bench', 'bird', 'cat', 'dog',
                'horse', 'sheep', 'cow', 'elephant', 'bear', 'zebra', 'giraffe',
                'backpack', 'umbrella', 'handbag', 'tie', 'suitcase', 'frisbee',
                'skis', 'snowboard', 'sports ball', 'kite', 'baseball bat',
                'baseball glove', 'skateboard', 'surfboard', 'tennis racket',
                'bottle', 'wine glass', 'cup', 'fork', 'knife', 'spoon', 'bowl',
                'banana', 'apple', 'sandwich', 'orange', 'broccoli', 'carrot',
                'hot dog', 'pizza', 'donut', 'cake', 'chair', 'couch',
                'potted plant', 'bed', 'dining table', 'toilet', 'tv', 'laptop',
                'mouse', 'remote', 'keyboard', 'cell phone', 'microwave', 'oven',
                'toaster', 'sink', 'refrigerator', 'book', 'clock', 'vase',
                'scissors', 'teddy bear', 'hair drier', 'toothbrush')

COCO_LABEL_MAP = { 1:  1,  2:  2,  3:  3,  4:  4,  5:  5,  6:  6,  7:  7,  8:  8,
                   9:  9, 10: 10, 11: 11, 13: 12, 14: 13, 15: 14, 16: 15, 17: 16,
                  18: 17, 19: 18, 20: 19, 21: 20, 22: 21, 23: 22, 24: 23, 25: 24,
                  27: 25, 28: 26, 31: 27, 32: 28, 33: 29, 34: 30, 35: 31, 36: 32,
                  37: 33, 38: 34, 39: 35, 40: 36, 41: 37, 42: 38, 43: 39, 44: 40,
                  46: 41, 47: 42, 48: 43, 49: 44, 50: 45, 51: 46, 52: 47, 53: 48,
                  54: 49, 55: 50, 56: 51, 57: 52, 58: 53, 59: 54, 60: 55, 61: 56,
                  62: 57, 63: 58, 64: 59, 65: 60, 67: 61, 70: 62, 72: 63, 73: 64,
                  74: 65, 75: 66, 76: 67, 77: 68, 78: 69, 79: 70, 80: 71, 81: 72,
                  82: 73, 84: 74, 85:
为自己的数据集格式,
修改处2:
将加载数据集的地址换成自己的数据集地址,即修改
# ----------------------- DATASETS ----------------------- #

dataset_base = Config({
    'name': 'Base Dataset',

    # Training images and annotations
    'train_images': 'xxx/mydataset/images/train',
    'train_info':   'path_to_annotation_file_for_train',

    # Validation images and annotations.
    'valid_images': 'xxx/mydataset/images/val',
    'valid_info':   'path_to_annotation_file_for_val',

    # Whether or not to load GT. If this is False, eval.py quantitative evaluation won't work.
    'has_gt': True,

    # A list of names for each of you classes.
    'class_names': COCO_CLASSES,

    # COCO class ids aren't sequential, so this is a bandage fix. If your ids aren't sequential,
    # provide a map from category_id -> index in class_names + 1 (the +1 is there because it's 1-indexed).
    # If not specified, this just assumes category ids start at 1 and increase sequentially.
    'label_map': None
})
将训练数据集和验证数据集的加载地址切换为自己的数据集地址,注意此处只要修改了images的地址就可以,具体后面会解释。
修改处3:
改为dataset_base的信息之后,还需要注意,在真正训练的时候,会实例化dataset_base的信息,所以还需要修改coco2014_dataset或coco2017_dataset的信息,如下:
coco2014_dataset = dataset_base.copy({
    'name': 'COCO 2014',

    'train_info': './data/coco/annotations/instances_train2014.json',
    'valid_info': './data/coco/annotations/instances_val2014.json',

    'label_map': COCO_LABEL_MAP
})
coco2017_dataset = dataset_base.copy({
    'name': 'COCO 2017',

    'train_info': './data/coco/annotations/instances_train2017.json',
    'valid_info': './data/coco/annotations/instances_val2017.json',

    'label_map': COCO_LABEL_MAP
})注意:这里的修改地址主要是修改label的地址,所以在dataset_base处只需要修改images的地址就可以。还有就是此处的JSON文件要保持与COCO数据集相同的格式,否则会报错哦。
⭐3.3其他参数设置
其他的训练参数可以在train.py文件处修改,代码如下。
parser = argparse.ArgumentParser(
    description='Yolact Training Script')
parser.add_argument('--batch_size', default=32, type=int,
                    help='Batch size for training')
parser.add_argument('--resume',  ype=str,
                    help='Checkpoint state_dict file to resume training from. If this is "interrupt"'\
                         ', the model will resume training from the interrupt file.')
parser.add_argument('--start_iter', default=-1, type=int,
                    help='Resume training at this iter. If this is -1, the iteration will be'\
                         'determined from the file name.')
parser.add_argument('--num_workers', default=0, type=int,
                    help='Number of workers used in dataloading')
parser.add_argument('--cuda', default=True, type=str2bool,
                    help='Use CUDA to train model')
parser.add_argument('--lr', '--learning_rate', default=None, type=float,
                    help='Initial learning rate. Leave as None to read this from the config.')
parser.add_argument('--momentum', default=None, type=float,
                    help='Momentum for SGD. Leave as None to read this from the config.')
parser.add_argument('--decay', '--weight_decay', default=None, type=float,
                    help='Weight decay for SGD. Leave as None to read this from the config.')
parser.add_argument('--gamma', default=None, type=float,
                    help='For each lr step, what to multiply the lr by. Leave as None to read this from the config.')
parser.add_argument('--save_folder', default='/save_weights/',
                    help='Directory for saving checkpoint models.')
parser.add_argument('--log_folder', default='logs/',
                    help='Directory for saving logs.')
parser.add_argument('--config', default=None,
                    help='The config object to use.')
parser.add_argument('--save_interval', default=1000, type=int,
                    help='The number of iterations between saving the model.')
parser.add_argument('--validation_size', default=1000, type=int,
                    help='The number of images to use for validation.')
parser.add_argument('--validation_epoch', default=1, type=int,
                    help='Output validation information every n iterations. If -1, do no validation.')
parser.add_argument('--keep_latest', dest='keep_latest', action='store_true',
                    help='Only keep the latest checkpoint instead of each one.')
parser.add_argument('--keep_latest_interval', default=100000, type=int,
                    help='When --keep_latest is on, don\'t delete the latest file at these intervals. This should be a multiple of save_interval or 0.')
parser.add_argument('--dataset', default=None, type=str,
                    help='If specified, override the dataset specified in the config with this one (example: coco2017_dataset).')
parser.add_argument('--no_log', dest='log', action='store_false',
                    help='Don\'t log per iteration information into log_folder.')
parser.add_argument('--log_gpu', dest='log_gpu', action='store_true',
                    help='Include GPU information in the logs. Nvidia-smi tends to be slow, so set this with caution.')
parser.add_argument('--no_interrupt', dest='interrupt', action='store_false',
                    help='Don\'t save an interrupt when KeyboardInterrupt is caught.')
parser.add_argument('--batch_alloc', default=None, type=str,
                    help='If using multiple GPUS, you can set this to be a comma separated list detailing which GPUs should get what local batch size (It should add up to your total batch size).')
parser.add_argument('--no_autoscale', dest='autoscale', action='store_false',
                    help='YOLACT will automatically scale the lr and the number of iterations depending on the batch size. Set this if you want to disable that.')
个人觉得重要的参数:
- batch_size:关系到显卡会不会爆
- resume:中间训练中断可以接上
- save_folder:模型保存地址
- log_folder:log文件保存地址
- save_interval:多少轮迭代保存一次模型
- validation_epoch:多少轮验证一次模型
- dataset:可以选择coco2014_dataset或者coco2017_dataset,就会调用上面的config文件里对应的数据地址了
当然,其它参数当然也很重要,什么GPU选择,num_work之类的,但是大多数咱们用GPU保持默认参数就可以。
其他参数设置在./data/config.py文件里。比如:
- 训练模型backbone设置
- num_class设置
- nms_thresh设置
- 数据增强设置
- 激活函数设置
还有很多其他参数,至此所有的训练参数设置位置就只有在train.py和这个config.py文件里了,修改完之后就可以进行模型训练了。
🍌🍌4.模型训练
训练代码如下:
# Trains using the base config with a batch size of 8 (the default).
python train.py --config=yolact_base_config

# Trains yolact_base_config with a batch_size of 5. For the 550px models, 1 batch takes up around 1.5 gigs of VRAM, so specify accordingly.
python train.py --config=yolact_base_config --batch_size=5

# Resume training yolact_base with a specific weight file and start from the iteration specified in the weight file's name.
python train.py --config=yolact_base_config --resume=weights/yolact_base_10_32100.pth --start_iter=-1

# Use the help option to see a description of all available command line arguments
python train.py --help
一般把参数提前设置好之后,就允许第一句就可以开始模型训练了。
YOLACT 现在在训练过程中无缝支持多个 GPU:
- 在运行任何脚本之前,请运行:
export CUDA_VISIBLE_DEVICES=[gpus]- 您应该将 [gpus] 替换为要使用的每个 GPU 的索引的逗号分隔列表(例如,0,1,2,3)。
- 如果仅使用 1 个 GPU,您仍然应该这样做。
- 您可以使用 检查 GPU 的索引
nvidia-smi。
8*num_gpus然后,只需使用上面的训练命令将批量大小设置为即可。训练脚本会自动将超参数调整为正确的值。- 如果您有空闲内存,则可以进一步增加批处理大小,但请将其保持为您正在使用的 GPU 数量的倍数。
- 如果要为每个 GPU 分配特定于不同 GPU 的图像,可以使用
--batch_alloc=[alloc]其中 [alloc] 是一个逗号分隔的列表,其中包含每个 GPU 上的图像数量。这必须总和为batch_size。
🔔🔔5.模型推理测试
⭐5.1COCO 格式的定量测试结果
# Quantitatively evaluate a trained model on the entire validation set. Make sure you have COCO downloaded as above.
# This should get 29.92 validation mask mAP last time I checked.
python eval.py --trained_model=weights/yolact_base_54_800000.pth

# Output a COCOEval json to submit to the website or to use the run_coco_eval.py script.
# This command will create './results/bbox_detections.json' and './results/mask_detections.json' for detection and instance segmentation respectively.
python eval.py --trained_model=weights/yolact_base_54_800000.pth --output_coco_json

# You can run COCOEval on the files created in the previous command. The performance should match my implementation in eval.py.
python run_coco_eval.py

# To output a coco json file for test-dev, make sure you have test-dev downloaded from above and go
python eval.py --trained_model=weights/yolact_base_54_800000.pth --output_coco_json --dataset=coco2017_testdev_dataset⭐5.2COCO格式 的定性测试结果
# Display qualitative results on COCO. From here on I'll use a confidence threshold of 0.15.
python eval.py --trained_model=weights/yolact_base_54_800000.pth --score_threshold=0.15 --top_k=15 --display⭐5.3COCO 数据集测试
# Run just the raw model on the first 1k images of the validation set
python eval.py --trained_model=weights/yolact_base_54_800000.pth --benchmark --max_images=1000⭐5.4测试图片
# Display qualitative results on the specified image.
python eval.py --trained_model=weights/yolact_base_54_800000.pth --score_threshold=0.15 --top_k=15 --image=my_image.png

# Process an image and save it to another file.
python eval.py --trained_model=weights/yolact_base_54_800000.pth --score_threshold=0.15 --top_k=15 --image=input_image.png:output_image.png

# Process a whole folder of images.
python eval.py --trained_model=weights/yolact_base_54_800000.pth --score_threshold=0.15 --top_k=15 --images=path/to/input/folder:path/to/output/folder⭐5.5测试视频
# Display a video in real-time. "--video_multiframe" will process that many frames at once for improved performance.
# If you want, use "--display_fps" to draw the FPS directly on the frame.
python eval.py --trained_model=weights/yolact_base_54_800000.pth --score_threshold=0.15 --top_k=15 --video_multiframe=4 --video=my_video.mp4

# Display a webcam feed in real-time. If you have multiple webcams pass the index of the webcam you want instead of 0.
python eval.py --trained_model=weights/yolact_base_54_800000.pth --score_threshold=0.15 --top_k=15 --video_multiframe=4 --video=0

# Process a video and save it to another file. This uses the same pipeline as the ones above now, so it's fast!
python eval.py --trained_model=weights/yolact_base_54_800000.pth --score_threshold=0.15 --top_k=15 --video_multiframe=4 --video=input_video.mp4:output_video.mp4 正如你所知,eval.py可以做很多事情。运行该--help命令以查看它可以执行的所有操作。通常实例分割中我们最常用的是就是测试图片功能了,可以支持文件夹测试和单张文件测试。
至此,yolact的训练和预测过程就全部完成了,接下来就是自由调参,验证模型效果了,有什么bug欢迎评论区交流。
整理不易,欢迎一键三连!!!
送你们一条美丽的--分割线--
🌷🌷🍀🍀🌾🌾🍓🍓🍂🍂🙋🙋🐸🐸🙋🙋💖💖🍌🍌🔔🔔🍉🍉🍭🍭🍋🍋🍇🍇🏆🏆📸📸⛵⛵⭐⭐🍎🍎👍👍🌷🌷
python eval.py --help

