Android集成百度地图
文章目录
- Android集成百度地图
- 前言
- 准备工作
- 创建工程
- 申请密钥
- 在项目中集成BaiduMap SDK
- 创建地图
前言
本案例使用百度地图实现在Android中集成地图,并且实现了普通地图/卫星地图,以及路况图和热状图功能;
参考技术文档:Android 地图SDK
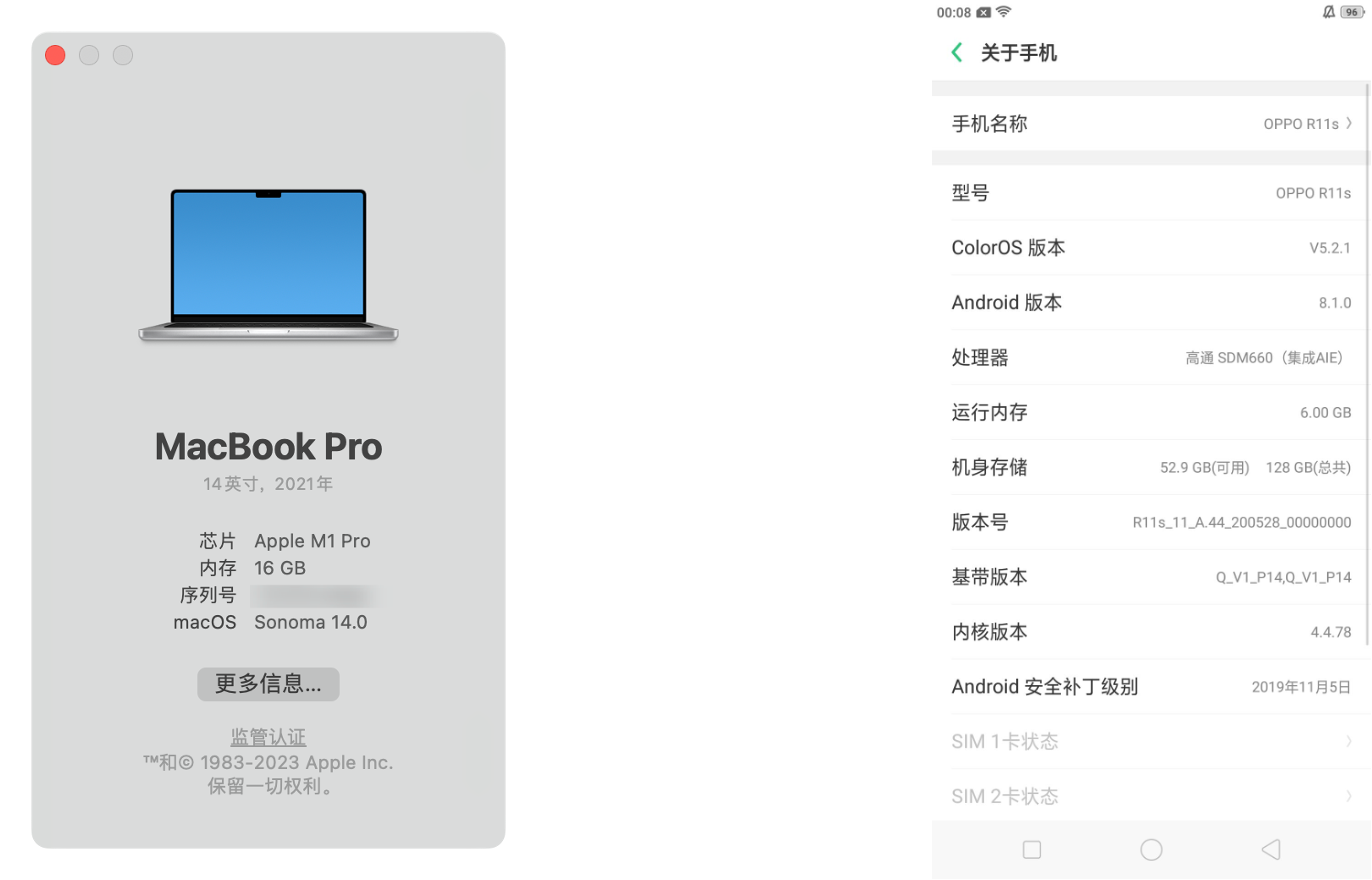
软件环境:
准备工作
创建工程
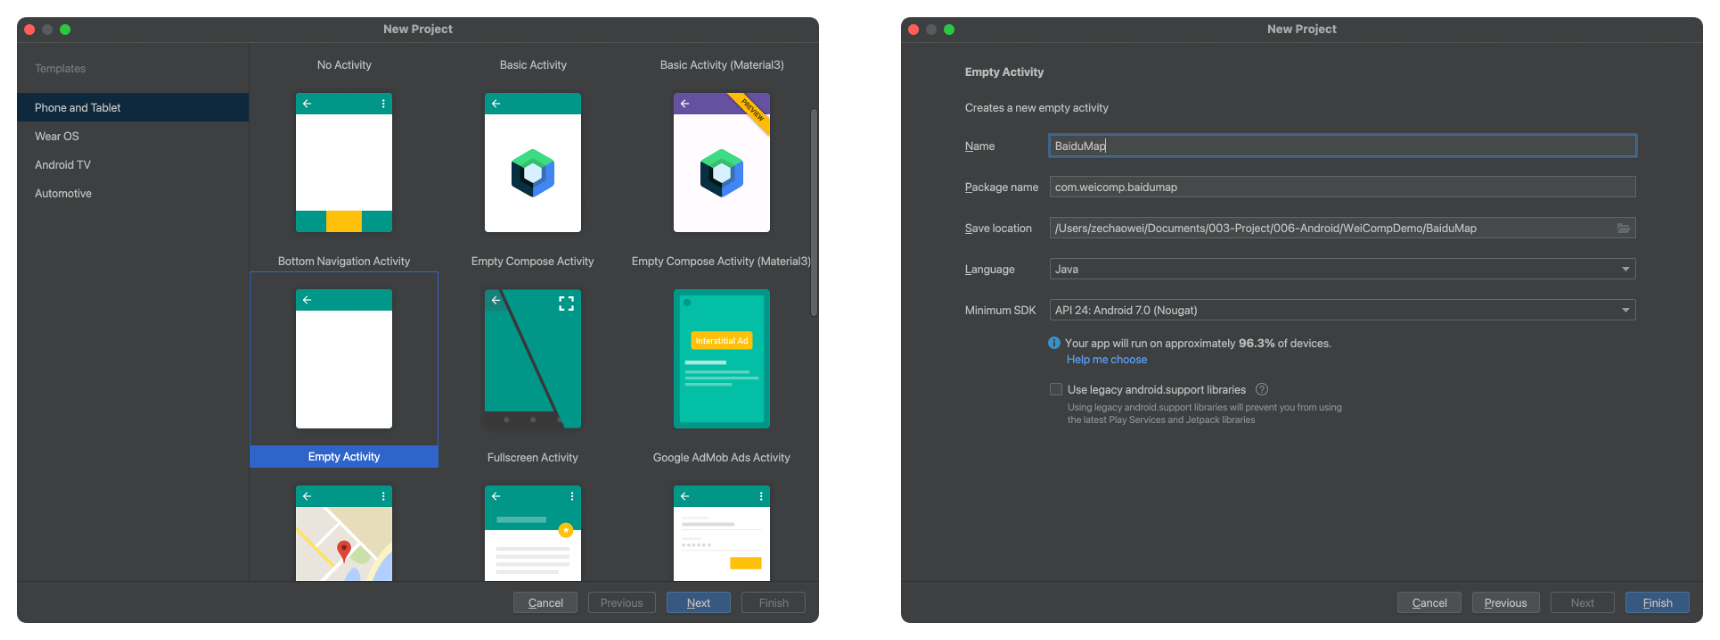
注:新创建的项目的 Name 和 Package name比较重要,后面会使用到
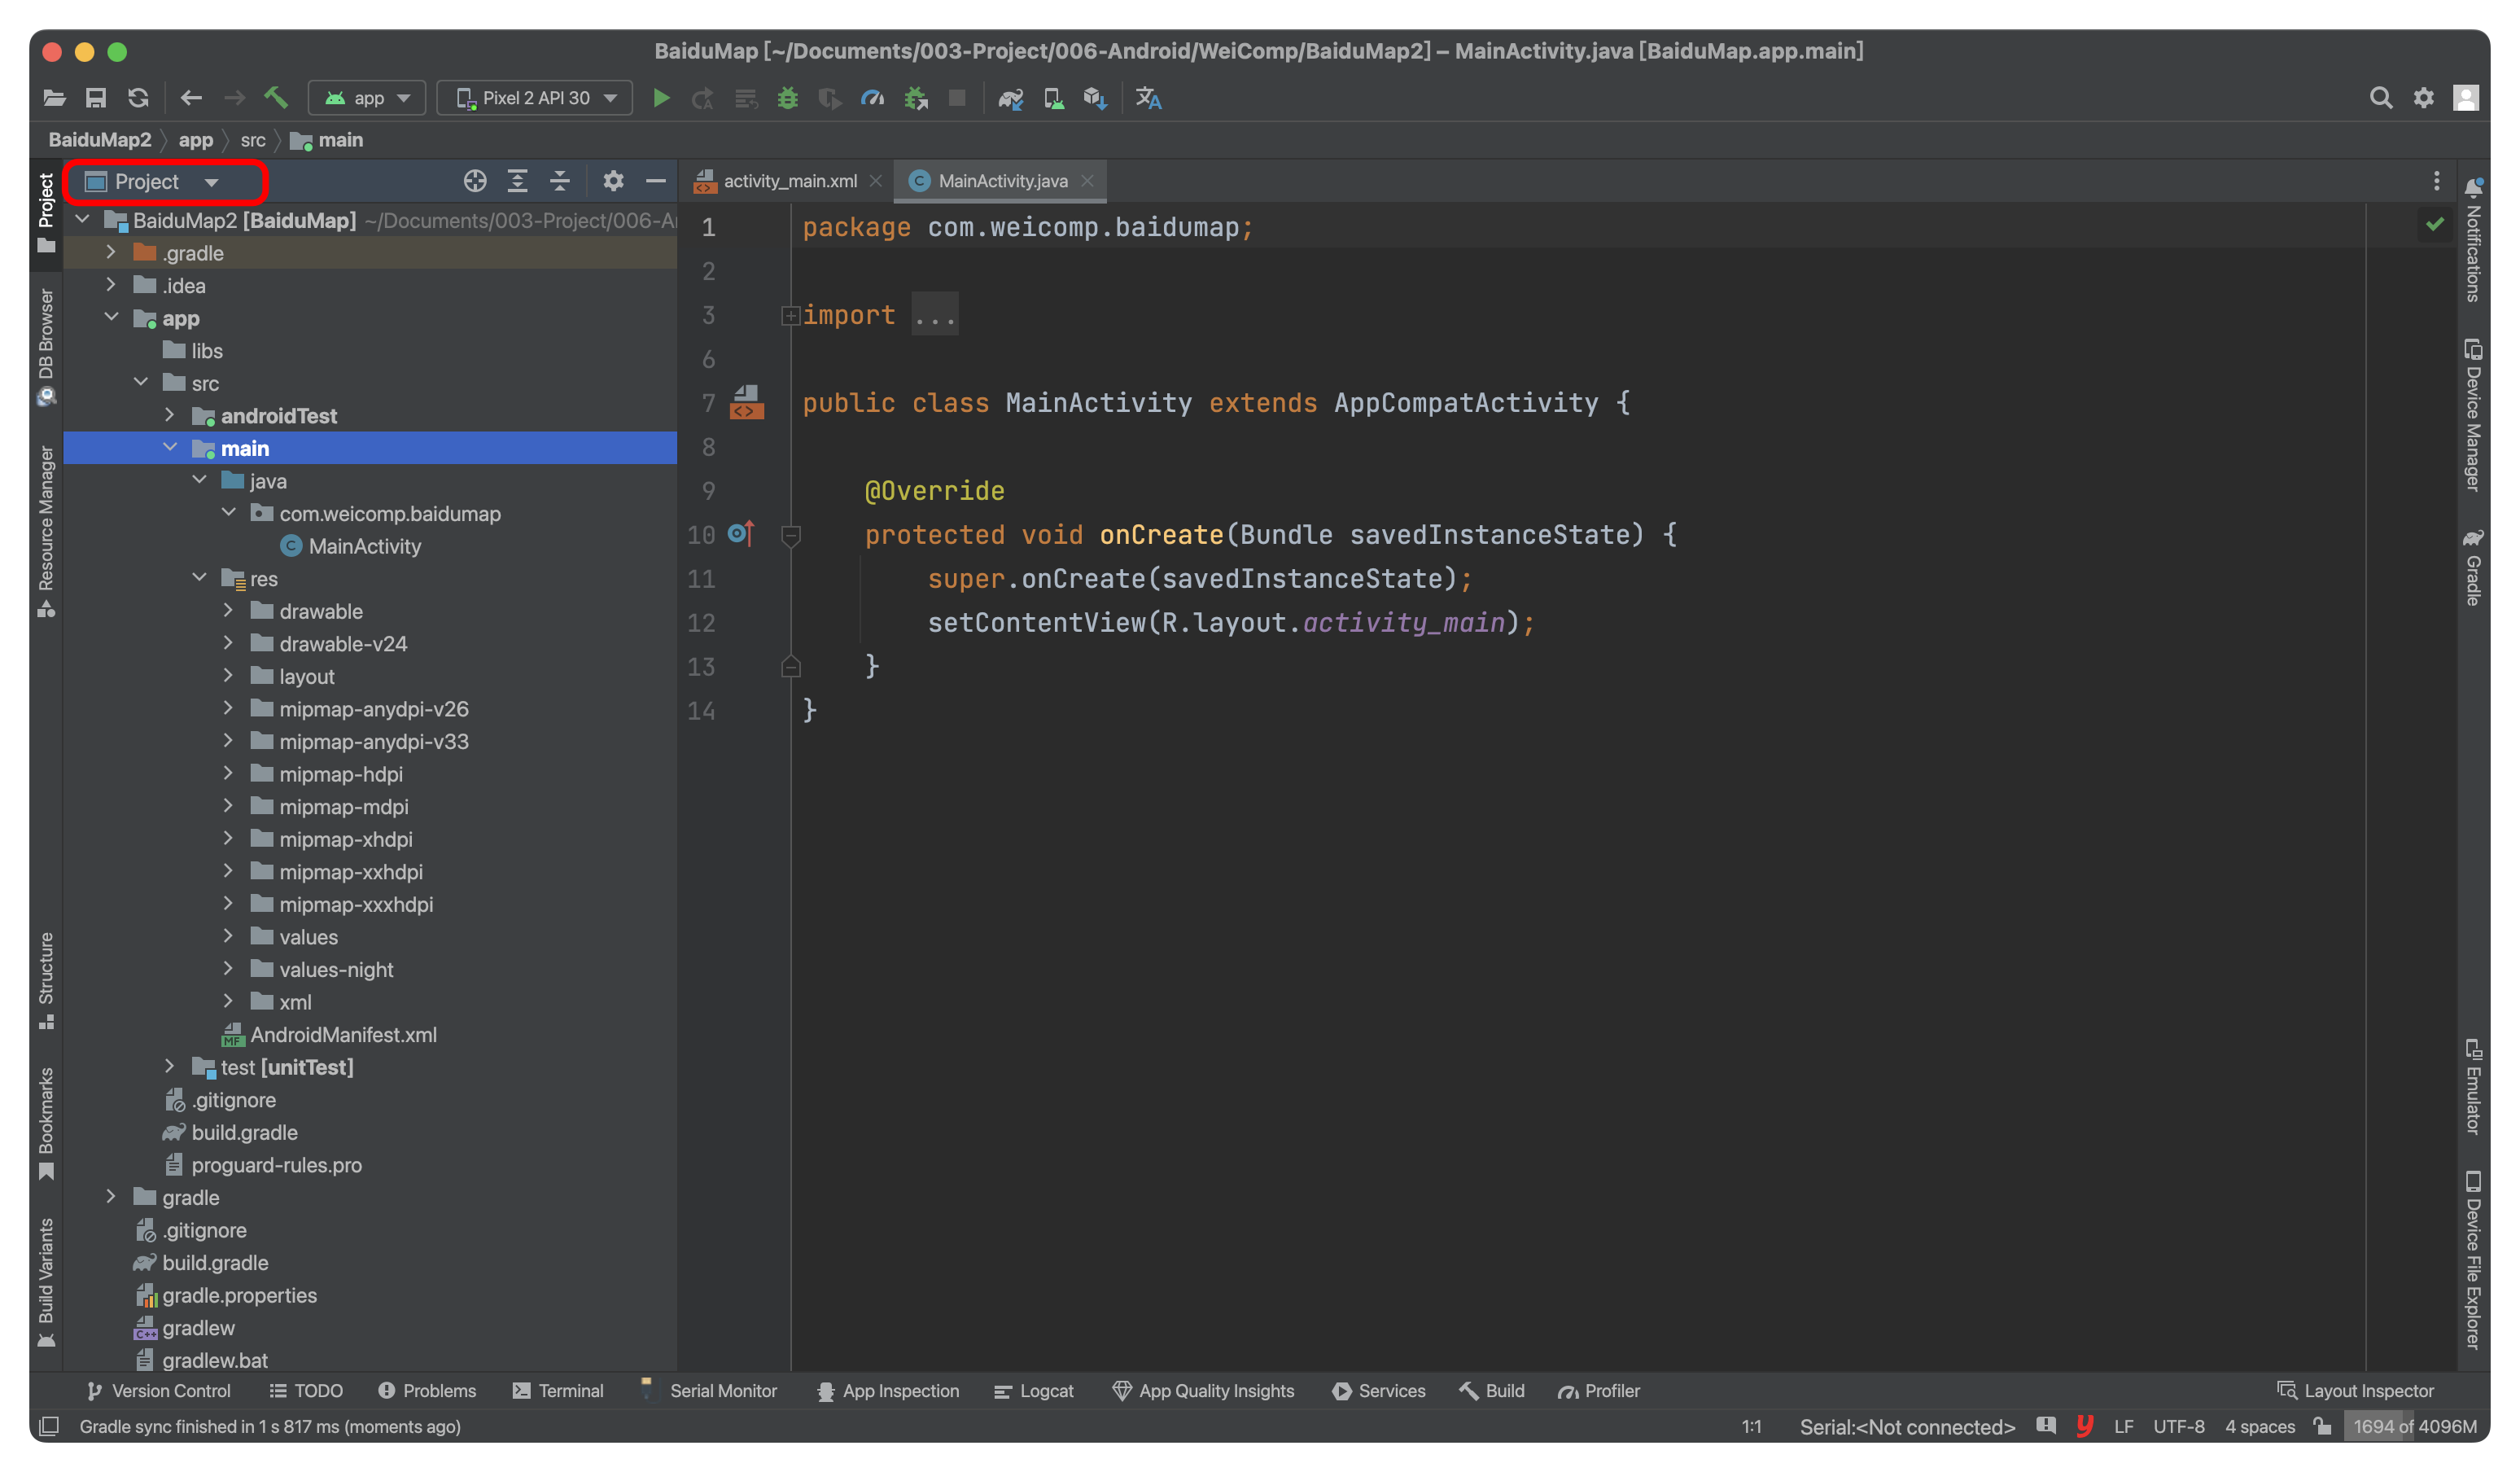
在正式开始之前,给大家看看初始化项目的结构
申请密钥
控制台->我的管理/我的应用->创建应用(这里我已经创建过了,大家忽略即可)
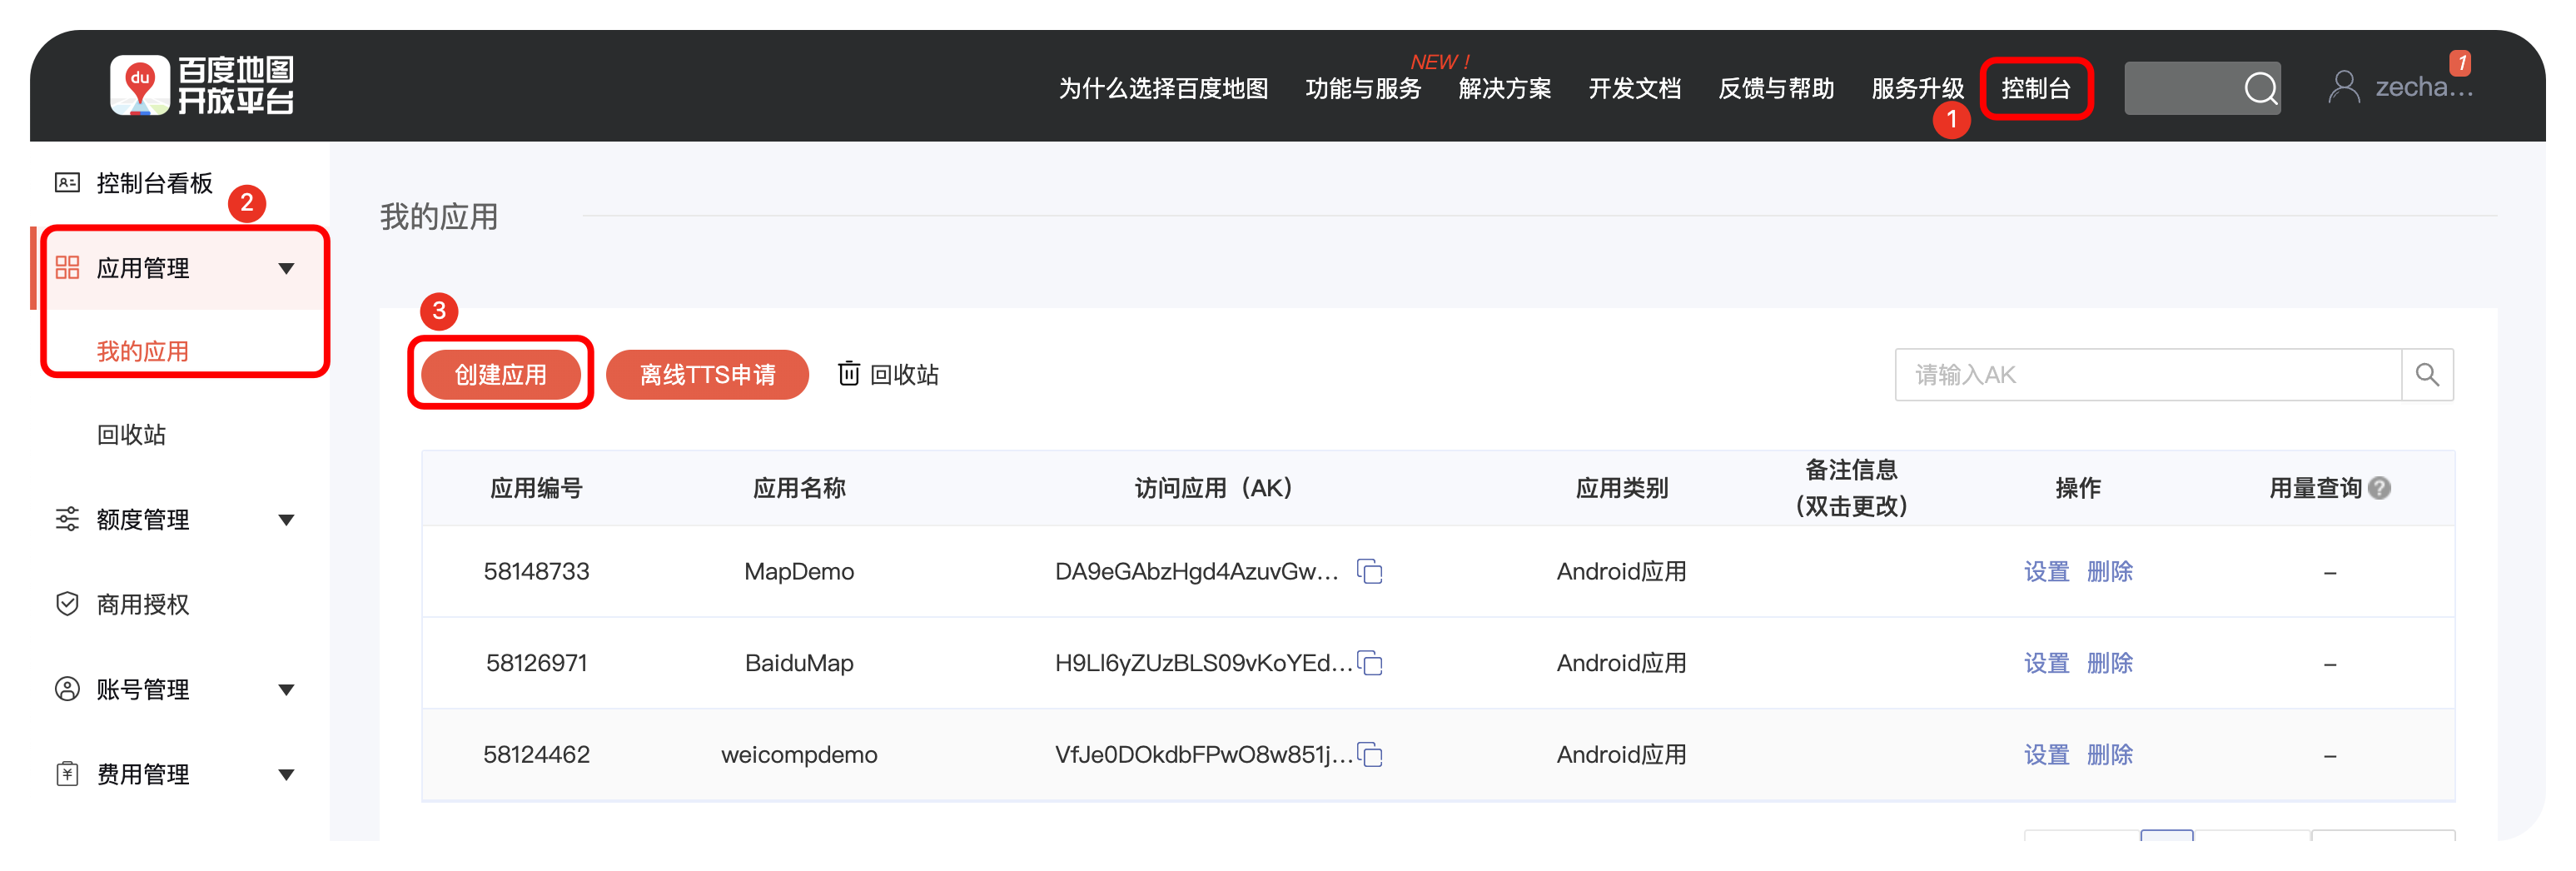
点击创建应用即可跳转到如下界面:

- 应用类型选择
Android SDK,应用名称大家可以根据自己的需求添加名称
页面接续向下滑动,出现了如下界面:

这里必填项就是发布版SHA1和PackageName,这两个都比较容易获取,首先最容易获取的就是包名了;
打开刚刚新建的项目工程,然后打开app结构下的build.gradle即可查看PackageName了;
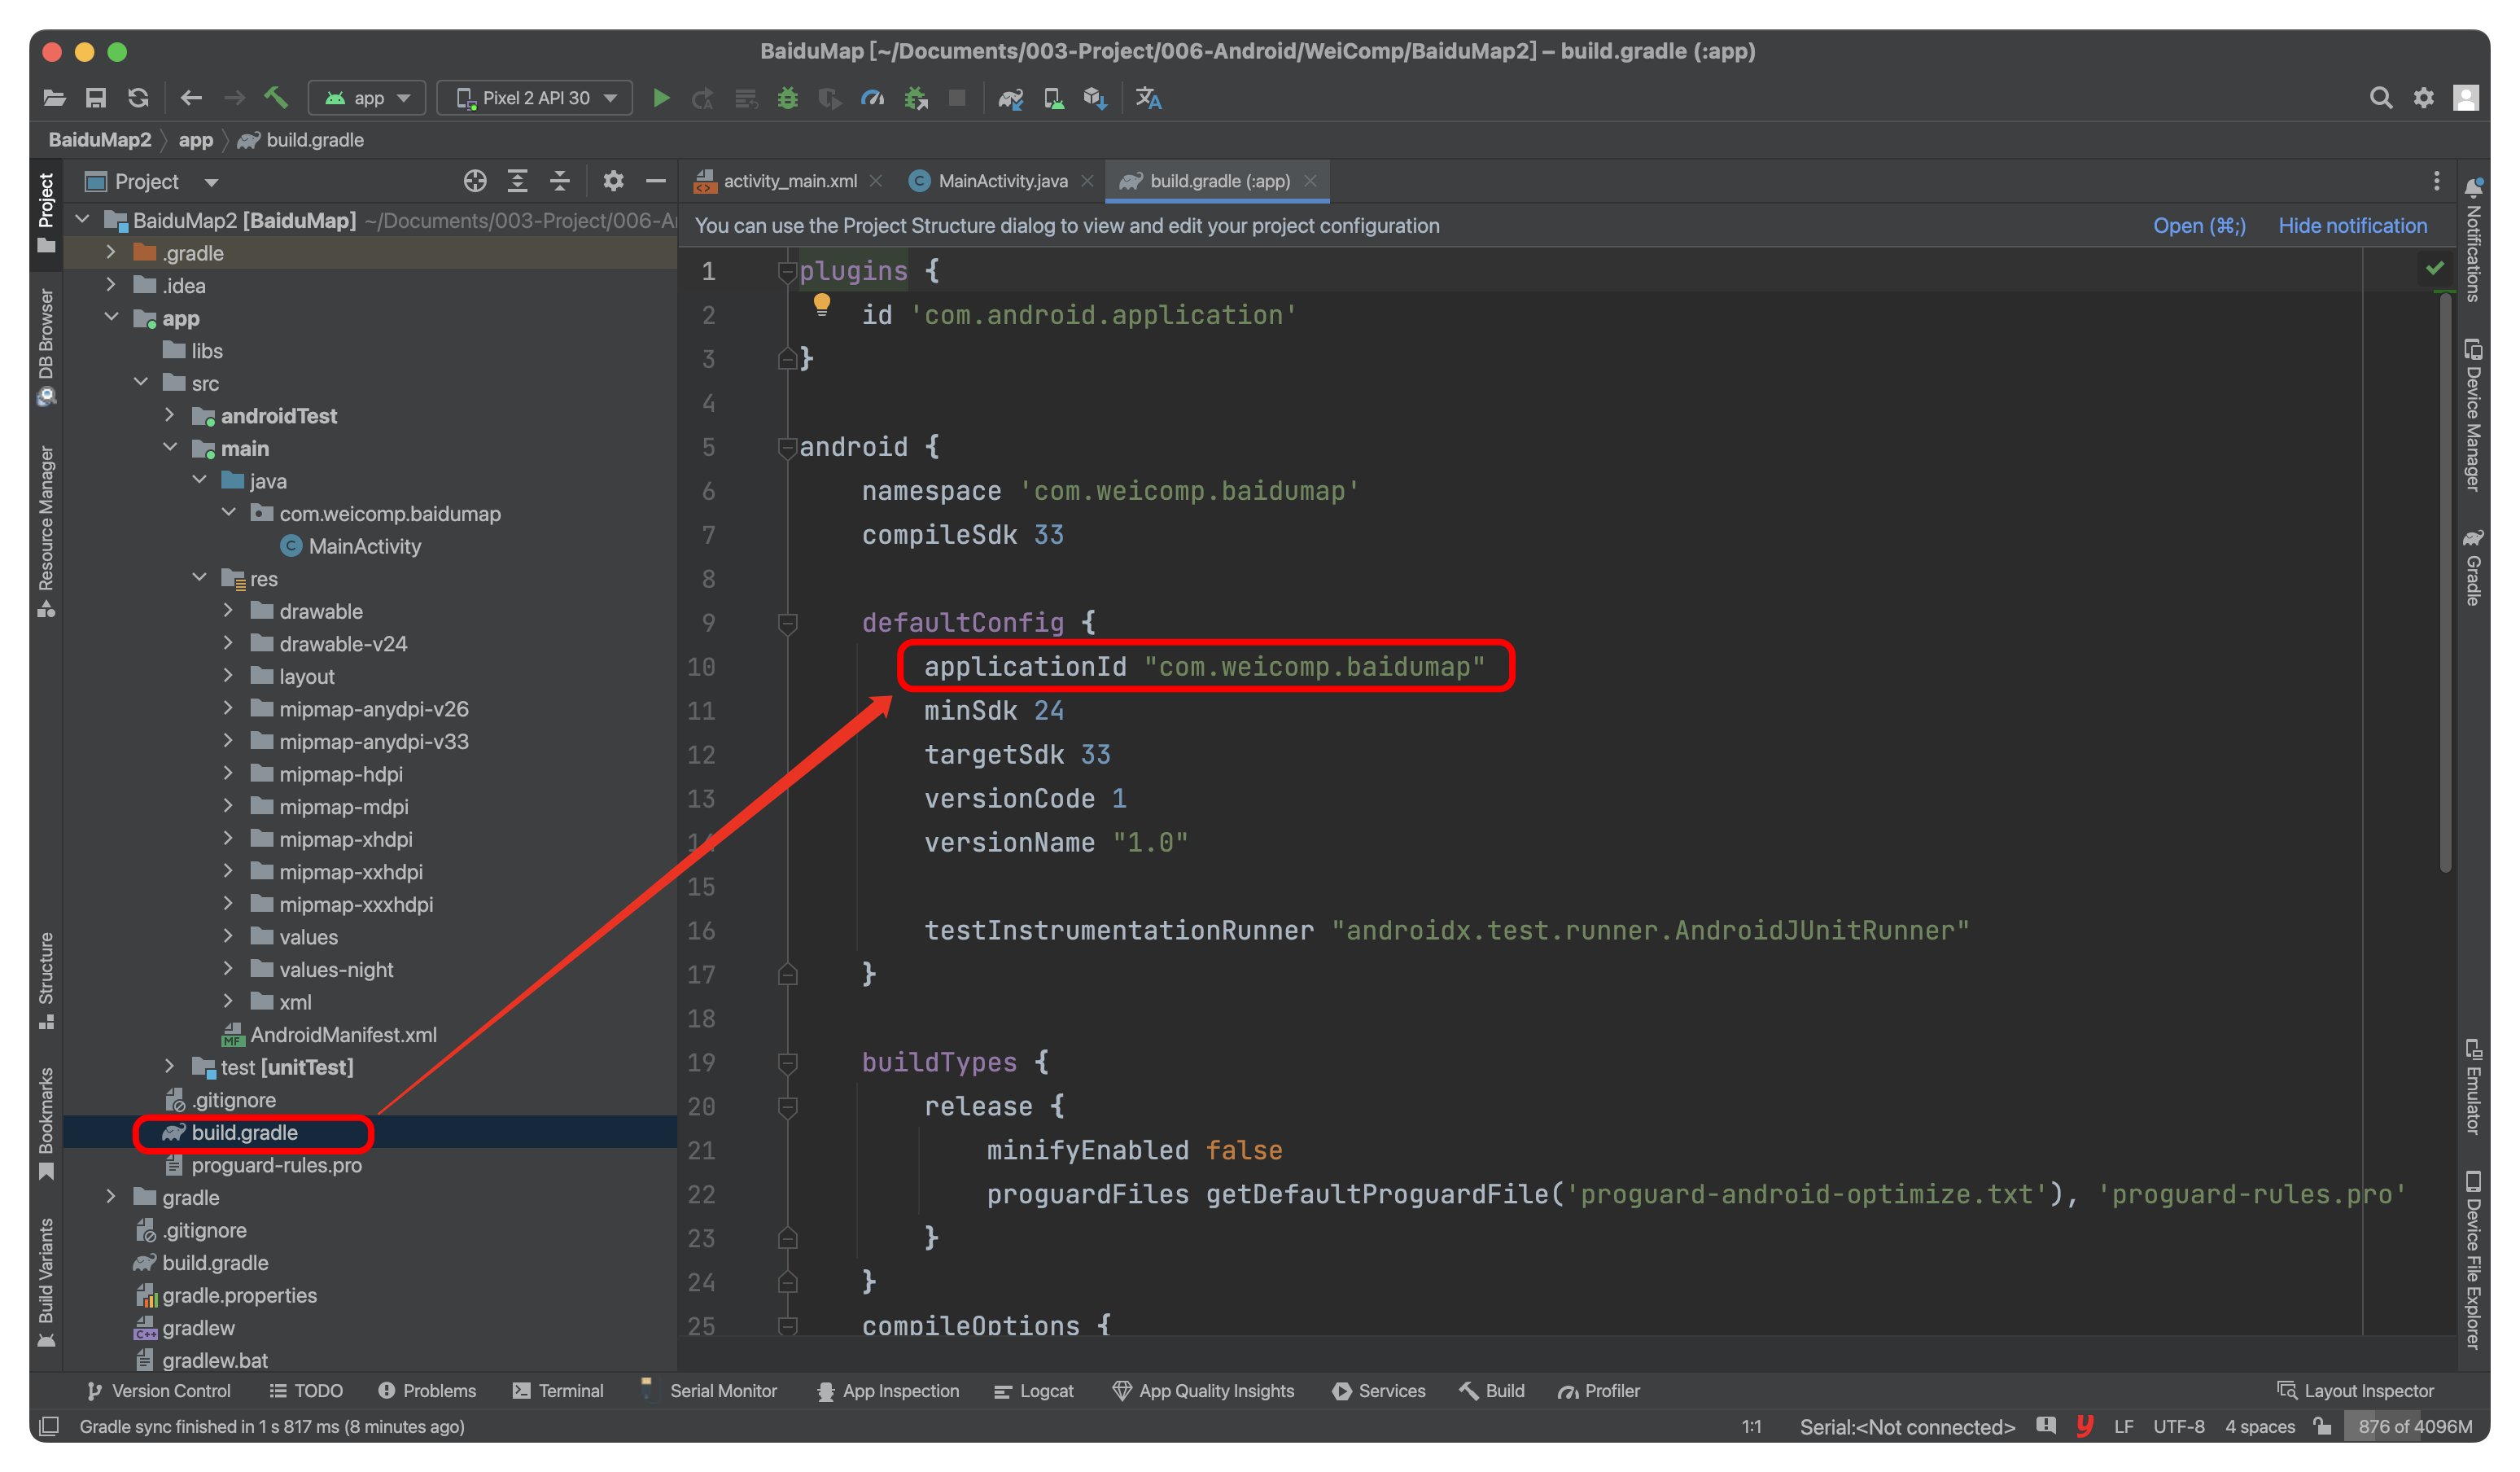
接下来就是填写SHA1了;我使用的操作系统是macOS
官方操作手册:注册和获取密钥
对于Mac用户:
-
打开终端,进入
.android目录cd .android -
打开 debug.keystore
keytool -list -v -keystore debug.keystore -
输入密码
系统默认的密码是android,输入完后直接回车,最后就可以在终端上面看见SHA1密钥了
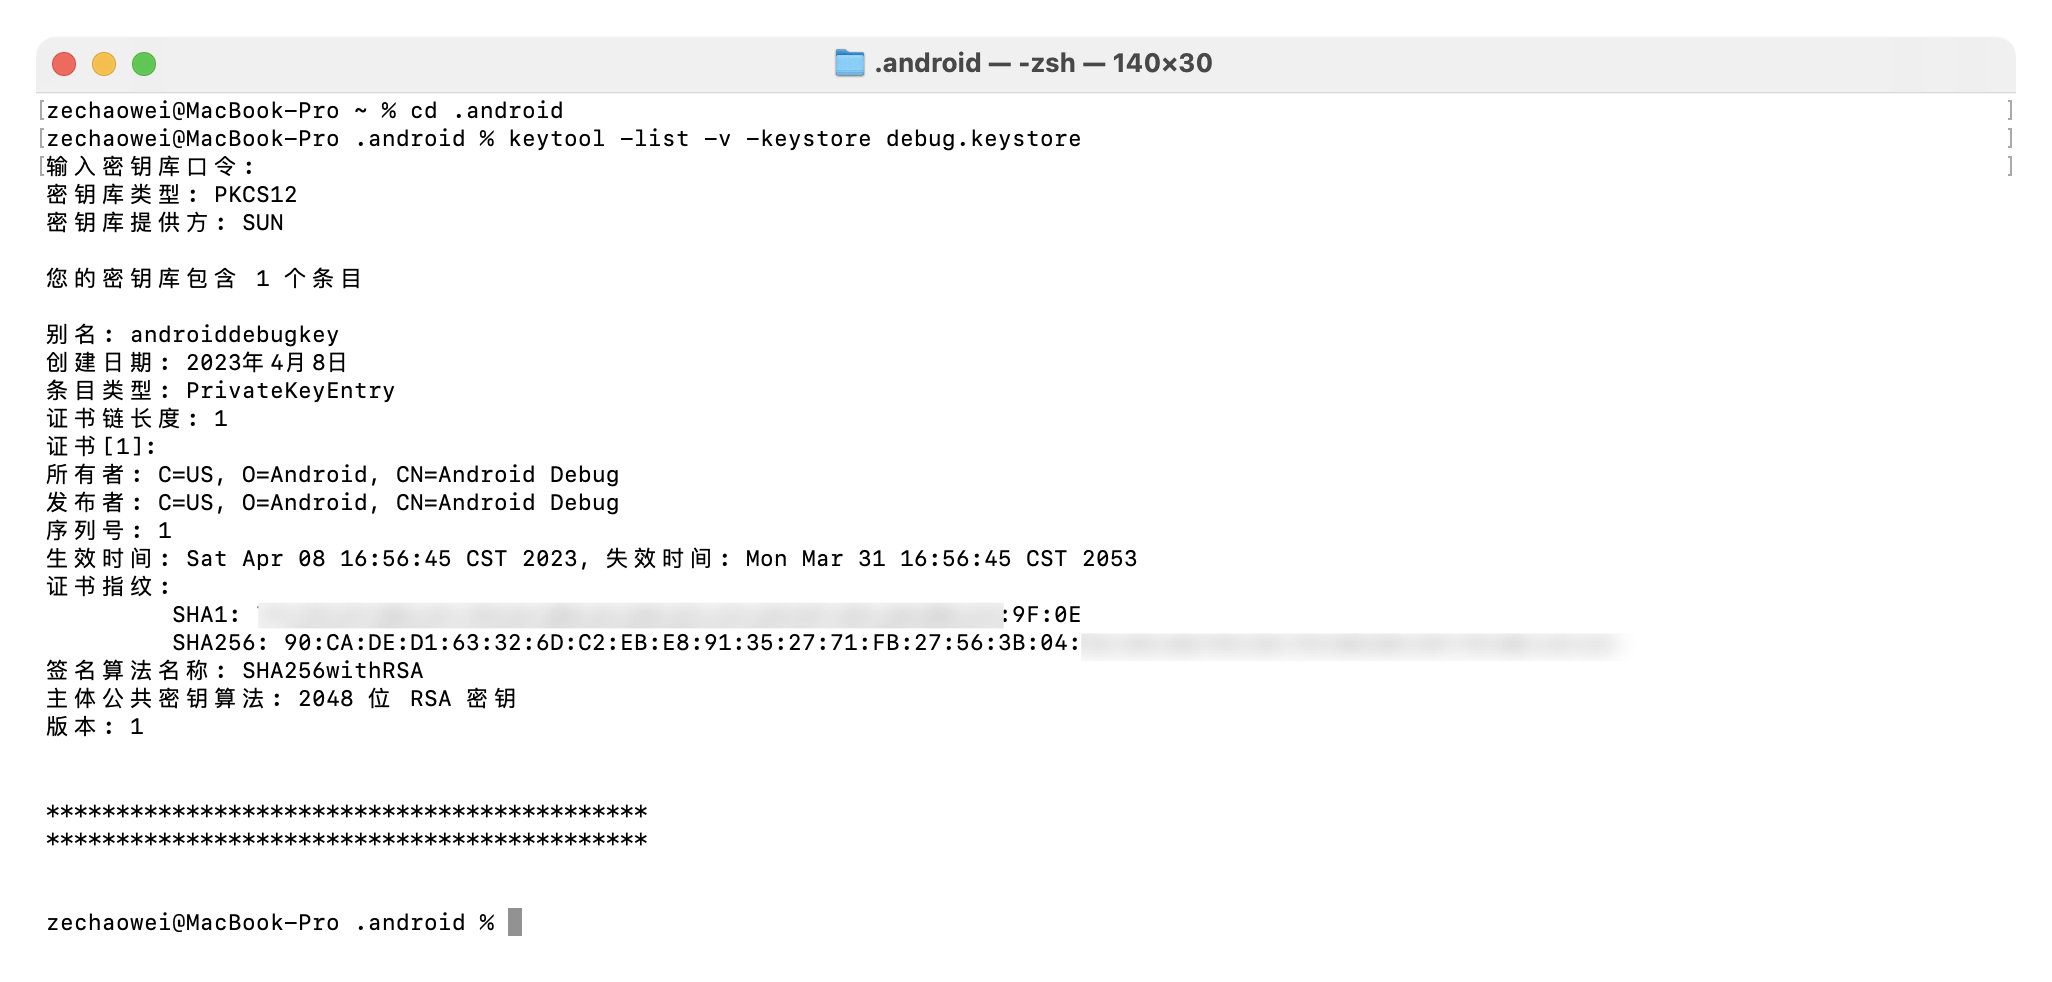
在终端中即可查看SHA1了,并将其赋值粘贴即可,最后点击确定即可生成新的AK密钥了;

最后点击提交后在控制台中置顶的应用为新建应用:

在项目中集成BaiduMap SDK
百度地图官方提供了两种SDK集成方式,分别为:
- 下载 SDK 本地依赖(本次采用方法)
- 通过 Gradle 集成 SDK
-
下载开发包

这里选择 全量定位+基础地图(含室内图),选择的配置选择jar包即可,点击开发包即可下载
示例代码+类参考大家自行下载,里面有文档可以查看
-
将开发包拷贝至工程app/libs目录下
-
添加jar文件
在libs目录下,选中每一个jar文件(此处只有一个BaiduLbs_Android.jar)右键,选择Add As Library…,此时会发现在app目录的build.gradle的dependencies块中生成了工程所依赖的jar文件的对应说明(此图略)

-
添加so文件
在src/main/目录下新建jniLibs目录(如果您的项目中已经包含该目录不用重复创建),在下载的开发包中拷贝项目中需要的CPU架构对应的so文件文件夹到jniLibs目录,如图:

-
至此,已完成通过本地依赖集成SDK。
创建地图
百度地图SDK为开发者提供了便捷的使用百度地图能力的接口,通过以下几步操作,即可在您的应用中使用百度地图:
-
第一步 配置AndroidManifest.xml文件
在<application>中加入如下代码配置开发密钥(AK)
<application>
    <meta-data
        android:name="com.baidu.lbsapi.API_KEY"
        android:value="AK" />
</application>
这里的AK密钥在我们创建的应用部分即可查看
-
在<application>外部添加如下权限声明
<!-- 访问网络,进行地图相关业务数据请求,包括地图数据,路线规划,POI检索等 --> <uses-permission android:name="android.permission.INTERNET" /> <!-- 获取网络状态,根据网络状态切换进行数据请求网络转换 --> <uses-permission android:name="android.permission.ACCESS_NETWORK_STATE" /> <!-- 读取外置存储。如果开发者使用了so动态加载功能并且把so文件放在了外置存储区域,则需要申请该权限,否则不需要 --> <uses-permission android:name="android.permission.READ_EXTERNAL_STORAGE" /> <!-- 写外置存储。如果开发者使用了离线地图,并且数据写在外置存储区域,则需要申请该权限 --> <uses-permission android:name="android.permission.WRITE_EXTERNAL_STORAGE" /> -
在布局文件中添加地图容器
MapView是View的一个子类,用于在Android View中放置地图。MapView的使用方法与Android提供的其他View一样。
<com.baidu.mapapi.map.MapView android:id="@+id/bmapView" android:layout_width="match_parent" android:layout_height="match_parent" android:clickable="true" /> -
地图初始化
新建一个自定义的Application,在其onCreate方法中完成SDK的初始化。示例代码如下
public class DemoApplication extends Application {
    @Override
    public void onCreate() {
        super.onCreate();
        //在使用SDK各组件之前初始化context信息,传入ApplicationContext
        SDKInitializer.setAgreePrivacy(this,true);  //自Android6.0起部分权限的使用需要开发者在代码中动态申请
        SDKInitializer.initialize(this);
        //自4.3.0起,百度地图SDK所有接口均支持百度坐标和国测局坐标,用此方法设置您使用的坐标类型.
        //包括BD09LL和GCJ02两种坐标,默认是BD09LL坐标。
        SDKInitializer.setCoordType(CoordType.BD09LL);
    }
}
在AndroidManifest.xml文件中声明该Application

-
创建地图Activity,管理MapView生命周期
public class MainActivity extends Activity { private MapView mMapView = null; @Override protected void onCreate(Bundle savedInstanceState) { super.onCreate(savedInstanceState); setContentView(R.layout.activity_main); //获取地图控件引用 mMapView = (MapView) findViewById(R.id.bmapView); } @Override protected void onResume() { super.onResume(); //在activity执行onResume时执行mMapView. onResume (),实现地图生命周期管理 mMapView.onResume(); } @Override protected void onPause() { super.onPause(); //在activity执行onPause时执行mMapView. onPause (),实现地图生命周期管理 mMapView.onPause(); } @Override protected void onDestroy() { super.onDestroy(); //在activity执行onDestroy时执行mMapView.onDestroy(),实现地图生命周期管理 mMapView.onDestroy(); } } -
完成以上工作即可在您的应用中显示地图
如果使用的AVD模拟器启动项目的话,项目会出现如下错误:
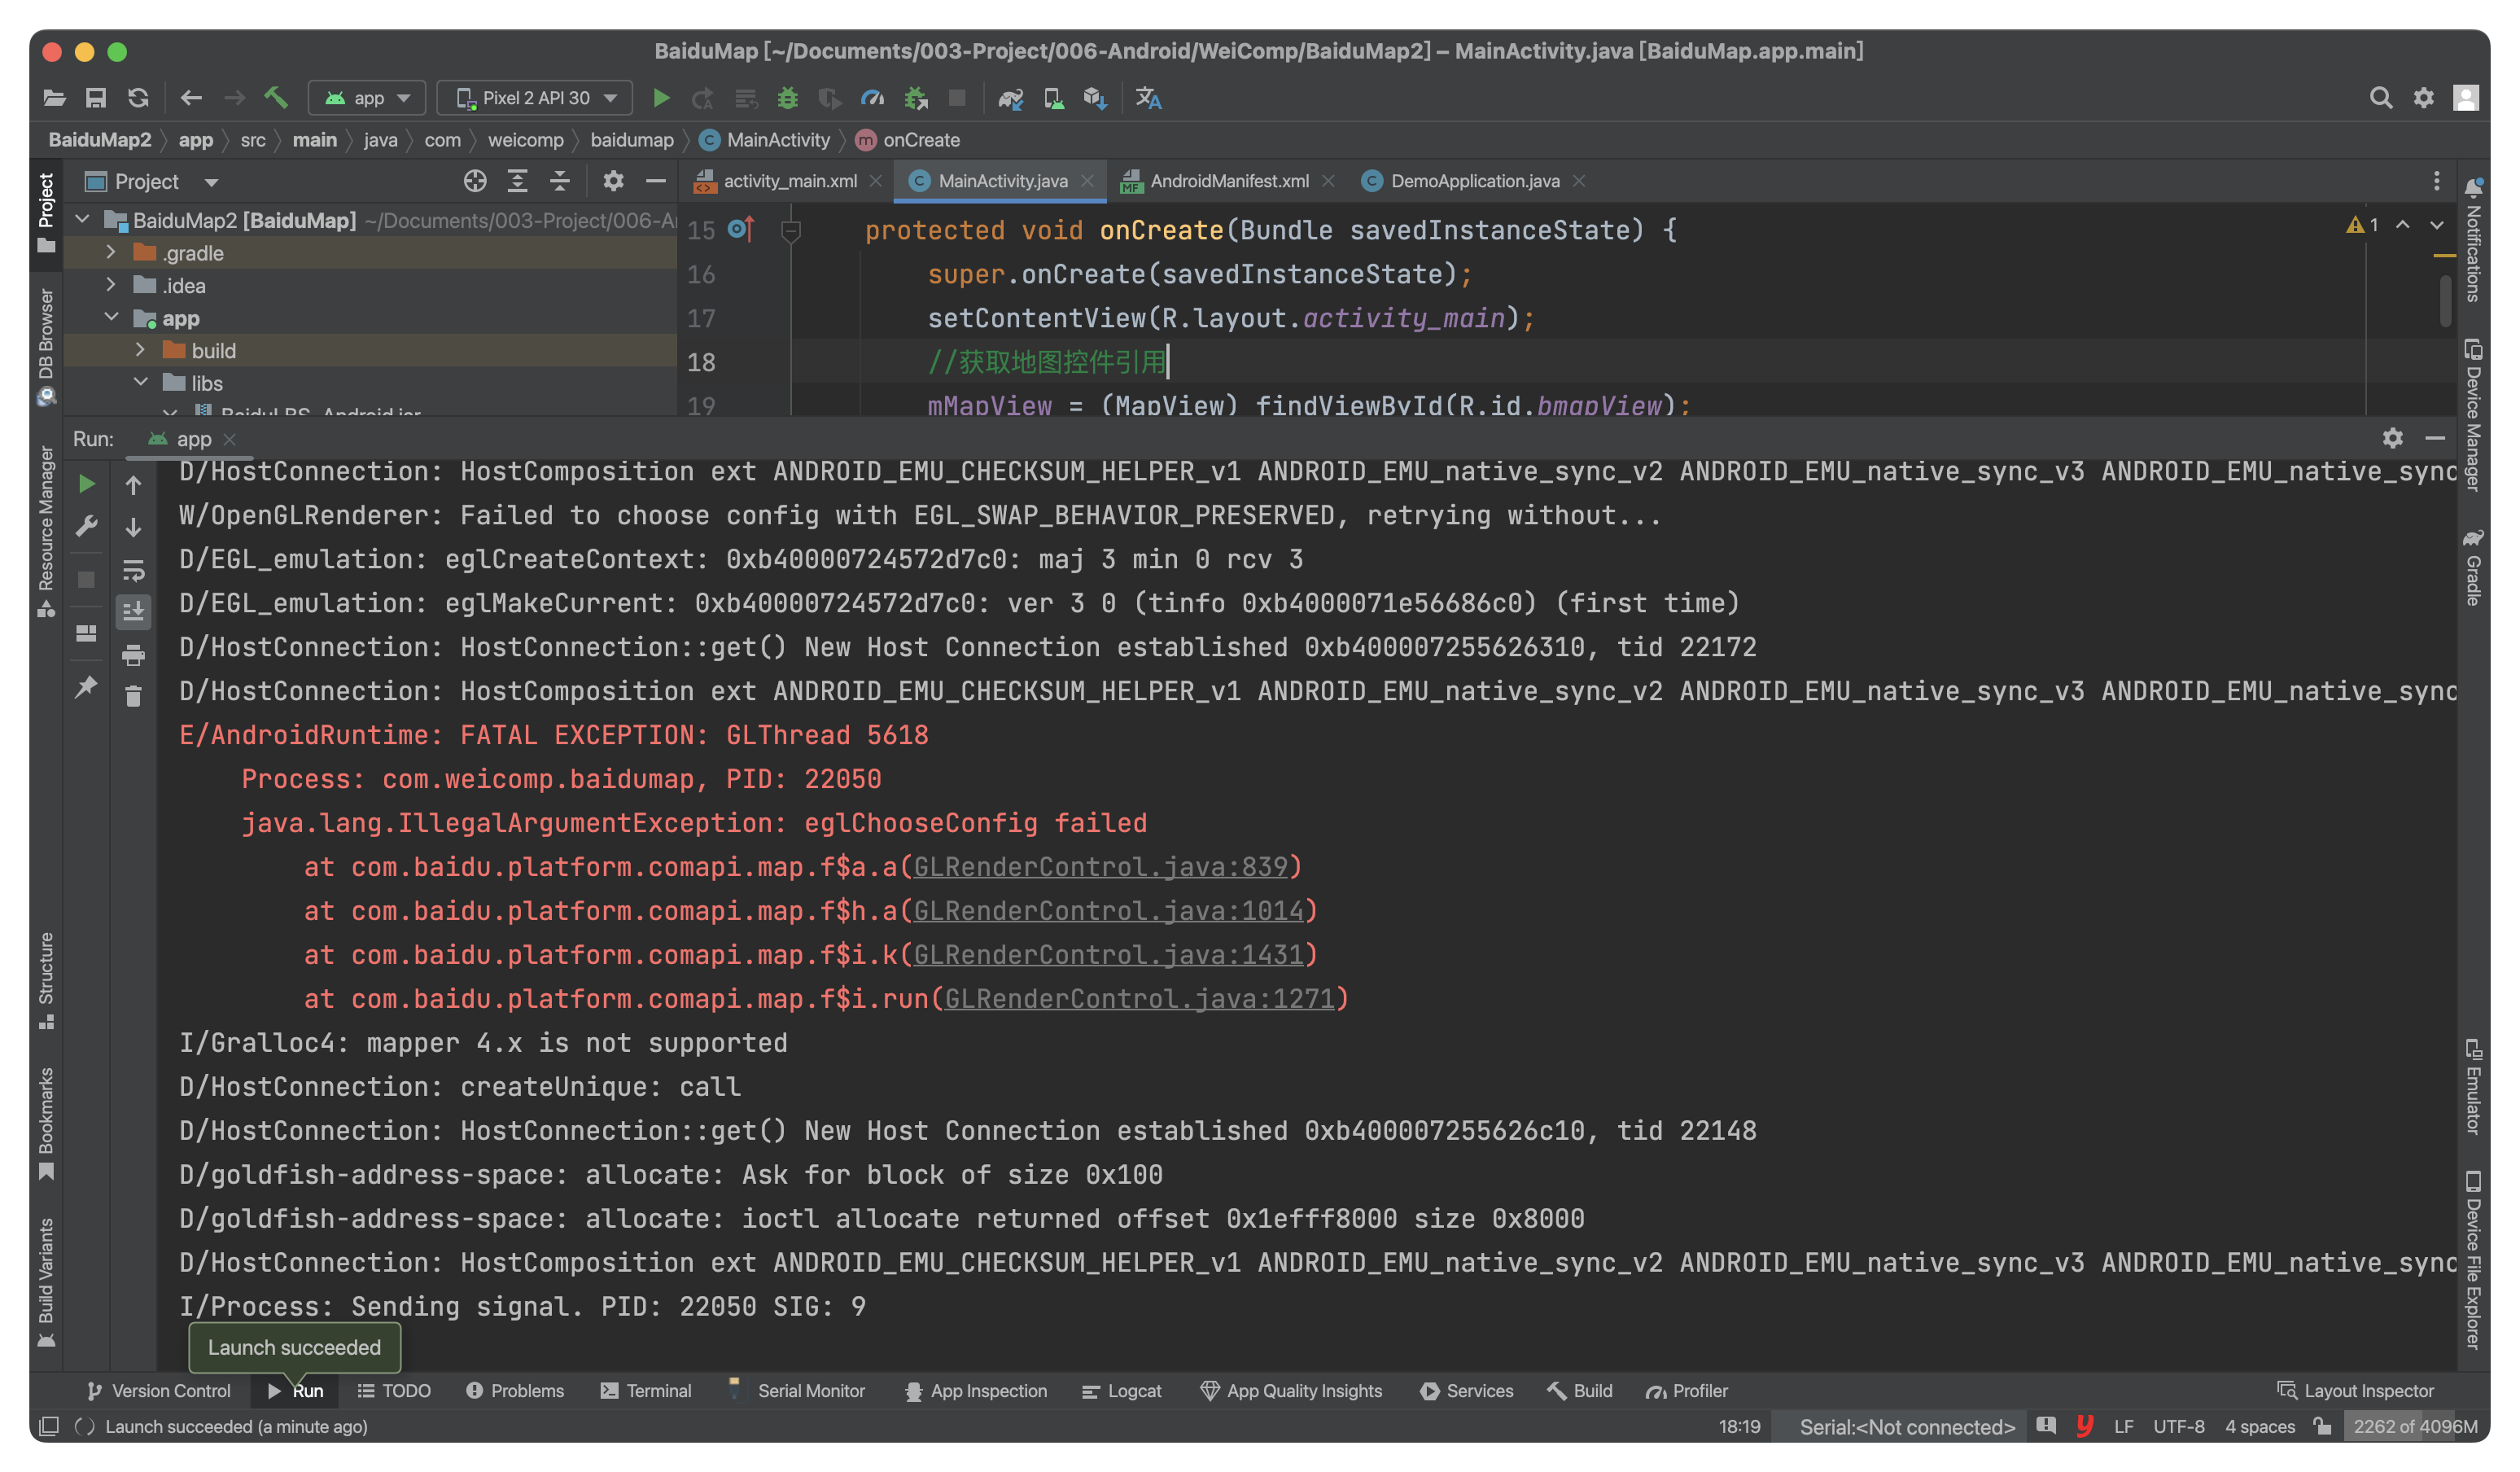
如果出现了E/AndroidRuntime: FATAL EXCEPTION: GLThread这个问题,说明项目运行“成功”了;这是因为定位不能用模拟器,你安装到手机上才行,换个夜神模拟器或者雷电模拟器试试说不准就好了;
下图是真机测试结果(默认是普通地图):
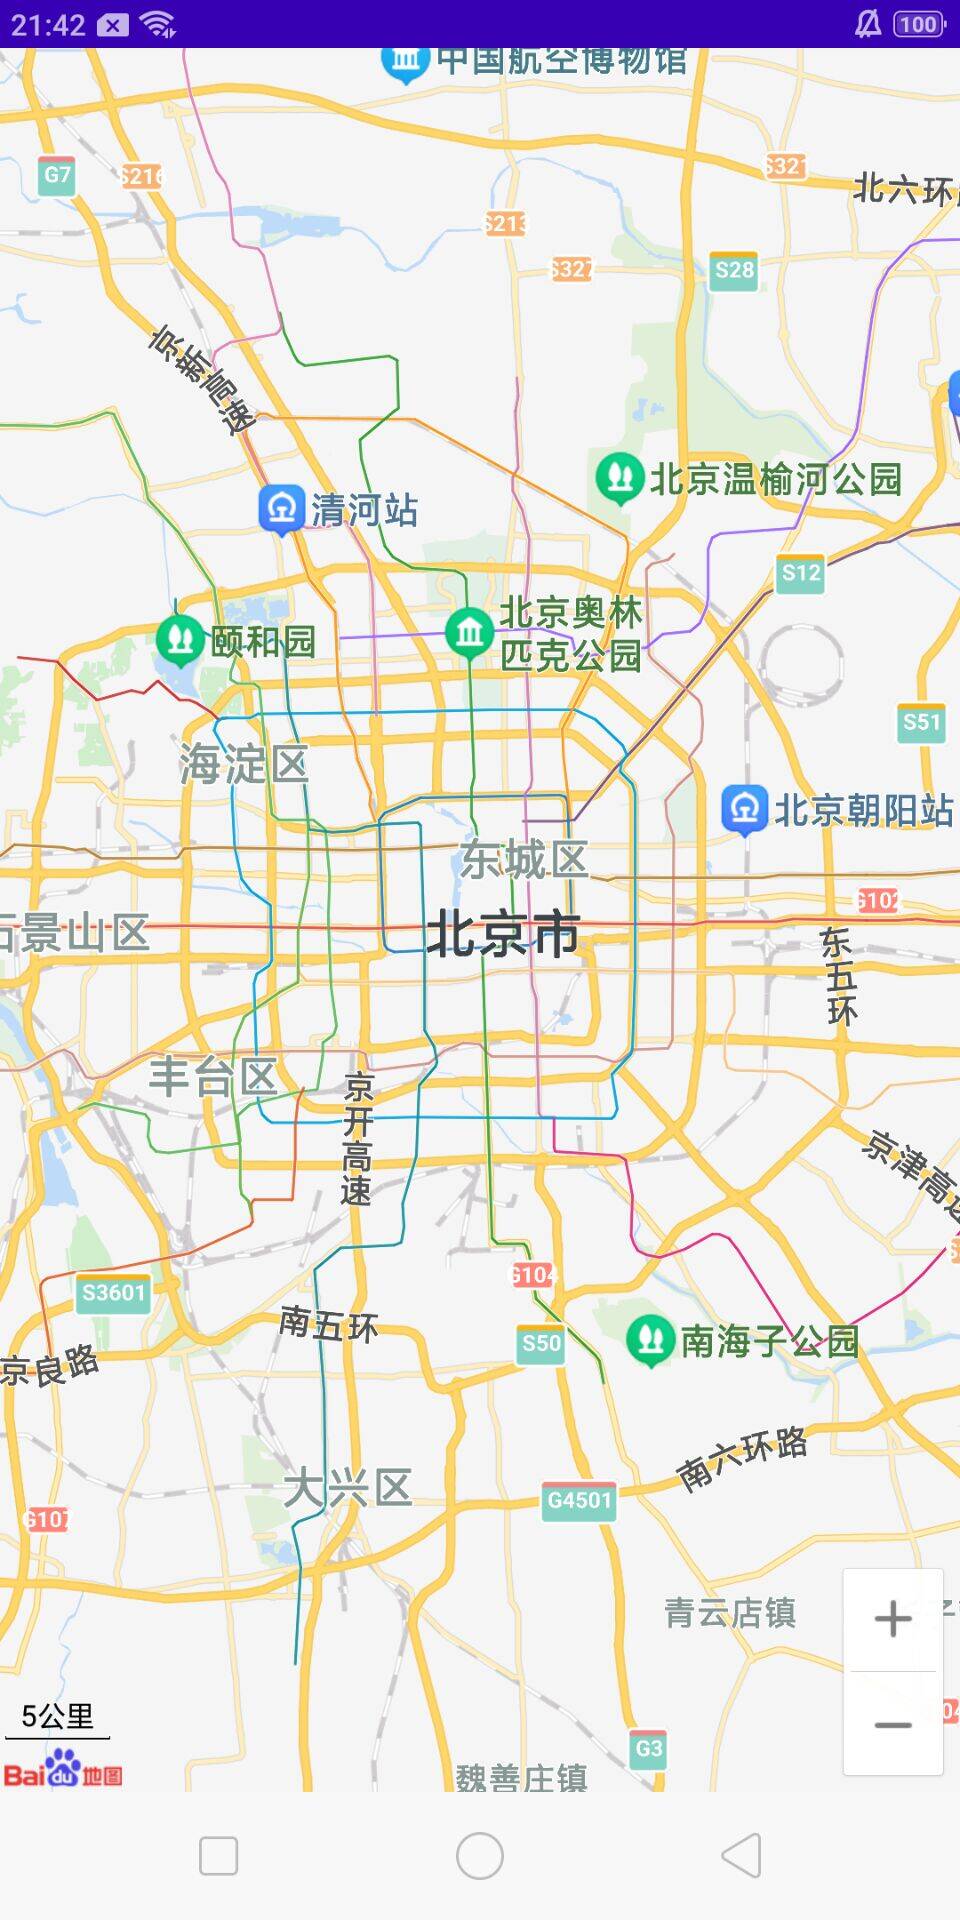
除了这些,平时常见的还有卫星地图,热力图,路况图等;接下来实现这些功能:
修改string.xml文件
<resources>
    <string name="app_name">BaiduMap</string>
    <string name="normal_map">普通地图</string>
    <string name="satellite_map">卫星地图</string>
    <string name="trafficEnable">开启路况图</string>
    <string name="heatMapEnable">开启热力图</string>
</resources>
设置背景颜色gradient_color.xml
<?xml version="1.0" encoding="utf-8"?>
<shape xmlns:android="http://schemas.android.com/apk/res/android"
    android:shape="rectangle">
    <gradient
        android:angle="0"
        android:startColor="#FF00AFFF"
        android:endColor="#FF379EB6"
        android:type="linear"/>
</shape>
接下来修改activity_main.xml文件
<?xml version="1.0" encoding="utf-8"?>
<LinearLayout xmlns:android="http://schemas.android.com/apk/res/android"
    xmlns:app="http://schemas.android.com/apk/res-auto"
    xmlns:tools="http://schemas.android.com/tools"
    android:layout_width="match_parent"
    android:layout_height="match_parent"
    android:orientation="vertical"
    tools:context=".MainActivity">

    <LinearLayout
        android:layout_width="match_parent"
        android:layout_height="50dp"
        android:background="@drawable/gradient_color"
        android:orientation="horizontal">

        <RadioGroup
            android:id="@+id/rg_type"
            android:layout_width="match_parent"
            android:layout_height="wrap_content"
            android:orientation="horizontal">

            <RadioButton
                android:id="@+id/rb_normal"
                android:layout_width="0dp"
                android:layout_height="wrap_content"
                android:layout_weight="1"
                android:text="@string/normal_map" />

            <RadioButton
                android:id="@+id/rb_satellite"
                android:layout_width="0dp"
                android:layout_height="wrap_content"
                android:layout_weight="1"
                android:text="@string/satellite_map" />
        </RadioGroup>
    </LinearLayout>

    <LinearLayout
        android:layout_width="match_parent"
        android:layout_height="wrap_content"
        android:background="@drawable/gradient_color">

        <CheckBox
            android:id="@+id/cb_trafficEnable"
            android:layout_width="0dp"
            android:layout_height="wrap_content"
            android:layout_weight="1"
            android:text="@string/trafficEnable" />

        <CheckBox
            android:id="@+id/cb_heatMapEnable"
            android:layout_width="0dp"
            android:layout_height="wrap_content"
            android:layout_weight="1"
            android:text="@string/heatMapEnable" />
    </LinearLayout>

    <com.baidu.mapapi.map.MapView
        android:id="@+id/bmapView"
        android:layout_width="match_parent"
        android:layout_height="match_parent"
        android:clickable="true"
        android:focusable="true" />

</LinearLayout>
最后修改MainActivity.java文件即可:
package com.weicomp.baidumap;


import android.app.Activity;
import android.os.Bundle;
import android.widget.CheckBox;
import android.widget.CompoundButton;
import android.widget.RadioButton;
import android.widget.RadioGroup;

import com.baidu.mapapi.map.BaiduMap;
import com.baidu.mapapi.map.MapView;

public class MainActivity extends Activity {

    private MapView mMapView = null;

    private RadioGroup mRgType;
    private RadioButton mRbNormal, mRbSatellite;
    private CheckBox mCbtTrafficEnable, mCbHeatMapEnable;


    @Override
    protected void onCreate(Bundle savedInstanceState) {
        super.onCreate(savedInstanceState);
        setContentView(R.layout.activity_main);
        //获取地图控件引用
        mMapView = (MapView) findViewById(R.id.bmapView);

        mRgType = findViewById(R.id.rg_type);
        mRbNormal = findViewById(R.id.rb_normal);
        mRbSatellite = findViewById(R.id.rb_satellite);
        mCbtTrafficEnable = findViewById(R.id.cb_trafficEnable);
        mCbHeatMapEnable = findViewById(R.id.cb_heatMapEnable);

        initEvent();
    }

    private void initEvent() {
        mRgType.setOnCheckedChangeListener(new RadioGroup.OnCheckedChangeListener() {
            @Override
            public void onCheckedChanged(RadioGroup radioGroup, int i) {
                if (i == mRbNormal.getId()) {
                    mMapView.getMap().setMapType(BaiduMap.MAP_TYPE_NORMAL);
                } else if (i == mRbSatellite.getId()) {
                    mMapView.getMap().setMapType(BaiduMap.MAP_TYPE_SATELLITE);
                }
            }
        });

        mCbtTrafficEnable.setOnCheckedChangeListener(new CompoundButton.OnCheckedChangeListener() {
            @Override
            public void onCheckedChanged(CompoundButton compoundButton, boolean b) {
                mMapView.getMap().setTrafficEnabled(b);
            }
        });

        mCbHeatMapEnable.setOnCheckedChangeListener(new CompoundButton.OnCheckedChangeListener() {
            @Override
            public void onCheckedChanged(CompoundButton compoundButton, boolean b) {
                mMapView.getMap().setBaiduHeatMapEnabled(b);
            }
        });
    }

    @Override
    protected void onResume() {
        super.onResume();
        //在activity执行onResume时执行mMapView. onResume (),实现地图生命周期管理
        mMapView.onResume();
    }

    @Override
    protected void onPause() {
        super.onPause();
        //在activity执行onPause时执行mMapView. onPause (),实现地图生命周期管理
        mMapView.onPause();
    }

    @Override
    protected void onDestroy() {
        super.onDestroy();
        //在activity执行onDestroy时执行mMapView.onDestroy(),实现地图生命周期管理
        mMapView.onDestroy();
    }
}
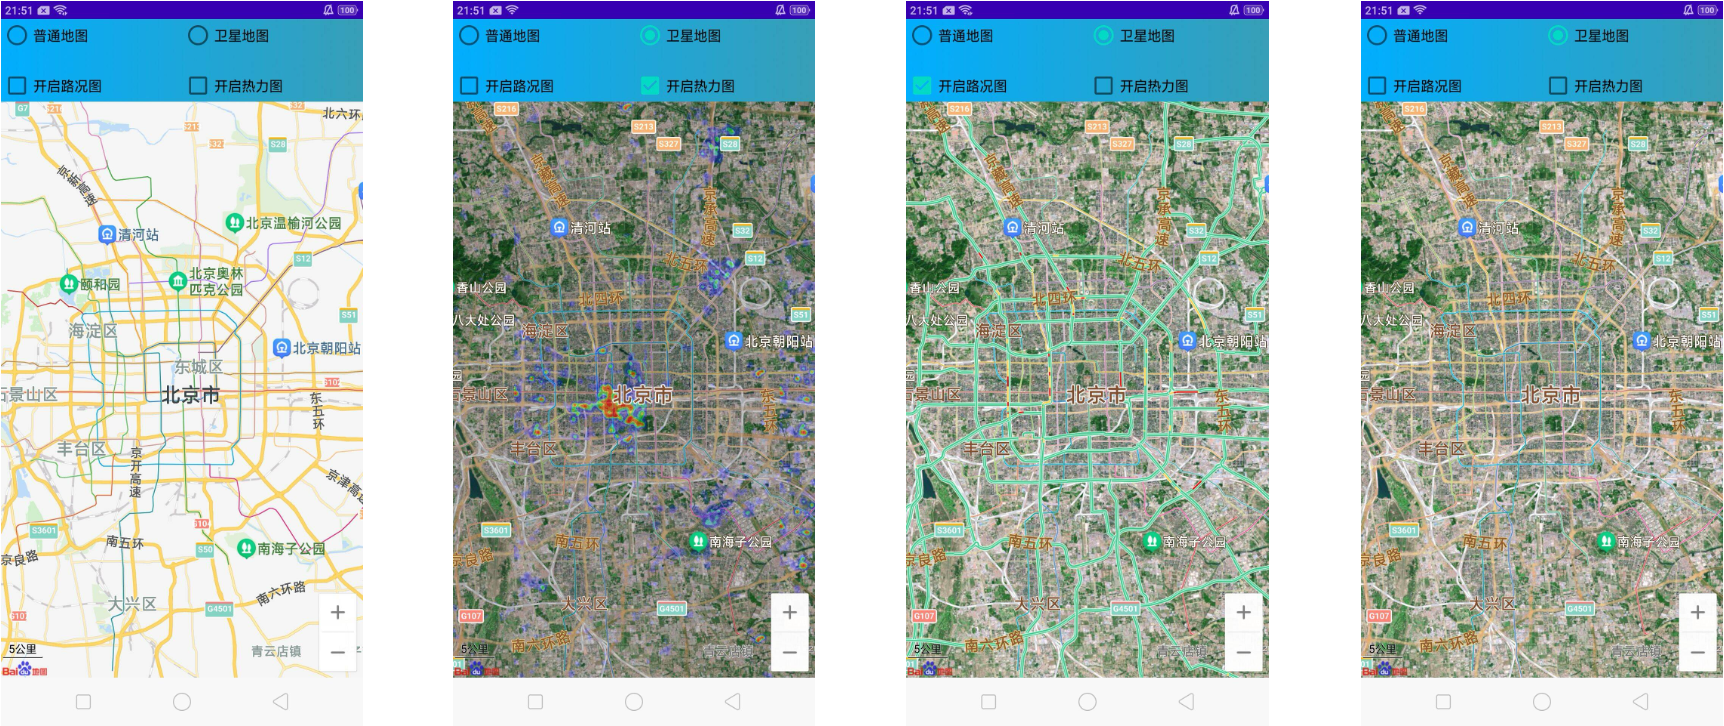
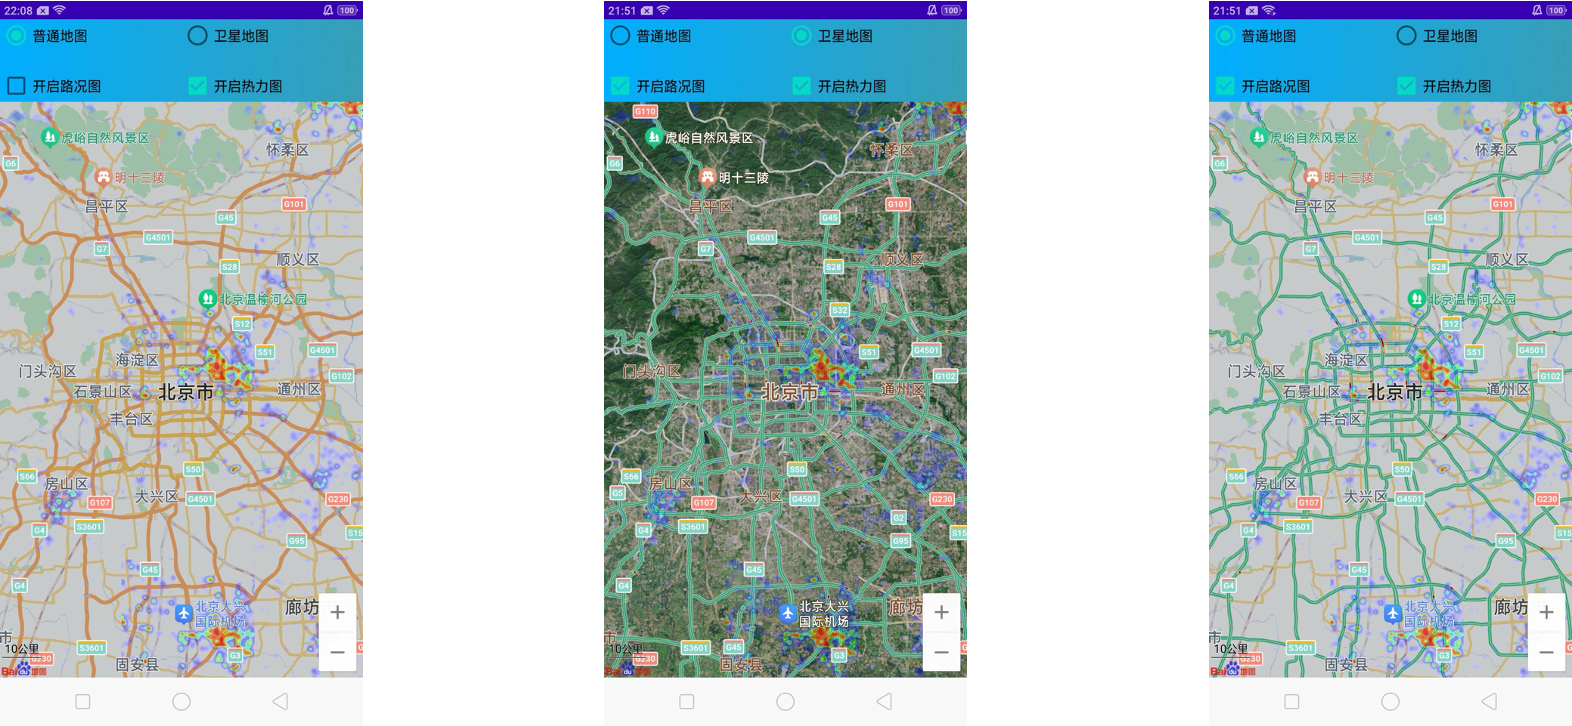
最后在真机测试一边,测试结果如下所示:
后面会陆续实现定位等功能;
