目录
- three.js 之 入门篇 5之几何体的认知
- 01BufferGeometry设置顶点创建矩阵
- 02 生产炫酷三角形科技物体
- 03 常见的网格几何体 geometry
- 04 基础网格材质 material
- 04-1 初识别材质与纹理
- 04-2 初识别材质与纹理 ( 平移、旋转 )
- 04-3 纹理显示设置( 缩小滤镜 ) Textures
- 04-4 设置纹理的透明纹理
- 04-5 AO环境遮挡图与强度( AO对于光的遮挡 )
- 04-6 标准网格材质与光照物理效果 - AmbientLight
- 04-7 置换贴图与顶点细分设置 -
- 04-7 设置粗糙度与粗糙度贴图
- 04-8 设置金属度与金属贴图
- 04-9 法线贴图
- 04-10 获取纹理贴纸 - 网址
- 04-11 纹理加载进度情况
three.js 之 入门篇 5之几何体的认知
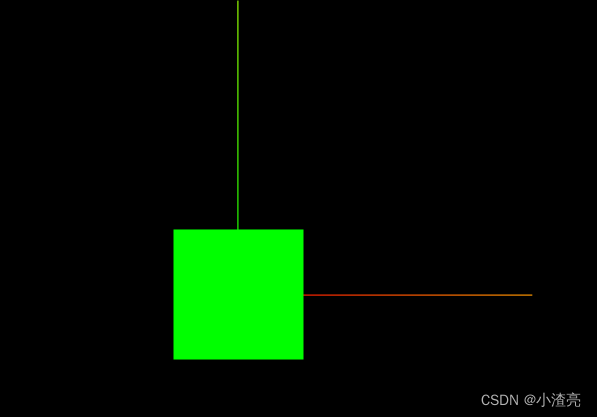
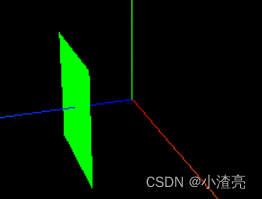
01BufferGeometry设置顶点创建矩阵
- 官网
import * as THREE from "three"
// console.log('main.js',THREE);

// 导入轨道控制器
import { OrbitControls } from "three/examples/jsm/controls/OrbitControls"
// gsap 1-1:导入动画库
import gsap from "gsap"
// 导入 dat.gui
import * as dat from "dat.gui"

// 1:创建场景
const scene = new THREE.Scene()

// 2:创建相机
const camera = new THREE.PerspectiveCamera(75,window.innerWidth/ window.innerHeight,0.1,1000)
// 设置相机位置 x y z
camera.position.set(0,0,10)
// 把相机添加到场景之中
scene.add( camera );

// 添加物体
// 创建几何体
// 01BufferGeometry设置顶点创建矩阵 start
const geometry = new THREE.BufferGeometry( 1, 1, 1 ); // 盒子的大小
const vertices = new Float32Array([
  -1.0,-1.0,1.0, // x y z
  1.0,-1.0,1.0,
  1.0,1.0,1.0,
  1.0,1.0,1.0,
  -1.0,1.0,1.0,
  -1.0,-1.0,1.0
])
// 一维数组,3个值
geometry.setAttribute('position',new THREE.BufferAttribute(vertices,3))
const material = new THREE.MeshBasicMaterial( {color: 0x00ff00} ); // 盒子的材质
// 根据几何体和材质创建物体
const mesh = new THREE.Mesh(geometry,material)
// 把几何体添加到场景之中
scene.add(mesh)
// 01BufferGeometry设置顶点创建矩阵 end


// 初始化渲染器
const renderer = new THREE.WebGL1Renderer()
// 设置渲染的尺寸大小
renderer.setSize(window.innerWidth,window.innerHeight)
// 将webgl渲染的canvas内容添加到body上
document.body.appendChild(renderer.domElement)
// 011 应用图形用户界面更改变量 end

// 创建轨道控制器
const controls = new OrbitControls(camera,renderer.domElement)
// 设置控制器阻尼,让控制器更具有真是效果
controls.enableDamping = true
// 06-1:添加坐标轴辅助器
const axesHelper = new THREE.AxesHelper( 5 );
scene.add( axesHelper );

// window双击事件的时候
window.addEventListener('dblclick',()=>{
  // 010 调研js接口控制画布全屏和退出全屏
  const fullScreenElement = document.fullscreenElement;
  if ( !fullScreenElement ) {
    renderer.domElement.requestFullscreen() // 画布对象全屏
  } else {
    document.exitFullscreen()
  }
})

// 渲染函数 - 每一帧渲染一次
function animate() {
  // 渲染下一帧 的时候 会调用 animate 函数
	requestAnimationFrame( animate );
	controls.update();
	renderer.render( scene, camera );
}
animate()

// 09 根据尺寸变化实现自适应画面
// 监听画面变化,更新渲染画面
window.addEventListener('resize',()=>{
  console.log('监听画面变化');
  // 更新摄像头
  camera.aspect = window.innerWidth / window.innerHeight
  // 更新摄像头的头部矩阵
  camera.updateProjectionMatrix()
  // 更新渲染器
  renderer.setSize(window.innerWidth, window.innerHeight)
  // 设置渲染器的像素比
  renderer.setPixelRatio(window.devicePixelRatio)
})
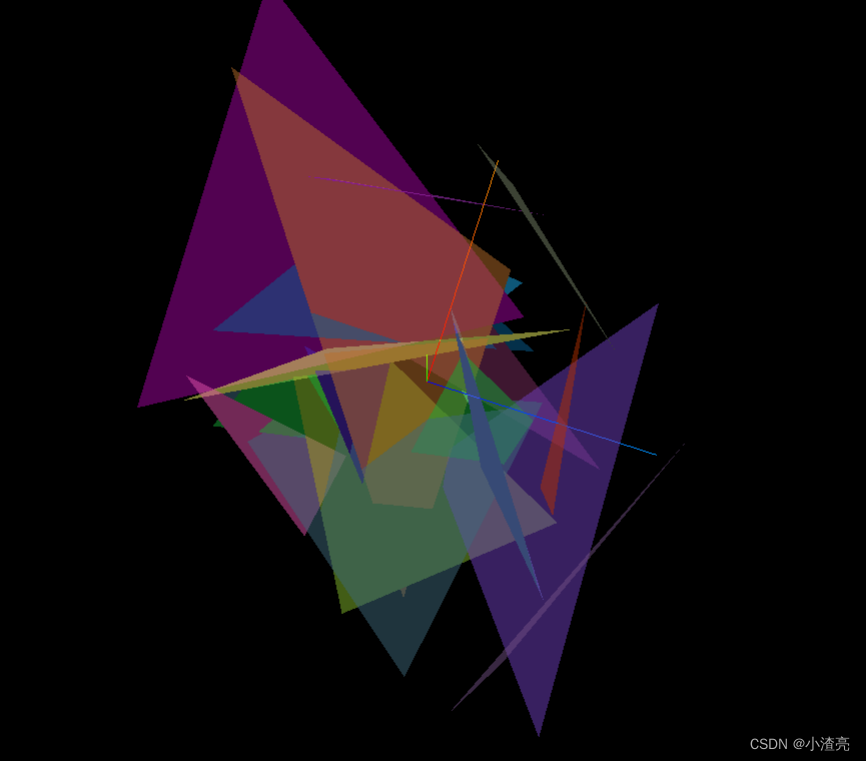
02 生产炫酷三角形科技物体
import * as THREE from "three"
// console.log('main.js',THREE);

// 导入轨道控制器
import { OrbitControls } from "three/examples/jsm/controls/OrbitControls"
// gsap 1-1:导入动画库
import gsap from "gsap"
// 导入 dat.gui
import * as dat from "dat.gui"

// 1:创建场景
const scene = new THREE.Scene()

// 2:创建相机
const camera = new THREE.PerspectiveCamera(75,window.innerWidth/ window.innerHeight,0.1,1000)
// 设置相机位置 x y z
camera.position.set(0,0,10)
// 把相机添加到场景之中
scene.add( camera );

// 添加物体
// 创建几何体
for( let i = 0 ; i < 50 ; i++) {
  const geometry = new THREE.BufferGeometry(); // 三角形的面
  const positionArray = new Float32Array(9)
  // 每一个三角形,都需要3个顶点,每个顶点需要3个值
  for (let j = 0; j < 9; j++ ){
    positionArray[j] = Math.random() * 10 - 5
  }
  geometry.setAttribute('position',new THREE.BufferAttribute(positionArray,3))
  let color = new THREE.Color(Math.random(),Math.random(),Math.random())
  // 一维数组,3个值

  const material = new THREE.MeshBasicMaterial( {color: color,transparent:true, opacity:0.5} ); // 盒子的材质
  // 根据几何体和材质创建物体
  const mesh = new THREE.Mesh(geometry,material)
  // 把几何体添加到场景之中
  scene.add(mesh)
}
// 02 生产炫酷三角形科技物体 satrt


// 初始化渲染器
const renderer = new THREE.WebGL1Renderer()
// 设置渲染的尺寸大小
renderer.setSize(window.innerWidth,window.innerHeight)
// 将webgl渲染的canvas内容添加到body上
document.body.appendChild(renderer.domElement)
// 011 应用图形用户界面更改变量 end

// 创建轨道控制器
const controls = new OrbitControls(camera,renderer.domElement)
// 设置控制器阻尼,让控制器更具有真是效果
controls.enableDamping = true
// 06-1:添加坐标轴辅助器
const axesHelper = new THREE.AxesHelper( 5 );
scene.add( axesHelper );

// window双击事件的时候
window.addEventListener('dblclick',()=>{
  // 010 调研js接口控制画布全屏和退出全屏
  const fullScreenElement = document.fullscreenElement;
  if ( !fullScreenElement ) {
    renderer.domElement.requestFullscreen() // 画布对象全屏
  } else {
    document.exitFullscreen()
  }
})

// 渲染函数 - 每一帧渲染一次
function animate() {
  // 渲染下一帧 的时候 会调用 animate 函数
	requestAnimationFrame( animate );
	controls.update();
	renderer.render( scene, camera );
}
animate()

// 09 根据尺寸变化实现自适应画面
// 监听画面变化,更新渲染画面
window.addEventListener('resize',()=>{
  console.log('监听画面变化');
  // 更新摄像头
  camera.aspect = window.innerWidth / window.innerHeight
  // 更新摄像头的头部矩阵
  camera.updateProjectionMatrix()
  // 更新渲染器
  renderer.setSize(window.innerWidth, window.innerHeight)
  // 设置渲染器的像素比
  renderer.setPixelRatio(window.devicePixelRatio)
})
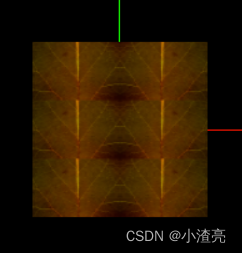
- 效果
03 常见的网格几何体 geometry
04 基础网格材质 material
04-1 初识别材质与纹理
import * as THREE from "three"
// console.log('main.js',THREE);

// 导入轨道控制器
import { OrbitControls } from "three/examples/jsm/controls/OrbitControls"
// gsap 1-1:导入动画库
import gsap from "gsap"
// 导入 dat.gui
import * as dat from "dat.gui"

// 1:创建场景
const scene = new THREE.Scene()

// 2:创建相机
const camera = new THREE.PerspectiveCamera(75,window.innerWidth/ window.innerHeight,0.1,1000)
// 设置相机位置 x y z
camera.position.set(0,0,10)
// 把相机添加到场景之中
scene.add( camera );

// 04 初识别材质与纹理  start
// 导入纹理
const texttrueLoader = new THREE.TextureLoader()
const ColorTextures = texttrueLoader.load('./textures/loader1.webp') // 纹理贴纸
// 添加物体
const meshGeometry = new THREE.BoxBufferGeometry(1,1,1)
const basicMatterials = new THREE.MeshBasicMaterial({
  color:'#ffff00',
  map:ColorTextures
})
const mesh = new THREE.Mesh(meshGeometry,basicMatterials)
scene.add(mesh)
// 04 初识别材质与纹理  end

// 初始化渲染器
const renderer = new THREE.WebGL1Renderer()
// 设置渲染的尺寸大小
renderer.setSize(window.innerWidth,window.innerHeight)
// 将webgl渲染的canvas内容添加到body上
document.body.appendChild(renderer.domElement)
// 011 应用图形用户界面更改变量 end

// 创建轨道控制器
const controls = new OrbitControls(camera,renderer.domElement)
// 设置控制器阻尼,让控制器更具有真是效果
controls.enableDamping = true
// 06-1:添加坐标轴辅助器
const axesHelper = new THREE.AxesHelper( 5 );
scene.add( axesHelper );

// window双击事件的时候
window.addEventListener('dblclick',()=>{
  // 010 调研js接口控制画布全屏和退出全屏
  const fullScreenElement = document.fullscreenElement;
  if ( !fullScreenElement ) {
    renderer.domElement.requestFullscreen() // 画布对象全屏
  } else {
    document.exitFullscreen()
  }
})

// 渲染函数 - 每一帧渲染一次
function animate() {
  // 渲染下一帧 的时候 会调用 animate 函数
	requestAnimationFrame( animate );
	controls.update();
	renderer.render( scene, camera );
}
animate()

// 09 根据尺寸变化实现自适应画面
// 监听画面变化,更新渲染画面
window.addEventListener('resize',()=>{
  console.log('监听画面变化');
  // 更新摄像头
  camera.aspect = window.innerWidth / window.innerHeight
  // 更新摄像头的头部矩阵
  camera.updateProjectionMatrix()
  // 更新渲染器
  renderer.setSize(window.innerWidth, window.innerHeight)
  // 设置渲染器的像素比
  renderer.setPixelRatio(window.devicePixelRatio)
})
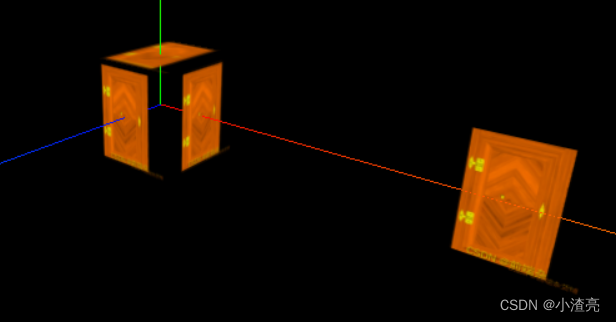
- 效果
04-2 初识别材质与纹理 ( 平移、旋转 )
import * as THREE from "three"
// console.log('main.js',THREE);

// 导入轨道控制器
import { OrbitControls } from "three/examples/jsm/controls/OrbitControls"
// gsap 1-1:导入动画库
import gsap from "gsap"
// 导入 dat.gui
import * as dat from "dat.gui"

// 1:创建场景
const scene = new THREE.Scene()

// 2:创建相机
const camera = new THREE.PerspectiveCamera(75,window.innerWidth/ window.innerHeight,0.1,1000)
// 设置相机位置 x y z
camera.position.set(0,0,10)
// 把相机添加到场景之中
scene.add( camera );

// 04 纹理属性之 平移、旋转、重复  start
// 导入纹理
const texttrueLoader = new THREE.TextureLoader()
const colorTextures = texttrueLoader.load('./textures/loader2.webp') // 纹理贴纸
// 纹理的平移
// colorTextures.offset.x = 0.3;
// colorTextures.offset.y = 0.3; // colorTextures.offset.set(0.3,0.3)
// 纹理的旋转
// colorTextures.center.set(0.5,0.5) // 设置旋转中心
// colorTextures.rotation = Math.PI / 4
// 纹理的重复 S-y轴 T-x轴
colorTextures.repeat.set(2,3)
colorTextures.wrapS = THREE.MirroredRepeatWrapping // 纹理镜像重复
colorTextures.wrapT = THREE.RepeatWrapping // 纹理无线重复

// 添加物体
const meshGeometry = new THREE.BoxBufferGeometry(1,1,1)
const basicMatterials = new THREE.MeshBasicMaterial({
  color:'#ffff00',
  map:colorTextures
})
const mesh = new THREE.Mesh(meshGeometry,basicMatterials)
scene.add(mesh)
// 04 纹理属性之 平移、旋转、重复   end

// 初始化渲染器
const renderer = new THREE.WebGL1Renderer()
// 设置渲染的尺寸大小
renderer.setSize(window.innerWidth,window.innerHeight)
// 将webgl渲染的canvas内容添加到body上
document.body.appendChild(renderer.domElement)
// 011 应用图形用户界面更改变量 end

// 创建轨道控制器
const controls = new OrbitControls(camera,renderer.domElement)
// 设置控制器阻尼,让控制器更具有真是效果
controls.enableDamping = true
// 06-1:添加坐标轴辅助器
const axesHelper = new THREE.AxesHelper( 5 );
scene.add( axesHelper );

// window双击事件的时候
window.addEventListener('dblclick',()=>{
  // 010 调研js接口控制画布全屏和退出全屏
  const fullScreenElement = document.fullscreenElement;
  if ( !fullScreenElement ) {
    renderer.domElement.requestFullscreen() // 画布对象全屏
  } else {
    document.exitFullscreen()
  }
})

// 渲染函数 - 每一帧渲染一次
function animate() {
  // 渲染下一帧 的时候 会调用 animate 函数
	requestAnimationFrame( animate );
	controls.update();
	renderer.render( scene, camera );
}
animate()

// 09 根据尺寸变化实现自适应画面
// 监听画面变化,更新渲染画面
window.addEventListener('resize',()=>{
  console.log('监听画面变化');
  // 更新摄像头
  camera.aspect = window.innerWidth / window.innerHeight
  // 更新摄像头的头部矩阵
  camera.updateProjectionMatrix()
  // 更新渲染器
  renderer.setSize(window.innerWidth, window.innerHeight)
  // 设置渲染器的像素比
  renderer.setPixelRatio(window.devicePixelRatio)
})
- 效果
04-3 纹理显示设置( 缩小滤镜 ) Textures
- NearestFilter返回与指定纹理坐标(在曼哈顿距离之内)最接近的纹理元素的值。
- LinearFilter为标准来从每个mipmap中生成纹理值。最终的纹理值是这两个值的加权平均值。
import * as THREE from "three"
// console.log('main.js',THREE);

// 导入轨道控制器
import { OrbitControls } from "three/examples/jsm/controls/OrbitControls"
// gsap 1-1:导入动画库
import gsap from "gsap"
// 导入 dat.gui
import * as dat from "dat.gui"

// 1:创建场景
const scene = new THREE.Scene()

// 2:创建相机
const camera = new THREE.PerspectiveCamera(75,window.innerWidth/ window.innerHeight,0.1,1000)
// 设置相机位置 x y z
camera.position.set(0,0,10)
// 把相机添加到场景之中
scene.add( camera );

// 05 设置纹理显示算法和mipmap start
// 导入纹理
const texttrueLoader = new THREE.TextureLoader()
const colorTextures = texttrueLoader.load('./textures/loader2.webp') // 纹理贴纸

// 纹理显示设置
// colorTextures.minFilter = THREE.NearestFilter
// colorTextures.magFilter = THREE.NearestFilter
colorTextures.minFilter = THREE.LinearFilter
colorTextures.magFilter = THREE.LinearFilter

// 添加物体
const meshGeometry = new THREE.BoxBufferGeometry(1,1,1)
const basicMatterials = new THREE.MeshBasicMaterial({
  color:'#ffff00',
  map:colorTextures
  // map:colorTextures1
})
const mesh = new THREE.Mesh(meshGeometry,basicMatterials)
scene.add(mesh)
// 05 设置纹理显示算法和mipmap end

// 初始化渲染器
const renderer = new THREE.WebGL1Renderer()
// 设置渲染的尺寸大小
renderer.setSize(window.innerWidth,window.innerHeight)
// 将webgl渲染的canvas内容添加到body上
document.body.appendChild(renderer.domElement)
// 011 应用图形用户界面更改变量 end

// 创建轨道控制器
const controls = new OrbitControls(camera,renderer.domElement)
// 设置控制器阻尼,让控制器更具有真是效果
controls.enableDamping = true
// 06-1:添加坐标轴辅助器
const axesHelper = new THREE.AxesHelper( 5 );
scene.add( axesHelper );

// window双击事件的时候
window.addEventListener('dblclick',()=>{
  // 010 调研js接口控制画布全屏和退出全屏
  const fullScreenElement = document.fullscreenElement;
  if ( !fullScreenElement ) {
    renderer.domElement.requestFullscreen() // 画布对象全屏
  } else {
    document.exitFullscreen()
  }
})

// 渲染函数 - 每一帧渲染一次
function animate() {
  // 渲染下一帧 的时候 会调用 animate 函数
	requestAnimationFrame( animate );
	controls.update();
	renderer.render( scene, camera );
}
animate()

// 09 根据尺寸变化实现自适应画面
// 监听画面变化,更新渲染画面
window.addEventListener('resize',()=>{
  console.log('监听画面变化');
  // 更新摄像头
  camera.aspect = window.innerWidth / window.innerHeight
  // 更新摄像头的头部矩阵
  camera.updateProjectionMatrix()
  // 更新渲染器
  renderer.setSize(window.innerWidth, window.innerHeight)
  // 设置渲染器的像素比
  renderer.setPixelRatio(window.devicePixelRatio)
})
04-4 设置纹理的透明纹理
import * as THREE from "three"
// console.log('main.js',THREE);

// 导入轨道控制器
import { OrbitControls } from "three/examples/jsm/controls/OrbitControls"
// gsap 1-1:导入动画库
import gsap from "gsap"
// 导入 dat.gui
import * as dat from "dat.gui"

// 1:创建场景
const scene = new THREE.Scene()

// 2:创建相机
const camera = new THREE.PerspectiveCamera(75,window.innerWidth/ window.innerHeight,0.1,1000)
// 设置相机位置 x y z
camera.position.set(0,0,10)
// 把相机添加到场景之中
scene.add( camera );

// 05 设置纹理的透明纹理 start
// 导入纹理
const texttrueLoader = new THREE.TextureLoader()
const colorTextures = texttrueLoader.load('./textures/door.png') // 纹理贴纸
const whiteAplhaTextures = texttrueLoader.load('./textures/doorWhite.png') // 纹理的透明纹理???

// 添加物体
const meshGeometry = new THREE.BoxBufferGeometry(1,1,1)
const basicMatterials = new THREE.MeshBasicMaterial({
  color:'#ffff00',
  map:colorTextures,
  alphaMap:whiteAplhaTextures,
  transparent:true,
  // opacity:0.5
})
const mesh = new THREE.Mesh(meshGeometry,basicMatterials)
scene.add(mesh)
// 添加平面
const plane = new THREE.Mesh(new THREE.PlaneBufferGeometry(1,1),basicMatterials)
plane.position.set(3,0,0)
scene.add(plane)
// 05 设置纹理的透明纹理 end

// 初始化渲染器
const renderer = new THREE.WebGL1Renderer()
// 设置渲染的尺寸大小
renderer.setSize(window.innerWidth,window.innerHeight)
// 将webgl渲染的canvas内容添加到body上
document.body.appendChild(renderer.domElement)
// 011 应用图形用户界面更改变量 end

// 创建轨道控制器
const controls = new OrbitControls(camera,renderer.domElement)
// 设置控制器阻尼,让控制器更具有真是效果
controls.enableDamping = true
// 06-1:添加坐标轴辅助器
const axesHelper = new THREE.AxesHelper( 5 );
scene.add( axesHelper );

// window双击事件的时候
window.addEventListener('dblclick',()=>{
  // 010 调研js接口控制画布全屏和退出全屏
  const fullScreenElement = document.fullscreenElement;
  if ( !fullScreenElement ) {
    renderer.domElement.requestFullscreen() // 画布对象全屏
  } else {
    document.exitFullscreen()
  }
})

// 渲染函数 - 每一帧渲染一次
function animate() {
  // 渲染下一帧 的时候 会调用 animate 函数
	requestAnimationFrame( animate );
	controls.update();
	renderer.render( scene, camera );
}
animate()

// 09 根据尺寸变化实现自适应画面
// 监听画面变化,更新渲染画面
window.addEventListener('resize',()=>{
  console.log('监听画面变化');
  // 更新摄像头
  camera.aspect = window.innerWidth / window.innerHeight
  // 更新摄像头的头部矩阵
  camera.updateProjectionMatrix()
  // 更新渲染器
  renderer.setSize(window.innerWidth, window.innerHeight)
  // 设置渲染器的像素比
  renderer.setPixelRatio(window.devicePixelRatio)
})
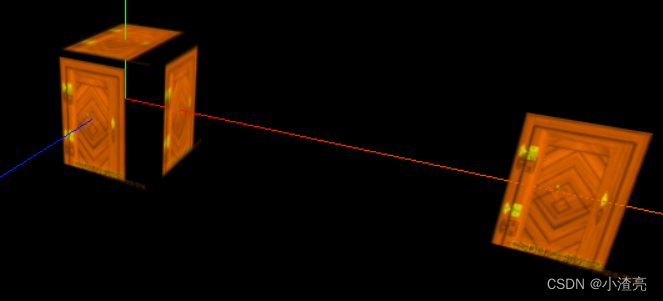
- 效果
04-5 AO环境遮挡图与强度( AO对于光的遮挡 )
import * as THREE from "three"
// console.log('main.js',THREE);

// 导入轨道控制器
import { OrbitControls } from "three/examples/jsm/controls/OrbitControls"
// gsap 1-1:导入动画库
import gsap from "gsap"
// 导入 dat.gui
import * as dat from "dat.gui"

// 1:创建场景
const scene = new THREE.Scene()

// 2:创建相机
const camera = new THREE.PerspectiveCamera(75,window.innerWidth/ window.innerHeight,0.1,1000)
// 设置相机位置 x y z
camera.position.set(0,0,10)
// 把相机添加到场景之中
scene.add( camera );

// 06 AO环境遮挡图与强度( AO对于光的遮挡 ) start
// 导入纹理
const texttrueLoader = new THREE.TextureLoader()
const colorTextures = texttrueLoader.load('./textures/door.png') // 纹理贴纸
const whiteAplhaTextures = texttrueLoader.load('./textures/doorWhite.png') // 纹理的透明纹理???
const doorAoTextrues = texttrueLoader.load('./textures/doorAo.png')

// 添加物体
const meshGeometry = new THREE.BoxBufferGeometry(1,1,1)
const basicMatterials = new THREE.MeshBasicMaterial({
  color:'#ffff00',
  map:colorTextures,
  alphaMap:whiteAplhaTextures,
  transparent:true,
  aoMap:doorAoTextrues
  // opacity:0.5
})
const mesh = new THREE.Mesh(meshGeometry,basicMatterials)
scene.add(mesh)
// 给mesh平面设置第二组 uv
meshGeometry.setAttribute(
  "uv2",
  new THREE.BufferAttribute(meshGeometry.attributes.uv.array,2)
)

// 添加平面
const planeGeometry = new THREE.PlaneBufferGeometry(1,1)
const plane = new THREE.Mesh(planeGeometry,basicMatterials)
plane.position.set(3,0,0)
scene.add(plane)
// 给平面设置第二组 uv
planeGeometry.setAttribute(
  "uv2",
  new THREE.BufferAttribute(planeGeometry.attributes.uv.array,2)
)
// 06 环境遮挡图与强度 end

// 初始化渲染器
const renderer = new THREE.WebGL1Renderer()
// 设置渲染的尺寸大小
renderer.setSize(window.innerWidth,window.innerHeight)
// 将webgl渲染的canvas内容添加到body上
document.body.appendChild(renderer.domElement)
// 011 应用图形用户界面更改变量 end

// 创建轨道控制器
const controls = new OrbitControls(camera,renderer.domElement)
// 设置控制器阻尼,让控制器更具有真是效果
controls.enableDamping = true
// 06-1:添加坐标轴辅助器
const axesHelper = new THREE.AxesHelper( 5 );
scene.add( axesHelper );

// window双击事件的时候
window.addEventListener('dblclick',()=>{
  // 010 调研js接口控制画布全屏和退出全屏
  const fullScreenElement = document.fullscreenElement;
  if ( !fullScreenElement ) {
    renderer.domElement.requestFullscreen() // 画布对象全屏
  } else {
    document.exitFullscreen()
  }
})

// 渲染函数 - 每一帧渲染一次
function animate() {
  // 渲染下一帧 的时候 会调用 animate 函数
	requestAnimationFrame( animate );
	controls.update();
	renderer.render( scene, camera );
}
animate()

// 09 根据尺寸变化实现自适应画面
// 监听画面变化,更新渲染画面
window.addEventListener('resize',()=>{
  console.log('监听画面变化');
  // 更新摄像头
  camera.aspect = window.innerWidth / window.innerHeight
  // 更新摄像头的头部矩阵
  camera.updateProjectionMatrix()
  // 更新渲染器
  renderer.setSize(window.innerWidth, window.innerHeight)
  // 设置渲染器的像素比
  renderer.setPixelRatio(window.devicePixelRatio)
})
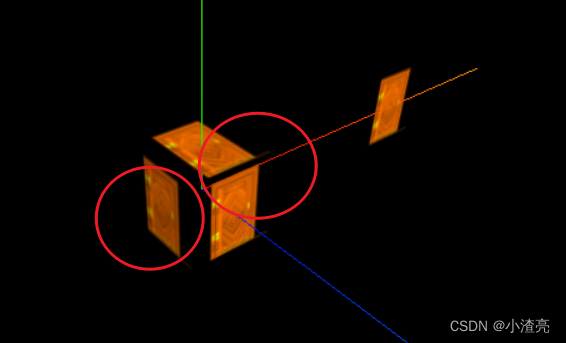
- 效果
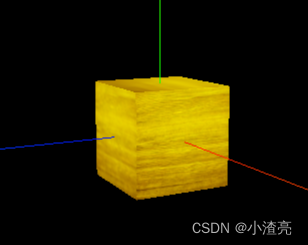
04-6 标准网格材质与光照物理效果 - AmbientLight
import * as THREE from "three"
// console.log('main.js',THREE);

// 导入轨道控制器
import { OrbitControls } from "three/examples/jsm/controls/OrbitControls"
// gsap 1-1:导入动画库
import gsap from "gsap"
// 导入 dat.gui
import * as dat from "dat.gui"

// 1:创建场景
const scene = new THREE.Scene()

// 2:创建相机
const camera = new THREE.PerspectiveCamera(75,window.innerWidth/ window.innerHeight,0.1,1000)
// 设置相机位置 x y z
camera.position.set(0,0,10)
// 把相机添加到场景之中
scene.add( camera );

// 07 标准网格材质与光照物理效果 start
// 导入纹理
const texttrueLoader = new THREE.TextureLoader()
const colorTextures = texttrueLoader.load('./textures/door.png') // 纹理贴纸
const whiteAplhaTextures = texttrueLoader.load('./textures/doorWhite.png') // 纹理的透明纹理???
const doorAoTextrues = texttrueLoader.load('./textures/doorAo.png')

// 添加物体
const meshGeometry = new THREE.BoxBufferGeometry(1,1,1)
// 材质
const materials = new THREE.MeshStandardMaterial({
  color:'#ffff00',
  map:colorTextures,
  alphaMap:whiteAplhaTextures,
  transparent:true,
  aoMap:doorAoTextrues
})
const mesh = new THREE.Mesh(meshGeometry,materials)
scene.add(mesh)
// 给mesh平面设置第二组 uv
meshGeometry.setAttribute(
  "uv2",
  new THREE.BufferAttribute(meshGeometry.attributes.uv.array,2)
)
// 添加灯光 start
// 环境光
const light = new THREE.AmbientLight( 0xffffff,0.8 ); // soft white light
scene.add( light );
// 平行光
const directionalLight = new THREE.DirectionalLight( 0xffffff, 0.5 );
directionalLight.position.set(10,10,10) // 光源位置
scene.add( directionalLight );
// 添加灯光 end

// 添加平面
const planeGeometry = new THREE.PlaneBufferGeometry(1,1)
const plane = new THREE.Mesh(planeGeometry,materials)
plane.position.set(3,0,0)
scene.add(plane)
// 给平面设置第二组 uv
planeGeometry.setAttribute(
  "uv2",
  new THREE.BufferAttribute(planeGeometry.attributes.uv.array,2)
)
// 07 标准网格材质与光照物理效果 end

// 初始化渲染器
const renderer = new THREE.WebGL1Renderer()
// 设置渲染的尺寸大小
renderer.setSize(window.innerWidth,window.innerHeight)
// 将webgl渲染的canvas内容添加到body上
document.body.appendChild(renderer.domElement)
// 011 应用图形用户界面更改变量 end

// 创建轨道控制器
const controls = new OrbitControls(camera,renderer.domElement)
// 设置控制器阻尼,让控制器更具有真是效果
controls.enableDamping = true
// 06-1:添加坐标轴辅助器
const axesHelper = new THREE.AxesHelper( 5 );
scene.add( axesHelper );

// window双击事件的时候
window.addEventListener('dblclick',()=>{
  // 010 调研js接口控制画布全屏和退出全屏
  const fullScreenElement = document.fullscreenElement;
  if ( !fullScreenElement ) {
    renderer.domElement.requestFullscreen() // 画布对象全屏
  } else {
    document.exitFullscreen()
  }
})

// 渲染函数 - 每一帧渲染一次
function animate() {
  // 渲染下一帧 的时候 会调用 animate 函数
	requestAnimationFrame( animate );
	controls.update();
	renderer.render( scene, camera );
}
animate()

// 09 根据尺寸变化实现自适应画面
// 监听画面变化,更新渲染画面
window.addEventListener('resize',()=>{
  console.log('监听画面变化');
  // 更新摄像头
  camera.aspect = window.innerWidth / window.innerHeight
  // 更新摄像头的头部矩阵
  camera.updateProjectionMatrix()
  // 更新渲染器
  renderer.setSize(window.innerWidth, window.innerHeight)
  // 设置渲染器的像素比
  renderer.setPixelRatio(window.devicePixelRatio)
})
- 效果
04-7 置换贴图与顶点细分设置 -
import * as THREE from "three"
// console.log('main.js',THREE);

// 导入轨道控制器
import { OrbitControls } from "three/examples/jsm/controls/OrbitControls"
// gsap 1-1:导入动画库
import gsap from "gsap"
// 导入 dat.gui
import * as dat from "dat.gui"

// 1:创建场景
const scene = new THREE.Scene()

// 2:创建相机
const camera = new THREE.PerspectiveCamera(75,window.innerWidth/ window.innerHeight,0.1,1000)
// 设置相机位置 x y z
camera.position.set(0,0,10)
// 把相机添加到场景之中
scene.add( camera );

// 07 置换贴图与顶点细分设置 start
// 导入纹理
const texttrueLoader = new THREE.TextureLoader()
const colorTextures = texttrueLoader.load('./textures/door.png') // 纹理贴纸
const whiteAplhaTextures = texttrueLoader.load('./textures/doorWhite.png') // 纹理的透明纹理???
const doorAoTextrues = texttrueLoader.load('./textures/doorAo.png')
const height = texttrueLoader.load("./textures/height.png") // 置换贴图

// 添加物体
const meshGeometry = new THREE.BoxBufferGeometry(1,1,1,100,100,100) // 置换贴图之顶点细分
// 材质
const materials = new THREE.MeshStandardMaterial({
  color:'#ffff00',
  map:colorTextures,
  alphaMap:whiteAplhaTextures,
  transparent:true,
  aoMap:doorAoTextrues,
  displacementMap:height, // 置换贴图
  displacementScale:0.1 ,// 置换贴图之影响程度

})
const mesh = new THREE.Mesh(meshGeometry,materials)
scene.add(mesh)
// 给mesh平面设置第二组 uv
meshGeometry.setAttribute(
  "uv2",
  new THREE.BufferAttribute(meshGeometry.attributes.uv.array,2)
)
// 添加灯光 start
// 环境光
const light = new THREE.AmbientLight( 0xffffff,0.8 ); // soft white light
scene.add( light );
// 平行光
const directionalLight = new THREE.DirectionalLight( 0xffffff, 0.5 );
directionalLight.position.set(10,10,10) // 光源位置
scene.add( directionalLight );
// 添加灯光 end

// 添加平面
const planeGeometry = new THREE.PlaneBufferGeometry(1,1)
const plane = new THREE.Mesh(planeGeometry,materials)
plane.position.set(2,0,0)
scene.add(plane)
// 给平面设置第二组 uv
planeGeometry.setAttribute(
  "uv2",
  new THREE.BufferAttribute(planeGeometry.attributes.uv.array,2)
)
// 07 置换贴图与顶点细分设置 end

// 初始化渲染器
const renderer = new THREE.WebGL1Renderer()
// 设置渲染的尺寸大小
renderer.setSize(window.innerWidth,window.innerHeight)
// 将webgl渲染的canvas内容添加到body上
document.body.appendChild(renderer.domElement)

// 创建轨道控制器
const controls = new OrbitControls(camera,renderer.domElement)
// 设置控制器阻尼,让控制器更具有真是效果
controls.enableDamping = true
// 06-1:添加坐标轴辅助器
const axesHelper = new THREE.AxesHelper( 5 );
scene.add( axesHelper );

// window双击事件的时候
window.addEventListener('dblclick',()=>{
  // 010 调研js接口控制画布全屏和退出全屏
  const fullScreenElement = document.fullscreenElement;
  if ( !fullScreenElement ) {
    renderer.domElement.requestFullscreen() // 画布对象全屏
  } else {
    document.exitFullscreen()
  }
})

// 渲染函数 - 每一帧渲染一次
function animate() {
  // 渲染下一帧 的时候 会调用 animate 函数
	requestAnimationFrame( animate );
	controls.update();
	renderer.render( scene, camera );
}
animate()

// 09 根据尺寸变化实现自适应画面
// 监听画面变化,更新渲染画面
window.addEventListener('resize',()=>{
  console.log('监听画面变化');
  // 更新摄像头
  camera.aspect = window.innerWidth / window.innerHeight
  // 更新摄像头的头部矩阵
  camera.updateProjectionMatrix()
  // 更新渲染器
  renderer.setSize(window.innerWidth, window.innerHeight)
  // 设置渲染器的像素比
  renderer.setPixelRatio(window.devicePixelRatio)
})
04-7 设置粗糙度与粗糙度贴图
import * as THREE from "three"
// console.log('main.js',THREE);

// 导入轨道控制器
import { OrbitControls } from "three/examples/jsm/controls/OrbitControls"
// gsap 1-1:导入动画库
import gsap from "gsap"
// 导入 dat.gui
import * as dat from "dat.gui"

// 1:创建场景
const scene = new THREE.Scene()

// 2:创建相机
const camera = new THREE.PerspectiveCamera(75,window.innerWidth/ window.innerHeight,0.1,1000)
// 设置相机位置 x y z
camera.position.set(0,0,10)
// 把相机添加到场景之中
scene.add( camera );

// 010 设置粗糙度与粗糙度贴图 start
// 导入纹理
const texttrueLoader = new THREE.TextureLoader()
const colorTextures = texttrueLoader.load('./textures/door.png') // 纹理贴纸
const whiteAplhaTextures = texttrueLoader.load('./textures/doorWhite.png') // 纹理的透明纹理???
const doorAoTextrues = texttrueLoader.load('./textures/doorAo.png')
const height = texttrueLoader.load("./textures/height.png") // 置换贴图
const roughnessTextrues = texttrueLoader.load("./textures/roughness.png") // 粗糙贴图

// 添加物体
const meshGeometry = new THREE.BoxBufferGeometry(1,1,1,100,100,100) // 置换贴图之顶点细分
// 材质
const materials = new THREE.MeshStandardMaterial({
  color:'#ffff00',
  map:colorTextures,
  alphaMap:whiteAplhaTextures,
  transparent:true,
  aoMap:doorAoTextrues,
  displacementMap:height, // 置换贴图
  displacementScale:0.1 ,// 置换贴图之影响程度
  roughness: 1, // 粗糙度
  roughnessMap:roughnessTextrues // 粗糙贴图

})
const mesh = new THREE.Mesh(meshGeometry,materials)
scene.add(mesh)
// 给mesh平面设置第二组 uv
meshGeometry.setAttribute(
  "uv2",
  new THREE.BufferAttribute(meshGeometry.attributes.uv.array,2)
)
// 添加灯光 start
// 环境光
const light = new THREE.AmbientLight( 0xffffff,0.8 ); // soft white light
scene.add( light );
// 平行光
const directionalLight = new THREE.DirectionalLight( 0xffffff, 0.5 );
directionalLight.position.set(10,10,10) // 光源位置
scene.add( directionalLight );
// 添加灯光 end

// 添加平面
const planeGeometry = new THREE.PlaneBufferGeometry(1,1)
const plane = new THREE.Mesh(planeGeometry,materials)
plane.position.set(2,0,0)
scene.add(plane)
// 给平面设置第二组 uv
planeGeometry.setAttribute(
  "uv2",
  new THREE.BufferAttribute(planeGeometry.attributes.uv.array,2)
)
// 010 设置粗糙度与粗糙度贴图 end

// 初始化渲染器
const renderer = new THREE.WebGL1Renderer()
// 设置渲染的尺寸大小
renderer.setSize(window.innerWidth,window.innerHeight)
// 将webgl渲染的canvas内容添加到body上
document.body.appendChild(renderer.domElement)

// 创建轨道控制器
const controls = new OrbitControls(camera,renderer.domElement)
// 设置控制器阻尼,让控制器更具有真是效果
controls.enableDamping = true
// 06-1:添加坐标轴辅助器
const axesHelper = new THREE.AxesHelper( 5 );
scene.add( axesHelper );

// window双击事件的时候
window.addEventListener('dblclick',()=>{
  // 010 调研js接口控制画布全屏和退出全屏
  const fullScreenElement = document.fullscreenElement;
  if ( !fullScreenElement ) {
    renderer.domElement.requestFullscreen() // 画布对象全屏
  } else {
    document.exitFullscreen()
  }
})

// 渲染函数 - 每一帧渲染一次
function animate() {
  // 渲染下一帧 的时候 会调用 animate 函数
	requestAnimationFrame( animate );
	controls.update();
	renderer.render( scene, camera );
}
animate()

// 09 根据尺寸变化实现自适应画面
// 监听画面变化,更新渲染画面
window.addEventListener('resize',()=>{
  console.log('监听画面变化');
  // 更新摄像头
  camera.aspect = window.innerWidth / window.innerHeight
  // 更新摄像头的头部矩阵
  camera.updateProjectionMatrix()
  // 更新渲染器
  renderer.setSize(window.innerWidth, window.innerHeight)
  // 设置渲染器的像素比
  renderer.setPixelRatio(window.devicePixelRatio)
})
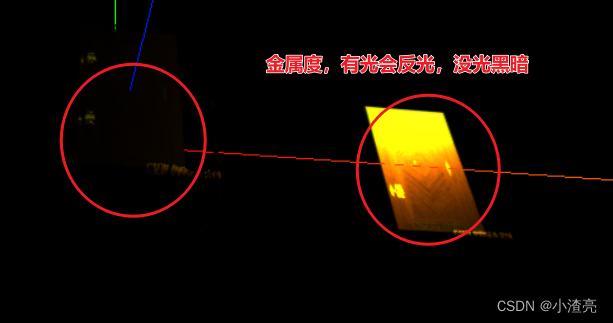
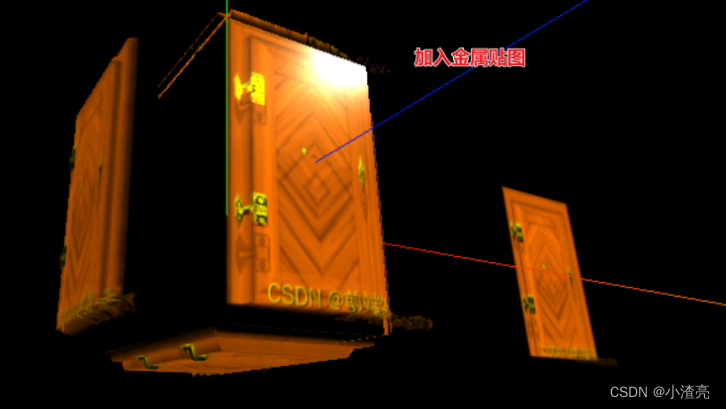
04-8 设置金属度与金属贴图
import * as THREE from "three"
// console.log('main.js',THREE);

// 导入轨道控制器
import { OrbitControls } from "three/examples/jsm/controls/OrbitControls"
// gsap 1-1:导入动画库
import gsap from "gsap"
// 导入 dat.gui
import * as dat from "dat.gui"

// 1:创建场景
const scene = new THREE.Scene()

// 2:创建相机
const camera = new THREE.PerspectiveCamera(75,window.innerWidth/ window.innerHeight,0.1,1000)
// 设置相机位置 x y z
camera.position.set(0,0,10)
// 把相机添加到场景之中
scene.add( camera );

// 011 设置金属度与金属贴图 start
// 导入纹理
const texttrueLoader = new THREE.TextureLoader()
const colorTextures = texttrueLoader.load('./textures/door.png') // 纹理贴纸
const whiteAplhaTextures = texttrueLoader.load('./textures/doorWhite.png') // 纹理的透明纹理???
const doorAoTextrues = texttrueLoader.load('./textures/doorAo.png')
const height = texttrueLoader.load("./textures/height.png") // 置换贴图
const roughnessTextrues = texttrueLoader.load("./textures/roughness.png") // 粗糙贴图
const metalnessTexture = texttrueLoader.load("./textures/metalness.png") // 金属贴图

// 添加物体
const meshGeometry = new THREE.BoxBufferGeometry(1,1,1,100,100,100) // 置换贴图之顶点细分
// 材质
const materials = new THREE.MeshStandardMaterial({
  color:'#ffff00',
  map:colorTextures,
  alphaMap:whiteAplhaTextures,
  transparent:true,
  aoMap:doorAoTextrues,
  displacementMap:height, // 置换贴图
  displacementScale:0.1 ,// 置换贴图之影响程度
  roughness: 1, // 粗糙度
  roughnessMap:roughnessTextrues, // 粗糙贴图
  metalness:1 , // 金属度
  metalnessMap:metalnessTexture , // 金属贴图

})
const mesh = new THREE.Mesh(meshGeometry,materials)
scene.add(mesh)
// 给mesh平面设置第二组 uv
meshGeometry.setAttribute(
  "uv2",
  new THREE.BufferAttribute(meshGeometry.attributes.uv.array,2)
)
// 添加灯光 start
// 环境光
const light = new THREE.AmbientLight( 0xffffff,0.8 ); // soft white light
scene.add( light );
// 平行光
const directionalLight = new THREE.DirectionalLight( 0xffffff, 0.5 );
directionalLight.position.set(10,10,10) // 光源位置
scene.add( directionalLight );
// 添加灯光 end

// 添加平面
const planeGeometry = new THREE.PlaneBufferGeometry(1,1)
const plane = new THREE.Mesh(planeGeometry,materials)
plane.position.set(2,0,0)
scene.add(plane)
// 给平面设置第二组 uv
planeGeometry.setAttribute(
  "uv2",
  new THREE.BufferAttribute(planeGeometry.attributes.uv.array,2)
)
// 011 设置金属度与金属贴图 end

// 初始化渲染器
const renderer = new THREE.WebGL1Renderer()
// 设置渲染的尺寸大小
renderer.setSize(window.innerWidth,window.innerHeight)
// 将webgl渲染的canvas内容添加到body上
document.body.appendChild(renderer.domElement)

// 创建轨道控制器
const controls = new OrbitControls(camera,renderer.domElement)
// 设置控制器阻尼,让控制器更具有真是效果
controls.enableDamping = true
// 06-1:添加坐标轴辅助器
const axesHelper = new THREE.AxesHelper( 5 );
scene.add( axesHelper );

// window双击事件的时候
window.addEventListener('dblclick',()=>{
  // 010 调研js接口控制画布全屏和退出全屏
  const fullScreenElement = document.fullscreenElement;
  if ( !fullScreenElement ) {
    renderer.domElement.requestFullscreen() // 画布对象全屏
  } else {
    document.exitFullscreen()
  }
})

// 渲染函数 - 每一帧渲染一次
function animate() {
  // 渲染下一帧 的时候 会调用 animate 函数
	requestAnimationFrame( animate );
	controls.update();
	renderer.render( scene, camera );
}
animate()

// 09 根据尺寸变化实现自适应画面
// 监听画面变化,更新渲染画面
window.addEventListener('resize',()=>{
  console.log('监听画面变化');
  // 更新摄像头
  camera.aspect = window.innerWidth / window.innerHeight
  // 更新摄像头的头部矩阵
  camera.updateProjectionMatrix()
  // 更新渲染器
  renderer.setSize(window.innerWidth, window.innerHeight)
  // 设置渲染器的像素比
  renderer.setPixelRatio(window.devicePixelRatio)
})
+效果
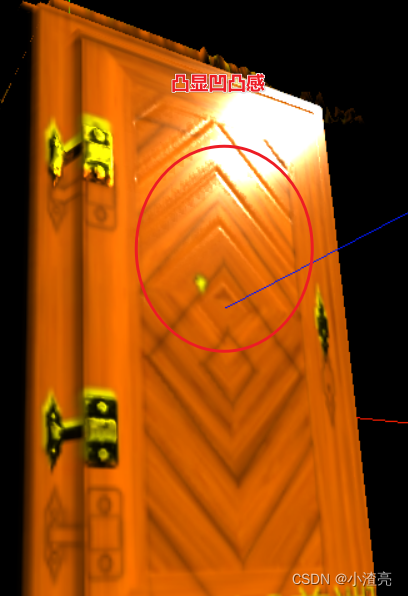
04-9 法线贴图
-
法线贴图就是在原物体的凹凸表面的每个点上均作法线,通过RGB颜色通道来标记法线的方向,你可以把它理解成与原凹凸表面平行的另一个不同的表面,但实际上它又只是一个光滑的平面。
-
对于视觉效果而言,它的效率比原有的凹凸表面更高,若在特定位置上应用光源,可以让细节程度较低的表面生成高细节程度的精确光照方向和反射效果。
-
设置法线贴图,让门的凸显门的凹凸感,立体感更加逼真
import * as THREE from "three"
// console.log('main.js',THREE);

// 导入轨道控制器
import { OrbitControls } from "three/examples/jsm/controls/OrbitControls"
// gsap 1-1:导入动画库
import gsap from "gsap"
// 导入 dat.gui
import * as dat from "dat.gui"

// 1:创建场景
const scene = new THREE.Scene()

// 2:创建相机
const camera = new THREE.PerspectiveCamera(75,window.innerWidth/ window.innerHeight,0.1,1000)
// 设置相机位置 x y z
camera.position.set(0,0,10)
// 把相机添加到场景之中
scene.add( camera );

// 012 法线贴图 start
// 导入纹理
const texttrueLoader = new THREE.TextureLoader()
const colorTextures = texttrueLoader.load('./textures/door.png') // 纹理贴纸
const whiteAplhaTextures = texttrueLoader.load('./textures/doorWhite.png') // 纹理的透明纹理???
const doorAoTextrues = texttrueLoader.load('./textures/doorAo.png')
const height = texttrueLoader.load("./textures/height.png") // 置换贴图
const roughnessTextrues = texttrueLoader.load("./textures/roughness.png") // 粗糙贴图
const metalnessTexture = texttrueLoader.load("./textures/metalness.png") // 金属贴图
const normalTexture = texttrueLoader.load('./textures/normal.png') // 导入法线贴图

// 添加物体
const meshGeometry = new THREE.BoxBufferGeometry(1,1,1,100,100,100) // 置换贴图之顶点细分
// 材质
const materials = new THREE.MeshStandardMaterial({
  color:'#ffff00',
  map:colorTextures,
  alphaMap:whiteAplhaTextures,
  transparent:true,
  aoMap:doorAoTextrues,
  displacementMap:height, // 置换贴图
  displacementScale:0.1 ,// 置换贴图之影响程度
  roughness: 1, // 粗糙度
  roughnessMap:roughnessTextrues, // 粗糙贴图
  metalness:1 , // 金属度
  metalnessMap:metalnessTexture , // 金属贴图
  normalMap:normalTexture, // 法线贴图

})
const mesh = new THREE.Mesh(meshGeometry,materials)
scene.add(mesh)
// 给mesh平面设置第二组 uv
meshGeometry.setAttribute(
  "uv2",
  new THREE.BufferAttribute(meshGeometry.attributes.uv.array,2)
)
// 添加灯光 start
// 环境光
const light = new THREE.AmbientLight( 0xffffff,0.8 ); // soft white light
scene.add( light );
// 平行光
const directionalLight = new THREE.DirectionalLight( 0xffffff, 0.5 );
directionalLight.position.set(10,10,10) // 光源位置
scene.add( directionalLight );
// 添加灯光 end

// 添加平面
const planeGeometry = new THREE.PlaneBufferGeometry(1,1)
const plane = new THREE.Mesh(planeGeometry,materials)
plane.position.set(2,0,0)
scene.add(plane)
// 给平面设置第二组 uv
planeGeometry.setAttribute(
  "uv2",
  new THREE.BufferAttribute(planeGeometry.attributes.uv.array,2)
)
// 012 法线贴图 end

// 初始化渲染器
const renderer = new THREE.WebGL1Renderer()
// 设置渲染的尺寸大小
renderer.setSize(window.innerWidth,window.innerHeight)
// 将webgl渲染的canvas内容添加到body上
document.body.appendChild(renderer.domElement)

// 创建轨道控制器
const controls = new OrbitControls(camera,renderer.domElement)
// 设置控制器阻尼,让控制器更具有真是效果
controls.enableDamping = true
// 06-1:添加坐标轴辅助器
const axesHelper = new THREE.AxesHelper( 5 );
scene.add( axesHelper );

// window双击事件的时候
window.addEventListener('dblclick',()=>{
  // 010 调研js接口控制画布全屏和退出全屏
  const fullScreenElement = document.fullscreenElement;
  if ( !fullScreenElement ) {
    renderer.domElement.requestFullscreen() // 画布对象全屏
  } else {
    document.exitFullscreen()
  }
})

// 渲染函数 - 每一帧渲染一次
function animate() {
  // 渲染下一帧 的时候 会调用 animate 函数
	requestAnimationFrame( animate );
	controls.update();
	renderer.render( scene, camera );
}
animate()

// 09 根据尺寸变化实现自适应画面
// 监听画面变化,更新渲染画面
window.addEventListener('resize',()=>{
  console.log('监听画面变化');
  // 更新摄像头
  camera.aspect = window.innerWidth / window.innerHeight
  // 更新摄像头的头部矩阵
  camera.updateProjectionMatrix()
  // 更新渲染器
  renderer.setSize(window.innerWidth, window.innerHeight)
  // 设置渲染器的像素比
  renderer.setPixelRatio(window.devicePixelRatio)
})
- 效果
04-10 获取纹理贴纸 - 网址
- 纹理贴纸
04-11 纹理加载进度情况
- 单张的纹理加载进度查看
- 多张纹理加载进度查看
import * as THREE from "three"
// console.log('main.js',THREE);

// 导入轨道控制器
import { OrbitControls } from "three/examples/jsm/controls/OrbitControls"
// gsap 1-1:导入动画库
import gsap from "gsap"
// 导入 dat.gui
import * as dat from "dat.gui"

// 1:创建场景
const scene = new THREE.Scene()

// 2:创建相机
const camera = new THREE.PerspectiveCamera(75,window.innerWidth/ window.innerHeight,0.1,1000)
// 设置相机位置 x y z
camera.position.set(0,0,10)
// 把相机添加到场景之中
scene.add( camera );

// 013 纹理加载进度情况 start
const div = document.createElement('div')
div.style.width = "200px"
div.style.height = "200px"
div.style.position = 'fixed'
div.style.right = 0
div.style.top = 0
div.style.color = '#fff'
document.body.appendChild(div)
let event = {}
// 单张纹理图的加载 start
event.onLoad = function () {
  console.log('图片加载完成');
}
// onProgress — 将在加载过程中进行调用
event.onProgress = function (url,num,total) {
  let val = ((num / total) *100).toFixed(2) +"%"
  console.log('将在加载过程中进行调用',url,"num",num,"total",total,"加载进度百分百",val);
  div.innerHTML = val
}
// onError — 在加载错误时被调用
event.onError = function (e) {
  console.log('在加载错误时被调用',e);
}
// 单张纹理图的加载 end
// 设置加载管理器
const loadingManager = new THREE.LoadingManager( event.onLoad, event.onProgress, event.onError)
// 导入纹理
const texttrueLoader = new THREE.TextureLoader(loadingManager)
// const colorTextures = texttrueLoader.load('./textures/door.png',event.onLoad,event.onProgress,event.onError) // 纹理贴纸 + 单张贴纸纹理图加载
const colorTextures = texttrueLoader.load('./textures/door.png') // 纹理贴纸
const whiteAplhaTextures = texttrueLoader.load('./textures/doorWhite.png') // 纹理的透明纹理???
const doorAoTextrues = texttrueLoader.load('./textures/doorAo.png')
const height = texttrueLoader.load("./textures/height.png") // 置换贴图
const roughnessTextrues = texttrueLoader.load("./textures/roughness.png") // 粗糙贴图
const metalnessTexture = texttrueLoader.load("./textures/metalness.png") // 金属贴图
const normalTexture = texttrueLoader.load('./textures/normal.png') // 导入法线贴图

// 添加物体
const meshGeometry = new THREE.BoxBufferGeometry(1,1,1,100,100,100) // 置换贴图之顶点细分
// 材质
const materials = new THREE.MeshStandardMaterial({
  color:'#ffff00',
  map:colorTextures,
  alphaMap:whiteAplhaTextures,
  transparent:true,
  aoMap:doorAoTextrues,
  displacementMap:height, // 置换贴图
  displacementScale:0.1 ,// 置换贴图之影响程度
  roughness: 1, // 粗糙度
  roughnessMap:roughnessTextrues, // 粗糙贴图
  metalness:1 , // 金属度
  metalnessMap:metalnessTexture , // 金属贴图
  normalMap:normalTexture, // 法线贴图
})
const mesh = new THREE.Mesh(meshGeometry,materials)
scene.add(mesh)
// 给mesh平面设置第二组 uv
meshGeometry.setAttribute(
  "uv2",
  new THREE.BufferAttribute(meshGeometry.attributes.uv.array,2)
)
// 添加灯光 start
// 环境光
const light = new THREE.AmbientLight( 0xffffff,0.8 ); // soft white light
scene.add( light );
// 平行光
const directionalLight = new THREE.DirectionalLight( 0xffffff, 0.5 );
directionalLight.position.set(10,10,10) // 光源位置
scene.add( directionalLight );
// 添加灯光 end

// 添加平面
const planeGeometry = new THREE.PlaneBufferGeometry(1,1)
const plane = new THREE.Mesh(planeGeometry,materials)
plane.position.set(2,0,0)
scene.add(plane)
// 给平面设置第二组 uv
planeGeometry.setAttribute(
  "uv2",
  new THREE.BufferAttribute(planeGeometry.attributes.uv.array,2)
)
// 013 纹理加载进度情况 end

// 初始化渲染器
const renderer = new THREE.WebGL1Renderer()
// 设置渲染的尺寸大小
renderer.setSize(window.innerWidth,window.innerHeight)
// 将webgl渲染的canvas内容添加到body上
document.body.appendChild(renderer.domElement)

// 创建轨道控制器
const controls = new OrbitControls(camera,renderer.domElement)
// 设置控制器阻尼,让控制器更具有真是效果
controls.enableDamping = true
// 06-1:添加坐标轴辅助器
const axesHelper = new THREE.AxesHelper( 5 );
scene.add( axesHelper );

// window双击事件的时候
window.addEventListener('dblclick',()=>{
  // 010 调研js接口控制画布全屏和退出全屏
  const fullScreenElement = document.fullscreenElement;
  if ( !fullScreenElement ) {
    renderer.domElement.requestFullscreen() // 画布对象全屏
  } else {
    document.exitFullscreen()
  }
})

// 渲染函数 - 每一帧渲染一次
function animate() {
  // 渲染下一帧 的时候 会调用 animate 函数
	requestAnimationFrame( animate );
	controls.update();
	renderer.render( scene, camera );
}
animate()

// 09 根据尺寸变化实现自适应画面
// 监听画面变化,更新渲染画面
window.addEventListener('resize',()=>{
  console.log('监听画面变化');
  // 更新摄像头
  camera.aspect = window.innerWidth / window.innerHeight
  // 更新摄像头的头部矩阵
  camera.updateProjectionMatrix()
  // 更新渲染器
  renderer.setSize(window.innerWidth, window.innerHeight)
  // 设置渲染器的像素比
  renderer.setPixelRatio(window.devicePixelRatio)
})
- 效果