前言
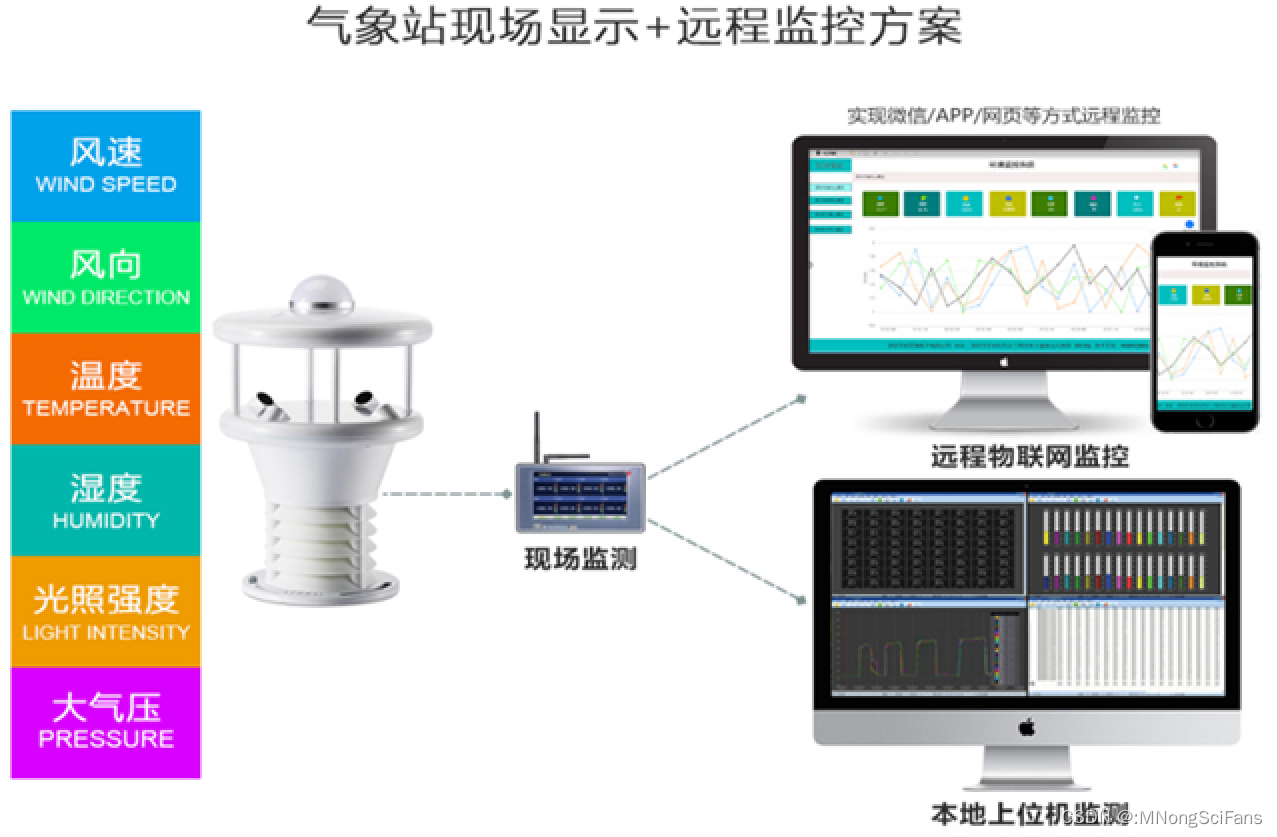
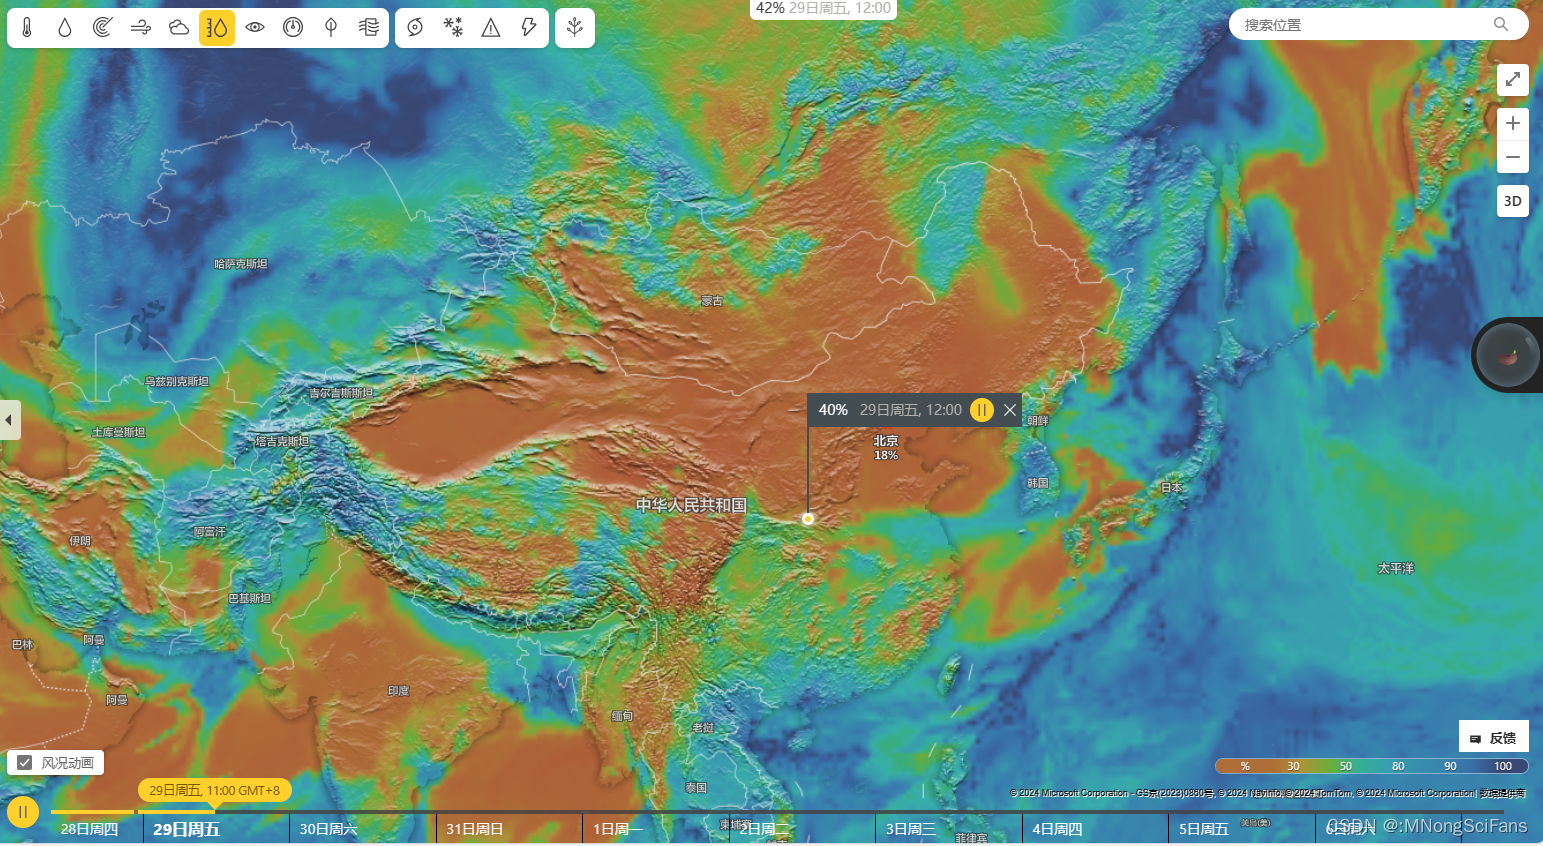
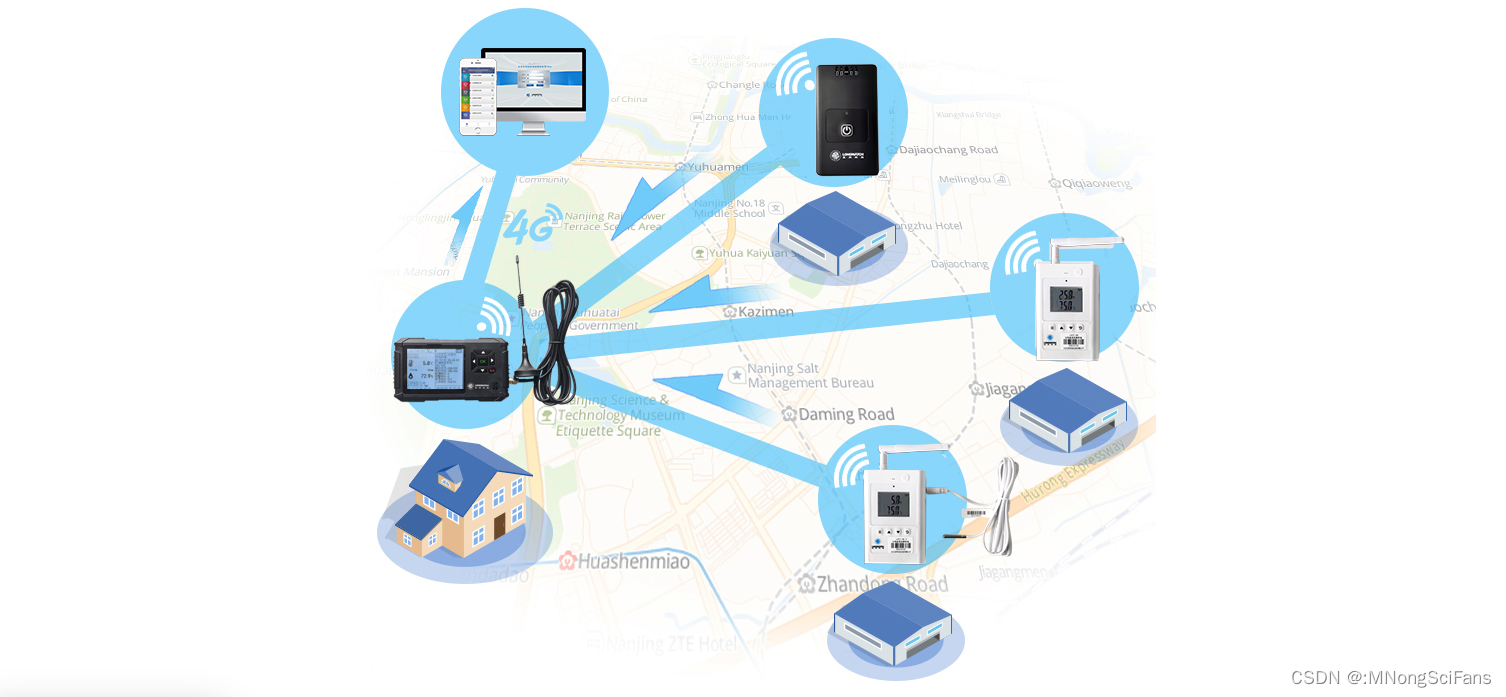
气象站将采集到的相关气象数据通过GPRS/3G/4G无线网络发送到气象站监测中心,摆脱了地理空间的限制。
前端:气象站主机将采集好的气象数据存储到本地,通过RS485等线路与GPRS/3G/4G无线设备相连。
通信:GPRS/3G/4G无线设备通过互联网与物联网云平台相连,气象站有计划的将收集到的气象信息通过无线设备发送到监控数据中心。
后台:气象监控中心通过互联网实现了对前端所有的自动气象站数据的采集和整合。
1、摆脱了地理空间的限制,可以在有无线信号的任何地方架设自动气象站点。
2、高规格工业级无线通信设备,有力的保证了气象数据的稳定可靠。
3、体积小巧、安装方便,使得现场安装调试人员轻松高效。
4、费用低廉,降低了运用成本。
温度、湿度等环境数据整合,趋势模拟。
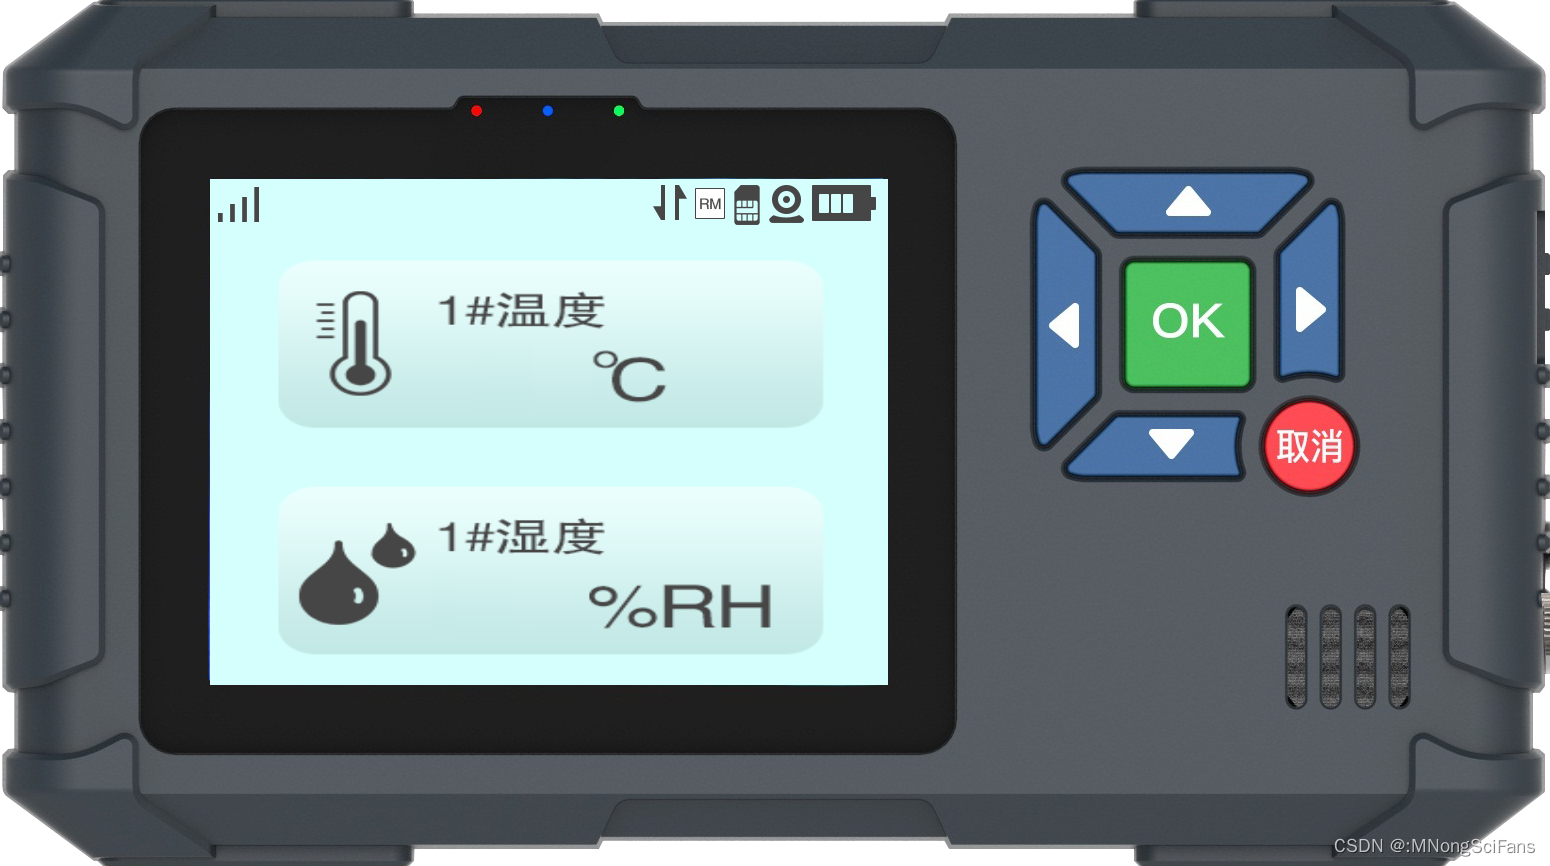
温湿度采集终端

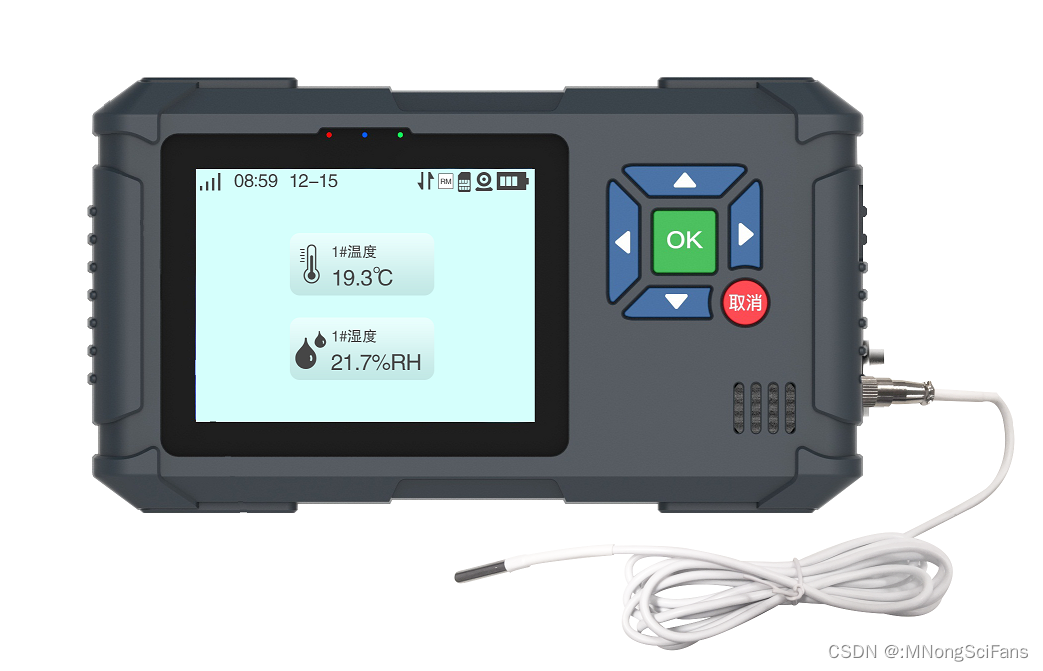

Pt100 就是说它的阻值在 0 度时为 100 欧姆, PT100 温度传感器。是一种以铂(Pt) 作成的电阻式温度传感器,属于正电阻系数, 其电阻和温度变化的关系式如下: R=Ro(1+α T)。广泛应用于实验室及工业环境。
技术参数
存储温度:-10 ~ +55 °C、湿度 0~85%RH
测量精度:温度: ±0.5°C ~ ±0.7°C
显示分辨率: 0.1 C
记录时间间隔:2秒~24小时
存储:数据存储量 65000组数据
电池电量:电池类型 1颗 2600mA 18650锂电池
电池寿命:3 年(测量速率在10秒/刷新 300秒/记录)
尺寸:135mm×125mm×36mm
材料/外壳: ABS工程塑料
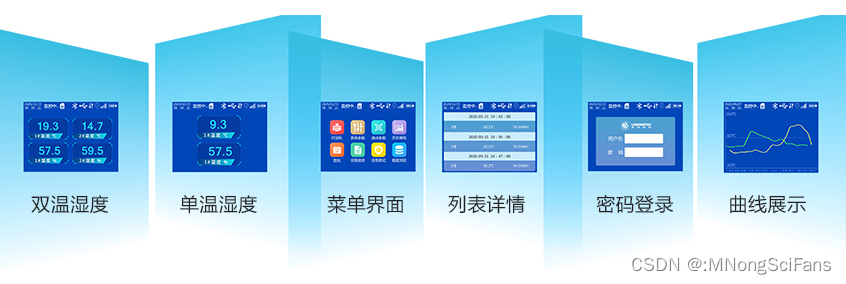
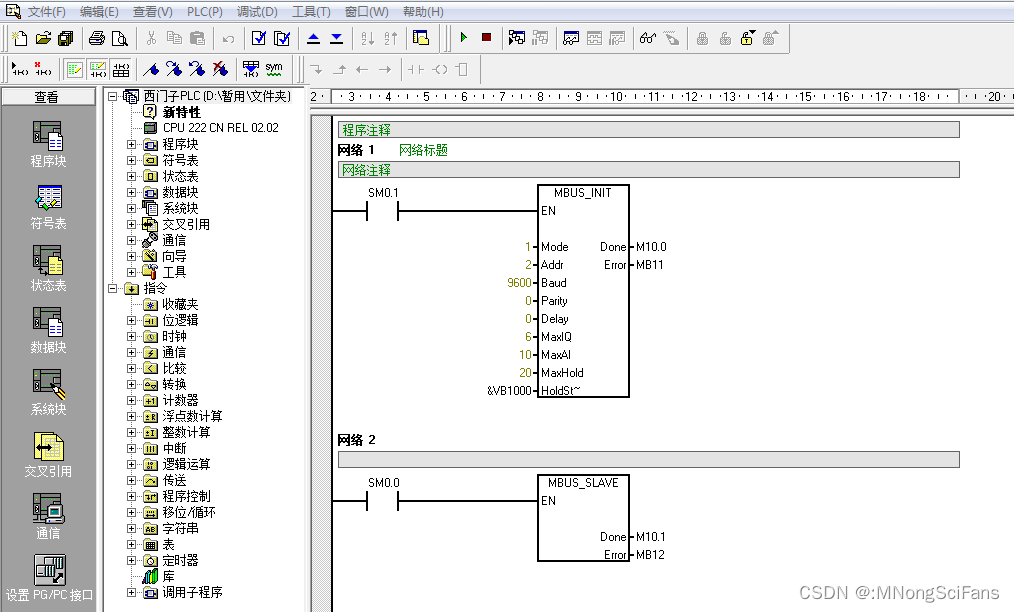
PLC版
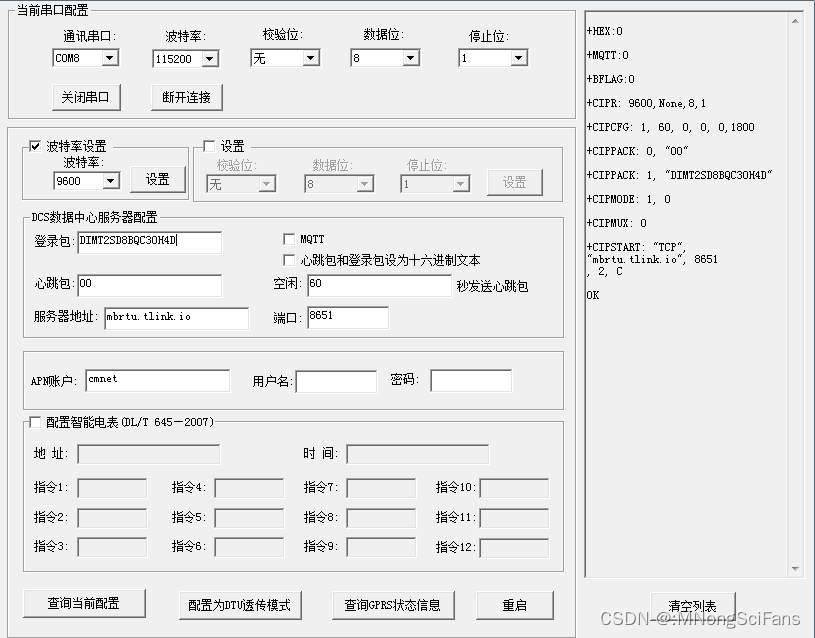


web简版
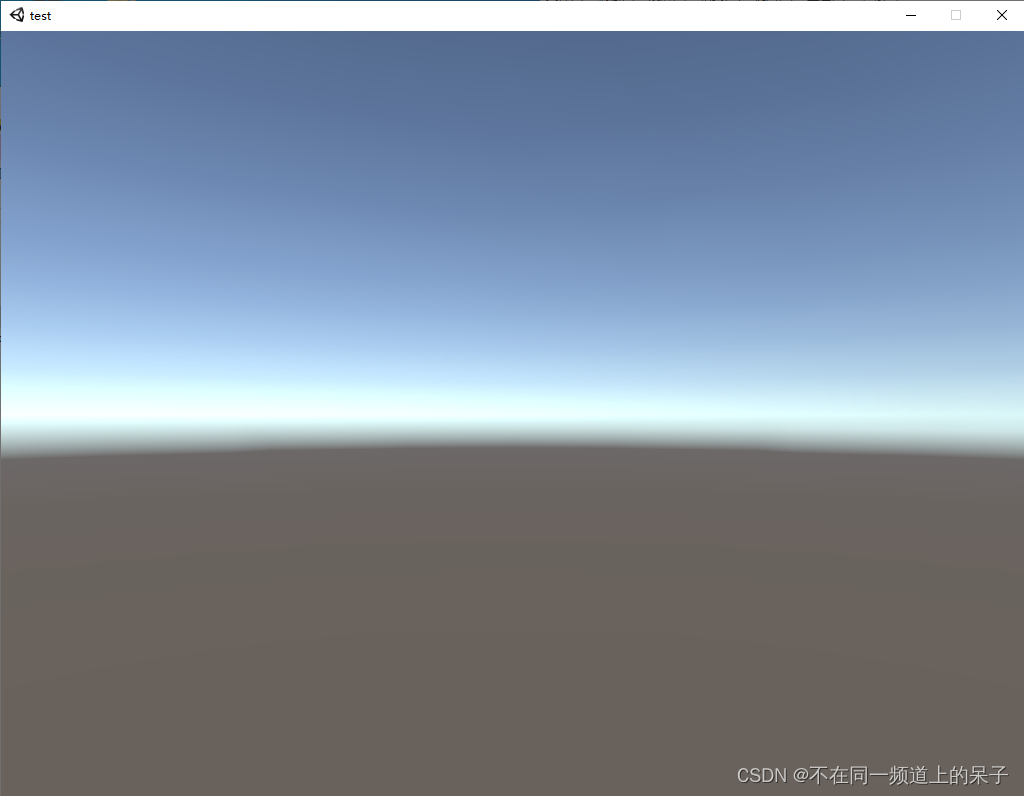
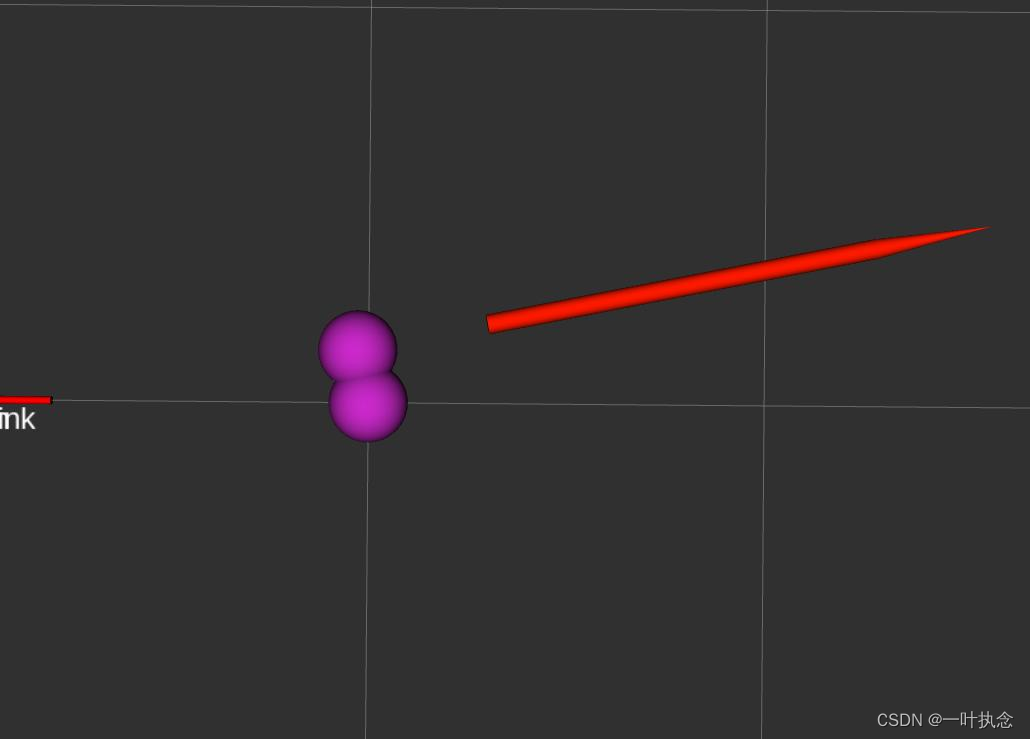
react+three.js,无三维建模软件,web三维展现温湿度采集器


应用程序的模块化理念,使用模块来构建你的代码。通过将实现隐藏在一个简单的接口后面,您可以使您的应用程序万无一失且易于使用。它只做它应该做的,没有别的。 通过隐藏实现,我们对使用我们代码的人实施了良好的编码风格。您可以访问的实现越多,它就越有可能成为您以后必须处理的复杂的半生不熟的“修复”。创建3D场景时,唯一的限制是您的想象力 - 以及您的技术知识深度。要点是如何描述3D空间的坐标系和用于在坐标系内移动对象。场景图是一种用于描述构成我们场景的对象层次结构的结构,向量是用于描述3D空间中的位置(以及许多其他事物) ,还有不少于两种描述旋转的方式:欧拉角Euler angles和四元数quaternions。

依赖
"react": "^18.2.0",
"three": "^0.162.0",
app.tsx
import React, { useEffect, useRef, useState } from 'react'
import './App.css';
import { World } from './World/World.js';

interface appProps {
  style?: Record<string, unknown>;
  [key: string]: unknown;
}

function App(props: appProps) {

  const { style, ...pros} = props;

  const renderRef = useRef(null);

  let  world: World;

  useEffect(() => {
    // eslint-disable-next-line @typescript-eslint/strict-boolean-expressions
    if (renderRef && renderRef.current) {
      // Get a reference to the container element
      //const container = document.querySelector('#scene-container');
      //const container = document.getElementById('scene-container')
      // 1. Create an instance of the World app
      //world = new World(container);
      world = new World(renderRef.current);

      // 2. Render the scene
      // start the animation loop
      world.start();
    }

    const timer = setInterval(() => {
      if(isAutoRotate){
        world.start();
        world.tick();
      }else{
        world.stop();
      }
    }, 1);

    return () => {
      cancelAnimationFrame(1);
      clearInterval(timer);
    };

  }, [renderRef])


  return (
    <div className="App">
      <header className="header"></header>
      <main>
        <div id="scene-container" ref={renderRef} style={{ position: 'relative', width: '100%', height: 'calc( 100vh - 100px )', ...style }} {...pros}>
          </div>
      </main>
      <footer style={ { background: 'skyblue', height: '30px' }}></footer>
    </div>
  )
}

export default App;
world.js
/* eslint-disable no-undef */
/* eslint-disable @typescript-eslint/strict-boolean-expressions */
/*
 * @Date: 2024-03-21 14:57:52
 * @LastEditors: david
 * @LastEditTime: 2024-03-21 17:04:01
 * @FilePath: .\src\components\World.js
 * @Description: 创建三维场景单例
 */
import { createCamera } from '../components/camera.js';
import { createCube } from '../components/cube.js';
import { createScene } from '../components/scene.js';
import { createControls } from '../components/controls.js';
import { createLights } from '../components/lights.js';

import { createRenderer } from '../systems/renderer.js';
import { Resizer } from '../systems/Resizer.js';
import { Loop } from '../systems/Loop.js';

// These variables are module-scoped: we cannot access them
// from outside the module 将相机、渲染器和场景创建为模块作用域变量
let camera;
//let scene;
let light;
let renderer;
let controls;
let loop;
// 温湿度采集器
import { changeMaterial, updateData } from '../components/canvasTexture.js'


/**
 * @description: 初始化三维场景 容器
 * @param {string} container - 三维场景挂载的div容器
 * @return {*}
 */
class World {
    // 1. Create an instance of the World app
    constructor(container) {
        // 首次使用构造器实例
        if (!(World.instance instanceof World)) {
            // 初始化相机
            camera = createCamera();
            // 初始化场景
            model.scene = createScene();
            // 初始化灯光
            light = createLights({
                directionX: 30,
                directionY: 10,
                directionZ: 0.5
              });
            model.scene.add(...light);
            // 初始化渲染器
            renderer = createRenderer();
            renderer.setSize(container.clientWidth, container.clientHeight);
            // Type: Element | String
            container.appendChild(renderer.domElement);
            // container.innerHTML = null;

            loop = new Loop(camera, model.scene, renderer);

            // 初始化控制器
            controls = createControls(camera,renderer)

            //loop.updatables.push(controls);

            // 添加模型
            const cube = createCube();
            model.scene.add(cube);

            const  collectorCube = changeMaterial();
            // async await Promise resole reject Promise.all 解决异步加载模型和贴图
            collectorCube.then((res) => {
              model.scene.add(res);
              //loop.updatables.push(res);
            }).catch(err => {
              console.log('温湿度采集器添加失败:'+err)
            })

            // stop the cube's animation
            loop.updatables.push(cube);

            controls.addEventListener('change', () => {
                this.render();
            });

            const resizer = new Resizer(container, camera, renderer);
            resizer.onResize = () => {
                this.render();
            };

            this.render();
            this.animate();

            // 将this挂载到World这个类的instance属性上
            World.instance = this
        }
        return World.instance
    }
    // 2. Render the scene
    render() {
        // draw a single frame
        if ((Boolean(renderer)) && (Boolean(model.scene)) && (Boolean(camera))) {
            renderer.render(model.scene, camera);
        }
    }
    animate(){
        try{
            // eslint-disable-next-line no-undef
            //requestAnimationFrame(this.animate);
            requestAnimationFrame(this.animate.bind(this));
            TWEEN.update();
            //更新控制器
            this.render()
        } catch (error) {
            // eslint-disable-next-line @typescript-eslint/strict-boolean-expressions
            console.log(`Failed to add world imagery: ${error}`);
        }
        // eslint-disable-next-line @typescript-eslint/strict-boolean-expressions
        if (controls) {
            controls.update();
        }
    }
}

export { World };
camera.js
import { PerspectiveCamera, MathUtils } from 'three';

function createCamera() {
  const camera = new PerspectiveCamera(
    45, // fov = Field Of View
    1, // aspect ratio (dummy value)
    0.1, // near clipping plane
    10000, // far clipping plane
  );

  // move the camera back so we can view the scene
  // camera.position.set(0, 0, 30);

  const layoutWidth = 25;

  const angle = camera.fov / 2;  // 夹角
  const rad = MathUtils.degToRad(angle);  // 转为弧度值
  const cameraZ = layoutWidth / 2 / Math.tan(rad);
  // 调整相机的 Z 轴位置,使桌台元素完整显示到场景
  camera.position.set(0, 15, cameraZ);

  return camera;
}

export { createCamera };
scene.js
import { Color, Scene, Fog } from 'three';

function createScene() {
  const scene = new Scene();
  scene.background = new Color(0xe6f4ff);
  scene.fog = new Fog( 0xa0a0a0, 5, 250 );

  return scene;
}

export { createScene };
controls.js
import { OrbitControls } from "three/examples/jsm/controls/OrbitControls";
function createControls ( Camera, renderer ) {
  // 轨道控制器
  const controls  = new OrbitControls(Camera, renderer.domElement);

  //设置控制器的中心点
  controls.target.set(0, 10, 0);
  const distanceZ = Camera.position.z;
  // 如果使用animate方法时,将此函数删除
  //controls.addEventListener( 'change', render );
  // 使动画循环使用时阻尼或自转 意思是否有惯性
  controls.enableDamping = false;
  //动态阻尼系数 就是鼠标拖拽旋转灵敏度
  // 阻尼系数
  controls.dampingFactor = 0.1;

  controls.minPolarAngle = Math.PI / 12;
  controls.maxPolarAngle = (Math.PI * 19) / 40;
  //是否可以缩放
  controls.enableZoom = true;
  //是否自动旋转
  controls.autoRotate = true;
  controls.autoRotateSpeed = 0.5;
  //设置相机距离原点的最远距离
  //controls.minDistance = 10;
  //设置相机距离原点的最远距离
  //controls.maxDistance = 200;
  controls.minDistance = distanceZ / 10;  // 相机离目标点的最小距离(放大)
  controls.maxDistance = distanceZ * 10;  // 相机离目标点的最大距离(缩小)
  //是否开启右键拖拽
  controls.enablePan = true;
  controls.tick = () => controls.update();

  return controls;
}

export { createControls };
lights.js
import { HemisphereLight, AmbientLight, DirectionalLight, DirectionalLightHelper, SpotLight, SpotLightHelper } from 'three';

function createLights({ directionX, directionY, directionZ }) {
  const hemisphere = new HemisphereLight(0xffffff, 0xffffff, 0.6);
  // move the light right, up, and towards us
  hemisphere.position.set(10, 10, 10);

  const ambient = new AmbientLight(0xffffff, 1);  // 环境光
  const spot = new SpotLight(0xfdf4d5);
  spot.position.set(5, directionY * 4, 0);
  spot.angle = Math.PI / 2;
  spot.power = 2000;
  // eslint-disable-next-line @typescript-eslint/no-unused-vars
  const spotLightHelper = new SpotLightHelper(spot, 0x00f);

  const direct = new DirectionalLight(0xffffff, 3);  // 平行光
  direct.position.set(-directionX / 3, directionY * 4, directionZ * 1.5);
  direct.castShadow = true;
  direct.shadow.camera.left = -directionX;
  direct.shadow.camera.right = directionX;
  direct.shadow.camera.top = directionZ;
  direct.shadow.camera.bottom = -directionZ;

  // eslint-disable-next-line @typescript-eslint/no-unused-vars
  const directLightHelper = new DirectionalLightHelper(direct, 1, 0xf00);

  return [hemisphere, ambient, spot, direct];

}

export { createLights };
cube.js
import { BoxGeometry, Mesh,
  //MeshBasicMaterial,
  MeshStandardMaterial, MathUtils  } from 'three';
function createCube() {
  // create a geometry
  const geometry = new BoxGeometry(1, 1, 1);

  // create a default (white) Basic material
  // const material = new MeshBasicMaterial();
  // Switch the old "basic" material to
  // a physically correct "standard" material
  const spec = {
    color: 'purple',
  }
  const material = new MeshStandardMaterial(spec);

  // create a Mesh containing the geometry and material
  const cube = new Mesh(geometry, material);

  cube.position.set(0, 10, 0);

  // cube.rotation.set(-0.5, -0.1, 0.8);
  const radiansPerSecond = MathUtils.degToRad(30);
  // this method will be called once per frame
  cube.tick = (delta) => {
    // increase the cube's rotation each frame
    cube.rotation.z += radiansPerSecond * delta;
    cube.rotation.x += radiansPerSecond * delta;
    cube.rotation.y += radiansPerSecond * delta;
  };

  return cube;
}

export { createCube };
loop.js
import { Clock } from "three";
const clock = new Clock();

class Loop {
  constructor(camera, scene, renderer) {
    this.camera = camera;
    this.scene = scene;
    this.renderer = renderer;
    // somewhere in the Loop class:
    this.updatables = []
  }
  start() {
    this.renderer.setAnimationLoop(() => {
        // tell every animated object to tick forward one frame
        // this.tick();
        // render a frame
        this.renderer.render(this.scene, this.camera);
    });
  }
  stop() {
    this.renderer.setAnimationLoop(null);
  }
  tick(){
    // only call the getDelta function once per frame!
    const delta = clock.getDelta();
    // console.log(
    //   `The last frame rendered in ${delta * 1000} milliseconds`,
    // );
    // eslint-disable-next-line @typescript-eslint/strict-boolean-expressions
    if(this.updatables.length){
        for (const object of this.updatables) {
            if(typeof object.tick == 'function'){
                object.tick(delta);
            }
        }
    }
  }
}

export { Loop };
renderer.js
import { WebGLRenderer, PCFSoftShadowMap } from 'three';

function createRenderer() {
  const renderer = new WebGLRenderer({
    alpha: true, // 透明度
    antialias: true // 开启抗锯齿
  });
  // turn on the physically correct lighting model
  renderer.physicallyCorrectLights = true;
  renderer.shadowMap.enabled = true;
  renderer.shadowMap.type = PCFSoftShadowMap;
  renderer.setClearColor('#f8f8f6', 1);
  // eslint-disable-next-line no-undef
  renderer.setPixelRatio(window.devicePixelRatio);
  return renderer;
}

export { createRenderer };
resizer.js
const setSize = (container, camera, renderer) => {
    // Set the camera's aspect ratio
    camera.aspect = container.clientWidth / container.clientHeight;

    // update the camera's frustum
    camera.updateProjectionMatrix();

    // update the size of the renderer AND the canvas
    renderer.setSize(container.clientWidth, container.clientHeight);

    // set the pixel ratio (for mobile devices)
    // eslint-disable-next-line no-undef
    renderer.setPixelRatio(window.devicePixelRatio);
};

class Resizer {
    constructor(container, camera, renderer) {
        // set initial size on load
        setSize(container, camera, renderer);
        // eslint-disable-next-line no-undef
        window.addEventListener("resize", () => {
            // set the size again if a resize occurs
            setSize(container, camera, renderer);
            // perform any custom actions
            this.onResize();
        });
    }
    // 空方法, 我们可以从Resizer类的外部自定义。
    // eslint-disable-next-line @typescript-eslint/no-empty-function
    onResize() {}
  }

  export { Resizer };
canvasTexture.js
/* eslint-disable no-undef */
/* eslint-disable @typescript-eslint/strict-boolean-expressions */
import { CanvasTexture, MeshLambertMaterial, BoxGeometry, Mesh, } from 'three';
import moment from 'moment';
import collectorImg from '../assets/images/collector.png';
const meshcolor = 0xa1a5a9;
let cube;
let timeNow = new Date().valueOf();
let time = { hum: 40.0, tep: 20.0 };
// 方法二:放大画布之后,需要把每一个绘制的 api 都乘以 dpr
// * 这样一来使用的时候就会很麻烦,所以我们需要把所有的绘制操作进行统一封装
// 可以参考这个库:https://github.com/jondavidjohn/hidpi-canvas-polyfill,不过这个库也不是所有 api 都覆盖
const adaptDPR = (canvas)=> { // 在初始化 canvas 的时候就要调用该方法
const context = canvas.getContext('2d');
const devicePixelRatio = window.devicePixelRatio || 1;
const backingStoreRatio = context.webkitBackingStorePixelRatio ||
context.mozBackingStorePixelRatio ||
context.msBackingStorePixelRatio ||
context.oBackingStorePixelRatio ||
context.backingStorePixelRatio || 1;
const ratiodpr = devicePixelRatio / backingStoreRatio;
const { width, height } = canvas;
// 重新设置 canvas 自身宽高大小和 css 大小。放大 canvas;css 保持不变,因为我们需要那么多的点
// upscale the canvas if the two ratios don't match
if (devicePixelRatio !== backingStoreRatio) {
canvas.width = width * ratiodpr;
canvas.height = height * ratiodpr;
canvas.style.width = width + 'px';
canvas.style.height = height + 'px';
// 注意这里没有用 scale
// now scale the context to counter
// the fact that we've manually scaled
// our canvas element 通过backing store的像素比例和设备像素比(dpr)来控制你的图片和canvas是保证图片质量和清晰的保证。
context.scale(ratiodpr, ratiodpr);
}
}
// 每个涉及绘制的 api 时都乘以 dpr
// 获取带数据的canvas
const getTextCanvas = async ({ tep, hum }) => {
const time = moment().format('HH:mm:ss');
const width = 310, height = 173;
const canvas = document.createElement('canvas');
canvas.width = width;
canvas.height = height;
adaptDPR(canvas);
const ctx = canvas.getContext('2d');
return new Promise((resole) => {
if (ctx) {
const img = new Image();
img.src = collectorImg;
//图片加载完后,将其显示在canvas中
img.onload = () => {
ctx.drawImage(img, 0, 0, width, height);
ctx.font = 18 + 'px " bold';
ctx.fillStyle = '#333';
ctx.textAlign = 'center';
ctx.textBaseline = 'middle';
// 实时温度
ctx.fillText(tep, width * 0.33, height * 0.44);
// 实时湿度
ctx.fillText(hum, width * 0.33, height * 0.70);
// 数据采集时间
ctx.font = 10 + 'px " bold';
ctx.fillText(time, width * 0.24 , height * 0.245);
resole(canvas);
};
}
});
}
// 改变材质种类
const changeMaterial = async () => {
const canvas = await getTextCanvas({ hum: 40, tep: 20 });
if (canvas) {
const texture = new CanvasTexture(canvas);
const materials = [
new MeshLambertMaterial({ color: meshcolor, opacity: 1, transparent: true }),
new MeshLambertMaterial({ color: meshcolor, opacity: 1, transparent: true }),
new MeshLambertMaterial({ color: meshcolor, opacity: 1, transparent: true }),
new MeshLambertMaterial({ color: meshcolor, opacity: 1, transparent: true }),
new MeshLambertMaterial({
color: meshcolor,
opacity: 1,
transparent: true,
map: texture,
}),
new MeshLambertMaterial({ color: meshcolor, opacity: 1, transparent: true }),
];
const geometry = new BoxGeometry(8.404, 6.16, 1);
cube = new Mesh(geometry, materials);
cube.position.set(0, 15, 0);
//scene.add(cube);
return cube;
}
}
const updateData = async () => {
if (new Date().valueOf() - timeNow > 500) {
timeNow = new Date().valueOf();
changeValues();
}
const canvas = await getTextCanvas(time);
if (canvas && cube) {
cube.material[4].map = new CanvasTexture(canvas);
cube.material.map.needsUpdate = true;
}
}
// 更新time数据
const changeValues = () => {
const hum = parseFloat((39 + Math.random() * 10).toFixed(1));
const tep = parseFloat((19 + Math.random() * 5).toFixed(1));
setTime({ hum: hum, tep: tep})
}
const setTime = (date)=>{
time = date
}
export {
changeMaterial,
updateData
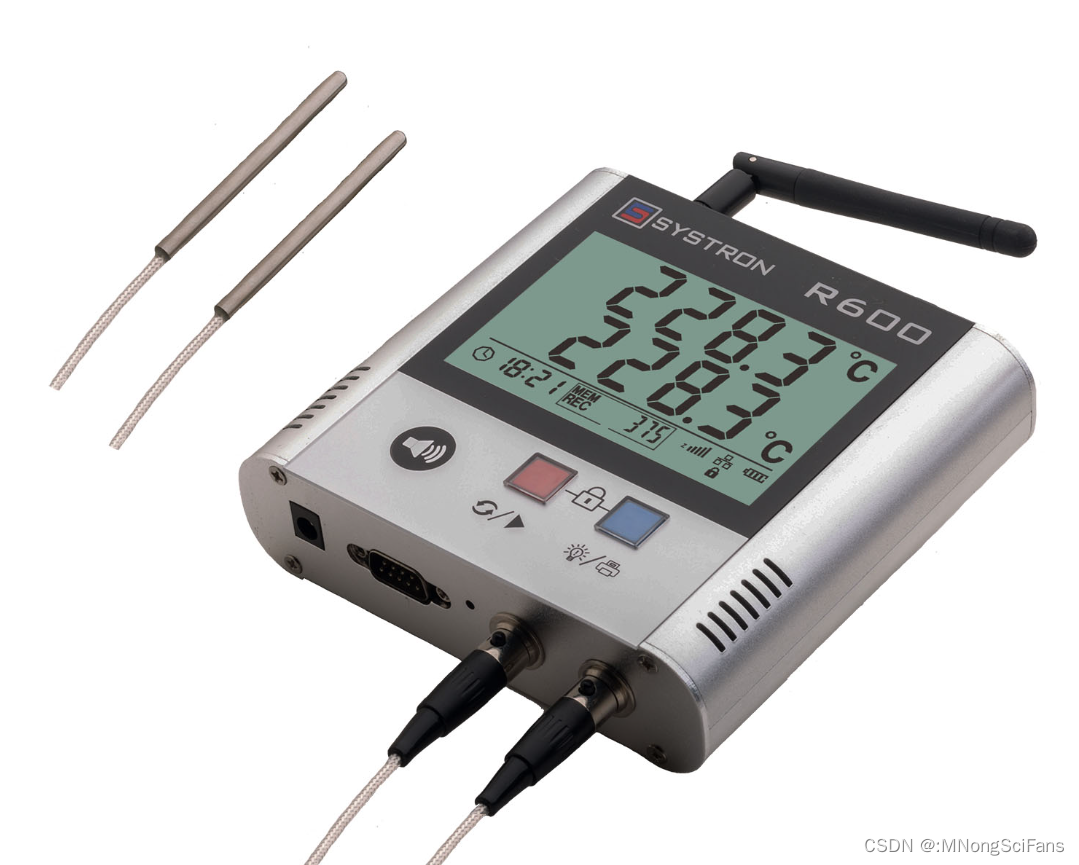
}采集器正面贴图,空出需要动态渲染的时间、温度、湿度,采集器用用最简单的长方形盒子代替。
index.tsx
import React from 'react';
import ReactDOM from 'react-dom/client';
import './index.css';
import App from './App';

const root = ReactDOM.createRoot(
  document.getElementById('root') as HTMLElement
);

root.render(
  <React.StrictMode>
    <App />
  </React.StrictMode>
);
index.html
<!DOCTYPE html>
<html lang="zh-CN">
  <head>
    <meta charset="utf-8" />
    <meta name="viewport" content="width=device-width, initial-scale=1" />
    <meta name="theme-color" content="#000000" />
    <meta http-equiv="X-UA-Compatible" content="IE=edge">
    <meta name="renderer" content="webkit">
    <meta name="force-rendering" content="webkit">
    <meta name="google-site-verification" content="FTeR0c8arOPKh8c5DYh_9uu98_zJbaWw53J-Sch9MTg">
    <meta data-rh="true" name="keywords" content="React three.js World示例">
    <meta data-rh="true" name="description" content="React three.js World示例">
    <meta data-rh="true" property="og:title" content="React three.js World示例">
    <link rel="icon" href="./favicon.ico">
    <title>React three.js World示例</title>
  </head>
  <body>
    <div id="root"></div>
  </body>
</html>![Cocos2dx-lua ScrollView[三]高级篇](https://img-blog.csdnimg.cn/direct/6b3c230be38d46f688e1c12f7c07b39a.gif)
![[flink] flink macm1pro 快速使用从零到一](https://img-blog.csdnimg.cn/img_convert/4ad8d3bd3368a641131a7ae571e1ad34.png)