简介
Ultralytics YOLOv8是一种前沿的、最先进的(SOTA)模型,它在前代YOLO版本的成功基础上进行了进一步的创新,引入了全新的特性和改进,以进一步提升性能和灵活性。作为一个高速、精准且易于操作的设计,YOLOv8在广泛的领域中,包括目标检测与跟踪、实例分割、图像分类以及姿势估计等任务中,都表现出色。实例分割在物体检测的基础上迈出了更进一步的步伐,它不仅可以识别图像中的单个物体,还能够精确地将这些物体从图像的其他部分中分割出来。

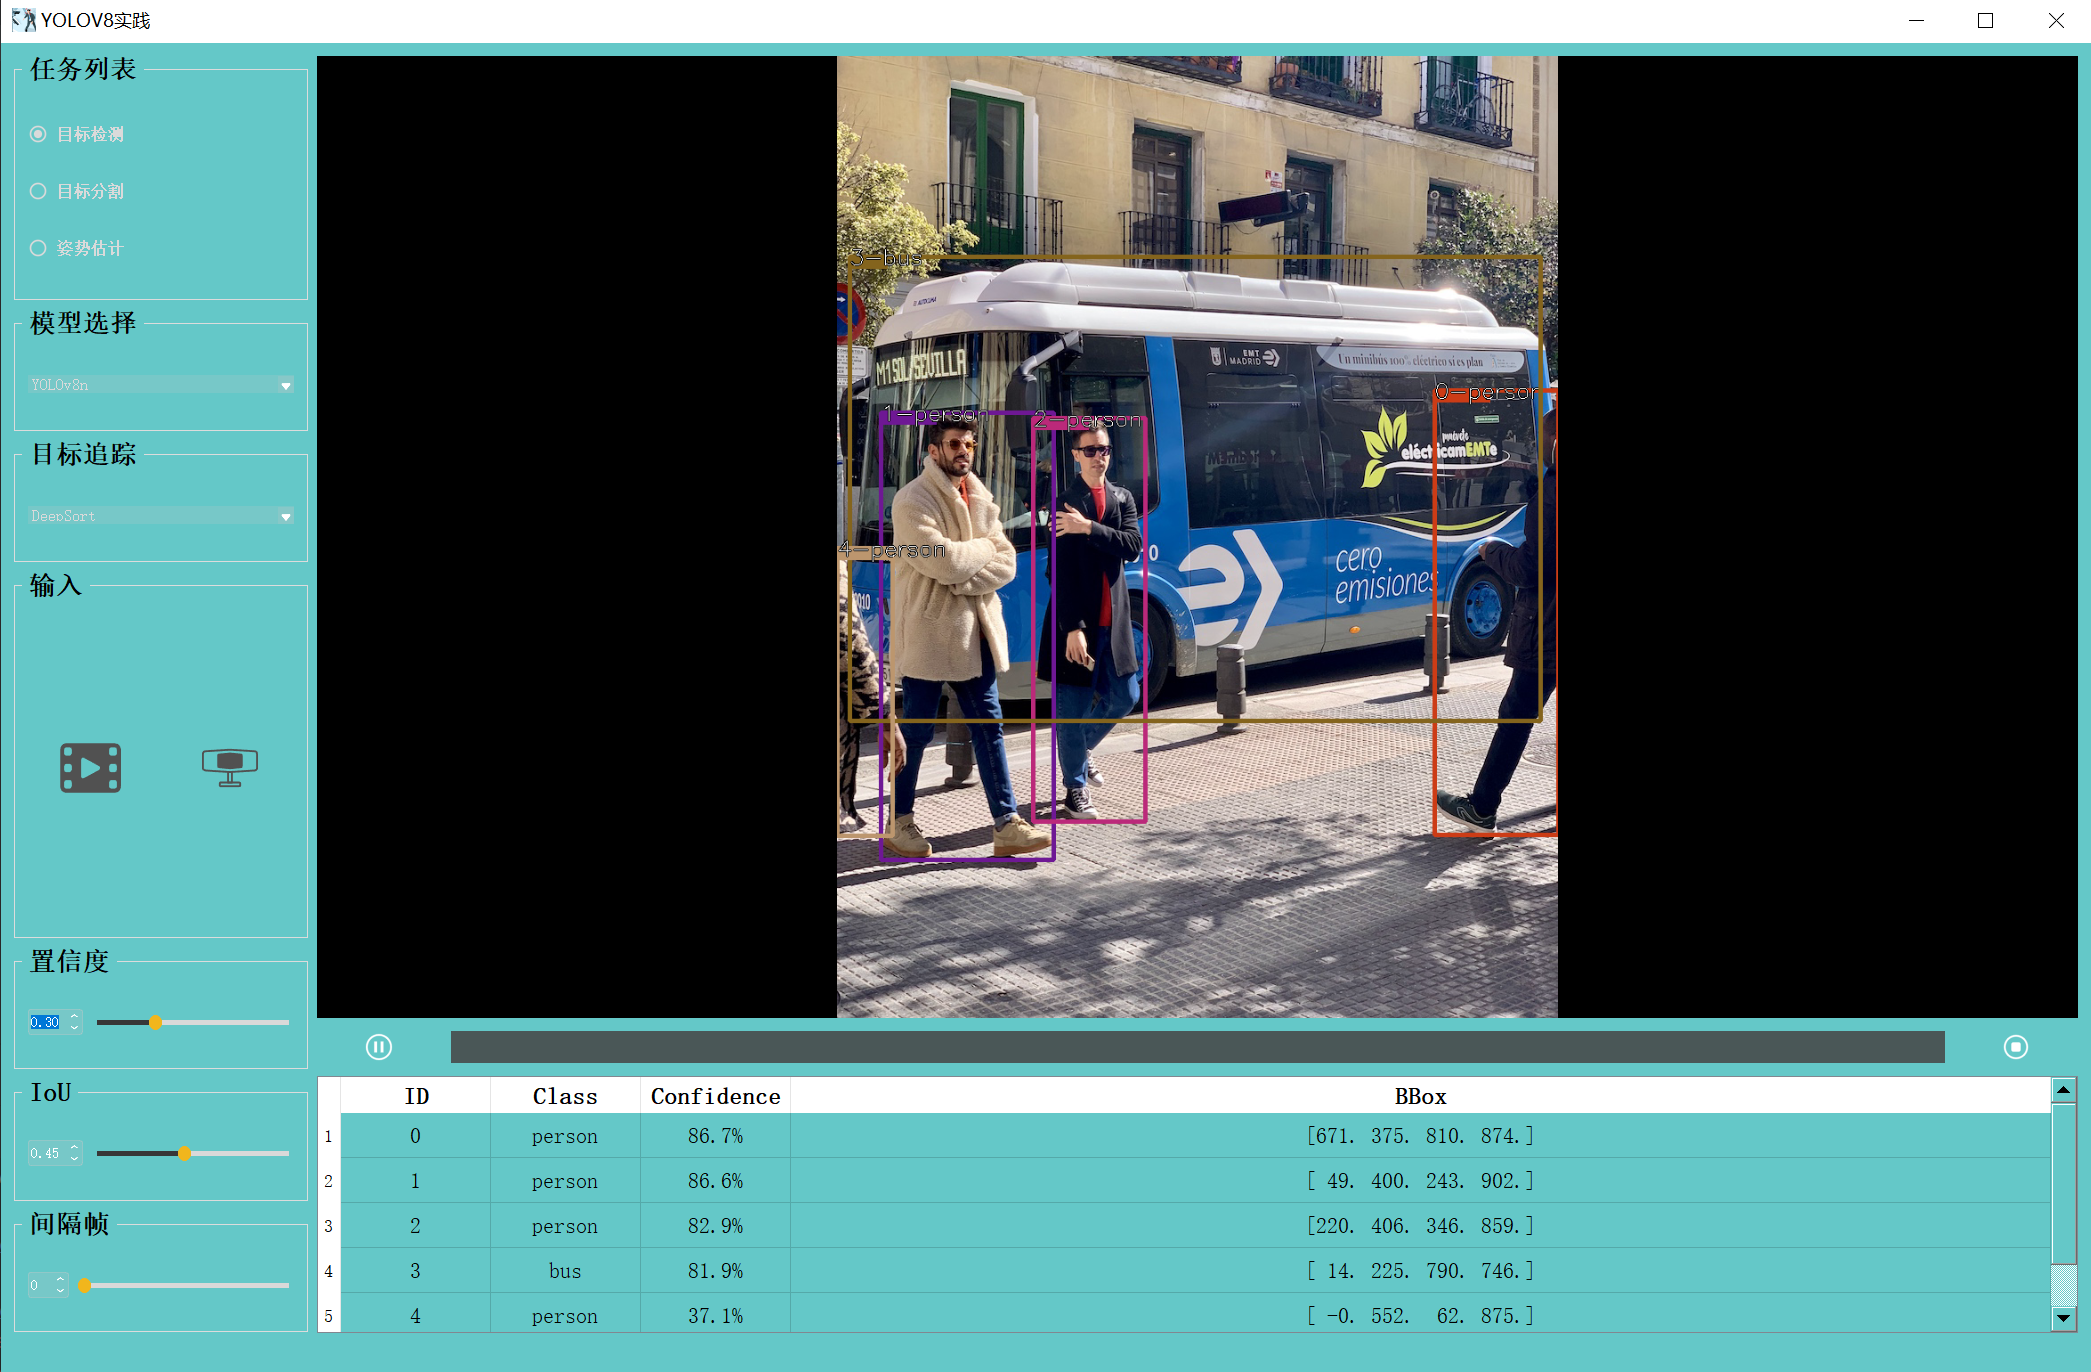
这是一个集成了YoloV8目标检测、实例分割、姿态估计与目标追踪的项目,界面是用PyQt5写的,可以读入图像,视频与摄像头。
项目演示视频:
YOLOv8目标检测、语义分割、状态估计、目标追踪实践
源码下载地址:https://download.csdn.net/download/matt45m/89036361?spm=1001.2014.3001.5503
1、目标检测
目标检测模型分为两类:two-stage和one-stage。前者将物体识别和物体定位分为两个步骤,代表包括R-CNN、fast R-CNN和faster R-CNN等。它们具有低的识别错误率和漏识别率,但由于网络结构参数较多,导致检测速度较慢,无法满足实时检测需求。为了解决速度和精度之间的平衡问题,另一类称为one-stage的方法出现了,典型代表有YOLO、SSD和YoloV2等。这些方法采用基于回归的思想,在输入图像的多个位置直接回归出区域框坐标和物体类别,具有快速的识别速度和与faster R-CNN相当的准确率。
1.1 YOLOv8的创新点:
骨干网络
骨干网络在目标检测模型中扮演着核心角色,用于提取输入图像的特征。YOLOv8引入了全新的骨干网络设计,这一设计不仅提高了特征提取能力,有效提升了模型的检测性能,还通过提升特征的分辨率和引入更多的上下文信息,使模型更好地理解图像中的目标。

Anchor-Free检测头:
传统目标检测算法通常使用Anchor来定义目标框的大小和形状。而YOLOv8采用了全新的Anchor-Free检测头,这种方法不再需要预定义Anchor,直接预测目标框的中心点和大小。这样的方法更加灵活,能够更好地适应不同大小和形状的目标,提高了检测的准确性。
损失函数:
损失函数在目标检测模型的训练过程中起着关键作用,用于衡量模型预测结果与实际标签之间的差异。YOLOv8引入了全新的损失函数,能够更准确地度量预测框与实际框之间的偏差,指导模型进行更有效的学习。
YOLOv8作为SOTA模型,在目标检测任务中表现出了卓越的性能。它能够在实时速度下对图像中的目标进行准确检测,并具有良好的泛化能力。不论是在常见的目标检测数据集(如COCO、Pascal VOC等)上,还是在实际应用场景中,YOLOv8都展现出了强大的实力。
官方开源了训练代码和预训练模型,想训练自己的数据可参考我之前的博客:YOLOV8目标识别——详细记录从环境配置、自定义数据、模型训练到模型推理部署
1.2 模型推理
下载官方开源的模型,转onnx后使用onnxruntim进行推理,推理代码如下:
import numpy as np
from onnxruntime import InferenceSession
import cv2 as cv
from src.models.detection.detector_base import DetectorBase, Model
from src.models.base.yolov8_base import ModelError
from src.utils.boxes import xywh2xyxy, multiclass_nms_class_agnostic
from src.utils.general import get_classes


class YoloDetector(DetectorBase):
    def __init__(self):
        self._model = None

    def init(self, model_path, class_txt_path, confidence_threshold=0.3, iou_threshold=0.45):
        _class_names = get_classes(class_txt_path)
        _session = InferenceSession(model_path, providers=['CUDAExecutionProvider', 'CPUExecutionProvider'])
        self.input_names, self.output_names, input_size = self.get_onnx_model_details(_session)
        self._model = Model(
            model=_session,
            confidence_threshold=confidence_threshold,
            iou_threshold=iou_threshold,
            input_size=input_size,
            class_names=_class_names)
        init_frame = np.random.randint(0, 256, (input_size[0], input_size[1], 3)).astype(np.uint8)
        self.inference(init_frame)

    def postprocess(self, model_output, scale, conf_threshold, iou_threshold, class_names):
        predictions = np.squeeze(model_output[0]).T
        scores = np.max(predictions[:, 4:], axis=1)
        predictions = predictions[scores > conf_threshold, :]
        scores = scores[scores > conf_threshold]
        if len(scores) == 0:
            return []
        boxes = predictions[:, :4]
        boxes = xywh2xyxy(boxes)
        boxes *= scale
        dets = multiclass_nms_class_agnostic(boxes, predictions[:, 4:], iou_threshold, conf_threshold)
        detection_results=[]
        i=0
        for det in dets:
            obj_dict = {
                    "id": int(i),
                    'class': class_names[int(det[5])],
                    'confidence': det[4],
                    'bbox': np.rint(det[:4]),
                    "keypoints": np.array([]),
                    "segmentation": np.array([])}
            detection_results.append(obj_dict)
            i += 1
        return detection_results

    def inference(self, image, confi_thres=None, iou_thres=None):
        if self._model is None:
            raise ModelError("Model not initialized. Have you called init()?")
        if confi_thres is None:
            confi_thres = self._model.confidence_threshold
        if iou_thres is None:
            iou_thres = self._model.iou_threshold

        scale, image = self.preprocess(image, self._model.input_size)

        ort_inputs = {self.input_names[0]: image}
        outputs = self._model.model.run(self.output_names, ort_inputs)

        detection_results = self.postprocess(
            model_output=outputs,
            scale=scale,
            conf_threshold=confi_thres,
            iou_threshold=iou_thres,
            class_names=self._model.class_names
        )
        return detection_results
2、实例分割
2.1 实践方法
实例分割结合了目标检测和语义分割的特点,在检测出目标的同时,对每个目标生成其像素级的掩码,以实现对不同对象的区分。这种方法使得模型不仅可以检测出图像中的物体,还可以为每个检测到的物体提供像素级的分割结果,从而实现了对不同实例的区分。常用的实例分割算法有Mask R-CNN,RTMDet,YOLACT,而在YOLOv5和YOLOv8中的实例分割,是基于 YOLACT实现的。
YOLACT是基于单阶段检测器的实例分割方法,结合了目标检测和语义分割的思想。通过添加一个并行的mask分支来实现实例分割。实现流程如下:
-
输入图片:将待处理的图像输入到模型中。
-
主干网络特征提取:使用主干网络(如ResNet、EfficientNet等)对输入图像进行特征提取,得到一系列特征图。
-
FPN特征金字塔融合:使用特征金字塔网络(FPN)将来自不同尺寸的特征图进行融合,以便在不同尺度上进行目标检测和实例分割。
-
检测分支:在检测分支中,对于每个检测到的目标物体,模型输出其类别信息、边界框信息(x、y、宽度、高度)以及k个mask Coefficients(掩码系数)。这些掩码系数表示对应目标物体的k个掩码的置信度,通常取值为1或-1。
-
分割分支:在分割分支中,模型针对输入图像输出k个Prototype(掩码原型图)。这些原型图是用于生成目标物体掩码的基础。
-
实例分割结果生成:对于每个目标物体,将其对应的k个掩码系数与k个原型图相乘,然后将所有结果相加,得到该目标物体的实例分割结果。这个过程实际上是将每个原型图按照其置信度加权融合,以生成最终的实例分割掩码。

2.2 模型推理
import math
import cv2 as cv
import numpy as np
from onnxruntime import InferenceSession
from src.models.segmentation.segmentation_base import SegmentBase, Model
from src.models.base.yolov8_base import ModelError
from src.utils.boxes import xywh2xyxy, nms
from src.utils.general import get_classes, sigmoid


class YOLOSeg(SegmentBase):
    def __init__(self):
        self._model = None

    def init(self, model_path, class_txt_path, confidence_threshold=0.5, iou_threshold=0.5):
        _class_names = get_classes(class_txt_path)
        _session = InferenceSession(model_path, providers=['CUDAExecutionProvider', 'CPUExecutionProvider'])
        self.input_names,self.output_names, input_size = self.get_onnx_model_details(_session)
        self.num_masks = 32
        self._model = Model(
            model=_session,
            confidence_threshold=confidence_threshold,
            iou_threshold=iou_threshold,
            input_size=input_size,
            class_names=_class_names)

        init_frame = np.random.randint(0, 256, (input_size[0], input_size[1], 3)).astype(np.uint8)
        self.inference(init_frame)

    def inference(self, image, confi_thres=None, iou_thres=None):
        if self._model is None:
            raise ModelError("Model not initialized. Have you called init()?")
        if confi_thres is None:
            confi_thres = self._model.confidence_threshold
        if iou_thres is None:
            iou_thres = self._model.iou_threshold
        image_size = (image.shape[1],image.shape[0])
        scale, processed_image = self.preprocess(image, self._model.input_size)
        outputs = self._model.model.run(self.output_names, {self.input_names[0]: processed_image})
        boxes, scores, class_ids, mask_pred = self.process_box_output(
            box_output=outputs[0],
            scale=scale,
            image_size=image_size,
            confidence_threshold=confi_thres,
            iou_threshold=iou_thres)
        mask_maps = self.process_mask_output(mask_pred, boxes, outputs[1], image_size, scale)
        resutls = []
        for i in range(len(class_ids)):
            obj_dict = {
                "id": int(i),
                "class": self._model.class_names[int(class_ids[i])],
                "bbox": np.rint(boxes[i]),
                "confidence": scores[i],
                "keypoints":np.array([]),
                "segmentation": np.array(mask_maps[i])}
            resutls.append(obj_dict)
        return resutls

    def process_box_output(self, box_output, scale, image_size, confidence_threshold, iou_threshold):
        predictions = np.squeeze(box_output).T
        num_classes = box_output.shape[1] - self.num_masks - 4
        scores = np.max(predictions[:, 4:4+num_classes], axis=1)
        predictions = predictions[scores > confidence_threshold, :]
        scores = scores[scores > confidence_threshold]
        if len(scores) == 0:
            return [], [], [], np.array([])
        box_predictions = predictions[..., :num_classes+4]
        mask_predictions = predictions[..., num_classes+4:]
        class_ids = np.argmax(box_predictions[:, 4:], axis=1)
        boxes = box_predictions[:, :4]
        boxes = xywh2xyxy(boxes)
        boxes *= scale
        boxes[:, 0] = np.clip(boxes[:, 0], 0, image_size[0])
        boxes[:, 1] = np.clip(boxes[:, 1], 0, image_size[1])
        boxes[:, 2] = np.clip(boxes[:, 2], 0, image_size[0])
        boxes[:, 3] = np.clip(boxes[:, 3], 0, image_size[1])
        indices = nms(boxes, scores, iou_threshold)
        return boxes[indices], scores[indices], class_ids[indices], mask_predictions[indices]

    def process_mask_output(self, mask_predictions, boxes, mask_output, image_size, scale):
        if mask_predictions.shape[0] == 0:
            return []
        mask_output = np.squeeze(mask_output)
        num_mask, mask_height, mask_width = mask_output.shape  # CHW
        masks = sigmoid(mask_predictions @ mask_output.reshape((num_mask, -1)))
        masks = masks.reshape((-1, mask_height, mask_width))
        scale_new = min((mask_height/image_size[1],mask_width/image_size[0]))
        scale_boxes = boxes * scale_new
        mask_maps = np.zeros((len(scale_boxes), image_size[1], image_size[0]))
        blur_size = (int(image_size[0] / mask_width), int(image_size[1] / mask_height))
        for i in range(len(scale_boxes)):
            scale_x1 = int(math.floor(scale_boxes[i][0]))
            scale_y1 = int(math.floor(scale_boxes[i][1]))
            scale_x2 = int(math.ceil(scale_boxes[i][2]))
            scale_y2 = int(math.ceil(scale_boxes[i][3]))
            x1 = int(math.floor(boxes[i][0]))
            y1 = int(math.floor(boxes[i][1]))
            x2 = int(math.ceil(boxes[i][2]))
            y2 = int(math.ceil(boxes[i][3]))
            scale_crop_mask = masks[i][scale_y1:scale_y2, scale_x1:scale_x2]
            crop_mask = cv.resize(
                scale_crop_mask,
                (x2 - x1, y2 - y1),
                interpolation=cv.INTER_CUBIC)
            crop_mask = cv.blur(crop_mask, blur_size)
            crop_mask = (crop_mask > 0.5).astype(np.uint8)
            mask_maps[i, y1:y2, x1:x2] = crop_mask
        return mask_maps
3、姿态估计
3.1 方案比对
姿态估计任务旨在识别图像中物体的特定部位,通常是人体或动物的关键点,以及它们之间的关系。关键点可以代表身体的关节、人脸的特定地标,或者其他物体的显著特征。
姿态估计模型的输出通常是一组表示物体关键点的坐标,这些坐标可以是二维(例如[x,y])或三维(例如[x,y,visible],其中visible表示关键点的可见性)。此外,输出还通常包括每个关键点的置信度分数,用于表示模型对于该关键点位置的信心程度。
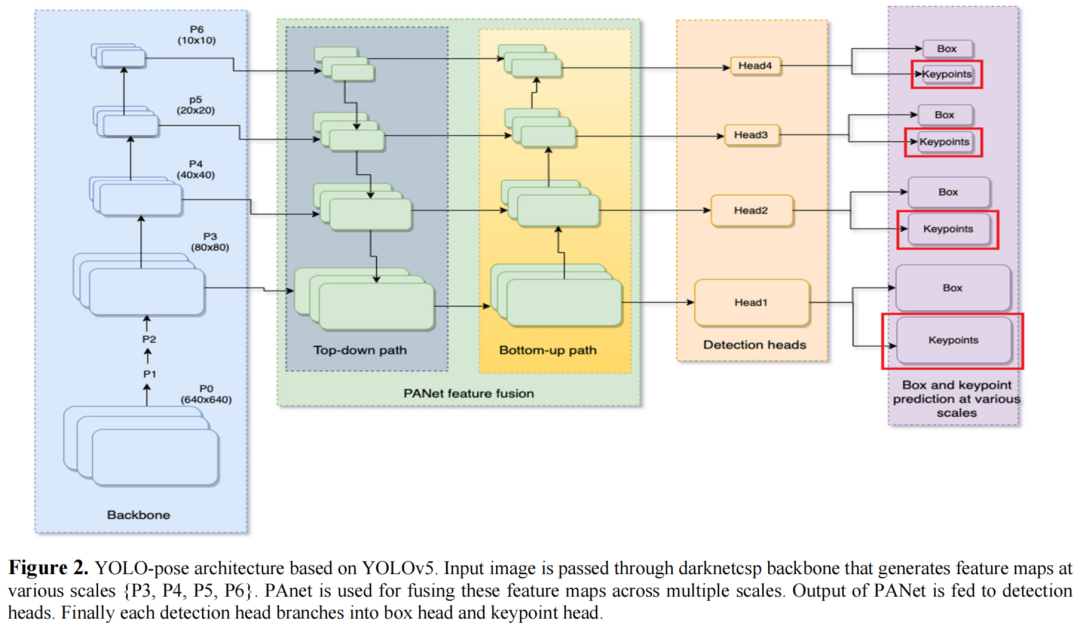
相对于目标检测网络,Yolov5与V8借鉴了YOLO-Pose的设计理念,在目标检测的基础上增加了一个分支头,用于关键点的检测实现。
-
姿态估计解决方案的分类:姿态估计解决方案通常可以分为自上而下和自下而上两种方法。自上而下方法先进行人体检测,然后对每个检测到的人进行单独的姿态估计;而自下而上方法直接从图像中检测出所有关键点,然后再进行关键点之间的分组。
-
自上而下方法的特点:自上而下方法通常具有较高的准确性,但其复杂性随着图像中人数的增加而线性增加,不适合实时应用场景。
-
自下而上方法的特点:自下而上方法具有恒定的运行时间,因为它们直接从图像中检测出所有关键点。然而,自下而上方法的后处理过程通常较为复杂,包括像素级NMS、线积分、细化和分组等步骤。
-
将关键点检测与目标检测统一的可行性:文章提出了一种将关键点检测与目标检测统一的方法,即利用目标检测框架来解决多人姿态估计问题。这样的方法可以享受目标检测领域的所有主要进展,并且具有恒定的运行时间和简单的后处理。
-
YOLO-Pose方法的操作:基于YOLOv5目标检测框架上,增加了一个分支头。该方法是一种无热图的二维姿态估计方法,使用了与目标检测中相同的后处理方法。该方法在COCO关键点数据集上验证,并取得了竞争性的准确性,尤其在AP50方面有显著改进。
3.2 模型推理
import numpy as np
from onnxruntime import InferenceSession
from src.utils.boxes import multiclass_nms_class_agnostic_keypoints
from src.models.pose.pose_detector_base import PoseDetectorBase, Model
from src.models.base.yolov8_base import ModelError


class PoseDetector(PoseDetectorBase):
    def __init__(self):
        self._model = None

    def init(self, model_path, confidence_threshold=0.3, iou_threshold=0.45):
        _session = InferenceSession(model_path, providers=['CUDAExecutionProvider', 'CPUExecutionProvider'])
        self.input_names,self.output_names, input_size = self.get_onnx_model_details(_session)
        self._model = Model(
            model=_session,
            confidence_threshold=confidence_threshold,
            iou_threshold=iou_threshold,
            input_size=input_size
        )

    def postprocess(self, model_output, scale, iou_thres, confi_thres):
        preds = np.squeeze(model_output[0]).T
        boxes = preds[:,:4]
        scores = preds[:,4:5]
        kpts = preds[:,5:]
        dets = multiclass_nms_class_agnostic_keypoints(boxes, scores, kpts, iou_thres, confi_thres)
        pose_results = []
        if dets is not None:
            for i, pred in enumerate(dets):
                bbox = pred[:4]#xywh2xyxy(pred[:4])
                bbox *= scale
                bbox = np.rint(bbox)
                kpts = pred[6:]
                kpt = (kpts.reshape((17,3)))*[scale,scale,1]
                pose_dict = {
                    "id":int(i),
                    "class":"person",
                    "confidence":pred[4],
                    "bbox":bbox,
                    "keypoints":np.array(kpt),
                    "segmentation":np.array([])}
                pose_results.append(pose_dict)
        return pose_results

    def inference(self, image, confi_thres=None, iou_thres=None):
        if self._model is None:
            raise ModelError("Model not initialized. Have you called init()?")
        if confi_thres is None:
            confi_thres = self._model.confidence_threshold
        if iou_thres is None:
            iou_thres = self._model.iou_threshold

        scale, meta = self.preprocess(image, self._model.input_size)
        model_input = {self.input_names[0]: meta}
        model_output = self._model.model.run(self.output_names, model_input)[0]
        pose_results = self.postprocess(model_output, scale, iou_thres, confi_thres)
        return pose_results
4、目标追踪
4.1. 简介
多目标跟踪(Multiple Object Tracking,简称MOT)是指在视频或图像序列中检测并跟踪多个目标,并为每个目标分配一个唯一的标识符(ID),以便在时间上保持其连续性和一致性。在这个过程中,目标的数量通常是未知的,因此需要在不同帧之间动态地管理目标的识别和追踪。
MOT技术在计算机视觉领域具有重要意义,广泛应用于自动驾驶、智能监控、行为识别等领域。在自动驾驶中,MOT可用于实时检测和跟踪周围车辆、行人和其他障碍物,从而帮助车辆做出安全决策。在智能监控中,MOT可用于实时监测人员活动、异常行为检测等任务。在行为识别中,MOT可用于跟踪特定对象的行为,如球赛中的球员或商场中的顾客。在众多目标追踪算法中,DeepSORT和ByteTrack因其卓越的性能和实用性而备受关注。
4.2. DeepSORT
DeepSORT(Deep Simple Online and Realtime Tracking)是一种基于深度学习的在线实时目标追踪算法。它通过对目标在连续帧之间的匹配,实现了对目标的稳定追踪。DeepSORT算法主要包括三个核心部分:目标检测、特征提取和数据关联。目标检测阶段负责在每一帧中检测出目标的位置和大小;特征提取阶段则利用深度学习模型提取目标的外观特征;数据关联阶段则根据目标的运动信息和外观特征,将不同帧中的目标进行匹配,实现目标的持续追踪。
DeepSort算法的核心思想是利用递归的卡尔曼滤波和逐帧的匈牙利数据关联,在实时目标跟踪中引入深度学习模型,提取目标的外观特征进行最近邻匹配。这样做的目的是有效处理目标被遮挡的情况,并减少目标ID跳变的问题。
首先,递归的卡尔曼滤波用于预测目标的状态。卡尔曼滤波器是一种最优线性滤波器,能够根据目标的运动模型和观测数据进行状态估计。在DeepSort中,卡尔曼滤波器用于预测目标的位置和速度,为后续的目标匹配提供参考。
其次,逐帧的匈牙利数据关联用于将检测框与跟踪框进行匹配。匈牙利算法是一种解决二分图最大匹配问题的算法,可以高效地进行目标匹配。在DeepSort中,将检测框与跟踪框的交并比作为相似度度量,输入到匈牙利算法中进行线性分配来关联帧间ID。
另外,当某一帧出现了新的检测结果时(即与当前跟踪结果无法匹配的检测结果),DeepSort会认为可能出现了新的目标,为其创建新的跟踪器。为了避免大量的ID Switch,DeepSort同时考虑了运动信息的关联和目标外观信息的关联,使用融合度量的方式计算检测结果和跟踪结果的匹配程度。
DeepSort算法通过引入深度学习模型和递归的卡尔曼滤波,实现了实时、准确的多目标跟踪。它能够有效地处理目标被遮挡的情况,减少目标ID跳变的问题,因此在工业开发等领域得到了广泛应用。在实际应用中,使用DeepSort算法时需要注意一些关键问题。首先,需要选择合适的深度学习模型和特征提取方法,以适应不同的目标和场景。其次,需要调整卡尔曼滤波器的参数,以获得最佳的预测效果。此外,需要合理设置数据关联的阈值和规则,以确保准确的目标匹配。
但DeepSORT也存在一些问题。例如,当目标发生遮挡或快速运动时,算法可能会出现追踪失败的情况。为了解决这些问题,DeepSORT引入了级联匹配和外观特征信息,以提高算法的鲁棒性。级联匹配通过综合考虑目标的运动信息和外观特征,提高了目标匹配的准确性;而外观特征信息则通过深度学习模型提取目标的特征,使得算法能够在目标发生遮挡或快速运动时,依然能够保持稳定的追踪。
4. 3.ByteTrack
ByteTrack是一种基于检测的目标追踪算法,它在YOLOv8检测器的基础上进行了改进,实现了更高效的目标追踪,具有简单、高效和通用的特点。相较于传统的多目标跟踪方法,ByteTrack不依赖于ReID模型,而是通过关联每个检测框来进行跟踪。这种方法可以有效地解决低分检测框被简单丢弃的问题,从而减少漏检和碎片化轨迹的情况。
ByteTrack算法流程如下:首先,使用目标检测器对当前帧进行检测,得到一系列候选目标框。然后,利用卡尔曼滤波对目标框进行预测,并利用匈牙利算法进行数据关联,将检测框与历史轨迹进行匹配。对于得分较高的目标框,直接与历史轨迹匹配;对于得分较低的目标框,则与第一次没有匹配上的轨迹进行匹配,用于检测目标遮挡的情形。
为了实现高效的实时多目标跟踪,ByteTrack还采用了一些优化策略。例如,对轨迹进行分类,避免在代码阅读时出现混淆的情形;同时,对于连续两帧都未匹配上的轨迹,将其标记为即将删除的轨迹,从而及时清理无效轨迹。
在实际应用中,ByteTrack能够轻松应用到各种多目标跟踪框架中,并取得显著的性能提升。在MOT17测试集上,ByteTrack实现了80.3 MOTA、77.3 IDF1和63.1 HOTA等优异性能指标,同时在单个V100 GPU上运行速度达到了30 FPS。这表明ByteTrack具有高效、准确和实时性强的特点,能够满足实际应用的需求。
4.4 对比
DeepSORT和ByteTrack算法各有优劣。DeepSORT算法在目标特征提取和数据关联方面具有较高的准确性,适用于对目标追踪精度要求较高的场景,如视频监控、自动驾驶等。而ByteTrack算法则以其高效的检测器和稳定的目标匹配性能,在实际应用中取得了良好的表现,尤其适用于需要实时处理大量视频数据的场景,如智能监控、人机交互等。
5.源码配置
5.1.环境创建
#新建虚拟环境
conda create -n yolov8 python=3.8
#激活
conda activate yolov8
#安装torch,
conda install pytorch==2.0.0 torchvision==0.15.0 torchaudio==2.0.0 pytorch-cuda=11.7 -c pytorch -c nvidia
cd YOLOv8_GUI
#将requirements.txt中torch torchbision 注释掉,下载其他包
pip install -r requirements.txt
5.2.配置PyCharm
参考之前的博客:详细记录Pycharm配置已安装好的Conda虚拟环境





![[BT]BUUCTF刷题第9天(3.27)](https://img-blog.csdnimg.cn/direct/ba6105b0bda44faa9ee9b32de065a19b.png)
