一、创建SpringBoot的两种方式
1.Spring Initializr方式创建
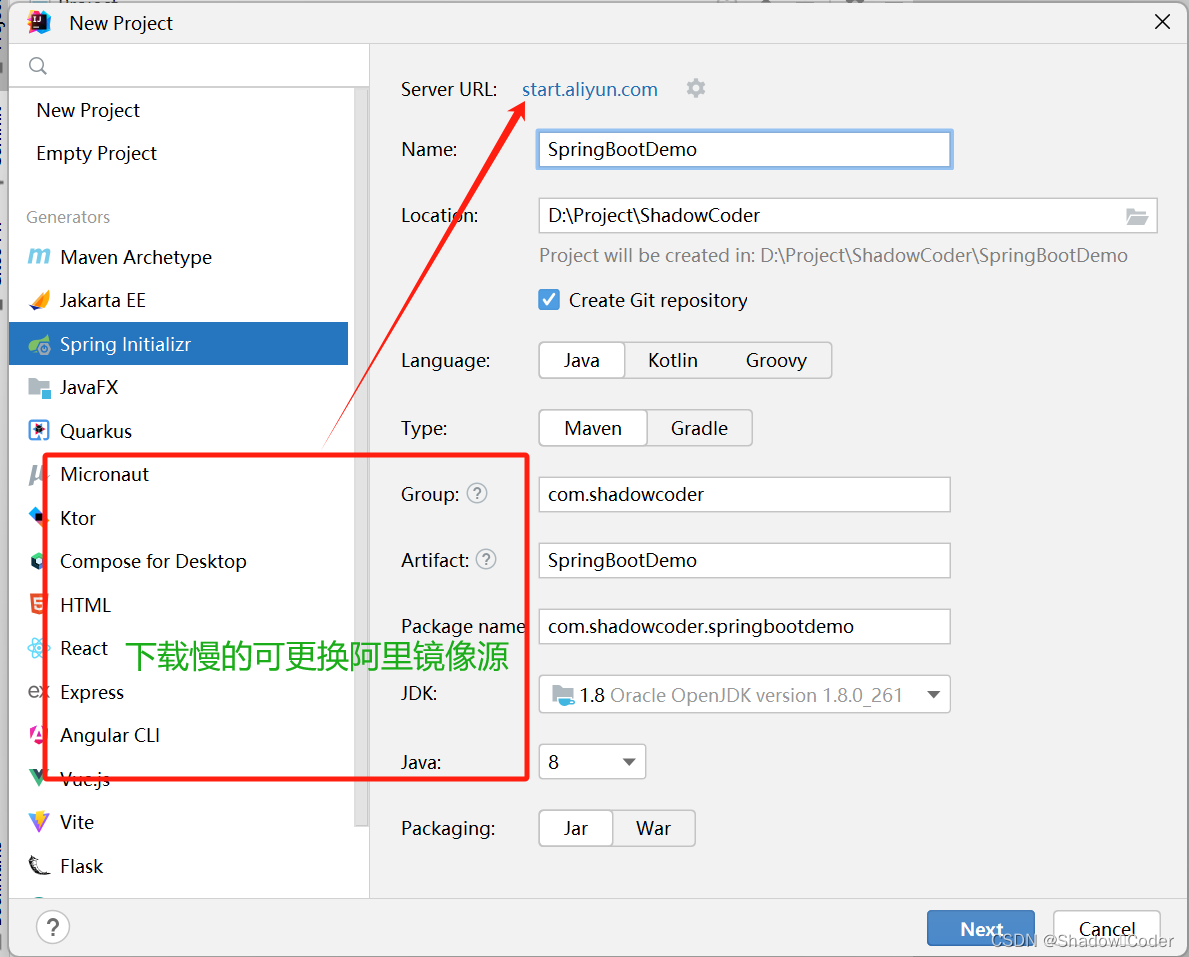
(1)第一步在IDEA中选择 File-->NEW-->Project ,选择 Spring Initializr ,指定Maven坐标、包名、指定 JDK 版本 1.8 ,然后点击Next 。如下图:
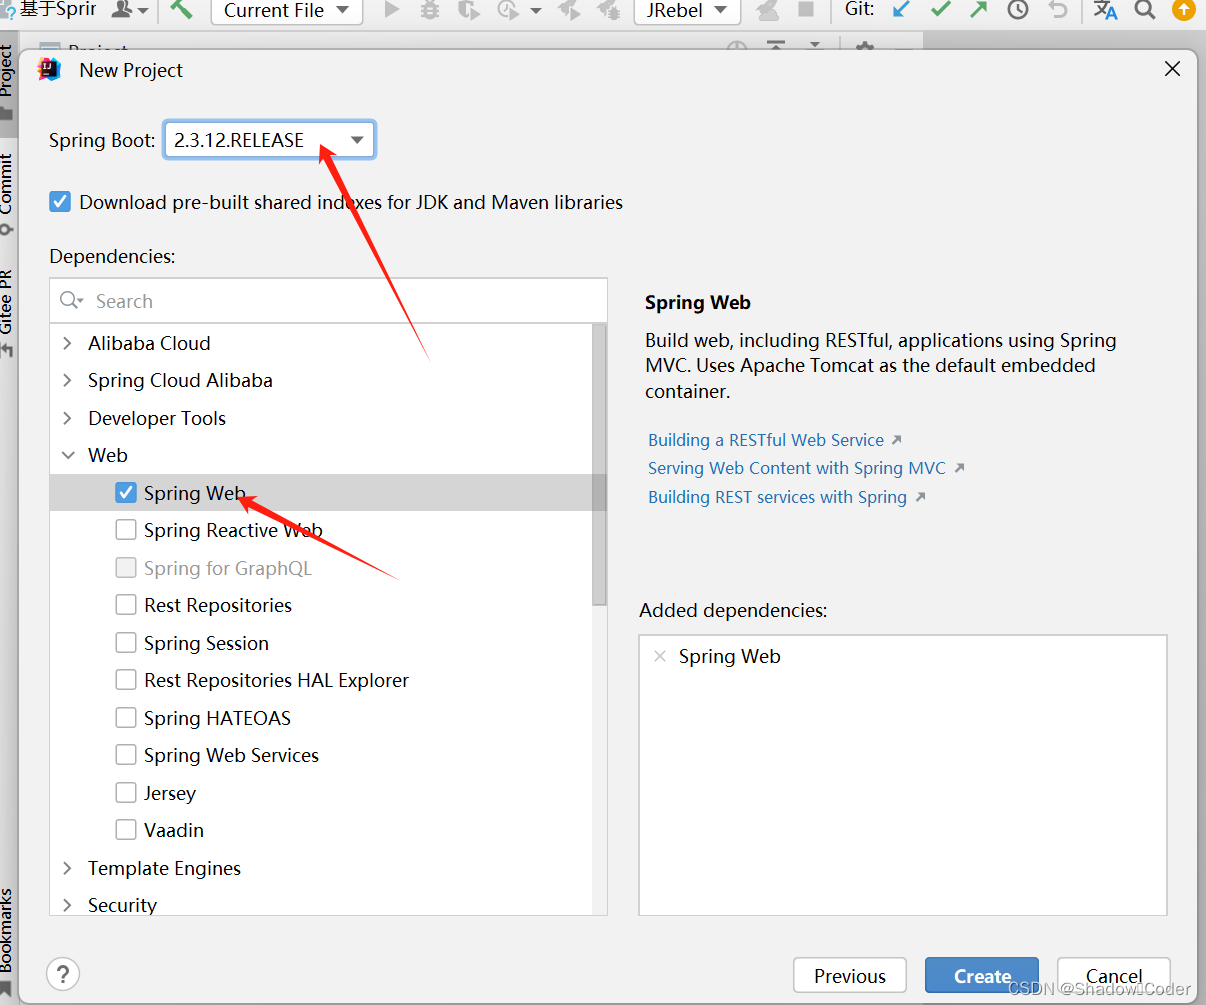
(2)由于是初步创建 我们选择一个SpringWeb依赖即可,选择好SpringBoot版本后点击Create:
(3)创建完的项目结构如图:
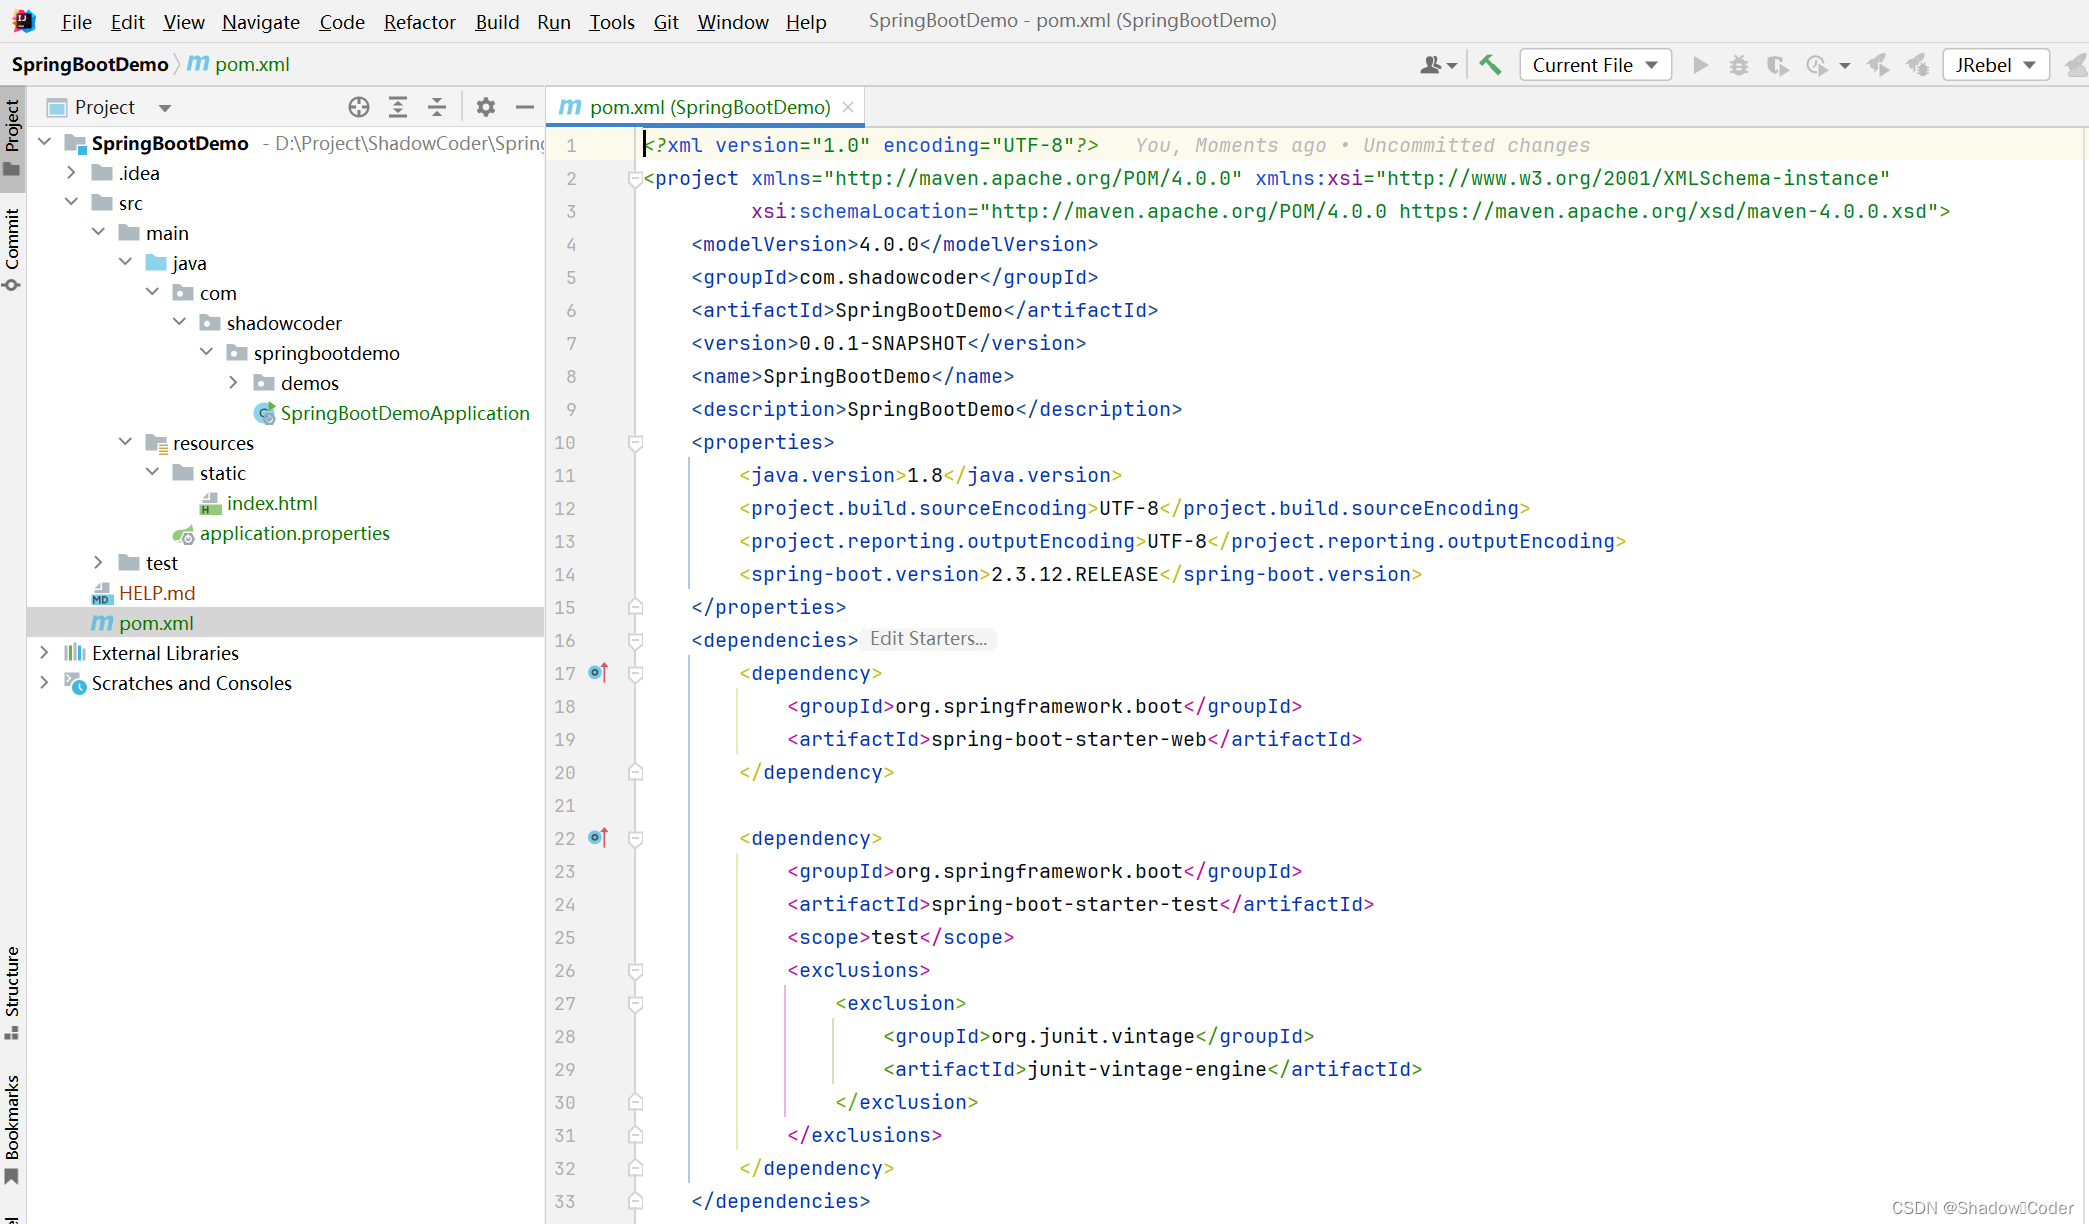
(4)其中pom.xml文件内容如下:
<?xml version="1.0" encoding="UTF-8"?>
<project xmlns="http://maven.apache.org/POM/4.0.0" xmlns:xsi="http://www.w3.org/2001/XMLSchema-instance"
         xsi:schemaLocation="http://maven.apache.org/POM/4.0.0 https://maven.apache.org/xsd/maven-4.0.0.xsd">
    <modelVersion>4.0.0</modelVersion>
    <groupId>com.shadowcoder</groupId>
    <artifactId>SpringBootDemo</artifactId>
    <version>0.0.1-SNAPSHOT</version>
    <name>SpringBootDemo</name>
    <description>SpringBootDemo</description>
    <properties>
        <java.version>1.8</java.version>
        <project.build.sourceEncoding>UTF-8</project.build.sourceEncoding>
        <project.reporting.outputEncoding>UTF-8</project.reporting.outputEncoding>
        <spring-boot.version>2.3.12.RELEASE</spring-boot.version>
    </properties>
    <dependencies>
        <dependency>
            <groupId>org.springframework.boot</groupId>
            <artifactId>spring-boot-starter-web</artifactId>
        </dependency>

        <dependency>
            <groupId>org.springframework.boot</groupId>
            <artifactId>spring-boot-starter-test</artifactId>
            <scope>test</scope>
            <exclusions>
                <exclusion>
                    <groupId>org.junit.vintage</groupId>
                    <artifactId>junit-vintage-engine</artifactId>
                </exclusion>
            </exclusions>
        </dependency>
    </dependencies>
    <dependencyManagement>
        <dependencies>
            <dependency>
                <groupId>org.springframework.boot</groupId>
                <artifactId>spring-boot-dependencies</artifactId>
                <version>${spring-boot.version}</version>
                <type>pom</type>
                <scope>import</scope>
            </dependency>
        </dependencies>
    </dependencyManagement>

    <build>
        <plugins>
            <plugin>
                <groupId>org.apache.maven.plugins</groupId>
                <artifactId>maven-compiler-plugin</artifactId>
                <version>3.8.1</version>
                <configuration>
                    <source>1.8</source>
                    <target>1.8</target>
                    <encoding>UTF-8</encoding>
                </configuration>
            </plugin>
            <plugin>
                <groupId>org.springframework.boot</groupId>
                <artifactId>spring-boot-maven-plugin</artifactId>
                <version>${spring-boot.version}</version>
                <configuration>
                    <mainClass>com.shadowcoder.springbootdemo.SpringBootDemoApplication</mainClass>
                    <skip>true</skip>
                </configuration>
                <executions>
                    <execution>
                        <id>repackage</id>
                        <goals>
                            <goal>repackage</goal>
                        </goals>
                    </execution>
                </executions>
            </plugin>
        </plugins>
    </build>

</project>
(5)运行SpringBoot项目
找到最里层目录下的启动类SpringBootDemoApplication,点击上面的小三角启动

其代码如下:
package com.shadowcoder.springbootdemo;

import org.springframework.boot.SpringApplication;
import org.springframework.boot.autoconfigure.SpringBootApplication;

@SpringBootApplication
public class SpringBootDemoApplication {

    public static void main(String[] args) {
        SpringApplication.run(SpringBootDemoApplication.class, args);
    }

}
(6)成功运行
无报错且出现下面页面则为成功

2.New Project方式创建
(1)第一步在IDEA中选择 File-->NEW-->Project ,选择 New Project ,指定Maven坐标、包名、指定 JDK 版本 1.8 ,然后点击Create 。如下图:

(2)查看pom.xml文件及结构,如下图:

(3)更改pom.xml文件,代码如下:
<?xml version="1.0" encoding="UTF-8"?>
<project xmlns="http://maven.apache.org/POM/4.0.0"
         xmlns:xsi="http://www.w3.org/2001/XMLSchema-instance"
         xsi:schemaLocation="http://maven.apache.org/POM/4.0.0 http://maven.apache.org/xsd/maven-4.0.0.xsd">
    <modelVersion>4.0.0</modelVersion>

    <groupId>com.shadowcoder</groupId>
    <artifactId>SpringBootTest1</artifactId>
    <version>1.0-SNAPSHOT</version>

    <properties>
        <maven.compiler.source>8</maven.compiler.source>
        <maven.compiler.target>8</maven.compiler.target>
        <project.build.sourceEncoding>UTF-8</project.build.sourceEncoding>
    </properties>

    <parent>
        <groupId>org.springframework.boot</groupId>
        <artifactId>spring-boot-starter-parent</artifactId>
        <version>2.2.6.RELEASE</version>
        <relativePath/> <!-- lookup parent from repository -->
    </parent>
    <dependencies>
    <dependency>
        <groupId>org.springframework.boot</groupId>
        <artifactId>spring-boot-starter-web</artifactId>
    </dependency>
    </dependencies>

</project>
(4)刷新安装依赖,点击右上角的小符号,或者点开Maven进行刷新,如图所示:


(5)写入启动类,并启动,代码如下:

package com.shadowcoder;


import org.springframework.boot.SpringApplication;
import org.springframework.boot.autoconfigure.SpringBootApplication;

@SpringBootApplication
public class SpringBootTest1 {
    public static void main(String[] args) {
        SpringApplication.run(SpringBootTest1.class,args);
    }
}
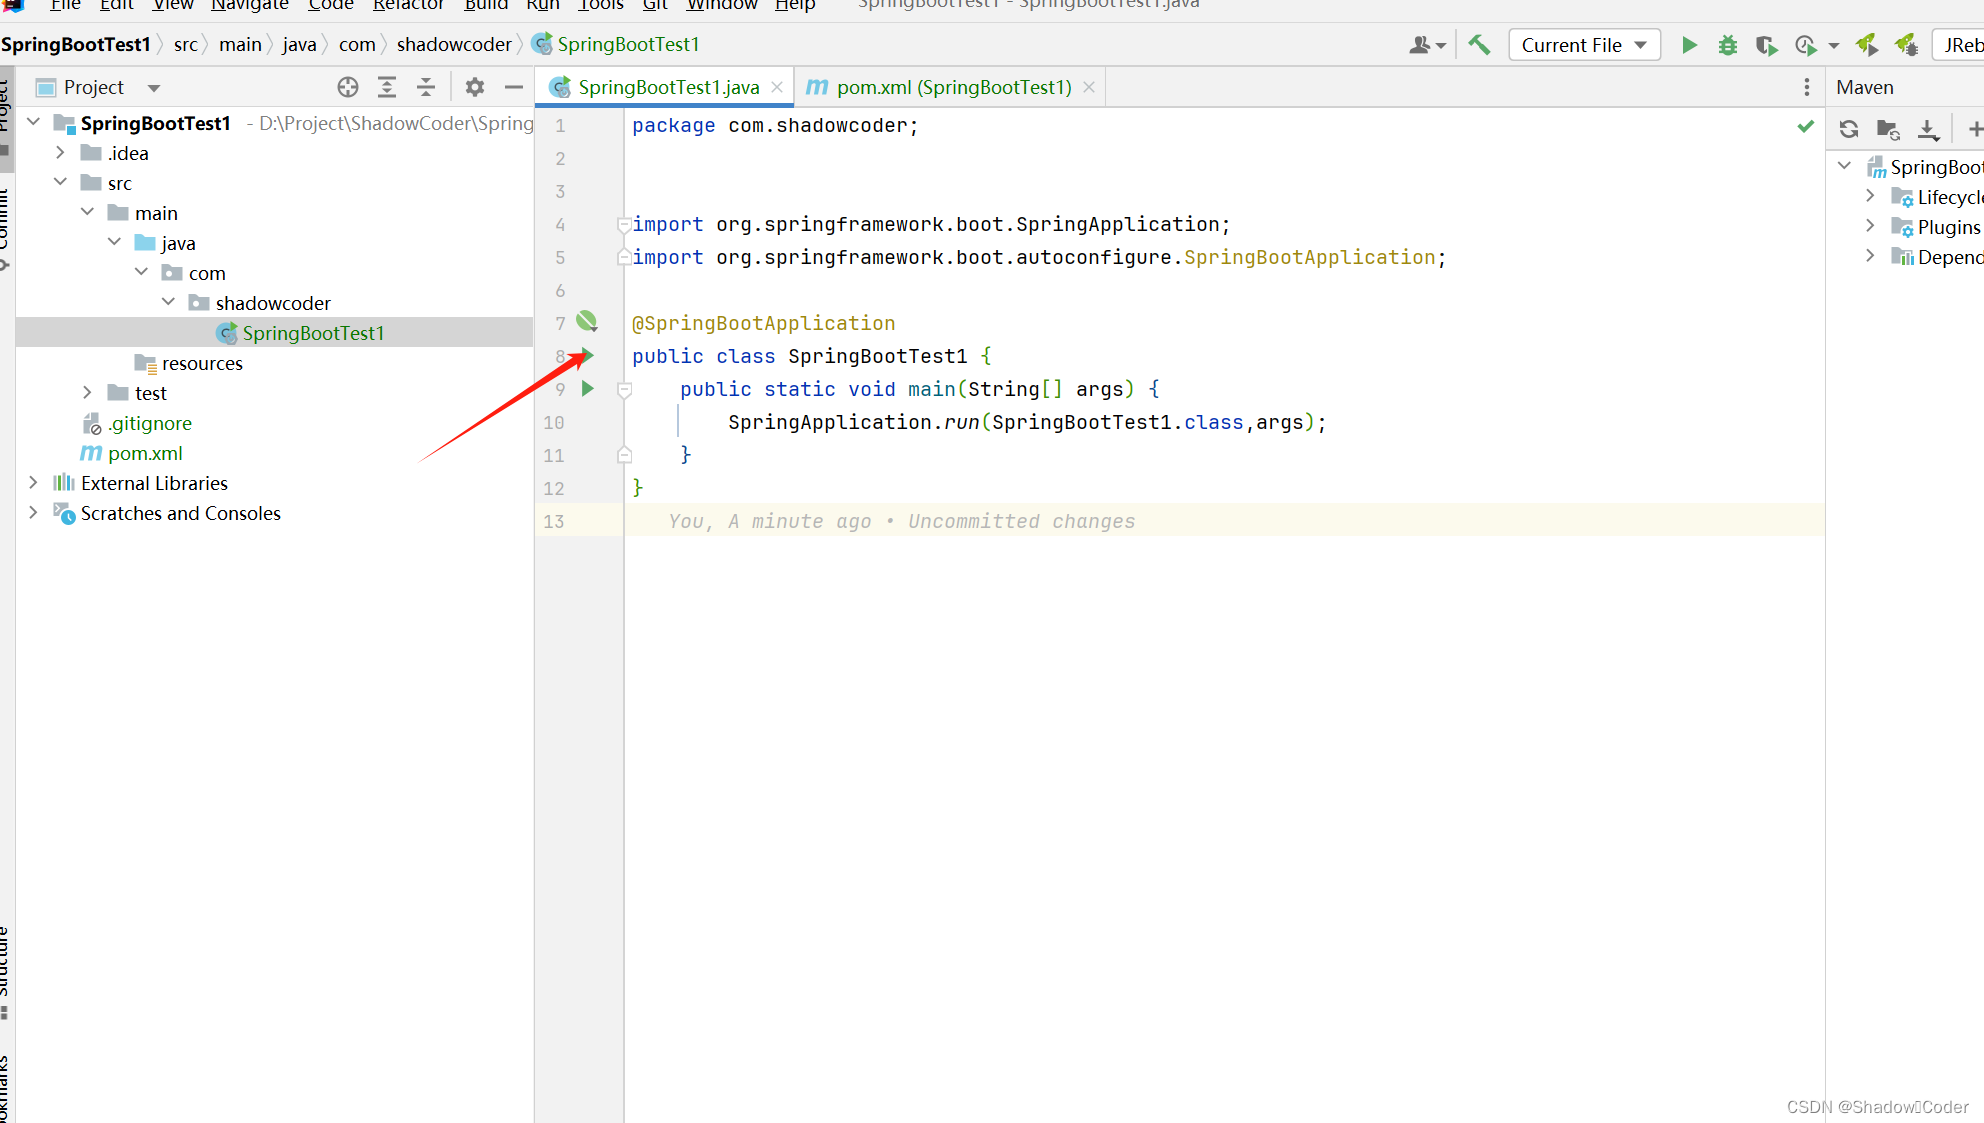
(7)运行SpringBoot项目
找到最里层目录下的启动类SpringBootTest1,点击上面的小三角启动
(8)成功运行
无报错且出现下面页面则为成功

二、SpringBoot简单配置
1.application.properties的端口配置
默认端口server.port = 8080,更改后重新运行会直接更改应用的web访问入口。

三、简单的访问接口层HelloWorld
1.添加一个类HelloWorldController,代码结构如下:

package com.shadowcoder.springbootdemo.demos;

import org.springframework.web.bind.annotation.GetMapping;
import org.springframework.web.bind.annotation.RestController;


@RestController
public class HelloWorldController {
    @GetMapping("/hello")
    public String hello(){
        return "Hello World";
    }
}
2.访问接口
重新运行项目后访问localhost:8080/hello出现Hello World页面即为成功

备注(提示):
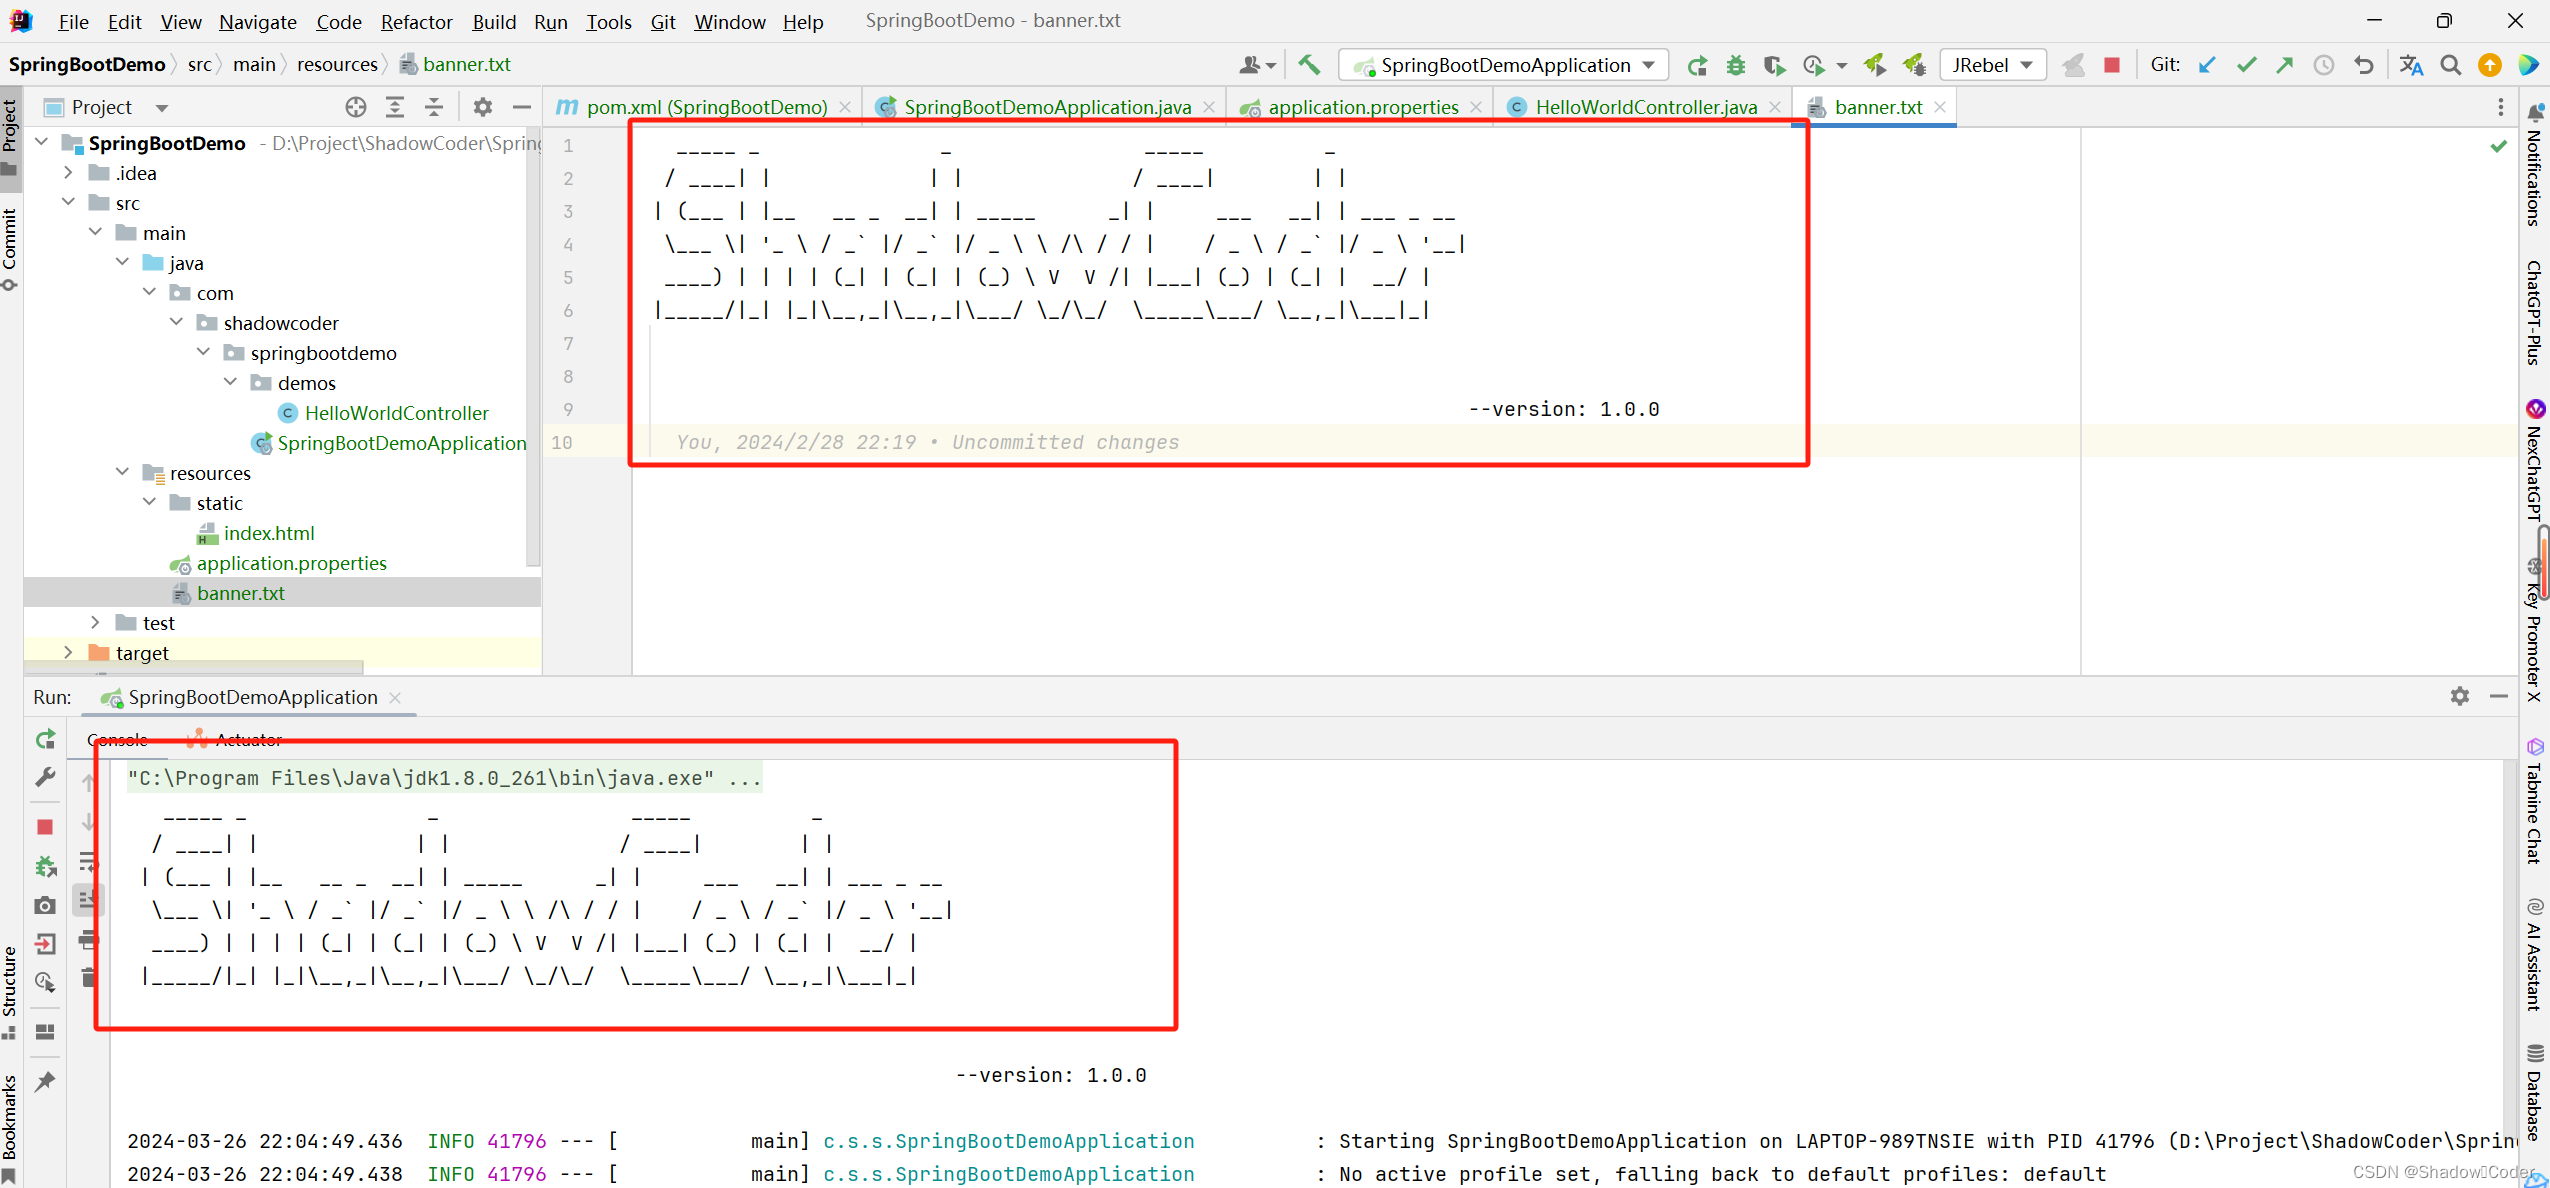
1.(趣味)更改SpringBoot启动页面打印图形
在resources下添加一个banner.txt文件,启动窗口会将此文件作为启动类。
2.在线制作banner的网站
纯字体
http://patorjk.com/software/taag/
https://www.bootschool.net/ascii
ASCII Generator
图片风
https://www.degraeve.com/img2txt.php
https://www.bootschool.net/ascii-art/animals
3.依赖解读
Spring Boot项目中的
pom.xml
中有这么一个依赖,如下:
    <parent>
        <groupId>org.springframework.boot</groupId>
        <artifactId>spring-boot-starter-parent</artifactId>
        <version>2.2.6.RELEASE</version>
        <relativePath/> <!-- lookup parent from repository -->
    </parent>
<parent> 这个标签都知道什么意思, 父亲 是吧,这么个标签主要的作用就是用于版本控制。这也就是 引入的 WEB 模块 starter 的时候不用指定版本号 <version> 标签的原因,因为在 spring-boot-starter-parent 中已经指定了,类似于一种继承的关系,父亲已经为你提供了,你只需要选择用不用就行。
