这篇是在上篇的基础上继续学习LayoutInflater,上篇主要讲了LayoutInflater是怎么解析布局的,但是并没有去仔细地说明LayoutInflater创建View的过程,这篇就补上这部分。
LayoutInflater创建xml布局View是分开创建的:
1. 先创建xml布局最外层的View,也就是布局的根View
2. 递归创建所有的子View
本着先简后繁的原则,先不考虑 <merge> <include>等标签,直接从一般情况的流程看起
public View inflate(XmlPullParser parser, ViewGroup root, boolean attachToRoot) {
        synchronized (mConstructorArgs) {
           ......
            View result = root;
            try {
               ......
                if (TAG_MERGE.equals(name)) {
                    ......
                    rInflate(parser, root, inflaterContext, attrs, false);
                } else {
                    //首先创建xml布局最外层View:根View
                    // Temp is the root view that was found in the xml
                    final View temp = createViewFromTag(root, name, inflaterContext, attrs);
                    ViewGroup.LayoutParams params = null;
                    //递归创建子View
                    // Inflate all children under temp against its context.
                    rInflateChildren(parser, temp, attrs, true);
                    ......
                }
            } catch (XmlPullParserException e) {
            ......
            return result;
        }
    }
布局根View的创建
布局最外层根View的创建是通过 createViewFromTag() 来创建的,其实后面子View的创建依然会用到这个方法,在看这个方法之前先理清方法的参数.
第一个参数 root :这里注意:这个 root 是我们调用LayoutInflater的inflate方法加载布局时自己传入的一个父View,需要和要加载的xml布局根View区分开来
第二个参数 name:这个是对应我们要解析的xml布局树中对应的每个View的名称,就以上篇文章中 activity_main.xml 为例,name 的取值为
androidx.constraintlayout.widget.ConstraintLayout,当然如果是子View的创建取值将依次为:LinearLayout、TextView、FrameLayout
后面两个参数依次为上下文 Context 和保存要创建View的属性的 AttributeSet 对象,接下来开始看代码,还是只看主要流程
    private View createViewFromTag(View parent, String name, Context context, AttributeSet attrs) {
        return createViewFromTag(parent, name, context, attrs, false);
    }
    View createViewFromTag(View parent, String name, Context context, AttributeSet attrs,
            boolean ignoreThemeAttr) {
       ......
        try {
            //这里可以通过设置工厂的形式拦截系统创建View
            View view = tryCreateView(parent, name, context, attrs);
            if (view == null) {
                final Object lastContext = mConstructorArgs[0];
                mConstructorArgs[0] = context;
                try {
                    if (-1 == name.indexOf('.')) {
                        //SDK View的创建,eg:LinearLayout TextView ...
                        view = onCreateView(context, parent, name, attrs);
                    } else {
                        //自定义View的创建,eg:androidx.constraintlayout.widget.ConstraintLayout
                        view = createView(context, name, null, attrs);
                    }
                } finally {
                    mConstructorArgs[0] = lastContext;
                }
            }
            return view;
        } catch (InflateException e) {
        ......
    }
首先来看下这个 tryCreateView ,这个方法其实是系统创建View的一个Hook点
   private boolean mFactorySet;
   private Factory mFactory;
   private Factory2 mFactory2;
   private Factory2 mPrivateFactory;
   public final View tryCreateView(@Nullable View parent, @NonNull String name,
        @NonNull Context context,
        @NonNull AttributeSet attrs) {
        ......
        View view;
        if (mFactory2 != null) {
            view = mFactory2.onCreateView(parent, name, context, attrs);
        } else if (mFactory != null) {
            view = mFactory.onCreateView(name, context, attrs);
        } else {
            view = null;
        }
        if (view == null && mPrivateFactory != null) {
            view = mPrivateFactory.onCreateView(parent, name, context, attrs);
        }
        return view;
    }
tryCreateView 中首先通过 mFactory2 来创建View, mFactory2 是LayoutInflater的一个成员变量,Factory2是一个接口,平时我们使用LayoutInflater来加载布局的时候 tryCreateView方法一般都是返回 null 的,我们可以自己实现这个接口,并通过对应的 setFactory2()方法设置到LayoutInflater中,这样可以拦截系统创建xml布局View的过程,不过这个setFactory2的方法只能设置一次,因为mFactorySet的控制,再次设置会抛出异常,这里也可以通过反射消除这个异常,后面的mFactory也是类似的,mPrivateFactory 其实Activity已经实现了 不过onCreateView方法直接返回null了,对于系统创建 xml 布局的Hook点就说到这里,对此感兴趣的朋友可以去看下对应源码
接下来看第二个try语句中的逻辑,也就是 if..else..语句,这才是系统创建View的核心逻辑,这里对要创建的View做了个分类,看看要创建的View是开发者自定义的View,还是SDK中的系统View,一般我们使用自定义View的时候 name 值往往是 com.xxx.xx.XxxView,所以这里通过判断 name 中是否包含 "." 来判断是不是自定义View,像LinearLayout、TextView、FrameLayout、RelativeLayout等这些都是SDK View,有人可能会问了,那上面的约束布局 ConstraintLayout 又该怎么算呢,ConstraintLayout 的 name 中包含了".",当然它也是自定义View,只不过是google工程师自定义的。
为什么要区分SDK View和自定义View,这是因为后面创建View对象都是通过反射,需要View的全类名,而SDK View在不同的包下,需要手动拼接全类名
先来看SDK View 的创建流程,会通过多个重载的方法:onCreateView方法来创建View
   public View onCreateView(@NonNull Context viewContext, @Nullable View parent,
            @NonNull String name, @Nullable AttributeSet attrs)
            throws ClassNotFoundException {
        return onCreateView(parent, name, attrs);
    }
   protected View onCreateView(View parent, String name, AttributeSet attrs)
            throws ClassNotFoundException {
        return onCreateView(name, attrs);
    }
流程走到这里需要注意下了:看过第一篇文章的朋友应该知道,我们加载布局最终获取到的是PhoneLayoutInflater对象,所以后面的流程不在LayoutInflater这个类里面,而是要到 PhoneLayoutInflater里去,虽说不是很难找到,但是也是比较容易忽略的一个点,稍微提下。
public class PhoneLayoutInflater extends LayoutInflater {
    private static final String[] sClassPrefixList = {
        "android.widget.",
        "android.webkit.",
        "android.app."
    };
    @Override
    protected View onCreateView(String name, AttributeSet attrs) throws ClassNotFoundException {
        for (String prefix : sClassPrefixList) {
            try {
                View view = createView(name, prefix, attrs);
                if (view != null) {
                    return view;
                }
            } catch (ClassNotFoundException e) {
               ......
            }
        }
        return super.onCreateView(name, attrs);
    }
}
细心的朋友可能发现了,这个 sClassPrefixList 数组里好像少了一个 "android.view." 的包,这个参数其实是加在了超类LayoutInflater里,有兴趣的可以看下就不再贴源码了,这里循环遍历了SDK View的包名 prefix,之后作为参数传到了createView方法中,接下来又进入了LayoutInflater的方法中,其核心代码如下
   public final View createView(String name, String prefix, AttributeSet attrs)
            throws ClassNotFoundException, InflateException {
        Context context = (Context) mConstructorArgs[0];
        if (context == null) {
            context = mContext;
        }
        return createView(context, name, prefix, attrs);
    }

    public final View createView(@NonNull Context viewContext, @NonNull String name,
            @Nullable String prefix, @Nullable AttributeSet attrs)
            throws ClassNotFoundException, InflateException {
        ......
        Constructor<? extends View> constructor = sConstructorMap.get(name);
        ......
        Class<? extends View> clazz = null;
        try {
            if (constructor == null) {
                //反射获取对应View的Class对象
                clazz = Class.forName(prefix != null ? (prefix + name) : name, false,
                        mContext.getClassLoader()).asSubclass(View.class);
                ......
                //获取创建View的构造器
                constructor = clazz.getConstructor(mConstructorSignature);
                constructor.setAccessible(true);
                sConstructorMap.put(name, constructor);
            } else {
               ......
            }
            Object lastContext = mConstructorArgs[0];
            mConstructorArgs[0] = viewContext;
            Object[] args = mConstructorArgs;
            args[1] = attrs;
            try {
                //通过View的构造器反射创建View对象
                final View view = constructor.newInstance(args);
                if (view instanceof ViewStub) {
                    final ViewStub viewStub = (ViewStub) view;
                    viewStub.setLayoutInflater(cloneInContext((Context) args[0]));
                }
                return view;
            } finally {
                mConstructorArgs[0] = lastContext;
            }
        } catch (NoSuchMethodException e) {
        ......
    }
最终SDK View的创建和自定义View的创建都是通过 createView(Context viewContext, String name, String prefix, AttributeSet attrs) 方法来创建的,只不过SDK View需要先获取到对应的包名,再拼接获取到全类名之后再调用该方法创建View
通过反射获取对应View的Class对象时,SDK View会对全类名做一个拼接, 而自定义View prefix为null,因为在xml布局获取到的 name 就是自定义View的全类名,当通过构造器的newInstance方法创建View时,会调用对应View的构造方法,由于传入的参数 args 是一个包含两个元素的数组,这两个元素分别是Context上下文和属性集合Attributeset对象,所以最终会调用每个View的两参构造函数,例如 TextView 将会调用如下构造方法,其他View也一样
    public TextView(Context context, @Nullable AttributeSet attrs) {
        this(context, attrs, com.android.internal.R.attr.textViewStyle);
    }
这就是为什么我们写自定义View时必须要有这个两参的构造函数,否则就会报错,到此两种类型View的创建流程都走完了
递归创建子View
递归创建子View的方法是 rInflateChildren(),这个方法是在inflate()方法中创建完xml的根View后调用的,另外在rInflate()方法中也调用了一次,这一次是为了实现递归,还有就是在解析 include 标签的 parseInclude()方法中也调用了这个方法,我们先了解在 inflate()方法中的调用,在看这个方法之前还是要先了解下它的参数,重点关注下第二个参数,在 inflate()方法中传入的是 temp,而 temp 就是xml布局的根View,这里同样要和父容器root 区分开来。
一般递归流程
还是先从一般的简单流程看,不考虑xml中其他标签,这个之后再讨论
   final void rInflateChildren(XmlPullParser parser, View parent, AttributeSet attrs,
            boolean finishInflate) throws XmlPullParserException, IOException {
        rInflate(parser, parent, parent.getContext(), attrs, finishInflate);
    }

    void rInflate(XmlPullParser parser, View parent, Context context,
            AttributeSet attrs, boolean finishInflate) throws XmlPullParserException, IOException {
        final int depth = parser.getDepth();
        int type;
        boolean pendingRequestFocus = false;
        while (((type = parser.next()) != XmlPullParser.END_TAG ||
                parser.getDepth() > depth) && type != XmlPullParser.END_DOCUMENT) {
            if (type != XmlPullParser.START_TAG) {
                continue;
            }
            final String name = parser.getName();
            if (TAG_REQUEST_FOCUS.equals(name)) {
              ......
            } else if (TAG_TAG.equals(name)) {
              ......
            } else {
                final View view = createViewFromTag(parent, name, context, attrs);
                final ViewGroup viewGroup = (ViewGroup) parent;
                final ViewGroup.LayoutParams params = viewGroup.generateLayoutParams(attrs);
                //递归创建子View
                rInflateChildren(parser, view, attrs, true);
                viewGroup.addView(view, params);
            }
        }
        ......
    }
首次调用 parent 参数接收的就是 temp,xml布局的根View,看rInflate()方法时先不考虑<merge> <include>等其他标签,先通过一个 while()循环找到temp下面的第一个子View标签的起始位置,之后将进入 else 语句中执行,依然是调用 createViewFromTag()来创建该子View,创建完子View之后又调用了rInflateChildren()形成递归调用,注意:这次第二个参数传的是 view,之后就是递归创建view下面的所有子View了.递归创建完所有子View之后,都是通过addView()的方法添加到对应的父View中去,这样一直到把整个子View树全部创建完成。
包含标签的递归流程
在上篇文章中一开始将xml解析的时候就遇到了<merge>标签,我们在写xml布局文件的时候是可以加入各种标签的,有些标签我们经常用到,有些可能使用的频率比较低,这些标签在LayoutInflater中都有定义,下面来一一介绍(只讲LayoutInflater中定义的标签)
public abstract class LayoutInflater {
    private static final String TAG_MERGE = "merge";
    private static final String TAG_INCLUDE = "include";
    private static final String TAG_1995 = "blink";
    private static final String TAG_REQUEST_FOCUS = "requestFocus";
    private static final String TAG_TAG = "tag";
"merge标签"
讲 <merge>标签之前先来看一个关于<merge>标签的事例,还是对第一篇的例子做稍微的改动,原来的activity_mainxml的布局内容保持不变,通过LayoutInflater向其中LinearLayout(id为ll) 添加 layout_merge.xml
<?xml version="1.0" encoding="utf-8"?>
<merge
xmlns:android="http://schemas.android.com/apk/res/android"
>
<TextView
android:text="测试布局merge------merge"
android:textColor="@color/red_200"
android:layout_width="wrap_content"
android:layout_height="wrap_content"
/>
<!--"merge"必须放在布局根View的位置否则报错:
layout/layout_merge: <merge /> must be the root element-->
<!--<merge>
<TextView
android:text="测试布局merge------merge"
android:textColor="@color/red_200"
android:layout_width="wrap_content"
android:layout_height="wrap_content"
/>
</merge>-->
<LinearLayout
android:orientation="vertical"
android:layout_width="match_parent"
android:layout_height="100dp"
>
<TextView
android:text="测试布局merge------merge"
android:layout_width="wrap_content"
android:layout_height="wrap_content"
/>
<TextView
android:text="测试布局merge------merge"
android:layout_width="wrap_content"
android:layout_height="wrap_content"
/>
<TextView
android:text="测试布局merge------merge"
android:layout_width="wrap_content"
android:layout_height="wrap_content"
/>
</LinearLayout>
</merge>@Override
protected void onCreate(Bundle savedInstanceState) {
super.onCreate(savedInstanceState);
setContentView(R.layout.activity_main);
//ConstraintLayout cs = findViewById(R.id.cs);
LinearLayout ll = findViewById(R.id.ll);
LayoutInflater.from(this).inflate(R.layout.layout_merge, ll,true);
}最后的效果如下:
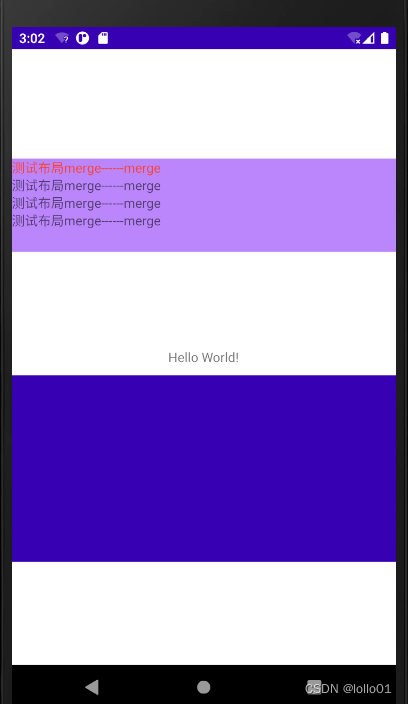
通过上面的事例来总结下 <merge>标签的用法及作用:
1. <merge>标签只能作为xml的根标签,其他位置会报错(见layout_merge.xml中注释)
2. 使用LayoutInflater加载包含<merge>标签的布局时,必须同时满足 root 不为空且 attachToRoot为true
<merge>标签的作用通过源码就可以看得出来,由于第一篇讲过,这里只截取 inflate()方法的包含 "merge" 的代码
public View inflate(XmlPullParser parser, @Nullable ViewGroup root, boolean attachToRoot) {
        synchronized (mConstructorArgs) {
           ......
            try {
                if (TAG_MERGE.equals(name)) {
                    if (root == null || !attachToRoot) {
                        throw new InflateException("<merge /> can be used only with a valid "
                                + "ViewGroup root and attachToRoot=true");
                    }
                    rInflate(parser, root, inflaterContext, attrs, false);
                } else {
                  ......
上面提到的第2点,看抛异常的代码就很清楚了,当解析到布局中包含 <merge>标签后,直接调用了 rInflate()方法去递归创建所有<merge>标签下的子View,再看下参数,第二个参数传的是 root ,这里的root是我们调用LayoutInflater的inflate方法时自己传入的root父容器,这样以来后面递归创建的<merge>标签之下的所有子View的容器将是 root父容器,以上面的事例来时 root 就是 id 为 ll 的LinearLayout,这里<merge>的效果就好比是直接把 layout_merge.xml的布局放到 id 为 ll 的LinearLayout里面,如果不加<merge>标签,那就需要在最外层再添加一个父容器
所以<merge>标签的作用:可以减少一层嵌套,至于为什么只能是根标签后面会有对应源码
"include"标签
<include>标签也是属于这几个标签中比较常用的一个,由于源码较为枯燥,所以先通过一个事例说下 include 的具体用法,有兴趣的可以往后看源码
由于activity_main.xml的布局和第一篇一样,这里只贴部分,在父容器 ll 中加了一个 include布局(注意:include标签自身也设置了id)
<?xml version="1.0" encoding="utf-8"?>
<androidx.constraintlayout.widget.ConstraintLayout
    xmlns:android="http://schemas.android.com/apk/res/android"
    xmlns:app="http://schemas.android.com/apk/res-auto"
    xmlns:tools="http://schemas.android.com/tools"
    android:id="@+id/cs"
    android:layout_width="match_parent"
    android:layout_height="match_parent"
    tools:context=".MainActivity">

    <LinearLayout
        android:id="@+id/ll"
        android:background="@color/purple_200"
        android:layout_width="match_parent"
        android:layout_height="100dp"
        android:orientation="vertical"
        app:layout_constraintBottom_toBottomOf="parent"
        app:layout_constraintHorizontal_bias="0.0"
        app:layout_constraintLeft_toLeftOf="parent"
        app:layout_constraintRight_toRightOf="parent"
        app:layout_constraintTop_toTopOf="parent"
        app:layout_constraintVertical_bias="0.21">
        <include
            android:id="@+id/include"
            layout="@layout/layout_include"
            />
    </LinearLayout>
    ......
</androidx.constraintlayout.widget.ConstraintLayout>
layout_include.xml (注意点1:最外层父容器设置了 id,下文会讲;注意点2:如果上面的<include>标签本身设置了宽、高,将会覆盖 id 为 linear_include在xml中的宽、高,也就是如果<include>本身设置了layout_width、layout_height,下面xml布局中的对应的宽高属性将会失效!)
<?xml version="1.0" encoding="utf-8"?>
<LinearLayout
    xmlns:android="http://schemas.android.com/apk/res/android"
    android:id="@+id/linear_include"
    android:orientation="vertical"
    android:gravity="center"
    android:layout_width="match_parent"
    android:layout_height="match_parent">

    <TextView
        android:text="测试include布局"
        android:layout_gravity="center"
        android:layout_width="wrap_content"
        android:layout_height="wrap_content"/>

</LinearLayout>
代码很简单,直接通过setContentView()把activity_main.xml显示出来,效果如下:

通过以上事例总结下<include>用法,<include>的用法也比较简单,它恰好和 <merge>的用法相反,使用<include>需要注意的点:
1. <include> 标签不能作为布局根标签,必须放在某个父容器内
2. 如果<include>标签本身设置了 id,这个id将会覆盖它所引用的layout的最外层View的id
3. 如果<include>标签本身设置了layout_width layout_height,和id的作用效果一样会覆盖它引用的layout的最外层View的宽、高
上面第 2 点有点绕,直接通过上面的例子就好理解了,activity_main.xml布局中 id为ll的LinearLayout里嵌套了一个<include>标签,这个<include>标签本身有一个id:"include",而这个<include>所引用的布局 layout_include.xml 的最外层View是个Linear Layout也设置了一个id: linear_include,此时layout_include.xml中的LinearLayout 的 id 将会被 <include>标签的id "include"覆盖,也就是如果我们要通过findViewById()找到它,传的id值必须是 R.id.include,否则报错
接下来看下解析 <include>的源码,比较枯燥,不想了解的这里可以跳过,其实处理tag标签的逻辑都在rInflate()方法中,这次只看处理标签的逻辑
void rInflate(XmlPullParser parser, View parent, Context context,
            AttributeSet attrs, boolean finishInflate) throws XmlPullParserException, IOException {
        final int depth = parser.getDepth();
        int type;
        boolean pendingRequestFocus = false;
        while (((type = parser.next()) != XmlPullParser.END_TAG ||
                parser.getDepth() > depth) && type != XmlPullParser.END_DOCUMENT) {
            if (type != XmlPullParser.START_TAG) {
                continue;
            }
            final String name = parser.getName();
            if (TAG_REQUEST_FOCUS.equals(name)) {
                pendingRequestFocus = true;
                consumeChildElements(parser);
            } else if (TAG_TAG.equals(name)) {
                parseViewTag(parser, parent, attrs);
            } else if (TAG_INCLUDE.equals(name)) {
                if (parser.getDepth() == 0) {
                    throw new InflateException("<include /> cannot be the root element");
                }//解析 <include> 标签
                parseInclude(parser, context, parent, attrs);
            } else if (TAG_MERGE.equals(name)) {
                throw new InflateException("<merge /> must be the root element");
            } else {
               ......
            }
        }
        ......
    }
<include>标签的解析都在 parseInclude() 方法中
private void parseInclude(XmlPullParser parser, Context context, View parent,
            AttributeSet attrs) throws XmlPullParserException, IOException {
        int type;
        if (!(parent instanceof ViewGroup)) {//<include>必须放在一个父容器里
            throw new InflateException("<include /> can only be used inside of a ViewGroup");
        }
        ......
        if (precompiled == null) {//注意:childParser是<include>标签引用的layoutId所对应的xml解析器
            final XmlResourceParser childParser = context.getResources().getLayout(layout);
            try {//注意:childAttrs是是<include>标签引用的layoutId所对应的属性集合
                final AttributeSet childAttrs = Xml.asAttributeSet(childParser);
                while ((type = childParser.next()) != XmlPullParser.START_TAG &&
                    type != XmlPullParser.END_DOCUMENT) {
                    // Empty.
                }
                ......
                final String childName = childParser.getName();
                if (TAG_MERGE.equals(childName)) {
                    rInflate(childParser, parent, context, childAttrs, false);
                } else {
                    final View view = createViewFromTag(parent, childName,
                        context, childAttrs, hasThemeOverride);
                    final ViewGroup group = (ViewGroup) parent;

                    final TypedArray a = context.obtainStyledAttributes(
                        attrs, R.styleable.Include);//注意这里获取的是<include>标签的id
                    final int id = a.getResourceId(R.styleable.Include_id, View.NO_ID);
                    final int visibility = a.getInt(R.styleable.Include_visibility, -1);
                    a.recycle();
                    ViewGroup.LayoutParams params = null;
                    try {//如果<include>标签本身没有设置宽、高这里会抛出异常
                        params = group.generateLayoutParams(attrs);
                    } catch (RuntimeException e) {
                        // Ignore, just fail over to child attrs.
                    }
                    if (params == null) {//如果<include>标签本身没有设置宽、高,将会使用View在xml布局中的宽、高值
                        params = group.generateLayoutParams(childAttrs);
                    }
                    view.setLayoutParams(params);
                    rInflateChildren(childParser, view, childAttrs, true);
                    if (id != View.NO_ID) {
                        view.setId(id);//把<include>标签的id覆盖View原有的id
                    }
                    ......
                    group.addView(view);
                }
            } finally {
                childParser.close();
            }
        }
        LayoutInflater.consumeChildElements(parser);
    }
解析 <include> 标签时,<include>标签所引用的布局文件最外层View布局参数的设置需要注意下:
1.LayoutParams的设置 2. id值的设置 这些在源码中已经有相应的注释
"blink"标签
这个标签可能我们开发中用的少一些,看它的命名就能大概知道它的效果,"blink"是眨眼、闪烁的意思,是的"blink"标签就是实现了这个一个效果,源码实现也比较简单,直接创建了一个BlinkLayout布局,其实就是一个自定义的FrameLayout
public final View tryCreateView(@Nullable View parent, @NonNull String name,
        @NonNull Context context,
        @NonNull AttributeSet attrs) {
        if (name.equals(TAG_1995)) {
            // Let's party like it's 1995!
            return new BlinkLayout(context, attrs);
        }
        ......
    }
这里的TAG_1995 就是"blink",废话不多说了,直接看下实现代码及效果,直接在Activity中通过setContentView显示就可以了,
layout_tag_blink.xml
<?xml version="1.0" encoding="utf-8"?>
<LinearLayout
    xmlns:android="http://schemas.android.com/apk/res/android"
    android:orientation="vertical"
    android:gravity="center"
    android:layout_width="match_parent"
    android:layout_height="match_parent">

    <blink
        android:layout_width="wrap_content"
        android:layout_height="wrap_content"
        >
        <TextView
            android:layout_width="wrap_content"
            android:layout_height="wrap_content"
            android:text="测试blink"
            android:textSize="30sp"
            android:textColor="@color/red_200"
            />
    </blink>

</LinearLayout>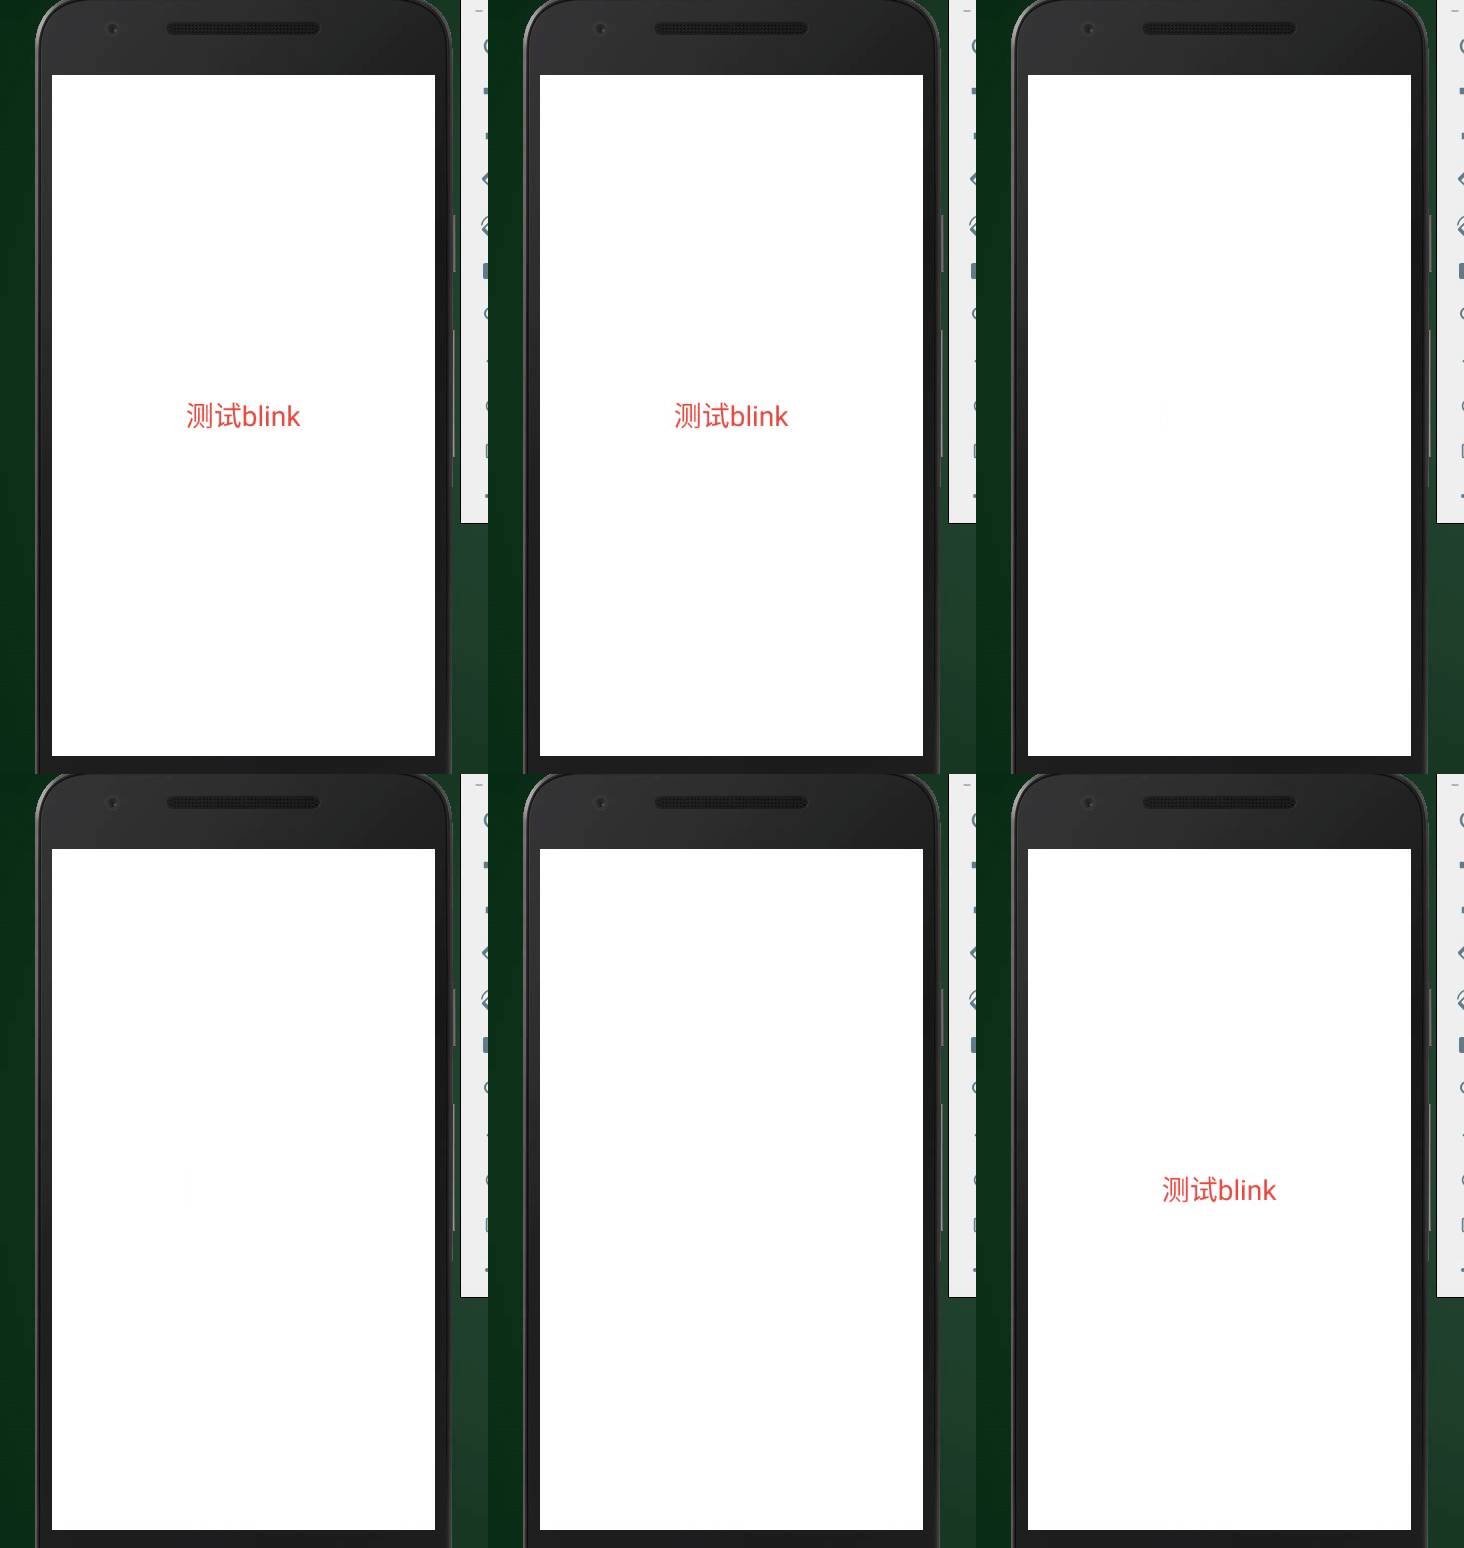
"requestFocus"标签
这个标签实现也比较简单,是用来获取焦点的,一般用到EditText上,我们可以通过加<requestFocus/>标签来指定哪个View优先获取到焦点
<?xml version="1.0" encoding="utf-8"?>
<LinearLayout
    xmlns:android="http://schemas.android.com/apk/res/android"
    android:orientation="vertical"
    android:layout_width="match_parent"
    android:layout_height="match_parent">

    <EditText
        android:hint="第一个"
        android:textSize="20sp"
        android:layout_height="50dp"
        android:layout_width="match_parent"/>

    <EditText
        android:hint="第二个"
        android:layout_marginTop="15dp"
        android:textSize="20sp"
        android:layout_height="50dp"
        android:layout_width="match_parent"/>

    <EditText
        android:hint="第三个"
        android:textSize="20sp"
        android:layout_height="50dp"
        android:layout_width="match_parent">
        <requestFocus/>
    </EditText>

</LinearLayout>
上面布局页面有多个EditText,第三个EditText添加了 <requestFocus/>标签,所以它会优先获取到焦点
"tag"标签
这个标签的作用就是setTag,getTag的作用,只不过我们平时用的多的是在代码中直接使用setTag方法,它的作用就是把数据和一个View绑定起来,当我们要绑定的数据比较多的时候,可以直接在xml中通过添加 <tag>标签的形式实现,"tag"标签的源码也比较简单,在parseViewTag中,不再贴了直接看用法
首先创建 ids.xml
<?xml version="1.0" encoding="utf-8"?>
<resources>
    <item name="linear_tag1" type="id"/>
    <item name="linear_tag2" type="id"/>
    <item name="linear_tag3" type="id"/>

    <item name="textView_tag1" type="id"/>
    <item name="textView_tag2" type="id"/>
    <item name="textView_tag3" type="id"/>
</resources>
实现代码,其中activity_main.xml还是用的之前的例子
@Override
    protected void onCreate(Bundle savedInstanceState) {
        super.onCreate(savedInstanceState);
        setContentView(R.layout.activity_tag);
        LinearLayout ll = findViewById(R.id.ll);
        final LayoutInflater inflater = LayoutInflater.from(this);
        final View view = inflater.inflate(R.layout.layout_tag, ll, false);
        tagTest(view);
        ll.addView(view);
    }
    void tagTest(View view) {
        String linearTag1 = (String) view.getTag(R.id.linear_tag1);
        TextView tv = view.findViewById(R.id.textView);
        String textViewTag3 = (String) tv.getTag(R.id.textView_tag3);
        Log.d("TagActivity_Test", "Tag1: "+linearTag1+"  Tag3: "+textViewTag3);
        //TagActivity_Test  com.github.app_tag   D  Tag1: LinearLayout tag1  Tag3: TextView tag3
    }
layout_tag.xml
<?xml version="1.0" encoding="utf-8"?>
<LinearLayout
    xmlns:android="http://schemas.android.com/apk/res/android"
    android:orientation="vertical"
    android:layout_width="match_parent"
    android:layout_height="match_parent">
    <tag
        android:id="@id/linear_tag1"
        android:value="LinearLayout tag1"
        >
    </tag>

    <TextView
        android:id="@+id/textView"
        android:layout_width="wrap_content"
        android:layout_height="wrap_content"
        android:text="测试tag标签"
        android:textSize="30sp"
        android:textColor="@color/teal_200"
        android:gravity="center"
        >
        <tag
            android:id="@+id/textView_tag1"
            android:value="TextView tag1"/>
        <tag
            android:id="@+id/textView_tag2"
            android:value="TextView tag2"/>
        <tag
            android:id="@+id/textView_tag3"
            android:value="TextView tag3"/>
    </TextView>

    <tag
        android:id="@id/linear_tag2"
        android:value="LinearLayout tag2"
        />

    <tag
        android:id="@id/linear_tag3"
        android:value="LinearLayout tag3"
        />

    <include layout="@layout/layout_tag_blink"/>
</LinearLayout>
日志打印结果已经在代码中贴出,实现也比较简单,上面的示例都可以直接自己复制粘贴实现,好了到此所有标签都已记录完毕了



![[L1 - 5分合集]心理阴影面积](https://img-blog.csdnimg.cn/6ab8e13b637540d28dffdd298a21e221.jpeg#pic_center)

