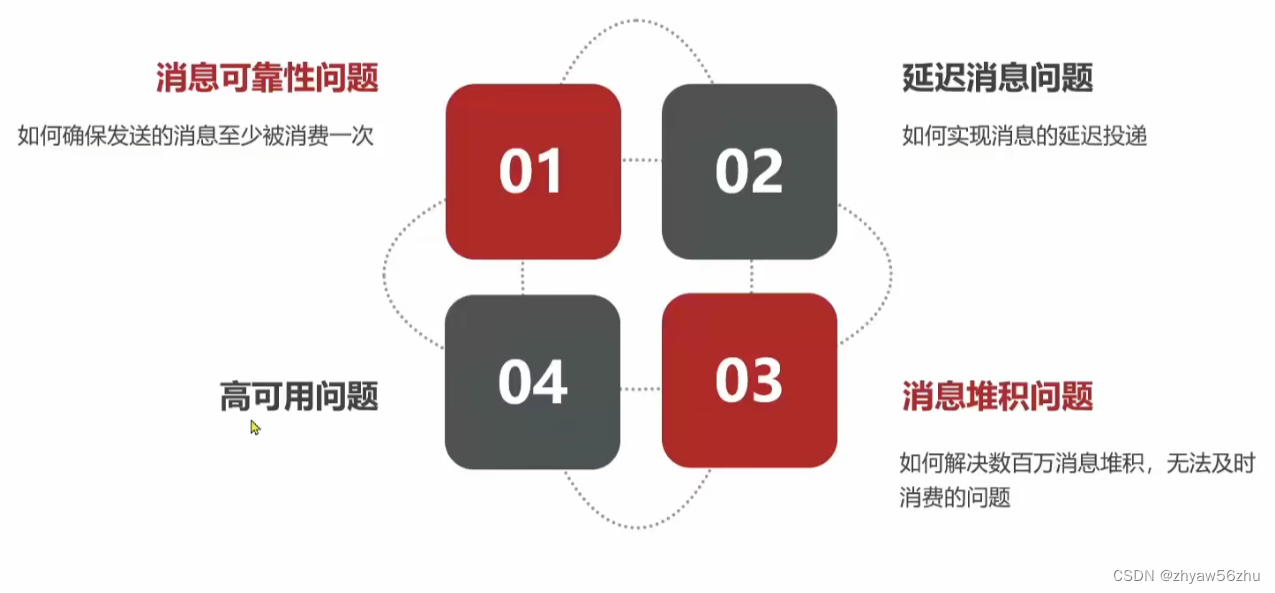
MQ的一些常见问题
后面内容基于springboot 2.3.9.RELEASE
消息可靠性
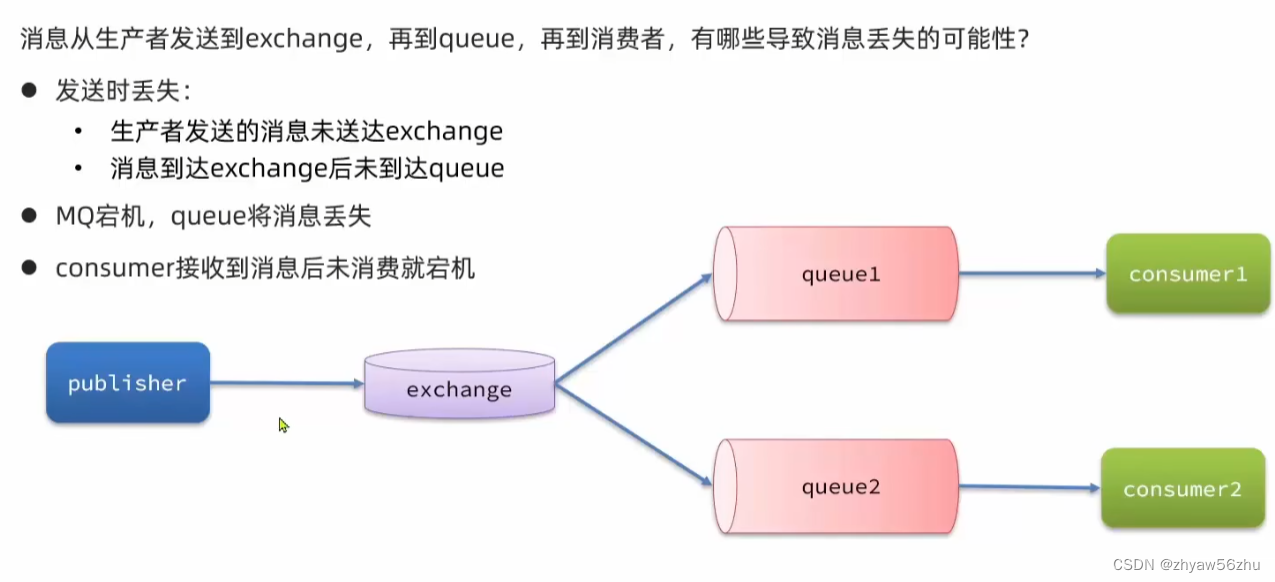
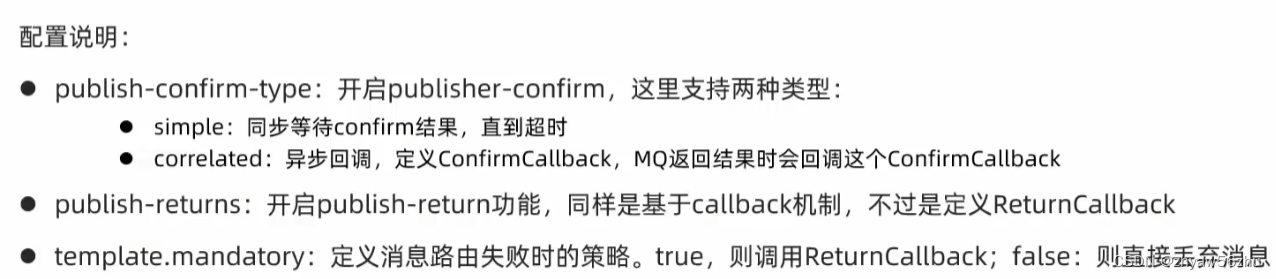
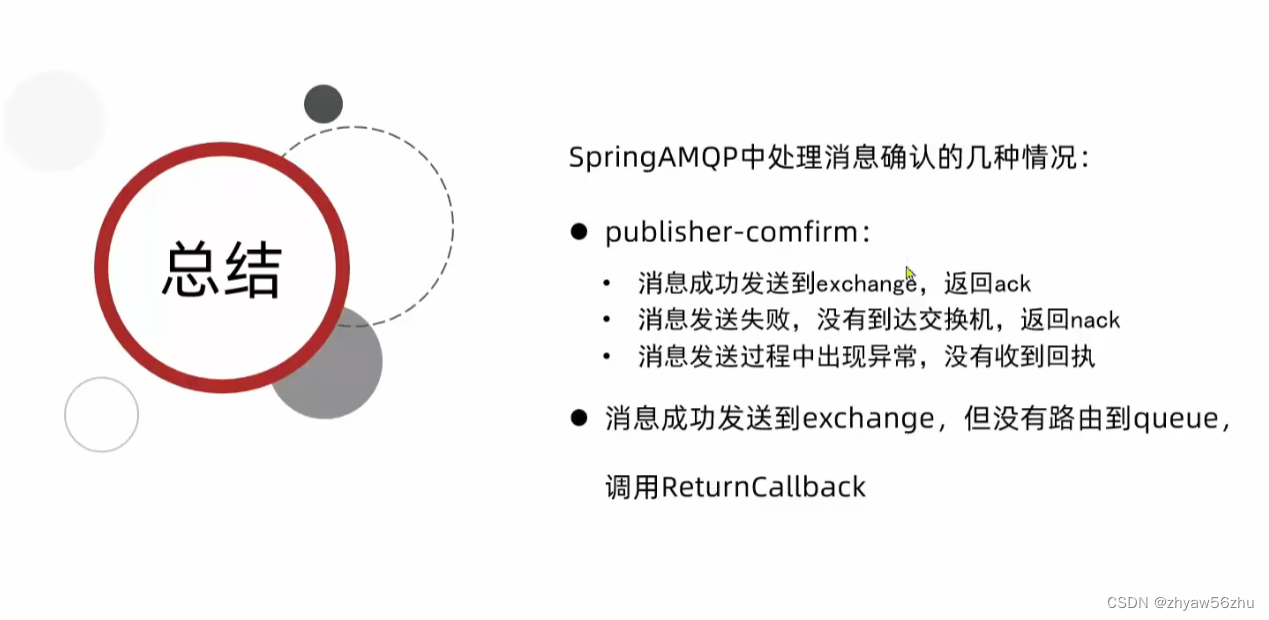
生产者确认机制
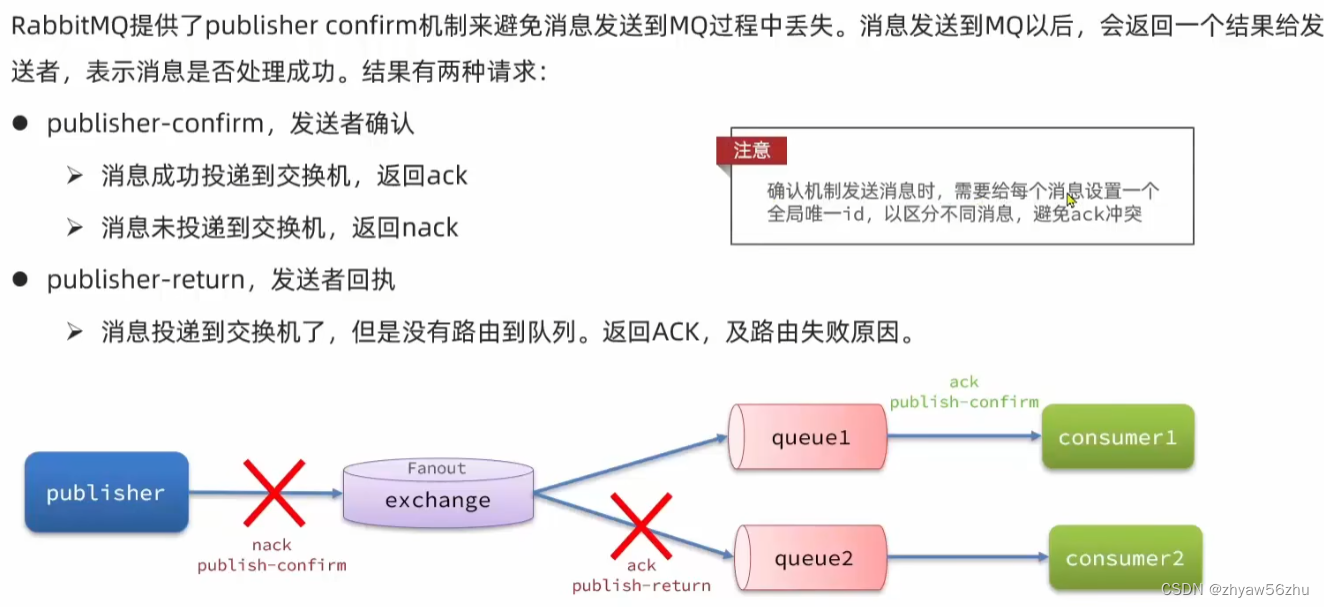
- 在publisher微服务中application.yml中添加
spring:
  rabbitmq:
    publisher-confirm-type: correlated
    publisher-returns: true
    template:
      mandatory: true
- 每个RabbitTemplate只能配置一个ReturnCallback, 因此需要在项目启动过程中配置
import lombok.extern.slf4j.Slf4j;
import org.springframework.amqp.rabbit.core.RabbitTemplate;
import org.springframework.beans.BeansException;
import org.springframework.context.ApplicationContext;
import org.springframework.context.ApplicationContextAware;
import org.springframework.context.annotation.Configuration;

@Slf4j
@Configuration
public class CommonConfig implements ApplicationContextAware {
    @Override
    public void setApplicationContext(ApplicationContext applicationContext) throws BeansException {
        RabbitTemplate rabbitTemplate = applicationContext.getBean(RabbitTemplate.class);
        rabbitTemplate.setReturnCallback((message, replyCode, replyText, exchange, routingKey) -> {
            log.error("消息发送到队列失败, 响应码:{}, 失败原因: {}, 交换机: {}, 路由key: {}, 消息: {}",
                    replyCode, replyText, exchange, routingKey, message);
        });
    }
}
- 发送消息, 指定消息ID,消息ConfirmCallBack
import lombok.extern.slf4j.Slf4j;
import org.junit.jupiter.api.Test;
import org.springframework.amqp.rabbit.connection.CorrelationData;
import org.springframework.amqp.rabbit.core.RabbitTemplate;
import org.springframework.beans.factory.annotation.Autowired;
import org.springframework.boot.test.context.SpringBootTest;

import java.util.UUID;


@Slf4j
@SpringBootTest
public class PublishTest {

    @Autowired
    private RabbitTemplate rabbitTemplate;

    @Test
    void name() throws InterruptedException {
        CorrelationData correlationData = new CorrelationData(UUID.randomUUID().toString());
        correlationData.getFuture().addCallback(result -> {
            if(result.isAck()){
                // ACK
                log.debug("消息成功投递到交换机! 消息ID: {}", correlationData.getId());
            }else {
                // NACK
                log.error("消息投递到交换机失败! 消息ID: {}", correlationData.getId());
            }
        }, ex -> {
            log.error("消息发送失败!", ex);
        });
        rabbitTemplate.convertAndSend("high.topic", "high.#", "hello amqp", correlationData);
    }
}
消息持久化
声明队列和交换机时指定
durable为true,为持久化
spring amqp中交换机、队列、消息默认都是持久的
消费者消息确认

消费者业务添加配置
spring:
  rabbitmq:
    listener:
      simple:
        acknowledge-mode: auto
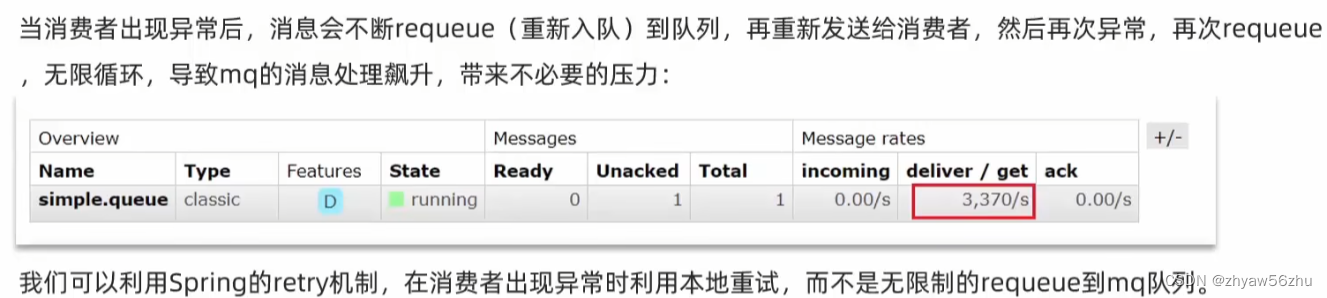
失败重试机制
spring:
  rabbitmq:
    listener:
      simple:
        acknowledge-mode: auto
        prefetch: 1
        retry:
          enabled: true     # 开启消费者失败重试
          initial-interval: 1000  # 初始的失败等待时长1秒
          multiplier: 1  # 下次失败的等待时长倍数
          max-attempts: 3   # 最大重试次数
          stateless: true  # true无状态, false有状态, 如果业务中包含事务, 这里改为false
配置说明:
初始等待时长1秒,倍数为2, 则等待时长为 1秒 2秒 4秒 8秒 …
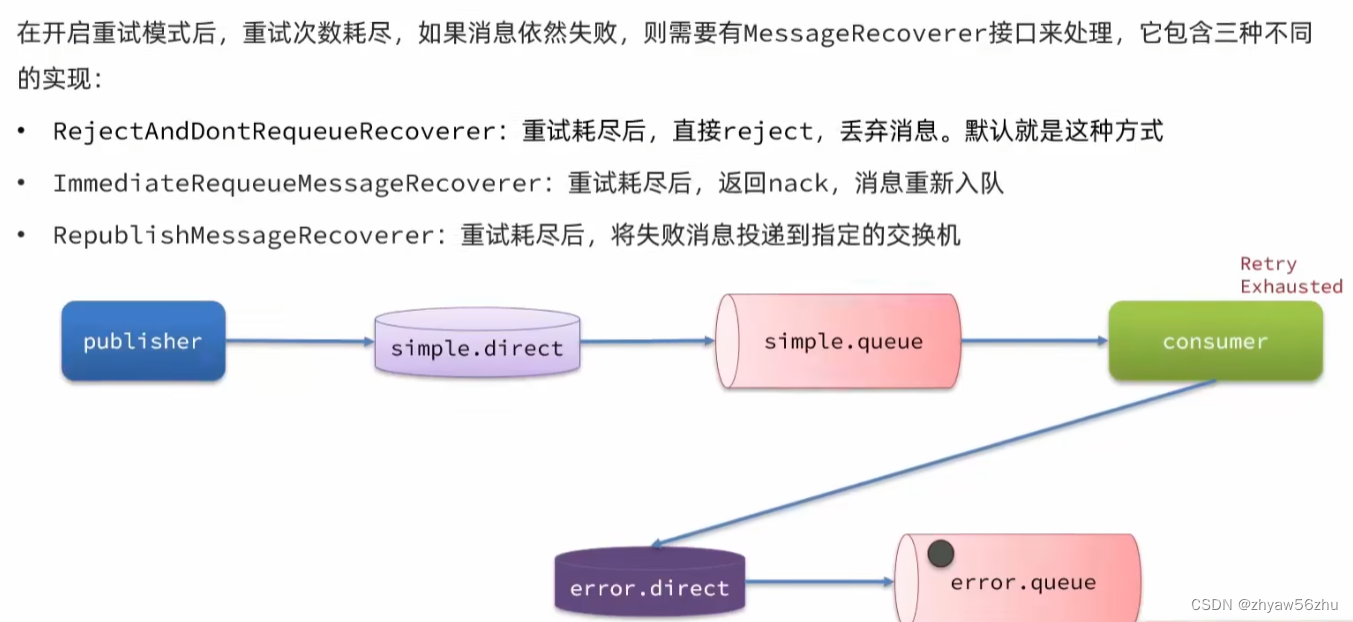
消费者失败消息处理策略
import org.springframework.amqp.core.Binding;
import org.springframework.amqp.core.BindingBuilder;
import org.springframework.amqp.core.DirectExchange;
import org.springframework.amqp.core.Queue;
import org.springframework.amqp.rabbit.core.RabbitTemplate;
import org.springframework.amqp.rabbit.retry.MessageRecoverer;
import org.springframework.amqp.rabbit.retry.RepublishMessageRecoverer;
import org.springframework.context.annotation.Bean;
import org.springframework.context.annotation.Configuration;

@Configuration
public class ErrorMessageConfig {

    @Bean
    public DirectExchange errorMessageExchange(){
        return new DirectExchange("error.direct");
    }

    @Bean
    public Queue errorQueue(){
        return new Queue("error.queue");
    }

    @Bean
    public Binding errorMessageBinding(){
        return BindingBuilder.bind(errorQueue()).to(errorMessageExchange()).with("error");
    }

    @Bean
    public MessageRecoverer republishMessageRecoverer(RabbitTemplate rabbitTemplate){
        return new RepublishMessageRecoverer(rabbitTemplate, "error.direct", "error");
    }
}
死信交换机

这个是由队列投递
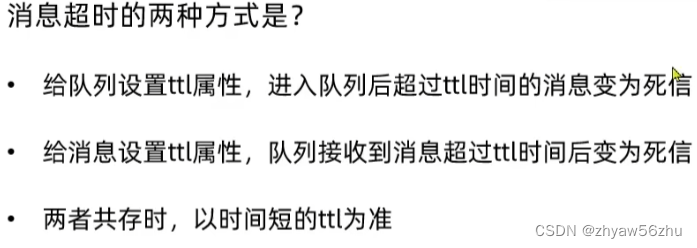
TTL

- 声明死信交换机
	@RabbitListener(bindings = @QueueBinding(
            value = @Queue(name = "dl.queue", durable = "true"),
            exchange = @Exchange(name = "dl.direct"),
            key = "dl"
    ))
    public void listenDlQueue(String msg){
        log.info("消费者接收到了dl.queue的延迟消息: {}", msg);
    }
- 声明TTL交换机和队列
import org.springframework.amqp.core.*;
import org.springframework.context.annotation.Bean;
import org.springframework.context.annotation.Configuration;

@Configuration
public class TTLMessageConfig {

    @Bean
    public DirectExchange ttlDirectExchange(){
        return new DirectExchange("ttl.direct");
    }

    @Bean
    public Queue ttlQueue(){
        return QueueBuilder
                .durable("ttl.queue")
                .ttl(10000)   // 指定时间10秒
                .deadLetterExchange("dl.direct")
                .deadLetterRoutingKey("dl")
                .build();
    }
    @Bean
    public Binding ttlBinding(){
        return BindingBuilder.bind(ttlQueue()).to(ttlDirectExchange()).with("ttl");
    }
}
- 发送消息
	@Test
    void name() {
        MessageBuilder.withBody("hello ttl".getBytes(StandardCharsets.UTF_8))
                .setDeliveryMode(MessageDeliveryMode.PERSISTENT)
                .setExpiration("5000")
                .build();
        rabbitTemplate.convertAndSend("ttl.direct", "ttl", "ttl message");
    }
也可以指定消息的过期时间, 两者都指定时, 以短的为准