今天分享一篇 java 发送 QQ 邮件的功能
环境:
jdk 1.8 + springboot 2.6.3 + maven 3.9.6
邮件功能依赖:
        <dependency>
            <groupId>org.springframework.boot</groupId>
            <artifactId>spring-boot-starter-mail</artifactId>
        </dependency>
配置:
spring.mail.protocol=smtp
spring.mail.port=587
# qq邮箱
spring.mail.host=smtp.qq.com
# 发件人邮箱
spring.mail.username=xxx@qq.com
# 这里替换为自己的发件人邮箱的授权码
spring.mail.password=xxx
spring.mail.properties.mail.smtp.auth=true
spring.mail.properties.mail.smtp.starttls.enable=true
spring.mail.properties.mail.smtp.starttls.required=true
获取授权码:
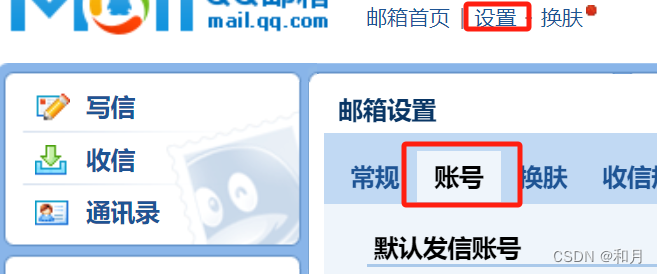
登录 QQ 邮箱网页版 -> 设置 -> 账号
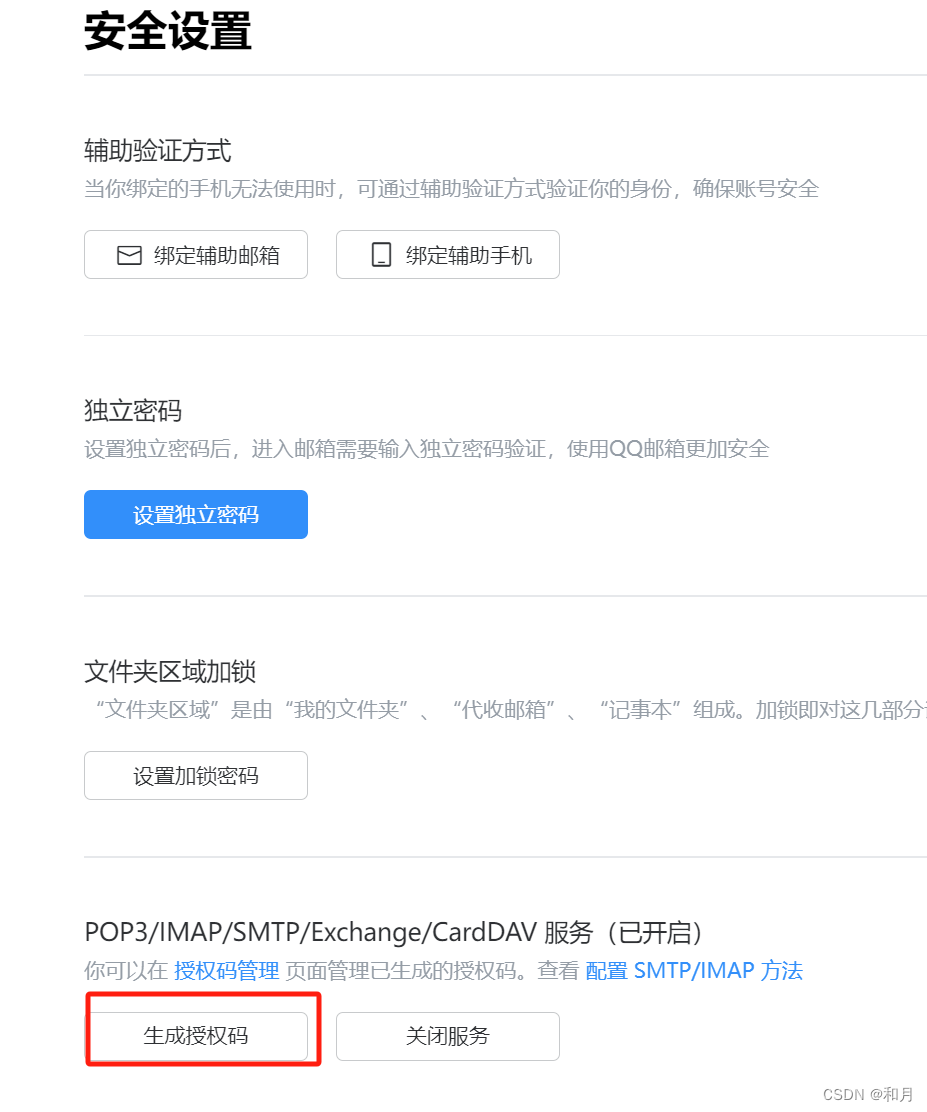
往下翻:找到下面这一块区域,如果没有开启服务的,直接开启服务即可 然后点击管理服务

然后点击生成授权码
注意:生成后需要记住,授权码只展示这一次,如果忘了,可以生成多个
发送简单邮件
import org.springframework.beans.factory.annotation.Autowired;
import org.springframework.beans.factory.annotation.Value;
import org.springframework.mail.SimpleMailMessage;
import org.springframework.mail.javamail.JavaMailSender;
import org.springframework.web.bind.annotation.GetMapping;
import org.springframework.web.bind.annotation.RestController;

@RestController
public class Test1Controller {

    @Autowired
    private JavaMailSender mailSender;

    @Value("${from.email:xxx@qq.com}")
    private String fromEmail;

    @Value("${to.email:xxx@qq.com}")
    private String toEmail;

    @GetMapping("test")
    public void test() {
        sendSimpleMail();
    }

    public void sendSimpleMail() {

        SimpleMailMessage message = new SimpleMailMessage();
        message.setFrom(fromEmail); // 发件人邮箱
        message.setTo(toEmail);
        message.setSubject("主题:简单邮件");
        message.setText("内容:简单的邮件内容");

        mailSender.send(message);
    }
}
发送带附件的邮件
import lombok.SneakyThrows;
import org.springframework.beans.factory.annotation.Autowired;
import org.springframework.beans.factory.annotation.Value;
import org.springframework.core.io.FileSystemResource;
import org.springframework.mail.javamail.JavaMailSender;
import org.springframework.mail.javamail.MimeMessageHelper;
import org.springframework.web.bind.annotation.GetMapping;
import org.springframework.web.bind.annotation.RestController;

import javax.mail.internet.MimeMessage;
import java.io.File;

@RestController
public class Test1Controller {

    @Autowired
    private JavaMailSender mailSender;

    @Value("${from.email:xxx@qq.com}")
    private String fromEmail;

    @Value("${to.email:xxx@qq.com}")
    private String toEmail;

    @GetMapping("test")
    public void test() {
        sendAttachmentsMail();
    }

    @SneakyThrows
    public void sendAttachmentsMail() {

        MimeMessage mimeMessage = mailSender.createMimeMessage();

        MimeMessageHelper helper = new MimeMessageHelper(mimeMessage, true);
        helper.setFrom(fromEmail);
        helper.setTo(toEmail);
        helper.setSubject("主题:有附件");
        helper.setText("内容:有附件的邮件");

        FileSystemResource file = new FileSystemResource(new File("C:\\Users\\11786\\Desktop\\blackground\\1.jpg"));
        // 这里可以上传多个文件,我这里就直接用一个文件了
        helper.addAttachment("file-1.jpg", file);
        helper.addAttachment("file-2.jpg", file);
        helper.addAttachment("file-2.jpg", file);
        mailSender.send(mimeMessage);
    }
}
使用 freemarker 发送模板邮件
在 resources -> templates -> email 目录下创建模板文件 template.ftl
<!DOCTYPE html>
<html xmlns:th="http://www.thymeleaf.org">
<head>
    <title>邮件标题</title>
    <meta http-equiv="Content-Type" content="text/html; charset=UTF-8" />
</head>
<body>
<h1 th:text="${username}">用户名</h1>
<p>这是一封模板邮件。</p>
</body>
</html>
发送邮件代码:
import freemarker.template.Configuration;
import freemarker.template.Template;
import lombok.SneakyThrows;
import org.springframework.beans.factory.annotation.Autowired;
import org.springframework.beans.factory.annotation.Value;
import org.springframework.mail.javamail.JavaMailSender;
import org.springframework.mail.javamail.MimeMessageHelper;
import org.springframework.web.bind.annotation.GetMapping;
import org.springframework.web.bind.annotation.RestController;

import javax.mail.internet.MimeMessage;
import java.io.StringWriter;
import java.io.Writer;
import java.util.HashMap;
import java.util.Map;

@RestController
public class Test1Controller {

    @Autowired
    private JavaMailSender mailSender;

    @Autowired
    private Configuration freemarkerConfig;

    @Value("${from.email:xxx@qq.com}")
    private String fromEmail;

    @Value("${to.email:xxx@qq.com}")
    private String toEmail;

    @GetMapping("test")
    public void test() {
        sendTemplateMail();
    }

    @SneakyThrows
    public void sendTemplateMail() {
        MimeMessage mimeMessage = mailSender.createMimeMessage();
        MimeMessageHelper helper = new MimeMessageHelper(mimeMessage, true);
        helper.setFrom(fromEmail);
        helper.setTo(toEmail);
        helper.setSubject("主题:模板邮件");

        // 创建数据模型
        Map<String, Object> model = new HashMap<>();
        model.put("username", "heyue");

        // 获取模板
        Template template = freemarkerConfig.getTemplate("email/template.ftl");

        // 渲染模板
        Writer out = new StringWriter();
        template.process(model, out);
        String htmlContent = out.toString();

        // 设置邮件内容
        helper.setText(htmlContent, true);

        // 发送邮件
        mailSender.send(mimeMessage);
    }
}
使用 thymeleaf 发送模板邮件
需要先引入依赖:
<dependency>
            <groupId>org.springframework.boot</groupId>
            <artifactId>spring-boot-starter-thymeleaf</artifactId>
        </dependency>
配置:
# 指定模板文件位置
spring.thymeleaf.prefix=classpath:/templates/email/
# 模板文件类型
spring.thymeleaf.suffix=.html
spring.thymeleaf.mode=HTML5
spring.thymeleaf.encoding=UTF-8
spring.thymeleaf.servlet.content-type=text/html
spring.thymeleaf.template-resolver-order=1
在 resources -> templates -> email 目录下创建模板文件 template.html
<!DOCTYPE html>
<html xmlns:th="http://www.thymeleaf.org">
<head>
    <title>邮件标题</title>
    <meta http-equiv="Content-Type" content="text/html; charset=UTF-8" />
</head>
<body>
<h1 th:text="${username}">用户名</h1>
<p>这是一封模板邮件。</p>
</body>
</html>
发送邮件代码:
import lombok.SneakyThrows;
import org.springframework.beans.factory.annotation.Autowired;
import org.springframework.beans.factory.annotation.Value;
import org.springframework.context.ApplicationContext;
import org.springframework.mail.javamail.JavaMailSender;
import org.springframework.mail.javamail.MimeMessageHelper;
import org.springframework.web.bind.annotation.GetMapping;
import org.springframework.web.bind.annotation.RestController;
import org.thymeleaf.TemplateEngine;
import org.thymeleaf.context.Context;

import javax.mail.internet.MimeMessage;
import java.io.StringWriter;

@RestController
public class Test1Controller {

    @Autowired
    private JavaMailSender mailSender;

    @Autowired
    private ApplicationContext applicationContext;

    @Value("${from.email:xxx@qq.com}")
    private String fromEmail;

    @Value("${to.email:xxx@qq.com}")
    private String toEmail;

    @GetMapping("test")
    public void test() {
        sendTemplateMail();
    }

    @SneakyThrows
    public void sendTemplateMail() {

        MimeMessage mimeMessage = mailSender.createMimeMessage();
        MimeMessageHelper helper = new MimeMessageHelper(mimeMessage, true);
        helper.setFrom(fromEmail);
        helper.setTo(toEmail);
        helper.setSubject("主题:模板邮件");

        // 获取 Thymeleaf 模板引擎
        TemplateEngine templateEngine = applicationContext.getBean(TemplateEngine.class);

        // 创建上下文并设置变量
        Context context = new Context();
        context.setVariable("username", "heyue");

        // 渲染模板
        StringWriter writer = new StringWriter();
        templateEngine.process("template", context, writer);
        String htmlContent = writer.toString();

        // 设置邮件内容
        helper.setText(htmlContent, true);

        // 发送邮件
        mailSender.send(mimeMessage);
    }
}


![[Halcon学习笔记]在Qt上实现Halcon窗口的字体设置颜色设置等功能](https://img-blog.csdnimg.cn/img_convert/bc2637cb32ac52760605e4b939ab57ba.webp?x-oss-process=image/format,png)