前言
人像抠图将图像中的人物与背景进行像素级别的区分的技术。通过人像分割,可以实现诸如背景虚化、弹幕穿人等各种有趣的功能,为视频通话和影音观看提供更加优质和丰富的体验。由于广泛部署到Web、手机和边缘设备,肖像分割在兼顾分割精度的前提下,需要具有极快的推理速度。
PP-HumanSeg v2人像分割方案是一项重要的突破,采用了深度学习技术,以96.63%的mIoU精度和仅15.86ms的推理耗时,在人像分割领域刷新了SOTA指标。该方案不仅支持商业应用,而且可零成本、开箱即用。
相比于之前的版本,PP-HumanSeg v2在推理速度和精度上都有显著提升,肖像分割模型推理速度提升45.5%,mIoU精度提升3.03%。通用人像分割模型推理速度提升5.7%,mIoU精度提升6.5%。
网络结构
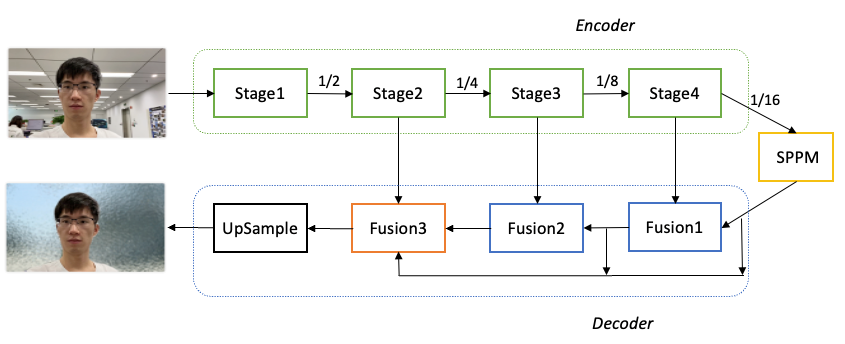
PaddleSeg整体结构如下图所示。具体优化过程如下:
-
骨干网络选择: 为了降低模型的算量要求,选择了MobileNetV3作为骨干网络,用于提取多层特征。
-
参数量优化: 对MobileNetV3进行参数量优化。分析发现MobileNetV3的参数主要集中在最后一个Stage,在不影响分割精度的前提下,保留了MobileNetV3的前四个Stage,成功减少了68.6%的参数量。
-
全局上下文信息汇集: 对于16倍下采样特征图,使用了SPPM(Spatial Pyramid Pooling Module)模块来汇集全局上下文信息,以提高模型对背景和环境的理解能力。
-
特征融合: 使用三个Fusion模块来不断融合深层语义特征和浅层细节特征。这些Fusion模块的作用是将不同层次的特征图进行融合,以获取更加丰富和准确的语义信息。
-
分割结果输出: 最后一个Fusion模块再次汇集不同层次的特征图,并将最终的分割结果输出。
通过以上优化措施,PaddleSeg的肖像分割模型在保证分割精度的情况下,大幅减少了参数量,提高了模型的轻量化程度,并且通过全局上下文信息的汇集和特征融合,进一步提升了模型的语义理解能力和分割效果。
针对肖像分割任务,数据量不足是影响分割精度的一个重要因素。为了解决这一问题,PaddleSeg开源了PP-HumanSeg-14K数据集,其中包含14000张室内场景半身人像的图片,从一定程度上缓解了数据不足的问题。为了进一步提高模型的分割精度和泛化能力,采用了迁移学习的方法。具体来说,首先在大规模的通用人像分割数据集上进行预训练,然后再针对PP-HumanSeg-14K数据集进行微调。
在调整模型的深度和宽度以平衡分割精度和推理速度方面,模型的输入尺寸也是一个需要重视的变量。针对手机和电脑端常见的拍摄尺寸为1028x720的情况,PP-HumanSeg v1肖像分割模型建议将图片缩放为398x224进行预测。为了进一步追求极致的推理速度,PP-HumanSeg v2肖像分割模型将最佳输入尺寸进一步缩小为256x144,从而将推理速度提升了52%(相比输入尺寸398x224)。虽然较小的输入尺寸会减少输入信息量,但由于PP-HumanSeg v2模型具有更强的学习能力,最终也能获得不错的分割效果。
综合考虑上述改进,与PP-HumanSeg v1相比,PP-HumanSeg v2肖像分割模型在推理速度(手机端)提升了45.5%,mIoU精度提升了3.03%,同时具有更佳的可视化效果。此外,该模型还支持手机拍摄的横屏和竖屏输入图像,针对室内场景可以开箱即用,为用户提供了更加便捷和高效的人像分割解决方案。

通用人像分割模型
针对通用人像分割任务,我们在PaddleSeg平台上使用了领先的模型,在大规模数据集上进行了训练,并发布了两个型号的PP-HumanSeg v2通用人像分割模型。
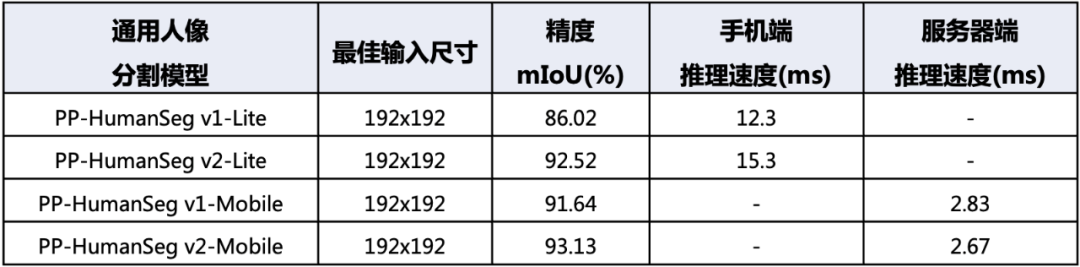
首先是PP-HumanSeg v2-Lite通用人像分割模型,它采用了类似于肖像分割模型的结构,并且特别适合在手机端的ARM CPU上进行部署。相比PP-HumanSeg v1-Lite模型,PP-HumanSeg v2-Lite在精度上提升了6.5%的mIoU。这个模型可以有效地应用于移动端的人像分割场景,提供更高质量的分割效果。
其次是PP-HumanSeg v2-Mobile通用人像分割模型,它采用了PaddleSeg自研的PP-LiteSeg模型结构,更适合在服务器端的GPU上进行部署。相比PP-HumanSeg v1-Mobile模型,PP-HumanSeg v2-Mobile在精度上提升了1.49%的mIoU,同时推理速度也提升了5.7%。这个模型适用于对分割精度和推理速度都有要求的场景,为用户提供了更高效和准确的人像分割解决方案。
由于通用人像分割任务的场景变化很大,我们建议用户在实际应用中评估PP-HumanSeg通用人像分割模型的精度。如果模型符合业务要求,用户可以直接使用。如果需要进一步优化,用户也可以基于PP-HumanSeg通用人像分割模型进行定制化优化,以获得更好的效果。
模型部署
PP-HumanSeg 分割模型提供了最终模型和二次训练以其部署的功能代码。使用提供的肖像分割和通用人像分割配置文件,用户只需准备好数据即可开始训练。该模型支持在多种硬件上进行应用部署,包括NVIDIA GPU、X86 CPU、ARM CPU以及浏览器Web。
另外,还对模型预测结果进行了形态学后处理操作,以过滤掉背景干扰,保留人像主体。具体流程如下图所示:原始预测图像中每个像素的数值表示其为前景的概率。首先,使用阈值操作来过滤掉概率较小的像素,然后通过腐蚀和膨胀操作来消除细小的噪点。腐蚀操作的核尺寸小于膨胀操作,然后将掩码图像应用于原始预测结果上,得到最终的预测结果。通过形态学后处理,可以有效地提升人像分割的可视化效果,从而使分割结果更加清晰和准确。
C++ onnxruntime推理:
#define _CRT_SECURE_NO_WARNINGS
#include <iostream>
#include <fstream>
#include <string>
#include <opencv2/imgproc.hpp>
#include <opencv2/highgui.hpp>
//#include <cuda_provider_factory.h> ///使用cuda加速
#include <onnxruntime_cxx_api.h>
class pphuman_seg
{
public:
pphuman_seg(std::string model_path);
void inference(cv::Mat &cv_src, std::vector<cv::Mat>& cv_dsts);
private:
void preprocess(cv::Mat &cv_src);
int inpWidth;
int inpHeight;
std::vector<float> input_image_;
const float conf_threshold = 0.5;
Ort::Env env = Ort::Env(ORT_LOGGING_LEVEL_ERROR, "pphuman");
Ort::Session *ort_session = nullptr;
Ort::SessionOptions sessionOptions = Ort::SessionOptions();
std::vector<char*> input_names;
std::vector<char*> output_names;
std::vector<std::vector<int64_t>> input_node_dims; // >=1 outputs
std::vector<std::vector<int64_t>> output_node_dims; // >=1 outputs
};
pphuman_seg::pphuman_seg(std::string model_path)
{
std::wstring widestr = std::wstring(model_path.begin(), model_path.end()); //windows写法
//OrtStatus* status = OrtSessionOptionsAppendExecutionProvider_CUDA(sessionOptions, 0); //使用cuda加速
sessionOptions.SetGraphOptimizationLevel(ORT_ENABLE_BASIC);
ort_session = new Ort::Session(env, widestr.c_str(), sessionOptions); //windows写法
//ort_session = new Session(env, model_path.c_str(), sessionOptions); //linux写法
size_t numInputNodes = ort_session->GetInputCount();
size_t numOutputNodes = ort_session->GetOutputCount();
Ort::AllocatorWithDefaultOptions allocator;
for (int i = 0; i < numInputNodes; i++)
{
input_names.push_back(ort_session->GetInputName(i, allocator));
Ort::TypeInfo input_type_info = ort_session->GetInputTypeInfo(i);
auto input_tensor_info = input_type_info.GetTensorTypeAndShapeInfo();
auto input_dims = input_tensor_info.GetShape();
input_node_dims.push_back(input_dims);
}
for (int i = 0; i < numOutputNodes; i++)
{
output_names.push_back(ort_session->GetOutputName(i, allocator));
Ort::TypeInfo output_type_info = ort_session->GetOutputTypeInfo(i);
auto output_tensor_info = output_type_info.GetTensorTypeAndShapeInfo();
auto output_dims = output_tensor_info.GetShape();
output_node_dims.push_back(output_dims);
}
this->inpHeight = input_node_dims[0][2];
this->inpWidth = input_node_dims[0][3];
}
void pphuman_seg::preprocess(cv::Mat &cv_src)
{
cv::Mat dstimg;
resize(cv_src, dstimg, cv::Size(this->inpWidth, this->inpHeight), cv::INTER_LINEAR);
int row = dstimg.rows;
int col = dstimg.cols;
this->input_image_.resize(row * col * dstimg.channels());
for (int c = 0; c < 3; c++)
{
for (int i = 0; i < row; i++)
{
for (int j = 0; j < col; j++)
{
float pix = dstimg.ptr<uchar>(i)[j * 3 + c];
this->input_image_[c * row * col + i * col + j] = (pix / 255.0 - 0.5) / 0.5;
}
}
}
}
void pphuman_seg::inference(cv::Mat &cv_src,std::vector<cv::Mat> &cv_dsts)
{
this->preprocess(cv_src);
std::array<int64_t, 4> input_shape_{1, 3, this->inpHeight, this->inpWidth};
auto allocator_info = Ort::MemoryInfo::CreateCpu(OrtDeviceAllocator, OrtMemTypeCPU);
Ort::Value input_tensor_ = Ort::Value::CreateTensor<float>(allocator_info, input_image_.data(),
input_image_.size(), input_shape_.data(), input_shape_.size());
std::vector<Ort::Value> ort_outputs = ort_session->Run(Ort::RunOptions{ nullptr }, input_names.data(),
&input_tensor_, 1, output_names.data(), output_names.size()); // 开始推理
// post process.
Ort::Value &mask_pred = ort_outputs.at(0);
const int out_h = this->output_node_dims[0][1];
const int out_w = this->output_node_dims[0][2];
float *mask_ptr = mask_pred.GetTensorMutableData<float>();
cv::Mat segmentation_map;
cv::Mat mask_out(out_h, out_w, CV_32FC2, mask_ptr);
cv::resize(mask_out, segmentation_map, cv::Size(cv_src.cols, cv_src.rows));
cv::Mat cv_dst = cv_src.clone();
for (int h = 0; h < cv_src.rows; h++)
{
for (int w = 0; w < cv_src.cols; w++)
{
float pix = segmentation_map.ptr<float>(h)[w * 2 + 1];
if (pix > this->conf_threshold)
{
float b = (float)cv_dst.at<cv::Vec3b>(h, w)[0];
cv_dst.at<cv::Vec3b>(h, w)[0] = uchar(b * 0.5 + 1);
float g = (float)cv_dst.at<cv::Vec3b>(h, w)[1] + 255.0;
cv_dst.at<cv::Vec3b>(h, w)[1] = uchar(g * 0.5 + 1);
float r = (float)cv_dst.at<cv::Vec3b>(h, w)[2];
cv_dst.at<cv::Vec3b>(h, w)[2] = uchar(r * 0.5 + 1);
}
}
}
cv_dsts.push_back(cv_dst);
cv::Mat cv_matting = cv_src.clone();
for (int h = 0; h < cv_src.rows; h++)
{
for (int w = 0; w < cv_src.cols; w++)
{
float pix = segmentation_map.ptr<float>(h)[w * 2 + 1];
if (pix > this->conf_threshold)
{
cv_matting.at<cv::Vec3b>(h, w)[0] = (float)cv_src.at<cv::Vec3b>(h, w)[0];
cv_matting.at<cv::Vec3b>(h, w)[1] = (float)cv_src.at<cv::Vec3b>(h, w)[1];
cv_matting.at<cv::Vec3b>(h, w)[2] = (float)cv_src.at<cv::Vec3b>(h, w)[2];
}
else
{
cv_matting.at<cv::Vec3b>(h, w)[0] = 255;
cv_matting.at<cv::Vec3b>(h, w)[1] = 255;
cv_matting.at<cv::Vec3b>(h, w)[2] = 255;
}
}
}
cv_dsts.push_back(cv_matting);
}
void show_img(std::string name, const cv::Mat& img)
{
cv::namedWindow(name, 0);
int max_rows = 500;
int max_cols = 600;
if (img.rows >= img.cols && img.rows > max_rows) {
cv::resizeWindow(name, cv::Size(img.cols * max_rows / img.rows, max_rows));
}
else if (img.cols >= img.rows && img.cols > max_cols) {
cv::resizeWindow(name, cv::Size(max_cols, img.rows * max_cols / img.cols));
}
cv::imshow(name, img);
}
cv::Mat replaceBG(const cv::Mat cv_src, cv::Mat& alpha, std::vector<int>& bg_color)
{
int width = cv_src.cols;
int height = cv_src.rows;
cv::Mat cv_matting = cv::Mat::zeros(cv::Size(width, height), CV_8UC3);
float* alpha_data = (float*)alpha.data;
for (int i = 0; i < height; i++)
{
for (int j = 0; j < width; j++)
{
float alpha_ = alpha_data[i * width + j];
cv_matting.at < cv::Vec3b>(i, j)[0] = cv_src.at < cv::Vec3b>(i, j)[0] * alpha_ + (1 - alpha_) * bg_color[0];
cv_matting.at < cv::Vec3b>(i, j)[1] = cv_src.at < cv::Vec3b>(i, j)[1] * alpha_ + (1 - alpha_) * bg_color[1];
cv_matting.at < cv::Vec3b>(i, j)[2] = cv_src.at < cv::Vec3b>(i, j)[2] * alpha_ + (1 - alpha_) * bg_color[2];
}
}
return cv_matting;
}
int main()
{
pphuman_seg pp_net("model_float32.onnx");
std::string path = "images";
std::vector<std::string> filenames;
cv::glob(path, filenames, false);
for (auto file_name : filenames)
{
cv::Mat cv_src = cv::imread(file_name);
std::vector<cv::Mat> cv_dsts;
pp_net.inference(cv_src,cv_dsts);
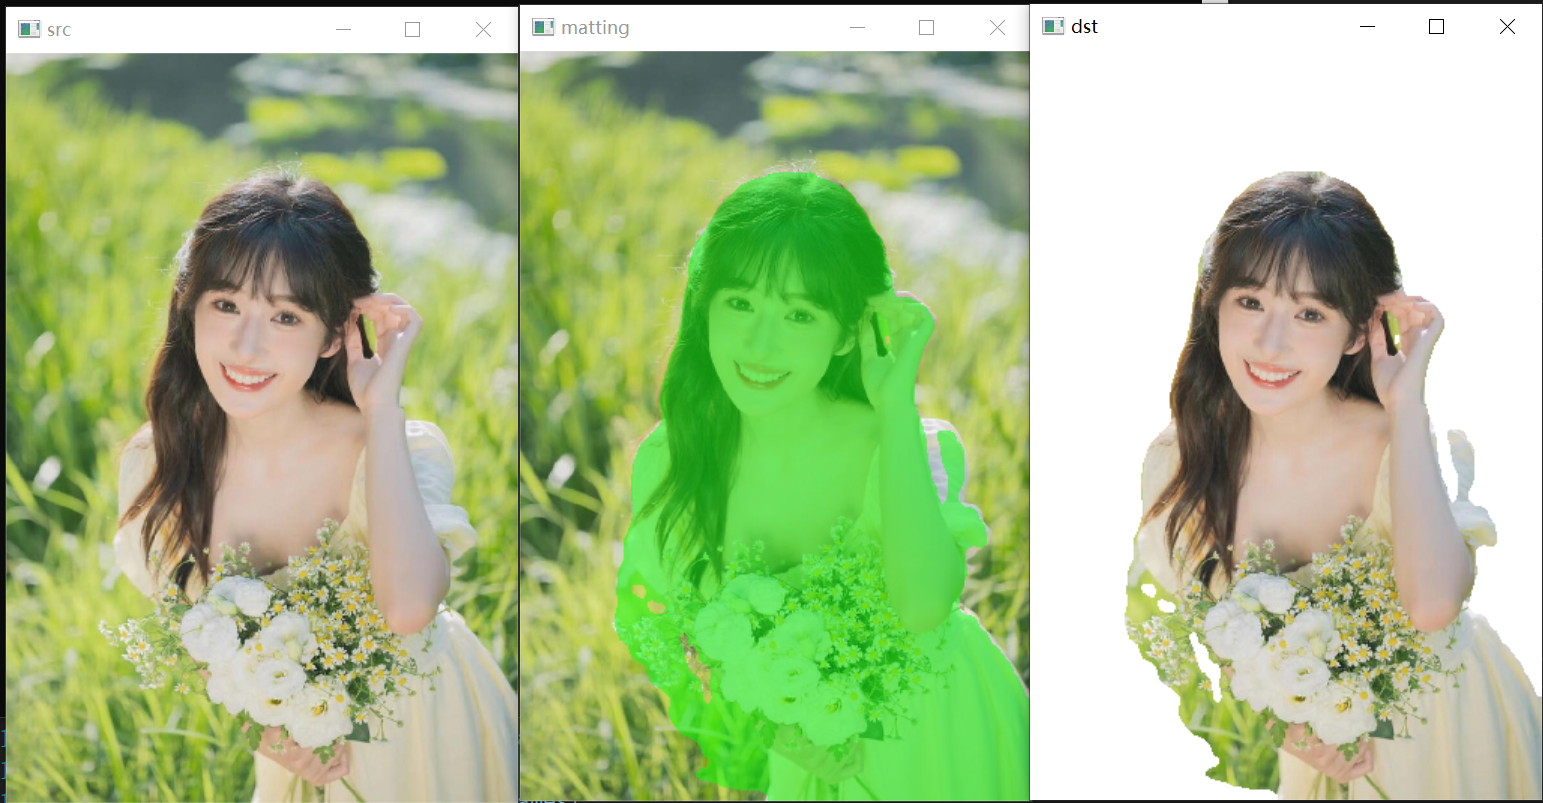
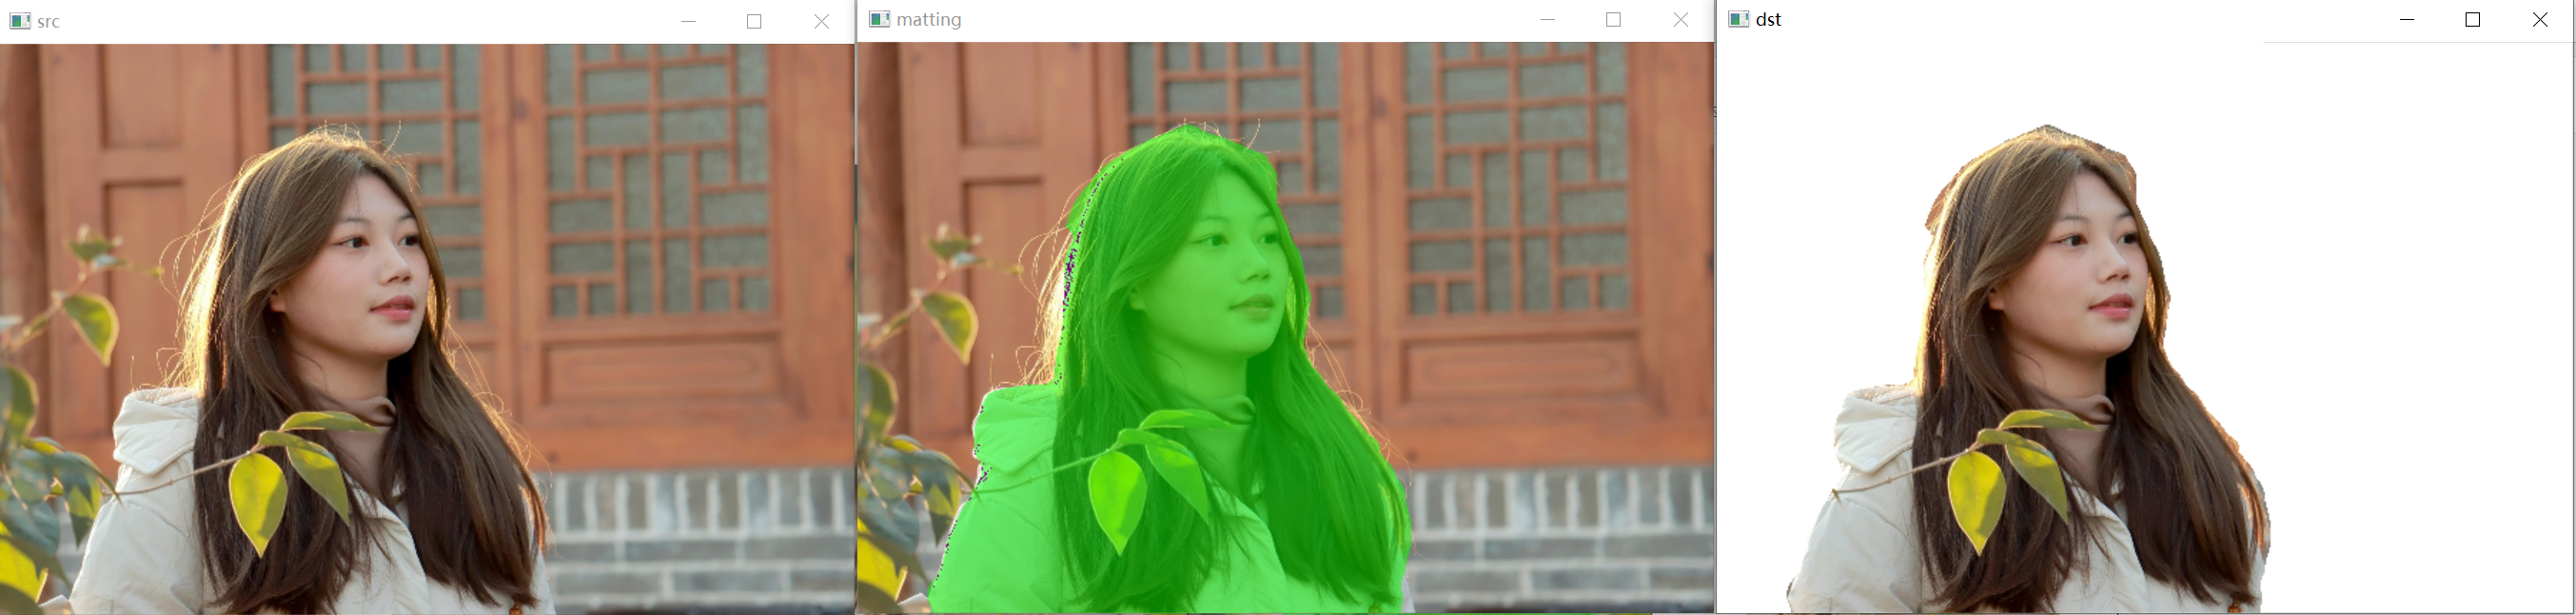
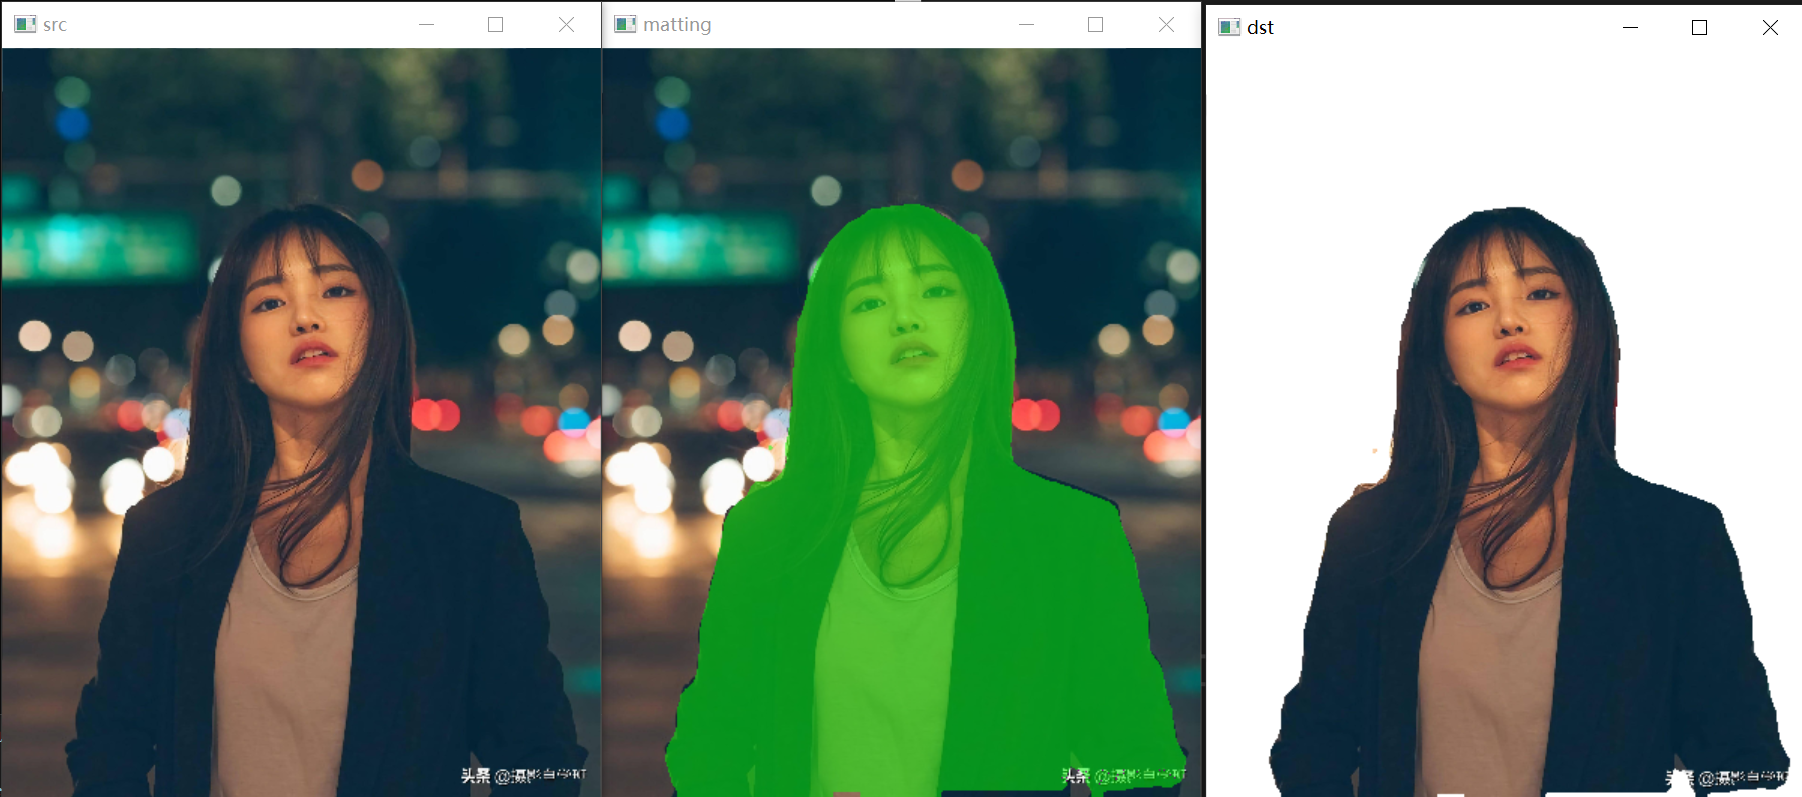
show_img("src", cv_src);
show_img("matting", cv_dsts[0]);
show_img("dst", cv_dsts[1]);
cv::waitKey(0);
}
}
python onnxruntimer推理:
#!/usr/bin/env python
# -*- coding: utf-8 -*-
import copy
import argparse
import cv2
import numpy as np
import onnxruntime

class pphumanseg:
    def __init__(self, conf_thres=0.5):
        self.conf_threshold = conf_thres
        # Initialize model
        self.onnx_session = onnxruntime.InferenceSession("model_float32.onnx")
        self.input_name = self.onnx_session.get_inputs()[0].name
        self.output_name = self.onnx_session.get_outputs()[0].name

        self.input_shape = self.onnx_session.get_inputs()[0].shape
        self.input_height = self.input_shape[2]
        self.input_width = self.input_shape[3]
        self.mean = np.array([0.5, 0.5, 0.5], dtype=np.float32).reshape(1,1,3)
        self.std = np.array([0.5, 0.5, 0.5], dtype=np.float32).reshape(1,1,3)
    def prepare_input(self, image):
        input_image = cv2.resize(image, dsize=(self.input_width, self.input_height))
        input_image = (input_image.astype(np.float32) / 255.0 - self.mean) / self.std
        input_image = input_image.transpose(2, 0, 1)
        input_image = np.expand_dims(input_image, axis=0)
        return input_image

    def detect(self, image):
        input_image = self.prepare_input(image)

        # Perform inference on the image
        result = self.onnx_session.run([self.output_name], {self.input_name: input_image})

        # Post process:squeeze
        segmentation_map = result[0]
        segmentation_map = np.squeeze(segmentation_map)

        image_width, image_height = image.shape[1], image.shape[0]
        dst_image = copy.deepcopy(image)
        segmentation_map = cv2.resize(
            segmentation_map,
            dsize=(image_width, image_height),
            interpolation=cv2.INTER_LINEAR,
        )

        # color list
        color_image_list = []
        # ID 0:BackGround
        bg_image = np.zeros(image.shape, dtype=np.uint8)
        bg_image[:] = (0, 0, 0)
        color_image_list.append(bg_image)
        # ID 1:Human
        bg_image = np.zeros(image.shape, dtype=np.uint8)
        bg_image[:] = (0, 255, 0)
        color_image_list.append(bg_image)

        # Overlay segmentation map
        masks = segmentation_map.transpose(2, 0, 1)
        for index, mask in enumerate(masks):
            # Threshold check by score
            mask = np.where(mask > self.conf_threshold, 0, 1)

            # Overlay
            mask = np.stack((mask,) * 3, axis=-1).astype('uint8')
            mask_image = np.where(mask, dst_image, color_image_list[index])
            dst_image = cv2.addWeighted(dst_image, 0.5, mask_image, 0.5, 1.0)
        return dst_image


if __name__ == '__main__':
    parser = argparse.ArgumentParser()
    parser.add_argument('--imgpath', type=str, default='images/person.jpg', help="image path")
    parser.add_argument('--confThreshold', default=0.5, type=float, help='class confidence')
    parser.add_argument('--use_video', type=int, default=1, help="if use video")
    args = parser.parse_args()

    segmentor = pphumanseg(conf_thres=args.confThreshold)
    if args.use_video != 1:
        srcimg = cv2.imread(args.imgpath)

        # Detect Objects
        dstimg = segmentor.detect(srcimg)
        winName = 'pphumanseg in ONNXRuntime'
        cv2.namedWindow(winName, 0)
        cv2.imshow(winName, dstimg)
        cv2.waitKey(0)
        cv2.destroyAllWindows()
    else:
        cap = cv2.VideoCapture(0)
        while True:
            ret, frame = cap.read()
            if not ret:
                break

            dstimg = segmentor.detect(frame)
            key = cv2.waitKey(1)
            if key == 27:  # ESC
                break
            cv2.imshow('pphumanseg Demo', dstimg)

        cap.release()
        cv2.destroyAllWindows()


![[小程序开发] 分包加载](https://img-blog.csdnimg.cn/direct/917dc11329294ec0b4bfe59221c917cb.png)