目录
本节目标
1. list的介绍及使用
1.2 list的使用
2.list的模拟实现
1.对list进行初步的实现
2.头插和任意位置的插入
3.pos节点的删除,头删,尾删
4.销毁list和析构函数
5.const迭代器
6.拷贝构造和赋值操作
3.完整代码
本节目标
1. list的介绍及使用
2. list的深度剖析及模拟实现
3. list与vector的对比
1. list的介绍及使用
1. list是可以在常数范围内在任意位置进行插入和删除的序列式容器,并且该容器可以前后双向迭代。
2. list的底层是双向链表结构,双向链表中每个元素存储在互不相关的独立节点中,在节点中通过指针指向其前一个元素和后一个元素。
3. list与forward_list非常相似:最主要的不同在于forward_list是单链表,只能朝前迭代,已让其更简单高效。
4. 与其他的序列式容器相比(array,vector,deque),list通常在任意位置进行插入、移除元素的执行效率更好。
5. 与其他序列式容器相比,list和forward_list最大的缺陷是不支持任意位置的随机访问,比如:要访问list的第6个元素,必须从已知的位置(比如头部或者尾部)迭代到该位置,在这段位置上迭代需要线性的时间开销;list还需要一些额外的空间,以保存每个节点的相关联信息(对于存储类型较小元素的大list来说这可能是一个重要的因素)
1.2 list的使用
list中的接口比较多,此处类似,只需要掌握如何正确的使用,然后再去深入研究背后的原理,已达到可扩展的能力。以下为list中一些常见的重要接口。
1.list的构造
构造函数( (constructor)) 接口说明 list (size_type n, const value_type& val = value_type()) 构造的list中包含n个值为val的元素 list() 构造空的list list (const list& x) 拷贝构造函数 list (InputIterator first, InputIterator last) 用[first, last)区间中的元素构造list
代码演示:
void TestList1()
{
    list<int> l1;                         // 构造空的l1
    list<int> l2(4, 100);                 // l2中放4个值为100的元素
    list<int> l3(l2.begin(), l2.end());  // 用l2的[begin(), end())左闭右开的区间构造l3
    list<int> l4(l3);                    // 用l3拷贝构造l4

    // 以数组为迭代器区间构造l5
    int array[] = { 16,2,77,29 };
    list<int> l5(array, array + sizeof(array) / sizeof(int));

    // 列表格式初始化C++11
    list<int> l6{ 1, 2, 3, 4, 5 };

    // 用迭代器方式打印l5中的元素
    list<int>::iterator it = l5.begin();
    while (it != l5.end())
    {
        cout << *it << " ";
        ++it;
    }
    cout << endl;

    // C++11范围for的方式遍历
    for (auto& e : l5)
        cout << e << " ";

    cout << endl;
}
2.list iterator的使用
函数声明 接口说明 begin +
end返回第一个元素的迭代器+返回最后一个元素下一个位置的迭代器 rbegin +
rend返回第一个元素的reverse_iterator,即end位置,返回最后一个元素下一个位置的
reverse_iterator,即begin位置【注意】
1. begin与end为正向迭代器,对迭代器执行++操作,迭代器向后移动
2. rbegin(end)与rend(begin)为反向迭代器,对迭代器执行++操作,迭代器向前移动
代码演示:// list迭代器的使用 // 注意:遍历链表只能用迭代器和范围for void PrintList(const list<int>& l) { // 注意这里调用的是list的 begin() const,返回list的const_iterator对象 for (list<int>::const_iterator it = l.begin(); it != l.end(); ++it) { cout << *it << " "; // *it = 10; 编译不通过 } cout << endl; }void TestList2() { int array[] = { 1, 2, 3, 4, 5, 6, 7, 8, 9, 0 }; list<int> l(array, array + sizeof(array) / sizeof(array[0])); // 使用正向迭代器正向list中的元素 // list<int>::iterator it = l.begin(); // C++98中语法 auto it = l.begin(); // C++11之后推荐写法 while (it != l.end()) { cout << *it << " "; ++it; } cout << endl; // 使用反向迭代器逆向打印list中的元素 // list<int>::reverse_iterator rit = l.rbegin(); auto rit = l.rbegin(); while (rit != l.rend()) { cout << *rit << " "; ++rit; } cout << endl; }
3.list capacity
函数声明 接口说明 empty 检测list是否为空,是返回true,否则返回false size 返回list中有效节点的个数
4.list element access
函数声明 接口说明 front 返回list的第一个节点中值的引用 back 返回list的最后一个节点中值的引用 代码演示:
void TestList3()
{
    int array[] = { 1, 2, 3 };
    list<int> L(array, array + sizeof(array) / sizeof(array[0]));

    // 在list的尾部插入4,头部插入0
    L.push_back(4);
    L.push_front(0);
    PrintList(L);

    // 删除list尾部节点和头部节点
    L.pop_back();
    L.pop_front();
    PrintList(L);
}
5.list modifiers
函数声明 接口说明 push_front 在list首元素前插入值为val的元素 pop_front 删除list中第一个元素 push_back 在list尾部插入值为val的元素 pop_back 删除list中最后一个元素 insert 在list position 位置中插入值为val的元素 erase 删除list position位置的元素 swap 交换两个list中的元素 clear 清空list中的有效元素 代码演示:
// insert /erase
void TestList4()
{
    int array1[] = { 1, 2, 3 };
    list<int> L(array1, array1 + sizeof(array1) / sizeof(array1[0]));

    // 获取链表中第二个节点
    auto pos = ++L.begin();
    cout << *pos << endl;

    // 在pos前插入值为4的元素
    L.insert(pos, 4);
    PrintList(L);

    // 在pos前插入5个值为5的元素
    L.insert(pos, 5, 5);
    PrintList(L);

    // 在pos前插入[v.begin(), v.end)区间中的元素
    vector<int> v{ 7, 8, 9 };
    L.insert(pos, v.begin(), v.end());
    PrintList(L);

    // 删除pos位置上的元素
    L.erase(pos);
    PrintList(L);

    // 删除list中[begin, end)区间中的元素,即删除list中的所有元素
    L.erase(L.begin(), L.end());
    PrintList(L);
}
// resize/swap/clear
void TestList5()
{
    // 用数组来构造list
    int array1[] = { 1, 2, 3 };
    list<int> l1(array1, array1 + sizeof(array1) / sizeof(array1[0]));
    PrintList(l1);

    // 交换l1和l2中的元素
    list<int> l2;
    l1.swap(l2);
    PrintList(l1);
    PrintList(l2);

    // 将l2中的元素清空
    l2.clear();
    cout << l2.size() << endl;
}
1.2.6 list的迭代器失效
前面说过,此处大家可将迭代器暂时理解成类似于指针,迭代器失效即迭代器所指向的节点的无效,即该节点被删除了。因为list的底层结构为带头结点的双向循环链表,因此在list中进行插入时是不会导致list的迭代器失效的,只有在删除时才会失效,并且失效的只是指向被删除节点的迭代器,其他迭代器不会受到影响。void TestListIterator1() { int array[] = { 1, 2, 3, 4, 5, 6, 7, 8, 9, 0 }; list<int> l(array, array + sizeof(array) / sizeof(array[0])); auto it = l.begin(); while (it != l.end()) { // erase()函数执行后,it所指向的节点已被删除,因此it无效,在下一次使用it时,必须先给其赋值 l.erase(it); ++it; } }
下面是修正的代码:
// 改正
void TestListIterator()
{
	int array[] = { 1, 2, 3, 4, 5, 6, 7, 8, 9, 0 };
	list<int> l(array, array + sizeof(array) / sizeof(array[0]));
	auto it = l.begin();
	while (it != l.end())
	{
		l.erase(it++); // it = l.erase(it);
	}
}
2.list的模拟实现
1.对list进行初步的实现
namespace my_list
{
	//list节点的结构
	template<class T>
	struct ListNode
	{
		ListNode<T>* _next;
		ListNode<T>* _prev;
		T _data;
		//构造走列表
		ListNode(const T& x = T())
			:_next(nullptr)
			, _prev(nullptr)
			, _data(x)
		{}
	};

	template<class T>
	struct __list_iterator
	{
		typedef ListNode<T> Node;
		typedef __list_iterator<T> self;
		Node* _node;
		//构造迭代器
		__list_iterator(Node* x)
			:_node(x)
		{}

		// ++it
		self& operator++()
		{
			_node = _node->_next;
			return *this;
		}
		self operator++(int)
		{

			self tmp(*this);

			_node = _node->_next;

			return tmp;
		}

		self& operator--()
		{
			_node = _node->_prev;
			return *this;
		}


		T& operator*()
		{
			return _node->_data;
		}
		T& operator*()
		{
			return _node->_data;
		}
		bool operator!=(const self& s)
		{
			return _node != s._node;
		}
	};

	//对list成员函数进行模拟实现
	template<class T>
	class list
	{
		typedef ListNode<T> Node;
	public:
		typedef __list_iterator<T> iterator;
		list()
		{
			_head = new Node;
			_head->_next = _head;
			_head->_prev = _head;
		}
		iterator begin()
		{
			//return iterator(_head->_next);
			return _head->_next;
		}

		iterator end()
		{
			return _head;
		}
		void push_back(const T& x)
		{
			Node* newnode = new Node(x);
			Node* tail = _head->_prev;

			tail->_next = newnode;
			newnode->_prev = tail;
			newnode->_next = _head;
			_head->_prev = newnode;
		}
	private:
		Node* _head;
	};

}
这段代码是对C++中的双向链表list的简单模拟实现。以下是对其实现逻辑的解释:
1. 在namespace my_list中定义了ListNode结构体,用于表示链表节点,包含指向前一个节点和后一个节点的指针,以及存储数据的成员变量_data。
2. 定义了__list_iterator结构体,用于封装list的迭代器。该结构体包含一个指向ListNode的指针_node,并重载了operator++/--(前置++(返回之后的值)和后置++(返回之前的值),后置++调用了拷贝构造)、operator*和operator!=等操作。
(Node*没办法重载,只有自定义类型才支持重载,我们只能进行封装)
3. 定义了list类,包含内部类iterator作为迭代器类型。list类中有构造函数初始化头节点_head,begin()返回第一个节点的迭代器,end()返回尾节点的迭代器,push_back()在链表尾部插入新节点。
总体逻辑是通过定义节点结构体、迭代器结构体和链表类,实现了简单的双向链表功能,并提供了对链表进行遍历和插入操作的接口。
test_list1函数演示了如何使用该简单链表实现,创建链表对象lt,插入几个元素,然后通过迭代器遍历输出链表中的元素。
	void test_list1()
	{
		list<int> lt;
		lt.push_back(1);
		lt.push_back(2);
		lt.push_back(3);
		lt.push_back(4);

		list<int>::iterator it = lt.begin();
		while (it != lt.end())
		{

			cout << *it << " ";
			++it;
		}
		cout << endl;

	}
2.头插和任意位置的插入
		iterator insert(iterator pos, const T& x)
		{
			Node* cur = pos._node;
			Node* prev = cur->_prev;
			Node* newnode = new Node(x);

			// prev newnode cur
			prev->_next = newnode;
			newnode->_prev = prev;
			newnode->_next = cur;
			cur->_prev = newnode;

			//return iterator(newnode);
			return newnode;
		}
		void push_front(const T& x)
		{
			insert(begin(), x);
		}
1. insert函数:
- 获取当前迭代器pos指向的节点cur以及其前一个节点prev。
- 创建一个新的节点newnode,存储值为x。
- 将prev节点的_next指针指向newnode,建立prev和newnode之间的连接。
- 将newnode的_prev指针指向prev,将newnode的_next指针指向cur,建立newnode和cur之间的连接。
- 返回一个新的迭代器,指向插入的newnode节点。2. push_front函数:
- 调用insert函数,在链表头部(即begin()位置)插入值为x的新节点。
- 通过调用insert(begin(), x)实现在链表头部插入新节点的功能。
3.pos节点的删除,头删,尾删
		iterator erase(iterator pos)
		{
			assert(pos != end());

			Node* cur = pos._node;
			Node* prev = cur->_prev;
			Node* next = cur->_next;
			prev->_next = next;
			next->_prev = prev;

			delete cur;

			return next;
		}
		void pop_back()
		{
			erase(--end());
		}

		void pop_front()
		{
			erase(begin());
		}
在这段代码中, iterator erase(iterator pos) 函数的目的是从容器中删除给定位置的元素。在双向链表中,当删除一个节点后,需要重新连接前一个节点和后一个节点,然后删除当前节点。在这段代码中, return next; 返回的是下一个节点的迭代器,因为在删除当前节点后,下一个节点就变成了当前位置。这样做是为了防止迭代器失效,方便在调用 erase 函数后继续遍历容器中的元素。
测试:
	void test_list1()
	{
		list<int> lt;
		lt.push_back(1);
		lt.push_back(2);
		lt.push_back(3);
		lt.push_back(4);
		lt.pop_back();
		lt.pop_front();
		list<int>::iterator it = lt.begin();
		while (it != lt.end())
		{

			cout << *it << " ";
			++it;
		}
		cout << endl;

	}
4.销毁list和析构函数
		void clear()
		{
			iterator it = begin();
			while (it != end())
			{
				it = erase(it);
			}
		}

		~list()
		{
			clear();

			delete _head;
			_head = nullptr;
		}
在这段代码中, clear() 函数用于清空整个双向链表,它通过循环调用 erase() 函数来一个一个删除链表中的元素,直到链表为空。而在析构函数 ~list() 中,首先调用了 clear() 函数来确保在销毁链表之前先清空所有元素,然后删除链表的头节点 _head 并将其置为 nullptr ,以释放链表占用的内存空间。这样的设计确保了在销毁链表对象时,会正确地释放链表中所有节点的内存,并避免内存泄漏问题。
5.const迭代器
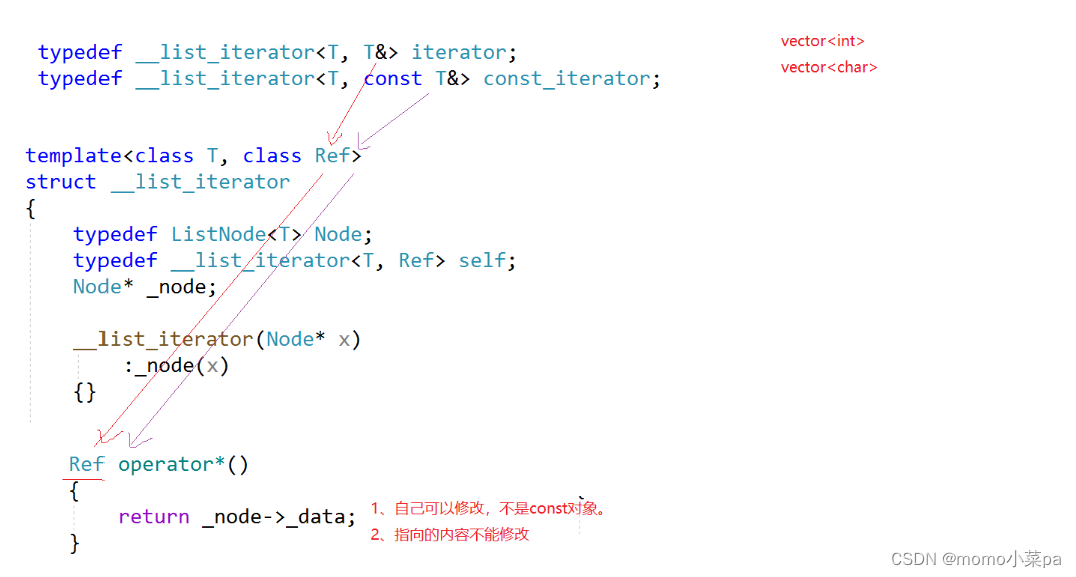
const迭代器和普通迭代器最大的区别就是将T& operator*前面加上const,让指针指向的内容不能被修改。但需要注意:const迭代器不是一个const的对象,const对象自己可以修改,只是让指向的类容不能修改
	template<class T, class Ref>
	struct __list_iterator
	{
		typedef ListNode<T> Node;
		typedef __list_iterator<T, Ref> self;
		Node* _node;

		__list_iterator(Node* x)
			:_node(x)
		{}

		// ++it
		self& operator++()
		{
			_node = _node->_next;
			return *this;
		}

		// it++
		self operator++(int)
		{
			//__list_iterator<T> tmp(*this);
			self tmp(*this);

			_node = _node->_next;

			return tmp;
		}

		self& operator--()
		{
			_node = _node->_prev;
			return *this;
		}

		self operator--(int)
		{
			self tmp(*this);

			_node = _node->_prev;

			return tmp;
		}

		Ref operator*()
		{
			return _node->_data;
		}

		bool operator!=(const self& s)
		{
			return _node != s._node;
		}

		bool operator==(const self& s)
		{
			return _node == s._node;
		}
	};
这里的操作是通过参数的不同重载了这个类,所以才在这里多加一个参数
6.拷贝构造和赋值操作
//拷贝构造 lt1(lt) list(const list<T>& lt) { _head = new node; _head->_next = _head; _head->_prev = _head; 将lt的元素全部尾插到新链表 for (const auto& e : lt) { push_back(e); } }拷贝构造函数,用于复制另一个链表 lt 的所有元素到新链表中。首先创建一个新的头节点 _head,并将其前驱和后继都指向自身,然后通过循环遍历 lt 中的每个元素,将其依次尾插到新链表中。这样就实现了将另一个链表的所有元素复制到新链表的功能。
赋值操作的传统写法
		list<T> operator=(const list<T>& lt)
		{
            //链表已存在,只需将节点尾插进去即可
			if(this != lt)
			{
				for (auto& e : lt)
				{
					push_back(e);
				}
			}
		}
链表存在,直接尾插就行了。
现代写法
list<T>& operator=(list<T>& lt) { swap(_head, lt->_head); return *this; } template <class T> void swap ( T& a, T& b ) { T c(a); a=b; b=c; }赋值运算符函数,用于将另一个链表 lt 的内容与当前链表进行交换。在函数内部,调用了一个名为 swap 的模板函数,用于交换两个对象的值。在这里,通过将当前链表的头节点和另一个链表的头节点进行交换,实现了两个链表内容的交换。
3.完整代码
#include<iostream>
#include<assert.h>
using namespace std;
namespace delia
{
template<class T>
struct _list_node
{
T _val;
_list_node<T>* _prev;
_list_node<T>* _next;
_list_node(const T& val = T())
:_val(val)
, _prev(nullptr)
, _next(nullptr)
{};
};
template<class T, class Ref>
struct _list_iterator//使用_list_iterator类来封装node*
{
typedef _list_node<T> node;
typedef _list_iterator<T, Ref> self;
node* _pnode;
//构造函数
_list_iterator(node* pnode)
:_pnode(pnode)
{}
//拷贝构造、赋值运算符重载、析构函数,编译器默认生成即可
//解引用,返回左值,是拷贝,因此要用引用返回
Ref operator*()
{
return _pnode->_val;
}
//!=重载
bool operator!=(const self& s) const
{
return _pnode != s._pnode;
}
//==重载
bool operator==(const self& s) const
{
return _pnode == s._pnode;
}
//前置++ it.operator(&it)
self& operator++()
{
_pnode = _pnode->_next;
return *this;
}
//后置++ 返回++之前的值 it.operator(&it,0)
self operator++(int)
{
self tmp(*this);
_pnode = _pnode->_next;
return tmp;
}
//前置-- it.operator(&it)
self& operator--()
{
_pnode = _pnode->prev;
return *this;
}
//后置++ 返回++之前的值 it.operator(&it,0)
self operator--(int)//临时对象不能用引用返回,所以self没有加&
{
self tmp(*this);
_pnode = _pnode->_prev;
return tmp;
}
};
template<class T>
class list
{
typedef _list_node<T> node;
public:
typedef _list_iterator<T, T&, T*> iterator;//重命名迭代器
typedef _list_iterator<T, const T&, const T*> const_iterator;//重命名const迭代器
//构造函数
list()
{
_head = new node;//会调_list_node的构造函数
_head->_next = _head;//整个链表只有头节点,先构造一个没有实际节点的链表
_head->_prev = _head;//整个链表只有头节点,先构造一个没有实际节点的链表
}
//拷贝构造 lt1(lt)
list(const list<T>& lt)
{
_head = new node;
_head->_next = _head;
_head->_prev = _head;
//将lt的元素全部尾插到新链表
for (const auto& e : lt)
{
push_back(e);
}
}
//赋值重载
list<T>&operator=(list<T><)
{
swap(_head, lt._head);
return *this;
}
template <class T> void swap(T& a, T& b)
{
T c(a);
a = b;
b = c;
}
//析构
~list()
{
clear();
delete _head;
_head = nullptr;
}
iterator begin()
{
return iterator(_head->_next);
}
iterator end()
{
return iterator(_head);//尾节点的下一个节点位置即头节点
}
const_iterator begin() const
{
return const_iterator(_head->_next);
}
const_iterator end() const
{
return const_iterator(_head);//尾节点的下一个节点位置即头节点
}
//插入节点
void insert(iterator pos, const T& x)
{
assert(pos._pnode);
node* newnode = new node(x);//构造节点
node* prev = pos._pnode->_prev;
//插入节点
newnode->_next = pos._pnode;
pos._pnode->_prev = newnode;
prev->_next = newnode;
newnode->_prev = prev;
}
//删除节点
iterator erase(iterator pos)
{
assert(pos._pnode);//判断该位置节点是否存在
assert(pos != end());//end()是最后一个节点的下一个节点位置,也就是头节点,头节点不能删,需要断言
node* prev = pos._pnode->_prev;//pos位置节点的前一个节点
node* next = pos._pnode->_next;//pos位置节点的后一个节点
//删除节点
delete pos._pnode;
prev->_next = next;
next->_prev = prev;
return iterator(next);//删除之后pos失效,把下一个位置的迭代器给它
}
void clear()
{
iterator it = begin();
while (it != end())
{
erase(it++);
}
}
//头插
void push_front(const T& x)
{
insert(begin(), x);
}
//尾插
void push_back(const T& x)
{
insert(end()--, x);
}
//头删
void pop_front()
{
erase(begin());
}
//尾删
void pop_back()
{
erase(--end());
}
//判空
bool empty()
{
return _head->_next == _head;
}
//求节点个数
size_t size()
{
iterator it = begin();
size_t sz = 0;
while (it != end())//时间复杂度O(N)
{
it++;
sz++;
}
return sz;
}
private:
node* _head;
};
void PrintList(const list<int>& lt)
{
list<int>::const_iterator it = lt.begin();
while (it != lt.end())
{
cout << it._pnode->_val << " ";
it++;
}
cout << endl;
}
}







![[云] vmware: host: net: Net.CoaleseDefaultOn](https://img-blog.csdnimg.cn/direct/34cf41483a5843ee82228e3439b85cbf.png#pic_center)
