设备
nginx:192.168.67.11
tomcat1:192.168.67.12
tomcat2:192.168.67.13
安装nginx
(192.168.67.11)
#关闭防火墙和安全机制
[root@test1 ~]# systemctl stop firewalld
[root@test1 ~]# setenforce 0

#安装epel源
[root@test1 ~]# yum -y install epel-release.noarch

#安装nginx
[root@test1 ~]# yum -y install nginx

#开启nginx服务
[root@test1 ~]# systemctl start nginx

#修改配置文件;在22行下写upstream反向代理
[root@test1 ~]# vim /etc/nginx/nginx.conf
 22     access_log  /var/log/nginx/access.log  main;
 23         upstream tomcat {
 24         server   192.168.67.12:8080;
 25         server   192.168.67.13:8080;
 26         }
    #在49行下写
 48         # Load configuration files for the default server block.
 49         include /etc/nginx/default.d/*.conf;
 50         location ~* \.jsp$ {
 51         proxy_pass   http://tomcat;
 52         }

#检查配置文件
[root@test1 ~]# nginx -t
nginx: the configuration file /etc/nginx/nginx.conf syntax is ok
nginx: configuration file /etc/nginx/nginx.conf test is successful
#重新加载配置文件
[root@test1 ~]# nginx -s reload
安装tomcat
(192.168.67.12、192.168.67.13)两者操作相同,下面只展示了tomcat1
#关闭防火墙和安全机制
[root@test2 ~]# systemctl stop firewalld
[root@test2 ~]# setenforce 0

#创建一个data目录
[root@test2 ~]# mkdir data
[root@test2 ~]# cd data/
[root@test2 data]# ls

#上传jdk和tomcat包
[root@test2 data]# rz -E
rz waiting to receive.
[root@test2 data]# rz -E
rz waiting to receive.
[root@test2 data]# ls
apache-tomcat-9.0.16.tar.gz  jdk-8u201-linux-x64.tar.gz

#解压安装jdk
[root@test2 data]# tar xvf jdk-8u201-linux-x64.tar.gz -C /usr/local

[root@test2 data]# cd /usr/local/
[root@test2 local]# ln -s jdk1.8.0_201/ jdk
[root@test2 local]# vim /etc/profile.d/jdk.sh
export JAVA_HOME=/usr/local/jdk
export PATH=$JAVA_HOME/bin:$PATH
export JRE_HOME=$JAVA_HOME/jre
export CLASSPATH=$JAVA_HOME/lib/:$JRE_HOME/lib/

[root@test2 local]# . /etc/profile.d/jdk.sh

[root@test2 local]# java -version
java version "1.8.0_201"
Java(TM) SE Runtime Environment (build 1.8.0_201-b09)
Java HotSpot(TM) 64-Bit Server VM (build 25.201-b09, mixed mode)
解压安装tomcat
[root@test2 local]# cd
[root@test2 ~]# cd data
#解压
[root@test2 data]# tar zxvf apache-tomcat-9.0.16.tar.gz
[root@test2 data]# ls
apache-tomcat-9.0.16         jdk-8u201-linux-x64.tar.gz
apache-tomcat-9.0.16.tar.gz
[root@test2 data]# cp -r apache-tomcat-9.0.16 /usr/local/tomcat
#创建tomcat用户
[root@test2 data]# useradd -s /sbin/nologin tomcat
[root@test2 data]# cd /usr/local/
[root@test2 local]# ls
bin  games    jdk           lib    libexec  share  tomcat
etc  include  jdk1.8.0_201  lib64  sbin     src
[root@test2 local]# chown tomcat:tomcat tomcat/ -R
[root@test2 local]# cat > /usr/lib/systemd/system/tomcat.service <<EOF
> [Unit]
> Description=Tomcat
> After=syslog.target netwaork.target
>
> [Service]
> Type=forking
> ExecStart=/usr/local/tomcat/bin/startup.sh
> ExecStop=/usr/local/tomcat/bin/shutdown.sh
> RestartSec=3
> PrivateTmp=true
> User=tomcat
> Group=tomcat
>
> [Install]
> WantedBy=muti-user.target
>
> EOF

#刷新配置文件;启动tomcat
[root@test2 local]# systemctl daemon-reload
[root@test2 local]# systemctl start tomcat.service
[root@test2 local]# systemctl status tomcat.service
[root@test2 local]# ls
bin games jdk lib libexec share tomcat
etc include jdk1.8.0_201 lib64 sbin src
[root@test2 webapps]# cd tomcat/webapps/ROOT/
[root@test2 ROOT]# ls
asf-logo-wide.svg favicon.ico tomcat.png
bg-button.png index.jsp tomcat-power.gif
bg-middle.png RELEASE-NOTES.txt tomcat.svg
bg-nav.png tomcat.css WEB-INF
bg-upper.png tomcat.gif
[root@test2 ROOT]# mv index.jsp index.jsp.bak
[root@test2 ROOT]# rz -E
rz waiting to receive.
[root@test2 ROOT]# ls
asf-logo-wide.svg favicon.ico tomcat.gif
bg-button.png index.jsp tomcat.png
bg-middle.png index.jsp.bak tomcat-power.gif
bg-nav.png RELEASE-NOTES.txt tomcat.svg
bg-upper.png tomcat.css WEB-INF
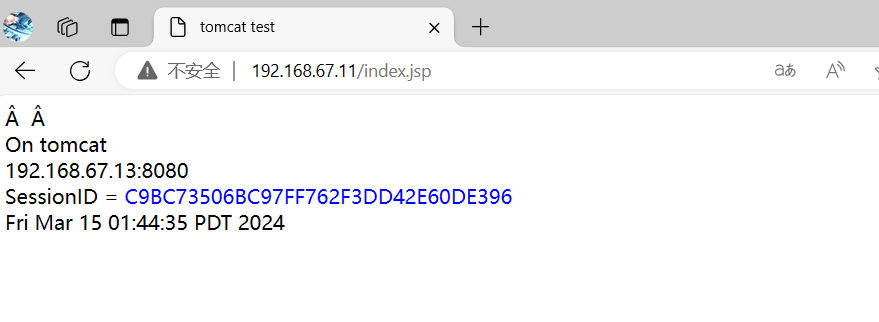
[root@test2 ROOT]# cat index.jsp
<%@ page import="java.util.*" %>
<!DOCTYPE html>
<html lang="en">
<head>
<meta charset="UTF-8">
<title>tomcat test</title>
</head>
<body>
<div>On <%=request.getServerName() %></div>
<div><%=request.getLocalAddr() + ":" + request.getLocalPort() %></div>
<div>SessionID = <span style="color:blue"><%=session.getId() %></span></div>
<%=new Date()%>
</body>
</html>
浏览器访问:
刷新浏览器可以看到sid一直在变化
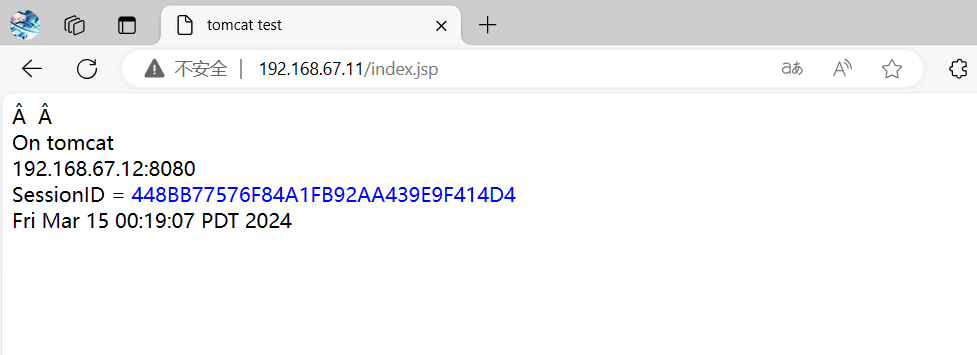
sid变化的原因:

固定同一客户机的SID
[root@test1 ~]# vim /etc/nginx/nginx.conf
#添加第24行
 22     access_log  /var/log/nginx/access.log  main;
 23         upstream tomcat {
 24         hash     $remote_addr;
 25         server   192.168.67.12:8080;
 26         server   192.168.67.13:8080;
 27         }

#检查配置文件
[root@test1 ~]# nginx -t
nginx: the configuration file /etc/nginx/nginx.conf syntax is ok
nginx: configuration file /etc/nginx/nginx.conf test is successful
#重新加载配置文件
[root@test1 ~]# nginx -s reload
可以看到SID不再改变,但同一客户机的请求也不会再被轮循


搭配共享服务
官网网址:Apache Tomcat 9 (9.0.87) - Clustering/Session Replication How-To
注意先删除上面固定SID的代码
[root@test2 ROOT]# cd /usr/local/tomcat
[root@test2 tomcat]# vim conf/server.xml
#在163行,</Host>上面  添加
        <Cluster className="org.apache.catalina.ha.tcp.SimpleTcpCluster"
                 channelSendOptions="8">

          <Manager className="org.apache.catalina.ha.session.DeltaManager"
                   expireSessionsOnShutdown="false"
                   notifyListenersOnReplication="true"/>

          <Channel className="org.apache.catalina.tribes.group.GroupChannel">
            <Membership className="org.apache.catalina.tribes.membership.McastService"
                        address="228.0.0.4"
                        port="45564"
                        frequency="500"
                        dropTime="3000"/>
            <Receiver className="org.apache.catalina.tribes.transport.nio.NioReceiver"
                      address="auto"    #这里最好将auto改为本机地址
                      port="4000"
                      autoBind="100"
                      selectorTimeout="5000"
                      maxThreads="6"/>

            <Sender className="org.apache.catalina.tribes.transport.ReplicationTransmitter">
              <Transport className="org.apache.catalina.tribes.transport.nio.PooledParallelSender"/>
            </Sender>
            <Interceptor className="org.apache.catalina.tribes.group.interceptors.TcpFailureDetector"/>
            <Interceptor className="org.apache.catalina.tribes.group.interceptors.MessageDispatchInterceptor"/>
          </Channel>

          <Valve className="org.apache.catalina.ha.tcp.ReplicationValve"
                 filter=""/>
          <Valve className="org.apache.catalina.ha.session.JvmRouteBinderValve"/>

          <Deployer className="org.apache.catalina.ha.deploy.FarmWarDeployer"
                    tempDir="/tmp/war-temp/"
                    deployDir="/tmp/war-deploy/"
                    watchDir="/tmp/war-listen/"
                    watchEnabled="false"/>

          <ClusterListener className="org.apache.catalina.ha.session.ClusterSessionListener"/>
        </Cluster>

#若要添加上面的内容,之后一定要添加下面的内容
[root@test2 ROOT]# pwd
/usr/local/tomcat/webapps/ROOT
[root@test2 ROOT]# cd WEB-INF/
[root@test2 WEB-INF]# ls
web.xml
[root@test2 WEB-INF]# vim web.xml
#在29行  </description>下面 添加
 29 <distributable/>
浏览器访问:192.168.67.11/index.jsp
刷新可以看到SID不会改变,轮询正常