SpringBoot整合阿里云文件上传OSS
1. 引入相关依赖
        <!--阿里云 OSS依赖-->
        <dependency>
            <groupId>com.aliyun.oss</groupId>
            <artifactId>aliyun-sdk-oss</artifactId>
            <version>3.10.2</version>
        </dependency>
        <dependency>
            <groupId>org.springframework</groupId>
            <artifactId>spring-web</artifactId>
        </dependency>
2. 相关配置
aliyun:
  oss:
    end-point: oss-cn-hangzhou.aliyuncs.com
    access-key-id: L**********
    access-key-secret: O**********
    bucket-name: oss-test-img
3. 配置类OSSConfig.java
package com.vehicle.manager.core.config;

import lombok.Data;
import org.springframework.boot.context.properties.ConfigurationProperties;
import org.springframework.context.annotation.Configuration;

/**
 * @author zr 2024/2/29
 */
@ConfigurationProperties(prefix = "aliyun.oss")
@Configuration
@Data
public class OSSConfig {
    private String endPoint;
    private String accessKeyId;
    private String accessKeySecret;
    private String bucketName;
}
4. 文件上传相关接口FileService
package com.vehicle.manager.core.service;

import org.springframework.web.multipart.MultipartFile;

/**
 * @author zr 2024/2/29
 */
public interface FileService {
    /**
     * 阿里云OSS文件上传
     * @param file
     * @return
     */
    String upload(MultipartFile file);
}
5. 文件上传接口实现类FileServiceImpl
package com.vehicle.manager.core.service.impl;

import com.aliyun.oss.OSS;
import com.aliyun.oss.OSSClientBuilder;
import com.aliyun.oss.model.PutObjectResult;
import com.vehicle.manager.core.config.OSSConfig;
import com.vehicle.manager.core.service.FileService;
import lombok.extern.slf4j.Slf4j;
import org.springframework.beans.factory.annotation.Autowired;
import org.springframework.stereotype.Service;
import org.springframework.web.multipart.MultipartFile;

import java.io.IOException;
import java.time.LocalDateTime;
import java.time.format.DateTimeFormatter;
import java.util.UUID;

/**
 * 文件上传业务类
 * @author zr 2024/2/29
 */
@Service
@Slf4j
public class FileServiceImpl implements FileService {
    @Autowired
    private OSSConfig ossConfig;

    /**
     * 阿里云OSS文件上传
     *
     * @param file
     */
    @Override
    public String upload(MultipartFile file) {

        //获取相关配置
        String bucketName = ossConfig.getBucketName();
        String endPoint = ossConfig.getEndPoint();
        String accessKeyId = ossConfig.getAccessKeyId();
        String accessKeySecret = ossConfig.getAccessKeySecret();

        //创建OSS对象
        OSS ossClient = new OSSClientBuilder().build(endPoint, accessKeyId, accessKeySecret);

        //获取原生文件名
        String originalFilename = file.getOriginalFilename();
        //JDK8的日期格式
        LocalDateTime time = LocalDateTime.now();
        DateTimeFormatter dft = DateTimeFormatter.ofPattern("yyyy/MM/dd");

        //拼装OSS上存储的路径
        String folder = dft.format(time);
        String fileName = generateUUID();
        String extension = originalFilename.substring(originalFilename.lastIndexOf("."));

        //在OSS上bucket下的文件名
        String uploadFileName = "user/" + folder + "/" + fileName + extension;

        try {
            PutObjectResult result = ossClient.putObject(bucketName, uploadFileName, file.getInputStream());
            //拼装返回路径
            if (result != null) {
                return "https://"+bucketName+"."+endPoint+"/"+uploadFileName;
            }
        } catch (IOException e) {
            log.error("文件上传失败:{}",e.getMessage());
        } finally {
            //OSS关闭服务,不然会造成OOM
            ossClient.shutdown();
        }
        return null;
    }

    /**
     * 获取随机字符串
     * @return
     */
    private String generateUUID() {
        return UUID.randomUUID().toString().replaceAll("-", "").substring(0, 32);
    }
}
6. 文件上传接口
- 此处我整合了swagger,不需要的话可以去掉
@Api和@ApiOperation注解- Result可以用自己的,或者直接返回字符串
package com.vehicle.manager.api.controller;

import com.vehicle.manager.core.model.Result;
import com.vehicle.manager.core.model.enumeration.CommonResultStatus;
import com.vehicle.manager.core.service.FileService;
import io.swagger.annotations.Api;
import io.swagger.annotations.ApiOperation;
import lombok.extern.slf4j.Slf4j;
import org.springframework.beans.factory.annotation.Autowired;
import org.springframework.web.bind.annotation.PostMapping;
import org.springframework.web.bind.annotation.RequestMapping;
import org.springframework.web.bind.annotation.RequestPart;
import org.springframework.web.bind.annotation.RestController;
import org.springframework.web.multipart.MultipartFile;

/**
 * @author zr 2024/2/29
 */
@Slf4j
@RestController
@Api(tags = "文件管理")
@RequestMapping("/file")
public class FileController {
    @Autowired
    private FileService fileService;

    /**
     * 文件上传接口
     * @param file
     * @return
     */
    @PostMapping("/upload")
    @ApiOperation(value = "文件上传")
    public Result upload(@RequestPart("file") MultipartFile file){
        String imgFileStr = fileService.upload(file);
        if(imgFileStr== null || "".equals(imgFileStr)){
            return Result.failure(CommonResultStatus.FILE_UPLOAD_FAILED);
        }else{
            return Result.success(imgFileStr);
        }
    }
}
7. 测试接口
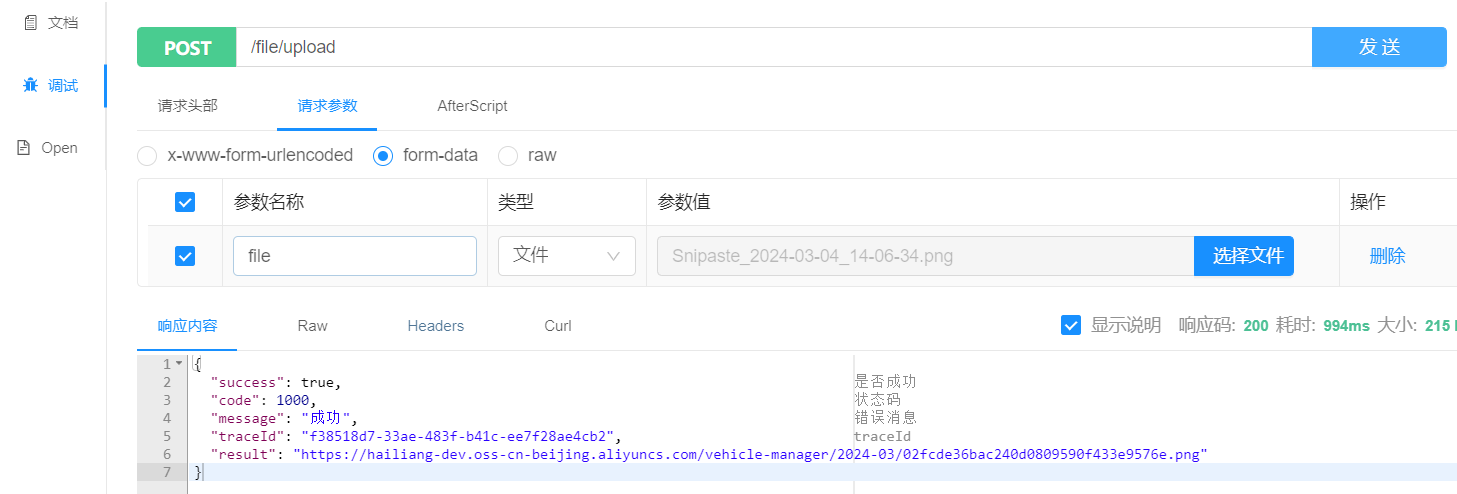
直接拿那返回的url去访问,发现AccessDenied,这种情况就是没有开放bucket的公共读的权限,有如下几种解决方案:
- 直接bucket开启公共读权限,所有人都可以访问,但是不安全
- bucket指定白名单,指定服务器ip可以访问(我认为比较好的一种方式)
- 使用STS以及签名URL临时授权访问OSS资源(本次我使用的)

使用STS以及签名URL临时授权访问OSS资源
设计思路:
- 因为生成的临时url会过期,所以我这里没有把生成的临时url存入数据库,而是存入缓存redis中
- 其中key为
OSS上bucket下的文件,这里我就简称为ObjectName,这个名称在bucket中是不会变的(key存入数据库)- 如果返回对象需要url,可以在vo中添加一个相关url字段,返回时获取临时url传入该字段
- value为我们生成的临时url地址
- 因为是临时url的缘故就需要涉及到过期时间的问题
- 临时url的过期时间我查了一下最大是7天,我设置的7天,可以视情况而定
- redis的过期时间我设置的6天,建议让redis过期时间小于url过期时间(不然就会出现url过期的情况)
1. 整合redis相关依赖
        <!-- 集成redis依赖  -->
        <dependency>
            <groupId>org.springframework.boot</groupId>
            <artifactId>spring-boot-starter-data-redis</artifactId>
        </dependency>
2. redisUtil,只涉及到相关的
package com.vehicle.manager.core.util;

import com.alibaba.fastjson.JSON;
import lombok.extern.slf4j.Slf4j;
import org.springframework.beans.BeansException;
import org.springframework.context.ApplicationContext;
import org.springframework.context.ApplicationContextAware;
import org.springframework.data.redis.RedisSystemException;
import org.springframework.data.redis.connection.DataType;
import org.springframework.data.redis.connection.RedisConnection;
import org.springframework.data.redis.connection.RedisStringCommands;
import org.springframework.data.redis.connection.ReturnType;
import org.springframework.data.redis.connection.jedis.JedisConnection;
import org.springframework.data.redis.connection.lettuce.LettuceConnection;
import org.springframework.data.redis.core.*;
import org.springframework.data.redis.core.types.Expiration;
import org.springframework.stereotype.Component;

import java.nio.charset.StandardCharsets;
import java.time.Instant;
import java.util.*;
import java.util.Map.Entry;
import java.util.concurrent.TimeUnit;

/**
 *  统一说明一: 方法中的key、 value都不能为null。
 *  统一说明二: 不能跨数据类型进行操作, 否者会操作失败/操作报错。
 *             如: 向一个String类型的做Hash操作,会失败/报错......等等
 * @author zr 2024/3/4
 */

@Slf4j
@Component
@SuppressWarnings("unused")
public class RedisUtil implements ApplicationContextAware {

    /**
     * 使用StringRedisTemplate(,其是RedisTemplate的定制化升级)
     */
    private static StringRedisTemplate redisTemplate;

    @Override
    public void setApplicationContext(ApplicationContext applicationContext) throws BeansException {
        RedisUtil.redisTemplate = applicationContext.getBean(StringRedisTemplate.class);
    }


    /**
     * string相关操作
     * <p>
     * 提示: redis中String的数据结构可参考resources/data-structure/String(字符串)的数据结构(示例一).png
     * redis中String的数据结构可参考resources/data-structure/String(字符串)的数据结构(示例二).png
     */
    public static class StringOps {

        /**
         * 设置key-value
         * <p>
         * 注: 若已存在相同的key, 那么原来的key-value会被丢弃。
         *
         * @param key   key
         * @param value key对应的value
         */
        public static void set(String key, String value) {
            log.info("set(...) => key -> {}, value -> {}", key, value);
            redisTemplate.opsForValue().set(key, value);
        }


        /**
         * 设置key-value
         * <p>
         * 注: 若已存在相同的key, 那么原来的key-value会被丢弃
         *
         * @param key     key
         * @param value   key对应的value
         * @param timeout 过时时长
         * @param unit    timeout的单位
         */
        public static void setEx(String key, String value, long timeout, TimeUnit unit) {
            log.info("setEx(...) => key -> {}, value -> {}, timeout -> {}, unit -> {}",
                    key, value, timeout, unit);
            redisTemplate.opsForValue().set(key, value, timeout, unit);
        }

        /**
         * 根据key,获取到对应的value值
         *
         * @param key key-value对应的key
         * @return 该key对应的值。
         * 注: 若key不存在, 则返回null。
         */
        public static String get(String key) {
            log.info("get(...) => key -> {}", key);
            String result = redisTemplate.opsForValue().get(key);
            log.info("get(...) => result -> {} ", result);
            return result;
        }
    }

}
3. 配置文件新增redis相关配置以及oss的`expiration`
spring:
  redis:
    host: 127.0.0.1
    password: 123456
    port: 6379
aliyun:
  oss:
    end-point: oss-cn-hangzhou.aliyuncs.com
    access-key-id: L**********
    access-key-secret: O**********
    bucket-name: oss-test-img
    expiration: 7  #临时url有效期(天)
4. 配置类新增`expiration`
package com.vehicle.manager.core.config;

import lombok.Data;
import org.springframework.boot.context.properties.ConfigurationProperties;
import org.springframework.context.annotation.Configuration;

/**
 * @author zr 2024/2/29
 */
@ConfigurationProperties(prefix = "aliyun.oss")
@Configuration
@Data
public class OSSConfig {
    private String endPoint;
    private String accessKeyId;
    private String accessKeySecret;
    private String bucketName;
    private Integer expiration;
}
5. 改动FileServiceImpl的upload返回临时url
package com.vehicle.manager.core.service.impl;

import com.alibaba.fastjson.JSON;
import com.aliyun.oss.OSS;
import com.aliyun.oss.OSSClientBuilder;
import com.aliyun.oss.model.GeneratePresignedUrlRequest;
import com.aliyun.oss.model.PutObjectResult;
import com.vehicle.manager.core.config.OSSConfig;
import com.vehicle.manager.core.service.FileService;
import com.vehicle.manager.core.util.RedisUtil;
import lombok.extern.slf4j.Slf4j;
import org.apache.commons.lang3.ObjectUtils;
import org.springframework.beans.factory.annotation.Autowired;
import org.springframework.stereotype.Service;
import org.springframework.web.multipart.MultipartFile;

import java.io.IOException;
import java.net.URL;
import java.time.LocalDateTime;
import java.time.format.DateTimeFormatter;
import java.util.Date;
import java.util.UUID;
import java.util.concurrent.TimeUnit;

/**
 * 文件上传业务类
 *
 * @author zr 2024/2/29
 */
@Service
@Slf4j
public class FileServiceImpl implements FileService {
    @Autowired
    private OSSConfig ossConfig;
    /**
     * 阿里云OSS文件上传
     *
     * @param file
     */
    @Override
    public String upload(MultipartFile file) {

        //获取相关配置
        String bucketName = ossConfig.getBucketName();
        String endPoint = ossConfig.getEndPoint();
        String accessKeyId = ossConfig.getAccessKeyId();
        String accessKeySecret = ossConfig.getAccessKeySecret();

        //创建OSS对象
        OSS ossClient = new OSSClientBuilder().build(endPoint, accessKeyId, accessKeySecret);

        //获取原生文件名
        String originalFilename = file.getOriginalFilename();
        //JDK8的日期格式
        LocalDateTime time = LocalDateTime.now();
        DateTimeFormatter dft = DateTimeFormatter.ofPattern("yyyy-MM");

        //拼装OSS上存储的路径
        String folder = dft.format(time);
        String fileName = generateUUID();
        String extension = originalFilename.substring(originalFilename.lastIndexOf("."));

        //在OSS上bucket下的文件名
        String uploadFileName = "vehicle-manager/" + folder + "/" + fileName + extension;
        String temporaryUrl = null;
        try {
            PutObjectResult result = ossClient.putObject(bucketName, uploadFileName, file.getInputStream());
            //拼装返回路径
            if (result != null) {
//                原路径
//                return "https://"+bucketName+"."+endPoint+"/"+uploadFileName;
                temporaryUrl  = getTemporaryUrl(uploadFileName);
            }
        } catch (Exception e) {
            log.error("文件上传失败:{}", e.getMessage());
        } finally {
            //OSS关闭服务,不然会造成OOM
            ossClient.shutdown();
        }
        return temporaryUrl;
    }

    /**
     * 获取临时url
     *
     * @return
     */
    @Override
    public String getTemporaryUrl(String uploadFileName) {
        String value = RedisUtil.StringOps.get(uploadFileName);
        if (ObjectUtils.isNotEmpty(value)){
            return value;
        }
        //获取相关配置
        String bucketName = ossConfig.getBucketName();
        String endPoint = ossConfig.getEndPoint();
        String accessKeyId = ossConfig.getAccessKeyId();
        String accessKeySecret = ossConfig.getAccessKeySecret();
        Integer expirationDay = ossConfig.getExpiration();

        //创建OSS对象
        OSS ossClient = new OSSClientBuilder().build(endPoint, accessKeyId, accessKeySecret);

        // 设置过期时间
        Date expiration = new Date(System.currentTimeMillis() + expirationDay * 3600 * 1000); // 1 小时后过期
        // 生成临时访问 URL
        GeneratePresignedUrlRequest request = new GeneratePresignedUrlRequest(bucketName, uploadFileName);
        request.setExpiration(expiration);
        URL signedUrl = ossClient.generatePresignedUrl(request);
        String urlString = signedUrl.toString();
        //缓存过期时间比oss过期时间少一天
        RedisUtil.StringOps.setEx(uploadFileName, urlString, expirationDay - 1, TimeUnit.DAYS);
        // 关闭 OSS 客户端
        ossClient.shutdown();

        return urlString;
    }

    /**
     * 获取随机字符串
     *
     * @return
     */
    private String generateUUID() {
        return UUID.randomUUID().toString().replaceAll("-", "").substring(0, 32);
    }
}
6. 测试

