相机和介质一样,调试起来很麻烦,所以我总是逐步开发我的相机。首先,我们允许可调节的视野(fov)。这是渲染图像从一边到另一边的视觉角度。由于我们的图像不是正方形的,水平和垂直的视野是不同的。我总是使用垂直视野。通常我会用角度来指定,然后在构造函数内部转换为弧度 — 这只是个人喜好的问题。
12.1 Camera Viewing Geometry
首先,我们将保持从原点出发并指向z = -1平面的光线。我们可以将其设置为z = -2平面,或任何其他平面,只要我们将h与该距离成比例即可。以下是我们的设置:
Figure 18: Camera viewing geometry (from the side)
This implies , Our camera now becomes:
class camera {
  public:    double aspect_ratio      = 1.0;  // Ratio of image width over height
int    image_width       = 100;  // Rendered image width in pixel count
int    samples_per_pixel = 10;   // Count of random samples for each pixel
int    max_depth         = 10;   // Maximum number of ray bounces into scene

double vfov = 90;  // Vertical view angle (field of view)

void render(const hittable& world) {
    ...
  private:
   ...
   void initialize() {
      image_height = static_cast<int>(image_width / aspect_ratio);
      image_height = (image_height < 1) ? 1 : image_height;

      center = point3(0, 0, 0);

      // Determine viewport dimensions.
        auto focal_length = 1.0;
        auto theta = degrees_to_radians(vfov);
        auto h = tan(theta/2);
        auto viewport_height = 2 * h * focal_length;
auto viewport_width=viewport_height*(static_cast<double>(image_width)/image_height);

// Calculate the vectors across the horizontal and down the vertical viewport edges.
        auto viewport_u = vec3(viewport_width, 0, 0);
        auto viewport_v = vec3(0, -viewport_height, 0);

        // Calculate the horizontal and vertical delta vectors from pixel to pixel.
       pixel_delta_u = viewport_u / image_width;
        pixel_delta_v = viewport_v / image_height;

        // Calculate the location of the upper left pixel.
        auto viewport_upper_left =
            center - vec3(0, 0, focal_length) - viewport_u/2 - viewport_v/2;        pixel00_loc = viewport_upper_left + 0.5 * (pixel_delta_u + pixel_delta_v);
    }
    ...
};
Listing 74: [camera.h] Camera with adjustable field-of-view (fov)
我们将使用一个90°的视野来测试这些变化,以两个相互接触的球体构成的简单场景为例。
int main() {
hittable_list world;
auto R = cos(pi/4);
auto material_left  = make_shared<lambertian>(color(0,0,1));
auto material_right = make_shared<lambertian>(color(1,0,0));
world.add(make_shared<sphere>(point3(-R, 0, -1), R, material_left));
world.add(make_shared<sphere>(point3( R, 0, -1), R, material_right));
camera cam;
cam.aspect_ratio      = 16.0 / 9.0;
cam.image_width       = 400;
cam.samples_per_pixel = 100;
cam.max_depth         = 50;
cam.vfov = 90;
cam.render(world);
}
得到渲染结果: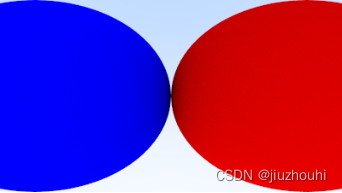
Image 19: A wide-angle view
12.2 Positioning and Orienting the Camera(定位和定向相机)
为了获得任意的viewpoint,让我们首先给出我们关心的点的名称。我们将摄像机放置的位置称为"lookfrom",我们注视的点称为"lookat"。(稍后,如果需要,可以定义一个注视方向而不是注视点。)
我们还需要一种方式来指定摄像机的倾斜角度,也就是绕"lookat-lookfrom"轴的旋转。另一种思考方式是,即使保持"lookfrom"和"lookat"不变,你仍然可以围绕你的鼻子旋转头部。我们需要的是一种为摄像机指定"up"向量的方法。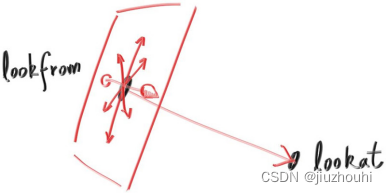
Figure 19: Camera view direction
我们可以指定任何一个up向量,只要它不与视线方向平行。将这个up向量投影到与视线方向正交的平面上,得到一个相对于相机的up向量。我使用常见的约定将其命名为“view up”(vup)向量。经过几次叉乘和向量归一化,我们现在有了一个完整的正交基(u、v、w),用于描述相机的方向。u是指向相机右侧的单位向量,v是指向相机上方的单位向量,w是指向视线方向相反的单位向量(由于我们使用右手坐标系),相机中心位于原点。
Figure 20: Camera view up direction
与以前一样,当我们的固定相机面向-Z时,我们的任意视角相机面向-w。请记住,我们可以选择使用世界坐标系的上方向(0,1,0)来指定vup,但不是必须的。这种方法很方便,可以让你的相机在水平方向保持平稳,直到你决定尝试一些疯狂的相机角度为止。
class camera {
  public:
double aspect_ratio      = 1.0;  // Ratio of image width over height
    int    image_width       = 100;  // Rendered image width in pixel count
    int    samples_per_pixel = 10;   // Count of random samples for each pixel
    int    max_depth         = 10;   // Maximum number of ray bounces into scene
    double vfov     = 90;              // Vertical view angle (field of view)
    point3 lookfrom = point3(0,0,-1);  // Point camera is looking from
    point3 lookat   = point3(0,0,0);   // Point camera is looking at
    vec3   vup      = vec3(0,1,0);     // Camera-relative "up" direction
    ...
  private:    int    image_height;   // Rendered image height
    point3 center;         // Camera center
    point3 pixel00_loc;    // Location of pixel 0, 0
    vec3   pixel_delta_u;  // Offset to pixel to the right
    vec3   pixel_delta_v;  // Offset to pixel below
    vec3   u, v, w;        // Camera frame basis vectors

    void initialize() {
       image_height = static_cast<int>(image_width / aspect_ratio);
       image_height = (image_height < 1) ? 1 : image_height;

        center = lookfrom;

        // Determine viewport dimensions.
        auto focal_length = (lookfrom - lookat).length();
        auto theta = degrees_to_radians(vfov);
       auto h = tan(theta/2);
        auto viewport_height = 2 * h * focal_length;
Auto viewport_width = viewport_height * (static_cast<double>(image_width) / image_height);

        // Calculate the u,v,w unit basis vectors for the camera coordinate frame.
        w = unit_vector(lookfrom - lookat);
        u = unit_vector(cross(vup, w));
        v = cross(w, u);

    // Calculate the vectors across the horizontal and down the vertical viewport edges.
        vec3 viewport_u = viewport_width * u; // Vector across viewport horizontal edge
       vec3 viewport_v = viewport_height * -v; // Vector down viewport vertical edge

        // Calculate the horizontal and vertical delta vectors from pixel to pixel.
       pixel_delta_u = viewport_u / image_width;
        pixel_delta_v = viewport_v / image_height;

        // Calculate the location of the upper left pixel.
        auto viewport_upper_left=center-(focal_length*w)-viewport_u/2-viewport_v/2;
        pixel00_loc = viewport_upper_left + 0.5 * (pixel_delta_u + pixel_delta_v);
}
    ...
  private:
};
Listing 76: [camera.h] Positionable and orientable camera
我们将回到之前的场景,并使用新的视点:
int main() {
hittable_list world;

auto material_ground = make_shared<lambertian>(color(0.8, 0.8, 0.0));
auto material_center = make_shared<lambertian>(color(0.1, 0.2, 0.5));
auto material_left   = make_shared<dielectric>(1.5);
auto material_right  = make_shared<metal>(color(0.8, 0.6, 0.2), 0.0);

    world.add(make_shared<sphere>(point3( 0.0, -100.5, -1.0), 100.0, material_ground));
    world.add(make_shared<sphere>(point3( 0.0,    0.0, -1.0),   0.5, material_center));
    world.add(make_shared<sphere>(point3(-1.0,    0.0, -1.0),   0.5, material_left));
world.add(make_shared<sphere>(point3(-1.0,    0.0, -1.0),  -0.4, material_left));
world.add(make_shared<sphere>(point3( 1.0,    0.0, -1.0),   0.5, material_right));

camera cam;

    cam.aspect_ratio      = 16.0 / 9.0;
    cam.image_width       = 400;
    cam.samples_per_pixel = 100;
    cam.max_depth         = 50;

    cam.vfov     = 90;
    cam.lookfrom = point3(-2,2,1);
    cam.lookat   = point3(0,0,-1);
    cam.vup      = vec3(0,1,0);

    cam.render(world);
}
Listing 77: [main.cc] Scene with alternate viewpoint
得到: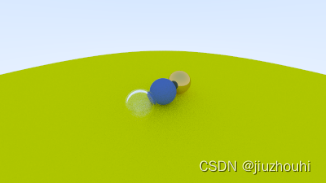
Image 20: A distant view
修改 field of view :
cam.vfov = 20;
Listing 78: [main.cc] Change field of view
变为:
Image 21: Zooming in


