简介
人群计数是计算机视觉领域的一个核心任务,旨在估算静止图像或视频帧中的行人数量。在过去几十年中,研究人员在这个领域投入了大量的精力,并在提高现有主流基准数据集性能方面取得了显著进展。然而,训练卷积神经网络需要大规模且高质量的标记数据集,而标记像素级别的行人位置成本昂贵,令人望而却步。
此外,由于数据分布之间存在领域转移,即在标签丰富的数据领域(源领域)上训练的模型无法很好地泛化到另一个标签稀缺的数据领域(目标领域),这严重限制了现有方法的实际应用。
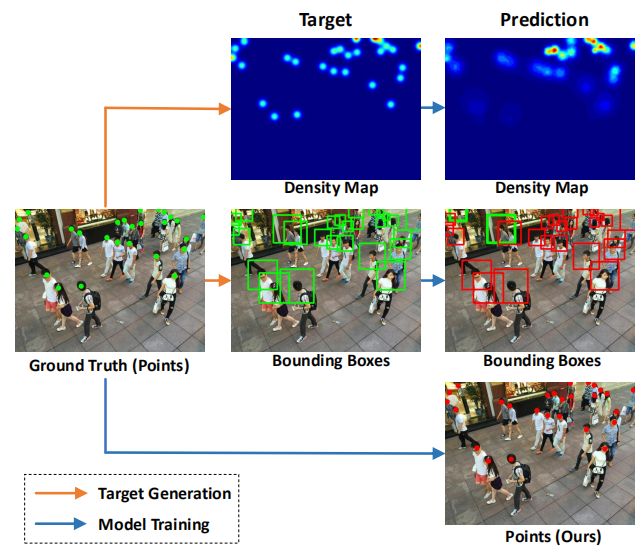
《Rethinking Counting and Localization in Crowds: A Purely Point-Based Framework》提出了一个全新的基于点的框架,可以同时用于人群计数和个体定位。与传统的基于定位的方法不同,该框架完全依赖于点级别的表示,避免了中间表示(如密度图或伪目标框)可能引入的误差,并提出了一种新的性能评价指标,称为密度归一化平均精度,以更全面、更准确地评估模型性能。
研究团队还提出了一个名为点对点网络(P2PNet)的示例模型,该模型直接预测一系列人头点的集合来定位图像中的人群个体,避免了冗余步骤,并实现了与真实人工标注一致的定位。通过深入分析,研究者发现了实现该方法的核心策略,即为预测的候选点分配最优的学习目标,并通过基于匈牙利算法的一对一匹配策略来实现。实验证明,P2PNet在人群计数基准上显著超越了现有的最先进方法,并取得了非常高的定位精度。
网络结构
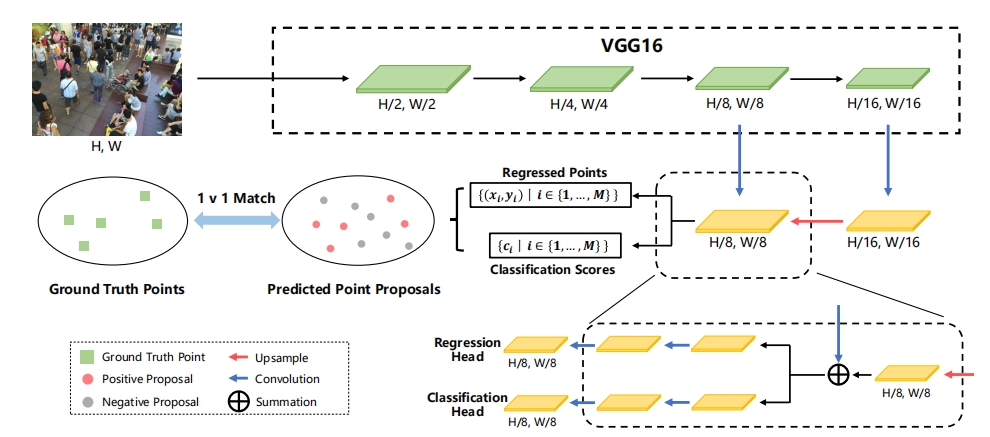
P2PNet的网络结构并不复杂。它建立在VGG16的基础上,并引入了一个上采样路径来获取细粒度的深度特征图,类似于特征金字塔网络(FPN)。然后,它利用两个分支来同时预测一组点及其置信度分数。在我们的流程中,关键步骤是确保预测点和真实点之间的一对一匹配,这决定了这些预测点的学习目标。
预测
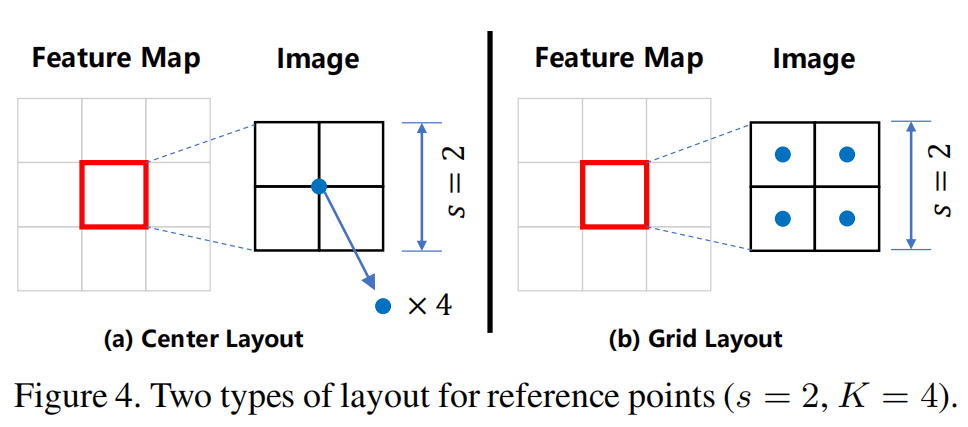
Point proposals的初始化有两种方式,一种是全部初始化在中心点,另一种是网格式分布。Feature Map上的一个pixel对应着原图上的一个patch(sxs),并在这上面初始化K个Point proposal。
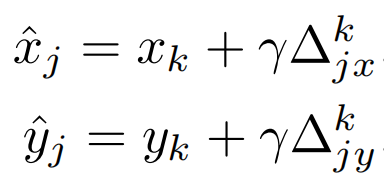
这些point proposals的坐标加上回归头分支得到的偏置就可以得到预测点的坐标。
匹配与损失计算

预测点与真实点之间的匹配用的是匈牙利算法,代价矩阵的计算方式如上图,它是坐标偏差与置信度分数的一个综合的考量。
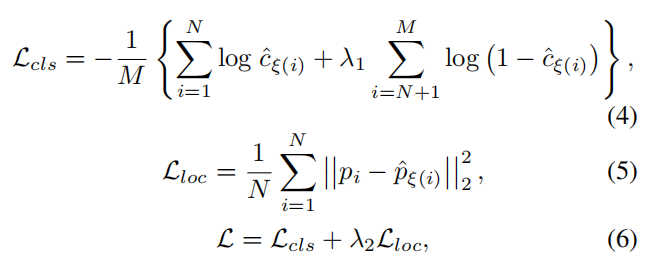
分类损失函数是交叉熵损失,回归损失函数是欧氏距离。
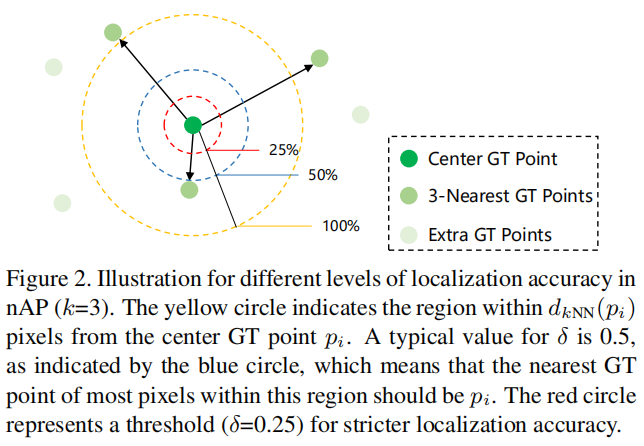
文章还提出了一种新的度量指标nAP。nAP是根据平均精度计算出来的,平均精度是精度-召回率(PR)曲线下的面积。具体来说,给定所有预测的头部点ˆP,我们首先将其置信度得分从高到低进行排序。然后,根据预定义的密度感知标准,依次确定所调查的点是TP或FP。密度感知标准如上左图所示。
实验结果
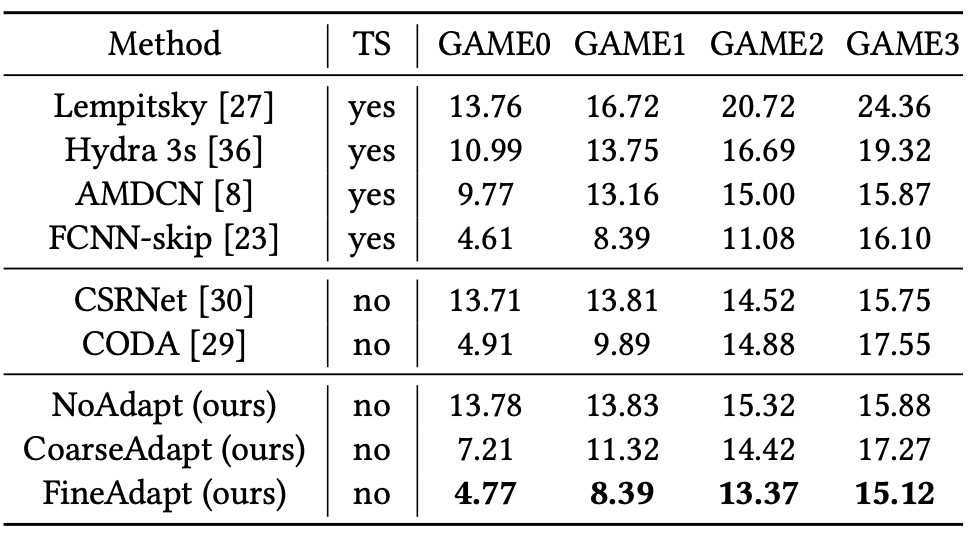
研究者考虑了从ShanghaiTech Part A到Trancos的实验,如上表所示。显然,所提出的方法比现有的适应方法提高了2.9%。
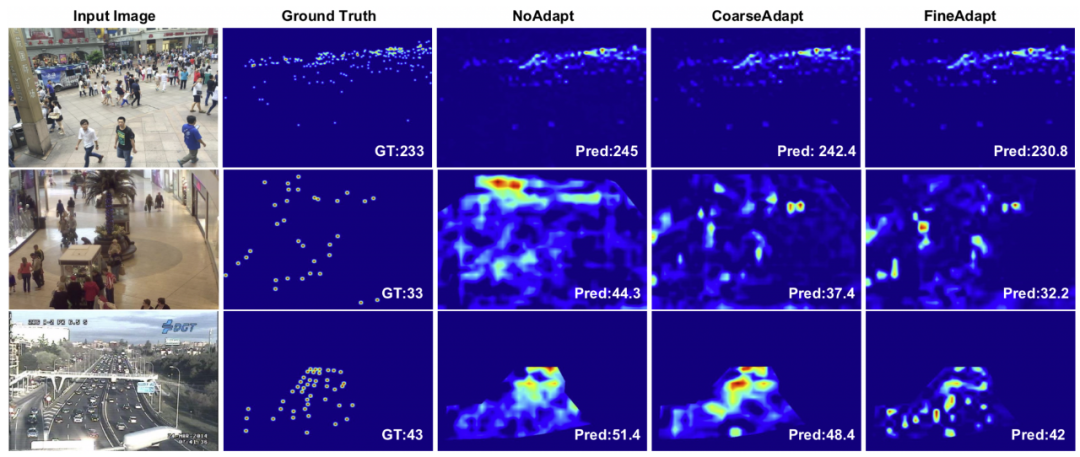
由双重鉴别器生成的不同级别(分别为像素、补丁像素、补丁、图像)级别分数的可视化。图中的正方形代表一个标量。注意白色方块代表1,黑色方块代表0。
实现代码
训练代码可以参考:https://github.com/TencentYoutuResearch/CrowdCounting-P2PNet
推理代码可以参考下面的代码:
#include <sstream>
#include <iostream>
#include <opencv2/opencv.hpp>
#include <opencv2/dnn.hpp>
using namespace cv;
using namespace dnn;
using namespace std;
struct CrowdPoint
{
cv::Point pt;
float prob;
};
static void shift(int w, int h, int stride, vector<float> anchor_points, vector<float>& shifted_anchor_points)
{
vector<float> x_, y_;
for (int i = 0; i < w; i++)
{
float x = (i + 0.5) * stride;
x_.push_back(x);
}
for (int i = 0; i < h; i++)
{
float y = (i + 0.5) * stride;
y_.push_back(y);
}
vector<float> shift_x((size_t)w * h, 0), shift_y((size_t)w * h, 0);
for (int i = 0; i < h; i++)
{
for (int j = 0; j < w; j++)
{
shift_x[i * w + j] = x_[j];
}
}
for (int i = 0; i < h; i++)
{
for (int j = 0; j < w; j++)
{
shift_y[i * w + j] = y_[i];
}
}
vector<float> shifts((size_t)w * h * 2, 0);
for (int i = 0; i < w * h; i++)
{
shifts[i * 2] = shift_x[i];
shifts[i * 2 + 1] = shift_y[i];
}
shifted_anchor_points.resize((size_t)2 * w * h * anchor_points.size() / 2, 0);
for (int i = 0; i < w * h; i++)
{
for (int j = 0; j < anchor_points.size() / 2; j++)
{
float x = anchor_points[j * 2] + shifts[i * 2];
float y = anchor_points[j * 2 + 1] + shifts[i * 2 + 1];
shifted_anchor_points[i * anchor_points.size() / 2 * 2 + j * 2] = x;
shifted_anchor_points[i * anchor_points.size() / 2 * 2 + j * 2 + 1] = y;
}
}
}
static void generate_anchor_points(int stride, int row, int line, vector<float>& anchor_points)
{
float row_step = (float)stride / row;
float line_step = (float)stride / line;
vector<float> x_, y_;
for (int i = 1; i < line + 1; i++)
{
float x = (i - 0.5) * line_step - stride / 2;
x_.push_back(x);
}
for (int i = 1; i < row + 1; i++)
{
float y = (i - 0.5) * row_step - stride / 2;
y_.push_back(y);
}
vector<float> shift_x((size_t)row * line, 0), shift_y((size_t)row * line, 0);
for (int i = 0; i < row; i++)
{
for (int j = 0; j < line; j++)
{
shift_x[i * line + j] = x_[j];
}
}
for (int i = 0; i < row; i++)
{
for (int j = 0; j < line; j++)
{
shift_y[i * line + j] = y_[i];
}
}
anchor_points.resize((size_t)row * line * 2, 0);
for (int i = 0; i < row * line; i++)
{
float x = shift_x[i];
float y = shift_y[i];
anchor_points[i * 2] = x;
anchor_points[i * 2 + 1] = y;
}
}
static void generate_anchor_points(int img_w, int img_h, vector<int> pyramid_levels, int row, int line, vector<float>& all_anchor_points)
{
vector<pair<int, int> > image_shapes;
vector<int> strides;
for (int i = 0; i < pyramid_levels.size(); i++)
{
int new_h = floor((img_h + pow(2, pyramid_levels[i]) - 1) / pow(2, pyramid_levels[i]));
int new_w = floor((img_w + pow(2, pyramid_levels[i]) - 1) / pow(2, pyramid_levels[i]));
image_shapes.push_back(make_pair(new_w, new_h));
strides.push_back(pow(2, pyramid_levels[i]));
}
all_anchor_points.clear();
for (int i = 0; i < pyramid_levels.size(); i++)
{
vector<float> anchor_points;
generate_anchor_points(pow(2, pyramid_levels[i]), row, line, anchor_points);
vector<float> shifted_anchor_points;
shift(image_shapes[i].first, image_shapes[i].second, strides[i], anchor_points, shifted_anchor_points);
all_anchor_points.insert(all_anchor_points.end(), shifted_anchor_points.begin(), shifted_anchor_points.end());
}
}
class P2PNet
{
public:
P2PNet(const float confThreshold = 0.5)
{
this->confThreshold = confThreshold;
this->net = readNet("SHTechA.onnx");
}
void detect(Mat& frame);
private:
float confThreshold;
Net net;
Mat preprocess(Mat srcimgt);
const float mean[3] = { 0.485, 0.456, 0.406 };
const float std[3] = { 0.229, 0.224, 0.225 };
vector<String> output_names = { "pred_logits", "pred_points" };
};
Mat P2PNet::preprocess(Mat srcimg)
{
int srch = srcimg.rows, srcw = srcimg.cols;
int new_width = srcw / 128 * 128;
int new_height = srch / 128 * 128;
Mat dstimg;
cvtColor(srcimg, dstimg, cv::COLOR_BGR2RGB);
resize(dstimg, dstimg, Size(new_width, new_height), INTER_AREA);
dstimg.convertTo(dstimg, CV_32F);
int i = 0, j = 0;
for (i = 0; i < dstimg.rows; i++)
{
float* pdata = (float*)(dstimg.data + i * dstimg.step);
for (j = 0; j < dstimg.cols; j++)
{
pdata[0] = (pdata[0] / 255.0 - this->mean[0]) / this->std[0];
pdata[1] = (pdata[1] / 255.0 - this->mean[1]) / this->std[1];
pdata[2] = (pdata[2] / 255.0 - this->mean[2]) / this->std[2];
pdata += 3;
}
}
return dstimg;
}
void P2PNet::detect(Mat& frame)
{
const int width = frame.cols;
const int height = frame.rows;
Mat img = this->preprocess(frame);
const int new_width = img.cols;
const int new_height = img.rows;
Mat blob = blobFromImage(img);
this->net.setInput(blob);
vector<Mat> outs;
//this->net.forward(outs, this->net.getUnconnectedOutLayersNames());
this->net.forward(outs, output_names);
vector<int> pyramid_levels(1, 3);
vector<float> all_anchor_points;
generate_anchor_points(img.cols, img.rows, pyramid_levels, 2, 2, all_anchor_points);
const int num_proposal = outs[0].cols;
int i = 0;
float* pscore = (float*)outs[0].data;
float* pcoord = (float*)outs[1].data;
vector<CrowdPoint> crowd_points;
for (i = 0; i < num_proposal; i++)
{
if (pscore[i] > this->confThreshold)
{
float x = (pcoord[i] + all_anchor_points[i * 2]) / (float)new_width * (float)width;
float y = (pcoord[i + 1] + all_anchor_points[i * 2 + 1]) / (float)new_height * (float)height;
crowd_points.push_back({ Point(int(x), int(y)), pscore[i] });
}
pcoord += 2;
}
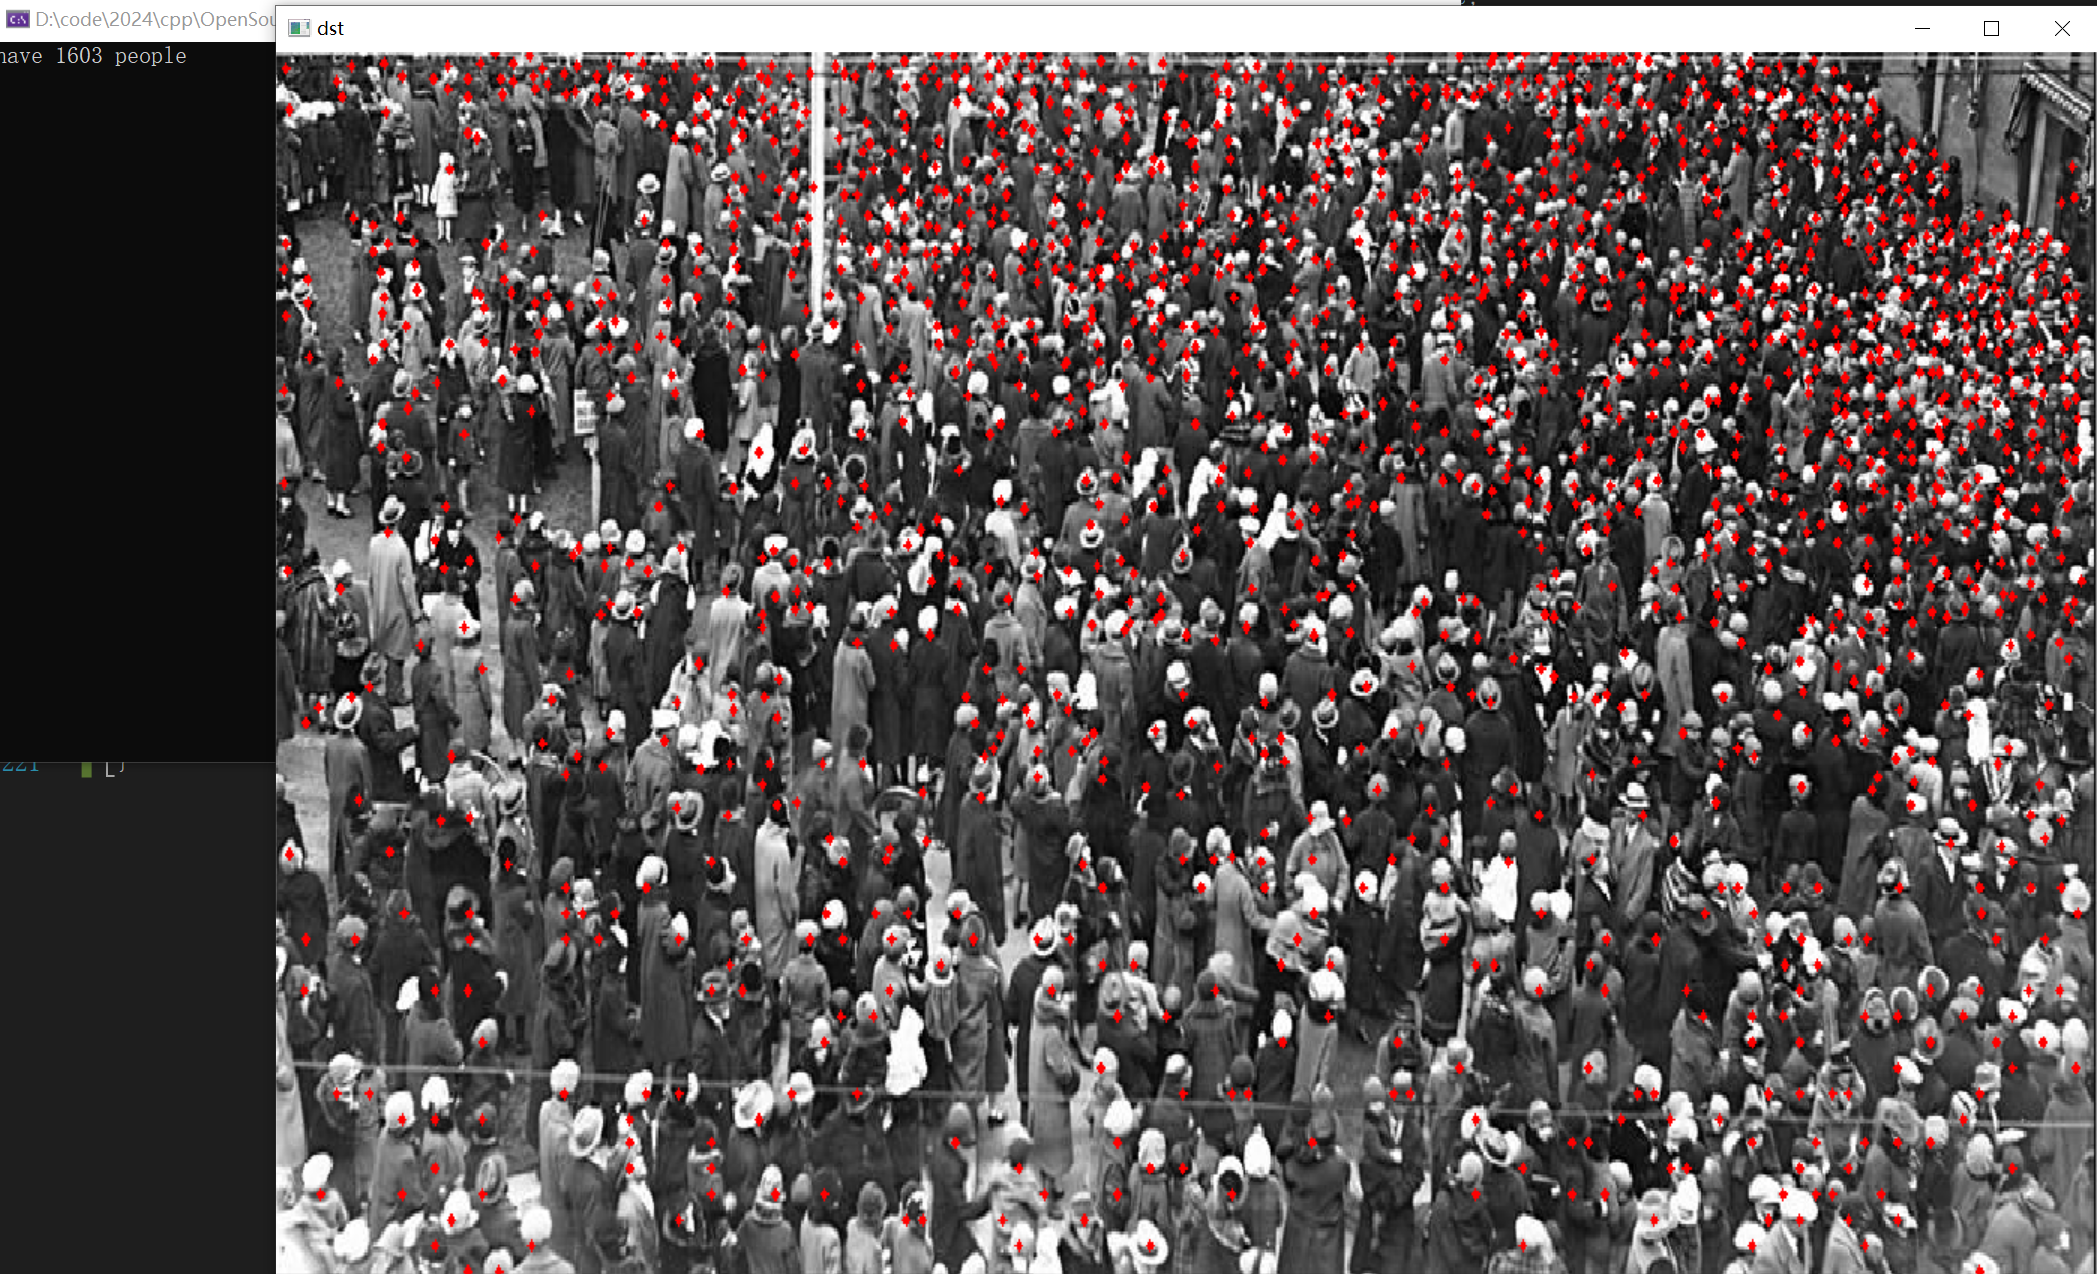
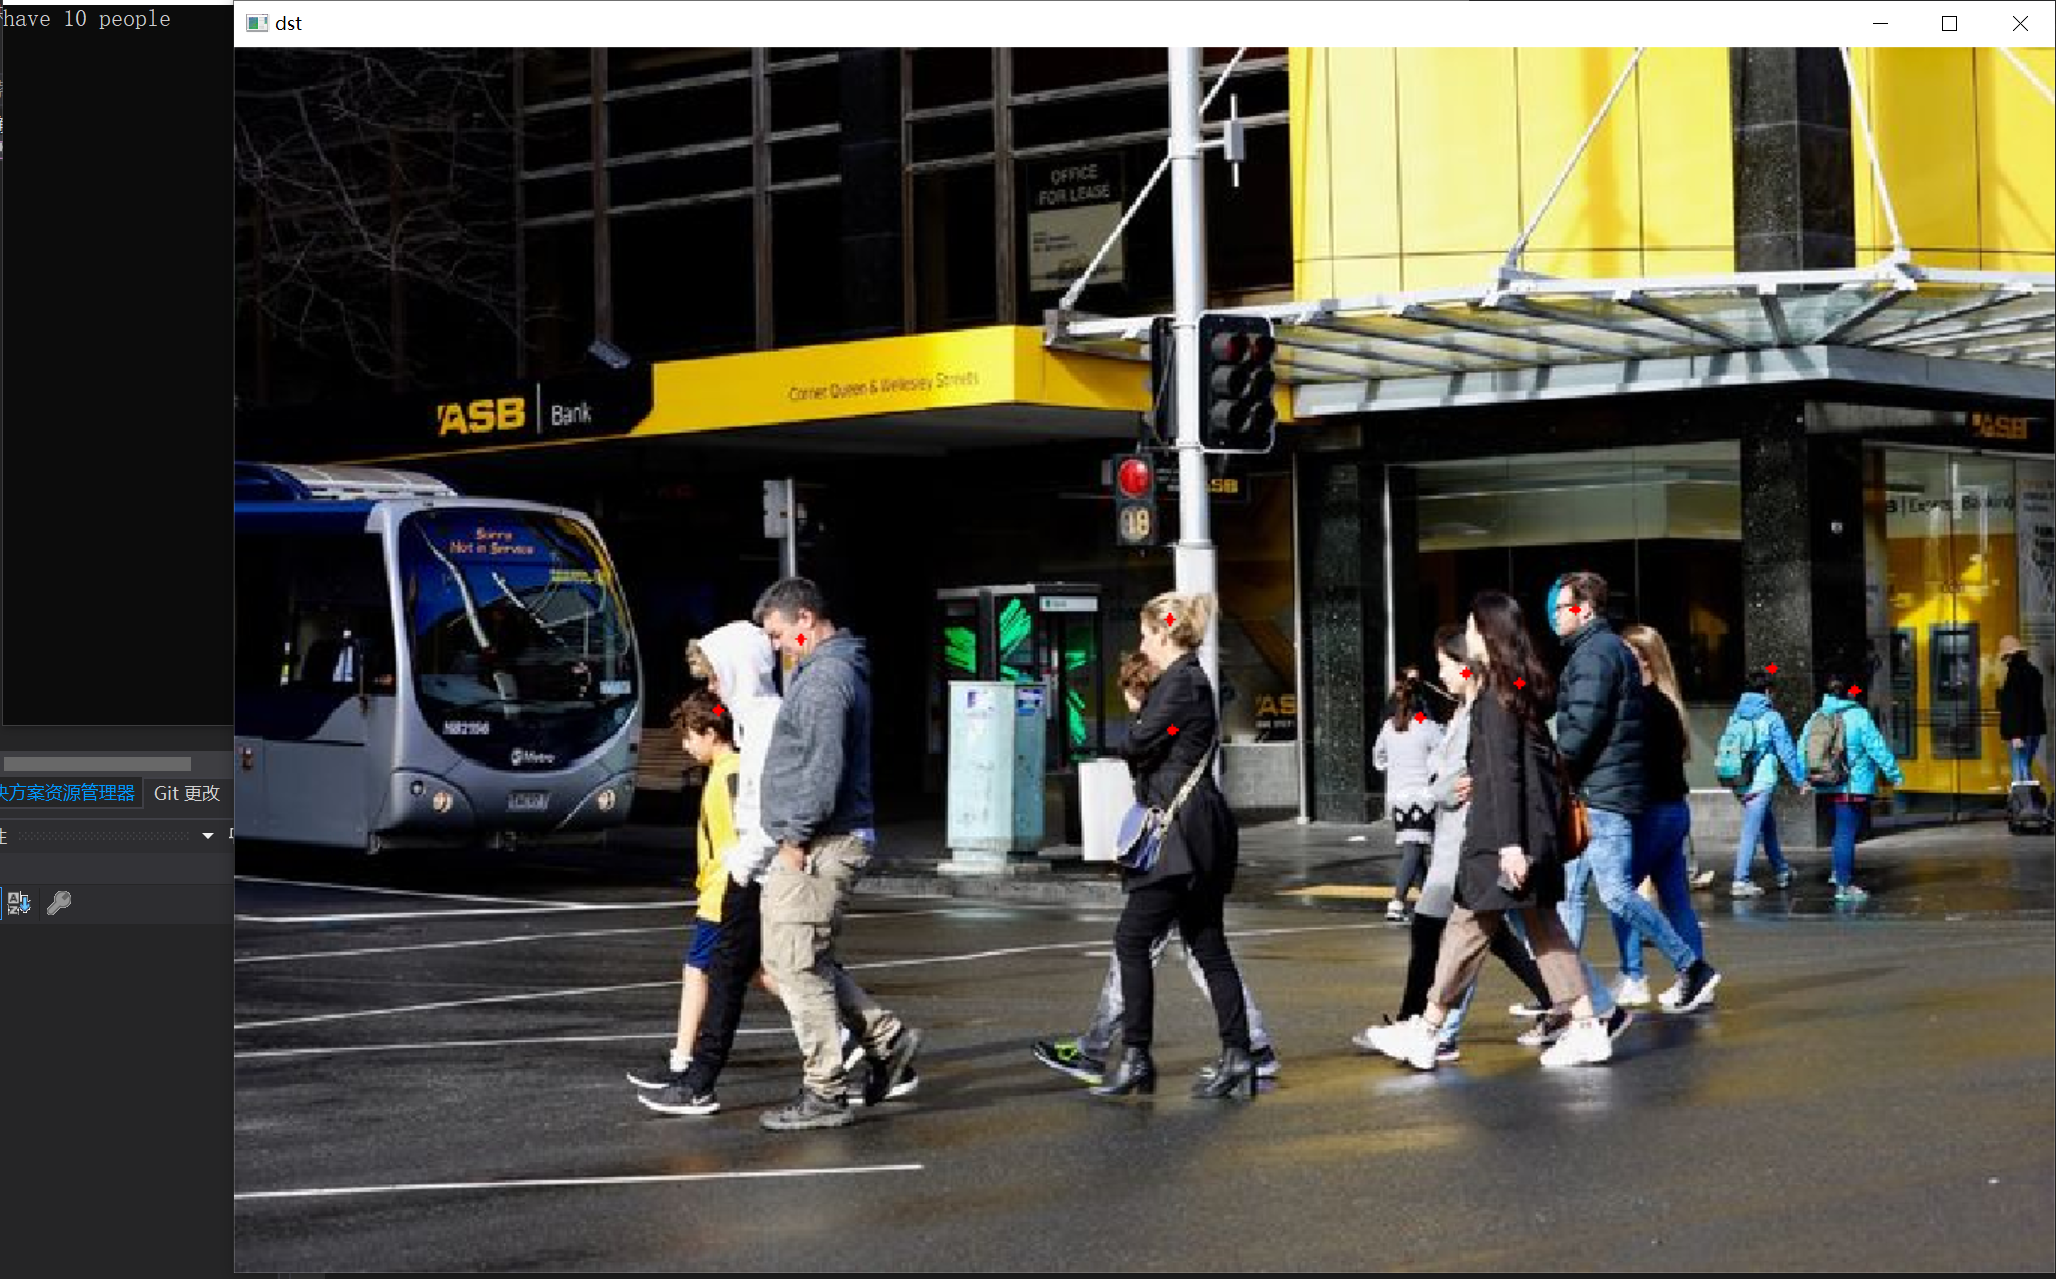
cout << "have " << crowd_points.size() << " people" << endl;
for (i = 0; i < crowd_points.size(); i++)
{
cv::circle(frame, crowd_points[i].pt, 2, cv::Scalar(0, 0, 255), -1, 8, 0);
}
}
int main()
{
P2PNet net(0.3);
string imgpath = "2.jpeg";
Mat srcimg = imread(imgpath);
net.detect(srcimg);
static const string kWinName = "dst";
namedWindow(kWinName, WINDOW_NORMAL);
imshow(kWinName, srcimg);
waitKey(0);
destroyAllWindows();
}
实现结果:
工程源码下载:https://download.csdn.net/download/matt45m/88936724?spm=1001.2014.3001.5503