Bun 提供了原生 Bun.serve API。它实现了 fetch 以及Node.js的 http 和 https 模块。
这些模块已被重新实现,以使用 Bun 的快速内部 HTTP 基础设施。随意直接使用这些模块;像 Express 这样依赖于这些模块的框架应该开箱即用。有关详细的兼容性信息,请参阅运行时> Node.js API。
要使用纯净的 API 启动高性能 HTTP 服务器,推荐的方法是 Bun.serve。
Bun.serve
使用 Bun.serve 启动 HTTP 服务器。
Bun.serve({
  fetch(req) {
    return new Response("Bun!");
  },
});
fetch 用来处理传入请求。它接收 Request 对象并返回 Response 或 Promise<Response>。
Bun.serve({
  fetch(req) {
    const url = new URL(req.url);
    if (url.pathname === "/") return new Response("Home page!");
    if (url.pathname === "/blog") return new Response("Blog!");
    return new Response("404!");
  },
});
配置服务器监听的端口和主机名:
Bun.serve({
  port: 8080, // defaults to $BUN_PORT, $PORT, $NODE_PORT otherwise 3000
  hostname: "mydomain.com", // defaults to "0.0.0.0"
  fetch(req) {
    return new Response("404!");
  },
});
监听 unix 域套接字:
Bun.serve({
  unix: "/tmp/my-socket.sock", // path to socket
  fetch(req) {
    return new Response(`404!`);
  },
});
错误处理
若要激活开发模式,请设置 development: true。默认情况下,除非NODE_ENV === production,否则将启用开发模式。
Bun.serve({
  development: true,
  fetch(req) {
    throw new Error("woops!");
  },
});
在开发模式下,Bun 会在浏览器中显示带有内置错误页面的错误。
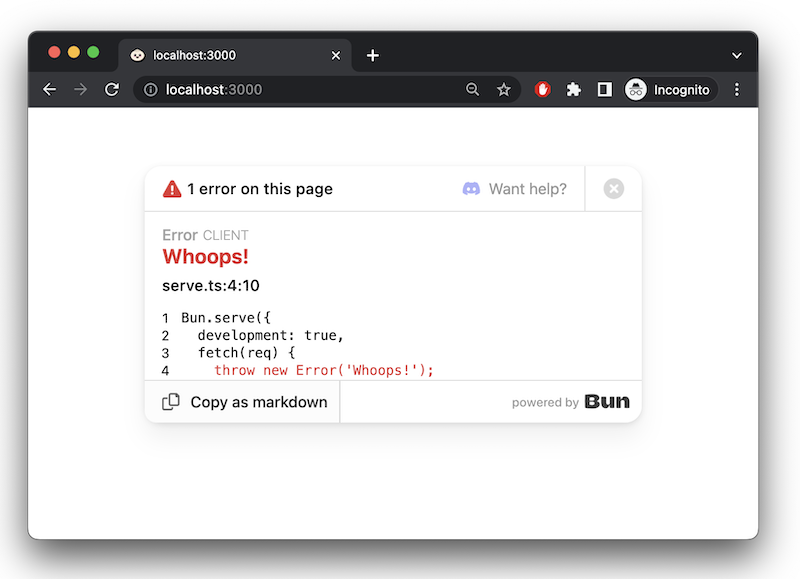
若要处理服务器端错误,请实现error处理程序。此函数应返回一个 Response,以便在发生错误时提供给客户端。此响应将取代 Bun 在development模式下的默认错误页面。
Bun.serve({
  fetch(req) {
    throw new Error("woops!");
  },
  error(error) {
    return new Response(`<pre>${error}\n${error.stack}</pre>`, {
      headers: {
        "Content-Type": "text/html",
      },
    });
  },
});
对 Bun.serve 的调用将返回一个 Server 对象。若要停止服务器,请调用 .stop() 方法。
const server = Bun.serve({
  fetch() {
    return new Response("Bun!");
  },
});

server.stop();
TLS
Bun 支持开箱即用的 TLS,由 BoringSSL 提供支持。通过传入 key 和 cert 的值来启用 TLS;两者都是启用 TLS 所必需的。
Bun.serve({
  fetch(req) {
    return new Response("Hello!!!");
  },

  tls: {
    key: Bun.file("./key.pem"),
    cert: Bun.file("./cert.pem"),
  }
});
key 和 cert 字段需要 TLS 密钥和证书的内容,而不是它的路径。这可以是字符串、BunFile、TypedArray 或 Buffer。
Bun.serve({
  fetch() {},

  tls: {
    // BunFile
    key: Bun.file("./key.pem"),
    // Buffer
    key: fs.readFileSync("./key.pem"),
    // string
    key: fs.readFileSync("./key.pem", "utf8"),
    // array of above
    key: [Bun.file("./key1.pem"), Bun.file("./key2.pem")],
  },
});
如果您的私钥是使用密码加密的,请为 passphrase 提供一个值来解密它。
Bun.serve({
  fetch(req) {
    return new Response("Hello!!!");
  },

  tls: {
    key: Bun.file("./key.pem"),
    cert: Bun.file("./cert.pem"),
    passphrase: "my-secret-passphrase",
  }
});
(可选)您可以通过传递 ca 的值来覆盖受信任的 CA 证书。默认情况下,服务器将信任 Mozilla 策划的知名 CA 列表。指定 ca 时,Mozilla 列表将被覆盖。
Bun.serve({
  fetch(req) {
    return new Response("Hello!!!");
  },
  tls: {
    key: Bun.file("./key.pem"), // path to TLS key
    cert: Bun.file("./cert.pem"), // path to TLS cert
    ca: Bun.file("./ca.pem"), // path to root CA certificate
  }
});
要覆盖 Diffie-Hellman 参数,请执行以下操作:
Bun.serve({
  // ...
  tls: {
    // other config
    dhParamsFile: "/path/to/dhparams.pem", // path to Diffie Hellman parameters
  },
});
对象语法
到目前为止,本页的示例使用了显式的 Bun.serve API。Bun 还支持替代语法。
import {type Serve} from "bun";

export default {
  fetch(req) {
    return new Response("Bun!");
  },
} satisfies Serve;
不要将服务器选项传递到 Bun.serve,而是export default。此文件可以按原样执行;当 Bun 看到一个default fetch 处理程序的文件时,它会将其传递到后台的 Bun.serve。
流式处理文件
若要流式传输文件,请返回一个 Response 对象,并将 BunFile 对象作为正文。
Bun.serve({
  fetch(req) {
    return new Response(Bun.file("./hello.txt"));
  },
});
⚡️ 速度 — Bun 在可能的情况下自动使用 sendfile(2) 系统调用, 在内核中启用零拷贝文件传输 — 发送文件的最快方式。
可以使用 Bun.file 对象上的 slice(start, end) 方法发送文件的一部分。这会自动设置 Response 对象上的 Content-Range 和 Content-Length 标头。
Bun.serve({
  fetch(req) {
    // parse `Range` header
    const [start = 0, end = Infinity] = req.headers
      .get("Range") // Range: bytes=0-100
      .split("=") // ["Range: bytes", "0-100"]
      .at(-1) // "0-100"
      .split("-") // ["0", "100"]
      .map(Number); // [0, 100]

    // return a slice of the file
    const bigFile = Bun.file("./big-video.mp4");
    return new Response(bigFile.slice(start, end));
  },
});
基准
下面是一个简单 HTTP 服务器的 Bun 和 Node.js 实现,它响应每个传入 Request Bun!。
// bun

Bun.serve({
  fetch(req: Request) {
    return new Response("Bun!");
  },
  port: 3000,
});


// node

require("http")
  .createServer((req, res) => res.end("Bun!"))
  .listen(8080);
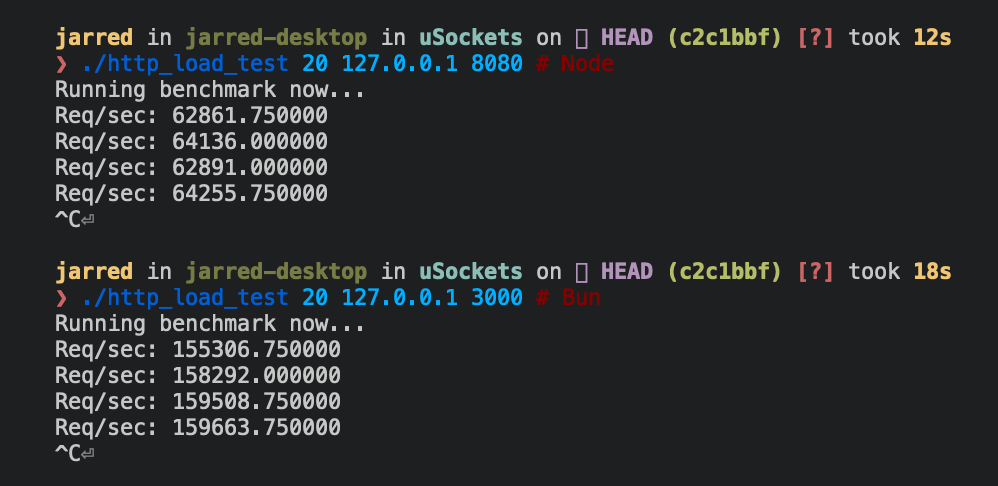
Bun.serve 服务器每秒处理的请求量大约是 Linux 上Node.js 的 2.5 倍。
| Runtime运行 | Requests per second每秒请求数 |
|---|---|
| Node 16 | ~64,000 |
| Bun | ~160,000 |
