1. 使用CRA创建项目
全局设置npm淘宝镜像源
npm config set registry https://registry.npmmirror.com -g
使用最新版create-react-app初始化项目结构
npx create-react-app custom-template --template typescript
初始化项目之后在package.json文件中配置使用node>=18.0.0,推荐包管理工具为pnpm 。如果使用npm包管理工具会导致后续安装依赖报错,需解决同级依赖问题。
{
	...
	"packageManager": "pnpm@8.6.6",
	"engines": {
	    "node": ">=18.0.0",
	    "npm": ">=8.0.0"
	}
}
2. 配置项目编码规范
2.1 集成editorconfig配置
在项目根目录下创建.editorconfig 文件;
官网:http://editorconfig.org
# @see: http://editorconfig.org
root = true

[*]
charset = utf-8
indent_style = space
indent_size = 2
end_of_line = lf
trim_trailing_whitespace = true
insert_final_newline = true

[*.md]
max_line_length = off
trim_trailing_whitespace = false
VSCode需要安装一个插件:EditorConfig for VS Code
2.2 使用prettier工具
Prettier 是一款强大的代码格式化工具,支持 JavaScript、TypeScript、CSS、SCSS、Less、JSX、Angular、Vue、GraphQL、JSON、Markdown 等语言,基本上前端能用到的文件格式它都可以搞定,是当下最流行的代码格式化工具。
- 在项目根目录下安装prettier
pnpm add prettier -D - 根目录下创建
.prettierrc文件{ "useTabs": false, "tabWidth": 2, "printWidth": 120, "singleQuote": false, "bracketSpacing": true, "trailingComma": "all", "semi": true, "arrowParens": "always" }
useTabs:使用tab缩进还是空格缩进,选择false;tabWidth:tab是空格的情况下,是几个空格,选择2个;printWidth:当行字符的长度,推荐80,也有人喜欢100或者120;singleQuote:使用单引号还是双引号,选择true,使用单引号;trailingComma:在多行输入的尾逗号是否添加,设置为none;semi:语句末尾是否要加分号,默认值true,选择false表示不加;
- 创建
.prettierignore忽略文件/dist/* .local .output.js /node_modules/** **/*.svg **/*.sh /public/* dist - VSCode需要安装prettier的插件

- 测试prettier是否生效
- 测试一:在代码中保存代码;
- 测试二:配置一次性修改的命令;
在package.json中配置一个scripts:
"prettier": "prettier --write ."
2.3 使用ESLint检测
- ESLint 为我们控编码质量,是项目开发必不可少的一箱工具。在项目中安装并使用
pnpm add -D eslint
- 安装完成后,使用命令生成默认配置文件
npm init @eslint/config


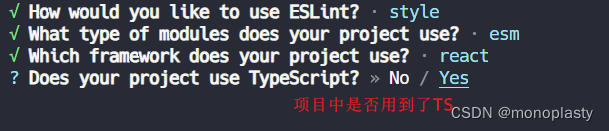

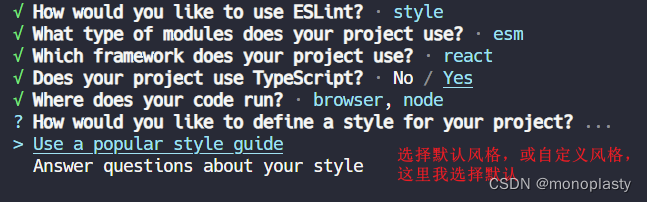
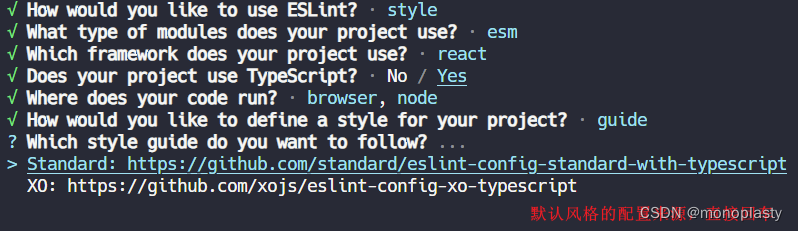
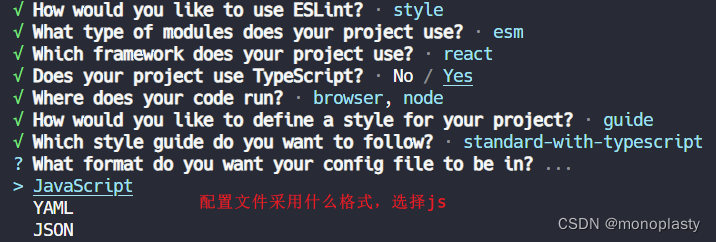
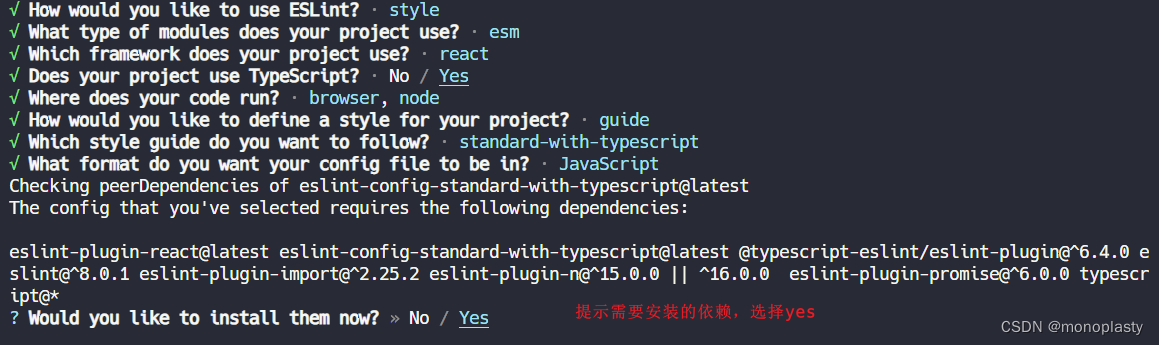

上述步骤完成后,会在项目根目录生成.eslintrc.js文件。后续可根据需求自定义在配置文件里修改。
- VSCode需要安装ESLint插件:

- 解决eslint和prettier冲突的问题:(如果有冲突则需要解决,没有问题可忽略)
以下是我的配置内容:
module.exports = {
  env: {
    browser: true,
    es2021: true,
    node: true,
  },
  extends: [
    "eslint:recommended",
    "plugin:@typescript-eslint/recommended",
    "plugin:react/recommended",
    "plugin:react/jsx-runtime",
    "plugin:react-hooks/recommended",
    "prettier",
    "plugin:prettier/recommended",
  ],
  parser: "@typescript-eslint/parser",
  parserOptions: {
    ecmaVersion: "latest",
    sourceType: "module",
    jsxPragma: "React",
    ecmaFeatures: {
      jsx: true,
    },
  },
  settings: {
    react: {
      version: "detect",
    },
  },
  plugins: ["react", "@typescript-eslint", "react-hooks", "prettier"],
  rules: {
    "@typescript-eslint/no-var-requires": "off",
    "@typescript-eslint/no-namespace": "off",
    "@typescript-eslint/no-explicit-any": "off",
  },
};
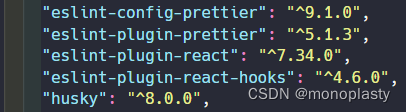
以上配置需额外安装eslint-plugin-react和eslint-plugin-react-hooks等插件。
- 测试配置效果
在package.json文件中增加一条命令:
"scripts": {
    "eslint": "eslint --fix --ext .js,.ts,.tsx ./src"
}
即可在命令行输入命令进行测试
pnpm eslint
3.4 git Husky和eslint
虽然我们已经要求项目使用eslint了,但是不能保证组员提交代码之前都将eslint中的问题解决掉了:
-
也就是我们希望保证代码仓库中的代码都是符合eslint规范的;
-
那么我们需要在组员执行
git commit命令的时候对其进行校验,如果不符合eslint规范,那么自动通过规范进行修复;
那么如何做到这一点呢?可以通过Husky工具:
- husky是一个git hook工具,可以帮助我们触发git提交的各个阶段:pre-commit、commit-msg、pre-push
*官网:https://github.com/typicode/husky
如何使用husky呢?
这里我们可以使用自动配置命令:
npx husky-init && pnpm install
这里自动会做三件事:
-
安装husky相关的依赖:
-
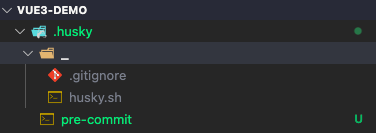
在项目目录下创建
.husky文件夹:
npx huksy install
3. 在package.json中添加一个脚本:

下面需要我们来配置了
修改 pre-commit 钩子
打开刚开自动创建的.husky/pre-commit文件
修改为:
#!/bin/sh
. "$(dirname "$0")/_/husky.sh"

npx --no-install --allow-empty "$1"
这个时候我们执行 git commit 的时候会自动执行lint-staged --allow-empty命令。
- 下面安装
lint-staged工具
官网:https://github.com/okonet/lint-staged
pnpm add -D lint-staged
- 在
package.json文件中添加配置。如下图
"husky": {
    "hooks": {
      "pre-commit": "lint-staged"
    }
  },
  "lint-staged": {
    "src/**/*.{js,jsx,ts,tsx}": [
      "prettier --write",
      "eslint --fix"
    ]
  },
如果想要跳过 Lint 程序,可以使用 git commit -no-verify 进行提交。
eslint --fix也可以不放入lint-staged里面
3.5 git commit规范
通常我们的git commit会按照统一的风格来提交,这样可以快速定位每次提交的内容,方便之后对版本进行控制。
我们用commitlint来规范和限制提交commit message信息
- 安装 @commitlint/config-conventional 和 @commitlint/cli
pnpm add -D @commitlint/config-conventional @commitlint/cli
- 在根目录创
commitlint.config.js文件,配置commitlint
module.exports = {
  extends: ["@commitlint/config-conventional"],
  rules: {
    "type-enum": [2, "always", ["upd", "feat", "fix", "refactor", "docs", "chore", "style", "revert"]],
    "type-case": [0],
    "type-empty": [0],
    "scope-empty": [0],
    "scope-case": [0],
    "subject-full-stop": [0, "never"],
    "subject-case": [0, "never"],
    "header-max-length": [0, "always", 72],
  },
};
- 使用husky生成commit-msg文件,验证提交信息:
npx husky add .husky/commit-msg 'npx --no-install commitlint --edit $1'
完成上面3步后测试一下:当提交不规范时会提示报错

正确的提交格式:
git commit -m "${type}: ${subject}"
- type指本次提交的类型,为必填项,必须为以下之一:
- feat: 一项新功能
- fix: 一个错误修复
- docs: 仅文档更改
- style: 不影响代码含义的更改(空白,格式,缺少分号等)
- refactor: 既不修正错误也不增加功能的代码更改(重构)
- perf: 改进性能的代码更改
- test: 添加缺失或更正现有测试
- build: 影响构建系统或外部依赖项的更改(gulp,npm等)
- ci: 对CI配置文件和脚本的更改
- chore: 更改构建过程或辅助工具和库,例如文档生成
- subject指本次提交的简要描述,它有如下两个规则。
- 不要大写第一个字母
- 末尾没有点(.)
- 和
:之间有一个空格
测试成功!

3. 项目集成扩展webpack配置
3.1 cra 项目可通过craco来扩展配置
官网:https://craco.js.org/docs/
pnpm add -D @craco/craco
3.2 在项目根目录下创建配置文件craco.config.js
例如:在配置文件中添加别名,并且添加webpack打包的进度条
pnpm add -D webpackbar
const path = require("path");
const WebpackBar = require("webpackbar");

const resolve = (dir) => path.resolve(__dirname, dir);

module.exports = {
  webpack: {
    plugins: [
      new WebpackBar({ profile: true }),
    ],
    alias: {
      "@": resolve("src"),
    },
  },
};
3.3 修改package.json文件中的运行脚本
"scripts": {
    "start": "craco start",
    "build": "craco build",
    "test": "craco test",
    "eject": "react-scripts eject",
    "eslint": "eslint --fix --ext .js,.ts,.tsx ./src",
    "lint-staged": "lint-staged",
    "prepare": "husky install"
},
4. 集成RTK
RTK 是 @reduxjs/toolkit 的简称。是官网用来替代redux写法的一个包,可以让redux书写更为便捷,那我们就用起来吧!
官网: https://redux-toolkit.js.org/introduction/getting-started
4.1 安装
react-redux包依然需要安装,RTK只是简化了redux的开发体验,与react集成依然需要react-redux包。 RTK默认集成了redux-thunk,即可发起异步action。
pnpm add @reduxjs/toolkit react-redux
4.2 创建store
这里创建一个 counter 计算器案例
目录结构为:
src/store
├── index.ts
└── modules
    └── counter.ts
// index.ts
import { configureStore } from "@reduxjs/toolkit";
import { type TypedUseSelectorHook, useDispatch, useSelector } from "react-redux";

import counterReducer from "./modules/counter";

export { operateCount } from "./modules/counter";

const store = configureStore({
  reducer: {
    counter: counterReducer,
  },
});

type RootState = ReturnType<typeof store.getState>;
type AppDispatch = typeof store.dispatch;

export const useAppDispatch: () => AppDispatch = useDispatch;
export const useAppSelector: TypedUseSelectorHook<RootState> = useSelector;
export default store;
4.3 创建切片 Slice
// counter.ts
import { PayloadAction, createSlice } from "@reduxjs/toolkit";

interface IState {
  count: number;
}

const initialState: IState = {
  count: 0,
};

const counterSlice = createSlice({
  name: "counter",
  initialState,
  reducers: {
    operateCount: (state, action: PayloadAction<number>) => {
      state.count += action.payload;
    },
  },
});

export const { operateCount } = counterSlice.actions;
export default counterSlice.reducer;
// src/index.tsx
import ReactDOM from "react-dom/client";
import { Provider } from "react-redux";

import App from "./App";
import store from "./store";

const root = ReactDOM.createRoot(document.getElementById("root") as HTMLElement);
root.render(
  <Provider store={store}>
    <App />
  </Provider>,
);
4.4 在pages/index.tsx中使用
const Home: React.FC = () => {
  const count = useAppSelector((state) => state.counter.count);
  const dispatch = useAppDispatch();

  return (
    <div>
      <span>{count}</span>
      <Button onClick={() => dispatch(operateCount(1))}>+1</Button>
      <Button onClick={() => dispatch(operateCount(-1))}>-1</Button>
    </div>
  );
};
4.5 在store中发起异步请求
// store/moudles/home.ts
export const fetchHomeDataAction = createAsyncThunk(
  "fetch/homemultidata",
  async (extraInfo, { dispatch, getState }) => {
    // 1.发送网络请求, 获取数据
    const res = await axios.get("http://api.example.com/data")

    // 2.取出数据, 并且在此处直接dispatch操作(次写法较为简洁)
    const banners = res.data.data.banner.list
    const recommends = res.data.data.recommend.list
    dispatch(changeBanners(banners))
    dispatch(changeRecommends(recommends))

    // 3.返回结果, 那么action状态会变成fulfilled状态
    return res.data
})
const homeSlice = createSlice({
  name: "home",
  initialState: {
    banners: [],
    recommends: []
  },
  reducers: {
    changeBanners(state, { payload }) {
      state.banners = payload
    },
    changeRecommends(state, { payload }) {
      state.recommends = payload
    }
  },
})

export const { changeBanners, changeRecommends } = homeSlice.actions
export default homeSlice.reducer
使用方式一样
dispatch(fetchHomeDataAction())
5. react-router 配置
5.1 安装最新版react-router-dom 6.22.2
p add react-router-dom
路由可通过配置方式进行编写了,变得更加简洁。
5.2 采用配置方式定义路由
// route.tsx
import { lazy } from "react";
import { type RouteObject } from "react-router-dom";

const Home = lazy(() => import("@/pages/home"));

const NotFound = lazy(() => import("@/pages/404"));

const rootRoutes: RouteObject[] = [
  {
    path: "/",
    element: <Home />,
  },
  {
    path: "*",
    element: <NotFound />,
  },
];

export default rootRoutes;
然后在router/index.tsx中进行导出
// router/index.tsx
import { memo } from "react";
import { useRoutes } from "react-router-dom";

import rootRoutes from "./route";

const Router: React.FC = () => {
  const routes = useRoutes(rootRoutes);
  return routes;
};

export default memo(Router);
5.3 引用路由到页面
// src/App.tsx
import React, { Suspense } from "react";
import { BrowserRouter } from "react-router-dom";
import { ConfigProvider, Spin } from "antd";

import Router from "./router";

function App() {
  return (
    <BrowserRouter>
      <ConfigProvider>
        <Suspense
          fallback={
            <Spin
              size="large"
              style={{
                display: "flex",
                alignItems: "center",
                justifyContent: "center",
                height: "100%",
              }}
            />
          }
        >
          <Router />
        </Suspense>
      </ConfigProvider>
    </BrowserRouter>
  );
}

export default App;
6. 安装antd 5 antd-style
antd-style 官网: https://ant-design.github.io/antd-style/zh-CN/guide
可使用cssinjs方式书写css样式
pnpm add antd antd-style

# 安装的版本是
"antd": "^5.15.0",
"antd-style": "^3.6.1",
6.1 使用antd-style编译报错解决方法
在实际使用过程中会发现,cra搭建的react项目使用antd-style会编译报错:
ERROR in ./node_modules/core-util-is/lib/util.js 86:0-52
Module not found: Error: Can't resolve 'buffer' in '/projects/node_modules/core-util-is/lib'

BREAKING CHANGE: webpack < 5 used to include polyfills for node.js core modules by default.
This is no longer the case. Verify if you need this module and configure a polyfill for it.

If you want to include a polyfill, you need to:
        - add a fallback 'resolve.fallback: { "buffer": require.resolve("buffer/") }'
        - install 'buffer'
If you don't want to include a polyfill, you can use an empty module like this:
        resolve.fallback: { "buffer": false }
出现以上错误的解决方案是:
pnpm add -D buffer stream-browserify
安装之后,在craco.config.js 文件中添加配置如下:
module.exports = {
  webpack: {
    plugins: [
      new WebpackBar({ profile: true }),
    ],
    alias: {
      "@": resolve("src"),
    },
    // 解决使用buffer、stream时的错误
    configure: (webpackConfig) => {
      return {
        ...webpackConfig,
        resolve: {
          ...webpackConfig.resolve,
          fallback: {
            ...webpackConfig.resolve.fallback,
            buffer: require.resolve("buffer"),
            stream: require.resolve("stream-browserify"),
          },
        },
      };
    },
  },
};
6.2 cssinjs书写方式
// pages/home/style.ts
import { createStyles } from "antd-style";

export default createStyles(({ token, css }) => ({
  // 支持 css object 的写法
  container: {
    backgroundColor: token.colorBgLayout,
    borderRadius: token.borderRadiusLG,
    maxWidth: 400,
    width: "100%",
    height: 180,
    display: "flex",
    alignItems: "center",
    justifyContent: "center",
    flexDirection: "column",
    marginLeft: "auto",
    marginRight: "auto",
  },
  // 也支持通过 css 字符串模板获得和 普通 css 一致的书写体验
  card: css`
    color: ${token.colorTextTertiary};
    box-shadow: ${token.boxShadow};
    &:hover {
      color: ${token.colorTextSecondary};
      box-shadow: ${token.boxShadowSecondary};
    }

    padding: ${token.padding}px;
    border-radius: ${token.borderRadius}px;
    background: ${token.colorBgContainer};
    transition: all 100ms ${token.motionEaseInBack};

    margin-bottom: 8px;
    cursor: pointer;
  `,
}));
组件使用方法如下。更详细的用法移步官网。
export default () => {
  // styles 对象在 useStyles 方法中默认会被缓存,所以不用担心 re-render 问题
  const { styles, cx, theme } = useStyles();

  return (
    // 使用 cx 可以组织 className
    <div className={cx('a-simple-create-style-demo-classname', styles.container)}>
      <div className={styles.card}>createStyles Demo</div>
      {/* theme 对象包含了所有的 token 与主题等信息 */}
      <div>当前主题模式:{theme.appearance}</div>
    </div>
  );
};
7. 总结
经过以上配置方式,react项目可完全自定义,可扩展性很大,但是需要配置的代码很多,对每一个库都要比较熟练的使用。
项目源码:https://github.com/monoplasty/custom-react-template
Happy hacking!


![[Buuctf] [MRCTF2020] Xor](https://img-blog.csdnimg.cn/direct/6529902962fd43b194462ddba2d993ee.png)