目录
一、JDBC基本介绍
二、JDBC快速入门
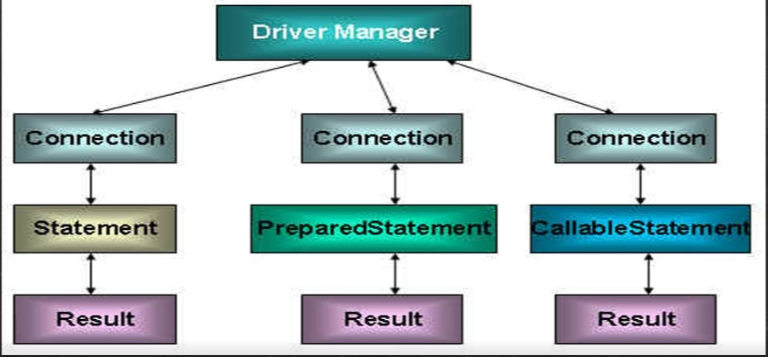
三、JDBC API
1、ResultSet [结果集]
2、Statement
3、PreparedStatement
4、DriverManager
四、封闭JDBCUtils
五、事务
六、批处理
七、数据库连接池
4、数据库连接池种类
(1) c3p0数据库连接池:
(2)druid数据库连接池
https://repo1.maven.org/maven2/com/alibaba/druid/http:// https://repo1.maven.org/maven2/com/alibaba/druid/
八、Apache—DBUtils
九、DAO和增删改查通用方法-BasicDao
一、JDBC基本介绍
1、JDBC为访问不同的数据库提供了统一的接口,为使用者屏蔽了细节问题
2、java程序员使用JDBC,可以连接任何提供了JDBC驱动程序的数据库系统,从而完成对数据的各种操作
3、JDBC的基本原理
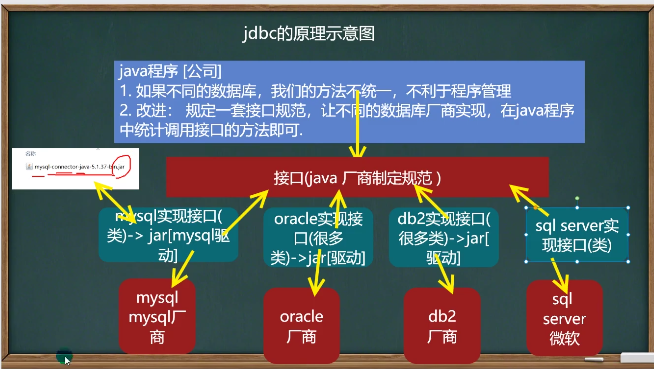
4、模拟JDBC


5、JDBC带来的好处:
JDBC是JAVA提供的一套用于数据库操作的接口API,JAVA程序员只需要面向这套接口编程即可。不同的数据误置厂商,需要针对这套接口,提供不同实现。

6、JDBC API
JDBC API是一系列的接口,它统一和规范了应用程序与数据库的连接、执行SQL语句,并得到返回结果等各类操作,相关类和接口在java.sql与javax.sql包中
二、JDBC快速入门
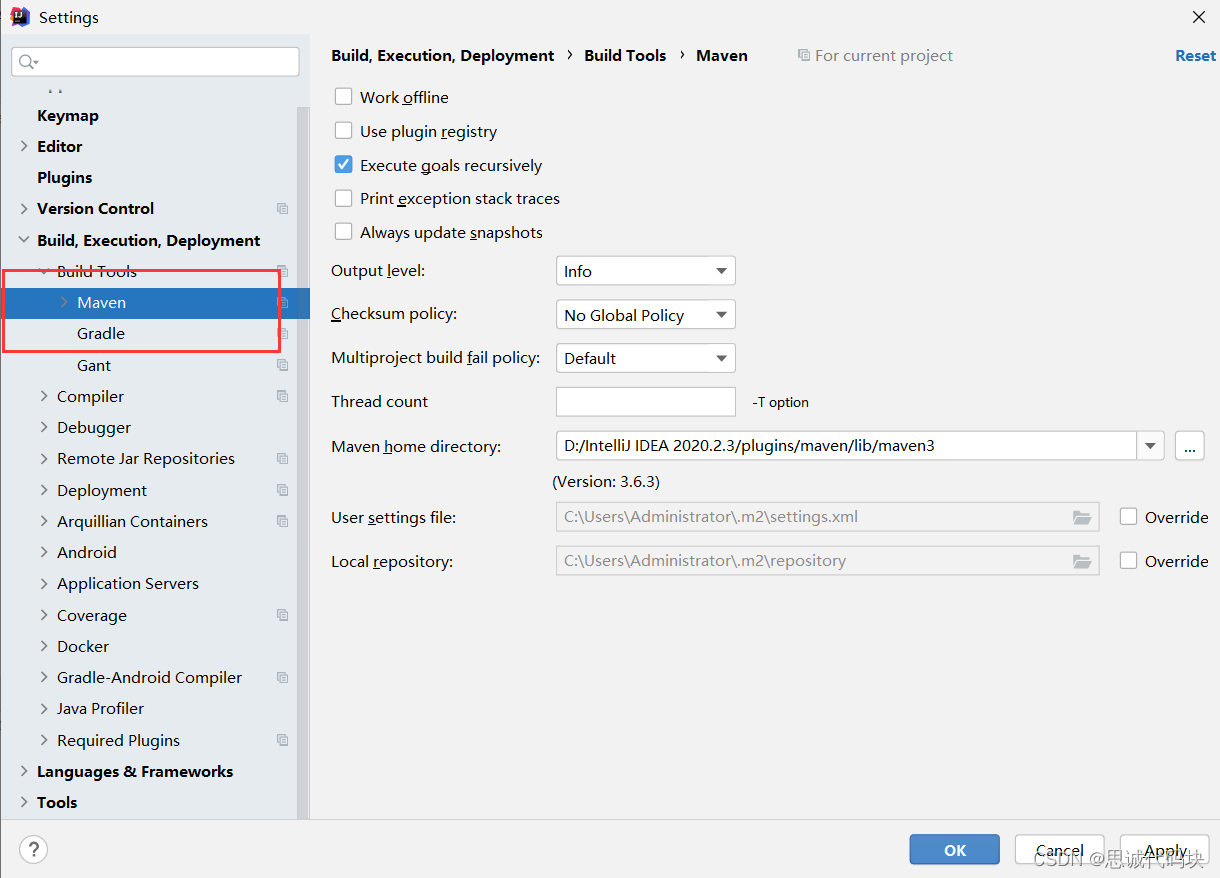
1、JDBC程序编写步骤
- 注册驱动——加载Driver类
- 获取连接——得到Connection
- 执行增删改查——发送SQL给mysql执行
- 释放资源——关闭相关连接
下载jar包:http://t.csdn.cn/xSxSZ![]() http://t.csdn.cn/xSxSZ
http://t.csdn.cn/xSxSZ
package com.hspedu.jdbc;


import com.mysql.jdbc.Driver;

import java.sql.Connection;
import java.sql.SQLException;
import java.sql.Statement;
import java.util.Properties;

/**
 * 第一个JDBC程序,完成简单的操作
 */
@SuppressWarnings({"all"})
public class Jdbc01 {
    public static void main(String[] args) throws SQLException {
        //1、注册驱动
        Driver driver = new Driver();//创建driver对象

        //2、得到连接
        //(1)jdbc:mysql// 规定好的,表示协议,通过jdbc的方式连接mysql
        //(2)localhost 表示主机,可以是ip地址
        //(3)3306 表示mysql监听的端口
        //(4)hsp_db05 表示连接到mysql dbms的哪个数据库
        //mysql的连接本质就是前面学过的socket连接

        String url="jdbc:mysql://localhost:3306/hsp_db05?useSSL=true&characterEncoding=utf8";
        //Thu Jan 05 12:03:59 CST 2023 WARN: Establishing SSL connection without server's identity verification is not recommended. According to MySQL 5.5.45+, 5.6.26+ and 5.7.6+ requirements SSL connection must be established by default if explicit option isn't set. For compliance with existing applications not using SSL the verifyServerCertificate property is set to 'false'. You need either to explicitly disable SSL by setting useSSL=false, or set useSSL=true and provide truststore for server certificate verification.
        //周四 1月 05 12:03:59 CST 2023 WARN:不建议在没有服务器身份验证的情况下建立 SSL 连接。根据 MySQL 5.5.45+、5.6.26+ 和 5.7.6+ 要求,如果未设置显式选项,则必须默认建立 SSL 连接。为了符合不使用 SSL 的现有应用程序,验证服务器证书属性设置为“false”。您需要通过设置 useSSL=false 来显式禁用 SSL,或者设置 useSSL=true 并为服务器证书验证提供信任库。
        //出现中文乱码,所以url后面加上了"?useSSL=true&characterEncoding=utf8"

        //将用户名和密码放入到Properties对象
        //user和password是规定好的,后面的值根据实际情况写
        Properties properties = new Properties();
        properties.setProperty("user","root");//用户
        properties.setProperty("password","123456");//密码
        Connection connect = driver.connect(url,properties);


        //3、执行连接
        //String sql="insert into actor values(null,'刘德华','男','1970-11-11','110')";
        String sql="delete from actor where id=1";
        //statement用于执行静态sql语句并返回其生成的结果的对象
        Statement statement=connect.createStatement();
        int rows=statement.executeUpdate(sql);//如果是dml语句,返回的就是影响行数

        System.out.println(rows > 0?"成功":"失败");


        //4、关闭连接
        statement.close();
        connect.close();
    }
}
2、获取数据库连接的5种方式(方式4使用最多,推荐使用)
package com.hspedu.jdbc;
import com.mysql.jdbc.Driver;
import org.junit.Test;
import java.io.FileInputStream;
import java.io.FileNotFoundException;
import java.io.IOException;
import java.sql.Connection;
import java.sql.DriverManager;
import java.sql.SQLException;
import java.util.Properties;
/**
* 分析java连接mysql的5种方式
*/
public class JdbcConn {
@Test
public void connect01() throws SQLException {
Driver driver = new Driver();
String url="jdbc:mysql://localhost:3306/hsp_db05?useSSL=true&characterEncoding=utf8";
Properties properties = new Properties();
properties.setProperty("user","root");//用户
properties.setProperty("password","123456");//密码
Connection connect = driver.connect(url,properties);
System.out.println("方式1:"+connect);
//方式1:com.mysql.jdbc.JDBC4Connection@59906517
}
@Test
//使用反射加载Driver类,动态加载,更加灵活,减少依赖性
public void connect02() throws ClassNotFoundException, InstantiationException, IllegalAccessException, SQLException {
//使用反射加载Driver类,动态加载,更加灵活,减少依赖性
Class<?> aClass=Class.forName("com.mysql.jdbc.Driver");
Driver driver=(Driver)aClass.newInstance();
String url="jdbc:mysql://localhost:3306/hsp_db05?useSSL=true&characterEncoding=utf8";
Properties properties = new Properties();
properties.setProperty("user","root");//用户
properties.setProperty("password","123456");//密码
Connection connect = driver.connect(url,properties);
System.out.println("方式2:"+connect);
//方式2:com.mysql.jdbc.JDBC4Connection@59906517
}
@Test
//使用DriverManager替代driver进行统一管理
public void connect03() throws ClassNotFoundException, InstantiationException, IllegalAccessException, SQLException {
//使用反射加载Driver类
Class<?> aClass = Class.forName("com.mysql.jdbc.Driver");
Driver driver = (Driver) aClass.newInstance();
String url = "jdbc:mysql://localhost:3306/hsp_db05?useSSL=true&characterEncoding=utf8";
String user="root";
String password="123456";
DriverManager.registerDriver(driver);//注册Driver驱动
Connection connection = DriverManager.getConnection(url, user, password);
System.out.println("方式3:"+connection);
//方式3:com.mysql.jdbc.JDBC4Connection@77f99a05
}
@Test
//使用Class.forName自动完成注册驱动,简化代码
public void connect04() throws ClassNotFoundException, SQLException {
//使用反射加载Driver类
//在加载Driver类时,完成注册
Class.forName("com.mysql.jdbc.Driver");
//com.mysql.jdbc.Driver追源码:
/*
//静态代码块,在类加载时,会执行一次
static {
try {
//注册
DriverManager.registerDriver(new Driver());
} catch (SQLException var1) {
throw new RuntimeException("Can't register driver!");
}
}
*/
String url = "jdbc:mysql://localhost:3306/hsp_db05?useSSL=true&characterEncoding=utf8";
String user="root";
String password="123456";
Connection connection = DriverManager.getConnection(url, user, password);
System.out.println("方式4:"+connection);
//方式4:com.mysql.jdbc.JDBC4Connection@77ec78b9
}
@Test
//在方式4的基础上改进,增加配置文件,让连接mysql更加灵活
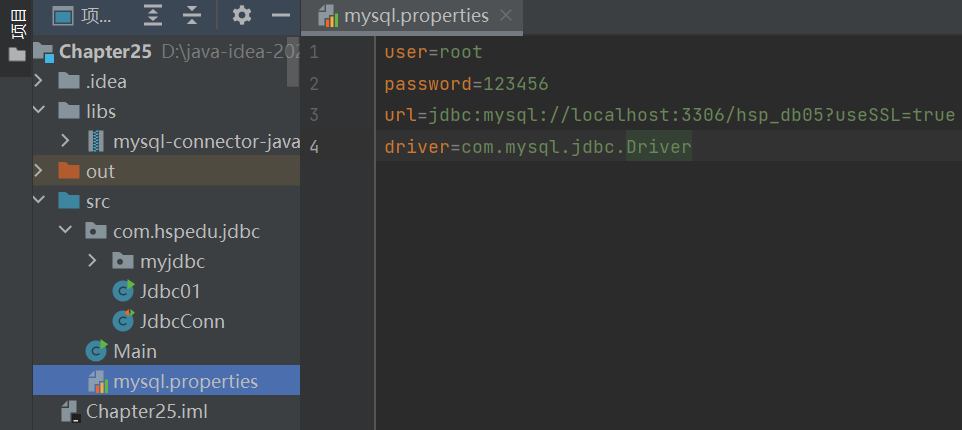
public void connect05() throws IOException, ClassNotFoundException, SQLException {
//通过Properties对象获取配置文件的信息
Properties properties = new Properties();
properties.load(new FileInputStream("src\\mysql.properties"));
//获取相关的值
String user=properties.getProperty("user");
String password=properties.getProperty("password");
String driver=properties.getProperty("driver");
String url=properties.getProperty("url");
Class.forName(driver);
Connection connection = DriverManager.getConnection(url, user, password);
System.out.println("方式5:"+connection);
//方式5:com.mysql.jdbc.JDBC4Connection@77ec78b9
}
}
方式4的提示:
- mysqL驱动5.1.6可以无需写CLass.forName(“com.mysqljdbc.Driver”);但建议写上。
- 从jdk1.5以后使用了jdbc4,不再需要显示调用class.forName()注册驱动而是自动调用驱动jar包下META-INF\services\java.sql.Driver文本中的类名称去注册
3、课堂练习
(1)使用方式5:
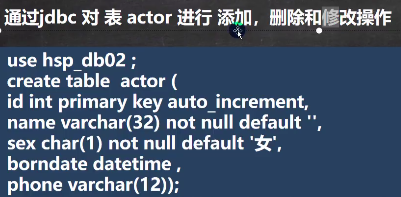
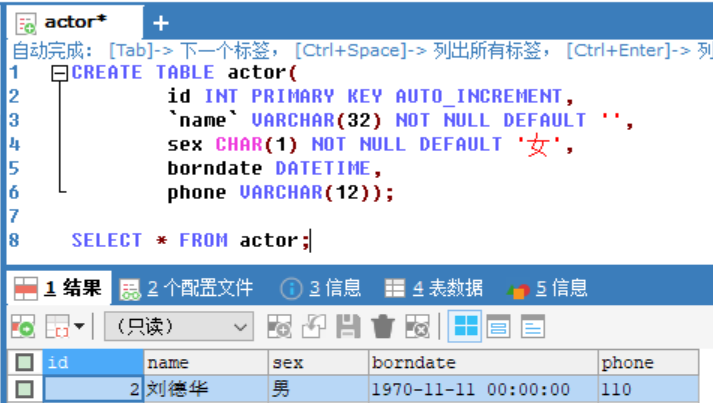
- 创建actor表
- 使用idbc添加5条数据
- 修改id=1的记录,将name改成你自己的名字
- 删除id=3的记录
//我的代码:
package com.hspedu.jdbc;

import org.junit.Test;

import java.io.FileInputStream;
import java.io.FileNotFoundException;
import java.io.IOException;
import java.lang.invoke.VarHandle;
import java.sql.Connection;
import java.sql.DriverManager;
import java.sql.SQLException;
import java.sql.Statement;
import java.util.Properties;

public class practice01 {
    @Test
    public void practice() throws IOException, ClassNotFoundException, SQLException {
        Properties properties = new Properties();
        properties.load(new FileInputStream("src\\mysql.properties"));
        String user=properties.getProperty("user");
        String password=properties.getProperty("password");
        String driver=properties.getProperty("driver");
        String url=properties.getProperty("url");

        Class.forName(driver);

        Connection connection = DriverManager.getConnection(url, user, password);

        System.out.println("连接数据库完毕");

        //String sql="insert into actor values(null,'贾宝玉','男','2000-1-1','119')";
        //String sql="update actor set name='林黛玉' where id=10";
        String sql="delete from actor where id=14";
        Statement statement = connection.createStatement();
        int rows=statement.executeUpdate(sql);
        System.out.println(rows > 0?"成功":"失败");

        statement.close();
        connection.close();
    }
}

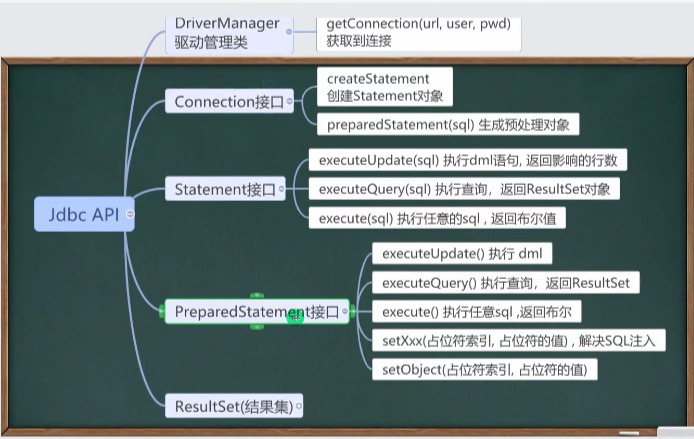
三、JDBC API
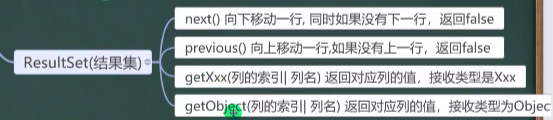
1、ResultSet [结果集]
(1)基本介绍:
- 表示数据库结果集的数据表,通常通过执行查询数据库的语句生成
- ResultSet对象保持一个光标指向其当前的数据行。最初,光标位于第一行之前
- next方法将光标移动到下一行,并且由于在ResultSet对象中没有更多行时返回false,因此可以在while循环中使用循环来遍历结果集
package com.hspedu.jdbc;

import java.io.FileInputStream;
import java.io.FileNotFoundException;
import java.io.IOException;
import java.sql.*;
import java.util.Properties;

@SuppressWarnings({"all"})
public class ResultSet_ {
    public static void main(String[] args) throws IOException, ClassNotFoundException, SQLException {
        Properties properties = new Properties();
        properties.load(new FileInputStream("src\\mysql.properties"));

        //获取相关的值
        String user=properties.getProperty("user");
        String password=properties.getProperty("password");
        String driver=properties.getProperty("driver");
        String url=properties.getProperty("url");

        //注册驱动
        Class.forName(driver);

        //得到连接
        Connection connection = DriverManager.getConnection(url, user, password);

        //得到statement
        Statement statement = connection.createStatement();

        //组织sql
        String sql="select id,name,sex,borndate from actor";

        //执行给定的sql语句,该语句返回单个ResultSet对象
        ResultSet resultSet = statement.executeQuery(sql);

        //使用while取出数据
        while(resultSet.next()){//让光标向后移动,如果没有更多行,则返回false
            int id=resultSet.getInt(1);//获取该行的第1列
            String name=resultSet.getString(2);//获取该行的第2列
            String sex=resultSet.getString(3);
            Date date=resultSet.getDate(4);
            System.out.println(id+"\t"+name+"\t"+sex+"\t"+date);
        }

        //关闭连接
        resultSet.close();
        statement.close();
        connection.close();
    }
}
/*
10	林黛玉	男	2000-01-01
11	贾宝玉	男	2000-01-01
12	贾宝玉	男	2000-01-01
13	贾宝玉	男	2000-01-01

 */
2、Statement
(1)基本介绍:
- Statement对象用于执行静态SQL语句并返回其生成的结果的对象
- 在连接建立后, 需要对数据库进行访问,执行命名或是SQL语句, 可以通过 Statement [存在SQL注入] PreparedStatement [预处理] Callabletatement [存储过程]
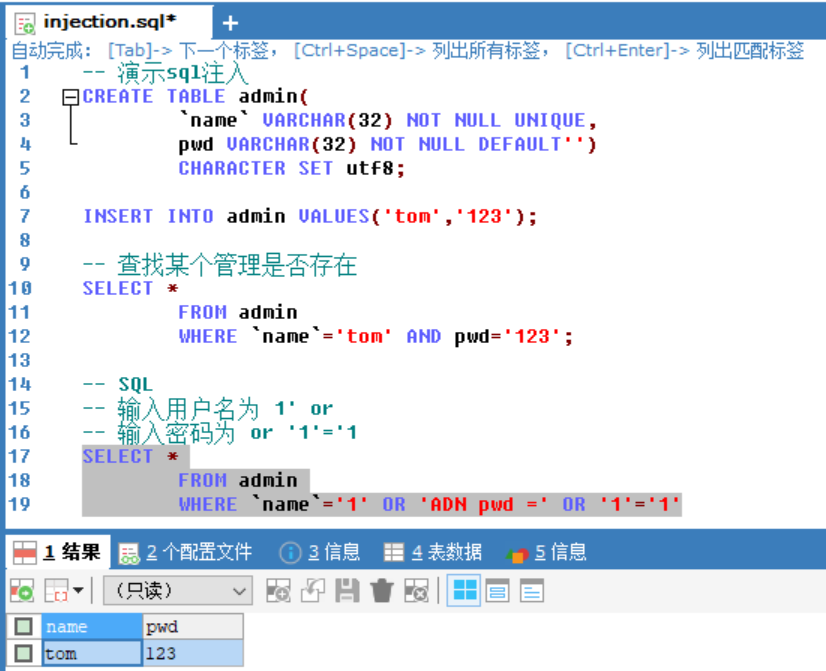
- Statement对象执行SQL语句,存在SQL注入风险
- SQL注入是利用某些系统没有对用户输入的数据进行充分的检查,而在用户输入数据中注入非法的SQL语句段或命令,恶意攻击数据库。
- 要防范SQL注入,只要用Preparedstatement(Statement扩展而来)取代Statement就可以了
package com.hspedu.jdbc;
/**
 * 用java程序演示sql注入
 */

import java.io.FileInputStream;
import java.io.IOException;
import java.sql.*;
import java.util.Properties;
import java.util.Scanner;

@SuppressWarnings({"all"})

public class Statement_{
    public static void main(String[] args) throws IOException, ClassNotFoundException, SQLException {

        Scanner scanner = new Scanner(System.in);

        //让用户输入管理员名和密码
        System.out.println("请输入管理员的名字:");
        String admin_name=scanner.nextLine();//next()遇到空格或单引号结束;nextLine()遇到回车结束;
        System.out.println("请输入管理员的密码:");
        String admin_pwd=scanner.nextLine();

        //通过Properties对象获取配置文件的信息
        Properties properties = new Properties();
        properties.load(new FileInputStream("src\\mysql.properties"));

        //获取相关的值
        String user=properties.getProperty("user");
        String password=properties.getProperty("password");
        String driver=properties.getProperty("driver");
        String url=properties.getProperty("url");

        //注册驱动
        Class.forName(driver);

        //得到连接
        Connection connection = DriverManager.getConnection(url, user, password);

        //得到statement
        Statement statement = connection.createStatement();

        //组织sql
        String sql="select name,pwd from admin where name= '"
                +admin_name+"' and pwd='"+admin_pwd+"'";
        ResultSet resultSet = statement.executeQuery(sql);
        if(resultSet.next()){
            System.out.println("恭喜,登录成功");
        }else{
            System.out.println("对不起,登录失败");
        }

        //关闭连接
        resultSet.close();
        statement.close();
        connection.close();
    }
}
/*
请输入管理员的名字:
tom
请输入管理员的密码:
123
恭喜,登录成功
---------------
请输入管理员的名字:
1' or
请输入管理员的密码:
or '1'='1
恭喜,登录成功

 */
3、PreparedStatement
(1)基本介绍:
- Preparedstatement执行的SQL语句中的参数用问号(?)来表示,调用Preparedstatement对象的setXxx()方法来设置这些参数。setXxx()方法有两个参数,第一个参数是要设置的SQL语句中的参数的索引(从1开始),第二个是设置的SQL语句中的参数的值
- 调用executeQuery(),返回ResultSet对象
- 调用executeUpdate():执行更新,包括增、删、修改
(2)预处理好处
- 不再使用+拼接sql语句,减少语法错误
- 有效的解决了sql注入问题!
- 大大减少了编译次数,效率较高
package com.hspedu.jdbc.preparedStatement_;

import java.io.FileInputStream;
import java.io.FileNotFoundException;
import java.sql.*;
import java.util.Properties;
import java.util.Scanner;

/**
 * 演示PreparedStatement使用
 */
@SuppressWarnings({"all"})
public class PreparedStatement_ {
    public static void main(String[] args) throws Exception {

        Scanner scanner = new Scanner(System.in);

        //让用户输入管理员名和密码
        System.out.println("请输入管理员的名字:");
        String admin_name=scanner.nextLine();//next()遇到空格或单引号结束;nextLine()遇到回车结束;
        System.out.println("请输入管理员的密码:");
        String admin_pwd=scanner.nextLine();

        //通过Properties对象获取配置文件的信息
        Properties properties = new Properties();
        properties.load(new FileInputStream("src\\mysql.properties"));

        //获取相关的值
        String user=properties.getProperty("user");
        String password=properties.getProperty("password");
        String driver=properties.getProperty("driver");
        String url=properties.getProperty("url");

        //注册驱动
        Class.forName(driver);

        //得到连接
        Connection connection = DriverManager.getConnection(url, user, password);

        //得到PreparedStatement
        //组织sql
        //1、语句中的"?"是点位符
        String sql="select name,pwd from admin where name =? and pwd =?";

        //2、preparedStatement对象实现了PreparedStatement接口的实现类的对象
        PreparedStatement preparedStatement = connection.prepareStatement(sql);
        //3、给?赋值
        preparedStatement.setString(1,admin_name);
        preparedStatement.setString(2,admin_pwd);

        //执行select 语句使用 executeQuery
        //执行dml(updqte, insert, delete) 使用 excuteUpdate()
        //执行excuteUpdate()时,()里不用再写sql
        ResultSet resultSet = preparedStatement.executeQuery();
        if(resultSet.next()){//如果查询到一条记录,则说明该管理存在
            System.out.println("恭喜,登录成功");
        }else{
            System.out.println("对不起,登录失败");
        }

        //关闭连接
        resultSet.close();
        preparedStatement.close();
        connection.close();
    }
}
//请输入管理员的名字:
//1' or
//请输入管理员的密码:
//or '1'='1
//对不起,登录失败
/*万能密码失效,成功解决sql注入问题*/
package com.hspedu.jdbc.preparedStatement_;

import java.io.FileInputStream;
import java.io.FileNotFoundException;
import java.sql.*;
import java.util.Properties;
import java.util.Scanner;

/**
 * 演示PreparedStatement使用
 */
@SuppressWarnings({"all"})
public class PreparedStatement_ {
    public static void main(String[] args) throws Exception {

        Scanner scanner = new Scanner(System.in);

        //让用户输入管理员名和密码
        System.out.println("请输入管理员的名字:");
        String admin_name=scanner.nextLine();//next()遇到空格或单引号结束;nextLine()遇到回车结束;
        System.out.println("请输入管理员的密码:");
        String admin_pwd=scanner.nextLine();

        //通过Properties对象获取配置文件的信息
        Properties properties = new Properties();
        properties.load(new FileInputStream("src\\mysql.properties"));

        //获取相关的值
        String user=properties.getProperty("user");
        String password=properties.getProperty("password");
        String driver=properties.getProperty("driver");
        String url=properties.getProperty("url");

        //注册驱动
        Class.forName(driver);

        //得到连接
        Connection connection = DriverManager.getConnection(url, user, password);

        //得到PreparedStatement
        //组织sql
        //1、语句中的"?"是点位符

        //添加记录
        String sql="insert into admin values(?,?)";

        //修改记录
        //String sql="update admin set pwd = ? where name = ?";
        //下面两句的顺序也要修改
        //preparedStatement.setString(1,admin_name);
        //preparedStatement.setString(2,admin_pwd);

        //删除记录
        //String sql="delete from admin where name = ?";
        //1、下面两句保留第一句
        //preparedStatement.setString(1,admin_name);
        //preparedStatement.setString(2,admin_pwd);
        //2、删掉
        //System.out.println("请输入管理员的密码:");
        //String admin_pwd=scanner.nextLine();


        //2、preparedStatement对象实现了PreparedStatement接口的实现类的对象
        PreparedStatement preparedStatement = connection.prepareStatement(sql);
        //3、给?赋值
        preparedStatement.setString(1,admin_name);
        preparedStatement.setString(2,admin_pwd);

        //执行dml(updqte, insert, delete) 使用 excuteUpdate()
        int rows=preparedStatement.executeUpdate();
        System.out.println(rows > 0 ? "执行成功":"执行失败");

        //关闭连接
        preparedStatement.close();
        connection.close();
    }
}
(3)练习
- 1.创建 admin表
- 2.使用PreparedStatement 添加 5条数据
- 3.修改tom的记录,将username 改成 king
- 4.删除一条的记录
- 5.查询全部记录,并显示在控制台
//我的代码
package com.hspedu.jdbc.preparedStatement_;

import java.io.FileInputStream;
import java.io.FileNotFoundException;
import java.io.IOException;
import java.sql.*;
import java.util.Properties;
import java.util.Scanner;

@SuppressWarnings({"all"})
public class practice02 {
    public static void main(String[] args) throws IOException, ClassNotFoundException, SQLException {
        Scanner scanner = new Scanner(System.in);

//        System.out.println("请输入管理员的名字:");
//        String admin_name=scanner.nextLine();
//        System.out.println("请输入管理员的密码:");
//        String admin_pwd=scanner.nextLine();

        Properties properties = new Properties();
        properties.load(new FileInputStream("src\\mysql.properties"));
        String user=properties.getProperty("user");
        String password=properties.getProperty("password");
        String driver=properties.getProperty("driver");
        String url=properties.getProperty("url");

        Class.forName(driver);

        Connection connection = DriverManager.getConnection(url, user, password);

        //添加记录
        //String sql="insert into admin values(?,?)";

        //修改tom为king
        //String sql="update admin set name='king' where name=?";

        //删除一条记录
        //String sql="delete from admin where name=?";

        //显示所有记录
        String sql="select * from admin";

        PreparedStatement preparedStatement = connection.prepareStatement(sql);
        //preparedStatement.setString(1,admin_name);
        //preparedStatement.setString(2,admin_pwd);

        ResultSet resultSet=preparedStatement.executeQuery();
        while(resultSet.next()){
            String name=resultSet.getString(1);
            String pwd=resultSet.getString(2);
            System.out.println(name+"\t"+pwd);
        }

        preparedStatement.close();
        connection.close();
    }
}
4、DriverManager
在前面第一点的第2条“ 获取数据库连接的5种方式”中的方式4
5、小结
四、封闭JDBCUtils
1、基本介绍:
在jdbc 操作中,获取连接和释放资源是经常使用到可以将其封装JDBC连接的工具类JDBCUtils
package com.hspedu.jdbc.utils_;

import com.mysql.jdbc.Connection;

import java.io.FileInputStream;
import java.io.IOException;
import java.sql.DriverManager;
import java.sql.ResultSet;
import java.sql.SQLException;
import java.sql.Statement;
import java.util.Properties;

public class JDBCUtils {
    //定义相关的属性(4个),因为只需要一份,所以加static
    private static String user;//用户名
    private static String password;//密码
    private static String url;//url
    private static String driver;//驱动名

    //在static代码块去初始化
    static{
        try {
            Properties properties = new Properties();
            properties.load(new FileInputStream("src\\mysql.properties"));
            //读取相关的属性值
            user=properties.getProperty("user");
            password=properties.getProperty("password");
            url=properties.getProperty("url");
            driver=properties.getProperty("driver");

        } catch (IOException e) {
            //在实际开发中,我们可以这样处理
            //1、将编译异常转成运行异常
            //2、这是调用者,可以选择捕获该异常,也可以选择默认处理该异常
            throw new RuntimeException(e);
        }

    }
    //连接数据库,返回Connection
    public static Connection getConnection(){
        try {
            return (Connection) DriverManager.getConnection(url,user,password);
        } catch (SQLException e) {
            //1、将编译异常转成运行异常
            //2、调用者,可以选择捕获该异常,也可以默认处理该异常
            throw new RuntimeException(e);
        }
    }
    //关闭相关资源
    /*
        1、ResultSet 结果集
        2、Statement 或者 PreparedStatement
        3、Connection
        4、如果需要关闭资源,就传入对象,否则传入null
     */
    public static void close(ResultSet set, Statement statement, Connection connection){
        //判断是否为null
        try {
            if (set != null) {
                set.close();
            }
            if (statement != null) {
                statement.close();
            }
            if (connection != null) {
                connection.close();
            }
        } catch (SQLException e) {
            //将编译异常转成运行异常招聘
            throw new RuntimeException(e);
        }
    }
}
package com.hspedu.jdbc.utils_;

import org.junit.Test;

import java.sql.Date;
import java.sql.PreparedStatement;
import com.mysql.jdbc.Connection;

import java.sql.ResultSet;
import java.sql.SQLException;
@SuppressWarnings({"all"})
public class JDBCUtils_Use {
    @Test
    public void testDML(){//insert, update, delete
        //1、得到连接
        Connection connection =null;

        //2、组织一个sql
        String sql="update actor set name=? where id=?";
        PreparedStatement preparedStatement=null;

        //3、创建PreparedStatement对象
        try {
            connection= JDBCUtils.getConnection();
            preparedStatement=connection.prepareStatement(sql);
            //给占位符赋值
            preparedStatement.setString(1,"周星驰");
            preparedStatement.setInt(2,10);
            //执行
            preparedStatement.executeUpdate();
        } catch (SQLException e) {
            e.printStackTrace();
        } finally {
            //关闭资源
            JDBCUtils.close(null,preparedStatement,connection);
        }
    }
    @Test
    public void testSelect(){
        Connection connection =null;

        String sql="select * from actor where id=?";
        PreparedStatement preparedStatement=null;
        ResultSet set= null;
        try {
            connection= JDBCUtils.getConnection();
            preparedStatement=connection.prepareStatement(sql);
            preparedStatement.setInt(1,13);//给?号赋值

            //执行,得到结果集
            set = preparedStatement.executeQuery();
            //遍历该结果集
            while (set.next()) {
                int id=set.getInt("id");
                String name = set.getString("name");
                String sex = set.getString("sex");
                Date borndate = set.getDate("borndate");
                String phone = set.getString("phone");
                System.out.println(id+"\t"+name+"\t"+sex+"\t"+borndate+"\t"+phone+"\t");
            }
        } catch (SQLException e) {
            e.printStackTrace();
        } finally {
            JDBCUtils.close(set,preparedStatement,connection);
        }
    }
    /*
        10	周星驰	男	2000-01-01	119
        11	贾宝玉	男	2000-01-01	119
        12	贾宝玉	男	2000-01-01	119
        13	贾宝玉	男	2000-01-01	119
     */
}
五、事务
1、基本介绍:
- JDBC程序中当一个Connection对象创建时,默认情况下是自动提交事务:每次执行一个SQL语句时,如果执行成功,就会向数据库自动提交,而不能回滚。
- JDBC程序中为了让多个SQL 语句作为一个整体执行,需要使用事务
- 调用 Connection的 setAutoCommit(false)可以取消自动提交事务
- 在所有的SQL语句都成功执行后,调用 commit();方法提交事务
- 在其中某个操作失败或出现异常时,调用 rollback();方法回滚事务
2、应用实例
模拟经典的转账业务
剖析问题:
package com.hspedu.jdbc.transaction_;

import com.hspedu.jdbc.utils_.JDBCUtils;
import com.mysql.jdbc.Connection;
import org.junit.Test;

import java.sql.PreparedStatement;
import java.sql.SQLException;

/**
 * 演示jdbc中如何使用事务
 */
@SuppressWarnings({"all"})
public class Transaction_ {
    @Test
    public void noTransaction(){
        //操作转账的业务
        //1、得到连接
        Connection connection =null;

        //2、组织一个sql
        String sql="update account set money = money - 100 where id =1";
        String sql2="update account set money = money + 100 where id =2";
        PreparedStatement preparedStatement=null;

        //3、创建PreparedStatement对象
        try {
            connection= JDBCUtils.getConnection();//在默认情况下,connection是默认自动提交
            preparedStatement=connection.prepareStatement(sql);
            preparedStatement.executeUpdate();//执行第一条sql语句

            int i=1/0;//此处抛出异常后,下面的语句不再执行,所以使用事务来解决这个问题
            preparedStatement=connection.prepareStatement(sql2);
            preparedStatement.executeUpdate();//执行第二条sql语句

        } catch (SQLException e) {
            e.printStackTrace();
        } finally {
            //关闭资源
            JDBCUtils.close(null,preparedStatement,connection);
        }
    }
}
使用事务解决问题:
package com.hspedu.jdbc.transaction_;

import com.hspedu.jdbc.utils_.JDBCUtils;
import com.mysql.jdbc.Connection;
import org.junit.Test;

import java.sql.PreparedStatement;
import java.sql.SQLException;

/**
 * 演示jdbc中如何使用事务
 */
@SuppressWarnings({"all"})
public class Transaction_ {
    @Test
    public void noTransaction(){
        //操作转账的业务
        //1、得到连接
        Connection connection =null;

        //2、组织一个sql
        String sql="update account set money = money - 100 where id =1";
        String sql2="update account set money = money + 100 where id =2";
        PreparedStatement preparedStatement=null;

        //3、创建PreparedStatement对象
        try {
            connection= JDBCUtils.getConnection();//在默认情况下,connection是默认自动提交
            //将connection设置为不自动提交
            connection.setAutoCommit(false);//开启了事务
            preparedStatement=connection.prepareStatement(sql);
            preparedStatement.executeUpdate();//执行第一条sql语句

            //int i=1/0;//此处抛出异常后,上面的语句执行了,但下面的语句不再执行,所以使用事务来解决这个问题
            preparedStatement=connection.prepareStatement(sql2);
            preparedStatement.executeUpdate();//执行第二条sql语句

            //提交事务
            connection.commit();

        } catch (SQLException e) {
            //这里进行回滚
            //默认回滚到事务开始的状态
            System.out.println("执行发生了异常,撤销执行的sql");
            try {
                connection.rollback();
            } catch (SQLException throwables) {
                throwables.printStackTrace();
            }
            e.printStackTrace();
        } finally {
            //关闭资源
            JDBCUtils.close(null,preparedStatement,connection);
        }
    }
}
六、批处理
1、基本介绍
- 当需要成批插入或者更新记录时。可以采用Java的批量更新机制,这一机制允许多条语句一次性提交给数据库批量处理。通常情况下比单独提交处理更有效率。
JDBC的批量处理语句包括下面方法:
addBatch():添加需要批量处理的SQL语句或参数
executeBatch():执行批量处理语句
clearBatch():清空批处理包的语句
- JDBC连接MySQL时,如果要使用批处理功能,请在url中加参数?rewriteBatchedStatements=true
- 批处理往往和PreparedStatement一起搭配使用,既可以减少编译次数,又减少运行次数,效率大大提高
2、演示
package com.hspedu.jdbc.batch_;

import com.hspedu.jdbc.utils_.JDBCUtils;
import com.mysql.jdbc.Connection;
import org.junit.Test;

import java.sql.PreparedStatement;
import java.sql.SQLException;

/**
 * 演示java的批处理
 */
@SuppressWarnings({"all"})
public class Batch_ {
    //传统方法,添加5000条数据到admin2
    @Test
    public void noBatch() throws SQLException {
        Connection connection = JDBCUtils.getConnection();
        String sql="insert into admin2 values(null,?,?)";
        PreparedStatement preparedStatement = connection.prepareStatement(sql);
        System.out.println("开始执行");
        long start=System.currentTimeMillis();//开始时间
        for(int i=0;i<5000;i++){
            preparedStatement.setString(1,"jack"+i);
            preparedStatement.setString(2,"666");
            preparedStatement.executeUpdate();
        }
        long end=System.currentTimeMillis();//结束时间
        System.out.println("传统方式耗时:"+(end-start));

        //关闭连接
        JDBCUtils.close(null,preparedStatement,connection);

    }

    @Test
    //使用批量方式添加数据
    public void batch() throws SQLException {
        Connection connection = JDBCUtils.getConnection();
        String sql="insert into admin2 values (null,?,?)";//values后面要加空格,再加()
        PreparedStatement preparedStatement = connection.prepareStatement(sql);
        System.out.println("开始执行");
        long start=System.currentTimeMillis();//开始时间
        for(int i=0;i<5000;i++){
            preparedStatement.setString(1,"jack"+i);
            preparedStatement.setString(2,"666");
            //将sql语句加入到批处理包中
            preparedStatement.addBatch();
            //当有1000条记录时,再批量执行
            if((i+1)%1000==0){
                preparedStatement.executeBatch();
                //清空
                preparedStatement.clearBatch();
            }
        }
        long end=System.currentTimeMillis();//结束时间
        System.out.println("批处理方式耗时:"+(end-start));

        //关闭连接
        JDBCUtils.close(null,preparedStatement,connection);

        //配置文件后面加上rewriteBatchedStatements=true
        //即为:url=jdbc:mysql://localhost:3306/hsp_db05?useSSL=true&characterEncoding=utf8&rewriteBatchedStatements=true
    }
}
//开始执行
//传统方式耗时:16500
//开始执行
//批处理方式耗时:94
*追源码:
package com.hspedu.jdbc.batch_;
import com.hspedu.jdbc.utils_.JDBCUtils;
import com.mysql.jdbc.Connection;
import org.junit.Test;
import java.sql.PreparedStatement;
import java.sql.SQLException;
/**
* 追批处理的源码
*/
@SuppressWarnings({"all"})
public class Batch_ {
@Test
//使用批量方式添加数据
public void batch() throws SQLException {
Connection connection = JDBCUtils.getConnection();
String sql="insert into admin2 values (null,?,?)";//values后面要加空格,再加()
PreparedStatement preparedStatement = connection.prepareStatement(sql);
System.out.println("开始执行");
long start=System.currentTimeMillis();//开始时间
for(int i=0;i<5000;i++){
preparedStatement.setString(1,"jack"+i);
preparedStatement.setString(2,"666");
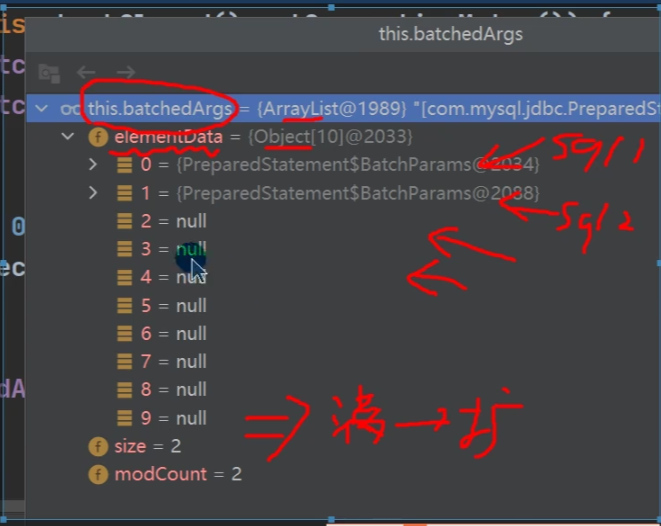
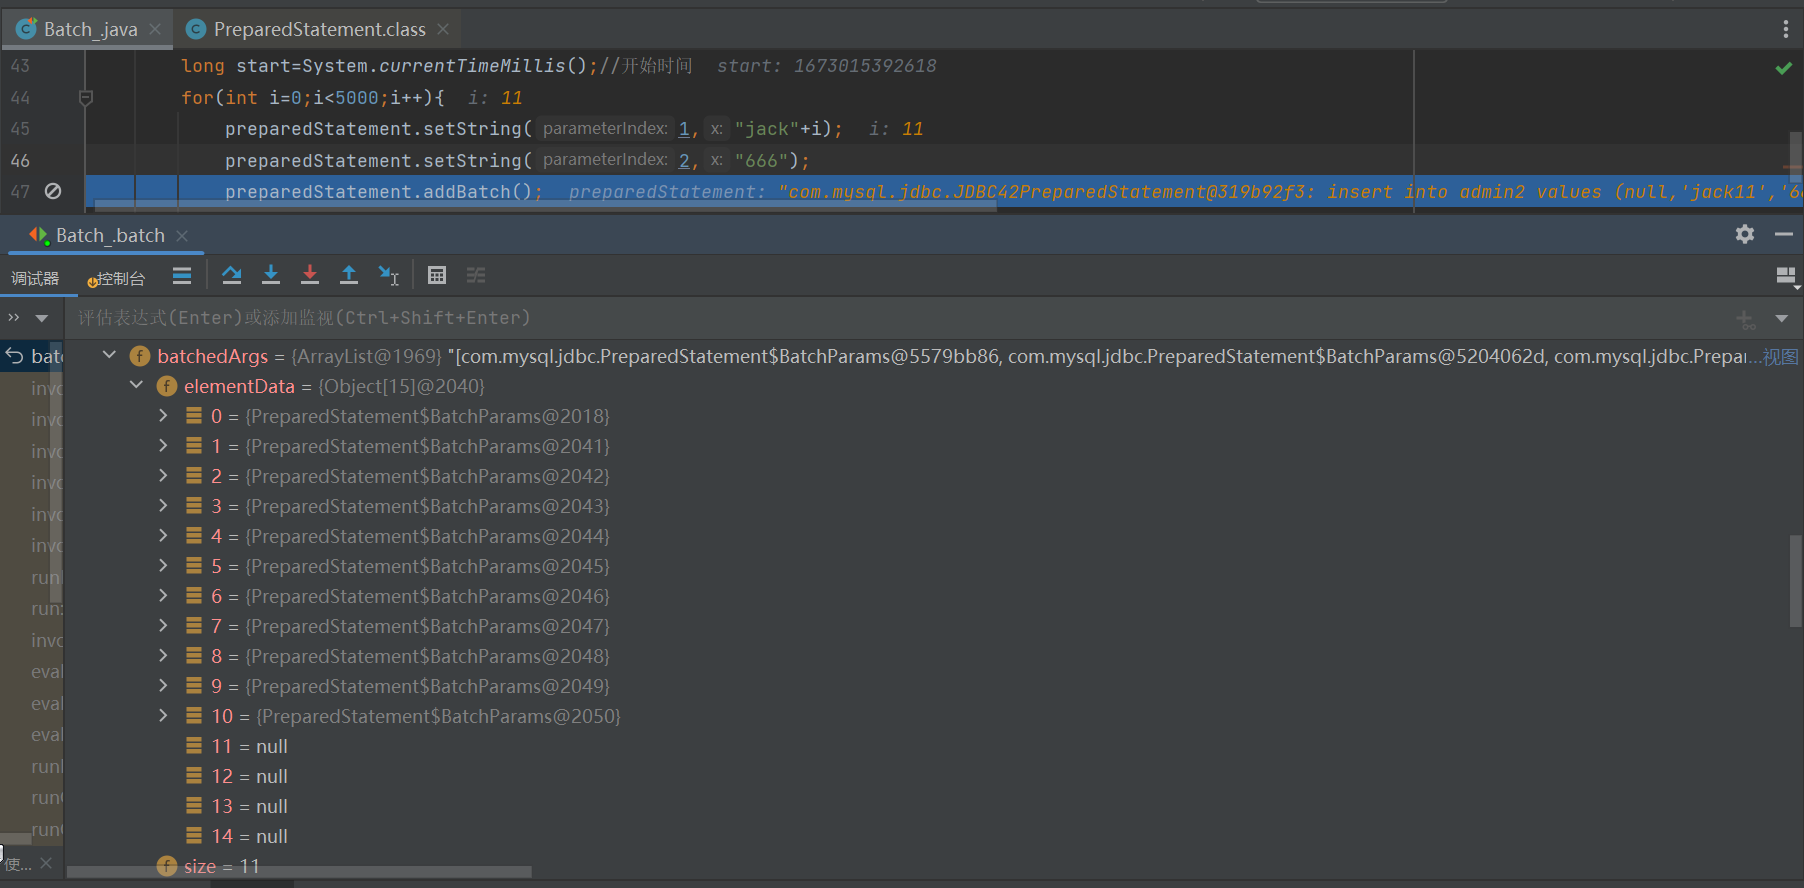
/*
1、第一就创建ArrayList - elementDta ==> Object[]
2、elementDta ==> Object[] 就会存放我们预处理的sql语句
3、当elementData满后,就按照1.5倍扩容
4、当添加到指定的值后,就executeBatch
5、批量处理会减少我们发送sql语句的网络开销,而且减少编译次数,提高了效率
public void addBatch() throws SQLException {
synchronized(this.checkClosed().getConnectionMutex()) {
if (this.batchedArgs == null) {
this.batchedArgs = new ArrayList();
}
for(int i = 0; i < this.parameterValues.length; ++i) {
this.checkAllParametersSet(this.parameterValues[i], this.parameterStreams[i], i);
}
this.batchedArgs.add(new BatchParams(this.parameterValues, this.parameterStreams, this.isStream, this.streamLengths, this.isNull));
}
}
*/
preparedStatement.addBatch();
//当有1000条记录时,再批量执行
if((i+1)%1000==0){
preparedStatement.executeBatch();
//清空
preparedStatement.clearBatch();
}
}
long end=System.currentTimeMillis();//结束时间
System.out.println("批处理方式耗时:"+(end-start));
//关闭连接
JDBCUtils.close(null,preparedStatement,connection);
}
}
*批处理和事务的区别:事务消耗数据库内存,批处理消耗客户端内存
七、数据库连接池
1、传统获取Connection问题分析
- 传统的JDBC数据库连接使用 DriverManager 来获取,每次向数据库建立连接的时候都要将 Connection 加载到内存中,再验证IP地址,用户名和密码(0.05s~1s时间)。需要数据库连接的时候,就向数据库要求一个,频繁的进行数据库连接操作将占用很多的系统资源,容易造成服务器崩溃。
- 每一次数据库连接,使用完后都得断开,如果程序出现异常而未能关闭,将导致数据库内存泄漏,最终将导致重启数据库。
- 传统获取连接的方式,不能控制创建的连接数量,如连接过多,也可能导致内存泄漏,MySQL崩溃。
- 解决传统开发中的数据库连接问题,可以采用数据库连接池技术(connection pool).
package com.hspedu.jdbc.datasource;

import com.hspedu.jdbc.utils_.JDBCUtils;
import com.mysql.jdbc.Connection;
import org.junit.Test;

public class ConQuestion {
    //连接mysql 5000次
    @Test
    public void testCon(){
        //使用传统的jdbc方式,得到连接
        long start=System.currentTimeMillis();
        for(int i=0;i<5000;i++){
            Connection connection = JDBCUtils.getConnection();
            //做一些工作,比如得到PreparedStatement,发送sql
            //......
            //关闭
            JDBCUtils.close(null,null,connection);
        }
        long end=System.currentTimeMillis();
        System.out.println("传统方式5000次耗时:"+(end-start));
        //传统方式5000次耗时:19011
    }
}
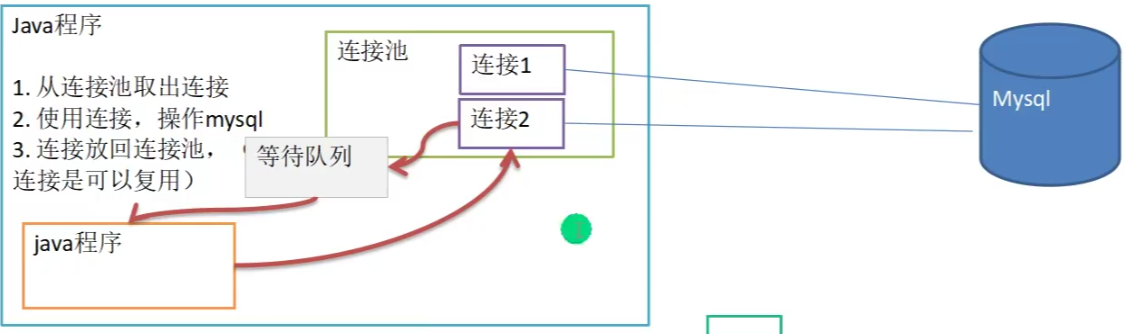
2、数据库连接池基本介绍
- 预先在缓冲池中放入一定数量的连接,当需要建立数据库连接时,只需从“缓冲池”中取出一个,使用完毕之后再放回去。
- 数据库连接池负责分配、管理和释放数据库连接,它允许应用程序重复使用一个现有的数据库连接,而不是重新建立一个。
- 当应用程序向连接池请求的连接数超过最大连接数量时,这些请求将被加入到等待队列中

类似于去门房大爷那拿钥匙来开门后再还回去
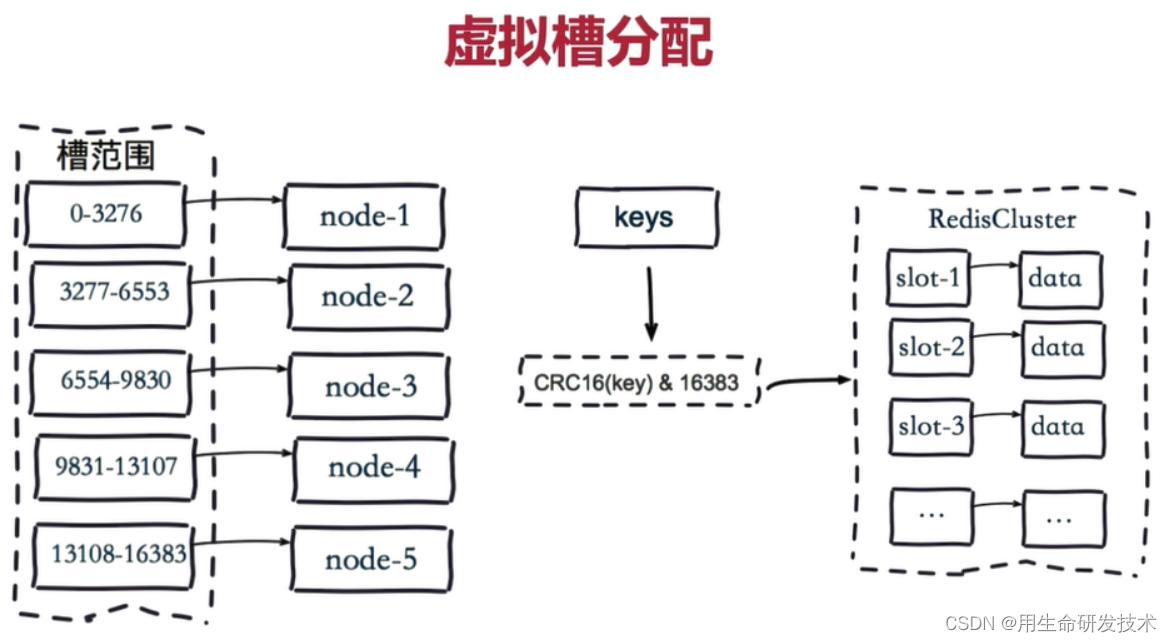
3、数据库连接池示意图
![]()
4、数据库连接池种类
- JDBC的数据库连接池使用 javax.sql.DataSource来表示,DataSource 只是一个接口,该接口通常由第三方提供实现,下载c3p0的jar包:http://t.csdn.cn/d3zii
 http://t.csdn.cn/d3zii
 - C3P0数据库连接池,速度相对较慢,稳定性不错(hibernate,spring) DBCP数据库连接池,速度相对c3p0较快,但不稳定
- Proxool数据库连接池,有监控连接池状态的功能,稳定性较c3p0差一点BoneCP数据库连接池,速度快
- Druid(德鲁伊)是阿里提供的数据库连接池,集DBCP、C3P0、Proxool 优点于一身的数据库连接池
(1) c3p0数据库连接池:
c3p0的使用方法1:
package com.hspedu.jdbc.datasource;


import com.mchange.v2.c3p0.ComboPooledDataSource;
import org.junit.Test;

import java.beans.PropertyVetoException;
import java.io.FileInputStream;
import java.io.IOException;
import java.sql.Connection;
import java.sql.SQLException;
import java.util.Properties;

/**
 *演示c3p0的使用
 *方式1:相关参数,在程序中指定user, url, password等
 */
@SuppressWarnings({"all"})
public class C3P0_ {

    @Test
    public void testC3P0_01() throws IOException, PropertyVetoException, SQLException {
        //1、创建一个数据源对象
        ComboPooledDataSource comboPooledDataSource = new ComboPooledDataSource();
        //2、通过配置文件mysql.properties获取相关连接的信息
        Properties properties = new Properties();
        properties.load(new FileInputStream("src\\mysql.properties"));
        //获取相关的属性值
        String user=properties.getProperty("user");
        String password=properties.getProperty("password");
        String url=properties.getProperty("url");
        String driver=properties.getProperty("driver");

        //给数据源comboPooledDataSource 设置相关的参数
        //注意:连接管理是由comboPooledDataSource 来管理的
        comboPooledDataSource.setDriverClass(driver);
        comboPooledDataSource.setJdbcUrl(url);
        comboPooledDataSource.setUser(user);
        comboPooledDataSource.setPassword(password);

        //设置初始化连接数
        comboPooledDataSource.setInitialPoolSize(10);
        //最大连接数
        comboPooledDataSource.setMaxPoolSize(50);
        //测试连接池的效率,测试对mysql 5000次操作
        long start=System.currentTimeMillis();
        for(int i=0;i<5000;i++) {
            Connection connection = comboPooledDataSource.getConnection();//这个方法就是从DataSource接口实现
            //System.out.println("连接OK");
            connection.close();
        }
        long end=System.currentTimeMillis();
        System.out.println("c3p0 5000次连接mysql耗时:"+(end-start));
        //c3p0 5000次连接mysql耗时:649
    }
}
//用的是9.5.2版本的c3p0,把解压出来的jar包中c3p0-0.9.5.2.jar
//和mchange-commons-java-0.2.12.jar都添加到根目录libs下面,然后右键,“添加到库”即可
c3p0的使用方法2:
jar包里的c3p0-config.xml配置文件(修改前):
<?xml version="1.0" encoding="utf-8"?>
<c3p0-config>
  <default-config>
    <property name="driverClass">com.mysql.jdbc.Driver</property>
    <property name="jdbcUrl">jdbc:mysql://localhost:3306/day25</property>
    <property name="user">root</property>
    <property name="password">root</property>

    <property name="initialPoolSize">5</property>
    <property name="maxPoolSize">10</property>
    <property name="checkoutTimeout">3000</property>
  </default-config>

  <named-config name="otherc3p0">
  </named-config>
</c3p0-config>修改后(修改了url和password两行,并且适当增大了initialPoolSize(初始连接数)和maxPoolSize(最大连接数)):
<?xml version="1.0" encoding="utf-8"?>
<c3p0-config>
<default-config>
<property name="driverClass">com.mysql.jdbc.Driver</property>
<property name="jdbcUrl">jdbc:mysql://localhost:3306/hsp_db05?useSSL=true&characterEncoding=utf8</property>
<property name="user">root</property>
<property name="password">123456</property>
<property name="initialPoolSize">10</property>
<property name="maxPoolSize">50</property>
<property name="checkoutTimeout">3000</property>
</default-config>
<named-config name="hsp_edu">
</named-config>
</c3p0-config>老师版详细说明(修改后):
<?xml version="1.0" encoding="utf-8"?>
<c3p0-config>
<default-config>
<!--驱动类-->
<property name="driverClass">com.mysql.jdbc.Driver</property>
<!--url,其中的&使用转义字符&-->
<property name="jdbcUrl">jdbc:mysql://localhost:3306/hsp_db05?useSSL=true&characterEncoding=utf8</property>
<!--用户名-->
<property name="user">root</property>
<!--密码-->
<property name="password">123456</property>
<!--每次增长的连接数 -->
<property name="acquireIncrement">5</property>
<!--初始的连接数-->
<property name="initialPoolSize">10</property>
<!--最小连接数,如果连接太多空余的,就关掉一部分,这是底线-->
<property name="minPoolSize">5</property>
<!--最大连接数-->
<property name="maxPoolSize">50</property>
<!--可连接的最多命令对象数-->
<property name="maxStatementsPerConnection">5</property>
<!--每个对象可连接的最多的命令对象数,默认为2-->
<property name="maxStatementPerConnection">2</property>
<property name="checkoutTimeout">3000</property>
</default-config>
<!--数据源名称代表连接池-->
<named-config name="hsp_edu">
</named-config>
</c3p0-config>package com.hspedu.jdbc.datasource;
import com.mchange.v2.c3p0.ComboPooledDataSource;
import org.junit.Test;
import java.sql.Connection;
import java.sql.SQLException;
/**
* 演示c3p0的使用,方式2:使用配置文件模板来完成
*/
@SuppressWarnings({"all"})
public class C3P0_ {
@Test
//1、将c3p0提供的c3p0.config.xml 拷贝到src目录下
//2、该文件指定了连接数据库和连接池的相关参数
public void testc3p0_02() throws SQLException {
ComboPooledDataSource comboPooledDataSource = new ComboPooledDataSource("hps_db05");
//测试5000次连接mysql
long start=System.currentTimeMillis();
for(int i=0;i<5000;i++) {
Connection connection = comboPooledDataSource.getConnection();
//System.out.println("连接OK");
connection.close();
}
long end=System.currentTimeMillis();
System.out.println("c3p0第二种使用方式耗时:"+(end-start));
//c3p0第二种使用方式耗时:718
}
}
(2)druid数据库连接池
1)演示druid的使用
druid的jar包里的druid.properties配置文件修改前:
#key=value
driverClassName=com.mysql.jdbc.Driver
url=jdbc:mysql://localhost:3306/girls?rewriteBatchedStatements=true
#url=jdbc:mysql://localhost:3306/girls
username=root
password=root
#initial connection Size
initialSize=10
#min idle connection size
minIdle=5
#max active connection size
maxActive=20
#max wait time(5000 mil seconds)
maxWait=5000修改后(只修改了url和password这两行):
#key=value
driverClassName=com.mysql.jdbc.Driver
url=jdbc:mysql://localhost:3306/hsp_db05?useSSL=true&characterEncoding=utf8&rewriteBatchedStatements=true
#url=jdbc:mysql://localhost:3306/girls
username=root
password=123456
#initial connection Size
initialSize=10
#min idle connection size
minIdle=5
#max active connection size
maxActive=20
#max wait time(5000 mil seconds)
maxWait=5000
package com.hspedu.jdbc.datasource;
import com.alibaba.druid.pool.DruidDataSourceFactory;
import org.junit.Test;
import javax.sql.DataSource;
import java.io.FileInputStream;
import java.sql.Connection;
import java.util.Properties;
/**
* 演示druid的使用
*/
public class Druid_ {
@Test
public void testDruid() throws Exception {
//1、加入Druid jar包
//2、加入配置文件druid.properties,将该文件拷贝到项目的src目录下
//3、创建Properties对象,读取配置文件
Properties properties = new Properties();
properties.load(new FileInputStream("src\\druid.properties"));
//4、创建一个指定参数的数据库连接池
DataSource dataSource = DruidDataSourceFactory.createDataSource(properties);
long start=System.currentTimeMillis();
for(int i=1;i<500000;i++) {
Connection connection = dataSource.getConnection();
//System.out.println("连接成功");
connection.close();
}
long end=System.currentTimeMillis();
System.out.println("druid连接池操作500000次耗时:"+(end-start));
//比较druid和c3p0的性能:
//druid连接池操作5000次耗时:995
//c3p0方式二操作5000次耗时:584
//druid连接池操作500000次耗时:774
//c3p0方式二操作500000次耗时:2094
}
}
2)注意:
- druid操作大型数据库的速度快于c3p0的,c3p0较老,平时开发建议使用druid。
- 数据源只是帮我们管理了数据库的连接,所以仍然要使用到驱动
- druid的jar的官网下载链接:
https://repo1.maven.org/maven2/com/alibaba/druid/http:// https://repo1.maven.org/maven2/com/alibaba/druid/
3)将JDBCUtils工具类改成Druid实现
通过Druid数据库连接池获取连接对象
package com.hspedu.jdbc.datasource;

import com.alibaba.druid.pool.DruidDataSourceFactory;

import javax.sql.DataSource;
import java.io.FileInputStream;
import java.sql.Connection;
import java.sql.ResultSet;
import java.sql.SQLException;
import java.sql.Statement;
import java.util.Properties;

/**
 * 基于druid数据库连接池的工具类
 */
public class JDBCUtilsByDruid {
    private static DataSource ds;

    //在静态代码块中完成ds的初始化
    static{
        Properties properties = new Properties();
        try {
            properties.load(new FileInputStream("src\\druid.properties"));
            ds= DruidDataSourceFactory.createDataSource(properties);
        } catch (Exception e) {
            e.printStackTrace();
        }
    }

    //编写getConnection方法
    public static Connection getConnection() throws SQLException {
        return ds.getConnection();
    }

    //关闭连接
    //在数据库连接池技术中,close不是真的断掉连接
    //而是把使用的Connection对象放加连接池
    public static void close(ResultSet resultSet, Statement statement, Connection connection){
        try {
            if (resultSet != null) {
                resultSet.close();
            }
            if (statement != null) {
                statement.close();
            }
            if (connection != null) {
                connection.close();
            }
        } catch (SQLException e) {
            //将编译异常转成运行异常抛出
            throw new RuntimeException(e);
        }
    }
}
package com.hspedu.jdbc.datasource;

import org.junit.Test;
import java.sql.*;
/**
 * 测试JDBCUtilsByDruid的使用
 */
@SuppressWarnings({"all"})
public class JDBCUtilsByDruid_Use {
    @Test
    public void testSelect() {
        System.out.println("使用druid方式完成");
        Connection connection = null;
        String sql = "select * from actor where id=?";
        PreparedStatement preparedStatement = null;
        ResultSet set = null;
        try {
            connection = JDBCUtilsByDruid.getConnection();
            System.out.println("connection的运行类型:"+connection.getClass());
            //connection的运行类型:class com.alibaba.druid.pool.DruidPooledConnection
            preparedStatement = connection.prepareStatement(sql);
            preparedStatement.setInt(1, 12);//给?号赋值

            //执行,得到结果集
            set = preparedStatement.executeQuery();
            //遍历该结果集
            while (set.next()) {
                int id = set.getInt("id");
                String name = set.getString("name");
                String sex = set.getString("sex");
                Date borndate = set.getDate("borndate");
                String phone = set.getString("phone");
                System.out.println(id + "\t" + name + "\t" + sex + "\t" + borndate + "\t" + phone + "\t");
            }
        } catch (SQLException e) {
            e.printStackTrace();
        } finally {
            JDBCUtilsByDruid.close(set, preparedStatement, connection);
        }
    }
}
/*注意:
在使用JDBCUtilsByDruid工具类时,注意引入的Connection类要和JDBCUtilsByDruid里引入的Connection类类型一致
*/
八、Apache—DBUtils
1、引入

2、基本介绍
- commons—dbutils是 Apache 组织提供的一个开源 JDBC工具类库,它是对JDBC的封装,使用dbutils能极大简化jdbc编码的工作量。
- DbUtils类
- QueryRunner类:该类封装了SQL的执行,是线程安全的。可以实现增、删、改、查、批处理
- 使用QueryRunner类实现查询
- ResultSetHandler接口:该接口用于处理 java.sql.ResultSet,将数据按要求转换为另—种形式
- ArrayHandler:把结果集中的第一行数据转成对象数组。
- ArrayListHandler:把结果集中的每一行数据都转成一个数组,再存放到List中。
- BeanHandler:将结果集中的第一行数据封装到一个对应的JavaBean实例中。
- BeanListHandler:将结果集中的每一行数据都封装到一个对应的JavaBean实例中,存放到List里。
- ColumnListHandler:将结果集中某一列的数据存放到List中。
- KeyedHandler(name):将结果集中的每行数据都封装到Map里,再把这些map再存到一个map里,其key为指定的key。
- MapHHandler:将结果集中的第一行数据封装到一个Map里,key是列名,value就是对应的值。
- MapListHandler:将结果集中的每一行数据都封装到一个Map里,然后再存放到List
3、演示
(1)土方法:
package com.hspedu.jdbc.datasource;

import org.junit.Test;
import java.sql.*;
import java.util.ArrayList;

/**
 * 使用土方法把ResultSet封装到ArrayList里
 */
@SuppressWarnings({"all"})
public class JDBCUtilsByDruid_Use {
    @Test
    public ArrayList<Actor> testSelect() {
        Connection connection = null;
        String sql = "select * from actor where id>=?";
        PreparedStatement preparedStatement = null;
        ResultSet set = null;
        ArrayList<Actor> list = new ArrayList<>();//创建ArrayList对象,存放actor对象
        try {
            connection = JDBCUtilsByDruid.getConnection();
            preparedStatement = connection.prepareStatement(sql);
            preparedStatement.setInt(1, 12);//给?号赋值

            //执行,得到结果集
            set = preparedStatement.executeQuery();
            //遍历该结果集
            while (set.next()) {
                int id = set.getInt("id");
                String name = set.getString("name");
                String sex = set.getString("sex");
                Date borndate = set.getDate("borndate");
                String phone = set.getString("phone");
                //把得到的resultset的记录,封闭到Actor对象,放入到list集合
                list.add(new Actor(id,name,sex,borndate,phone));
            }
            System.out.println("list集合数据:"+list);
        } catch (SQLException e) {
            e.printStackTrace();
        } finally {
            //关闭资源
            JDBCUtilsByDruid.close(set, preparedStatement, connection);
        }
        //因为ArrayList和connection没有任何关联,所以关闭连接后,该集合仍然可以复用
        return list;
    }
}
//list集合数据:[
//Actor{id=12, name='贾宝玉', sex='男', borndate=2000-01-01, phone='119'},
//Actor{id=13, name='贾宝玉', sex='男', borndate=2000-01-01, phone='119'}]
package com.hspedu.jdbc.datasource;
import java.util.Date;
/**
* Actor对象和actor表的记录对应
*/
@SuppressWarnings({"all"})
public class Actor {
private Integer id;
private String name;
private String sex;
private Date borndate;
private String phone;
public Actor() {//一定要给一个无参构造器,因为底层可能会用到反射
}
public Actor(Integer id, String name, String sex, Date borndate, String phone) {
this.id = id;
this.name = name;
this.sex = sex;
this.borndate = borndate;
this.phone = phone;
}
public Integer getId() {
return id;
}
public void setId(Integer id) {
this.id = id;
}
public String getName() {
return name;
}
public void setName(String name) {
this.name = name;
}
public String getSex() {
return sex;
}
public void setSex(String sex) {
this.sex = sex;
}
public Date getBorndate() {
return borndate;
}
public void setBorndate(Date borndate) {
this.borndate = borndate;
}
public String getPhone() {
return phone;
}
public void setPhone(String phone) {
this.phone = phone;
}
@Override
public String toString() {
return "\nActor{" +
"id=" + id +
", name='" + name + '\'' +
", sex='" + sex + '\'' +
", borndate=" + borndate +
", phone='" + phone + '\'' +
'}';
}
}
(2)使用DBUtils+数据连接池(druid)方式,完成对表的crud
package com.hspedu.jdbc.datasource;

import org.apache.commons.dbutils.QueryRunner;
import org.apache.commons.dbutils.handlers.BeanListHandler;
import org.junit.Test;

import java.sql.Connection;
import java.sql.SQLException;
import java.util.List;

public class DBUtils_Use {
    @Test
    //使用apache-DBUtils工具类+druid完成对表的crud操作
    public void testQueryMany() throws SQLException {
        //1、得到连接(druid)
        Connection connection = JDBCUtilsByDruid.getConnection();
        //2、使用DBUtils类和接口,先引入DBUtils相关的jar,加入到本Project
        //3、创建QueryRunner
        QueryRunner queryRunner = new QueryRunner();
        //4、就可以执行相关的方法,返回ArrayList结果集
        String sql="select * from actor where id >=?";
        //查询部分列
        //String sql="select name from actor where id >=?";
        //解读:
        //(1)query方法就是执行sql语句,得到resultset---封装到--->ArrayList集合中
        //(2)返回集合
        //(3)connection: 连接
        //(4)sql: 执行的sql语句
        //(5)new BeanListHandler<>(Actor.class): 在将resultset->Actor对象->封闭到ArrayList
        //    底层使用反射机制去获取Actor类的属性,然后进行封装
        //(6)1 就是给sql语句中的?赋值,可以有多个值,因为是可变参数Object...params
        /**
         * 分析queryRunner.query方法:
         * private <T> T query(Connection conn, boolean closeConn, String sql, ResultSetHandler<T> rsh, Object... params) throws SQLException {
         *         if (conn == null) {
         *             throw new SQLException("Null connection");
         *         } else if (sql == null) {
         *             if (closeConn) {
         *                 this.close(conn);
         *             }
         *
         *             throw new SQLException("Null SQL statement");
         *         } else if (rsh == null) {
         *             if (closeConn) {
         *                 this.close(conn);
         *             }
         *
         *             throw new SQLException("Null ResultSetHandler");
         *         } else {
         *             PreparedStatement stmt = null;//定义PreparedStatement
         *             ResultSet rs = null;//接收返回的ResultSet
         *             T result = null;//返回ArrayList
         *
         *             try {
         *                 stmt = this.prepareStatement(conn, sql);//创建PreparedStatement
         *                 this.fillStatement(stmt, params);//对sql进行?赋值
         *                 rs = this.wrap(stmt.executeQuery());//执行sql,返回resultset
         *                 result = rsh.handle(rs);//返回的resultset--->封装到arrayList [使用到反射,对传入的class对象进行处理 ]
         *             } catch (SQLException var33) {
         *                 this.rethrow(var33, sql, params);
         *             } finally {
         *                 try {
         *                     this.close(rs);//关闭resultset
         *                 } finally {
         *                     this.close(stmt);//关闭PreparedStatement对象
         *                     if (closeConn) {
         *                         this.close(conn);
         *                     }
         *
         *                 }
         *             }
         *
         *             return result;
         *         }
         *     }
         */
        List<Actor> list=
                queryRunner.query(connection,sql,new BeanListHandler<>(Actor.class),1);
        System.out.println("输出集合的信息");
        for(Actor actor:list){
            System.out.print(actor);
        }

        //释放资源
        //(7)底层得到的resultSet,会在query关闭,同时也会关闭PreparedStatement
        JDBCUtilsByDruid.close(null,null,connection);
    }
}
//输出集合的信息
//
//Actor{id=10, name='周星驰', sex='男', borndate=2000-01-01 00:00:00.0, phone='119'}
//Actor{id=11, name='贾宝玉', sex='男', borndate=2000-01-01 00:00:00.0, phone='119'}
//Actor{id=12, name='贾宝玉', sex='男', borndate=2000-01-01 00:00:00.0, phone='119'}
//Actor{id=13, name='贾宝玉', sex='男', borndate=2000-01-01 00:00:00.0, phone='119'}
package com.hspedu.jdbc.datasource;

import org.apache.commons.dbutils.QueryRunner;
import org.apache.commons.dbutils.handlers.BeanHandler;
import org.apache.commons.dbutils.handlers.ScalarHandler;
import org.junit.Test;

import java.sql.Connection;
import java.sql.SQLException;
@SuppressWarnings({"all"})
public class DBUtils_Use {

    @Test
    /**
     * 演示apache-dbutils + druid 完成返回的结果是单行记录(单个对象)
     */
    public void testQuerySingle() throws SQLException {
        //1、得到连接(druid)
        Connection connection = JDBCUtilsByDruid.getConnection();
        //2、使用DBUtils类和接口,先引入DBUtils相关的jar,加入到本Project
        //3、创建QueryRunner
        QueryRunner queryRunner = new QueryRunner();
        //4、就可以执行相关的方法,返回单个对象
        String sql="select * from actor where id=?";
        //解读:
        //因为我们返回单行记录/单个对象,则使用的Handler是BeanHandler
        Actor actor = queryRunner.query(connection, sql, new BeanHandler<>(Actor.class), 4);
        System.out.println(actor);
        //null

        //释放资源
        JDBCUtilsByDruid.close(null,null,connection);

    }

    @Test
    /**
     *演示apache-dbutils + druid 完成查询结果是单行单列-返回的就是object
     */
    public void testScalar() throws SQLException {
        //1、得到连接(druid)
        Connection connection = JDBCUtilsByDruid.getConnection();
        //2、使用DBUtils类和接口,先引入DBUtils相关的jar,加入到本Project
        //3、创建QueryRunner
        QueryRunner queryRunner = new QueryRunner();
        //4、就可以执行相关的方法,返回单行单列,返回的就是object
        String sql="select name from actor where id=?";

        //解读:因为返回的是一个对象,使用handler就是ScalarHandler
        Object obj = queryRunner.query(connection, sql, new ScalarHandler(), 13);
        System.out.println(obj);
        //贾宝玉

        //释放资源
        JDBCUtilsByDruid.close(null,null,connection);

    }

    @Test
    /**
     * 演示apache-dbutils + druid 完成 dml(update,insert,delete)
     */
    public void testDML() throws SQLException {
        //1、得到连接(druid)
        Connection connection = JDBCUtilsByDruid.getConnection();
        //2、使用DBUtils类和接口,先引入DBUtils相关的jar,加入到本Project
        //3、创建QueryRunner
        QueryRunner queryRunner = new QueryRunner();
        //4、组织sql完成update,insert,delete
        String sql="update actor set name=? where id=?";

        //解读:
        //(1)执行dml操作是queryRunner.update,无论是update还是insert, delete
        //(2)返回的是受影响的行数
        int affectedRow=queryRunner.update(connection,sql,"张三丰",13);
        System.out.println(affectedRow>0?"执行成功":"执行没有影响列表");

        //释放资源
        JDBCUtilsByDruid.close(null,null,connection);

    }
}
4、表和JavaBean的类型映射关系
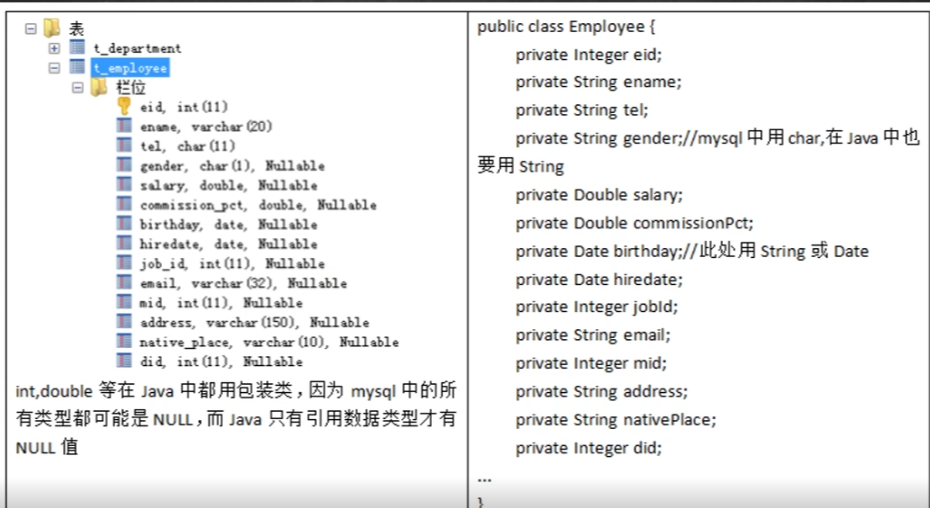
九、DAO和增删改查通用方法-BasicDao
1、分析问题


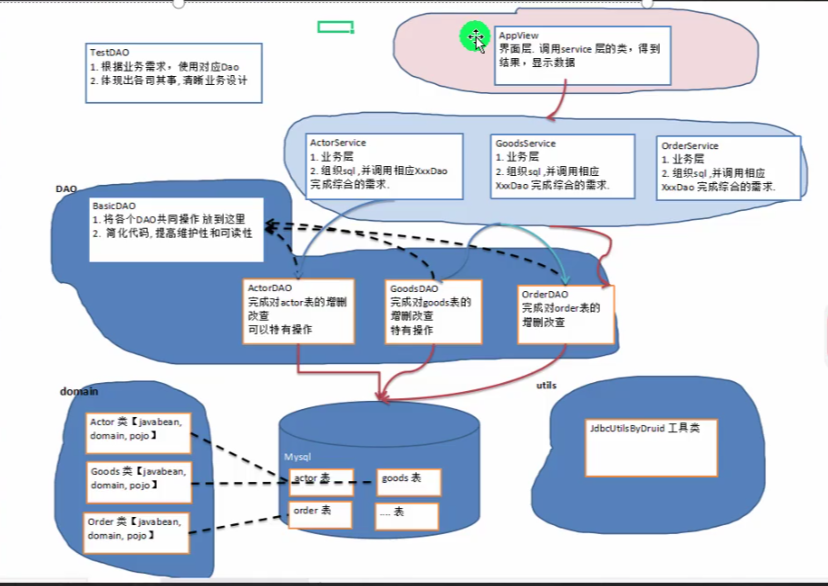
2、基本说明
- DAO:data access object数据访问对象
- 这样的通用类,称为 BasicDao,是专门和数据库交互的,即完成对数据库(表)的crud操作。
- 在BaiscDao的基础上,实现一张表 对应一个Dao,更好的完成功能,比如Customer表—Customer.java类(javabean)-CustomerDao.java
package com.hspedu.dao_.dao;

import com.hspedu.jdbc.datasource.JDBCUtilsByDruid;
import org.apache.commons.dbutils.QueryRunner;
import org.apache.commons.dbutils.handlers.BeanHandler;
import org.apache.commons.dbutils.handlers.BeanListHandler;
import org.apache.commons.dbutils.handlers.ScalarHandler;

import java.sql.Connection;
import java.sql.SQLException;
import java.util.List;

/**
 * 开发BasicDAO,是其他DAO的父类
 */
@SuppressWarnings({"all"})
public class BasicDAO<T> {//泛型指定具体类型

    private QueryRunner qr=new QueryRunner();

    /**
     *     开发通用的dml方法,针对任意的表
     * @param sql
     * @param parameters
     * @return
     */
    public int update(String sql,Object...parameters){

        Connection connection=null;
        try {
            connection= JDBCUtilsByDruid.getConnection();
            int update = qr.update(connection, sql, parameters);
            return update;
        } catch (SQLException e) {
            throw new RuntimeException(e);//将编译异常——》运行异常,抛出
        } finally {
            JDBCUtilsByDruid.close(null,null,connection);
        }
    }


    /**
     *    返回多个对象(即查询的结果是多行),针对任意表
     * @param sql 可以有?
     * @param clazz 传入一个类的Class对象,比如Actor.class
     * @param parameters 传入?的具体的值,可以是多个(可变参数)
     * @return 根据Actor.class返回对应的 ArrayList 集合
     */
    public List<T> queryMulti(String sql,Class<T> clazz,Object...parameters){
        Connection connection=null;
        try {
            connection= JDBCUtilsByDruid.getConnection();
            return qr.query(connection,sql,new BeanListHandler<T>(clazz),parameters);
        } catch (SQLException e) {
            throw new RuntimeException(e);//将编译异常——》运行异常,抛出
        } finally {
            JDBCUtilsByDruid.close(null,null,connection);
        }
    }

    /**
     * 查询单行结果的通用方法
     */
    public T querySingle(String sql,Class<T> clazz,Object...parameters){
        Connection connection=null;
        try {
            connection= JDBCUtilsByDruid.getConnection();
            return qr.query(connection,sql,new BeanHandler<T>(clazz),parameters);
        } catch (SQLException e) {
            throw new RuntimeException(e);//将编译异常——》运行异常,抛出
        } finally {
            JDBCUtilsByDruid.close(null,null,connection);
        }
    }

    /**
     * 查询单行单列的方法,即返回单值的方法
     */
    public Object queryScalar(String sql,Object...parameters){
        Connection connection=null;
        try {
            connection= JDBCUtilsByDruid.getConnection();
            return qr.query(connection,sql,new ScalarHandler(),parameters);
        } catch (SQLException e) {
            throw new RuntimeException(e);//将编译异常——》运行异常,抛出
        } finally {
            JDBCUtilsByDruid.close(null,null,connection);
        }
    }


}
package com.hspedu.dao_.dao;

import com.hspedu.dao_.domain.Actor;

public class ActorDAO extends BasicDAO<Actor> {
    //1、就有BasicDAO的方法
    //2、根据业务需求,可以编写特有的方法
}
package com.hspedu.dao_.domain;
import java.util.Date;
/**
* Actor对象和actor表的记录对应
*/
@SuppressWarnings({"all"})
public class Actor {
private Integer id;
private String name;
private String sex;
private Date borndate;
private String phone;
public Actor() {//一定要给一个无参构造器,因为底层可能会用到反射
}
public Actor(Integer id, String name, String sex, Date borndate, String phone) {
this.id = id;
this.name = name;
this.sex = sex;
this.borndate = borndate;
this.phone = phone;
}
public Integer getId() {
return id;
}
public void setId(Integer id) {
this.id = id;
}
public String getName() {
return name;
}
public void setName(String name) {
this.name = name;
}
public String getSex() {
return sex;
}
public void setSex(String sex) {
this.sex = sex;
}
public Date getBorndate() {
return borndate;
}
public void setBorndate(Date borndate) {
this.borndate = borndate;
}
public String getPhone() {
return phone;
}
public void setPhone(String phone) {
this.phone = phone;
}
@Override
public String toString() {
return "\nActor{" +
"id=" + id +
", name='" + name + '\'' +
", sex='" + sex + '\'' +
", borndate=" + borndate +
", phone='" + phone + '\'' +
'}';
}
}
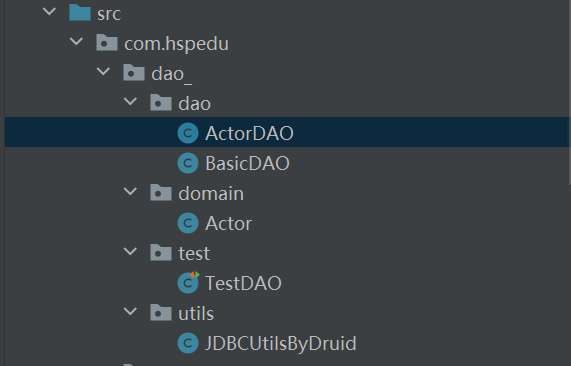
3、完成一个简单设计
com.hspedu.dao
- com.hspedu.dao_.utils//工具类
- com.hspedu.dao_.domain//javabean
- com.hspedu.dao_.dao//存放XxxDAO和BasicDAO
- com.hspedu.dao_.test//写测试类
package com.hspedu.dao_.test;

import com.hspedu.dao_.dao.ActorDAO;
import com.hspedu.dao_.domain.Actor;
import org.junit.Test;

import java.util.List;

/**
 * 测试ActorDAO 对actor表crud操作
 */
public class TestDAO{

    @Test
    public void testActorDAO(){
        ActorDAO actorDAO = new ActorDAO();
        //1、查询
        List<Actor> actors = actorDAO.queryMulti("select * from actor where id >=?", Actor.class, 1);
        System.out.println("=====查询结果====");
        for (Actor  actor :actors) {
            System.out.println(actor);
        }

        //2、查询单行记录
        Actor actor = actorDAO.querySingle("select * from actor where id=?", Actor.class, 13);
        System.out.println("=====查询单行结果====");
        System.out.println(actor);

        //3、查询单行单列
        Object o = actorDAO.queryScalar("select name from actor where id=?", 13);
        System.out.println("====查询单行单列值====");
        System.out.println(o);

        //4、dml操作insert, update, delete
        int update = actorDAO.update("insert into actor values(null,?,?,?,?)", "张无忌", "男", "2000-1-1", "999");

        System.out.println(update>0?"执行成功":"执行没有影响表");
    }
}
//=====查询结果====
//
//Actor{id=10, name='周星驰', sex='男', borndate=2000-01-01 00:00:00.0, phone='119'}
//
//Actor{id=11, name='贾宝玉', sex='男', borndate=2000-01-01 00:00:00.0, phone='119'}
//
//Actor{id=12, name='贾宝玉', sex='男', borndate=2000-01-01 00:00:00.0, phone='119'}
//
//Actor{id=13, name='张三丰', sex='男', borndate=2000-01-01 00:00:00.0, phone='119'}
//
//Actor{id=14, name='张无忌', sex='男', borndate=2000-01-01 00:00:00.0, phone='999'}
//=====查询单行结果====
//
//Actor{id=13, name='张三丰', sex='男', borndate=2000-01-01 00:00:00.0, phone='119'}
//====查询单行单列值====
//张三丰
//执行成功
4、练习

我的答案:

package com.hspedu.dao_.domain;

public class Goods {
    private Integer id;
    private String goods_name;
    private Double price;
    public Goods(){

    }

    public Goods(Integer id, String goods_name, Double price) {
        this.id = id;
        this.goods_name = goods_name;
        this.price = price;
    }

    public Integer getId() {
        return id;
    }

    public void setId(Integer id) {
        this.id = id;
    }

    public String getGoods_name() {
        return goods_name;
    }

    public void setGoods_name(String goods_name) {
        this.goods_name = goods_name;
    }

    public Double getPrice() {
        return price;
    }

    public void setPrice(Double price) {
        this.price = price;
    }

    @Override
    public String toString() {
        return "Goods{" +
                "id=" + id +
                ", goods_name='" + goods_name + '\'' +
                ", price=" + price +
                '}';
    }
}
package com.hspedu.dao_.dao;

import com.hspedu.dao_.domain.Goods;

public class GoodsDAO extends BasicDAO<Goods>{
}
package com.hspedu.dao_.test;

import com.hspedu.dao_.dao.GoodsDAO;
import com.hspedu.dao_.domain.Goods;
import org.junit.Test;

import java.util.List;

/**
 * 完成对goods表的crud操作
 */
public class testGoodsDAO {
    @Test
    public void goods(){
        GoodsDAO goodsDAO = new GoodsDAO();
        //1、查询
        List<Goods> goods = goodsDAO.queryMulti("select * from goods where id>=?", Goods.class, 10);
        for (Goods goods1 :goods) {
            System.out.println(goods1);
        }
        //2、查询单行记录
        Goods goods2 = goodsDAO.querySingle("select * from actor where id=?", Goods.class, 20);
        System.out.println(goods2);

        //3、查询单行单列
        Object o = goodsDAO.queryScalar("select goods_name from goods where id=?", 20);
        System.out.println(o);

        //4、insert
        int update = goodsDAO.update("insert into goods values(?,?,?)", "30", "小米手机", "2000");
        System.out.println(update>0?"执行成功":"执行没有影响表");
    }
}
//Goods{id=10, goods_name='华为手机', price=2000.0}
//Goods{id=20, goods_name='苹果手机', price=3000.0}
//null
//苹果手机
//执行成功