1、了解“申请和释放设备号函数”
int alloc_chrdev_region(dev_t *dev, unsigned baseminor, unsigned count, const char *name)
//注册字符设备驱动
//dev:保存申请到的设备号
//baseminor:次设备号的起始地址
//count:要申请的设备数量;
// name:表示“设备名字”
注意:
没有指定主设备号,但是给了“次设备号的基地址”和“次设备的数量”,可以使用alloc_chrdev_region()注册设备号;
int register_chrdev_region(dev_t from, unsigned count, const char *name)
from表示起始设备号
count表示次设备号的数量
name表示设备名
注意:
指定“起始设备号”和“次设备号的数量”,可以使用register_chrdev_region()注册设备号;
void unregister_chrdev_region(dev_t from, unsigned count)
//释放字符设备号
from表示起始设备号
count表示次设备的数量
注意:
指定“起始设备号”和“次设备的数量”,可以使用unregister_chrdev_region()注销设备号;
2、申请和释放设备应用举例:
int major; /* 主设备号 */
int minor; /* 次设备号 */
dev_t devid; /* 设备号 */
if (major)/* 定义了主设备号 */
{
devid = MKDEV(major, 0);
//将major左移20位,再与0相或,就得到“Linux设备号”
//输入参数major为“主设备号”
//输入参数0为“次设备号”,大部分驱动次设备号都选择0
register_chrdev_region(devid, 1, "DevicName");
//注册设备号
//devid表示起始设备号
//1表示次设备号的数量
//DevicName表示设备名
}
else
{ /* 没有定义设备号 */
alloc_chrdev_region(&devid, 0, 1, "DevicName");
//注册字符设备驱动
//devid:保存申请到的设备号
//0:次设备号的起始地址
//1:要申请的设备数量;
// DevicName:表示“设备名字”
major = MAJOR(devid); /* 获取分配号的主设备号 */
//输入参数devid为“Linux设备号”
//将devid右移20位得到“主设备号”
minor = MINOR(devid); /* 获取分配号的次设备号 */
//输入参数devid为“Linux设备号”
//将devid与0xFFFFF相与后得到“次设备号”
}
unregister_chrdev_region(devid, 1);
/* 释放设备号 */
//devid:需要释放的设备号
//1:需要释放的次设备号数量;
4、了解“字符设备结构”,初始化字符设备,添加和删除字符设备的函数
“字符设备结构类型cdev”,位于在include/linux/cdev.h文件中,如下:
struct cdev {
struct kobject kobj;
struct module *owner;//使用THIS_MODULE将owner指针指向当前这个模块
const struct file_operations *ops;//字符设备文件操作函数集合
struct list_head list;
dev_t dev; //32位设备号
unsigned int count;//次设备号数量
} __randomize_layout;
在include/linux/types.h文件中,可以查到如下:
typedef u32 __kernel_dev_t
//为“u32”起个别名叫“__kernel_dev_t”
typedef __kernel_dev_t dev_t;
//为“__kernel_dev_t”起个别名叫“dev_t”
void cdev_init(struct cdev *cdev, const struct file_operations *fops);
//初始化字符设备
//cdev是等待初始化的结构体变量
// fops就是字符设备文件操作函数集合
int cdev_add(struct cdev *p, dev_t dev, unsigned count);
//添加字符设备
// p表示指向要添加的字符设备,即字符设备结构cdev变量
// dev表示设备号
// count表示需要添加的设备数量
void cdev_del(struct cdev *p);
//删除字符设备
//p表示指向需要删除的字符设备,即字符设备结构cdev变量
5、初始化字符设备,添加和删除字符设备应用举例:
dev_t devid; /*声明32位变量devid用来给保存设备号 */
const struct file_operations test_fops = {
.owner = THIS_MODULE,
.open = CharDeviceXXX_open,
.read = CharDeviceXXX_read,
.write = CharDeviceXXX_write,
.release = CharDeviceXXX_release,
};
struct cdev test_cdev;//声明cdev字符设备结构变量test_cdev
Test_cdev.owner = THIS_MODULE;
//使用THIS_MODULE将owner指针指向当前这个模块
cdev_init(&test_cdev,& test_fops);
//初始化“字符设备结构变量test_cdev”
//test_cdev是等待初始化的结构体变量
// test_fops就是字符设备文件操作函数集合
cdev_add(&testcdev, devid, 1);
//添加字符设备
// &testcdev表示指向要添加的字符设备,即字符设备结构testcdev变量
// devid表示设备号
// 1表示需要添加的设备数量
cdev_del(&testc_dev);
//删除字符设备
//&testc_dev表示指向需要删除的字符设备,即字符设备结构testc_dev变量
6、节点文件的自动创建与删除
设备文件的自动创建与删除是通过mdev用户程序来实现的。
struct class *class_create (struct module *owner, const char *name);
//创建类
//owner一般为THIS_MODULE
//参数name是类名字
//返回值是指向结构体class的指针,也就是创建的类
void class_destroy(struct class *cls);
//删除类
//参数cls就是要删除的类
struct device *device_create(struct class *cls,struct device *parent, dev_t devt, void *drvdata, const char *fmt, ...)
//device_create是个可变参数的函数,用来创建设备
//参数cls就是设备要创建在哪个类下面
//参数parent是父设备,一般为 NULL,也就是没有父设备
//参数devt是设备号;
//参数drvdata 是设备可能会使用的一些数据,一般为 NULL;
//参数fmt是设备名字
//如果设置fmt=xxx 的话,就会生成/dev/xxx设备文件。
//返回值就是创建好的设备。
void device_destroy(struct class *cls, dev_t devt);
//删除创建的设备
//参数classs是要删除的设备所处的类
//参数devt是要删除的设备号
7、创建设备和删除设备举例:
struct class *class; /* 类 */
struct device *device; /* 设备 */
dev_t devid; /* 设备号 */
/* 驱动入口函数 */
static int __init xxx_init(void)
{
/* 创建类 */
class = class_create(THIS_MODULE, "Class_Name");
//创建类
//使用THIS_MODULE将owner指针指向当前这个模块
//Class_Name是类名字
//返回值是指向结构体class的指针,也就是创建的类
/* 创建设备 */
device = device_create(class, NULL, devid, NULL, "Class_Name");
//创建设备
//设备要创建在class类下面
//NULL表示没有父设备
//devid是设备号;
//参数drvdata=NULL,设备没有使用数据
//Class_Name是设备名字
//如果设置fmt=xxx 的话,就会生成/dev/xxx设备文件。
//返回值就是创建好的设备。
return 0;
}
/* 驱动出口函数 */
static void __exit led_exit(void)
{
/* 删除设备 */
device_destroy(newchrled.class, newchrled.devid);
//删除创建的设备
//newchrled.class是要删除的设备所处的类
//newchrled.devid是要删除的设备号
/* 删除类 */
class_destroy(newchrled.class);
//删除类
//newchrled.class就是要删除的类
}
module_init(led_init);
module_exit(led_exit);
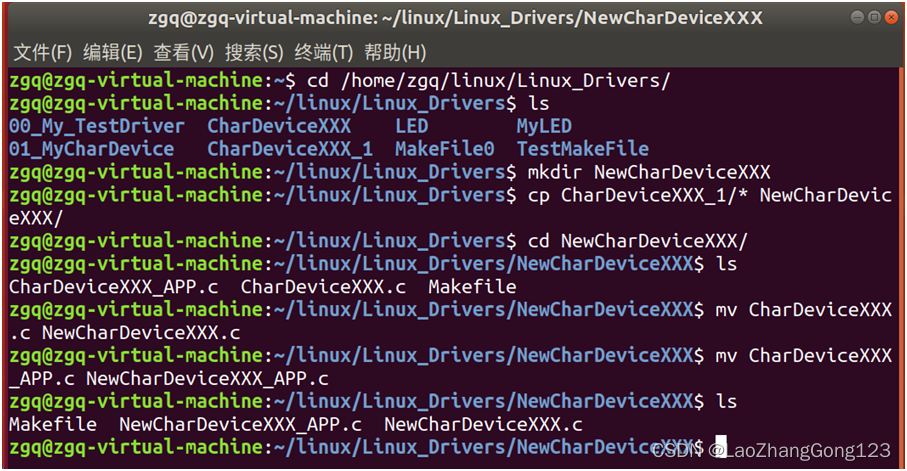
6、创建NewCharDeviceXXX目录
输入“cd /home/zgq/linux/Linux_Drivers/回车”
切换到“/home/zgq/linux/Linux_Drivers/”目录
输入“ls回车”查看“/home/zgq/linux/Linux_Drivers/”目录的文件和文件夹
输入“mkdir NewCharDeviceXXX回车”,创建NewCharDeviceXXX目录
输入“cp CharDeviceXXX_1/* NewCharDeviceXXX/回车”
将“CharDeviceXXX_1/”目录下的所有文件拷贝到“NewCharDeviceXXX/”目录下
输入“cd NewCharDeviceXXX/回车”
切换到“/home/zgq/linux/Linux_Drivers/NewCharDeviceXXX/”目录
输入“ls回车”查看“/home/zgq/linux/Linux_Drivers/NewCharDeviceXXX/”目录的文件和文件夹
输入“mv CharDeviceXXX.c NewCharDeviceXXX.c回车”
将“CharDeviceXXX.c”更名为“NewCharDeviceXXX.c”
输入“mv CharDeviceXXX_APP.c NewCharDeviceXXX_APP.c回车”
将“CharDeviceXXX_APP.c”更名为“NewCharDeviceXXX_APP.c”
输入“ls回车”查看“/home/zgq/linux/Linux_Drivers/NewCharDeviceXXX/”目录的文件和文件夹
7、修改Makefile文件
打开虚拟机上“VSCode”,点击“文件”,点击“打开文件夹”,点击“zgq”,点击“linux”,点击“Linux_Drivers”,点击“NewCharDeviceXXX”。
修改后Makefile文件如下:
KERNELDIR := /home/zgq/linux/atk-mp1/linux/my_linux/linux-5.4.31
#使用“:=”将其后面的字符串赋值给KERNELDIR
CURRENT_PATH := $(shell pwd)
#采用“shell pwd”获取当前打开的路径
#使用“$(变量名)”引用“变量的值”
obj-m := NewCharDeviceXXX.o
#给“obj-m”赋值为“NewCharDeviceXXX.o”
drv: kernel_modules
#生成“drv”需要依赖“kernel_modules”
@echo $(KERNELDIR)
#输出KERNELDIR的值为“/home/zgq/linux/atk-mp1/linux/linux-5.4.31”
@echo $(CURRENT_PATH)
#输出CURRENT_PATH的值为/home/zgq/linux/Linux_Drivers/NewCharDeviceXXX”
@echo $(MAKE)
#输出MAKE的值为make
kernel_modules:
$(MAKE) -C $(KERNELDIR) M=$(CURRENT_PATH) modules
#后面的"modules"表示编译成模块
#“KERNELDIR”上面定义为“/home/zgq/linux/atk-mp1/linux/my_linux/linux-5.4.31”,即“指定的工作目录”
#“CURRENT_PATH”上面定义为“当前的工作目录”
#“-C $(KERNELDIR) M=$(CURRENT_PATH) ”表示将“当前的工作目录”切换到“指定的目录”中
#即切换到“/home/zgq/linux/atk-mp1/linux/my_linux/linux-5.4.31”。
#M表示模块源码目录
#在“make和modules”之间加入“M=$(CURRENT_PATH)”,表示切换到由“CURRENT_PATH”指定的目录中读取源码,同时将其编>译为.ko 文件
clean_drv:
$(MAKE) -C $(KERNELDIR) M=$(CURRENT_PATH) clean
#“KERNELDIR”上面定义为“/home/zgq/linux/atk-mp1/linux/my_linux/linux-5.4.31”,即“指定的工作目录”
#“CURRENT_PATH”上面定义为“当前的工作目录
app:
arm-none-linux-gnueabihf-gcc NewCharDeviceXXX_APP.c -o NewCharDeviceXXX_APP
clean_app:
rm NewCharDeviceXXX_APP
8、添加“c_cpp_properties.json”
按下“Ctrl+Shift+P”,打开VSCode控制台,然后输入“C/C++:Edit Configurations(JSON)”,打开以后会自动在“.vscode ”目录下生成一个名为“c_cpp_properties.json” 的文件。
修改c_cpp_properties.json内容如下所示:
{
"configurations": [
{
"name": "Linux",
"includePath": [
"${workspaceFolder}/**",
"/home/zgq/linux/atk-mp1/linux/my_linux/linux-5.4.31",
"/home/zgq/linux/Linux_Drivers/NewCharDeviceXXX",
"/home/zgq/linux/atk-mp1/linux/my_linux/linux-5.4.31/arch/arm/include",
"/home/zgq/linux/atk-mp1/linux/my_linux/linux-5.4.31/include",
"/home/zgq/linux/atk-mp1/linux/my_linux/linux-5.4.31/arch/arm/include/generated"
],
"defines": [],
"compilerPath": "/usr/bin/gcc",
"cStandard": "gnu11",
"cppStandard": "gnu++14",
"intelliSenseMode": "gcc-x64"
}
],
"version": 4
}
9、NewCharDeviceXXX.c文件如下:
#include <linux/types.h>
//数据类型重命名
//使能bool,u8,u16,u32,u64, uint8_t, uint16_t, uint32_t, uint64_t
//使能s8,s16,s32,s64,int8_t,int16_t,int32_t,int64_t
#include <linux/kernel.h>
#include <linux/delay.h>
#include <linux/ide.h>
#include <linux/init.h>
#include <linux/module.h>
#include <linux/string.h>
#include <linux/cdev.h> /*字符设备结构cdev定义在linux/cdev.h文件里*/
#include <linux/mdev.h>//自动创建和删除“设备节点文件”
#include <linux/device.h>/* 类class定义在linux/device.h文件里*/
#define NewCharDeviceXXX_CNT 1 //定义设备数量为1
#define NewCharDeviceXXX_NAME "NewCharDeviceXXXName"//定义设备的名字
/* 设备结构体 */
struct CharDeviceXXX_dev{
dev_t devid; /*声明32位变量devid用来给保存设备号 */
int major; /* 主设备号 */
int minor; /* 次设备号 */
struct cdev cdev; /*字符设备结构cdev定义在linux/cdev.h文件里*/
struct class *class; /* 类 ,class定义在linux/device.h文件里*/
struct device *device;/*设备*/
};
struct CharDeviceXXX_dev strCharDeviceXXX;
static char CharDeviceXXX_readbuf[100]; //读缓冲区
static char CharDeviceXXX_writebuf[100]; //写缓冲区
static char My_DataBuffer[] = {"My Data!"};
/* 打开设备 */
static int CharDeviceXXX_open(struct inode *inode, struct file *filp)
{
/* 用户实现具体功能 */
printk("CharDeviceXXX_open!\r\n");
return 0;
}
/* 从设备读取数据,保存到首地址为buf的数据块中,长度为cnt个字节 */
//file结构指针变量flip表示要打开的设备文件
//buf表示用户数据块的首地址
//cnt表示用户数据的长度,单位为字节
//loff_t结构指针变量offt表示“相对于文件首地址的偏移”
static ssize_t CharDeviceXXX_read(struct file *filp, char __user *buf, size_t cnt, loff_t *offt)
{
int ret = 0;
memcpy(CharDeviceXXX_readbuf, My_DataBuffer,sizeof(My_DataBuffer));
//将My_DataBuffer[]中的所有数据拷贝到CharDeviceXXX_readbuf[]
ret = copy_to_user( buf, CharDeviceXXX_readbuf, cnt );
//将CharDeviceXXX_readbuf[]中的前cnt个字节拷贝到buf[]中
if(ret==0) printk("Driver send the data to the user, and the result is ok!\r\n");
else printk("Driver send the data to the user, and the result is failed!\r\n");
return 0;
}
/* 向设备写数据,将数据块首地址为buf的数据,长度为cnt个字节,发送给用户 */
//file结构指针变量flip表示要打开的设备文件
//buf表示用户数据块的首地址
//cnt表示用户数据的长度,单位为字节
//loff_t结构指针变量offt表示“相对于文件首地址的偏移”
static ssize_t CharDeviceXXX_write(struct file *filp, const char __user *buf, size_t cnt, loff_t *offt)
{
int ret = 0;
ret = copy_from_user(CharDeviceXXX_writebuf, buf, cnt);
//将buf[]中的前cnt个字节拷贝到CharDeviceXXX_writebuf[]中
if(ret==0) printk("Driver receive the data form user , and the result is ok!\r\n");
else printk("Driver receive the data form user , and the result is failed!\r\n");
return 0;
}
/* 关闭/释放设备 */
static int CharDeviceXXX_release(struct inode *inode, struct file *filp)
{
/* 用户实现具体功能 */
printk("CharDeviceXXX_release!\r\n");
return 0;
}
/*声明file_operations结构变量MyCharDevice_fops*/
/*它是指向设备的操作函数集合变量*/
const struct file_operations CharDeviceXXX_fops = {
.owner = THIS_MODULE,
.open = CharDeviceXXX_open,
.read = CharDeviceXXX_read,
.write = CharDeviceXXX_write,
.release = CharDeviceXXX_release,
};
/*驱动入口函数 */
static int __init CharDeviceXXX_init(void)
{
int ret;
/* 1、寄存器地址映射 */
/*2、创建设备号*/
strCharDeviceXXX.major=0;
if(strCharDeviceXXX.major)/*如果指定了主设备号*/
{
strCharDeviceXXX.devid = MKDEV(strCharDeviceXXX.major, 0);
//输入参数strCharDeviceXXX.major为“主设备号”
//输入参数0为“次设备号”,大部分驱动次设备号都选择0
//将strCharDeviceXXX.major左移20位,再与0相或,就得到“Linux设备号”
ret=register_chrdev_region(strCharDeviceXXX.devid, NewCharDeviceXXX_CNT, NewCharDeviceXXX_NAME);
//申请设备号
//strCharDeviceXXX.devid表示起始设备号
//NewCharDeviceXXX_CNT表示次设备号的数量
//NewCharDeviceXXX_NAME表示设备名
if(ret < 0) //申请设备号失败
goto fail_map;
}
else
{ /* 没有定义设备号 */
ret=alloc_chrdev_region(&strCharDeviceXXX.devid, 0, NewCharDeviceXXX_CNT,NewCharDeviceXXX_NAME);
/* 申请设备号 */
//strCharDeviceXXX.devid:保存申请到的设备号
//0:次设备号的起始地址
//NewCharDeviceXXX_CNT:要申请的次设备号数量;
//NewCharDeviceXXX_NAME:表示“设备名字”
if(ret < 0) //申请设备号失败
goto fail_map;//去释放“物理地址内存映射”
strCharDeviceXXX.major = MAJOR(strCharDeviceXXX.devid);
/* 获取分配号的主设备号 */
//输入参数strCharDeviceXXX.devid为“Linux设备号”
//将strCharDeviceXXX.devid右移20位得到“主设备号”
strCharDeviceXXX.minor = MINOR(strCharDeviceXXX.devid);
/* 获取分配号的次设备号 */
//输入参数strCharDeviceXXX.devid为“Linux设备号”
//将strCharDeviceXXX.devid与0xFFFFF相与后得到“次设备号”
}
/*3、注册字符设备*/
strCharDeviceXXX.cdev.owner = THIS_MODULE;
//使用THIS_MODULE将owner指针指向当前这个模块
cdev_init(&strCharDeviceXXX.cdev,&CharDeviceXXX_fops);
//注册字符设备,初始化“字符设备结构变量strCharDeviceXXX.cdev”
//strCharDeviceXXX.cdev是等待初始化的结构体变量
//CharDeviceXXX_fops就是字符设备文件操作函数集合
/*4、添加字符设备cdev*/ ret=cdev_add(&strCharDeviceXXX.cdev,strCharDeviceXXX.devid,NewCharDeviceXXX_CNT);
//添加字符设备
/*&strCharDeviceXXX.cdev表示指向要添加的字符设备,即字符设备结构strCharDeviceXXX.cdev变量*/
//strCharDeviceXXX.devid表示设备号
//NewCharDeviceXXX_CNT表示需要添加的设备数量
if(ret < 0 ) //添加字符设备失败
goto del_register;//去执行删除“已经注册的字符设备”
printk("dev id major = %d,minor = %d\r\n", strCharDeviceXXX.major, strCharDeviceXXX.minor);
printk("CharDeviceXXX_init is ok!!!\r\n");
/*5、创建类*/
strCharDeviceXXX.class = class_create(THIS_MODULE, NewCharDeviceXXX_NAME);
//创建类
//使用THIS_MODULE将owner指针指向当前这个模块
//NewCharDeviceXXX_NAME是类名字
//返回值是指向结构体class的指针,也就是创建的类
if(IS_ERR(strCharDeviceXXX.class)){
goto del_cdev; //去执行删除“已添加的字符设备”
}
/*6、创建设备 */
strCharDeviceXXX.device = device_create(strCharDeviceXXX.class, NULL, strCharDeviceXXX.devid, NULL, NewCharDeviceXXX_NAME);
//创建设备
//设备要创建在strCharDeviceXXX.class类下面
//NULL表示没有父设备
//strCharDeviceXXX.devid是设备号;
//参数drvdata=NULL,设备没有使用数据
//NewCharDeviceXXX_NAME是设备名字
/*如果设置fmt=NewCharDeviceXXX_NAME 的话,就会生成/dev/NewCharDeviceXXX_NAME设备文件*/
//返回值就是创建好的设备。
if(IS_ERR(strCharDeviceXXX.device)){
goto destroy_class;
}
return 0;//驱动初始化正确
destroy_class:
class_destroy(strCharDeviceXXX.class);
//删除类
//strCharDeviceXXX.class就是要删除的类
del_cdev:
cdev_del(&strCharDeviceXXX.cdev);
//删除字符设备
//&strCharDeviceXXX.cdev表示指向需要删除的字符设备,即字符设备结构strCharDeviceXXX.cdev变量
del_register:
unregister_chrdev_region(strCharDeviceXXX.devid, NewCharDeviceXXX_CNT);
/* 释放设备号 */
//strCharDeviceXXX.devid:需要释放的起始设备号
//NewCharDeviceXXX_CNT:需要释放的次设备号数量;
fail_map://申请设备号失败
/*若有物理地址映射到内存,则释放内存*/
return -EIO; //驱动初始化失败
}
/*驱动出口函数 */
static void __exit CharDeviceXXX_exit(void)
{
/*1、释放内存*/
/*2、 释放设备号 */
unregister_chrdev_region(strCharDeviceXXX.devid,NewCharDeviceXXX_CNT);
/* 释放设备号 */
//strCharDeviceXXX.devid:需要释放的起始设备号
//NewCharDeviceXXX_CNT:需要释放的次设备号数量;
/*3、删除字符设备*/
cdev_del(&strCharDeviceXXX.cdev);
/*删除字符设备*/
/*&strCharDeviceXXX.cdev表示指向需要删除的字符设备,即字符设备结构strCharDeviceXXX.cdev变量*/
/*4、 删除设备 */
device_destroy(strCharDeviceXXX.class, strCharDeviceXXX.devid);
//删除创建的设备
//newchrled.class是要删除的设备所处的类
//newchrled.devid是要删除的设备号
/*5、删除类*/
class_destroy(strCharDeviceXXX.class);
//删除类
//strCharDeviceXXX.class就是要删除的类
}
module_init(CharDeviceXXX_init);
//指定CharDeviceXXX_init()为驱动入口函数
module_exit(CharDeviceXXX_exit);
//指定CharDeviceXXX_exit()为驱动出口函数
MODULE_AUTHOR("Zhanggong");//添加作者名字
MODULE_LICENSE("GPL");//LICENSE采用“GPL协议”
MODULE_INFO(intree,"Y");
//去除显示“loading out-of-tree module taints kernel.”
10、编译
由于NewCharDeviceXXX_APP.c和CharDeviceXXX_APP.c内容相同,只是修改了文件名,不再重写,参考前面的文章“Linux第68步_旧字符设备驱动的一般模板”。
输入“make clean_drv回车”,清除NewCharDeviceXXX.*
输入“make drv回车”,编译生成NewCharDeviceXXX.ko
输入“make clean_app回车”,清除NewCharDeviceXXX_APP
输入“make app回车”,编译生成NewCharDeviceXXX_APP
输入“ls -l回车”
输入“sudo cp NewCharDeviceXXX.ko NewCharDeviceXXX_APP /home/zgq/linux/nfs/rootfs/lib/modules/5.4.31/ -f回车”

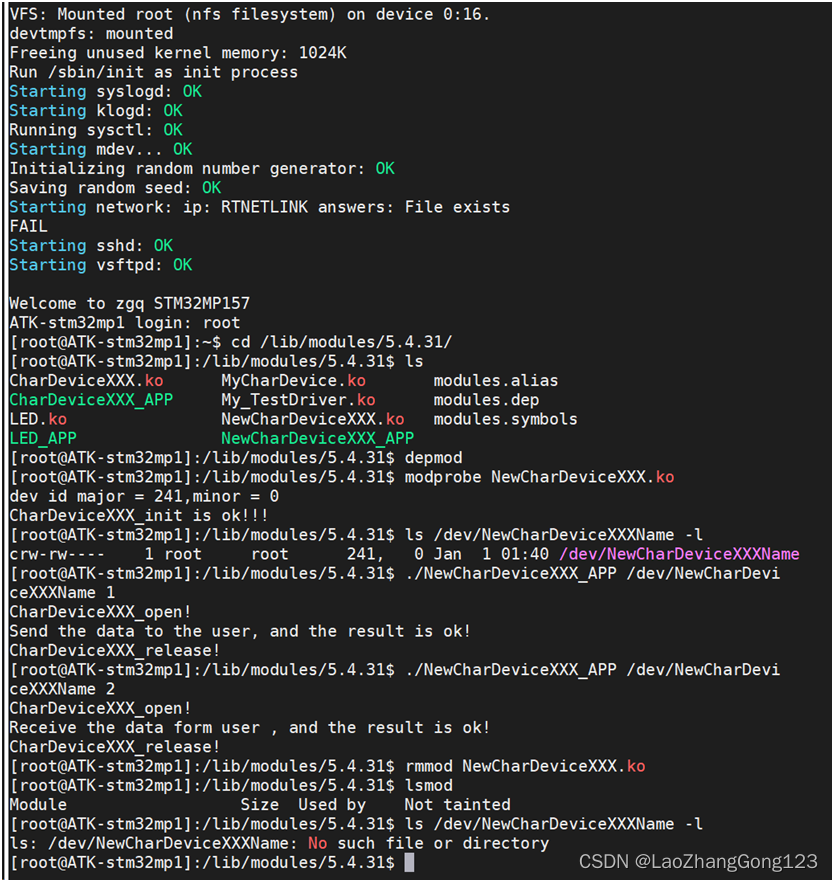
11、测试
启动开发板,从网络下载程序
输入“root”
输入“cd /lib/modules/5.4.31/回车”
切换到“/lib/modules/5.4.31/”目录
注意:“lib/modules/5.4.31/”在虚拟机中是位于“/home/zgq/linux/nfs/rootfs/”目录下,但在开发板中,却是位于根目录中。
输入“ls”查看“NewCharDeviceXXX.ko和NewCharDeviceXXXApp”是否存在
输入“depmod”,驱动在第一次执行时,需要运行“depmod”
输入“modprobe NewCharDeviceXXX.ko”,加载“NewCharDeviceXXX.ko”模块
输入“lsmod”查看有哪些驱动在工作
输入“ls /dev/NewCharDeviceXXXName -l回车”,发现节点文件“/dev/NewCharDeviceXXXName”
输入“./NewCharDeviceXXX_APP /dev/NewCharDeviceXXXName 1回车”执行读操作
输入“./NewCharDeviceXXX_APP /dev/NewCharDeviceXXXName 2回车”执行写操作
输入“rmmod NewCharDeviceXXX.ko”,卸载“NewCharDeviceXXX.ko”模块
注意:输入“rmmod NewCharDeviceXXX”也可以卸载“NewCharDeviceXXX.ko”模块
输入“lsmod”查看有哪些驱动在工作。
输入“ls /dev/NewCharDeviceXXXName -l回车”,查询节点文件“/dev/NewCharDeviceXXXName”是否存在
