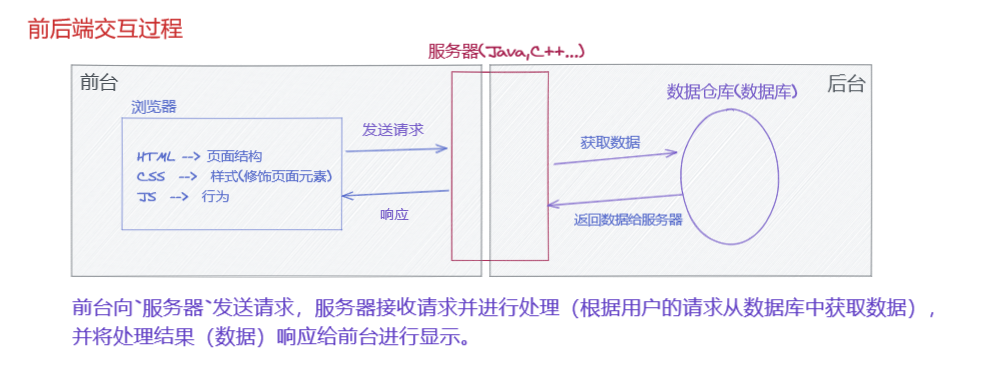
- 前后端交互
- 接口文档
- 请求方法
区分方式 | GET | POST |
从语义上区分 | 偏向于查询(获取数据....) | 偏向于提交数据(注册,修改,删除...) |
安全性 | 显示的携带参数,参数是直接拼接在请求地址之后,安全性较差,隐私性差 | 隐式的携带参数,不会在请求地址上显示,安全性好,以JSON格式传参 |
请求数据长度大小是否有限制 | 有限制,根据浏览器不同,限制在2k-8K | POST请求没有限制 |
是否被缓存 | 可以被缓存 | 不会被缓存 |
- 状态码
readyState | status状态 | ||
0 | 请求未初始化 | 202 | “OK” |
1 | 服务器连接已建立 | 404 | 表示没有找到页面 |
2 | 请求已接收 | 500 | (后台)代码有错误 |
3 | 请求处理中 | ||
4 | 请求已完成,且响应已就绪 | ||
当 readyState 等于 4 且状态为 200 时,表示响应已就绪
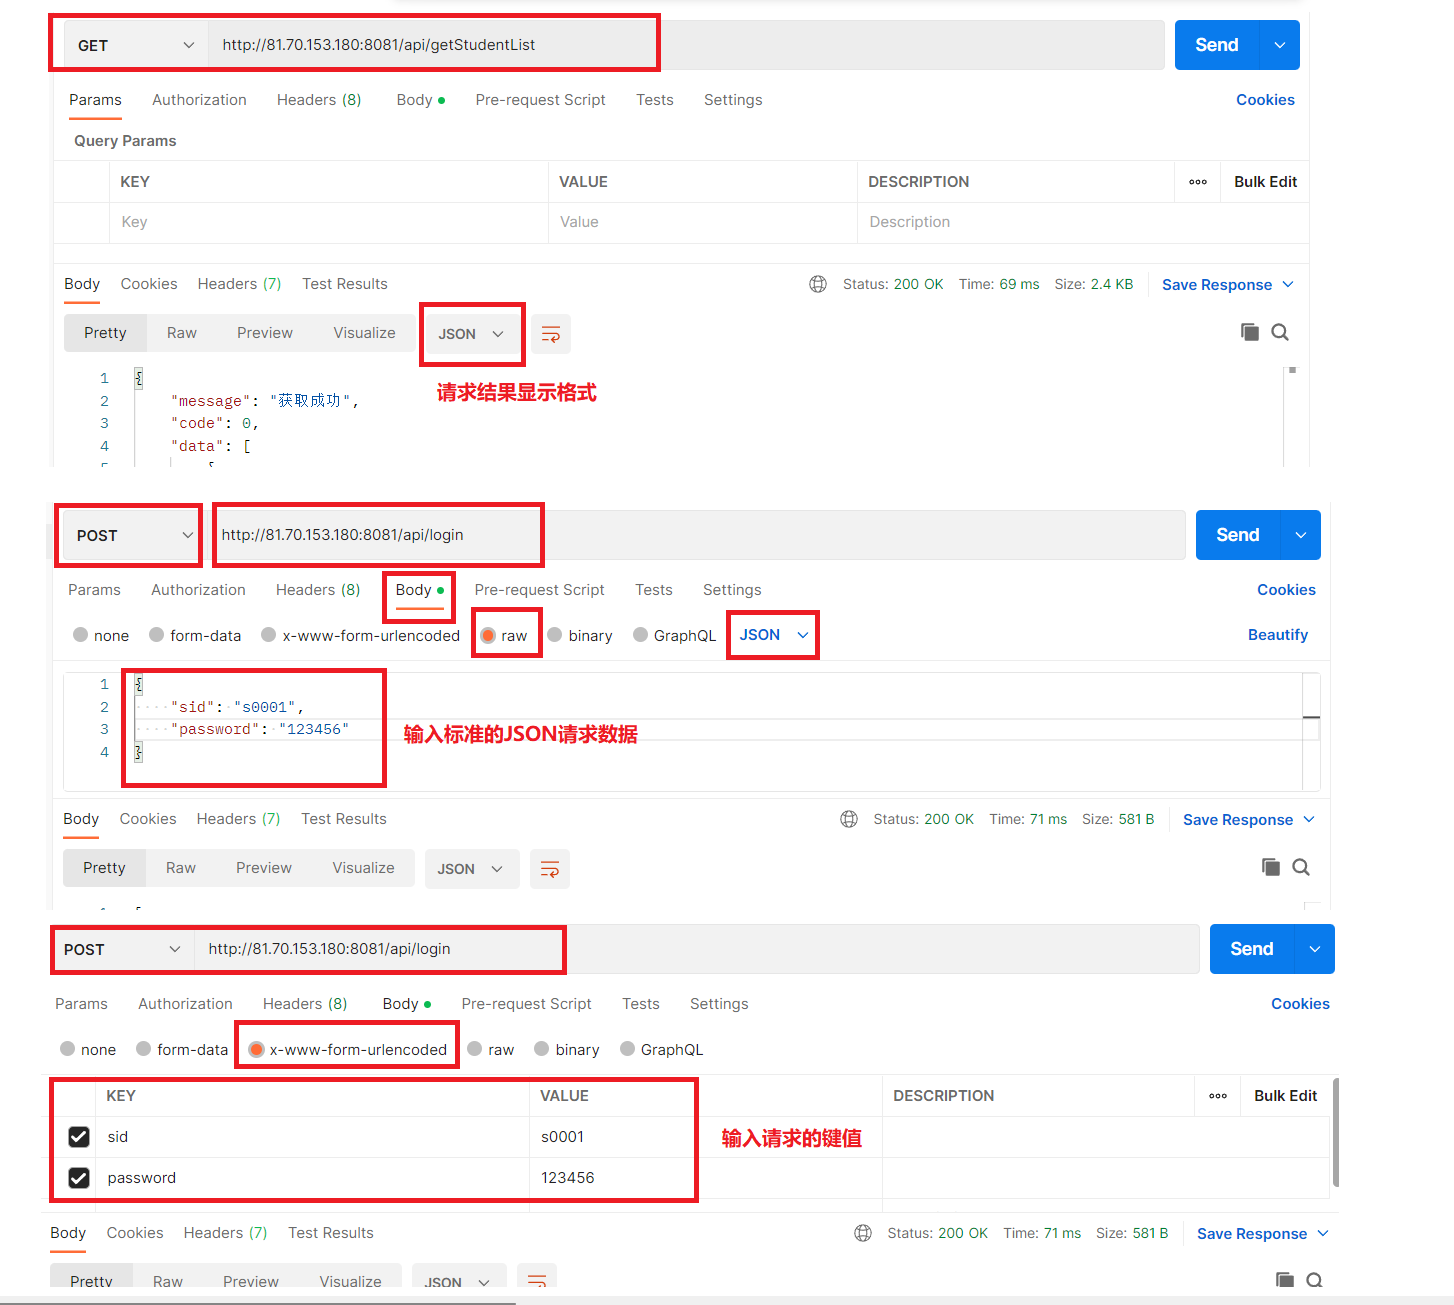
- 携带参数
例子:

- 响应数据
格式:JSON格式 {属性名:属性值,属性名2:属性值2.....}
- Ajax
- 发起GET请求
      // 前后端交互   GET
      // 1. 创建 XMLHTTPRequest 对象
      const xhr = new XMLHttpRequest()
      // 2. 发送请求配置 open()
      // 参数1: 请求方式get/post...  参数2: 请求地址url  参数3: true(异步)/false(同步)
      // (1) 不携带参数
      // xhr.open('get', 'http://81.70.153.180:8081/api/getStudentList', true)
      // (2) 携带参数  多个之间&分隔
      xhr.open('get', 'http://81.70.153.180:8081/api/getStudentList?sname=王&sid=0001', true)
      // 3. 发送请求 send()
      xhr.send()
      // 4. 接收服务器响应数据 onreadystatechange
      xhr.onreadystatechange = function () {
        //回调函数(状态码发生变化时,执行)
        // 获取服务器给客户端响应的数据(数据格式:JSON格式----->JSON格式的字符串)
        // 将JSON格式的字符串转换成对象  JSON.parse()
        if (xhr.readyState === 4 && xhr.status === 200) {
          const result = JSON.parse(xhr.responseText)
          console.log(result)
        }
}- 发起POST请求
// 前后端交互  POST
      // 1. 创建 XMLHTTPRequest 对象
      const xhr = new XMLHttpRequest()

      // 2. 发送请求配置 open()
      // 参数1: 请求方式get/post...  参数2: 请求地址url  参数3: true(异步)/false(同步)
      xhr.open('post', 'http://81.70.153.180:8081/api/login', true)

      // 3.设置 Content-Type 属性(固定写法)
      // xhr.setRequestHeader('Content-Type','application/x-www-form-urlencoded');
      // 4. 发送请求 send()   同时将数据以查询字符串的形式,提交给服务器
      // xhr.send('sid=s0001&password=123456')

      // 3.设置 Content-Type 属性  JSON格式  charset=UTF-8避免中文乱码
      xhr.setRequestHeader('Content-Type','application/json;charset=UTF-8');
      // 4. 发送请求
      xhr.send(JSON.stringify({'sid':'s0001','password':'123456'}))

      // 5. 接收服务器响应数据 onreadystatechange
      xhr.onreadystatechange = function () {
        //回调函数(状态码发生变化时,执行)
        // 获取服务器给客户端响应的数据(数据格式:JSON格式----->JSON格式的字符串)
        // 将JSON格式的字符串转换成对象  JSON.parse()
        if (xhr.readyState === 4 && xhr.status === 200) {
          const result = JSON.parse(xhr.responseText)
          console.log(result)
        }
}- axios
- 发起GET请求
<script src="https://unpkg.com/axios/dist/axios.min.js"></script> //引入axios // 1. 引入Axios (npm安装 / cdn引入)
// axios返回Promise对象, 需要.then(回调函数)来处理
// 2. 发起get请求
// 方式1
axios.get('http://81.70.153.180:8081/api/getStudentList', {
params: { sid: 's0001', sname: '王' }
}).then((res) => {
console.log(res.data)
})
// 方式2
axios.get("http://81.70.153.180:8081/api/getStudentList?sid=s0001&sname=王")
.then(res=>{
console.log(res);
})- 发起POST请求
      //  发送post请求    引入后
      axios.post('http://81.70.153.180:8081/api/login', {
          sid: 's0001',
          password: '123456',
        }).then((res) => {
          console.log(res)
      })

      axios({
        url: 'http://81.70.153.180:8081/api/login',  //请求地址
        method: 'post',     //请求方式
        headers: { ' Content-Type' : 'applicaton/json;charset=utf-8'},   //设置请求头(可选)
        data:{        //携带参数     get请求传参使用params
          sid: 's0001',
          password: '123456',
        },
      }).then(res=>{     //接收返回的结果
        console.log(res);
      })
注意: 使用axios发送请求携带参数时, get请求携参使用params, post请求携参使用data
- fetch
      // js原生发送请求 fetch
      // 发送get请求
      fetch('http://81.70.153.180:8081/api/getStudentList', {
        method: 'get', //默认get
      }).then((res) => {
          //返回的结果处理   返回的是Promise对象
          if (res.ok) {
            //如果请求成功, 将结果转为JSON格式
            return res.json()
          }
        }).then((data) => {
          console.log(data)
        })
      // 发送post请求
      fetch('http://81.70.153.180:8081/api/login', {
        method: 'post',
        headers: { ' Content-Type': 'applicaton/json;charset=utf-8' },
        body: JSON.stringify({
          //转换为JSON字符串
          sid: 's0001',
          password: '123456',
        }),
      }).then((res) => {
          //返回的结果处理   返回的是Promise对象
          if (res.ok) {
            //如果请求成功, 将结果转为JSON格式
            return res.json()
          }
        }).then((data) => {
          console.log(data)
})- Postman工具
- 一个例子
一个简单的例子, 对发送get/post请求的简单使用
登录验证

验证通过后跳转到查询页面
可根据id/姓名信息查找相关数据, 可重置
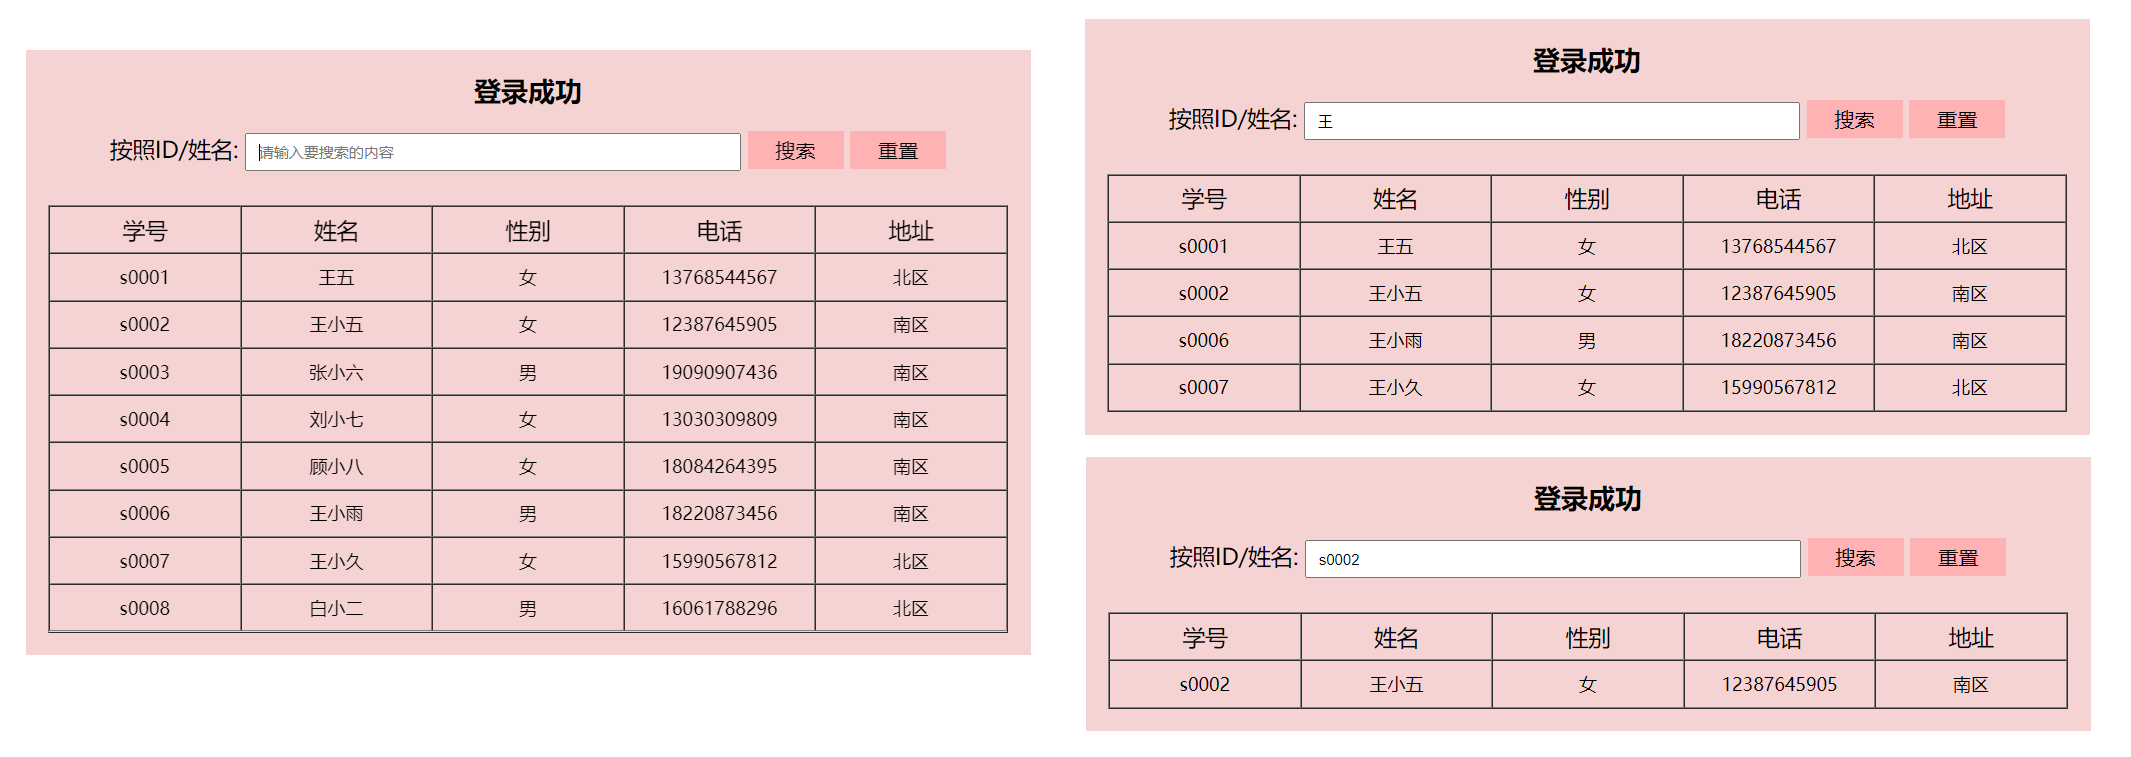
相关代码如下:
<!-- login.html -->
<!DOCTYPE html>
<html lang="en">
<head>
<title>login</title>
<script src="https://unpkg.com/axios/dist/axios.min.js"></script>
<style type="text/css">
* {
margin: 0;
padding: 0;
}
div.box {
margin: 10% auto;
padding: 40px;
width: 30%;
height: 30%;
text-align: center;
background-color: rgb(251, 236, 236);
}
div.box form ul li {
position: relative;
list-style: none;
margin-top: 40px;
font-size: 20px;
}
div.box form ul li input {
padding-left: 10px;
width: 50%;
height: 30px;
outline: 0;
}
div.box form ul li button {
width: 67%;
height: 40px;
border: 0;
font-size: 20px;
background-color: rgb(248, 217, 217);
}
div.box form ul li p {
position: absolute;
left: 32%;
top: 43px;
font-size: 14px;
display: none;
}
</style>
</head>
<body>
<!-- 登录案例 -->
<div class="box">
<!-- action地址 onsubmit提交方式 javascript:void(0)阻止跳转 -->
<form action="#" onsubmit="javascript:void(0)">
<h2>小m的登录耶</h2>
<ul>
<li class="uname">
<label for="uname">用户id :</label>
<input type="text" id="uname" placeholder="请输入用户名" />
<p>用户名不能为空!</p>
</li>
<li class="psd">
<label for="psd">密 码 :</label>
<input type="text" id="psd" placeholder="请输入密码" />
<p>密码不能为空!</p>
</li>
<li>
<button>登 录</button>
</li>
</ul>
</form>
<span style="margin-top: 10px;"></span>
</div>
<script>
// 1. 获取button按钮
const btn = document.querySelector('button')
// 2. 添加监听事件 对用户名和密码进行校验
btn.addEventListener('click', function(e) {
// 阻止按钮默认行为
e.preventDefault()
// 获取用户名和密码文本内容, 并去除前后端空格
const uname = document.querySelector('input#uname').value.trim()
const psd = document.querySelector('input#psd').value.trim()
const unameTip = document.querySelector('ul li.uname p')
const psdTip = document.querySelector('ul li.psd p')
unameTip.style.display = 'none'
psdTip.style.display = 'none'
// 输入内容为空时, 显示提示信息
if (uname === '' || uname.length === 0) {
unameTip.style.display = 'block'
return
}
if (psd === '' || psd.length === 0) {
psdTip.style.display = 'block'
return
}
// 登录操作
axios({
url: 'http://81.70.153.180:8081/api/login',
method: 'post',
data: {
sid: uname,
password: psd
}
}).then(res => {
// console.log(res)
// console.log(res.data.message)
if (res.data.message.indexOf('错误') > -1) { // 使用code进行判断,code == 0,就是用户名或密码错误, (由于后台问题这样使用,一般不会这样使用)
const h = document.querySelector('span')
h.innerHTML = res.data.message
h.style.display = 'block'
} else {
// 登录成功,转到首页。
window.location.href = './02-index.html';html'
}
})
})
</script>
</body>
</html>
<!-- index.html -->
<!DOCTYPE html>
<html lang="en">
    <head>
        <title>index首页</title>
        <script src="https://unpkg.com/axios/dist/axios.min.js"></script>
        <style type="text/css">
            * {
                margin: 0;
                padding: 0;
            }
            div.box {
                margin: 100px auto;
                padding: 20px;
                width: 50%;
                /* height: 80px; */
                text-align: center;
                background-color: rgb(245, 211, 211);
            }
            div.box div.search {
                margin-top: 20px;
                font-size: 20px;
            }
            div.box div.search input {
                padding-left: 10px;
                width: 50%;
                height: 30px;
                outline: 0;
            }
            div.box div.search button {
                width: 10%;
                height: 34px;
                border: 0;
                font-size: 18px;
                background-color: #ffb2b3;
            }
            div.box table {
                margin-top: 30px;
                width: 100%;
            }
            div.box table thead {
                font-size: 20px;
            }
            div.box table td {
                width: 20%;
                height: 40px;
            }
        </style>
    </head>
    <body>
        <div class="box">
            <h2>登录成功</h2>
            <div class="search">
                按照ID/姓名: <input type="text" placeholder="请输入要搜索的内容" />
                <button onclick="search()">搜索</button>
                <button onclick="init()">重置</button>
            </div>
            <table border="1px" cellspacing="0" cellpadding="0">
                <thead>
                    <td>学号</td>
                    <td>姓名</td>
                    <td>性别</td>
                    <td>电话</td>
                    <td>地址</td>
                </thead>
                <tbody></tbody>
            </table>
        </div>
        <script>
            // 渲染数据
            // 1. 获取元素
            const tbody = document.querySelector('div table tbody')

            window.onload = function() {
                Stu()
            }

            function Stu(val, flag) {
                tbody.innerHTML = '';
                if (flag) {
                    params = {sid: val}
                } else {
                    params = {sname: val}
                }

                // 2. 获取相应的数据
                axios({
                    url: 'http://81.70.153.180:8081/api/getStudentList',
                    method: 'get',
                    params: params
                }).then(res => {
                    console.log(res);
                    // 获取到学生信息
                    const students = res.data.data
                    console.log(students)
                    // 将数据渲染到页面
                    // 如果没有相关数据 显示nodata
                    if (students.length === 0) {
                        // 创建元素
                        const tr = document.createElement('tr')
                        const td = document.createElement('td')
                        // 设置属性, 合并单元格
                        td.setAttribute('colspan', 4)
                        td.innerText = 'No Data !'
                        tr.appendChild(td)
                        tbody.appendChild(tr)
                    } else {
                        // 遍历students数组
                        students.forEach(stu => {
                            // console.log(stu);
                            const {sid,sname,sex,phone,address} = stu
                            // 数组存放解构的内容
                            const arr = [sid, sname, sex, phone, address]
                            // console.log(arr);
                            const tr = document.createElement('tr')
                            // 遍历数组, 将每一项内容添加至表格中
                            arr.forEach((item, index) => {
                                const td = document.createElement('td');
                                td.innerText = item
                                if (index === 2) {
                                    td.innerText = sex == 0 ? '女' : '男';
                                }
                                tr.appendChild(td)
                            })
                            tbody.appendChild(tr);

                            // 一个一个的添加
                            // const sidTd = document.createElement('td');
                            // sidTd.innerText = sid;
                            // tr.appendChild(sidTd);
                            // const snameTd = document.createElement('td');
                            // snameTd.innerText = sname;
                            // tr.appendChild(snameTd);
                            // const sexTd = document.createElement('td');
                            // sexTd.innerText = sex == 0 ? '女' : '男';
                            // tr.appendChild(sexTd);
                            // const phoneTd = document.createElement('td');
                            // phoneTd.innerText = phone;
                            // tr.appendChild(phoneTd);
                            // 将tr作为tbody的孩子
                            // tbody.appendChild(tr);
                        })
                    }
                })
            }

            //搜索
            function search() {
                // 获取搜索框的内容
                const val = document.querySelector('div.search input').value.trim()
                if (val === '' || val.length === 0) {
                    alert('搜索内容为空!!!')
                    return;
                }
                let regExp = /^\w+$/g //  \w单词字符 单词字母下划线 +一次或多次
                // 满足 则是id
                let flag = regExp.test(val)
                Stu(val, flag)
            }

            // 重置
            function init(){
                Stu()
                // 清空输入框内容
                const ipt = document.querySelector('div.search input')
                ipt.value = ''
            }
        </script>
    </body>
</html>
自己做的一点小改变:
1. index.html中渲染数据时, 将解构出来的数据放在数组中, 在遍历数组,动态的将数据添加至页面, 避免了数据过多, 写很多的创建节点的代码
2. 其实也是偷了个懒, 把id搜索功能和姓名搜索功能写在了一起, 使用正则判断了一下文本输入的是id(单词字符)还是名字,动态的将数据给params携带参数, 发送请求, 实现既可以使用id,又可以使用姓名搜索相关内容
3. 实现了重置功能, 其实就是点击重置按钮, 使得文本框内容为空, 并且页面显示最初的所有数据
PreviousNotes:
https://blog.csdn.net/qq_54379580/article/details/126582952?spm=1001.2014.3001.5502
