| Unity3D特效百例 | 案例项目实战源码 | Android-Unity实战问题汇总 |
|---|---|---|
| 游戏脚本-辅助自动化 | Android控件全解手册 | 再战Android系列 |
| Scratch编程案例 | 软考全系列 | Unity3D学习专栏 |
| 蓝桥系列 | ChatGPT和AIGC |
👉关于作者
专注于Android/Unity和各种游戏开发技巧,以及各种资源分享(网站、工具、素材、源码、游戏等)
有什么需要欢迎底部卡片私我,交流让学习不再孤单。

👉实践过程
😜OpenCV
对于Android开发者而言,使用OpenCV可以实现很多有趣的功能。然而,Android开发中使用OpenCV也存在一些问题,比如对库的导入和集成需要较高的技术门槛。
相比之下,使用Chaquopy集成Python和OpenCV库,可以简化Android开发中对OpenCV库的使用和集成,使得开发人员可以更加轻松地开发应用。使用Chaquopy,开发人员可以直接使用Python编写OpenCV的代码,避免Java语言本身的一些限制。
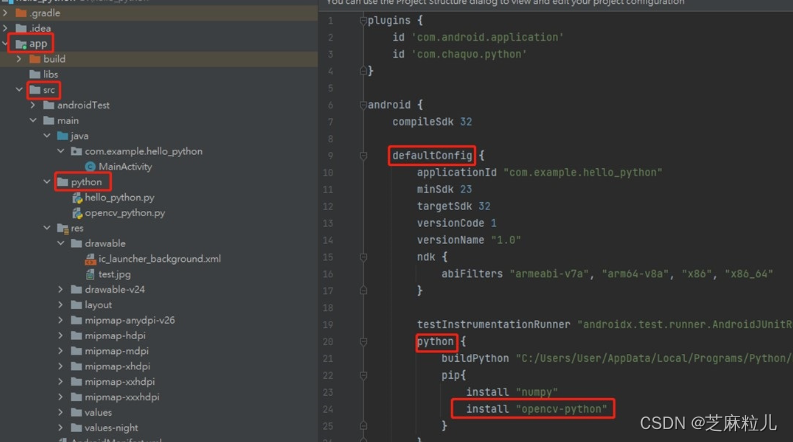
pip{
install "opencv-python"
}
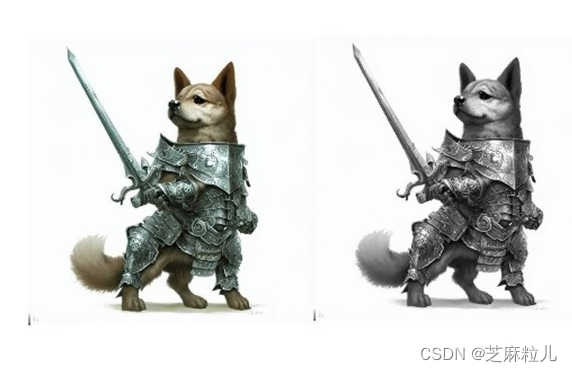
经由Java读取图片,并转换格式传给python OpenCV进行运算,运算后如何再将python格式转换成Java格式进行显示,达到java与python交互应用。
由于python运行OpenCV运算时,需要将Java的byte格式透过numpy转成OpenCV格式,因此透过以下程式码可进行转换。
opencv_python.py:
import numpy as np
import cv2
def opencv_process_image(data):
# 读取图片数据
image = cv2.imdecode(np.asarray(data),cv2.IMREAD_COLOR)
# 将图像转换为灰度图像
gray_image = cv2.cvtColor(image, cv2.COLOR_BGR2GRAY)
# 将处理后的图像转换为png格式并转换为byte数组
is_success, im_buf_arr = cv2.imencode(".png", gray_image)
byte_im = im_buf_arr.tobytes()
# 返回处理后的图像数据
return byte_im
Java
public class MainActivity extends AppCompatActivity {
    Button Go_btn;
    ImageView src_image, res_image;

    BitmapDrawable drawable;
    Bitmap  bitmap;
    @Override
    protected void onCreate(Bundle savedInstanceState) {
        super.onCreate(savedInstanceState);
        setContentView(R.layout.activity_main);

        Go_btn = findViewById(R.id.Go_button);
        src_image = (ImageView) findViewById(R.id.source_imageview);
        res_image = (ImageView) findViewById(R.id.response_imageview);
        //初始化python环境
        if(!Python.isStarted()){
            Python.start(new AndroidPlatform(this));
        }
        Python python_cv = Python.getInstance();

        Go_btn.setOnClickListener(new View.OnClickListener() {
            @Override
            public void onClick(View view) {
                // 获取源图片并转换为Bitmap对象
                drawable = (BitmapDrawable) src_image.getDrawable();
                bitmap = drawable.getBitmap();
                // 将Bitmap转换为byte[]对象
                ByteArrayOutputStream stream = new ByteArrayOutputStream();
                bitmap.compress(Bitmap.CompressFormat.PNG, 100, stream);
                byte[] byteArray = stream.toByteArray();

                // 调用Python方法处理图片
                PyObject cvObject = python_cv.getModule("opencv_python");
                byte[] bytes = cvObject.callAttr("opencv_process_image",byteArray).toJava(byte[].class);

                // 将处理后的图片显示到画面上
                Bitmap bmp = BitmapFactory.decodeByteArray(bytes,0, bytes.length);
                res_image.setImageBitmap(bmp);
            }
        });
    }
}
😜numpy
提供两个范例,
- 使用numpy计算两个矩阵的乘积。
- 使用numpy生成随机数组,并计算其平均值和标准差,除了透过python使用numpy计算外,还能将计算后的数值返回并转成java格式,供使用者能够在java进行后续应用,达到java与python交互应用。
使用numpy计算两个矩阵的乘积: 在hello_python.py档案内增加。
import numpy as np

#使用numpy计算两个矩阵的乘积
def matrix_multiply():
    a = np.array([[1, 2], [3, 4]])
    b = np.array([[5, 6], [7, 8]])
    c = np.matmul(a, b)
    return c
将python内numpy计算完后的数值读取到 Java 中
//初始化python环境
if(!Python.isStarted()){
Python.start(new AndroidPlatform(this));
}
//使用numpy计算两个矩阵的乘积
Python py = Python.getInstance();
//调用hello_python.py里面的matrix_multiply函式
PyObject pyObj = py.getModule("hello_python").get("matrix_multiply");
//将matrix_multiply计算完的数值,换成java中的float类型
float[][] result = pyObj.call().toJava(float[][].class);
String resultStr = "";
for (int i = 0; i < result.length; i++) {
for (int j = 0; j < result[i].length; j++) {
resultStr += result[i][j] + " ";
}
resultStr += "\n";
}
Log.d("Result", resultStr);
使用numpy生成随机数组,并计算其平均值和标准差: 在hello_python.py档案内增加。
import numpy as np
#使用numpy生成随机数组,并计算其平均值和标准差。
def numpy_example():
# Generate a random array with shape (3, 3)
a = np.random.rand(3, 3)
# Calculate the mean of the array
mean = np.mean(a)
# Calculate the standard deviation of the array
std = np.std(a)
return mean, std
//使用numpy生成随机数组,并计算其平均值和标准差。
Python np = Python.getInstance();
//调用hello_python.py里面的numpy_example函式
PyObject npObj = np.getModule("hello_python").get("numpy_example");
PyObject npResult = npObj.call();
//numpy_example的返回值有两个,将其分别转换成java中的float类型
float mean = npResult.asList().get(0).toFloat();
float std = npResult.asList().get(1).toFloat();
Log.d("Result"," mean = "+ mean);
Log.d("Result"," std = "+ std);
👉其他
📢作者:小空和小芝中的小空
📢转载说明-务必注明来源:https://zhima.blog.csdn.net/
📢这位道友请留步☁️,我观你气度不凡,谈吐间隐隐有王者霸气💚,日后定有一番大作为📝!!!旁边有点赞👍收藏🌟今日传你,点了吧,未来你成功☀️,我分文不取,若不成功⚡️,也好回来找我。
温馨提示:点击下方卡片获取更多意想不到的资源。


