1. 元素显示模式
<!DOCTYPE html>
<html lang="en">
<head>
    <meta charset="UTF-8">
    <meta name="viewport" content="width=device-width, initial-scale=1.0">
    <title>Document</title>
    <style>
        div,
        span,
        input {
            width: 200px;
            height: 200px;
            background-color: aquamarine;

            /*
                设置元素显示模式 display
                block 块元素
                inline 行内元素
                inline—block 行内块元素
                nono 取消显示模式,标签隐藏不显示
            */

            display: block;
        }
    </style>
</head>
<body>
    <!-- 块状元素,独占一行,可以设置宽高等属性 -->
    <div>块状元素1</div>
    <div>块状元素2</div>

    <!-- 行内元素,和其它行内元素在一行显示,不能设置宽高 -->
    <span>行内元素1</span>
    <span>行内元素2</span>

    <!-- 行内块元素,和其它行内块元素在一行显示,能设置宽高 -->
    <input type="text" name="" id="">
    <input type="text" name="" id="">
</body>
</html>
块级元素和行内元素的区别:
块级元素的特点:
(1)总是从新行开始
(2)高度,行高、外边距以及内边距都可以控制。
(3)宽度默认是容器的100%
(4)可以容纳内联元素和其他块元素。
行内元素的特点:
(1)和相邻行内元素在一行上。
(2)高、宽无效,但水平方向的padding和margin可以设置,垂直方向的无效。
(3)默认宽度就是它本身内容的宽度。
(4)行内元素只能容纳文本或则其他行内元素。
行内块元素的特点:
(1)和相邻行内元素(行内块)在一行上,但是之间会有空白缝隙。
(2)默认宽度就是它本身内容的宽度。
(3)高度,行高、外边距以及内边距都可以控制。
2. CSS三大特性
层叠性:
所谓层叠性是指多种CSS样式的叠加。是浏览器处理冲突的一个能力,如果一个属性通过两个相同选择器设置到同一个元素上,那么这时一个属性就会将另一个属性层叠掉。
比如先给某个标签指定了内部文字颜色为红色,接着又指定了颜色为蓝色,此时出现一个标签指定了相同样式不同值的情况,这就是样式冲突。 记住:就近原则。
继承性:
所谓继承性是指书写CSS样式表时,子标签会继承父标签的某些样式,如文本颜色和字号。想要设置一个可继承的属性,只需将它应用于父元素即可。
优先级:
定义CSS样式时,经常出现两个或更多规则应用在同一元素上,这时就会出现优先级的问题。在考虑权重时,初学者还需要注意一些特殊的情况,具体如下:
1. 继承样式的权重为0。即在嵌套结构中,不管父元素样式的权重多大,被子元素继承时,他的权重都为0,也就是说子元素定义的样式会覆盖继承来的样式。
2. 行内样式优先。应用style属性的元素,其行内样式的权重非常高,可以理解为远大于100。总之,他拥有比上面提到的选择器都大的优先级。
3. 权重相同时,CSS遵循就近原则。也就是说靠近元素的样式具有最大的优先级,或者说排在最后的样式优先级最大。
4. CSS定义了一个!important命令,该命令被赋予最大的优先级。也就是说不管权重如何以及样式位置的远近,!important都具有最大优先级。
<!DOCTYPE html>
<html lang="en">

<head>
    <meta charset="UTF-8">
    <meta name="viewport" content="width=device-width, initial-scale=1.0">
    <title>Document</title>
    <style>
        /* 继承性:父标签和子类标签之间样式可以继承,但只限于对字体的样式更改 */
        div {
            color: white;
            width: 100px;
            height: 100px;
            display: block;
            background-color: blue;
            font-size: 25px;
        }
    </style>
</head>

<body>
    <div>
        内容
        <span>
            文本内容
        </span>
    </div>
</body>

</html>
3. CSS背景
<!DOCTYPE html>
<html lang="en">
<head>
    <meta charset="UTF-8">
    <meta name="viewport" content="width=device-width, initial-scale=1.0">
    <title>Document</title>
    <style>
        div {
            width: 700px;
            height: 1200px;
            /* 背景颜色 */
            background-color: aqua;
            /* 背景图片 */
            background-image: url(./imgs/01.jpg);
            /*
                是否重复平铺
                no-repeat 不重复
                repeat-x 沿x轴重复
                repeat-y 沿y轴重复
                repeat x和y轴都重复 默认
            */
            background-repeat: no-repeat;
            /* background-repeat: repeat-x; */

            /*
                背景图片位置
                先x后y
                可以写百分比,也可以写数字
                还可以写方位名词 ,写方位名词时不区分x和y轴
                如果只写一个方位名词,另一个默认居中
                下 bottom  上 top  左 left  右 right
            */
            /*
            background-position: 20% 30%;
            background-position: 20px 50px; */
            background-position: right;

            /*
                设置固定和滚动
                fixed 固定  scroll 滚动 默认滚动
            */
            background-attachment: scroll;
            /* 控制图片大小,100%则填满容器 */
            background-size: 100% 100%;
        }
    </style>
</head>
<body>
    <div>

    </div>
</body>
</html>
4.盒子模型
4.1 盒子边框
<!DOCTYPE html>
<html lang="en">
<head>
    <meta charset="UTF-8">
    <meta name="viewport" content="width=device-width, initial-scale=1.0">
    <title>Document</title>
    <style>
        div {
            background-color: aquamarine;
            width: 300px;
            height: 300px;
            /* 设置边框 */
            border: 10px solid;
            /* 单独设置边框,如设置上边框 */
            border-top-color: brown;
            border-top-width: 20px;
            border-top-style: solid;
            /* 同时设置上边框的宽度,风格,颜色 */
            border-top: 25px solid red;

            /* 设置四个边框 */
            border-color: black;
            border-width: 20px;
            border-style: double;
            /* 同时设置四个边框的宽度,风格,颜色 */
            border: 30px solid red;

        }
    </style>
</head>
<body>
    <div></div>
</body>
</html>
4.2 表格的细线边框
之前的table表合并边框会让两个相邻的边框紧挨在一起,导致边框粗细变为两倍。只需要添加border-collapse: collapse;便可以去除重复的边框。或者是只设置外边框的左边框和下边框,在设置单元格的右边框
<!DOCTYPE html>
<html lang="en">

<head>
    <meta charset="UTF-8">
    <meta name="viewport" content="width=device-width, initial-scale=1.0">
    <title>Document</title>
    <style>
        /*
        table {
            border-top: 1px solid;
            border-left: 1px solid;
            border-spacing: 0px;
        }
        td {
            border-bottom: 1px solid;
            border-right: 1px solid;
        }
        */

        table,
        td {
            border: 1px solid;
            /* 合并重复边框 */
            border-collapse: collapse;
        }
    </style>
</head>

<body>
    <table width="500" align="center">
        <tr>
            <td>1</td>
            <td>1</td>
            <td>1</td>
        </tr>
        <tr>
            <td>2</td>
            <td>2</td>
            <td>2</td>
        </tr>
        <tr>
            <td>3</td>
            <td>3</td>
            <td>3</td>
        </tr>
    </table>
</body>

</html>
4.3 圆角边框
radius 半径 (距离)
<!DOCTYPE html>
<html lang="en">
<head>
    <meta charset="UTF-8">
    <meta name="viewport" content="width=device-width, initial-scale=1.0">
    <title>Document</title>
    <style>
        div {
            width: 50px;
            height: 20px;
            border: 1px solid;
            /* 设置圆角边 */
            border-radius: 20%;
        }
    </style>
</head>
<body>
    <div></div>
</body>
</html> 
4.4 内边距
padding 属性设置内边距,指边框与内容之间的距离。
<!DOCTYPE html>
<html lang="en">
<head>
    <meta charset="UTF-8">
    <meta name="viewport" content="width=device-width, initial-scale=1.0">
    <title>Document</title>
    <style>
        /* a { */
        /* background-color: red; */

        /* padding-left: 0%;
            padding-top: 0%;
            padding-bottom: 0%;
            padding-right: 0%; */
        /* 对上下左右各设置10内边距 */
        /* padding: 10px; */
        /* 两个值 : 上下20   左右10 */
        /* padding: 20px 10px; */
        /* 三个值 : 上10  左右20  下30 */
        /* padding: 10px 20px 30px; */
        /* 四个值 : 上 右 下 左 */
        /* padding: 10px 20px 30px 40px; */
        /* } */

        * {
            margin: 0;
        }
        div {
            border-top: 3px solid #ff8400;
            border-bottom: 1px solid #EDEEF0;
            color: #4C4C4C;
        }

        a {
            display: inline-block;
            height: 50px;
            line-height: 50px;
            padding: 0 20px;
            color: #4C4C4C;
            text-decoration: none;
        }

        div>a:hover {
            color: #ff8400;
            background-color: #EDEEF0;
        }
    </style>
</head>
<body>
    <div>
        <a href="">登录</a><a href="">设为首页</a><a href="">手机新浪网</a><a href="">移动客户端</a>
    </div>
</body>
</html>
4.5 外边距
margin属性用于设置外边距。 设置外边距会在元素之间创建“空白”, 这段空白通常不能放置其他内容。
<!DOCTYPE html>
<html lang="en">

<head>
    <meta charset="UTF-8">
    <meta http-equiv="X-UA-Compatible" content="IE=edge">
    <meta name="viewport" content="width=device-width, initial-scale=1.0">
    <title>Document</title>
    <style>
        div {
            /* 文本居中 */
            text-align: center;
            width: 300px;
            height: 300px;
            background-color: aqua;
            /* 使用外边距,使盒子居中 */
            /* 取值方式同padding一样 */
            margin: 0 auto;
        }
    </style>
</head>

<body>
    <div>内容</div>
</body>

</html>
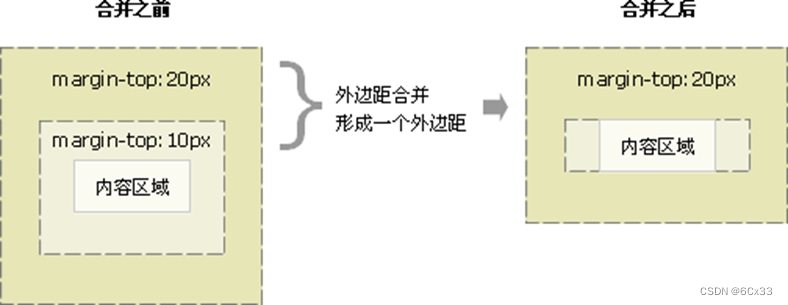
4.5.1 外边距合并
相邻块元素垂直外边距合并
使用margin定义块元素的垂直外边距时,可能会出现外边距的合并。当上下相邻的两个块元素相遇时,如果上面的元素有下外边距margin-bottom,下面的元素有上外边距margin-top,则他们之间的垂直间距不是margin-bottom与margin-top之和,而是两者中的较大者。这种现象称为相邻块元素垂直外边距合并(也称为外边距塌陷)。

嵌套块元素垂直外边距合并
对于两个嵌套关系的块元素,如果父元素没有上内边距及外框,则父元素的上外边距会与子元素的上外边距发生合并,合并后的外边距为两者中的较大者,即使父元素的上外边距为0,也会发生合并。
