1. 解决问题的场景
项目是开发好几年了,当时采用的是类组件开发。现在新增需求,新增需求使用的函数组件,组件涉及的层级比较多,如果直接组件传值,比较麻烦。但是单独为这次的需求新增 redux 的引入又觉得没必要。然后在即需要一个页面全局状态统一管理的地方,又不希望进行组件一级一级的传值,不方便维护。最后想到了访问上下文(Context)中的值的方法解决问题。
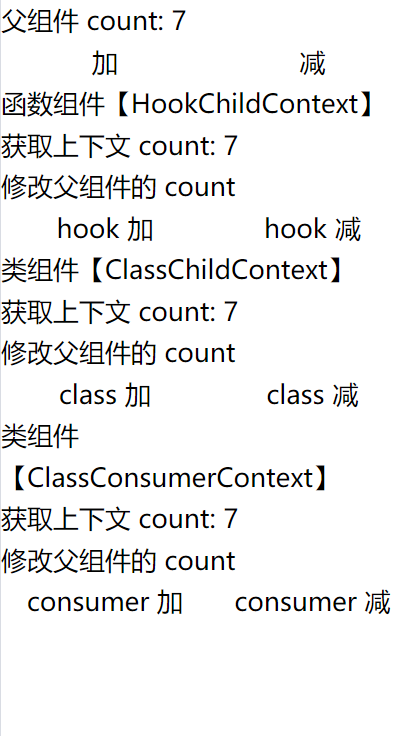
1. 方案一:父组件为类组件访问上下文
2. 父组件为类组件访问上下文
- ClassCreateContext 创建上下文;
- HookChildContext 函数组件使用 useContext 访问上下文;
- ClassChildContext 类组件使用 static contextType 访问上下文;
- ClassConsumerContext 类组件使用 <XxxContext.Consumer> 访问上下文;
- 父组件 count 变量;
- 父组件修改 count 的操作函数 updateCount;
- 创建上下文并提供值 ClassCreateContext.Provider。
import React, { Component } from "react";
import Taro from "@tarojs/taro";
import { View } from "@tarojs/components";
import { ClassCreateContext } from './classCreateContext';
import HookChildContext from './hookChildContext';
import ClassChildContext from './classChildContext';
import ClassConsumerContext from './classConsumerContext';

class ClassContext extends Component {
  constructor(props) {
    super(props);
  }
  state = {
    count: 0
  }
  // 修改count的值
  updateCount = (type = 'add') => {
    let { count } = this.state;
    count = {
      'add': () => {
        return ++count
      },
      'minus': () => {
        return --count
      }
    }[type]?.()
    this.setState({count})
  }
  render() {
    let { count } = this.state;
    return <View>
      {/* 类组件的父组件的变量显示和操作 */}
      <View>父组件 count: {count}</View>
      <View className='rui-flex-ac'>
        <View
          className='rui-fg rui-flex-cc'
          onClick={this.updateCount.bind(this,'add')}>加</View>
        <View
          className='rui-fg rui-flex-cc'
          onClick={this.updateCount.bind(this,'minus')}>减</View>
      </View>
      {/* 创建上下文并提供值 */}
      <ClassCreateContext.Provider value={{ count, updateCount: this.updateCount }}>
        {/* 类组件中使用函数组件访问上下文 */}
        <HookChildContext/>
        {/* 类组件中使用类组件使用 static contextType 访问上下文 */}
        <ClassChildContext/>
        {/* 类组件中使用类组件使用 <XxxContext.Consumer> 访问上下文 */}
        <ClassConsumerContext/>
      </ClassCreateContext.Provider>
    </View>;
  }
}

export default ClassContext;
3. 特别注意类组件的操作函数
  // 修改count的值
  updateCount = (type = 'add') => {
    let { count } = this.state;
    count = {
      'add': () => {
        return ++count
      },
      'minus': () => {
        return --count
      }
    }[type]?.()
    this.setState({count})
  }
类组件的父组件的操作函数必须使用箭头函数,因为类组件涉及到函数内部 this 的指向问题,当然我们也可以使用 bind、call、aplly 来解决这个问题,但是我认为此处直接使用箭头函数,直接指向的是当前类组件,这样我们就不用关心在子组件调用操作方法时 this 的指向问题!!!
4. 类组件创建上下文
classCreateContext.js
import { createContext } from "react";
// 创建类组件的上下文
export const ClassCreateContext = createContext({});
5. 函数组件实现访问上下文和修改上下文值 HookChildContext
- 引入创建的上下文 ClassCreateContext;
- 使用 useContext 访问上下文的值和修改值得操作方法;
- 在组件 HookChildContext 中展示访问的上下文值 count;
- 在组建 HookChildContext 中操作访问的上下文值的方法 updateCount。
import { View, Text, Image } from '@tarojs/components';
import { useContext } from 'react';
import { ClassCreateContext } from './classCreateContext';

const HookChildContext = (props) => {
  let { count, updateCount } = useContext(ClassCreateContext)
  return <View>
    <View>函数组件【HookChildContext】</View>
    <View>获取上下文 count: {count}</View>
    <View>修改父组件的 count</View>
    <View className='rui-flex-ac'>
      <View
        onClick={updateCount.bind(null, 'add')}
        className='rui-flex-cc rui-fg'>hook 加</View>
      <View
        onClick={updateCount.bind(null, 'minus')}
        className='rui-flex-cc rui-fg'>hook 减</View>
    </View>
  </View>
}
export default HookChildContext;
6. 类组件实现访问上下文和修改上下文值 ClassChildContext
- 引入创建的上下文 ClassCreateContext;
- 使用 static contextType 访问上下文的值和修改值得操作方法;
- 在组件 ClassChildContext 中展示访问的上下文值 count;
- 在组建 ClassChildContext 中操作访问的上下文值的方法 updateCount。
import React, { Component } from "react";
import Taro from "@tarojs/taro";
import { View } from "@tarojs/components";
import { ClassCreateContext } from './classCreateContext';

class ClassChildContext extends Component {
  static contextType = ClassCreateContext;
  constructor(props) {
    super(props);
  }
  state = {  }
  render() {
    let { count, updateCount } = this.context;
    return <View>
      <View>类组件【ClassChildContext】</View>
      <View>获取上下文 count: {count}</View>
      <View>修改父组件的 count</View>
      <View className='rui-flex-ac'>
        <View
          onClick={updateCount.bind(null, 'add')}
          className='rui-flex-cc rui-fg'>class 加</View>
        <View
          onClick={updateCount.bind(null, 'minus')}
          className='rui-flex-cc rui-fg'>class 减</View>
      </View>
    </View>;
  }
}

export default ClassChildContext;
7. 类组件实现访问上下文和修改上下文值 ClassConsumerContext
- 引入创建的上下文 ClassCreateContext;
- 使用 <ClassCreateContext.Consumer> 访问上下文的值和修改值得操作方法;
- 在组件 ClassConsumerContext 中展示访问的上下文值 count;
- 在组建 ClassConsumerContext 中操作访问的上下文值的方法 updateCount。
import React, { Component } from "react";
import Taro from "@tarojs/taro";
import { View } from "@tarojs/components";
import { ClassCreateContext } from './classCreateContext';

class ClassConsumerContext extends Component {
  constructor(props) {
    super(props);
  }
  state = {  }
  render() {
    return <ClassCreateContext.Consumer>
      {
        value => (
          <>
            <View>类组件【ClassConsumerContext】</View>
            <View>获取上下文 count: {value.count}</View>
            <View>修改父组件的 count</View>
            <View className='rui-flex-ac'>
              <View
                onClick={value.updateCount.bind(null, 'add')}
                className='rui-flex-cc rui-fg'>consumer 加</View>
              <View
                onClick={value.updateCount.bind(null, 'minus')}
                className='rui-flex-cc rui-fg'>consumer 减</View>
            </View>
          </>
        )
      }
    </ClassCreateContext.Consumer>;
  }
}

export default ClassConsumerContext;
8. 结果预览
2. 方案二:父组件为函数组件访问上下文
9. 父组件为函数组件访问上下文
- HookCreateContext 创建上下文;
- HookSonContext 函数组件使用 useContext 访问上下文;
- ClassSonContext 类组件使用 static contextType 访问上下文;
- ClassSonConsumerContext 类组件使用 <XxxContext.Consumer> 访问上下文;
- 父组件 count 变量;
- 父组件修改 count 的操作函数 updateCount;
- 创建上下文并提供值 HookCreateContext.Provider。
import { View, Text, Image } from '@tarojs/components';
import { useState, useEffect } from 'react';
import { HookCreateContext } from './hookCreateContext';
import ClassSonContext from './classSonContext';
import HookSonContext from './HookSonContext';

const HookContext = (props) => {
  let [count, setCount] = useState(0)
  // 修改 count
  function updateCount(type='add'){
    count = {
      'add': () => {
        return ++count
      },
      'minus': () => {
        return --count
      }
    }[type]?.()
    setCount(count)
  }
  return <View>
    <View>父组件 count: {count}</View>
    <View className='rui-flex-ac'>
      <View
        onClick={updateCount.bind(null, 'add')}
        className='rui-flex-cc rui-fg'>加</View>
      <View
        onClick={updateCount.bind(null, 'minus')}
        className='rui-flex-cc rui-fg'>减</View>
    </View>
    <HookCreateContext.Provider value={{count, updateCount}}>
      <ClassSonContext/>
      <HookSonContext/>
    </HookCreateContext.Provider>
  </View>
}
export default HookContext;
10. 函数组件创建上下文
hookCreateContext.js
import { createContext } from "react";
// 创建函数组件的上下文
export const HookCreateContext = createContext({});
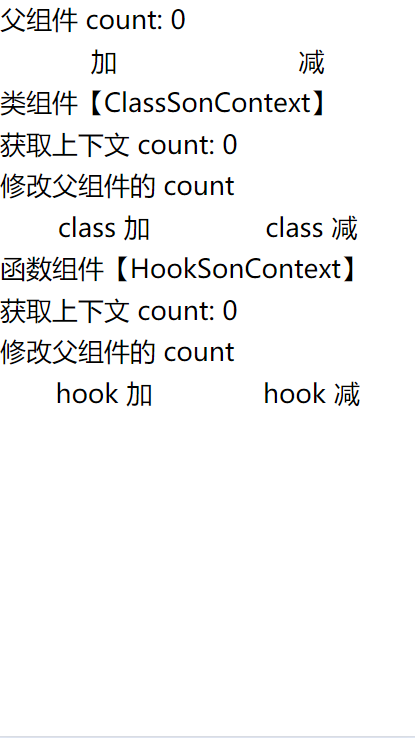
11. 类组件实现访问上下文和修改上下文值 ClassSonContext
- 引入创建的上下文 HookCreateContext;
- 使用 static contextType 访问上下文的值和修改值得操作方法;
- 在组件 ClassSonContext 中展示访问的上下文值 count;
- 在组建 ClassSonContext 中操作访问的上下文值的方法 updateCount。
import React, { Component } from "react";
import Taro from "@tarojs/taro";
import { View } from "@tarojs/components";
import { HookCreateContext } from './hookCreateContext';

class ClassSonContext extends Component {
  static contextType = HookCreateContext;
  constructor(props) {
    super(props);
  }
  state = {  }
  render() {
    let { count, updateCount } = this.context;
    return <View>
      <View>类组件【ClassSonContext】</View>
      <View>获取上下文 count: {count}</View>
      <View>修改父组件的 count</View>
      <View className='rui-flex-ac'>
        <View
          onClick={updateCount.bind(null, 'add')}
          className='rui-flex-cc rui-fg'>class 加</View>
        <View
          onClick={updateCount.bind(null, 'minus')}
          className='rui-flex-cc rui-fg'>class 减</View>
      </View>
    </View>;
  }
}

export default ClassSonContext;
12. 函数组件实现访问上下文和修改上下文值 HookSonContext
- 引入创建的上下文 HookCreateContext;
- 使用 useContext 访问上下文的值和修改值得操作方法;
- 在组件 HookSonContext 中展示访问的上下文值 count;
- 在组建 HookSonContext 中操作访问的上下文值的方法 updateCount。
import { View, Text, Image } from '@tarojs/components';
import { useContext } from 'react';
import { HookCreateContext } from './hookCreateContext';

const HookSonContext = (props) => {
  let { count, updateCount } = useContext(HookCreateContext)
  return <View>
    <View>函数组件【HookSonContext】</View>
    <View>获取上下文 count: {count}</View>
    <View>修改父组件的 count</View>
    <View className='rui-flex-ac'>
      <View
        onClick={updateCount.bind(null, 'add')}
        className='rui-flex-cc rui-fg'>hook 加</View>
      <View
        onClick={updateCount.bind(null, 'minus')}
        className='rui-flex-cc rui-fg'>hook 减</View>
    </View>
  </View>
}
export default HookSonContext;
13. 结果预览
14. 总结
- 创建上下文使用的是 createContext 方法;
- 使用 XxxContext.Provider 给上下文提供值;
- 在子组件是函数组件时,可以使用 useContext 访问上下文;
- 在子组件是类组件时,可以使用 static contextType 或者 <XxxContext.Consumer> 访问上下文;
- 如果是多界面子组件,建议还是传入值操作,访问上下文比较使用一个界面下的所有子组件访问上下文。