Spring Session是可配置的。
Redis Configuration
JSON序列化配置
Spring Session默认使用Java对象序列化机制对Session属性值进行序列化。
预定义类SysUser
先来定义一个SysUser类,在下面的演示案例中会用到。
package com.example.demo.model.entity;

import java.io.Serializable;

public class SysUser implements Serializable {
    private static final long serialVersionUID = -1802561599630491376L;
    private Integer id;
    private String name;
    private Integer age;

    public Integer getId() {
        return id;
    }

    public void setId(Integer id) {
        this.id = id;
    }

    public String getName() {
        return name;
    }

    public void setName(String name) {
        this.name = name;
    }

    public Integer getAge() {
        return age;
    }

    public void setAge(Integer age) {
        this.age = age;
    }

    public SysUser() {
    }

    public SysUser(Integer id, String name, Integer age) {
        this.id = id;
        this.name = name;
        this.age = age;
    }

    @Override
    public String toString() {
        return "SysUser{" +
                "id=" + id +
                ", name='" + name + '\'' +
                ", age=" + age +
                '}';
    }
}
Java对象序列化机制
序列化是指把一个Java对象变成二进制内容,本质上是一个byte[]数组。
通常,我们在SpringBoot Web应用中开发一个接口,配合@ResponseBody注解(将java对象转为json格式)返回一个Java对象给到前端时,无形中就使用到了SpringBoot内置的Jackson库进行对象的序列化操作。
而Java序列化机制,需要实现Serializable接口,序列化的过程是将对象转换为字节流,可以通过ObjectOutputStream类来实现;反序列化的过程是将字节流转换为对象,可以通过ObjectInputStream类来实现。在进行序列化和反序列化时,需要注意一些事项,比如版本控制、字段的访问控制等。
对象序列化:ObjectOutputStream
举个例子:将SysUser对象进行序列化,写入到test.txt文件中。
        SysUser user = new SysUser(1, "TomLink", 15);
        ObjectOutputStream os = null;
        FileOutputStream fos = null;
        try {
            fos = new FileOutputStream("test.txt");
            os = new ObjectOutputStream(fos);
            os.writeObject(user);
            os.flush();
        } catch (Exception e) {
            e.printStackTrace();
        } finally {
            //关闭流
            if (fos != null) {
                try {
                    fos.close();
                } catch (IOException e) {
                    e.printStackTrace();
                }
            }
            if (os != null) {
                try {
                    os.close();
                } catch (IOException e) {
                    e.printStackTrace();
                }
            }
        }
输出文件内容为:
sr %com.example.demo.model.entity.SysUser纥茍C? L aget Ljava/lang/Integer;L idq ~ L namet Ljava/lang/String;xpsr java.lang.Integer鉅亣8 I valuexr java.lang.Number啲?
斷? xp sq ~ t TomLink
对象反序列化:ObjectInputStream
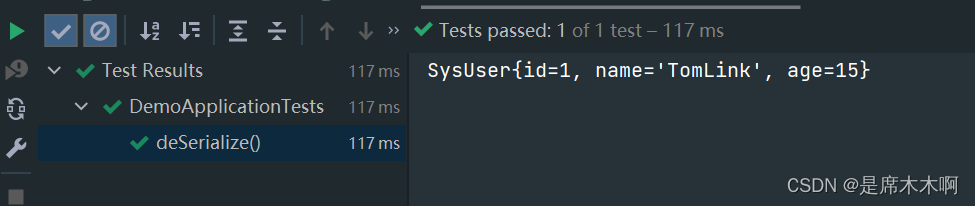
那么如何将文件内容恢复成SysUser对象呢?这就是对象反序列化的过程:将二进制数据转换为Java对象。
    @Test
    public void deSerialize(){
        ObjectInputStream ois = null;
        FileInputStream fis = null;
        try {
            fis = new FileInputStream("test.txt");
            ois = new ObjectInputStream(fis);
            SysUser sysUser = (SysUser)ois.readObject();
            System.out.println(sysUser);
        }catch (Exception e){
            e.printStackTrace();
        }finally {
            if (fis != null) {
                try {
                    fis.close();
                } catch (IOException e) {
                    e.printStackTrace();
                }
            }
            if (ois != null) {
                try {
                    ois.close();
                } catch (IOException e) {
                    e.printStackTrace();
                }
            }
        }
    }
存在的问题:序列化版本号
这种序列化机制存在什么问题呢?
假设我们将序列化版本号进行稍加改动:
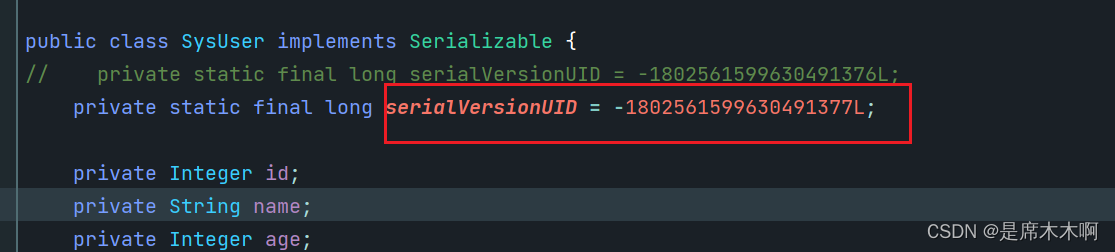
在执行反序列化操作,就会解析异常:

HttpSession的JSON序列化机制
By default, Spring Session uses Java Serialization to serialize the session attributes. Sometimes it might be problematic, especially when you have multiple applications that use the same Redis instance but have different versions of the same class.
前面也提到, Spring Session默认使用Java对象序列化机制对Session属性值进行序列化,那么,自然也存在同样的问题。
如何进行避免呢?一个比较好的解决方案就是:可以提供一个RedisSerializer实例自定义Session属性值的序列化方式。
Spring Data Redis provides the
GenericJackson2JsonRedisSerializerthat serializes and deserializes objects using Jackson’sObjectMapper.
我们可以使用Spring Data Redis提供的GenericJackson2JsonRedisSerializer 类来进行配置,其底层使用Jackson库的ObjectMapper进行序列化和反序列化,和SpringBoot的底层序列化机制类似。
配置方式如下,
package com.example.demo.config;

import com.fasterxml.jackson.databind.ObjectMapper;
import org.springframework.context.annotation.Bean;
import org.springframework.context.annotation.Configuration;
import org.springframework.data.redis.serializer.GenericJackson2JsonRedisSerializer;
import org.springframework.data.redis.serializer.RedisSerializer;

@Configuration
public class RedisHttpSessionConfig {

    /**
     * 自定义Http Session-Data-Redis的序列化机制
     */
    @Bean
    public RedisSerializer<Object> springSessionDefaultRedisSerializer(ObjectMapper objectMapper){
        return new GenericJackson2JsonRedisSerializer(objectMapper);
    }

}
Namespace命名空间配置
多个应用程序使用同一个 Redis 实例的情况并不少见。因此,Spring Session 会使用命名空间(默认为 spring:session),以便在需要时将会话数据分开。
查看RedisSessionProperties源码,会发现默认Namespace命名空间的值,
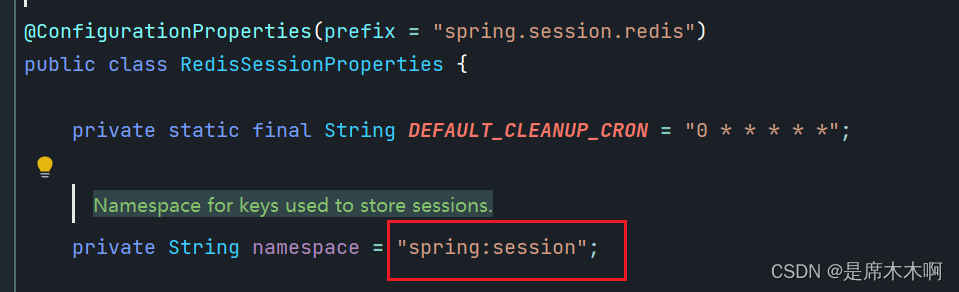
而实际存储到Redis中的Session信息,默认以namespace命名空间为前缀。

为了避免多个应用的namespace发生冲突,我们可以自行配置,以便于区分。
方式1:配置文件方式
spring.session.redis.namespace=spring:session:myapplication方式2:注解方式
@EnableRedisHttpSession:该注解启用Spring Session Data Redis,默认导入了RedisHttpSessionConfiguration配置类,改配置类默认提供的值就是 spring:session。
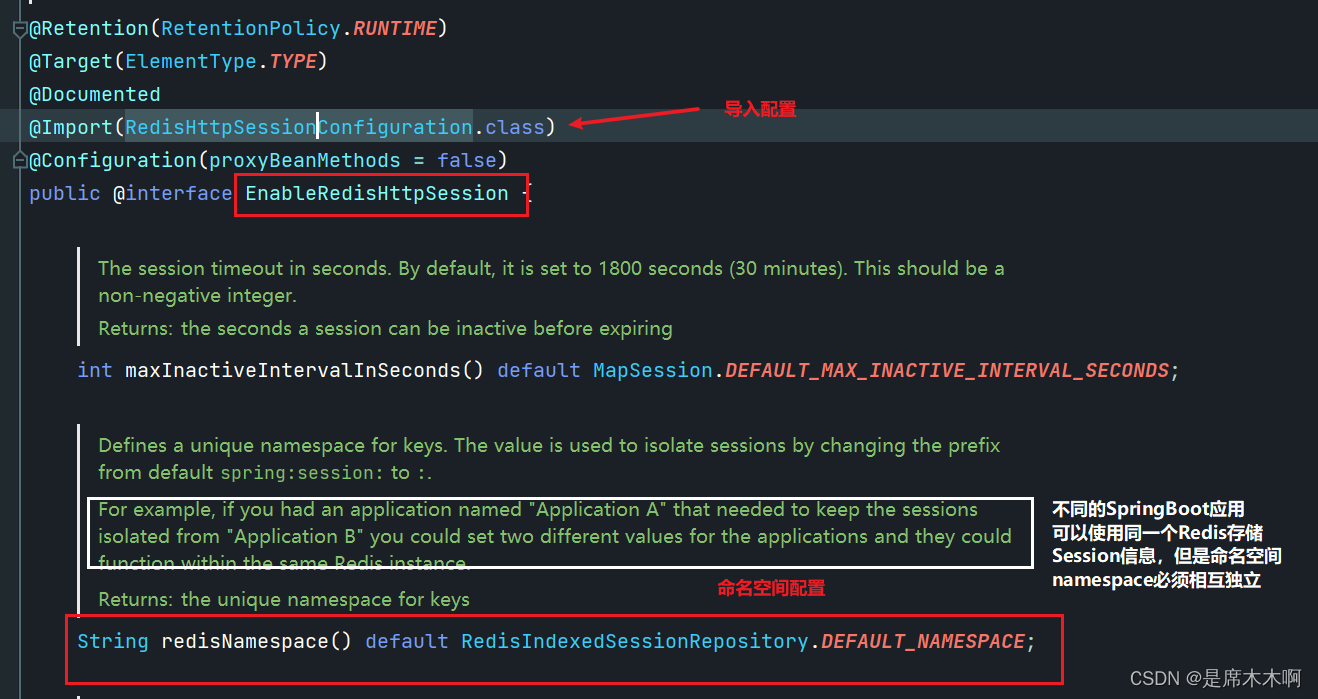

这里只需要重定义这个属性即可,例如:
@SpringBootApplication
@EnableRedisHttpSession(redisNamespace = "applicationA:session")
public class DemoApplication {

    public static void main(String[] args) {
        SpringApplication.run(DemoApplication.class, args);
    }

}
SessionRepository配置
SessionRepository简介
SessionRepository接口提供了对Session的增删改查操作。

Spring Session内置的实现类如下,
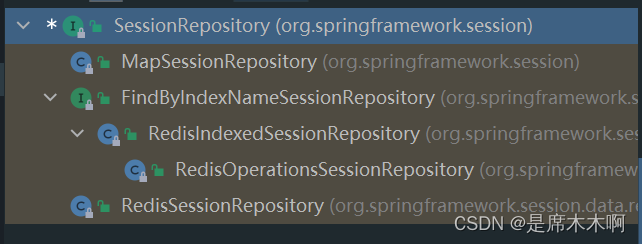
而我们接下来要考虑的,就是如何选择SessionRepository接口实现类的问题。
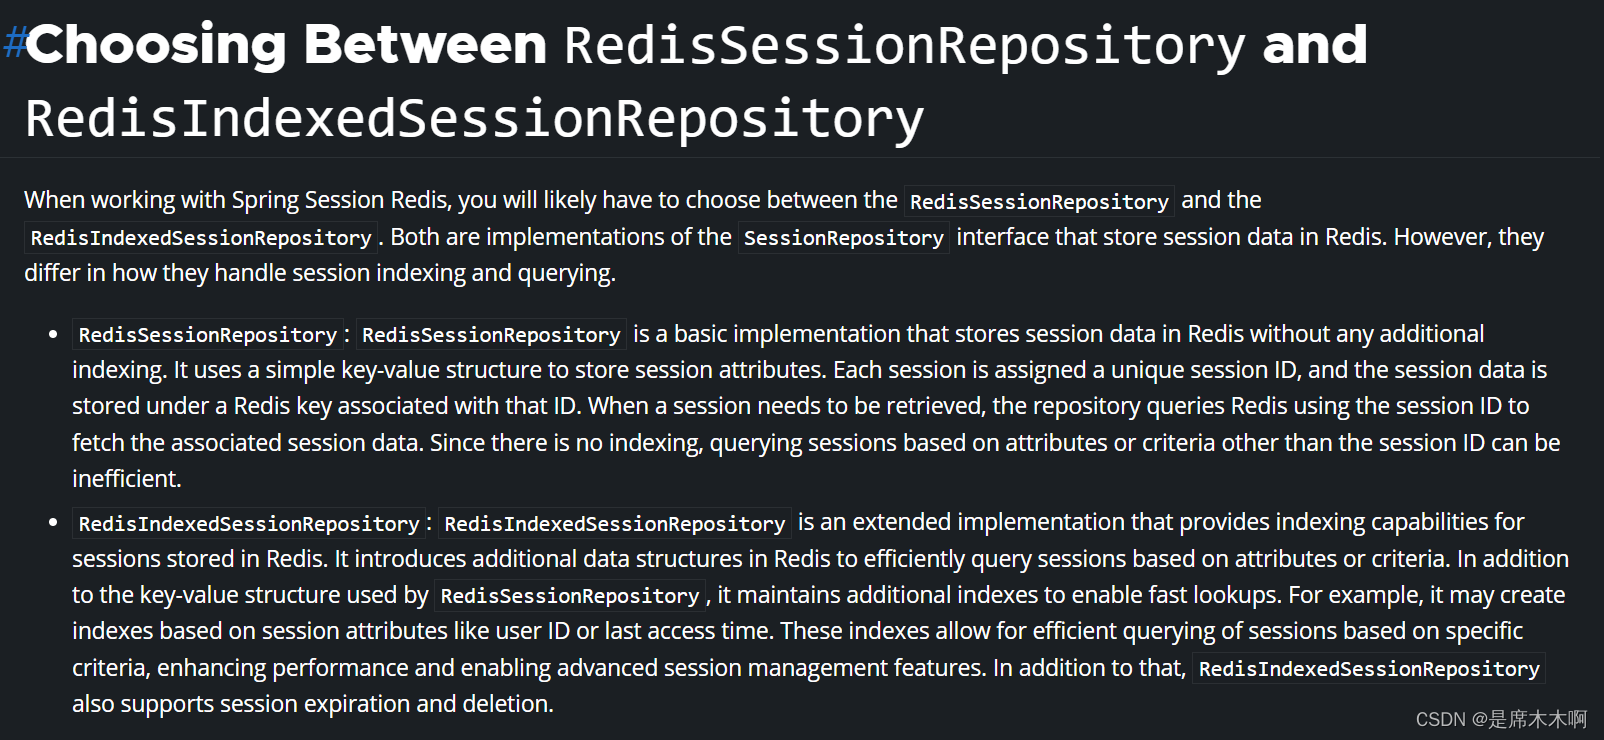
实现类1:RedisSessionRepository
RedisSessionRepository:是在Redis中存储Session数据的一种基本实现,没有任何额外的索引。仅仅使用简单的key-value键值结构去存储session属性。每一个Session会话都有一个唯一的ID值,session数据存储在与该 ID 关联的 Redis键中。
当需要获取Session数据时,RedisSessionRepository会使用SessionID在Redis中查询对应的Session数据。但是由于没有索引,根据SessionID 以外的属性名称查询Session数据可能会效率低下。
实现类2:RedisIndexedSessionRepository
RedisIndexedSessionRepository:是Redis存储Session会话的一种拓展实现,并提供了索引能力。它为Redis引入了额外的数据结构,以便于高效的基于属性名查询sessions。除了RedisSessionRepository使用的key-value键值结构外,它还维护额外的索引,以实现快速查询。例如,它可以根据用户ID或最后访问时间等会话属性创建索引;通过这些索引,可以根据特定条件高效的查询Session数据,从而提升性能、实现高级会话管理功能。
除此之外,RedisIndexedSessionRepository还支持会话过期和删除操作。
子接口:RedisIndexedSessionRepository
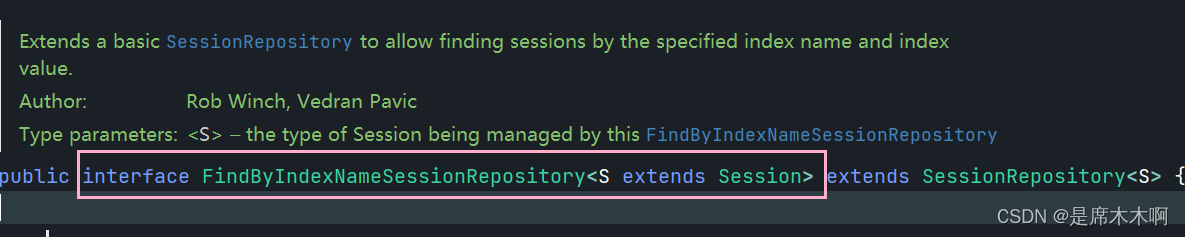
RedisIndexedSessionRepository:该接口拓展了SessionRepository接口的功能,作为RedisIndexedSessionRepository类的父接口出现,它允许根据特定的索引名和索引值来查询sessions会话信息。
通过检索特定用户的所有会话,可以跨设备或浏览器跟踪用户的活动会话。例如,可以将此信息用于会话管理目的,如允许用户从特定会话中失效或注销,或根据用户的会话活动执行某些操作。
例如:如下案例,可以使用getSessions 方法根据特定用户查询所有的会话信息;也可以使用removeSession 方法去移除用户的特定会话信息。
@Autowired
public FindByIndexNameSessionRepository<? extends Session> sessions;

public Collection<? extends Session> getSessions(Principal principal) {
    Collection<? extends Session> usersSessions = this.sessions.findByPrincipalName(principal.getName()).values();
    return usersSessions;
}

public void removeSession(Principal principal, String sessionIdToDelete) {
    Set<String> usersSessionIds = this.sessions.findByPrincipalName(principal.getName()).keySet();
    if (usersSessionIds.contains(sessionIdToDelete)) {
        this.sessions.deleteById(sessionIdToDelete);
    }
}@EnableRedisHttpSession注解与SessionRepository自动注入
通过如下的方式查看默认注入的是哪一个实现子类,
@SpringBootApplication
@EnableRedisHttpSession/*(redisNamespace = "applicationA:session")*/
public class DemoApplication {

    public static void main(String[] args) {
        ConfigurableApplicationContext run = SpringApplication.run(DemoApplication.class, args);

        SessionRepository bean = run.getBean(SessionRepository.class);
        System.out.println(bean.getClass().getName());
    }

}
至于为什么默认是RedisIndexedSessionRepository这个实现子类呢?其实和我们启用Http Session的方式有关。一开始我们是使用@EnableRedisHttpSession注解的方式有关。
查看该注解的源码,它内部使用@Import注解导入了RedisHttpSessionConfiguration这个配置类,在该类的内容,通过@Bean注解自动向IOC容器中注入了RedisIndexedSessionRepository的实例。

自定义SessionRepository Bean实例
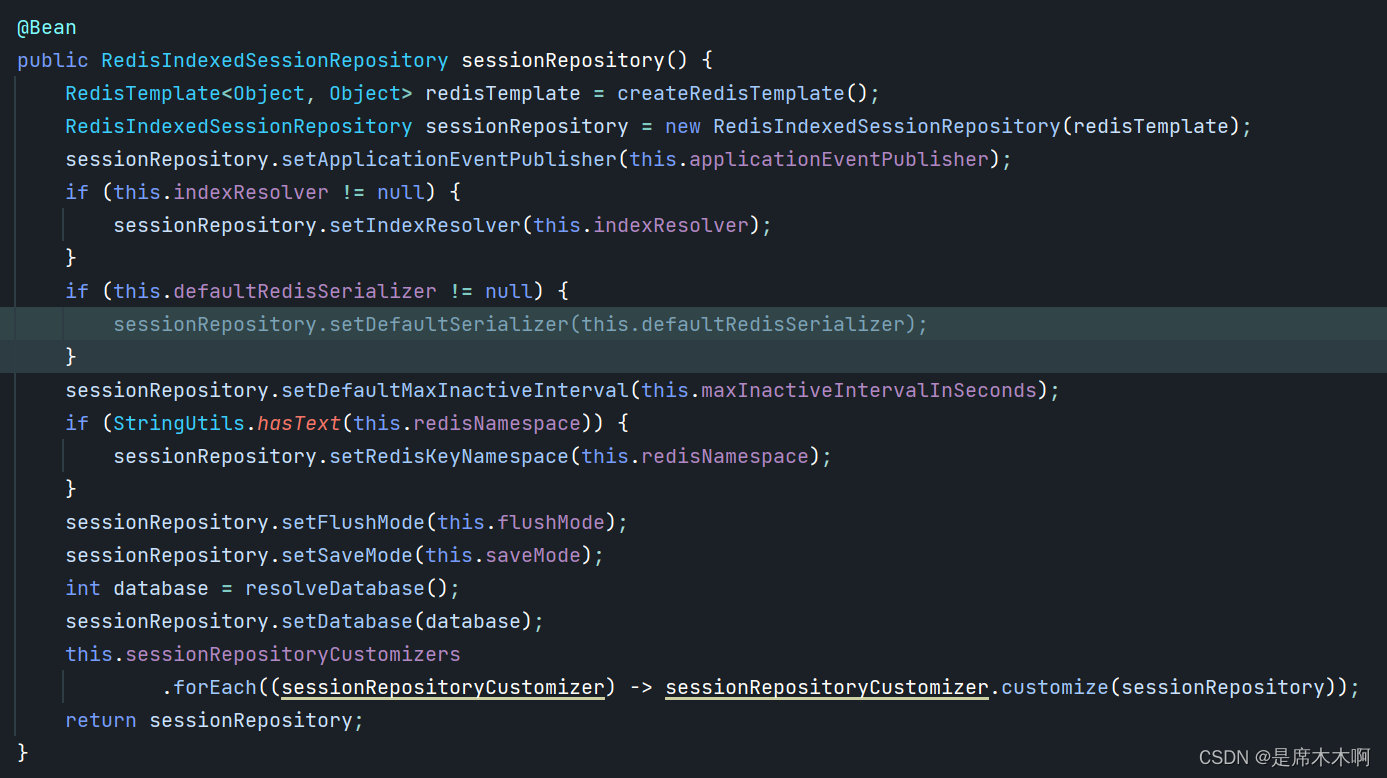
那么,如何自定义SessionRepository实例呢?最简单的方法就是不使用注解,而是主动通过@Bean注解自己创建一个实现子类,例如:
@Configuration
public class RedisHttpSessionConfig {
@Bean
public SessionRepository springSessionRepository(RedisTemplate redisTemplate){
//这里面没有做namespace等的配置,可自行补充
return new RedisSessionRepository(redisTemplate);
}
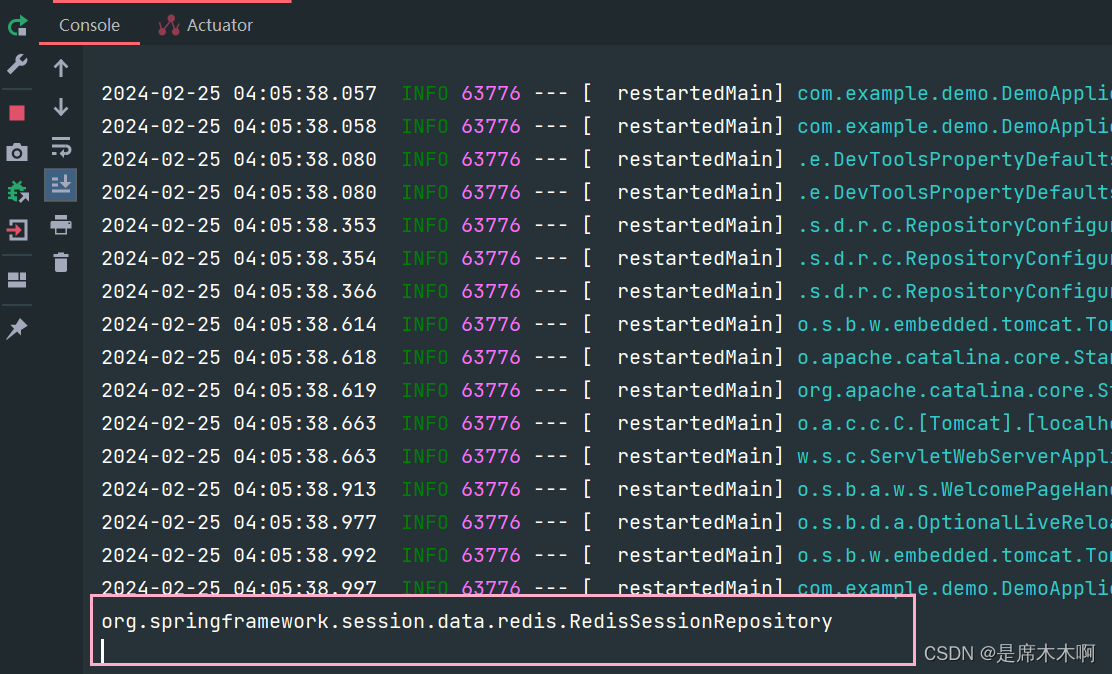
}再次启动,查看类类型如下,
监听Session Event
很多时候,对session操作做处响应的处理是有价值的。例如:根据session会话生命周期进行某种处理(前提是必须使用RedisIndexedSessionRepository)。在Servlet应用开发阶段,通常是通过HttpSessionListener来实现session会话创建和会话注销的监听和事件处理的。
/**
 * Implementations of this interface are notified of changes to the list of
 * active sessions in a web application. To receive notification events, the
 * implementation class must be configured in the deployment descriptor for the
 * web application.
 *
 * @see HttpSessionEvent
 * @since Servlet 2.3
 */
public interface HttpSessionListener extends EventListener {

    /**
     * Notification that a session was created.
     * The default implementation is a NO-OP.
     *
     * @param se
     *            the notification event
     */
    public default void sessionCreated(HttpSessionEvent se) {
    }

    /**
     * Notification that a session is about to be invalidated.
     * The default implementation is a NO-OP.
     *
     * @param se
     *            the notification event
     */
    public default void sessionDestroyed(HttpSessionEvent se) {
    }
}
Spring Session也提供了相应的接口用来处理Session会话事件,本质上是基于Java的事件模型机制来实现的。
Java事件模型机制
Java中事件模型机制的参与者分为3种角色:
- Event Source:事件源(source),表示是由谁触发的事件,例如:jframe编程中,定义一个按钮JButton,当你点击了这个按钮,就会有对应的点击事件被触发,那么这个按钮就作为事件源存在,通常将其作为事件对象的构造参数;
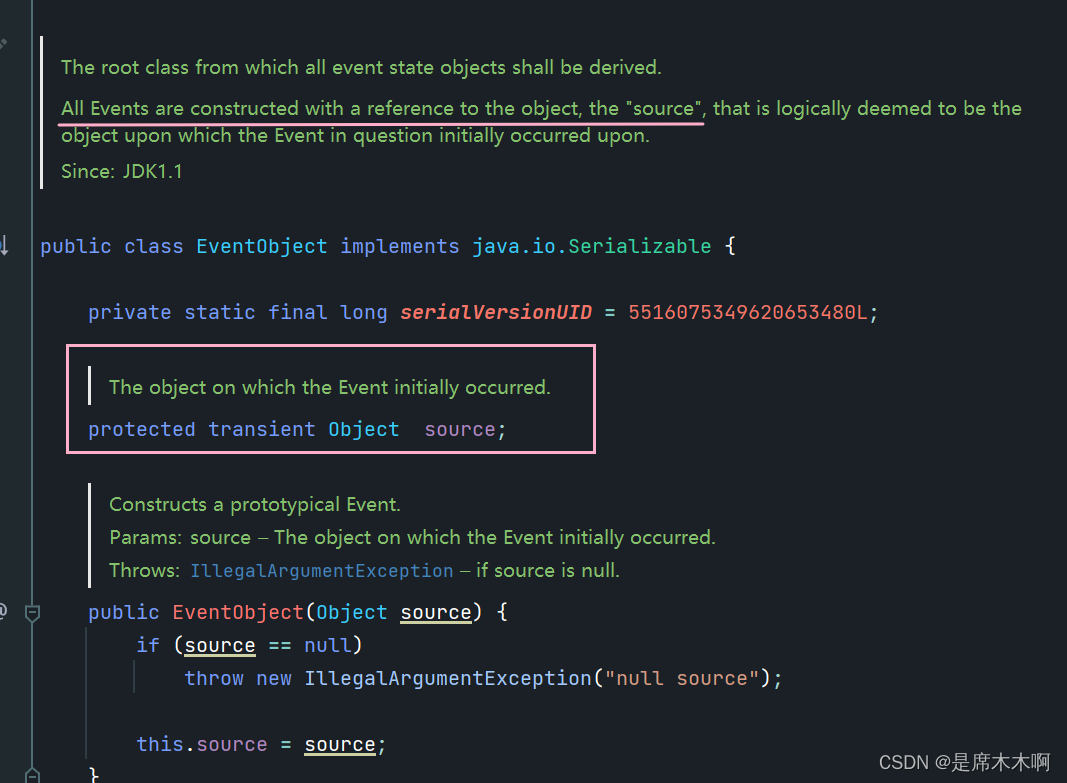
- Event Object:事件对象(java.util.EventObject),用于描述事件对象本身,每一个事件对象都和对应的事件源相绑定。
3. Event Listener:事件监听器(java.util.EventListener),用于监听事件对象的状态变化,并进行相应的处理。
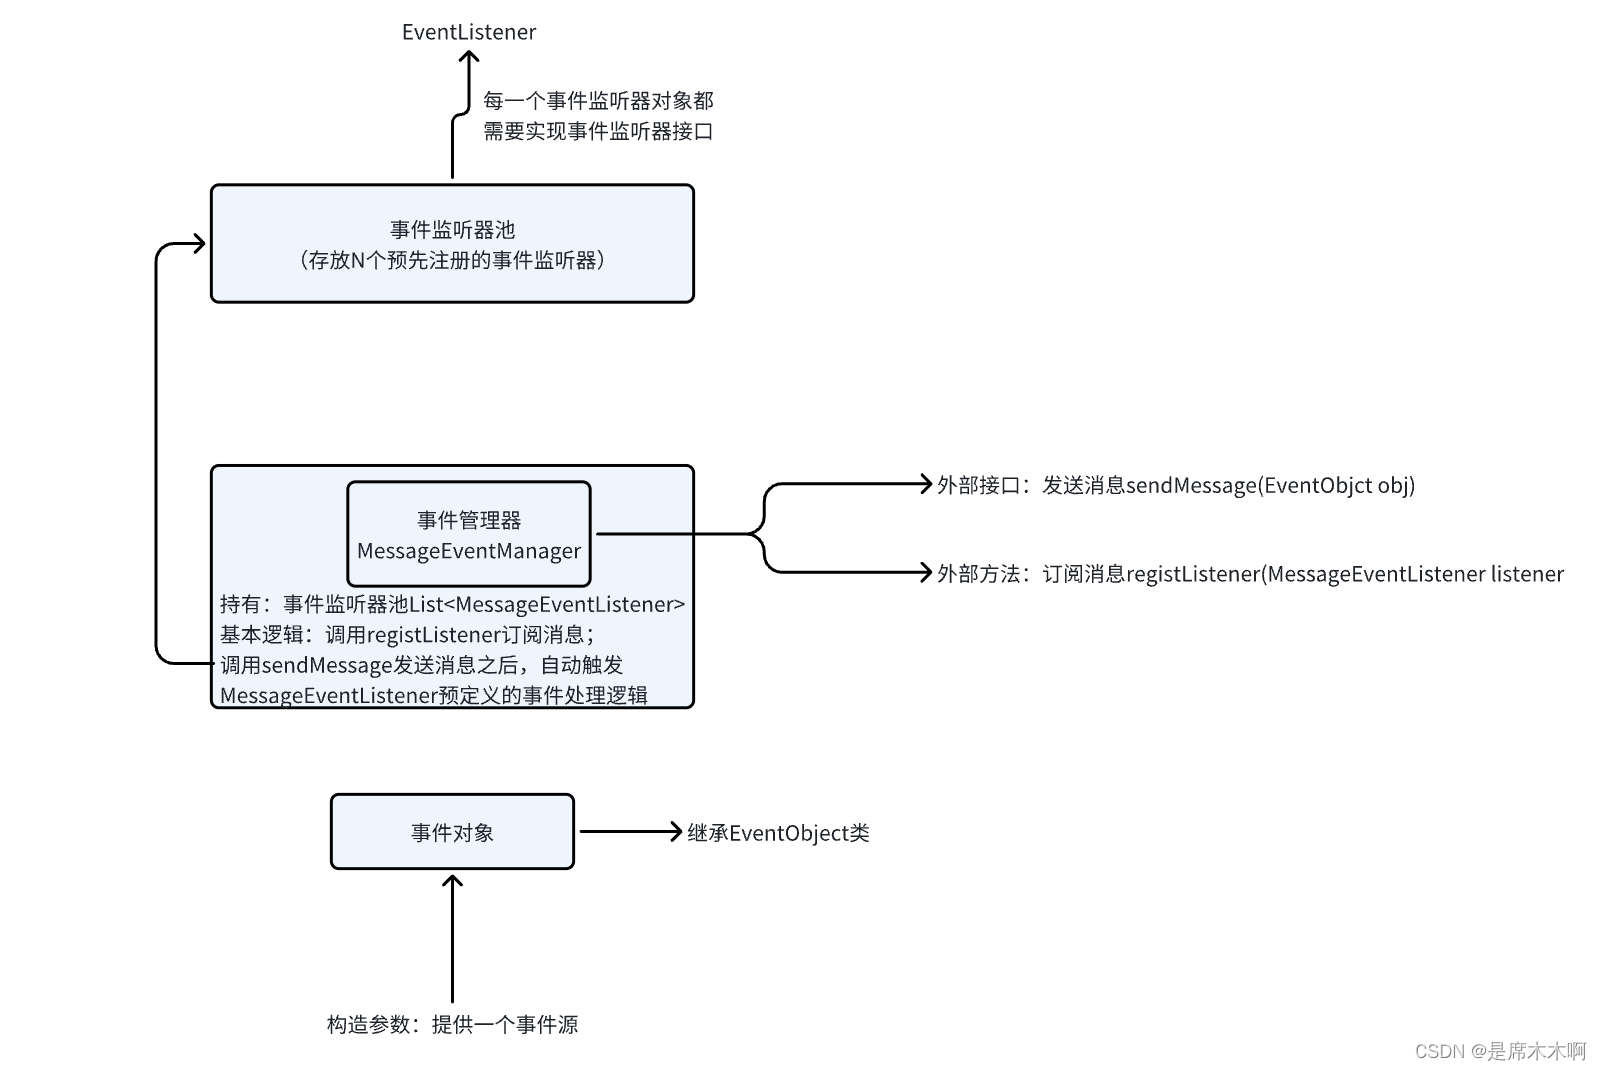
举个例子,如上图所示,我们建立一个消息发布和消息监听与回调处理的逻辑,并用Java代码进行实现,
/**
 * 消息事件对象
 */
class MessageEvent extends EventObject {

    //定义事件对象的状态
    private boolean status;

    /**
     * Constructs a prototypical Event.
     *
     * @param source The object on which the Event initially occurred.
     * @throws IllegalArgumentException if source is null.
     */
    public MessageEvent(Object source) {
        super(source);
    }

    //methods
    //修改状态
    public void setStatus(boolean status) {
        this.status = status;
    }

    //获取状态
    public boolean getStatus() {
        return status;
    }
}

/**
 * 消息事件监听器
 */
@FunctionalInterface
interface MessageEventListener extends EventListener{
    void handleMessage(MessageEvent event);
}

/**
 * 管理器
 */
class MessageEventManager{
    //事件监听器列表
    private static List<MessageEventListener> listeners = new ArrayList<>();

    //注册监听器
    public static void registListener(MessageEventListener eventListener){
        listeners.add(eventListener);
    }

    //触发监听器
    public static void notifyListener(MessageEvent messageEvent){
        for (MessageEventListener listener : listeners) {
            listener.handleMessage(messageEvent);
        }
    }

    //工具方法:发送消息
    public static void sendMessage(MessageEvent messageEvent){
        notifyListener(messageEvent);
    }

}

public class EventMechanismDemo {
    public static void main(String[] args) {
        //提供事件监听器
        MessageEventManager.registListener(event -> {
            System.out.println("MessageListener A::status["+event.getStatus()+"]");
        });

        //提供事件对象
        MessageEvent messageEvent = new MessageEvent(true);

        //获取与之绑定的事件源
        Object source = messageEvent.getSource();
        System.out.println("Event Srouce:"+source);

        //触发事件
        MessageEventManager.sendMessage(messageEvent);
    }
}
SpringBoot的事件模型机制
ApplicationEvent|事件对象
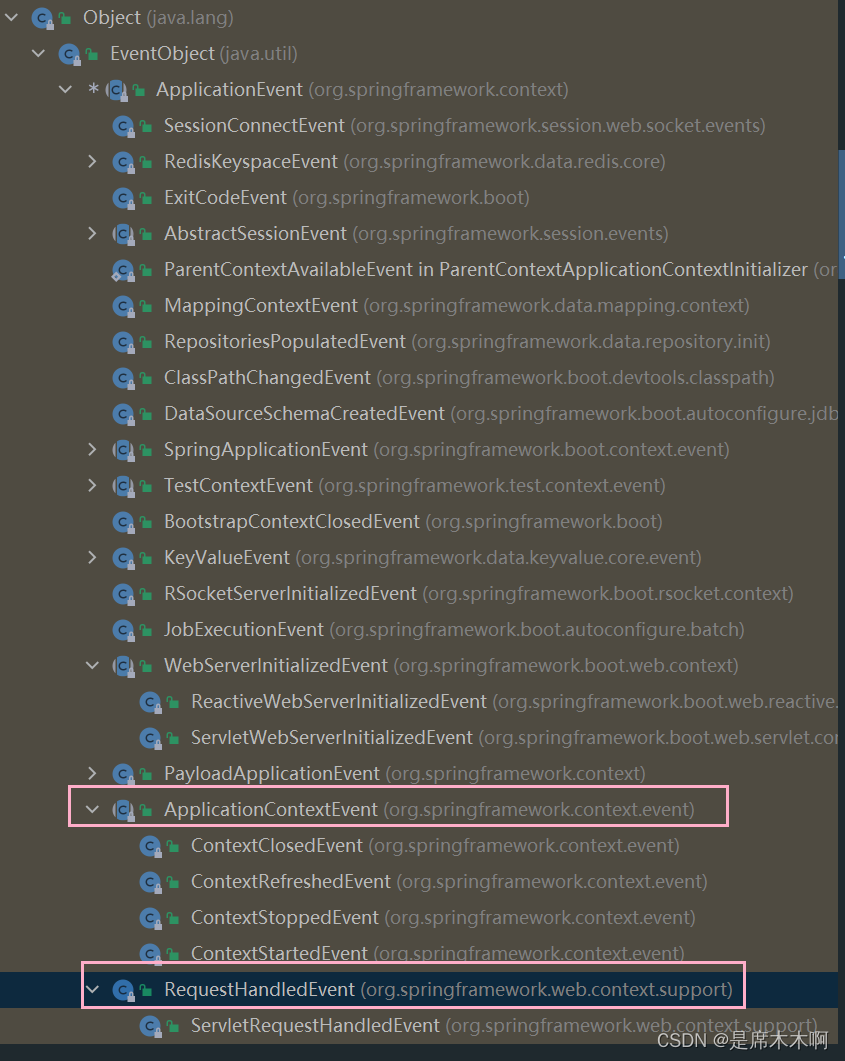
SpringBoot框架提供了ApplicationEvent抽象类,继承了java.util.EventObject,作用就是被其它具体的应用事件所继承,换言之,它并不能用于表示具体的事件对象。
ApplicationEvent拥有许多子类,例如:用于监听SpringBoot应用上下文的ApplicationContextEvent、监听Web服务器初始化的WebServerInitializedEvent、用于监听Spring应用的SpringApplicationEvent。
ApplicationEvent抽象类源码如下:
package org.springframework.context;

import java.time.Clock;
import java.util.EventObject;

/**
 * Class to be extended by all application events. Abstract as it
 * doesn't make sense for generic events to be published directly.
 */
public abstract class ApplicationEvent extends EventObject {

	/** use serialVersionUID from Spring 1.2 for interoperability. */
	private static final long serialVersionUID = 7099057708183571937L;

	/** System time when the event happened. */
	private final long timestamp;


	/**
	 * Create a new {@code ApplicationEvent} with its {@link #getTimestamp() timestamp}
	 * set to {@link System#currentTimeMillis()}.
	 * @param source the object on which the event initially occurred or with
	 * which the event is associated (never {@code null})
	 * @see #ApplicationEvent(Object, Clock)
	 */
	public ApplicationEvent(Object source) {
		super(source);
		this.timestamp = System.currentTimeMillis();
	}

	/**
	 * Create a new {@code ApplicationEvent} with its {@link #getTimestamp() timestamp}
	 * set to the value returned by {@link Clock#millis()} in the provided {@link Clock}.
	 * <p>This constructor is typically used in testing scenarios.
	 * @param source the object on which the event initially occurred or with
	 * which the event is associated (never {@code null})
	 * @param clock a clock which will provide the timestamp
	 * @since 5.3.8
	 * @see #ApplicationEvent(Object)
	 */
	public ApplicationEvent(Object source, Clock clock) {
		super(source);
		this.timestamp = clock.millis();
	}


	/**
	 * Return the time in milliseconds when the event occurred.
	 * @see #ApplicationEvent(Object)
	 * @see #ApplicationEvent(Object, Clock)
	 */
	public final long getTimestamp() {
		return this.timestamp;
	}

}
ApplicationListener|事件监听器
SpringBoot框架提供了ApplicationListener函数式接口,用于被具体的事件监听器实现。它也提供了很多子类/子接口,
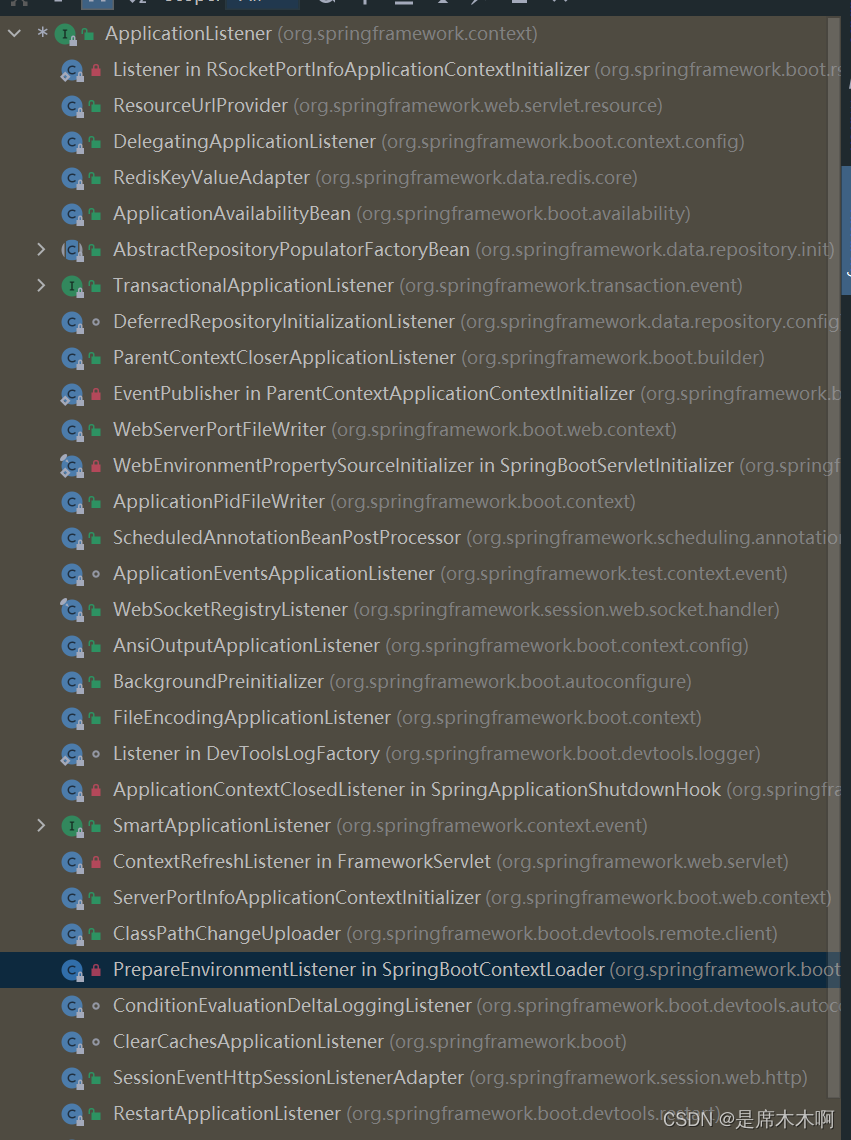
ApplicationListener函数式接口源码,
package org.springframework.context;

import java.util.EventListener;
import java.util.function.Consumer;

/**
 * Interface to be implemented by application event listeners.
 *
 * <p>Based on the standard {@code java.util.EventListener} interface
 * for the Observer design pattern.
 *
 * <p>As of Spring 3.0, an {@code ApplicationListener} can generically declare
 * the event type that it is interested in. When registered with a Spring
 * {@code ApplicationContext}, events will be filtered accordingly, with the
 * listener getting invoked for matching event objects only.

 */
@FunctionalInterface
public interface ApplicationListener<E extends ApplicationEvent> extends EventListener {

	/**
	 * Handle an application event.
	 * @param event the event to respond to
	 */
	void onApplicationEvent(E event);


	/**
	 * Create a new {@code ApplicationListener} for the given payload consumer.
	 * @param consumer the event payload consumer
	 * @param <T> the type of the event payload
	 * @return a corresponding {@code ApplicationListener} instance
	 * @since 5.3
	 * @see PayloadApplicationEvent
	 */
	static <T> ApplicationListener<PayloadApplicationEvent<T>> forPayload(Consumer<T> consumer) {
		return event -> consumer.accept(event.getPayload());
	}

}
监听SpringBoot应用内置的事件
接下来我们尝试自定义ApplicationListener实现子类,来监听SpringBoot应用启动过程中所触发的一些内置事件。
package com.example.demo.listener;
import lombok.extern.slf4j.Slf4j;
import org.springframework.context.ApplicationEvent;
import org.springframework.context.ApplicationListener;
import org.springframework.stereotype.Component;
import java.util.Date;
@Slf4j
@Component
public class CustomApplicationListener implements ApplicationListener<ApplicationEvent> {
@Override
public void onApplicationEvent(ApplicationEvent event) {
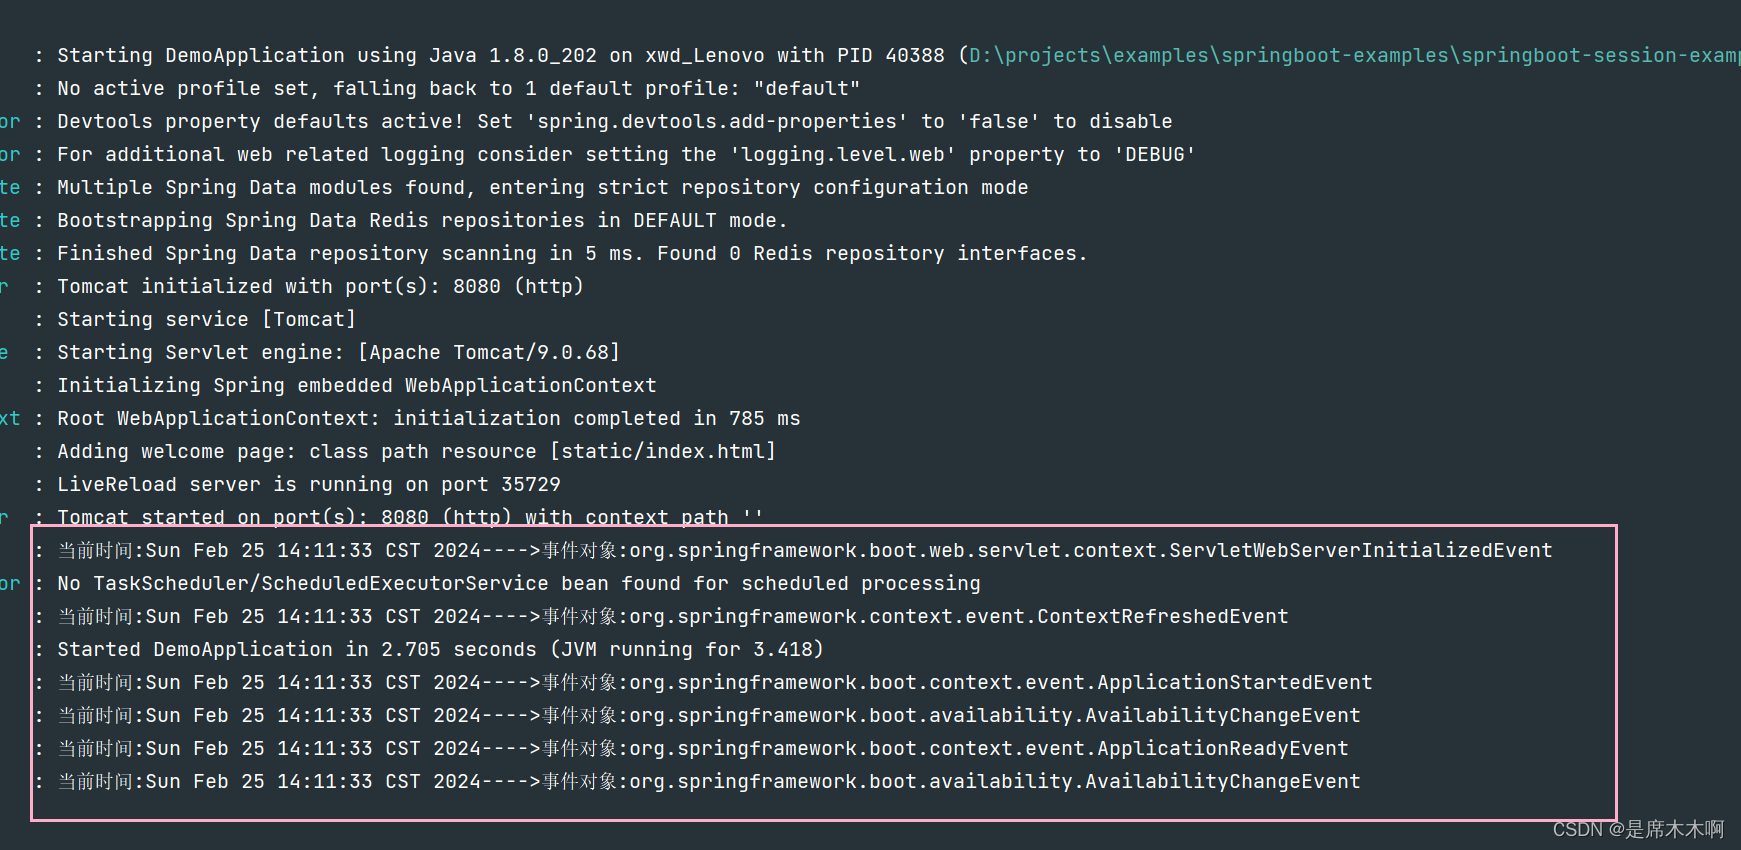
log.info("当前时间:{}---->事件对象:{}",
new Date(event.getTimestamp()),
event.getClass().getName());
}
}
启动日志信息如下,
@EventListener注解
@EventListener注解相当于是ApplicationListener实现子类的替代品,可以用于监听指定的事件。被该注解修饰的方法,将在内部由EventListenerMethodProcessor类进行处理。

该注解可用于监听的事件类型可以是一种,也可以是多种,相应的,方法的参数个数也随之发生变化。
该注解也可以配合 @Async 和 @Order 来实现异步监听器、顺序监听器。
package com.example.demo.config;

import lombok.extern.slf4j.Slf4j;
import org.springframework.context.ApplicationEvent;
import org.springframework.context.annotation.Configuration;
import org.springframework.context.event.EventListener;

import java.util.Date;

/**
 * 定义配置类
 */
@Slf4j
@Configuration
public class CustomApplicationListenerConfig {

    //监听springboot应用启动时触发的事件
    @EventListener(value = ApplicationEvent.class)
    public void handler(ApplicationEvent event){
        log.info("当前时间:{}---->事件对象:{}",
                new Date(event.getTimestamp()),
                event.getClass().getName());
    }
}
Spring Session事件模型机制
事件对象|AbstractSessionEvent抽象类
我们回归主题,Spring Session内置了AbstractSessionEvent抽象类,该类继承了SpringBoot内置的ApplicationEvent,每当Session会话被更新时,都会被触发。
package org.springframework.session.events;

import org.springframework.context.ApplicationEvent;
import org.springframework.session.Session;
import org.springframework.session.SessionRepository;

/**
 * For {@link SessionRepository} implementations that support it, this event is fired when
 * a {@link Session} is updated.
 *
 * @author Rob Winch
 * @since 1.1
 */
@SuppressWarnings("serial")
public abstract class AbstractSessionEvent extends ApplicationEvent {

	private final String sessionId;

	private final Session session;

	AbstractSessionEvent(Object source, Session session) {
		super(source);
		this.session = session;
		this.sessionId = session.getId();
	}

	/**
	 * Gets the {@link Session} that was destroyed. For some {@link SessionRepository}
	 * implementations it may not be possible to get the original session in which case
	 * this may be null.
	 * @param <S> the type of Session
	 * @return the expired {@link Session} or null if the data store does not support
	 * obtaining it
	 */
	@SuppressWarnings("unchecked")
	public <S extends Session> S getSession() {
		return (S) this.session;
	}

	public String getSessionId() {
		return this.sessionId;
	}

}
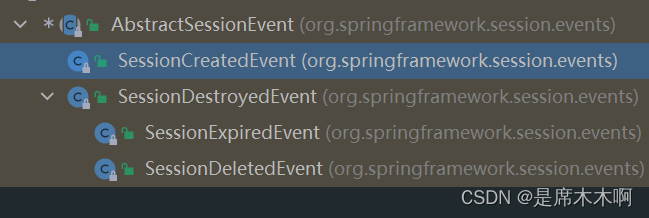
而AbstractSessionEvent抽象类也拥有如下几个子类,主要用于:
①SessionCreatedEvent:Session会话创建
②SessionDestroyedEvent:Session会话销毁,分为两种情况:Session会话过期和Session会话断开/删除,分别对应SessionExpiredEvent和SessionDeletedEvent两个类。
事件监听器
至于如何建听呢?那就换汤不换药了,直接使用@EventListener即可。
Session事件监听
折腾了以上这么多内容,言归正传,以下为监听Spring Session会话事件的示例代码,
package com.example.demo.config;

import lombok.extern.slf4j.Slf4j;
import org.springframework.context.annotation.Configuration;
import org.springframework.context.event.EventListener;
import org.springframework.session.events.SessionCreatedEvent;
import org.springframework.session.events.SessionDeletedEvent;
import org.springframework.session.events.SessionDestroyedEvent;
import org.springframework.session.events.SessionExpiredEvent;


@Slf4j
@Configuration
public class SessionEventListener {

    @EventListener(value = SessionCreatedEvent.class)
    public void processSessionCreatedEvent(SessionCreatedEvent event) {
        // do the necessary work
        log.info("SessionCreatedEvent::{}",event.toString());
    }

    @EventListener(SessionDeletedEvent.class)
    public void processSessionDeletedEvent(SessionDeletedEvent event) {
        // do the necessary work
        log.info("SessionDeletedEvent::{}",event.toString());
    }

    @EventListener(SessionDestroyedEvent.class)
    public void processSessionDestroyedEvent(SessionDestroyedEvent event) {
        // do the necessary work
        log.info("SessionDestroyedEvent::{}",event.toString());
    }

    @EventListener(SessionExpiredEvent.class)
    public void processSessionExpiredEvent(SessionExpiredEvent event) {
        // do the necessary work
        log.info("SessionExpiredEvent::{}",event.toString());
    }
}
验证Session事件监听
以下新建两个接口,分别用于触发Session会话创建和Session会话注销/删除事件。
- /app/addUser?id=1:创建Session会话
- /app/delUser?id=1:删除Session会话
示例代码如下,
package com.example.demo.web;

import com.example.demo.model.entity.SysUser;
import lombok.RequiredArgsConstructor;
import lombok.extern.slf4j.Slf4j;
import org.apache.catalina.SessionIdGenerator;
import org.springframework.beans.factory.annotation.Autowired;
import org.springframework.session.SessionRepository;
import org.springframework.session.data.redis.RedisIndexedSessionRepository;
import org.springframework.web.bind.annotation.GetMapping;
import org.springframework.web.bind.annotation.RequestMapping;
import org.springframework.web.bind.annotation.RequestParam;
import org.springframework.web.bind.annotation.RestController;

import javax.servlet.http.HttpSession;
import java.util.Map;

@Slf4j
@RestController
@RequestMapping(value = "/app")
@RequiredArgsConstructor
public class AppController {

    private final RedisIndexedSessionRepository redisIndexedSessionRepository;

    //接收一个id,创建user并返回
    @GetMapping("/addUser")
    public SysUser addUser(HttpSession session,
                           @RequestParam(value = "id")Integer id){
        SysUser user = new SysUser(id, "张三", 18);
        //设置user信息到session中
        session.setAttribute(String.valueOf(id),user);
        log.info("create SysUser:{}",user);
//        SessionIdGenerator
        return user;
    }


    //接收一个id,删除Session中存储的user信息
    @GetMapping("/delUser")
    public SysUser delUser(HttpSession session,
                           @RequestParam(value = "id")Integer id){
        session.removeAttribute(String.valueOf(id));
        log.info("del SysUser:{}",id);
        //Returns a string containing the unique identifier assigned to this session.
        String sessionId = session.getId();
        //删除
        redisIndexedSessionRepository.deleteById(sessionId);
        return null;
    }


}
web服务打印日志信息如下,