免费代理池搭建
# 代理有免费和收费代理
# 代理有http代理和https代理
# 匿名度:
高匿:隐藏访问者ip
透明:服务端能拿到访问者ip
作为后端,如何拿到使用代理人的ip
请求头中:x-forword-for
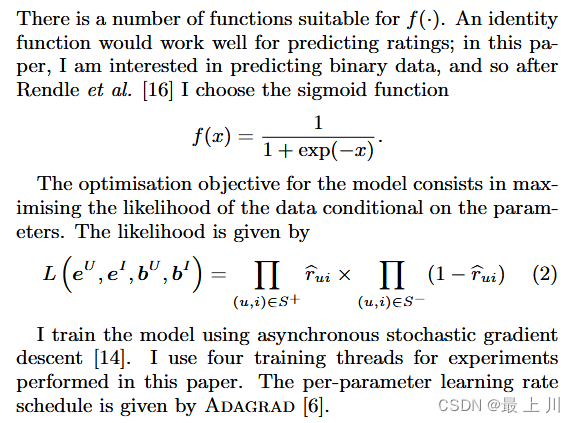
如一个 HTTP 请求到达服务器之前,经过了三个代理 Proxy1、Proxy2、Proxy3,IP 分别为 IP1、IP2、IP3,用户真实IP为IP0,那么按照XFF标准,服务端最终会收到以下信息:
X-Forwarded-For: IP0, IP1, IP2
如果拿IP3,remote-addr中
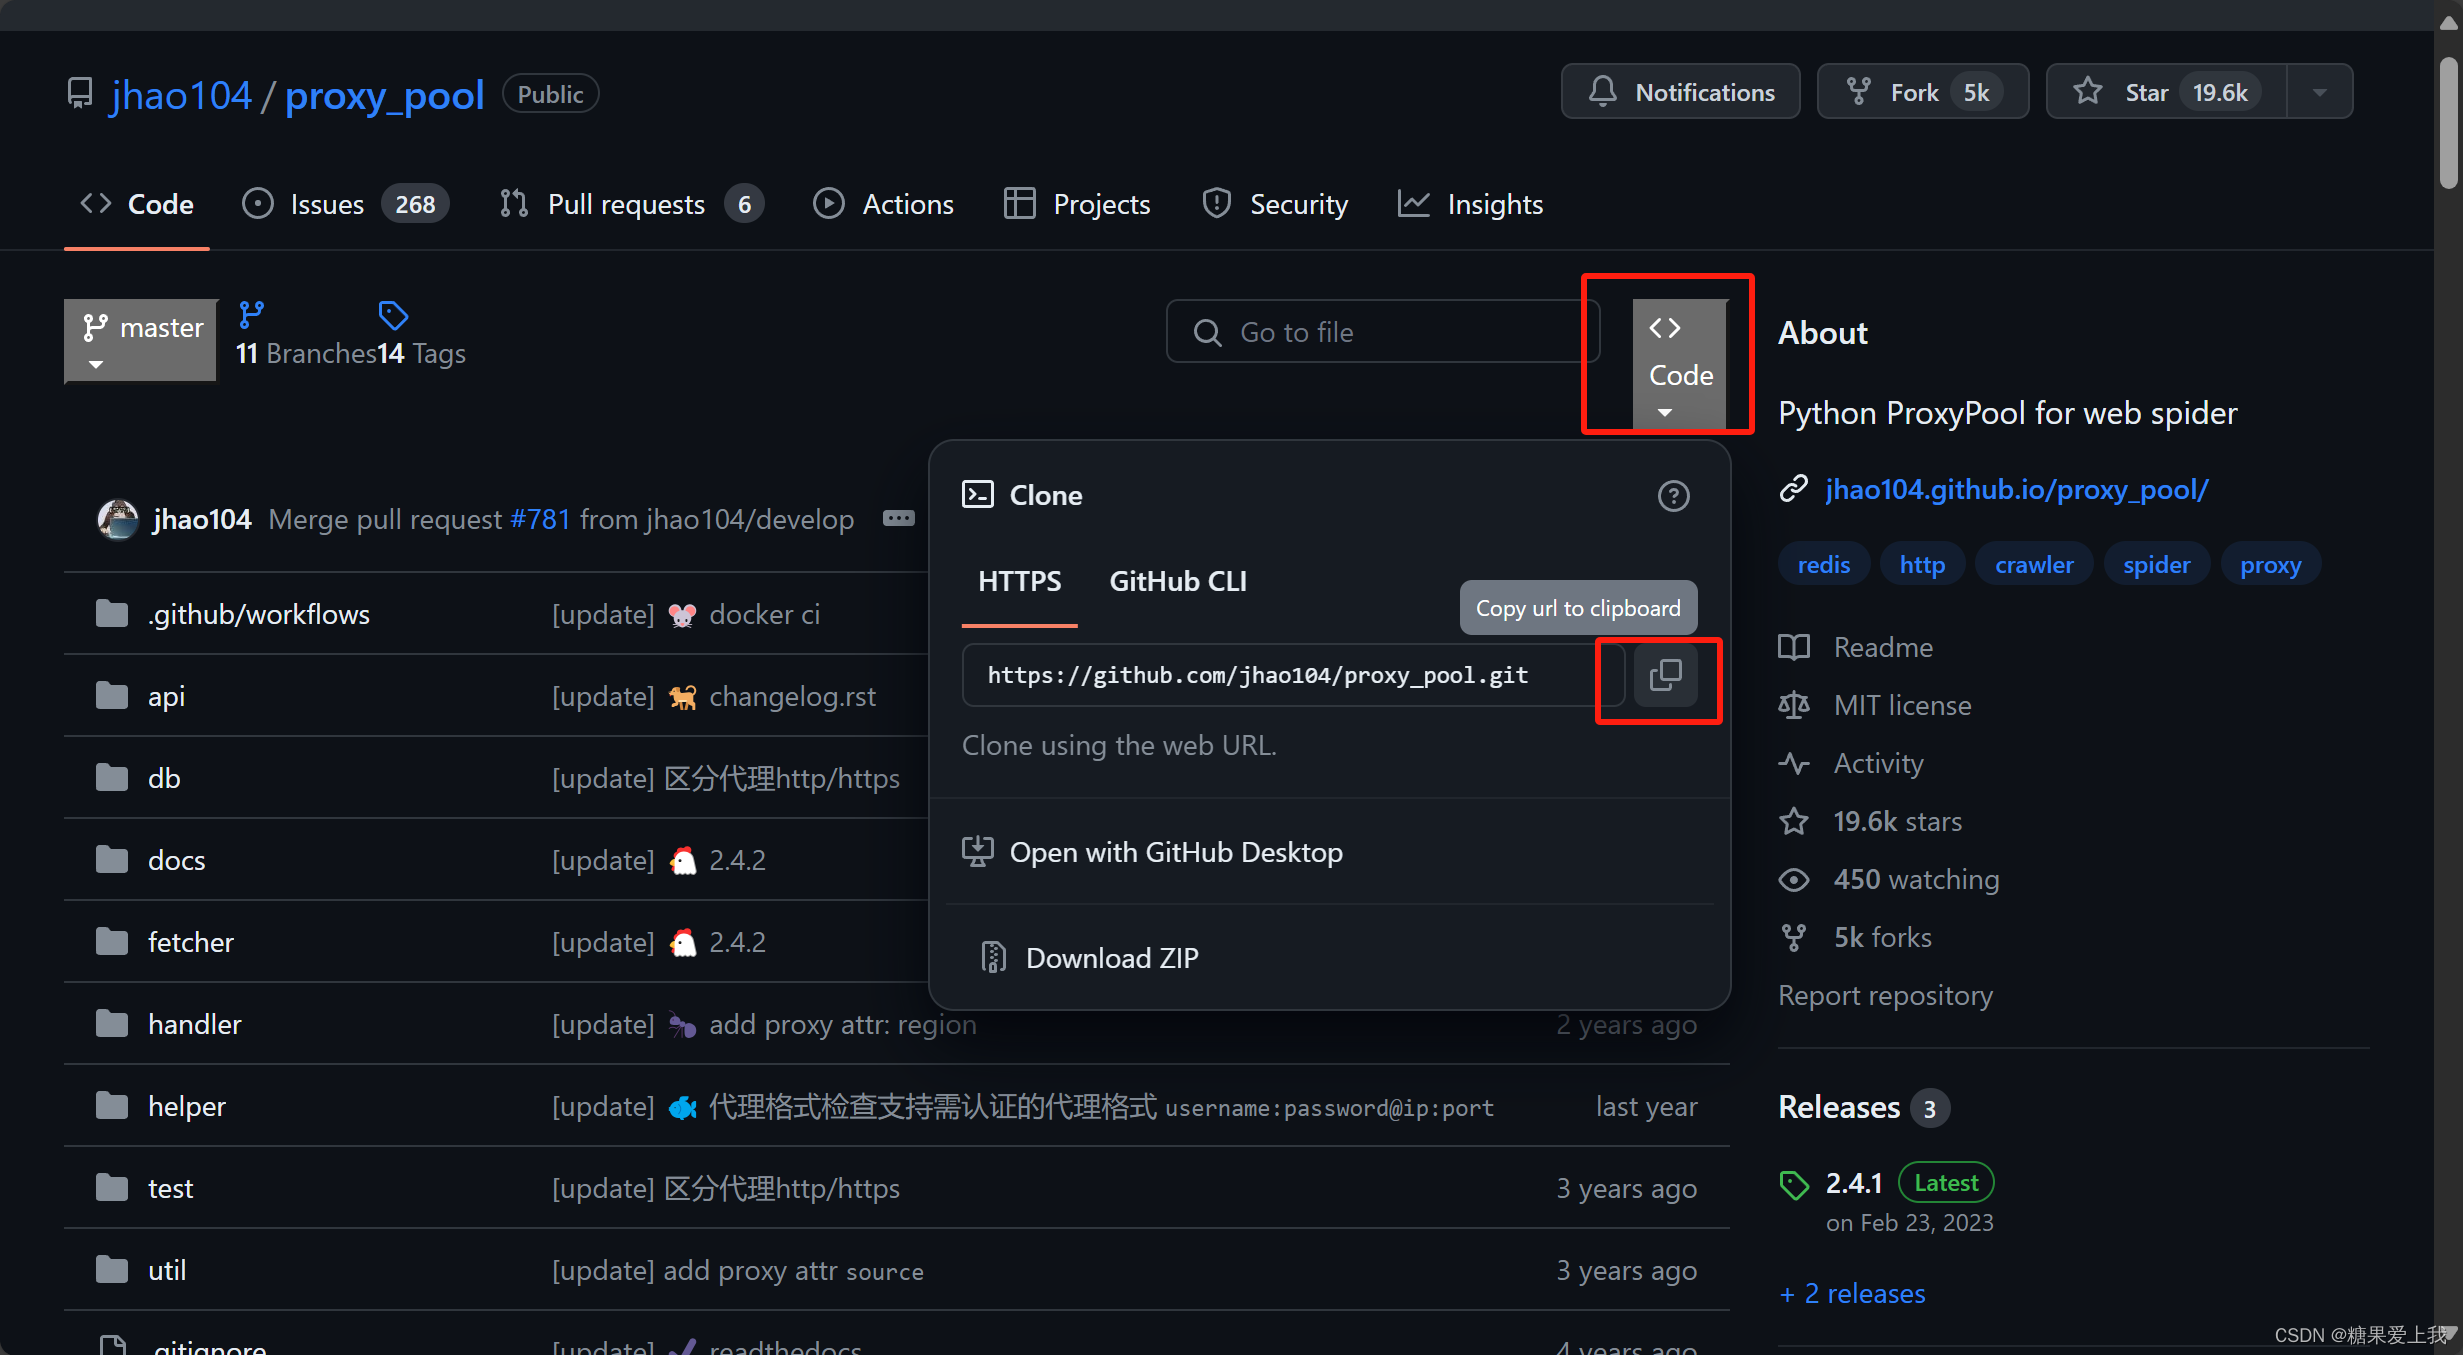
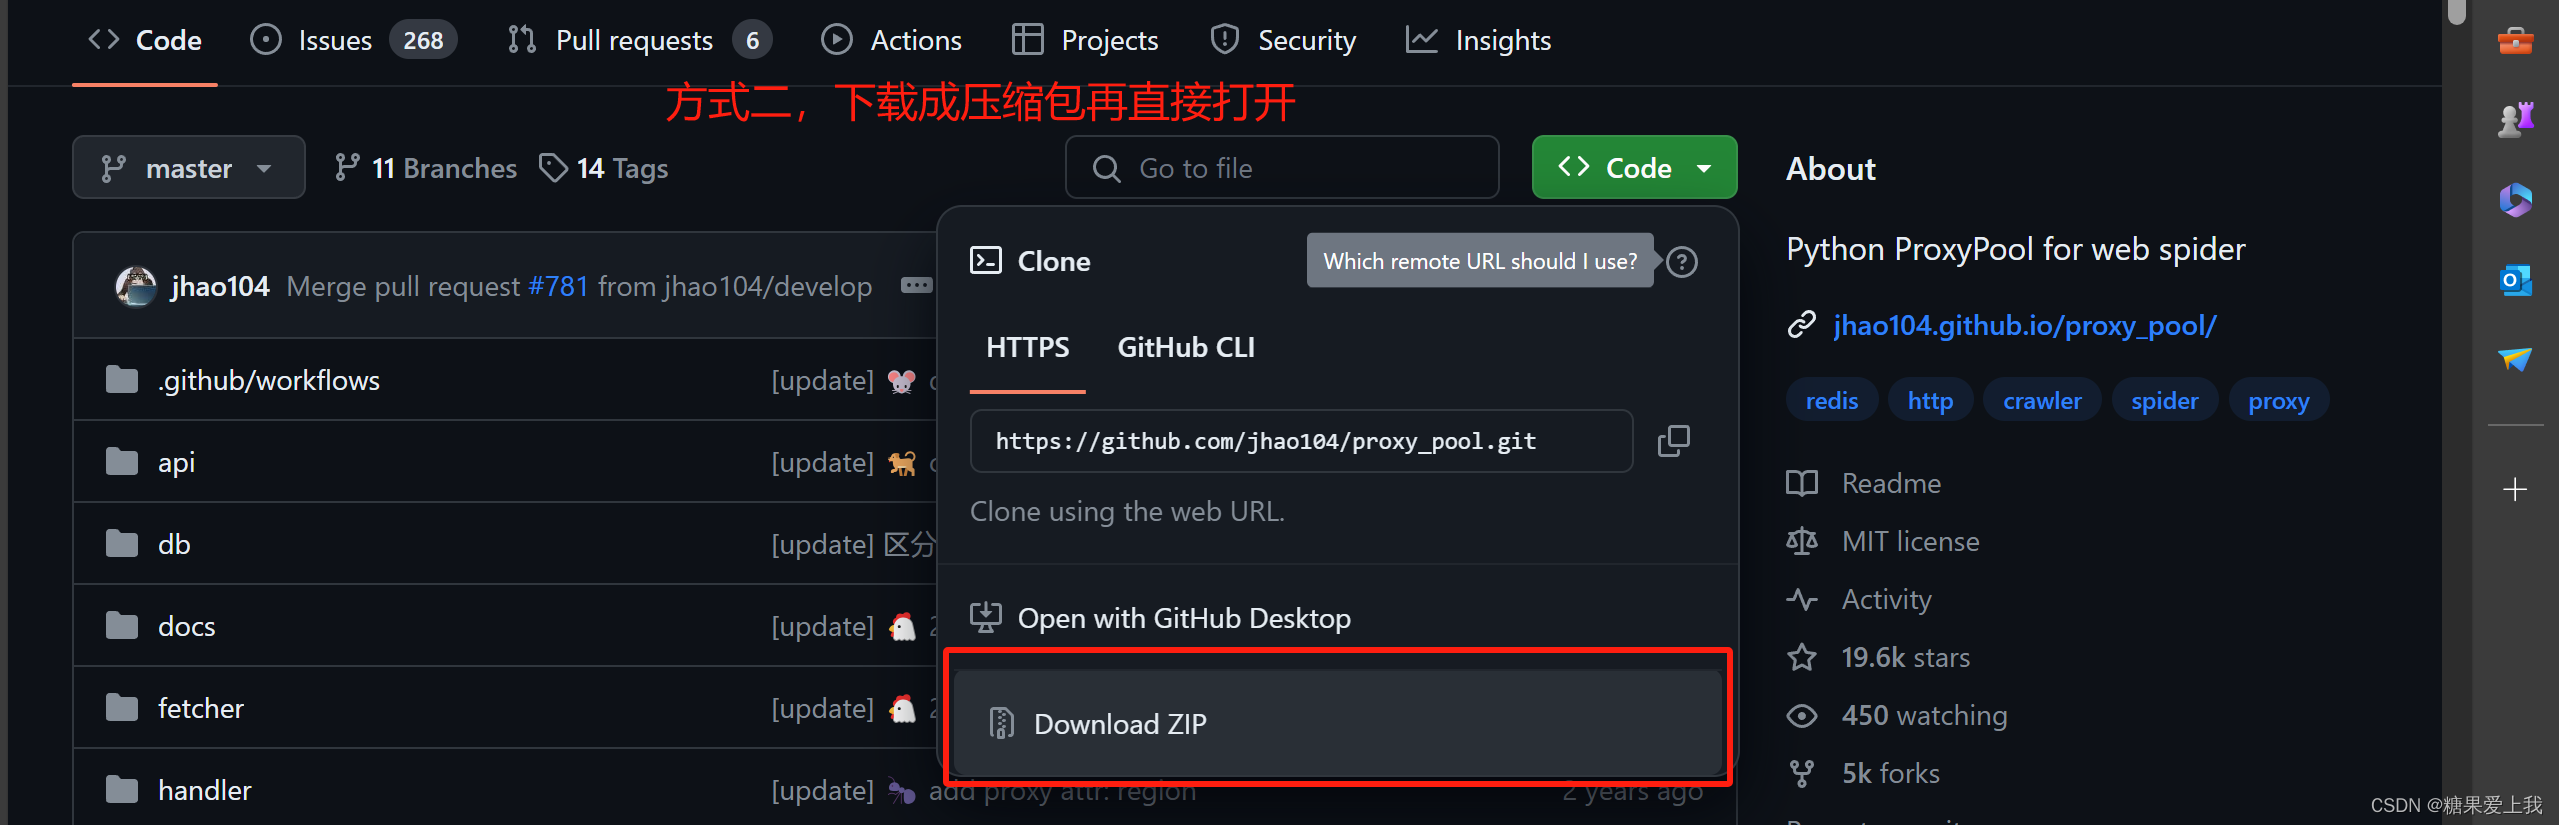
# 搭建免费代理池:https://github.com/jhao104/proxy_pool
使用python,爬取免费的代理,解析出ip和端口,地区,存到库中
使用flask,搭建了一个web服务,只要向 /get 发送一个请求,他就随机返回一个代理ip
# 步骤:
1、把项目下载下来
2、安装依赖,虚拟环境 pip install -r requirements.txt
3、修改配置文件
DB_CONN = 'redis://127.0.0.1:6379/2'
4、启动爬虫:python proxyPool.py schedule
5、启动web服务:python proxyPool.py server
6、以后访问:http://127.0.0.1:5010/get/ 可以拿到随机的免费ip
7、使用代码:
import requests

res = requests.get('http://192.168.1.51:5010/get/?type=https').json()
print(res['proxy'])

# 访问某个代理
res1=requests.get('https://www.baidu.com',proxies={'http':res['proxy']})
print(res1)
# 项目下载:


代理池使用
# 使用django写个项目,只要一访问,就返回访问者ip
# 编写步骤:
1、编写django项目,写一个视图函数:def index(request): ip=request.META.get('REMOTE_ADDR') return HttpResponse('您的ip 是:%s'%ip)2、配置路由:
from app01.views import index
urlpatterns = [
     path('', index),
]
3、删除settings.py 中的数据库配置
4、把代码上传到服务端,运行djagno项目
python3.8 manage.py runserver 0.0.0.0:80805、本地测试:
import requests
res=requests.get('http://127.0.0.1:5010/get/?type=http').json()
print(res['proxy'])
res1=requests.get('http://47.113.229.151:8080/',proxies={'http':res['proxy']})
print(res1.text)
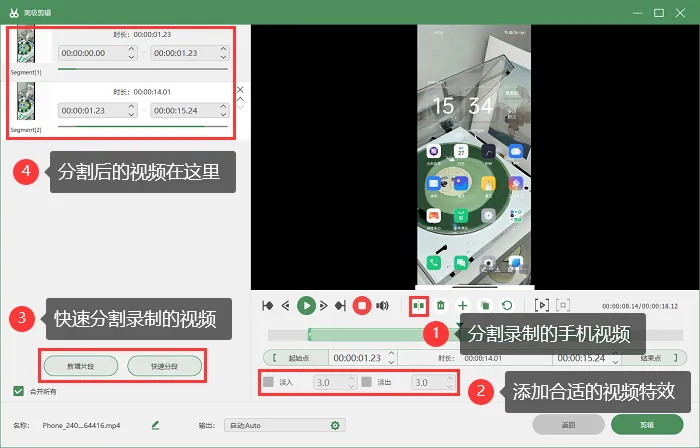
爬取某视频网站
注意:
1 发送ajax请求,获取真正视频地址
2 发送ajax请求时,必须携带referer
3 返回的视频地址,需要处理后才能播放import requests import re res = requests.get('https://www.pearvideo.com/category_loading.jsp?reqType=5&categoryId=1&start=0') # print(res.text) # 解析出所有视频地址---》re解析 video_list = re.findall('<a href="(.*?)" class="vervideo-lilink actplay">', res.text) for video in video_list: real_url = 'https://www.pearvideo.com/' + video video_id = video.split('_')[-1] # 必须携带referer,referer是视频详情地址 # contId 是视频id号 header={ 'Referer':real_url } res = requests.get('https://www.pearvideo.com/videoStatus.jsp?contId=%s&mrd=0.05520583472057039'%video_id,headers=header) real_mp4_url=res.json()['videoInfo']['videos']['srcUrl'] mp4 = real_mp4_url.replace(real_mp4_url.split('/')[-1].split('-')[0], 'cont-%s' % video_id) print('能播放的视频地址:',mp4) # 把视频下载到本地 res=requests.get(mp4) with open('./video/%s.mp4'%video_id,'wb') as f: for line in res.iter_content(): f.write(line)
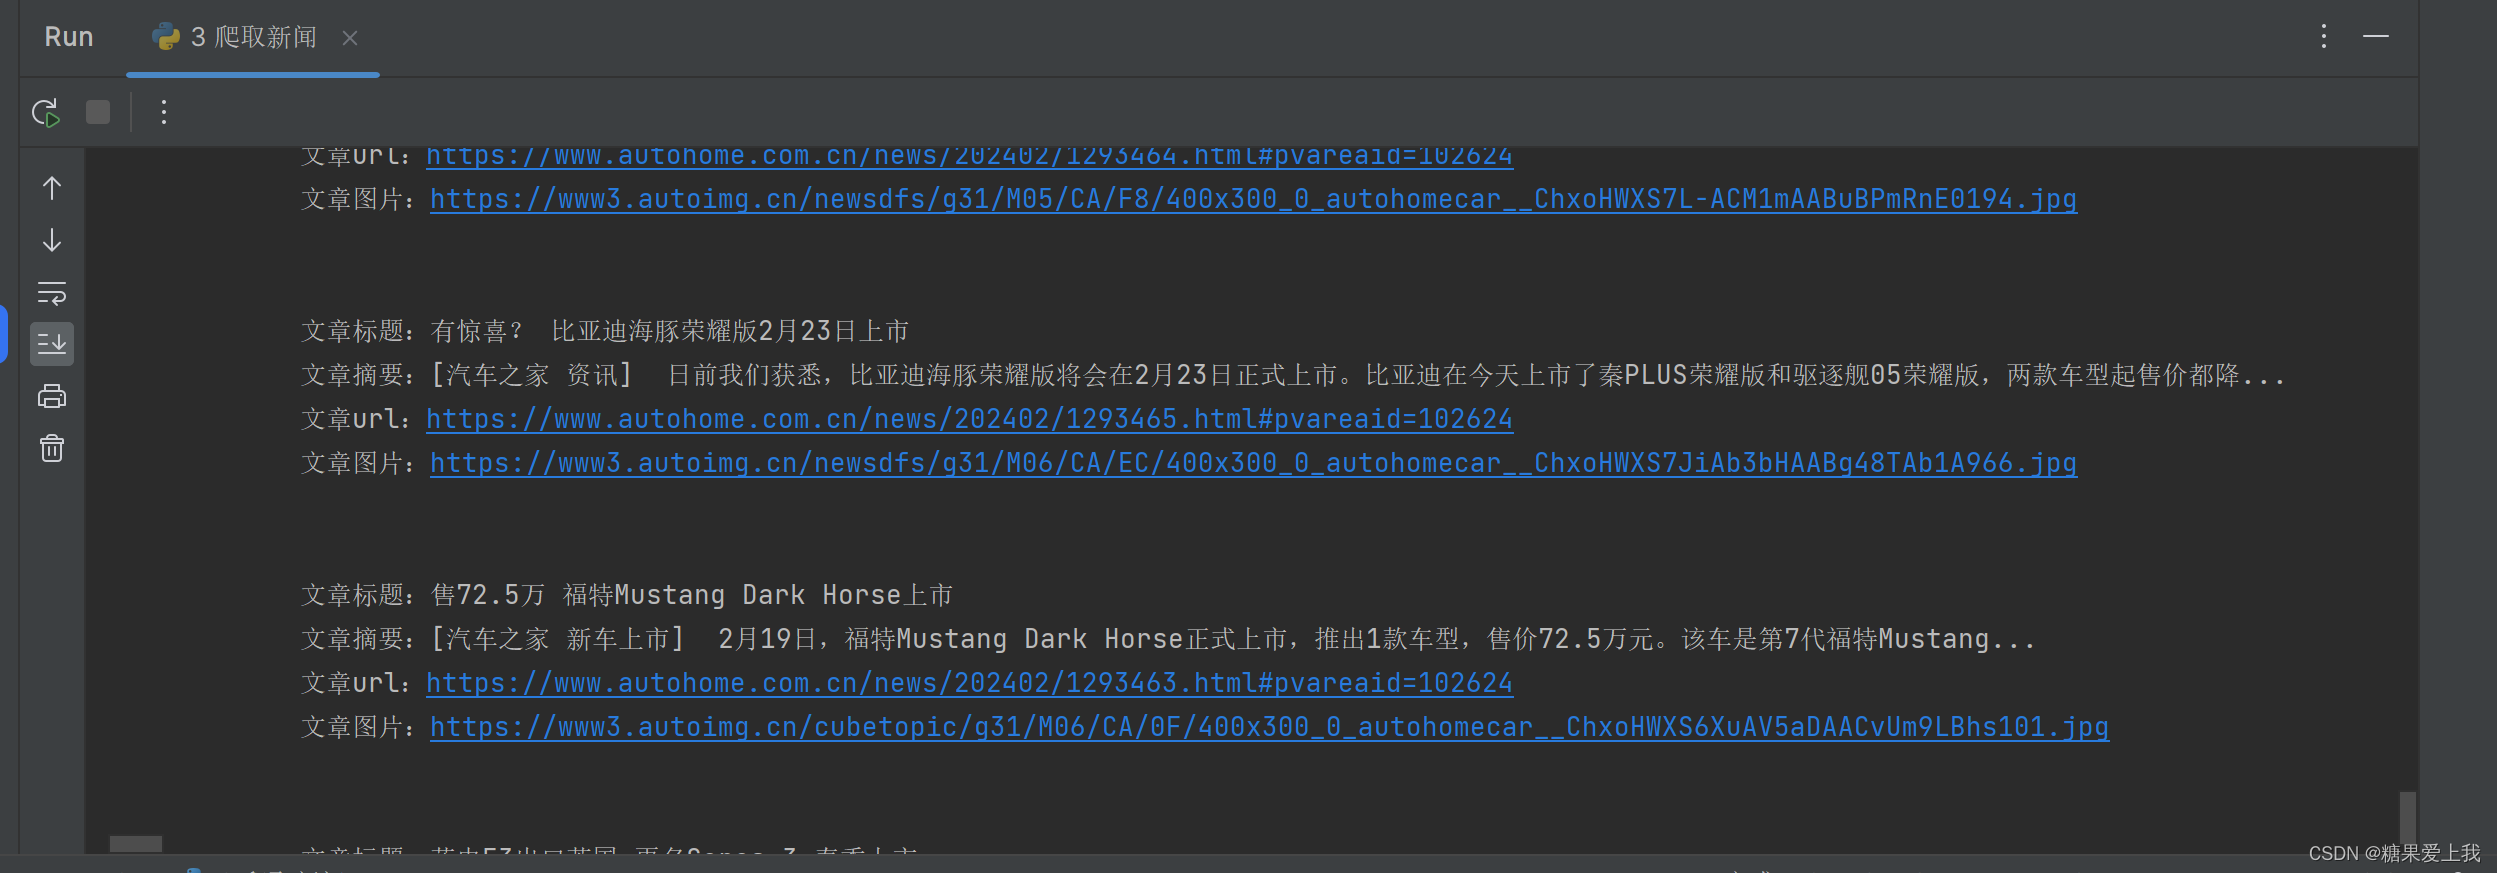
爬取新闻
# 解析库:汽车之家
# bs4 解析库 pip3 install beautifulsoup4lxml: pip3 install lxml
# 爬取所有数据:
import requests
from bs4 import BeautifulSoup

res = requests.get('https://www.autohome.com.cn/news/1/#liststart')
print(res.text)
# 取出文章详情:
import requests
from bs4 import BeautifulSoup

res = requests.get('https://www.autohome.com.cn/news/1/#liststart')
print(res.text)

soup = BeautifulSoup(res.text, 'html.parser')  # 解析库
ul_list = soup.find_all(name='ul', class_='article')  # 找到所有 类名是article 的ul标签
for ul in ul_list:  # 查找ul标签下的li标签
    li_list = ul.find_all(name='li')
    for li in li_list:
        h3 = li.find(name='h3')  # 查找li标签下的所有h3标题
        if h3:
            title = h3.text  # 拿出h3标签的文本内容
            content = li.find('p').text  # 拿出li标签下的第一个p标签的文本内容
            url = 'https:' + li.find(name='a').attrs['href']  # .attrs 拿到标签属性
            img = li.find('img')['src']  # 拿出img标签的属性src,可以直接取
            print('''
            文章标题:%s
            文章摘要:%s
            文章url:%s
            文章图片:%s
            ''' % (title, content, url, img))
bs4介绍和遍历文档树
# bs4的概念:是解析 xml/html 格式字符串的解析库
不但可以解析(爬虫),还可以修改# 解析库:
from bs4 import BeautifulSoup

html_doc = """
<html><head><title>The Dormouse's story</title></head>
<body>
<p class="title" id='id_xx' xx='zz'>lqz <b>The Dormouse's story <span>彭于晏</span></b>  xx</p>

<p class="story">Once upon a time there were three little sisters; and their names were
<a href="http://example.com/elsie" class="sister" id="link1">Elsie</a>
<a href="http://example.com/lacie" class="sister" id="link2">Lacie</a> and
<a href="http://example.com/tillie" class="sister" id="link3">Tillie</a>;
and they lived at the bottom of a well.</p>

<p class="story">...</p>
"""
# soup=BeautifulSoup(html_doc,'html.parser')
soup = BeautifulSoup(html_doc, 'lxml')  # pip3 install lxml
1、文档容错能力:
res=soup.prettify()
print(res)2、遍历文档树: 文档树:html开头 ------html结尾,中间包含了很多标签
print(soup.html.head.title)3、通过 . 找到p标签 只能找到最先找到的第一个
print(soup.html.body.p)
print(soup.p)4、获取标签的名称
p = soup.html.body.p
print(p.name)5、获取标签的属性
p = soup.html.body.p
print(p.attrs.get('class')) # class 特殊,可能有多个,所以放在列表汇总
print(soup.a.attrs.get('href'))
print(soup.a['href'])6、获取标签的文本内容
标签对象.text            # 拿标签子子孙孙
标签对象.string         # 该标签有且只有自己有文本内容才能拿出来
标签对象.strings       # 拿子子孙孙,都放在生成器中
print(soup.html.body.p.b.text)
print(soup.html.body.p.text)
print(soup.html.body.p.string) # 不能有子 孙
print(soup.html.body.p.b.string) # 有且只有它自己

print(soup.html.body.p.strings) # generator 生成器---》把子子孙孙的文本内容都放在生成器中,跟text很像
print(list(soup.html.body.p.strings)) # generator 生成器---》把子子孙孙的文本内容都放在生成器中,跟text很像
7、嵌套选的:
soup.html.body# -----了解-----------:
# 子节点、子孙节点
print(soup.p.contents) # p下所有子节点,只拿直接子节点
print(soup.p.children) # 直接子节点 得到一个迭代器,包含p下所有子节点
for i,child in enumerate(soup.p.children):
    print(i,child)

print(soup.p.descendants) #获取子孙节点,p下所有的标签都会选择出来  generator
for i,child in enumerate(soup.p.descendants):
    print(i,child)

# 父节点、祖先节点
print(soup.a.parent) #获取a标签的父节点
print(list(soup.a.parents)) #找到a标签所有的祖先节点,父亲的父亲,父亲的父亲的父亲...

# 兄弟节点
print(soup.a.next_sibling) #下一个兄弟
print(soup.a.previous_sibling) #上一个兄弟

print(list(soup.a.next_siblings)) #下面的兄弟们=>生成器对象
print(soup.a.previous_siblings) #上面的兄弟们=>生成器对象
搜索文档树
# 解析库:
html_doc = """
<html><head><title>The Dormouse's story</title></head>
<body>
<p id="my_p" class="title"><b id="bbb" class="boldest">The Dormouse's story</b>
</p>

<p class="story">Once upon a time there were three little sisters; and their names were
<a href="http://example.com/elsie" class="sister" id="link1">Elsie</a>,
<a href="http://example.com/lacie" class="sister" id="link2">Lacie</a> and
<a href="http://example.com/tillie" class="sister" id="link3">Tillie</a>;
and they lived at the bottom of a well.</p>

<p class="story">...</p>
"""

from bs4 import BeautifulSoup

soup = BeautifulSoup(html_doc, 'lxml')
# 五种过滤器: 字符串、正则表达式、列表、True、方法
1、字符串(和):res=soup.find(id='my_p') res=soup.find(class_='boldest') res=soup.find(href='http://example.com/elsie') res=soup.find(name='a',href='http://example.com/elsie',id='link1',class_='sister') # 多个是and条件 # 可以写成 # res=soup.find(attrs={'href':'http://example.com/elsie','id':'link1','class':'sister'}) # print(res)2、正则表达式:
import re
res=soup.find_all(href=re.compile('^http'))
res=soup.find_all(name=re.compile('^b'))
res=soup.find_all(name=re.compile('^b'))
print(res)
3、列表(或):
res=soup.find_all(name=['body','b','a'])
res=soup.find_all(class_=['sister','boldest'])
print(res)
4、布尔:
res=soup.find_all(id=True)
res=soup.find_all(name='img',src=True)
print(res)
5、方法:
def has_class_but_no_id(tag):
    return tag.has_attr('class') and not tag.has_attr('id')
print(soup.find_all(has_class_but_no_id))
6、搜索文档树可以结合遍历文档树一起用
res=soup.html.body.find_all('p')
res=soup.find_all('p')
print(res)
7、find 和find_all的区别:find 就是find_all,只要第一个
8、recursive=True limit=1
res=soup.find_all(name='p',limit=2) # 限制条数
res=soup.html.body.find_all(name='p',recursive=False) # 是否递归查找
print(res)
css选择器
# 解析库:
html_doc = """
<html><head><title>The Dormouse's story</title></head>
<body>
<p id="my_p" class="title"><b id="bbb" class="boldest">The Dormouse's story</b>
</p>

<p class="story">Once upon a time there were three little sisters; and their names were
<a href="http://example.com/elsie" class="sister" id="link1">Elsie</a>,
<a href="http://example.com/lacie" class="sister" id="link2">Lacie</a> and
<a href="http://example.com/tillie" class="sister" id="link3">Tillie</a>;
and they lived at the bottom of a well.</p>

<p class="story">...</p>
"""

from bs4 import BeautifulSoup
soup = BeautifulSoup(html_doc, 'lxml')
# css 选择器:
'''
.类名
#id
body
body a
# 终极大招:css选择器,复制
'''
res=soup.select('a.sister') res=soup.select('p#my_p>b') res=soup.select('p#my_p b') print(res) import requests from bs4 import BeautifulSoup header={ 'User-Agent':'Mozilla/5.0 (Windows NT 10.0; Win64; x64) AppleWebKit/537.36 (KHTML, like Gecko) Chrome/121.0.0.0 Safari/537.36' } res=requests.get('https://www.zdaye.com/free/',headers=header) # print(res.text) soup=BeautifulSoup(res.text,'lxml') res=soup.select('#ipc > tbody > tr:nth-child(2) > td.mtd') print(res[0].text)


![【sgCreateTableData】自定义小工具:敏捷开发→自动化生成表格数据数组[基于el-table]](https://img-blog.csdnimg.cn/direct/6aba114194844c62b8bf03cba32ba571.gif)