一、TensorBoard可视化学习
1、TensorFlow有一个亮点就是,我们能看到自己写的程序的可视化效果,这个功能就是TensorBoard
2、TensorFlow可用于训练大规模深度神经网络所需的计算,使用该工具涉及的计算往往复杂而深奥。为了方便TensorFlow程序的理解、调试和优化,TensorFlow提供了TensorBoard可视化工具
二、实现程序可视化过程
1、数据序列化
TensorBoard通过读取TensorFlow的事件文件来运行,需要将数据生成一个序列化的summary protobuf对象
将图序列化到本地events文件,这将在指定目录中生成一个events文件,其名称格式如下:
events.out.tfevents.{timestamp}.{hostname}
2、将可视化的图写入事件文件中API
(1)1.x版本:
tf.summary.FileWriter(path, graph=)
说明:
path:路径
graph:指定的图
(2)2.x版本:
writer = tf.summary.create_file_writer(path)
说明:创建一个文件写入器writer
path:路径
tf.summary.graph(graph)
说明:写入图
3、启动TensorBoard
终端输入:
tensorboard --logdir="事件文件的地址"
在浏览器中打开TensorBoard的图页面http://127.0.0.1:6006,就会看到图了
4、修改代码
import os
os.environ['TF_CPP_MIN_LOG_LEVEL']='2'
import tensorflow as tf

def tensorflow_demo():
    """
    TensorFlow的基本结构
    """

    # TensorFlow实现加减法运算
    a_t = tf.constant(2)
    b_t = tf.constant(3)
    c_t = a_t + b_t
    print("TensorFlow加法运算结果:\n", c_t)
    print(c_t.numpy())

    # 2.0版本不需要开启会话,已经没有会话模块了

    return None

def graph_demo():
    """
    图的演示
    """
    # TensorFlow实现加减法运算
    a_t = tf.constant(2)
    b_t = tf.constant(3)
    c_t = a_t + b_t
    print("TensorFlow加法运算结果:\n", c_t)
    print(c_t.numpy())

    # 查看默认图
    # 方法1:调用方法
    default_g = tf.compat.v1.get_default_graph()
    print("default_g:\n", default_g)

    # 方法2:查看属性
    # print("a_t的图属性:\n", a_t.graph)
    # print("c_t的图属性:\n", c_t.graph)

    # 自定义图
    new_g = tf.Graph()
    # 在自己的图中定义数据和操作
    with new_g.as_default():
        a_new = tf.constant(20)
        b_new = tf.constant(30)
        c_new = a_new + b_new
        print("c_new:\n", c_new)
        print("a_new的图属性:\n", a_new.graph)
        print("b_new的图属性:\n", b_new.graph)

    # 开启new_g的会话
    with tf.compat.v1.Session(graph=new_g) as sess:
        c_new_value = sess.run(c_new)
        print("c_new_value:\n", c_new_value)
        print("我们自己创建的图为:\n", sess.graph)

    # 可视化自定义图
    # 1)创建一个文件写入器writer
    writer = tf.summary.create_file_writer("./tmp/summary")
    # 2)将图写入
    with writer.as_default():
        tf.summary.graph(new_g)

    return None

if __name__ == "__main__":
    # 代码1:TensorFlow的基本结构
    # tensorflow_demo()
    # 代码2:图的演示
    graph_demo()
运行之后生成:./tmp/summary/events.out.tfevents.1708140220.server001.26046.0.v2
5、运行tensorboard
tensorboard --bind_all --logdir="./tmp/summary"访问http://127.0.0.1:6006
6、图例说明
将“Auto-extract high-degree nodes”选项去除
图例就不是两个三角重叠在一起了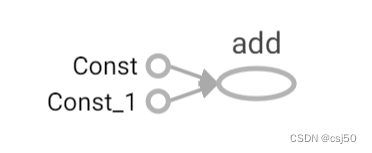
椭圆是OpNode,小圆是Constant,箭头是数据流动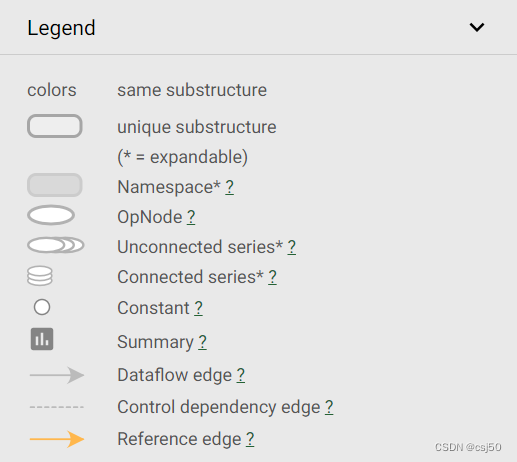
参考资料:
https://tensorflow.google.cn/versions/r2.6/api_docs/python/tf/summary/graph
