这是一个基于Tasmota的设备、用MQTT协议来通信控制的安卓应用程序。支持ON/OFF命令插座和基本的RGB LED控制。
源码点击此处
只需要关注SmartController-main\app\src的代码

项目解压之后如图
只需要关注“app”文件夹里的东西即可,“gradle”是配置文件,和Android studio的安装环境有关,后续打算出一个讲这部分的

只需要关注“src”文件夹里的东西即可,“build”是 Android 应用构建过程中生成的临时文件和输出,主要涉及编译过程中生成的中间文件以及用于加速编译的临时数据,不需要修改
手动更改这些文件可能会导致构建错误或不稳定的行为。通常,Android Studio和构建工具会负责处理这些生成的文件,你只需专注于修改 D:\AndroidCode\SmartController-main\app\src 目录下的源代码和资源文件,以及适当地修改 build.gradle 等配置文件。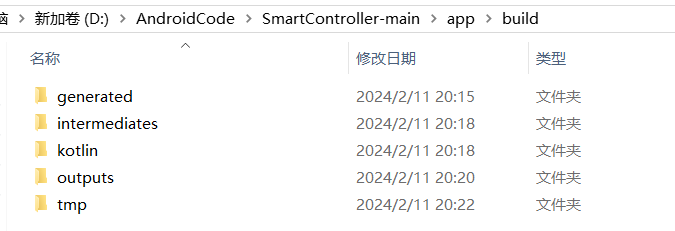
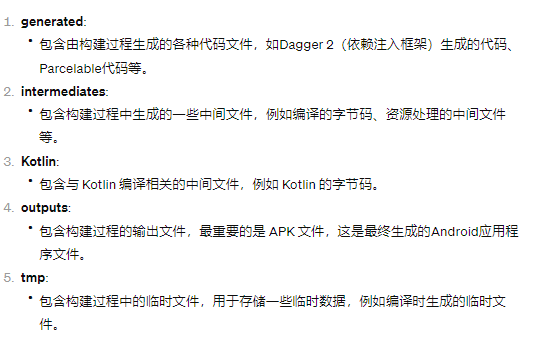
Android studio项目中看到的文件夹
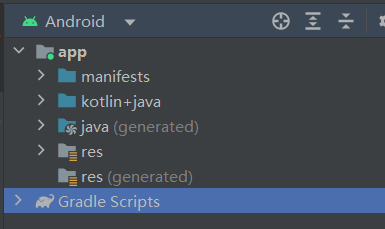
都来自于src文件,src 是 "source"(源代码)的缩写,用于存放应用程序的源代码
为什么在 Android Studio 中打开文件夹和实际文件系统中的文件夹看起来不一致:
1、过滤或忽略文件: Android Studio 可能会根据项目设置或 IDE 配置文件中的规则来过滤或忽略某些文件或文件类型,例如,临时文件、构建输出等。
2、链接文件或文件夹: 在文件系统中,可能存在符号链接或快捷方式指向其他文件或文件夹,而 Android Studio 可能会展示这些链接文件或文件夹的实际内容。
以下几个图示可以知道Android Studio里的项目的实际文件路径
AndroidManifest.xml

com.leondeklerk.smartcontroller

java代码+少数kotlin代码
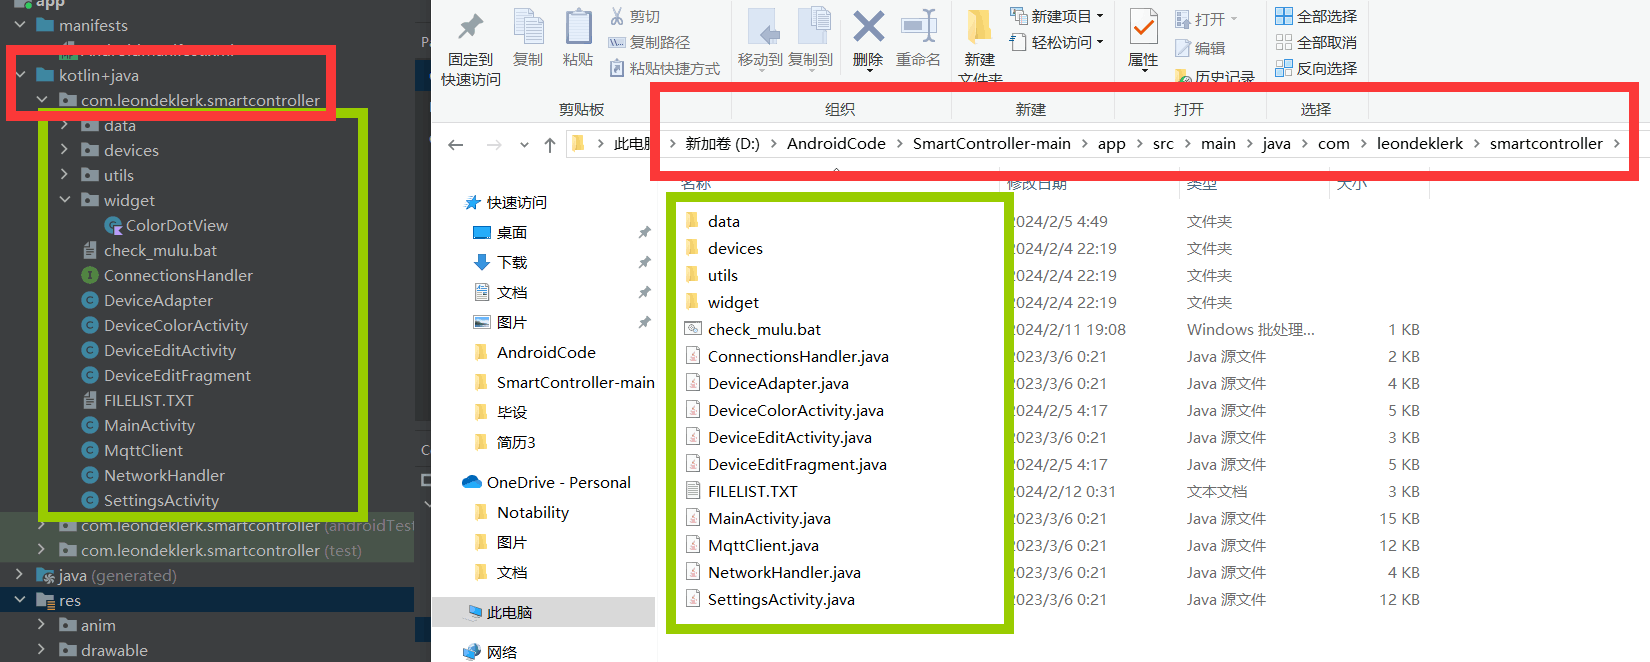
xml代码
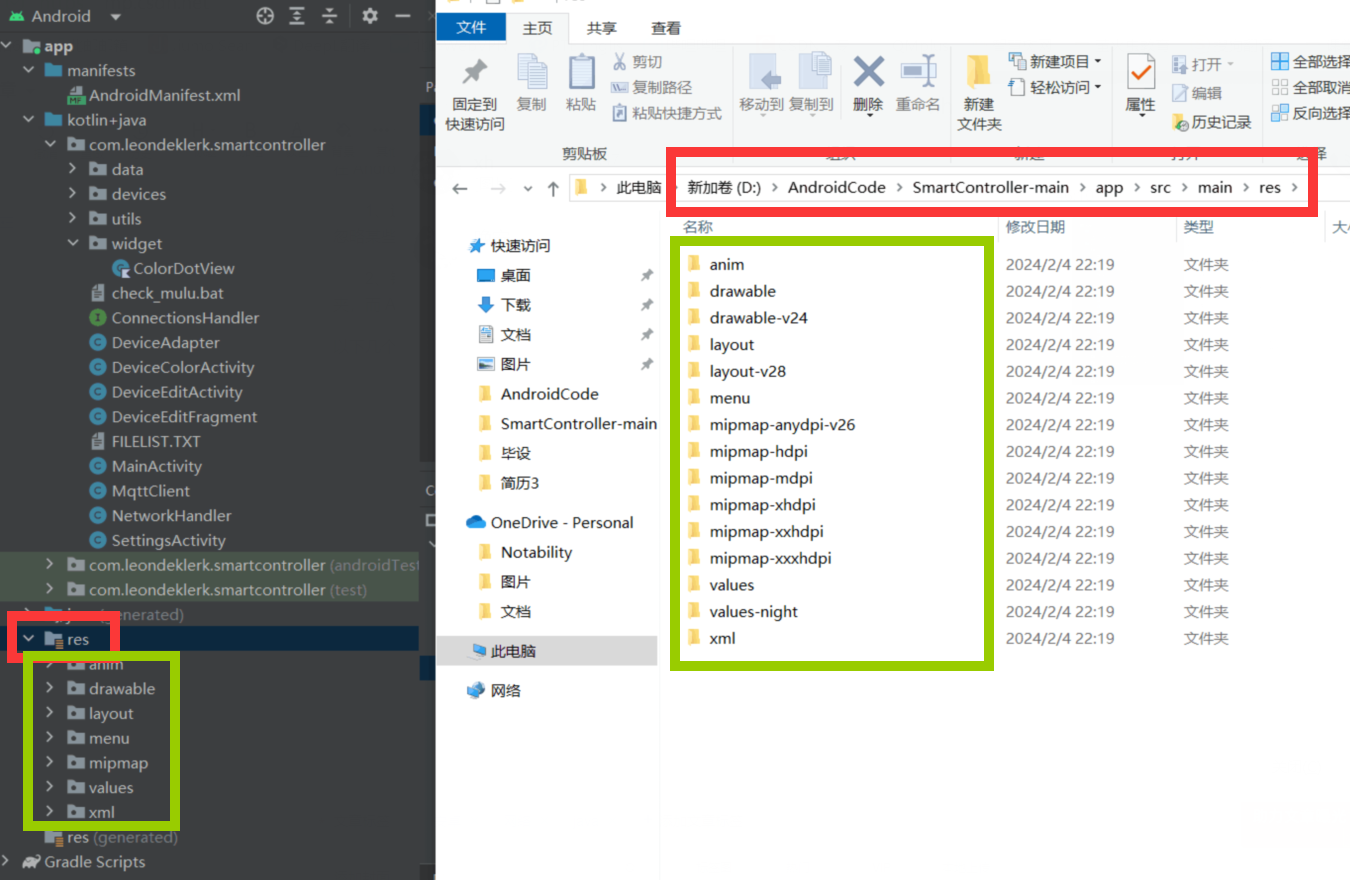
接下来就是针对上述4个模块的代码进行详细解释
AndroidManifest.xml

<?xml version="1.0" encoding="utf-8"?>
<!-- 定义 Android 清单文件 -->
<manifest xmlns:android="http://schemas.android.com/apk/res/android">

    <!-- 请求访问网络状态的权限 -->
    <uses-permission android:name="android.permission.ACCESS_NETWORK_STATE" />
    <!-- 请求访问互联网的权限 -->
    <uses-permission android:name="android.permission.INTERNET" />

    <!-- 定义应用程序的配置信息 -->
    <application
        android:allowBackup="true"
        android:icon="@mipmap/ic_launcher"
        android:label="@string/app_name"
        android:roundIcon="@mipmap/ic_launcher_round"
        android:supportsRtl="true"
        android:theme="@style/MyTheme.DayNight"
        android:usesCleartextTraffic="true">

        <!-- 定义设置界面的活动 -->
        <activity
            android:name=".SettingsActivity"
            android:label="@string/title_activity_settings" />

        <!-- 定义主界面的活动 -->
        <activity
            android:name=".MainActivity"
            android:exported="true">
            <intent-filter>
                <!-- 设置为主活动,应用启动时打开该活动 -->
                <action android:name="android.intent.action.MAIN" />
                <category android:name="android.intent.category.LAUNCHER" />
            </intent-filter>
        </activity>

        <!-- 定义设备编辑界面的活动 -->
        <activity
            android:name=".DeviceEditActivity"
            android:parentActivityName=".MainActivity"
            android:windowSoftInputMode="adjustPan" />

        <!-- 定义设备颜色选择界面的活动 -->
        <activity
            android:name=".DeviceColorActivity"
            android:parentActivityName=".MainActivity" />
    </application>
</manifest>
com.leondeklerk.smartcontroller
"com.leondeklerk.smartcontroller" 是一个应用程序的包名(Package Name),根据通常的Android应用命名规范。应用程序的包名是在开发应用时定义的唯一标识符,通常采用反转的域名形式(例如 com.example.myapp)。

其在实际文件夹中就是一个连续子文件夹

主要项目代码都在“main”里,另外两个只是双端简单的测试代码
“androidTest”是一个基本的Instrumented测试类,用于在Android设备上执行测试
/**
 * Instrumented test, which will execute on an Android device.
 * 仪器化测试,将在 Android 设备上执行。
 *
 * @see <a href="http://d.android.com/tools/testing">Testing documentation</a>
 * 参见测试文档链接
 */
@RunWith(AndroidJUnit4.class)
// 使用 AndroidJUnit4 运行器来执行测试
public class ExampleInstrumentedTest {

  @Test
  // 注解标识该方法是一个测试方法
  public void useAppContext() {
    // Context of the app under test.
    // 获取被测试应用的上下文对象
    Context appContext = InstrumentationRegistry.getInstrumentation().getTargetContext();

    // 断言被测试应用的包名是否符合预期值
    assertEquals("com.leondeklerk.smartcontroller", appContext.getPackageName());
  }
}
“test”是一个基本的JUnit Jupiter(JUnit 5)本地单元测试类,用于在开发机器(主机)上执行测试
/**
 * Example local unit test, which will execute on the development machine (host).
 * 示例本地单元测试,将在开发机器(主机)上执行。
 *
 * @see <a href="http://d.android.com/tools/testing">Testing documentation</a>
 * 参见测试文档链接
 */
public class ExampleUnitTest {

  @Test
  // 注解标识该方法是一个测试方法
  public void addition_isCorrect() {
    // 使用断言验证加法是否正确
    Assertions.assertEquals(4, 2 + 2);
  }
}
“main”里的java代码+少数kotlin代码

data 目录:
Command.java - 包含与设备通信的指令相关的类。
DeviceData.java - 包含设备数据的模型类。
Entry.java - 用于表示数据项的类。
devices 目录:
RGBLedController.java - 一个 RGB LED 控制器设备的实现类。
SmartDevice.java - 通用智能设备的实现类。
utils 目录:
DeviceStorageUtils.java - 包含用于设备数据存储的工具方法。
DiffUtilCallback.java - 是用于处理列表数据变更的回调类。
TextInputUtils.java - 包含处理文本输入的实用方法。
widget 目录:
ColorDotView.kt - 是一个用 Kotlin 编写的自定义颜色点视图,可能用于界面显示。(就这里用了kotlin)
其它:
ConnectionsHandler.java - 处理与设备的连接和通信的类。
DeviceAdapter.java - 设备列表的适配器类,用于在界面上显示设备列表。
DeviceColorActivity.java - 设备颜色控制的活动类。
DeviceEditActivity.java - 设备编辑界面的活动类。
DeviceEditFragment.java - 设备编辑界面的片段类。
MainActivity.java - 应用的主活动类。
MqttClient.java - MQTT(Message Queuing Telemetry Transport)客户端类,用于消息传递。
NetworkHandler.java - 处理网络连接的类。
SettingsActivity.java - 应用设置界面的活动类。
data 目录
Command.java
/**
 * A class that represents a new MQTT command. Contains a topic and message.
 * 表示一个新的MQTT命令的类。包含主题和消息。
 */
public class Command {
  private String topic;   // 存储消息将要发布的主题
  private String message; // 存储将要发布的消息内容
  /**
   * Class constructor.
   * 类的构造方法。
   *
   * @param topic   the topic that the message will be published on.
   *                消息将要发布的主题。
   * @param message the message that will be published.
   *                将要发布的消息。
   */
  public Command(String topic, String message) {
    this.topic = topic;
    this.message = message;
  }

  // 获取消息将要发布的主题
  public String getTopic() {
    return topic;
  }

  // 设置消息将要发布的主题
  public void setTopic(String topic) {
    this.topic = topic;
  }

  // 获取将要发布的消息内容
  public String getMessage() {
    return message;
  }

  // 设置将要发布的消息内容
  public void setMessage(String message) {
    this.message = message;
  }
}
DeviceData.java
/**
 * 表示与设备相关的所有数据的类。每个设备包含一组数据,这些数据在所有SmartDevices之间共享。此类扩展了BaseObservable以适应与UI的数据绑定。
 */
public class DeviceData extends BaseObservable {

  private final int id;        // 设备的唯一标识符
  private String name;         // 设备的名称
  private String status;       // 设备的状态
  private boolean enabled;     // 设备是否启用
  private final String type;   // 设备的类型
  private String topic;        // 设备将要监听的主题

  /**
   * Default constructor
   * 默认构造方法
   *
   * @param id     the id of this device
   *               此设备的唯一标识符
   * @param name   the name of the device
   *               设备的名称
   * @param status the status of the device
   *               设备的状态
   * @param enabled indicates if the device is enabled or not
   *                表示设备是否启用
   * @param type   the type of the device
   *               设备的类型
   * @param topic  the topic this device will listen to
   *               此设备将要监听的主题
   */
  public DeviceData(int id, String name, String status, boolean enabled, String type, String topic) {
    this.id = id;
    this.name = name;
    this.status = status;
    this.enabled = enabled;
    this.type = type;
    this.topic = topic;
  }

  @Override
  public boolean equals(Object o) {
    if (this == o) {
      return true;
    }
    if (o == null || getClass() != o.getClass()) {
      return false;
    }
    DeviceData that = (DeviceData) o;
    return id == that.id
            && enabled == that.enabled
            && Objects.equals(topic, that.topic)
            && Objects.equals(name, that.name)
            && Objects.equals(status, that.status);
  }

  public int getId() {
    return id;
  }

  public String getName() {
    return name;
  }

  /**
   * Set the name of the device
   * 设置设备的名称
   *
   * @param name the new name of the device
   *             设备的新名称
   * @return this
   */
  public DeviceData setName(String name) {
    this.name = name;
    notifyPropertyChanged(BR._all);
    return this;
  }

  public String getTopic() {
    return topic;
  }

  /**
   * Set the topic of this device.
   * 设置此设备的主题。
   *
   * @param topic the new topic.
   *              新的主题
   * @return this instance.
   */
  public DeviceData setTopic(String topic) {
    this.topic = topic;
    notifyPropertyChanged(BR._all);
    return this;
  }

  public String getStatus() {
    return status;
  }

  public void setStatus(String status) {
    this.status = status;
  }

  public boolean isEnabled() {
    return enabled;
  }

  public void setEnabled(boolean enabled) {
    this.enabled = enabled;
  }

  public String getType() {
    return type;
  }
}
Entry.java
/**
 * 表示设备存储数据结构中条目的类。包含一个 id 和设备的引用。id 表示设备在列表中的位置,而设备是实际存储的设备。
 */
public class Entry {
    private final int id;            // 设备在列表(例如MainActivity RecyclerView)中的位置
    private final SmartDevice device; // 实际存储的设备引用

    /**
     * Default constructor
     * 默认构造方法
     *
     * @param id     the id of the device in the list (MainActivity RecyclerView)
     *               设备在列表中(例如MainActivity RecyclerView)的位置
     * @param device the device itself.
     *               设备本身
     */
    public Entry(int id, SmartDevice device) {
        this.id = id;
        this.device = device;
    }

    // 获取设备在列表中的位置
    public int getId() {
        return id;
    }

    // 获取设备引用
    public SmartDevice getDevice() {
        return device;
    }
}
devices 目录
RGBLedController.java
// 表示这是一个LED控制器的SmartDevice的特定实例
public class RGBLedController extends SmartDevice {

  /**
   * 默认构造方法
   *
   * @param data the data that represents this device.
   *             表示此设备的数据。
   */
  public RGBLedController(DeviceData data) {
    super(data);
  }

  /**
   * 获取用于检查状态的命令。
   *
   * @return the color status Command
   */
  public Command getColor() {
    return new Command(super.getTopic("Color"), "?");
  }

  /**
   * 设置设备的颜色。
   *
   * @param red the value of red.
   *            红色通道的值。
   * @param green the value of green.
   *              绿色通道的值。
   * @param blue the value of blue.
   *             蓝色通道的值。
   * @return a new command that will be published on the MQTT client.
   *         将在MQTT客户端上发布的新命令。
   */
  @SuppressLint("DefaultLocale")
  public Command setColor(int red, int green, int blue) {
    return new Command(super.getTopic("Color2"), String.format("%d,%d,%d", red, green, blue));
  }
}
SmartDevice.java
/**
 * SmartDevice是所有支持的设备的基类。这包括封装基本数据,如id、名称、IP和可选凭证。该类还提供了一些基本命令,如检查电源状态、打开或关闭电源。其他设备可以从这个类扩展,以提供额外的功能,如LED的颜色控制。
 */
public class SmartDevice {

  private final DeviceData data; // 设备的基本数据

  /**
   * Default constructor to create a new SmartDevice, based on some given device data.
   * 根据给定的设备数据创建一个新的SmartDevice的默认构造方法。
   *
   * @param data the data for this device.
   *             此设备的数据。
   */
  public SmartDevice(DeviceData data) {
    this.data = data;
  }

  @Override
  public boolean equals(Object o) {
    if (this == o) {
      return true;
    }
    if (o == null || getClass() != o.getClass()) {
      return false;
    }
    return this.getData().equals(((SmartDevice) o).getData());
  }

  /**
   * 根据设备的数据和命令的类型获取要发布的主题。
   *
   * @param command the command that the device needs to execute.
   *                设备需要执行的命令。
   * @return the topic formatted with the device data topic.
   *         使用设备数据主题格式化的主题。
   */
  String getTopic(String command) {
    return "cmnd/" + data.getTopic() + "/" + command;
  }

  /**
   * 获取用于检查状态的命令。
   *
   * @return the power status Command
   */
  public Command getPowerStatus() {
    return new Command(getTopic("POWER"), "?");
  }

  /**
   * 获取打开或关闭电源的命令。
   *
   * @param on boolean indicating whether or not to turn the power the device on or off.
   *           布尔值,表示是否打开或关闭设备电源。
   * @return the command to turn the device on or off.
   *         打开或关闭设备的命令。
   */
  public Command setPower(boolean on) {
    return new Command(getTopic("POWER"), on ? "ON" : "OFF");
  }

  /**
   * 克隆一个设备并返回具有另一个内存地址的精确副本。
   *
   * @param other the device to clone.
   *              要克隆的设备。
   * @return a cloned instance of the other device.
   *         另一个设备的克隆实例。
   */
  public static SmartDevice clone(SmartDevice other) {
    DeviceData otherData = other.getData();
    return new SmartDevice(
            new DeviceData(
                    otherData.getId(),
                    otherData.getName(),
                    otherData.getStatus(),
                    otherData.isEnabled(),
                    otherData.getType(),
                    otherData.getTopic()));
  }

  public DeviceData getData() {
    return data;
  }
}
utils 目录
DeviceStorageUtils.java
// 一个用于处理在应用程序的SharedPreferences中存储和检索设备的类
public class DeviceStorageUtils {
  private SharedPreferences preferences; // SharedPreferences对象
  private Context context;               // 上下文对象

  /**
   * Basic constructor for the DeviceStorageUtils class.
   * DeviceStorageUtils类的基本构造方法。
   *
   * @param preferences the preferences to store and retrieve in/from.
   *                    用于存储和检索的SharedPreferences对象
   * @param context the context of the application.
   *                应用程序的上下文对象
   */
  public DeviceStorageUtils(SharedPreferences preferences, Context context) {
    this.preferences = preferences;
    this.context = context;
  }

  /**
   * 从SharedPreferences中的String使用GSON库检索所有SmartDevices的方法。
   *
   * @return a list of retrieved SmartDevices.
   *         检索到的SmartDevices列表。
   */
  public ArrayList<SmartDevice> getDevices() {
    String json = preferences.getString("deviceList", null);
    if (json != null) {
      Gson gson = new Gson();
      // Convert back to a Java Object
      Type type = new TypeToken<ArrayList<SmartDevice>>() {}.getType();
      return gson.fromJson(json, type);
    } else {
      return new ArrayList<>();
    }
  }

  /**
   * A method that converts a list of SmartDevices to a String and stores it in the
   * SharedPreferences specified by the class Object.
   * 将SmartDevices列表转换为String并将其存储在由类对象指定的SharedPreferences中的方法。
   *
   * @param devices the list of devices to store.
   *                要存储的设备列表。
   */
  public void storeDevices(ArrayList<SmartDevice> devices) {
    // Set the status to unknown (prevent the status from being stored)
    // 将状态设置为未知(防止状态被存储)
    for(SmartDevice device : devices) {
      device.getData().setStatus(context.getString(R.string.status_unknown));
    }

    Editor prefsEditor = preferences.edit();
    Gson gson = new Gson();
    // Convert the object to a String
    String json = gson.toJson(devices);
    // Store the string
    prefsEditor.putString("deviceList", json);
    prefsEditor.apply();
  }
}
DiffUtilCallback.java
/**
 * 一个处理两个ArrayList之间差异计算的类。用于更新RecyclerView及其相应的适配器。
 */
public class DiffUtilCallback extends Callback {

  private ArrayList<SmartDevice> oldList; // 旧列表
  private ArrayList<SmartDevice> newList; // 新列表

  /**
   * Default constructor, taking in the two lists that need to be compared.
   * 默认构造方法,接收需要进行比较的两个列表。
   *
   * @param oldList list one.
   *                列表一
   * @param newList list two.
   *                列表二
   */
  public DiffUtilCallback(ArrayList<SmartDevice> oldList, ArrayList<SmartDevice> newList) {
    this.oldList = oldList;
    this.newList = newList;
  }

  @Override
  public int getOldListSize() {
    return oldList.size();
  }

  @Override
  public int getNewListSize() {
    return newList.size();
  }

  @Override
  public boolean areItemsTheSame(int oldItemPosition, int newItemPosition) {
    return oldList.get(oldItemPosition).equals(newList.get(newItemPosition));
  }

  @Override
  public boolean areContentsTheSame(int oldItemPosition, int newItemPosition) {
    return oldList.get(oldItemPosition).getData().equals(newList.get(newItemPosition).getData());
  }
}
TextInputUtils.java
/**
 * 一组用于与TextInputLayouts交互的实用方法的集合。功能从设置监听器到检查错误和比较值等。
 */
public class TextInputUtils {
  public static final String DEV_TYPE_DEF = "DEFAULT_TYPE";
  public static final String DEV_TYPE_RGB = "RGB_CONTROLLER_TYPE";
  // An input type that is a field with a max length
  public static final String DEFAULT_TYPE = "DEFAULT_TYPE";

  /**
   * 检查布局列表中是否有任何错误,还检查是否为空的布局。
   *
   * @param layouts the ArrayList of TextInputLayouts to check.
   * @return true if there are errors, false if not.
   */
  public static boolean hasErrors(ArrayList<TextInputLayout> layouts) {
    // Check if one of the layouts is empty
    isEmpty(layouts);

    for (TextInputLayout layout : layouts) {
      if (layout.getError() != null) {
        // If a layout has an error, return true and request the focus on that one.
        layout.requestFocus();
        return true;
      }
    }
    return false;
  }

  /**
   * 检查TextInputLayouts的ArrayList是否有任何空字段。如果有一个字段为空,将设置正确的错误。
   *
   * @param layouts the list of layouts.
   */
  @SuppressWarnings("ConstantConditions")
  private static void isEmpty(ArrayList<TextInputLayout> layouts) {
    for (TextInputLayout layout : layouts) {
      // Get the text and resources from the layout
      String text = layout.getEditText().getText().toString();
      Resources resources = layout.getResources();
      if (TextUtils.isEmpty(text)) {
        // If empty, set an error
        layout.setError(resources.getString(R.string.error_input_required));
      }
    }
  }

  /**
   * 通过读取一个TextInputLayouts的ArrayList和一些附加信息,创建一个新的SmartDevice。基于这些值,将创建并返回一个新的SmartDevice。
   *
   * @param layouts the list of fields to read the data from.
   * @param nextId the id of this new device.
   * @return a new SmartDevice based on the read data.
   */
  @SuppressWarnings("ConstantConditions")
  public static SmartDevice readDevice(
      Context context, String type, ArrayList<TextInputLayout> layouts, int nextId) {
    ArrayList<String> inputs = new ArrayList<>();

    // Read each input and add it to the list of inputs
    for (TextInputLayout layout : layouts) {
      EditText editText = layout.getEditText();
      inputs.add(editText.getText().toString());
    }

    // Create a new device
    DeviceData data =
        new DeviceData(
            nextId,
            inputs.get(0),
            context.getString(R.string.status_unknown),
            false,
            type,
            inputs.get(1));

    // Return the type of device
    if (type.equals(DEV_TYPE_RGB)) {
      return new RGBLedController(data);
    }
    return new SmartDevice(data);
  }

  /**
   * 从TextInputLayout中检索字符串。
   *
   * @param layout the layout to retrieve the text from.
   * @return the input text.
   */
  @SuppressWarnings("ConstantConditions")
  public static String getText(TextInputLayout layout) {
    return layout.getEditText().getText().toString();
  }

  /**
   * 设置正确的过滤器和错误侦听器以处理用户输入中的错误。
   *
   * @param layout the layout to set the filter on.
   * @param type the type of input field, only option now is DEFAULT_TYPE.
   */
  @SuppressWarnings("ConstantConditions")
  public static void setListener(final TextInputLayout layout, String type) {
    if (DEFAULT_TYPE.equals(
        type)) { // The default type needs an error handler for surpassing the maximum length.
      layout
          .getEditText()
          .addTextChangedListener(
              new TextWatcher() {
                @Override
                public void beforeTextChanged(CharSequence s, int start, int count, int after) {}

                @Override
                public void onTextChanged(CharSequence s, int start, int before, int count) {}

                @Override
                public void afterTextChanged(Editable s) {
                  // If the length is too great, write an error
                  if (s.length() > layout.getCounterMaxLength()) {
                    Resources resources = layout.getResources();
                    layout.setError(resources.getString(R.string.error_input_length));
                  } else {
                    layout.setError(null);
                  }
                }
              });
    } else {
      Log.d("TextInputLayout type", type);
    }
  }
}
widget 目录
ColorDotView.kt
/*
 * 版权所有 2019 年 Android 开源项目
 *
 * 根据 Apache 许可证 2.0 版本(以下简称“许可证”)获得许可;
 * 您不得使用此文件,除非符合许可证的规定。
 * 您可以在以下网址获得许可证副本:
 *
 *     http://www.apache.org/licenses/LICENSE-2.0
 *
 * 除非适用法律要求或书面同意,否则按“原样”分发软件,
 * 无任何形式的明示或暗示的保证或条件。
 * 有关许可证下的特定语言,请参阅许可证。
 */

/**
 * 该项目代码简单绘制了带有描边的填充圆圈。
 */
class ColorDotView @JvmOverloads constructor(
  context: Context,
  attrs: AttributeSet? = null,
  defStyleAttr: Int = 0
) : View(context, attrs, defStyleAttr) {

  var fillColor: Int = Color.LTGRAY
    set(value) {
      paintFill.color = value
      field = value
      this.invalidate()
    }

  private val paintFill = Paint(Paint.ANTI_ALIAS_FLAG).apply {
    style = Paint.Style.FILL
    color = Color.RED
  }

  private var cx: Float = 0F
  private var cy: Float = 0F
  private var radius: Float = 0F

  init {
    // 从 XML 属性获取填充颜色
    val a = context.theme.obtainStyledAttributes(
      attrs,
      R.styleable.ColorDotView,
      defStyleAttr,
      0
    )
    fillColor = a.getColor(R.styleable.ColorDotView_colorFillColor, fillColor)
    a.recycle()
  }

  override fun onSizeChanged(w: Int, h: Int, oldw: Int, oldh: Int) {
    super.onSizeChanged(w, h, oldw, oldh)
    // 计算圆的位置和半径
    cx = w / 2F
    cy = h / 2F
    // 稍微减小我们圆的半径,以防止描边被裁剪。
    radius = (w / 2F) - 1F
  }

  override fun onDraw(canvas: Canvas) {
    // 在 Canvas 上绘制圆圈
    canvas.drawCircle(cx, cy, radius, paintFill)
  }
}
其它
ConnectionsHandler.java
//一个接口,用于处理所有需要得到适当处理的不同类型的连接。包含用于MQTT回调和NetworkHandler类的回调的方法。
public interface ConnectionsHandler {

  /**
   * 当"stat/+/RESULT"主题上的新MqttMessage到达时的回调。从这里开始,可以解析并相应地处理消息。
   *
   * @param topic 收到消息的主题。
   * @param message 收到的实际消息。
   */
  void onMqttMessage(String topic, MqttMessage message);

  void onMqttSubscribe();//当MqttClient成功订阅主题时的回调。用于通知活动客户端现在已完全设置并准备好。

  /**
   * 当客户端连接到服务器时使用的回调。尚未建立订阅。用于处理连接后需要设置的订阅和其他参数。
   * @param connected 指示客户端是否连接的标志。
   */
  void onMqttConnected(boolean connected);

  void onNetworkChange();//设备网络更改时的回调。用于在例如WiFi重新连接时适当处理状态更新。
}
DeviceAdapter.java
/**
 * 用于填充RecyclerView的SmartDevice实例的适配器,用于显示SmartDevice实例的卡片
 */
public class DeviceAdapter extends RecyclerView.Adapter<CardViewHolder> {

    private final ArrayList<SmartDevice> devices;
    private final Activity context;
    /**
     * RecyclerView中每个卡片的视图。
     */
    static class CardViewHolder extends RecyclerView.ViewHolder {

        ComponentCardsBinding binding;

        /**
         * 默认构造函数
         * @param binding 表示视图的绑定。
         */
        CardViewHolder(ComponentCardsBinding binding) {
            super(binding.getRoot());
            this.binding = binding;
        }

        /**
         * 将smartDevice绑定到布局。
         *
         * @param device 要绑定的设备。
         */
        public void bind(SmartDevice device) {
            binding.setDevice(device);
            binding.executePendingBindings();
        }
    }

    /**
     * 适配器的默认构造函数,接受上下文和设备列表。
     *
     * @param devices 用于创建此适配器的设备。
     * @param context 用于使用的应用程序上下文。
     */
    DeviceAdapter(ArrayList<SmartDevice> devices, Activity context) {
        this.devices = devices;
        this.context = context;
    }

    // 创建新视图(由布局管理器调用)
    @NotNull
    @Override
    public CardViewHolder onCreateViewHolder(ViewGroup parent, int viewType) {
        // 为此项创建一个新的MaterialCardView
        LayoutInflater inflater = LayoutInflater.from(parent.getContext());
        ComponentCardsBinding binding = ComponentCardsBinding.inflate(inflater, parent, false);
        return new CardViewHolder(binding);
    }

    // 替换视图的内容(由布局管理器调用)
    @Override
    public void onBindViewHolder(@NotNull CardViewHolder holder, final int pos) {
        final int position = holder.getAdapterPosition();
        final SmartDevice device = devices.get(position);
        holder.bind(device);
        ComponentCardsBinding binding = holder.binding;

        // 编辑Activity的按钮
        binding.deviceEdit.setOnClickListener(
                v -> {
                    Intent intent = new Intent(context, DeviceEditActivity.class);
                    intent.putExtra(DeviceEditActivity.EXTRA_SELECTED_DEV, position);
                    intent.putExtra(DeviceEditActivity.EXTRA_NUM_DEV, getItemCount());

                    context.startActivityForResult(intent, 0);
                });

        // 颜色Activity的按钮
        binding.deviceColor.setOnClickListener(
                v -> {
                    Intent intent = new Intent(context, DeviceColorActivity.class);
                    intent.putExtra(DeviceColorActivity.EXTRA_SELECTED_DEV, position);
                    context.startActivity(intent);
                });

        // 电源的开关
        binding.devicePower.setOnCheckedChangeListener(
                (buttonView, isChecked) -> {
                    // 检查是否由用户按下(而不是其他什么)
                    if (buttonView.isPressed()) {
                        MqttClient client = ((MainActivity) context).getMqttClient();
                        client.publish(device.setPower(isChecked));
                    }
                });
    }

    // 返回数据集的大小(由布局管理器调用)
    @Override
    public int getItemCount() {
        return devices.size();
    }
}
DeviceColorActivity.java
/**
 * 这个DeviceColorActivity用于处理显示和更新RGBLedController的颜色,它包括与MQTT客户端的交互和网络更改的响应。该活动使用相应的布局和UI元素来显示颜色信息,并在用户交互时执行相应的操作。
 */
public class DeviceColorActivity extends FragmentActivity
    implements View.OnClickListener, ConnectionsHandler {

  public static final String EXTRA_SELECTED_DEV = "com.leondeklerk.smartcontroller.SELECTED_DEV";
  private ActivityDeviceColorBinding binding;
  private RGBLedController device;
  private MqttClient client;

  @Override
  protected void onCreate(Bundle savedInstanceState) {
    super.onCreate(savedInstanceState);

    NetworkHandler handler = NetworkHandler.getHandler();
    handler.setCurrentHandler(this);

    binding = ActivityDeviceColorBinding.inflate(getLayoutInflater());
    View view = binding.getRoot();
    setContentView(view);

    binding.toolbar.setNavigationOnClickListener(
        new View.OnClickListener() {
          @Override
          public void onClick(View view) {
            onBackPressed();
          }
        });

    Intent intent = getIntent();
    int deviceNum = intent.getIntExtra(EXTRA_SELECTED_DEV, 0);

    // 设置MqttCient并注册正确的接收器。
    client = MqttClient.getInstance(getApplicationContext());
    client.registerHandler("DeviceColorActivity", this);
    client.setHandler("DeviceColorActivity");

    SharedPreferences preferences =
        this.getSharedPreferences(getString(R.string.dev_prefs), Context.MODE_PRIVATE);
    DeviceStorageUtils deviceStorageUtils = new DeviceStorageUtils(preferences, this);

    ArrayList<SmartDevice> devices = deviceStorageUtils.getDevices();
    device = new RGBLedController(devices.get(deviceNum).getData());

    client.publish(device.getColor());

    binding.colorInfo.setText(device.getData().getName());

    binding.colorCancel.setOnClickListener(this);
    binding.colorSet.setOnClickListener(this);
  }

  @Override
  public void onClick(View v) {
    int id = v.getId();
    if (id == R.id.color_cancel) {
      this.onBackPressed();
    } else if (id == R.id.color_set) {
      int red = (int) binding.sliderRed.getValue();
      int green = (int) binding.sliderGreen.getValue();
      int blue = (int) binding.sliderBlue.getValue();

      client.publish(device.setColor(red, green, blue));
    } else {
      Log.d("DeviceColorActivity@onClick", "Non-existent button clicked (color)");
    }

  }

  @Override
  protected void onDestroy() {
    super.onDestroy();
    client.setHandler("MainActivity");
  }

  @Override
  public void onMqttMessage(String topic, MqttMessage message) {
    parseResponse(message);
  }

  @Override
  public void onMqttSubscribe() {}

  @Override
  public void onMqttConnected(boolean connected) {}

  @Override
  public void onNetworkChange() {
    client = MqttClient.reconnect(this);
  }

  /**
   * 解析接收到的MQTT消息的响应并相应地更新布局。
   *
   * @param message 要解析的消息。
   */
  private void parseResponse(MqttMessage message) {
    String colorString = "";
    try {
      JSONObject obj = new JSONObject(message.toString());
      colorString = obj.getString("Color");
    } catch (JSONException e) {
      e.printStackTrace();
    }
    String[] colors = colorString.split(",");
    binding.sliderRed.setValue(Float.parseFloat(colors[0]));
    binding.sliderGreen.setValue(Float.parseFloat(colors[1]));
    binding.sliderBlue.setValue(Float.parseFloat(colors[2]));
  }
}
DeviceEditActivity.java
/** 这个DeviceEditActivity用于编辑设备数据,它包含一个ViewPager2,通过它可以左右滑动切换不同的DeviceEditFragment。DeviceEditFragmentAdapter是ViewPager2的适配器,负责管理所有的DeviceEditFragment。在onCreate方法中,根据传递的Intent设置ViewPager2和适配器,并指定当前显示的页面。 */
public class DeviceEditActivity extends FragmentActivity {

  public static final String EXTRA_SELECTED_DEV = "com.leondeklerk.smartcontroller.SELECTED_DEV";
  public static final String EXTRA_NUM_DEV = "com.leondeklerk.smartcontroller.NUM_DEV";
  private static int numOfDevices;
  static ActivityDeviceEditBinding binding;

  @Override
  protected void onCreate(Bundle savedInstanceState) {
    super.onCreate(savedInstanceState);

    binding = ActivityDeviceEditBinding.inflate(getLayoutInflater());
    View view = binding.getRoot();
    setContentView(view);

    binding.toolbar.setNavigationOnClickListener(
        new View.OnClickListener() {
          @Override
          public void onClick(View view) {
            onBackPressed();
          }
        });

    Intent intent = getIntent();
    numOfDevices = intent.getIntExtra(EXTRA_NUM_DEV, 0);

    ViewPager2 viewPager = binding.pager;
    FragmentStateAdapter pagerAdapter = new DeviceEditFragmentAdapter(this);

    viewPager.setAdapter(pagerAdapter);
    viewPager.setCurrentItem(intent.getIntExtra(EXTRA_SELECTED_DEV, 0));
  }

  /** 包含所有DeviceEditFragments的适配器。 */
  private static class DeviceEditFragmentAdapter extends FragmentStateAdapter {

    /**
     * 默认构造函数。
     *
     * @param fragmentActivity 与此片段相关的Activity。
     */
    DeviceEditFragmentAdapter(FragmentActivity fragmentActivity) {
      super(fragmentActivity);
    }

    @NotNull
    @Override
    public Fragment createFragment(int position) {
      Fragment fragment = new DeviceEditFragment();
      Bundle args = new Bundle();
      args.putInt(DeviceEditFragment.ARG_FRAG_NUM, position);
      fragment.setArguments(args);
      return fragment;
    }

    @Override
    public int getItemCount() {
      return numOfDevices;
    }
  }
}
DeviceEditFragment.java
/**
 * 代表设备编辑屏幕中的实际设备编辑界面的Fragment。包含设备的所有数据以及更改此数据的选项。
 */
public class DeviceEditFragment extends Fragment implements View.OnClickListener {

  static final String ARG_FRAG_NUM = "com.leondeklerk.smartcontroller.FRAG_NUM";
  private Activity context;
  private int devNum;
  private ArrayList<SmartDevice> devices;
  private DeviceStorageUtils deviceStorageUtils;
  private FragmentDeviceEditBinding binding;
  private SmartDevice device;
  private SmartDevice initial;
  private ArrayList<TextInputLayout> fragList;

  @Override
  public View onCreateView(
      @NotNull LayoutInflater inflater, ViewGroup container, Bundle savedInstanceState) {
    binding = FragmentDeviceEditBinding.inflate(inflater, container, false);
    context = getActivity();
    return binding.getRoot();
  }

  @Override
  public void onViewCreated(@NotNull View view, @Nullable Bundle savedInstanceState) {
    Bundle args = getArguments();
    if (args != null) {
      devNum = args.getInt(ARG_FRAG_NUM);
    } else {
      context.finish();
    }
    SharedPreferences preferences =
        context.getSharedPreferences(getString(R.string.dev_prefs), Context.MODE_PRIVATE);
    deviceStorageUtils = new DeviceStorageUtils(preferences, context);

    devices = deviceStorageUtils.getDevices();
    device = devices.get(devNum);

    // 设置对当前设备的引用
    initial = SmartDevice.clone(device);

    // 绑定数据类
    binding.setDevice(device);
    binding.executePendingBindings();

    // 设置按钮监听器
    binding.editDelete.setOnClickListener(this);
    binding.editUpdate.setOnClickListener(this);

    setUpUtilsFrag();
  }

  @Override
  public void onResume() {
    super.onResume();
    // 更改Activity的标题
    DeviceEditActivity.binding.toolbar.setTitle(device.getData().getName());
  }

  @Override
  public void onDestroyView() {
    super.onDestroyView();
    binding = null;
  }

  @SuppressLint("NonConstantResourceId")
  @Override
  public void onClick(View v) {
    int id = v.getId();
    if (id == R.id.edit_delete) {
      // 删除设备并存储
      devices.remove(devNum);
      deviceStorageUtils.storeDevices(devices);

      setResult(true);

      // 返回
      context.onBackPressed();
    } else if (id == R.id.edit_update) {
      if (!TextInputUtils.hasErrors(fragList)) {
        // 更新设备并返回
        updateDevice();
        context.onBackPressed();
      } else {
        setResult(false);
      }
    } else {
      Log.d("DeviceEditFragment@onClick", String.valueOf(id));
    }
  }

  /** 设置Fragment中的输入字段,添加它们的错误监听器。 */
  private void setUpUtilsFrag() {
    fragList = new ArrayList<>();

    // 将所有输入布局添加到列表中
    fragList.add(binding.editName);
    fragList.add(binding.editTopic);

    // 设置错误监听器
    TextInputUtils.setListener(binding.editName, TextInputUtils.DEFAULT_TYPE);
    TextInputUtils.setListener(binding.editTopic, TextInputUtils.DEFAULT_TYPE);
  }

  /**
   * 设置父Activity的结果Intent,将在MainActivity重新进入时进行检查。
   *
   * @param removed 如果设备已删除,则为true;否则为false
   */
  private void setResult(boolean removed) {
    // 创建一个新的Intent
    Intent resultIntent = new Intent();
    if (removed) {
      // 如果设备已删除,则标记此项
      resultIntent.putExtra(MainActivity.EXTRA_DEV_REMOVED, devNum);
    } else {
      if (!initial.equals(device)) {
        // 如果设备已编辑,则标记此项
        resultIntent.putExtra(MainActivity.EXTRA_DEV_CHANGED, devNum);
      }
    }
    context.setResult(Activity.RESULT_OK, resultIntent);
  }

  /** 更新并存储当前设备。 */
  private void updateDevice() {
    // 更新设备数据
    device
        .getData()
        .setName(TextInputUtils.getText(binding.editName))
        .setTopic(TextInputUtils.getText(binding.editTopic));
    setResult(false);

    // 存储新的设备数据
    deviceStorageUtils.storeDevices(devices);
  }
}
MainActivity.java
MqttClient.java
NetworkHandler.java
SettingsActivity.java
“main/res”里的xml代码

关于res:在 Android 开发中,res 文件夹是 "resources"(资源)的缩写,它是 Android 应用项目中存放各种资源文件的目录之一。这个目录主要包含了应用在运行时使用的非代码资源,例如图像、布局文件、字符串、颜色等。res 文件夹通常在应用的 app 模块下,是 Android 项目的标准结构之一。
anim: 包含动画资源文件,用于定义应用中的动画效果。
drawable: 存放应用图标、图片等可绘制资源。(就是一些矢量图)
layout: 包含应用中的布局文件,用于定义用户界面的结构和外观。
menu:在这个项目中定义应用右上角的弹出菜单。
mipmap: 存放应用图标的不同分辨率版本,用于适配不同屏幕密度的设备。
values: 包含了资源文件,如字符串、颜色、尺寸等,这些资源可以在应用的代码和布局文件中引用。
xml: 用于存放一些 XML 格式的资源文件,如菜单文件、布局文件引用等。(在这个项目中存放了用于配置MQTT的相关参数)
另外如果后续有需要的话还有raw,raw存放原始资源文件,例如音频或视频文件,这些文件在运行时不会被编译成资源 ID。


![第四节课[XTuner微调]作业](https://img-blog.csdnimg.cn/direct/9f02fba73f7e48898df1c735ada18360.png)

