一、效果&准备工作
1.效果
没啥好说的,低质量复刻SAM官网 https://segment-anything.com/
需要提一点:所有生成embedding和mask的操作都是python后端做的,计算mask不是onnxruntime-web实现的,前端只负责了把rle编码的mask解码后画到canvas上,会有几十毫秒的网络传输延迟。我不会react和typescript,官网F12里的源代码太难懂了,生成的svg总是与期望的不一样
主页
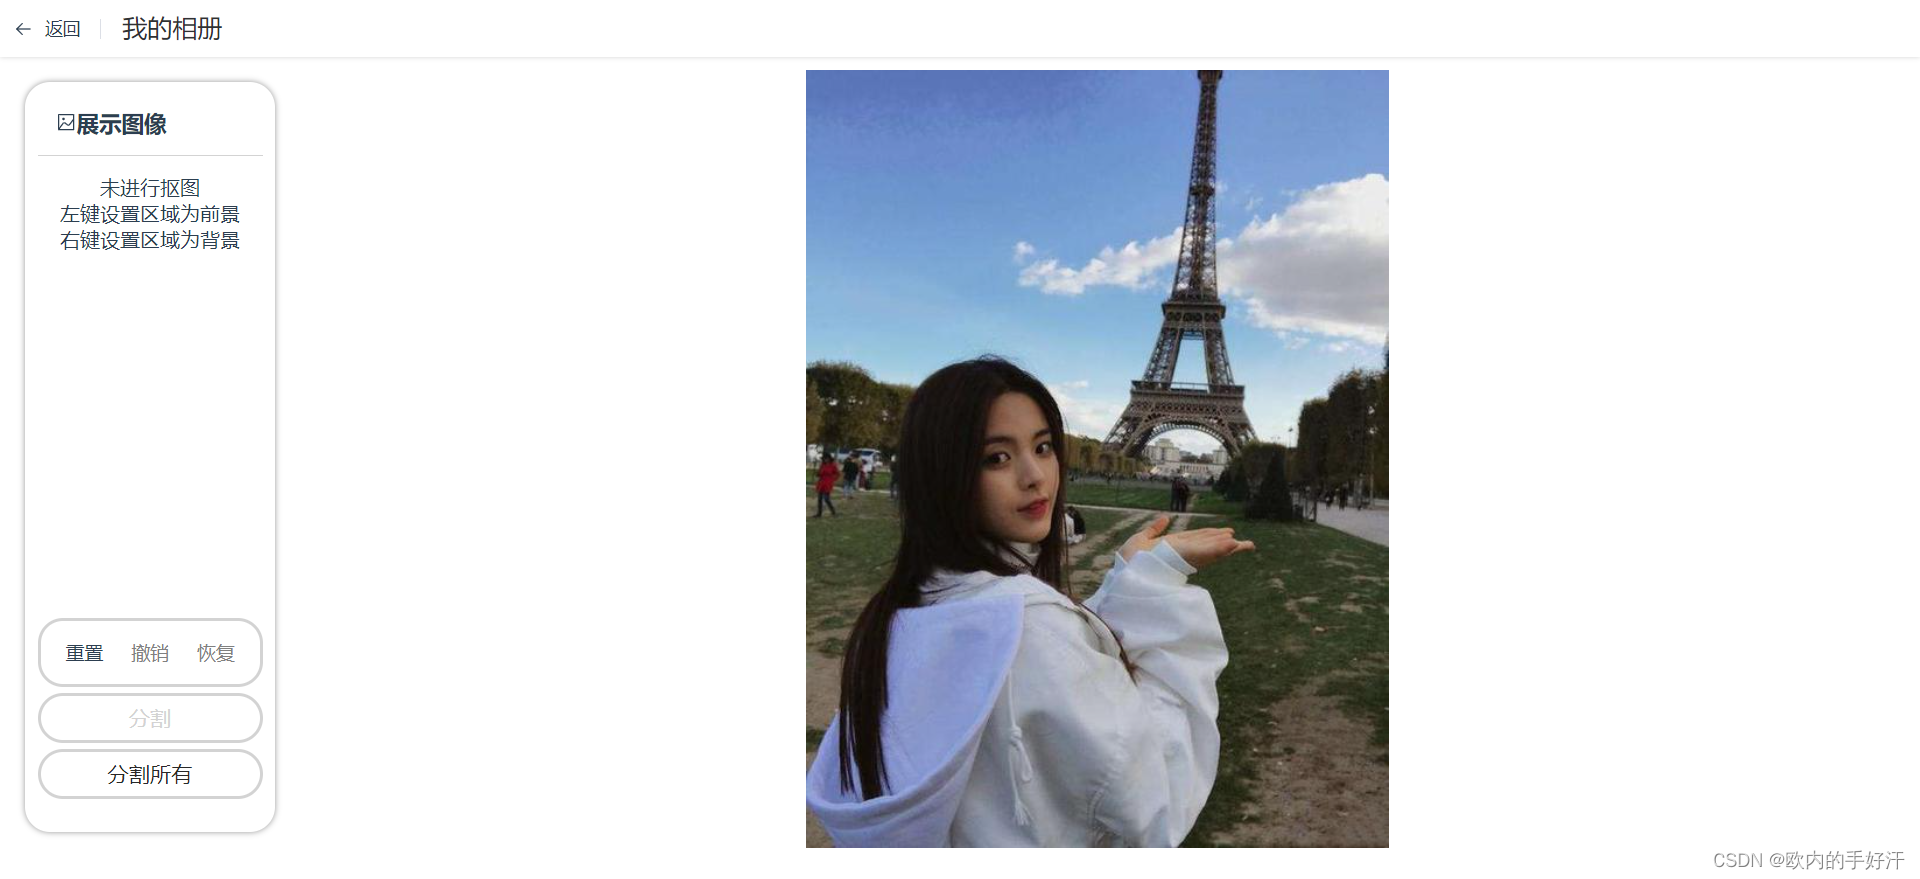
鼠标移动动态分割(Hover)
throttle了一下,修改代码里的throttle delay,反应更快些,我觉得没必要已经够了,设置的150ms
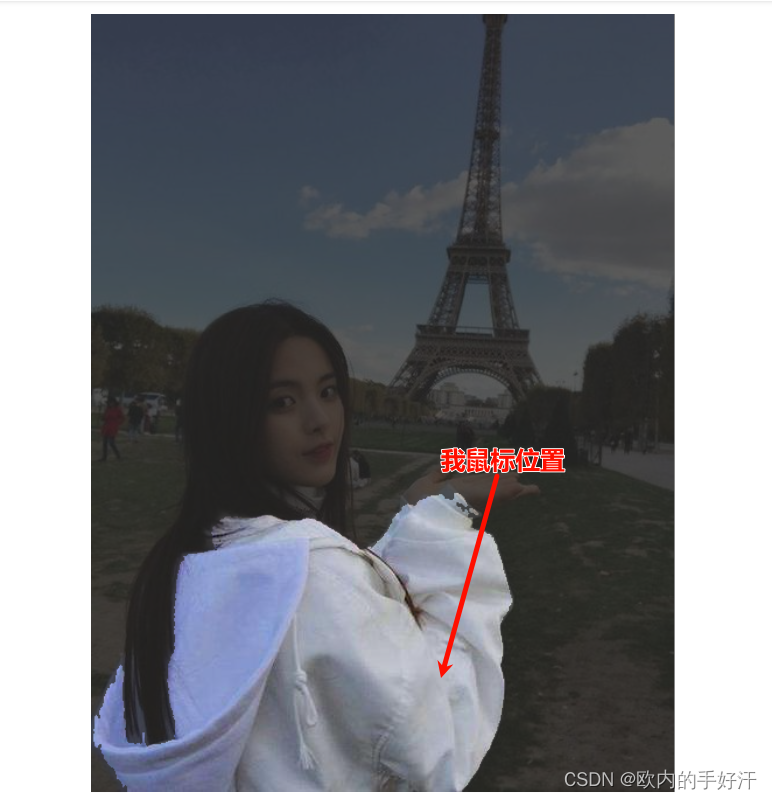
点选前景背景(Click)
蓝色前景,红色背景,对应clickType分别为1和0
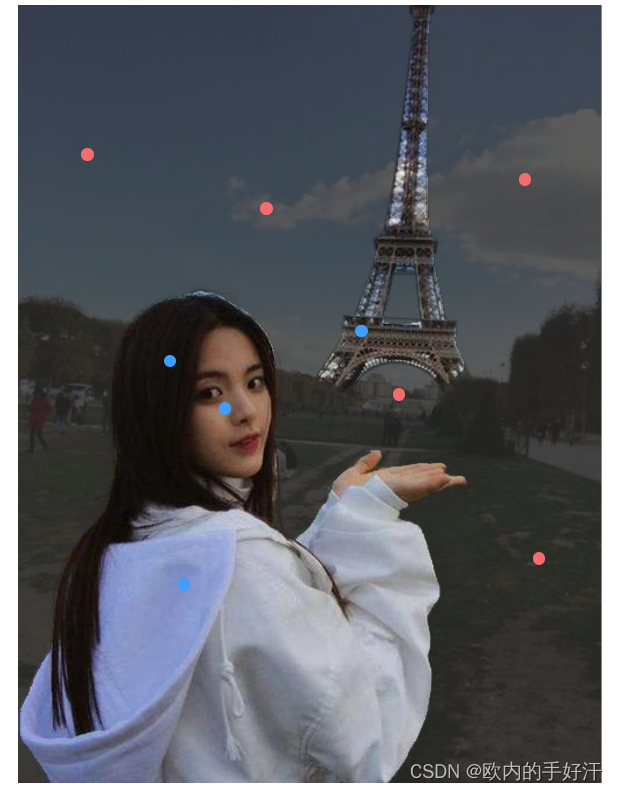
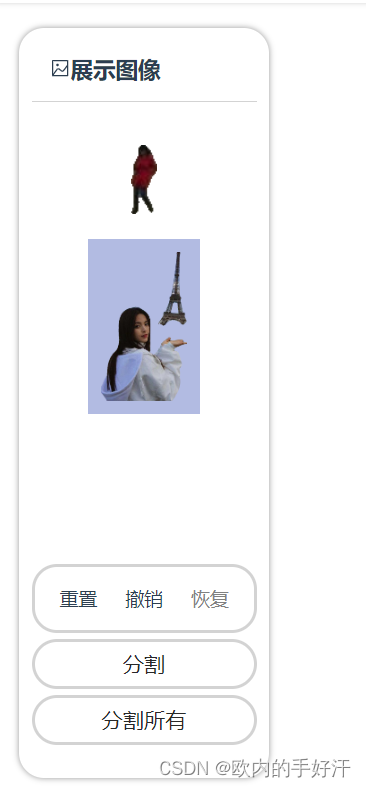
分割(Cut out object)
同官网,分割出该区域需要的最小矩形框部分
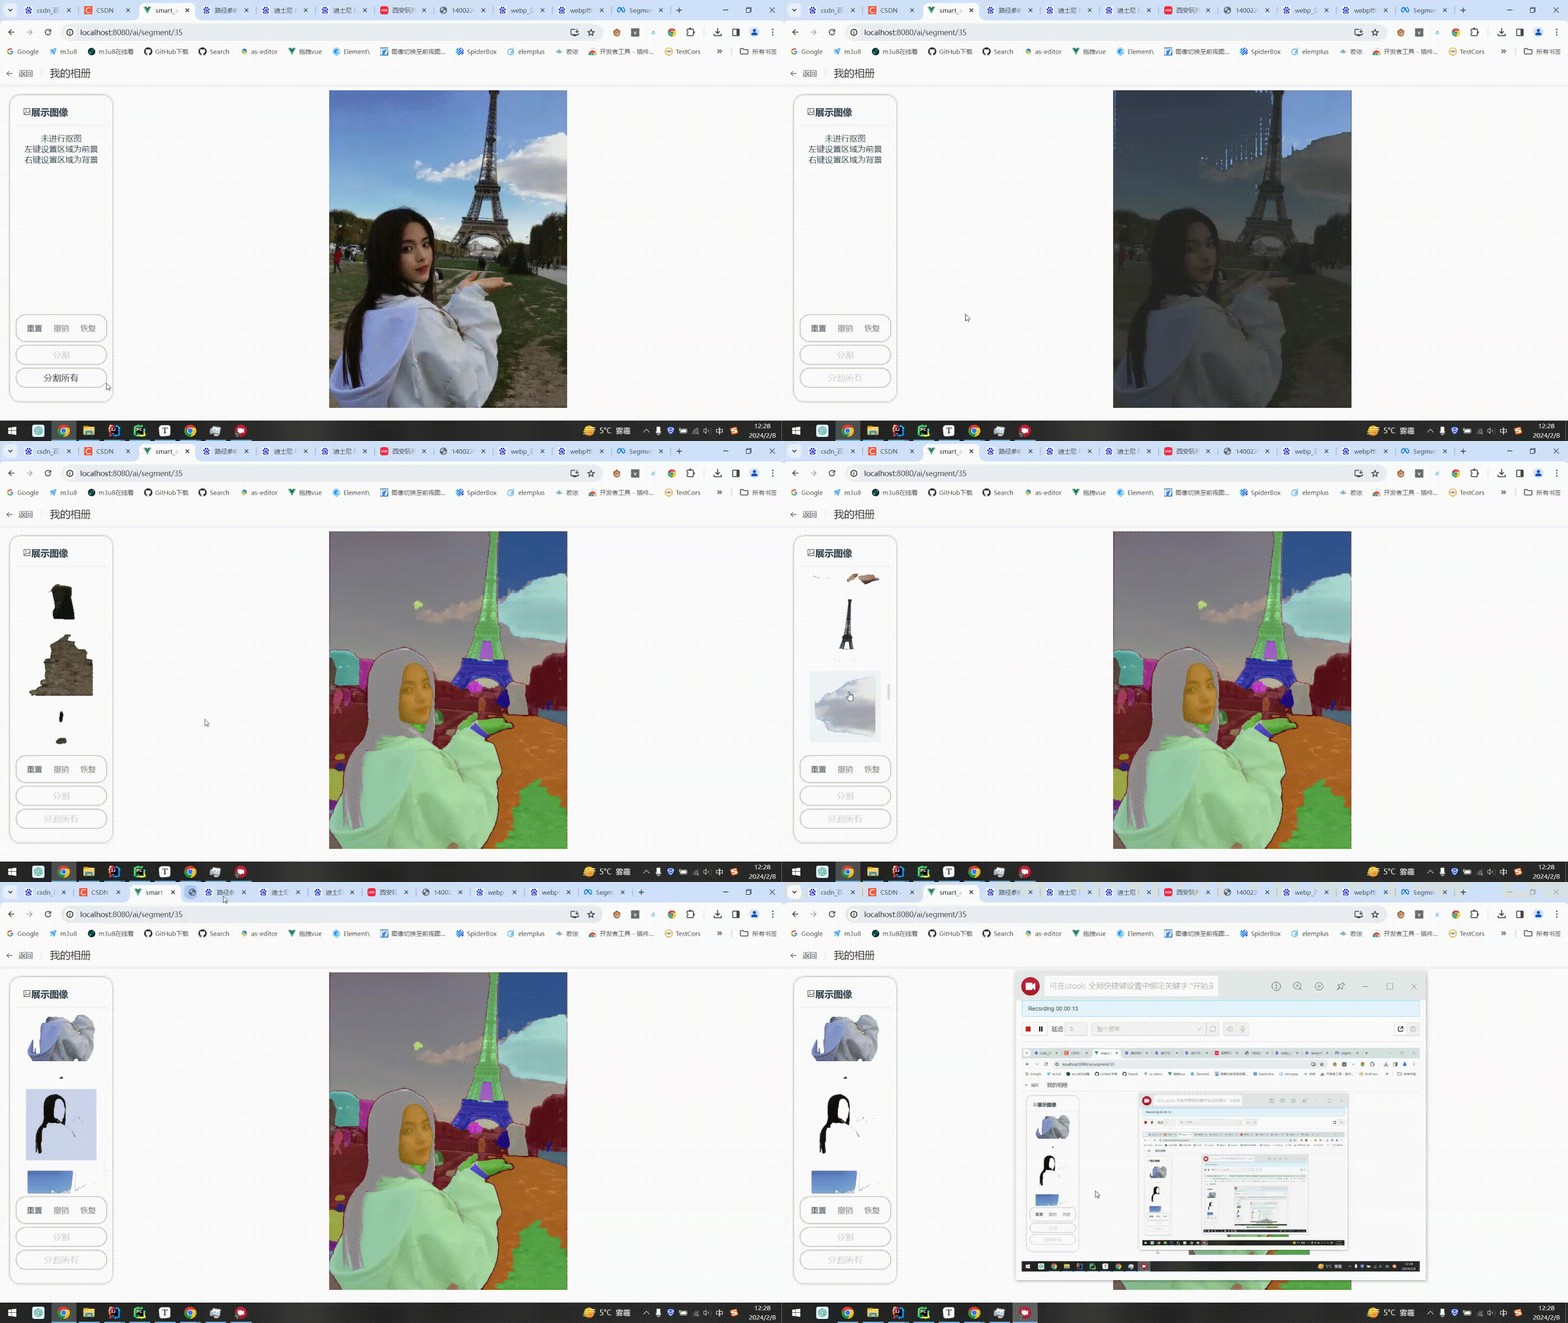
分割所有(Everything)
随便做了下,实在做不出官网的效果,可能模型也有问题 ,我用的vit_b,懒得试了,这功能对我来说没卵用
2.准备工作
安装依赖
前端使用了Vue3+ElementPlus(https://element-plus.org/zh-CN/#/zh-CN)+axios+lz-string,npm安装一下。
后端是fastapi(https://fastapi.tiangolo.com/),FastAPI 依赖 Python 3.8 及更高版本。
安装 FastAPI
pip install fastapi
另外我们还需要一个 ASGI 服务器,生产环境可以使用 Uvicorn 或者 Hypercorn:
pip install "uvicorn[standard]"
要用的js文件
@/util/request.js
import axios from "axios";
import { ElMessage } from "element-plus";

axios.interceptors.request.use(
    config => {
        return config;
    },
    error => {
        return Promise.reject(error);
    }
);

axios.interceptors.response.use(
    response => {
        if (response.data.success != null && !response.data.success) {
            return Promise.reject(response.data)
        }
        return response.data;
    },
    error => {
        console.log('error: ', error)
        ElMessage.error(' ');
        return Promise.reject(error);
    }
);

export default axios;
然后在main.js中绑定
import axios from './util/request.js'
axios.defaults.baseURL = 'http://localhost:9000'
axios.defaults.headers.post['Content-Type'] = 'application/x-www-form-urlencoded';
app.config.globalProperties.$http = axios
@/util/throttle.js
function throttle(func, delay) {
    let timer = null; // 定时器变量

    return function() {
        const context = this; // 保存this指向
        const args = arguments; // 保存参数列表

        if (!timer) {
            timer = setTimeout(() => {
                func.apply(context, args); // 调用原始函数并传入上下文和参数
                clearTimeout(timer); // 清除计时器
                timer = null; // 重置计时器为null
            }, delay);
        }
    };
}
export default throttle
@/util/mask_utils.js
/**
 * Parses RLE from compressed string
 * @param {Array<number>} input
 * @returns array of integers
 */
export const rleFrString = (input) => {
    let result = [];
    let charIndex = 0;
    while (charIndex < input.length) {
        let value = 0,
            k = 0,
            more = 1;
        while (more) {
            let c = input.charCodeAt(charIndex) - 48;
            value |= (c & 0x1f) << (5 * k);
            more = c & 0x20;
            charIndex++;
            k++;
            if (!more && c & 0x10) value |= -1 << (5 * k);
        }
        if (result.length > 2) value += result[result.length - 2];
        result.push(value);
    }
    return result;
};

/**
 * Parse RLE to mask array
 * @param rows
 * @param cols
 * @param counts
 * @returns {Uint8Array}
 */
export const decodeRleCounts = ([rows, cols], counts) => {
    let arr = new Uint8Array(rows * cols)
    let i = 0
    let flag = 0
    for (let k of counts) {
        while (k-- > 0) {
            arr[i++] = flag
        }
        flag = (flag + 1) % 2
    }
    return arr
};

/**
 * Parse Everything mode counts array to mask array
 * @param rows
 * @param cols
 * @param counts
 * @returns {Uint8Array}
 */
export const decodeEverythingMask = ([rows, cols], counts) => {
    let arr = new Uint8Array(rows * cols)
    let k = 0;
    for (let i = 0; i < counts.length; i += 2) {
        for (let j = 0; j < counts[i]; j++) {
            arr[k++] = counts[i + 1]
        }
    }
    return arr;
};

/**
 * Get globally unique color in the mask
 * @param category
 * @param colorMap
 * @returns {*}
 */
export const getUniqueColor = (category, colorMap) => {
    // 该种类没有颜色
    if (!colorMap.hasOwnProperty(category)) {
        // 生成唯一的颜色
        while (true) {
            const color = {
                r: Math.floor(Math.random() * 256),
                g: Math.floor(Math.random() * 256),
                b: Math.floor(Math.random() * 256)
            }
            // 检查颜色映射中是否已存在相同的颜色
            const existingColors = Object.values(colorMap);
            const isDuplicateColor = existingColors.some((existingColor) => {
                return color.r === existingColor.r && color.g === existingColor.g && color.b === existingColor.b;
            });
            // 如果不存在相同颜色,结束循环
            if (!isDuplicateColor) {
                colorMap[category] = color;
                break
            }
        }
        console.log("生成唯一颜色", category, colorMap[category])
        return colorMap[category]
    } else {
        return colorMap[category]
    }
}

/**
 * Cut out specific area of image uncovered by mask
 * @param w image's natural width
 * @param h image's natural height
 * @param image source image
 * @param canvas mask canvas
 * @param callback function to solve the image blob
 */
export const cutOutImage = ({w, h}, image, canvas, callback) => {
    const resultCanvas = document.createElement('canvas'),
        resultCtx = resultCanvas.getContext('2d', {willReadFrequently: true}),
        originalCtx = canvas.getContext('2d', {willReadFrequently: true});
    resultCanvas.width = w;
    resultCanvas.height = h;
    resultCtx.drawImage(image, 0, 0, w, h)
    const maskDataArray = originalCtx.getImageData(0, 0, w, h).data;
    const imageData = resultCtx.getImageData(0, 0, w, h);
    const imageDataArray = imageData.data
    // 将mask的部分去掉
    for (let i = 0; i < maskDataArray.length; i += 4) {
        const alpha = maskDataArray[i + 3];
        if (alpha !== 0) { // 不等于0,是mask区域
            imageDataArray[i + 3] = 0;
        }
    }
    // 计算被分割出来的部分的矩形框
    let minX = w;
    let minY = h;
    let maxX = 0;
    let maxY = 0;
    for (let y = 0; y < h; y++) {
        for (let x = 0; x < w; x++) {
            const alpha = imageDataArray[(y * w + x) * 4 + 3];
            if (alpha !== 0) {
                minX = Math.min(minX, x);
                minY = Math.min(minY, y);
                maxX = Math.max(maxX, x);
                maxY = Math.max(maxY, y);
            }
        }
    }
    const width = maxX - minX + 1;
    const height = maxY - minY + 1;
    const startX = minX;
    const startY = minY;
    resultCtx.putImageData(imageData, 0, 0)
    // 创建一个新的canvas来存储特定区域的图像
    const croppedCanvas = document.createElement("canvas");
    const croppedContext = croppedCanvas.getContext("2d");
    croppedCanvas.width = width;
    croppedCanvas.height = height;
    // 将特定区域绘制到新canvas上
    croppedContext.drawImage(resultCanvas, startX, startY, width, height, 0, 0, width, height);
    croppedCanvas.toBlob(blob => {
        if (callback) {
            callback(blob)
        }
    }, "image/png");
}

/**
 * Cut out specific area of image covered by target color mask
 * PS: 我写的这代码有问题,比较color的时候tmd明明mask canvas中有这个颜色,
 * 就是说不存在这颜色,所以不用这个函数,改成下面的了
 * @param w image's natural width
 * @param h image's natural height
 * @param image source image
 * @param canvas mask canvas
 * @param color target color
 * @param callback function to solve the image blob
 */
export const cutOutImageWithMaskColor = ({w, h}, image, canvas, color, callback) => {
    const resultCanvas = document.createElement('canvas'),
        resultCtx = resultCanvas.getContext('2d', {willReadFrequently: true}),
        originalCtx = canvas.getContext('2d', {willReadFrequently: true});
    resultCanvas.width = w;
    resultCanvas.height = h;
    resultCtx.drawImage(image, 0, 0, w, h)
    const maskDataArray = originalCtx.getImageData(0, 0, w, h).data;
    const imageData = resultCtx.getImageData(0, 0, w, h);
    const imageDataArray = imageData.data

    let find = false

    // 比较mask的color和目标color
    for (let i = 0; i < maskDataArray.length; i += 4) {
        const r = maskDataArray[i],
            g = maskDataArray[i + 1],
            b = maskDataArray[i + 2];
        if (r != color.r || g != color.g || b != color.b) { // 颜色与目标颜色不相同,是mask区域
            // 设置alpha为0
            imageDataArray[i + 3] = 0;
        } else {
            find = true
        }
    }
    // 计算被分割出来的部分的矩形框
    let minX = w;
    let minY = h;
    let maxX = 0;
    let maxY = 0;
    for (let y = 0; y < h; y++) {
        for (let x = 0; x < w; x++) {
            const alpha = imageDataArray[(y * w + x) * 4 + 3];
            if (alpha !== 0) {
                minX = Math.min(minX, x);
                minY = Math.min(minY, y);
                maxX = Math.max(maxX, x);
                maxY = Math.max(maxY, y);
            }
        }
    }
    const width = maxX - minX + 1;
    const height = maxY - minY + 1;
    const startX = minX;
    const startY = minY;
    // console.log(`矩形宽度:${width}`);
    // console.log(`矩形高度:${height}`);
    // console.log(`起点坐标:(${startX}, ${startY})`);
    resultCtx.putImageData(imageData, 0, 0)
    // 创建一个新的canvas来存储特定区域的图像
    const croppedCanvas = document.createElement("canvas");
    const croppedContext = croppedCanvas.getContext("2d");
    croppedCanvas.width = width;
    croppedCanvas.height = height;
    // 将特定区域绘制到新canvas上
    croppedContext.drawImage(resultCanvas, startX, startY, width, height, 0, 0, width, height);
    croppedCanvas.toBlob(blob => {
        if (callback) {
            callback(blob)
        }
    }, "image/png");
}

/**
 * Cut out specific area whose category is target category
 * @param w image's natural width
 * @param h image's natural height
 * @param image source image
 * @param arr original mask array that stores all pixel's category
 * @param category target category
 * @param callback function to solve the image blob
 */
export const cutOutImageWithCategory = ({w, h}, image, arr, category, callback) => {
    const resultCanvas = document.createElement('canvas'),
        resultCtx = resultCanvas.getContext('2d', {willReadFrequently: true});
    resultCanvas.width = w;
    resultCanvas.height = h;
    resultCtx.drawImage(image, 0, 0, w, h)
    const imageData = resultCtx.getImageData(0, 0, w, h);
    const imageDataArray = imageData.data
    // 比较mask的类别和目标类别
    let i = 0
    for(let y = 0; y < h; y++){
        for(let x = 0; x < w; x++){
            if (category != arr[i++]) { // 类别不相同,是mask区域
                // 设置alpha为0
                imageDataArray[3 + (w * y + x) * 4] = 0;
            }
        }
    }
    // 计算被分割出来的部分的矩形框
    let minX = w;
    let minY = h;
    let maxX = 0;
    let maxY = 0;
    for (let y = 0; y < h; y++) {
        for (let x = 0; x < w; x++) {
            const alpha = imageDataArray[(y * w + x) * 4 + 3];
            if (alpha !== 0) {
                minX = Math.min(minX, x);
                minY = Math.min(minY, y);
                maxX = Math.max(maxX, x);
                maxY = Math.max(maxY, y);
            }
        }
    }
    const width = maxX - minX + 1;
    const height = maxY - minY + 1;
    const startX = minX;
    const startY = minY;
    resultCtx.putImageData(imageData, 0, 0)
    // 创建一个新的canvas来存储特定区域的图像
    const croppedCanvas = document.createElement("canvas");
    const croppedContext = croppedCanvas.getContext("2d");
    croppedCanvas.width = width;
    croppedCanvas.height = height;
    // 将特定区域绘制到新canvas上
    croppedContext.drawImage(resultCanvas, startX, startY, width, height, 0, 0, width, height);
    croppedCanvas.toBlob(blob => {
        if (callback) {
            callback(blob)
        }
    }, "image/png");
}
二、后端代码
1.SAM下载
首先从github上下载SAM的代码https://github.com/facebookresearch/segment-anything
然后下载模型文件,保存到项目根目录/checkpoints中,
defaultorvit_h: ViT-H SAM model.vit_l: ViT-L SAM model.vit_b: ViT-B SAM model.
2.后端代码
在项目根目录下创建main.py
main.py
import os
import time

from PIL import Image
import numpy as np
import io
import base64
from segment_anything import SamPredictor, SamAutomaticMaskGenerator, sam_model_registry
from pycocotools import mask as mask_utils
import lzstring


def init():
    # your model path
    checkpoint = "checkpoints/sam_vit_b_01ec64.pth"
    model_type = "vit_b"
    sam = sam_model_registry[model_type](checkpoint=checkpoint)
    sam.to(device='cuda')
    predictor = SamPredictor(sam)
    mask_generator = SamAutomaticMaskGenerator(sam)
    return predictor, mask_generator


predictor, mask_generator = init()

from fastapi import FastAPI
from fastapi.middleware.cors import CORSMiddleware

app = FastAPI()
app.add_middleware(
    CORSMiddleware,
    allow_origins="*",
    allow_credentials=True,
    allow_methods=["*"],
    allow_headers=["*"],
)

last_image = ""
last_logit = None


@app.post("/segment")
def process_image(body: dict):
    global last_image, last_logit
    print("start processing image", time.time())
    path = body["path"]
    is_first_segment = False
    # 看上次分割的图片是不是该图片
    if path != last_image:  # 不是该图片,重新生成图像embedding
        pil_image = Image.open(path)
        np_image = np.array(pil_image)
        predictor.set_image(np_image)
        last_image = path
        is_first_segment = True
        print("第一次识别该图片,获取embedding")
    # 获取mask
    clicks = body["clicks"]
    input_points = []
    input_labels = []
    for click in clicks:
        input_points.append([click["x"], click["y"]])
        input_labels.append(click["clickType"])
    print("input_points:{}, input_labels:{}".format(input_points, input_labels))
    input_points = np.array(input_points)
    input_labels = np.array(input_labels)
    masks, scores, logits = predictor.predict(
        point_coords=input_points,
        point_labels=input_labels,
        mask_input=last_logit[None, :, :] if not is_first_segment else None,
        multimask_output=is_first_segment  # 第一次产生3个结果,选择最优的
    )
    # 设置mask_input,为下一次做准备
    best = np.argmax(scores)
    last_logit = logits[best, :, :]
    masks = masks[best, :, :]
    # print(mask_utils.encode(np.asfortranarray(masks))["counts"])
    # numpy_array = np.frombuffer(mask_utils.encode(np.asfortranarray(masks))["counts"], dtype=np.uint8)
    # print("Uint8Array([" + ", ".join(map(str, numpy_array)) + "])")
    source_mask = mask_utils.encode(np.asfortranarray(masks))["counts"].decode("utf-8")
    # print(source_mask)
    lzs = lzstring.LZString()
    encoded = lzs.compressToEncodedURIComponent(source_mask)
    print("process finished", time.time())
    return {"shape": masks.shape, "mask": encoded}


@app.get("/everything")
def segment_everything(path: str):
    start_time = time.time()
    print("start segment_everything", start_time)
    pil_image = Image.open(path)
    np_image = np.array(pil_image)
    masks = mask_generator.generate(np_image)
    sorted_anns = sorted(masks, key=(lambda x: x['area']), reverse=True)
    img = np.zeros((sorted_anns[0]['segmentation'].shape[0], sorted_anns[0]['segmentation'].shape[1]), dtype=np.uint8)
    for idx, ann in enumerate(sorted_anns, 0):
        img[ann['segmentation']] = idx
    #看一下mask是什么样
    #plt.figure(figsize=(10,10))
	#plt.imshow(img)
	#plt.show()
    # 压缩数组
    result = my_compress(img)
    end_time = time.time()
    print("finished segment_everything", end_time)
    print("time cost", end_time - start_time)
    return {"shape": img.shape, "mask": result}


@app.get('/automatic_masks')
def automatic_masks(path: str):
    pil_image = Image.open(path)
    np_image = np.array(pil_image)
    mask = mask_generator.generate(np_image)
    sorted_anns = sorted(mask, key=(lambda x: x['area']), reverse=True)
    lzs = lzstring.LZString()
    res = []
    for ann in sorted_anns:
        m = ann['segmentation']
        source_mask = mask_utils.encode(m)['counts'].decode("utf-8")
        encoded = lzs.compressToEncodedURIComponent(source_mask)
        r = {
            "encodedMask": encoded,
            "point_coord": ann['point_coords'][0],
        }
        res.append(r)
    return res


# 就是将连续的数字统计个数,然后把[个数,数字]放到result中,类似rle算法
# 比如[[1,1,1,2,3,2,2,4,4],[3,3,4...]]
# result是[3,1,  1,2,  1,3,  2,2,  2,4,  2,3,...]
def my_compress(img):
    result = []
    last_pixel = img[0][0]
    count = 0
    for line in img:
        for pixel in line:
            if pixel == last_pixel:
                count += 1
            else:
                result.append(count)
                result.append(int(last_pixel))
                last_pixel = pixel
                count = 1
    result.append(count)
    result.append(int(last_pixel))
    return result
3.原神启动
在cmd或者pycharm终端,cd到项目根目录下,输入uvicorn main:app --port 8006,启动服务器
三、前端代码
1.页面代码
template
<template>
  <div class="segment-container">
    <ElScrollbar class="tool-box">
      <div class="image-section">
        <div class="title">
          <div style="padding-left:15px">
            <el-icon><Picture /></el-icon><span style="font-size: 18px;font-weight: 550;">展示图像</span>
            <el-icon class="header-icon"></el-icon>
          </div>
        </div>
        <ElScrollbar height="350px">
          <div v-if="cutOuts.length === 0">
            <p>未进行抠图</p>
            <p>左键设置区域为前景</p>
            <p>右键设置区域为背景</p>
          </div>
          <img v-for="src in cutOuts" :src="src" alt="加载中"
               @click="openInNewTab(src)"/>
        </ElScrollbar>
      </div>
      <div class="options-section">
        <span class="option" @click="reset">重置</span>
        <span :class="'option'+(clicks.length===0?' disabled':'')" @click="undo">撤销</span>
        <span :class="'option'+(clickHistory.length===0?' disabled':'')" @click="redo">恢复</span>
      </div>
      <button :class="'segmentation-button'+(lock||clicks.length===0?' disabled':'')"
              @click="cutImage">分割</button>
      <button :class="'segmentation-button'+(lock||isEverything?' disabled':'')"
              @click="segmentEverything">分割所有</button>
    </ElScrollbar>
    <div class="segment-box">
      <div class="segment-wrapper" :style="{'left': left + 'px'}">
        <img v-show="path" id="segment-image" :src="url" :style="{width:w, height:h}" alt="加载失败" crossorigin="anonymous"
             @mousedown="handleMouseDown" @mouseenter="canvasVisible = true"
             @mouseout="() => {if (!this.clicks.length&&!this.isEverything) this.canvasVisible = false}"/>
        <canvas v-show="path && canvasVisible" id="segment-canvas" :width="originalSize.w" :height="originalSize.h"></canvas>
        <div id="point-box" :style="{width:w, height:h}"></div>
      </div>

    </div>
  </div>
</template>
script
<script>
import throttle from "@/util/throttle";
import LZString from "lz-string";
import {
  rleFrString,
  decodeRleCounts,
  decodeEverythingMask,
  getUniqueColor,
  cutOutImage,
  cutOutImageWithMaskColor, cutOutImageWithCategory
} from "@/util/mask_utils";
import {ElCollapse, ElCollapseItem, ElScrollbar} from "element-plus";
import {Picture} from '@element-plus/icons-vue'
export default {
  name: "segment",
  components: {
    ElCollapse, ElCollapseItem, ElScrollbar, Picture
  },
  data() {
    return {
      image: null,
      clicks: [],
      clickHistory: [],
      originalSize: {w: 0, h: 0},
      w: 0,
      h: 0,
      left: 0,
      scale: 1,
      url: null, // url用来设置成img的src展示
      path: null, // path是该图片在文件系统中的绝对路径
      loading: false,
      lock: false,
      canvasVisible: true,
      // cutOuts: ['http://localhost:9000/p/2024/01/19/112ce48bd76e47c7900863a3a0147853.jpg', 'http://localhost:9000/p/2024/01/19/112ce48bd76e47c7900863a3a0147853.jpg'],
      cutOuts: [],
      isEverything: false
    }
  },
  mounted() {
    this.init()
  },
  methods: {
    async init() {
      this.loading = true
      // 从路由获取id
      let id = this.$route.params.id
      if (!id) {
        this.$message.error('未选择图片')
        return
      }
      this.id = id
      // 获取图片信息
      try {
        const { path, url } = await this.getPathAndUrl()
        this.loadImage(path, url)
      } catch (e) {
        console.error(e)
        this.$message.error(e)
      }
    },
    async getPathAndUrl() {
      let res = await this.$http.get("/photo/path/" + this.id)
      console.log(res)
      return res.data
    },
    loadImage(path, url) {
      let image = new Image();
      image.src = this.$photo_base + url;
      image.onload = () => {
        let w = image.width, h = image.height
        let nw, nh
        let body = document.querySelector('.segment-box')
        let mw = body.clientWidth, mh = body.clientHeight
        let ratio = w / h
        if (ratio * mh > mw) {
          nw = mw
          nh = mw / ratio
        } else {
          nh = mh
          nw = ratio * mh
        }
        this.originalSize = {w, h}
        nw = parseInt(nw)
        nh = parseInt(nh)
        this.w = nw + 'px'
        this.h = nh + 'px'
        this.left = (mw - nw) / 2
        this.scale = nw / w
        this.url = this.$photo_base + url
        this.path = path
        console.log((this.scale > 1 ? '放大' : '缩小') + w + ' --> ' + nw)
        const img = document.getElementById('segment-image')
        img.addEventListener('contextmenu', e => e.preventDefault())
        img.addEventListener('mousemove', throttle(this.handleMouseMove, 150))
        const canvas = document.getElementById('segment-canvas')
        canvas.style.transform = `scale(${this.scale})`
      }
    },
    getClick(e) {
      let click = {
        x: e.offsetX,
        y: e.offsetY,
      }
      const imageScale = this.scale
      click.x /= imageScale;
      click.y /= imageScale;
      if(e.which === 3){ // 右键
        click.clickType = 0
      } else if(e.which === 1 || e.which === 0) { // 左键
        click.clickType = 1
      }
      return click
    },
    handleMouseMove(e) {
      if (this.isEverything) { // 分割所有模式,返回
        return;
      }
      if (this.clicks.length !== 0) { // 选择了点
        return;
      }
      if (this.lock) {
        return;
      }
      this.lock = true;
      let click = this.getClick(e);
      requestIdleCallback(() => {
        this.getMask([click])
      })
    },
    handleMouseDown(e) {
      e.preventDefault();
      e.stopPropagation();
      if (e.button === 1) {
        return;
      }
      // 如果是“分割所有”模式,返回
      if (this.isEverything) {
        return;
      }
      if (this.lock) {
        return;
      }
      this.lock = true
      let click = this.getClick(e);
      this.placePoint(e.offsetX, e.offsetY, click.clickType)
      this.clicks.push(click);
      requestIdleCallback(() => {
        this.getMask()
      })
    },
    placePoint(x, y, clickType) {
      let box = document.getElementById('point-box')
      let point = document.createElement('div')
      point.className = 'segment-point' + (clickType ? '' : ' negative')
      point.style = `position: absolute;
                      width: 10px;
                      height: 10px;
                      border-radius: 50%;
                      background-color: ${clickType?'#409EFF':'#F56C6C '};
                      left: ${x-5}px;
                      top: ${y-5}px`
      // 点的id是在clicks数组中的下标索引
      point.id = 'point-' + this.clicks.length
      box.appendChild(point)
    },
    removePoint(i) {
      const selector = 'point-' + i
      let point = document.getElementById(selector)
      if (point != null) {
        point.remove()
      }
    },
    getMask(clicks) {
      // 如果clicks为空,则是mouse move产生的click
      if (clicks == null) {
        clicks = this.clicks
      }
      const data = {
        path: this.path,
        clicks: clicks
      }
      console.log(data)
      this.$http.post('http://localhost:8006/segment', data, {
        headers: {
          "Content-Type": "application/json"
        }
      }).then(res => {
        const shape = res.shape
        const maskenc = LZString.decompressFromEncodedURIComponent(res.mask);
        const decoded = rleFrString(maskenc)
        this.drawCanvas(shape, decodeRleCounts(shape, decoded))
        this.lock = false
      }).catch(err => {
        console.error(err)
        this.$message.error("生成失败")
        this.lock = false
      })
    },
    segmentEverything() {
      if (this.isEverything) { // 上一次刚点过了
        return;
      }
      if (this.lock) {
        return;
      }
      this.lock = true
      this.reset()
      this.isEverything = true
      this.canvasVisible = true
      this.$http.get("http://localhost:8006/everything?path=" + this.path).then(res => {
        const shape = res.shape
        const counts = res.mask
        this.drawEverythingCanvas(shape, decodeEverythingMask(shape, counts))
      }).catch(err => {
        console.error(err)
        this.$message.error("生成失败")
      })
    },
    drawCanvas(shape, arr) {
      let height = shape[0],
          width = shape[1]
      console.log("height: ", height, " width: ", width)
      let canvas = document.getElementById('segment-canvas'),
          canvasCtx = canvas.getContext("2d"),
          imgData = canvasCtx.getImageData(0, 0, width, height),
          pixelData = imgData.data
      let i = 0
      for(let x = 0; x < width; x++){
        for(let y = 0; y < height; y++){
          if (arr[i++] === 0) { // 如果是0,是背景,遮住
            pixelData[0 + (width * y + x) * 4] = 40;
            pixelData[1 + (width * y + x) * 4] = 40;
            pixelData[2 + (width * y + x) * 4] = 40;
            pixelData[3 + (width * y + x) * 4] = 190;
          } else {
            pixelData[3 + (width * y + x) * 4] = 0;
          }
        }
      }
      canvasCtx.putImageData(imgData, 0, 0)
    },
    drawEverythingCanvas(shape, arr) {
      const height = shape[0],
          width = shape[1]
      console.log("height: ", height, " width: ", width)
      let canvas = document.getElementById('segment-canvas'),
          canvasCtx = canvas.getContext("2d"),
          imgData = canvasCtx.getImageData(0, 0, width, height),
          pixelData = imgData.data;
      const colorMap = {}
      let i = 0
      for(let y = 0; y < height; y++){
        for(let x = 0; x < width; x++){
          const category = arr[i++]
          const color = getUniqueColor(category, colorMap)
          pixelData[0 + (width * y + x) * 4] = color.r;
          pixelData[1 + (width * y + x) * 4] = color.g;
          pixelData[2 + (width * y + x) * 4] = color.b;
          pixelData[3 + (width * y + x) * 4] = 150;
        }
      }
      // 显示在图片上
      canvasCtx.putImageData(imgData, 0, 0)
      // 开始分割每一个mask的图片
      const image = document.getElementById('segment-image')
      Object.keys(colorMap).forEach(category => {
        cutOutImageWithCategory(this.originalSize, image, arr, category, blob => {
          const url = URL.createObjectURL(blob);
          this.cutOuts = [url, ...this.cutOuts]
        })
      })
    },
    reset() {
      for (let i = 0; i < this.clicks.length; i++) {
        this.removePoint(i)
      }
      this.clicks = []
      this.clickHistory = []
      this.isEverything = false
      this.clearCanvas()
    },
    undo() {
      if (this.clicks.length === 0)
        return
      const idx = this.clicks.length - 1
      const click = this.clicks[idx]
      this.clickHistory.push(click)
      this.clicks.splice(idx, 1)
      this.removePoint(idx)
      if (this.clicks.length) {
        this.getMask()
      } else {
        this.clearCanvas()
      }
    },
    redo() {
      if (this.clickHistory.length === 0)
        return
      const idx = this.clickHistory.length - 1
      const click = this.clickHistory[idx]
      console.log(this.clicks, this.clickHistory, click)
      this.placePoint(click.x * this.scale, click.y * this.scale, click.clickType)
      this.clicks.push(click)
      this.clickHistory.splice(idx, 1)
      this.getMask()
    },
    clearCanvas() {
      let canvas = document.getElementById('segment-canvas')
      canvas.getContext('2d').clearRect(0, 0, canvas.width, canvas.height)
    },
    cutImage() {
      if (this.lock || this.clicks.length === 0) {
        return;
      }
      const canvas = document.getElementById('segment-canvas'),
          image = document.getElementById('segment-image')
      const {w, h} = this.originalSize
      cutOutImage(this.originalSize, image, canvas, blob => {
        const url = URL.createObjectURL(blob);
        this.cutOuts = [url, ...this.cutOuts]
        // 不需要之后用下面的清除文件
        // URL.revokeObjectURL(url);
      })
    },
    openInNewTab(src) {
      window.open(src, '_blank')
    }
  }
}
</script>
style
<style scoped lang="scss">
.segment-container {
  position: relative;
}

.tool-box {
  position: absolute;
  left: 20px;
  top: 20px;
  width: 200px;
  height: 600px;
  border-radius: 20px;
  //background: pink;
  overflow: auto;
  box-shadow: 0 0 5px rgb(150, 150, 150);
  box-sizing: border-box;
  padding: 10px;

  .image-section {
    height: fit-content;
    width: 100%;
    .title {
      height: 48px;
      line-height: 48px;
      border-bottom: 1px solid lightgray;
      margin-bottom: 15px;
    }
  }

  .image-section img {
    max-width: 85%;
    max-height: 140px;
    margin: 10px auto;
    padding: 10px;
    box-sizing: border-box;
    object-fit: contain;
    display: block;
    transition: .3s;
    cursor: pointer;
  }
  .image-section img:hover {
    background: rgba(0, 30, 160, 0.3);
  }

  .image-section p {
    text-align: center;
  }

  .options-section {
    margin-top: 5px;
    display: flex;
    justify-content: space-between;
    align-items: center;
    padding: 10px;
    box-sizing: border-box;
    border: 3px solid lightgray;
    border-radius: 20px;
  }
  .options-section:hover {
    border: 3px solid #59ACFF;
  }

  .option {
    font-size: 15px;
    padding: 5px 10px;
    cursor: pointer;
  }
  .option:hover {
    color: #59ACFF;
  }
  .option.disabled {
    color: gray;
    cursor: not-allowed;
  }

  .segmentation-button {
    margin-top: 5px;
    width: 100%;
    height: 40px;
    background-color: white;
    color: rgb(40, 40, 40);
    font-size: 17px;
    cursor: pointer;
    border: 3px solid lightgray;
    border-radius: 20px;
  }
  .segmentation-button:hover {
    border: 3px solid #59ACFF;
  }
  .segmentation-button.disabled {
    color: lightgray;
    cursor: not-allowed;
  }
}

.segment-box {
  position: relative;
  margin-left: calc(220px);
  width: calc(100% - 220px);
  height: calc(100vh - 80px);
  //background: #42b983;
  .segment-wrapper {
    position: absolute;
    left: 0;
    top: 0;
  }
  #segment-canvas {
    position: absolute;
    left: 0;
    top: 0;
    pointer-events: none;
    transform-origin: left top;
    z-index: 1;
  }
  #point-box {
    position: absolute;
    left: 0;
    top: 0;
    z-index: 2;
    pointer-events: none;
  }
  .segment-point {
    position: absolute;
    width: 10px;
    height: 10px;
    border-radius: 50%;
    background-color: #409EFF;
  }
  .segment-point.negative {
    background-color: #F56C6C;
  }
}
</style>
2.代码说明
- 本项目没做上传图片分割,就是简单的选择本地图片分割,data中url是img的src,path是绝对路径用来传给python后端进行分割,我是从我项目的系统获取的,请自行修改代码成你的图片路径,如src: “/assets/test.jpg”, path:“D:/project/segment/assets/test.jpg”
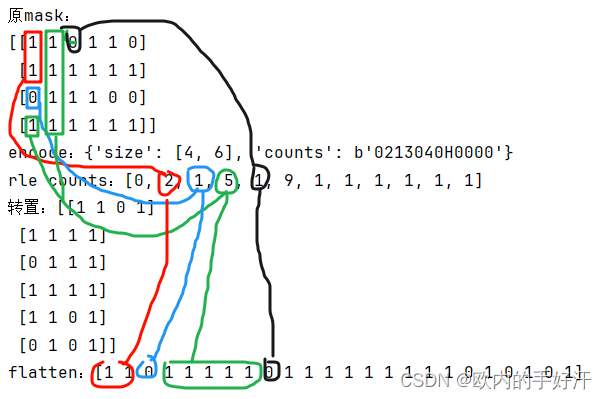
- 由于pycocotools的rle encode是从上到下进行统计连续的0和1,为了方便,我在【@/util/mask_utils.js:decodeRleCounts】解码Click点选产生的mask时将(H,W)的矩阵转成了(W,H)顺序存储的Uint8array;而在Everything分割所有时,我没有使用pycocotools的encode,而是main.py中的my_compress函数编码的,是从左到右进行压缩,因此矩阵解码后仍然是(H,W)的矩阵,所以在drawCanvas和drawEverythingCanvas中的二层循环xy的顺序不一样,我实在懒得改了,就这样就可以了。
关于上面所提rle,可以在项目根目录/notebooks/predictor_example.ipynb中产生mask的位置添加代码自行观察他编码的rle,他只支持矩阵元素为0或1,result的第一个位置是0的个数,不管矩阵是不是0开头。
-
[0,0,1,1,0,1,0],rle counts是[2(两个0), 2(两个1), 1(一个0), 1(一个1), 1(一个0)]; -
[1,1,1,1,1,0],rle counts是[0(零个0),5(五个1),1(一个0)]
def decode_rle(rle_string): # 这是将pycocotools的counts编码的字符串转成counts数组,而非转成原矩阵
    result = []
    char_index = 0

    while char_index < len(rle_string):
        value = 0
        k = 0
        more = 1

        while more:
            c = ord(rle_string[char_index]) - 48
            value |= (c & 0x1f) << (5 * k)
            more = c & 0x20
            char_index += 1
            k += 1
            if not more and c & 0x10:
                value |= -1 << (5 * k)

        if len(result) > 2:
            value += result[-2]
        result.append(value)
    return result

from pycocotools import mask as mask_utils
import numpy as np
mask = np.array([[1,1,0,1,1,0],[1,1,1,1,1,1],[0,1,1,1,0,0],[1,1,1,1,1,1]])
mask = np.asfortranarray(mask, dtype=np.uint8)
print("原mask:\n{}".format(mask))
res = mask_utils.encode(mask)
print("encode:{}".format(res))
print("rle counts:{}".format(decode_rle(res["counts"].decode("utf-8"))))
# 转置后好看
print("转置:{}".format(mask.transpose()))
# flatten后更好看
print("flatten:{}".format(mask.transpose().flatten()))
#numpy_array = np.frombuffer(res["counts"], dtype=np.uint8)
# 打印numpy数组作为uint8array的格式
#print("Uint8Array([" + ", ".join(map(str, numpy_array)) + "])")
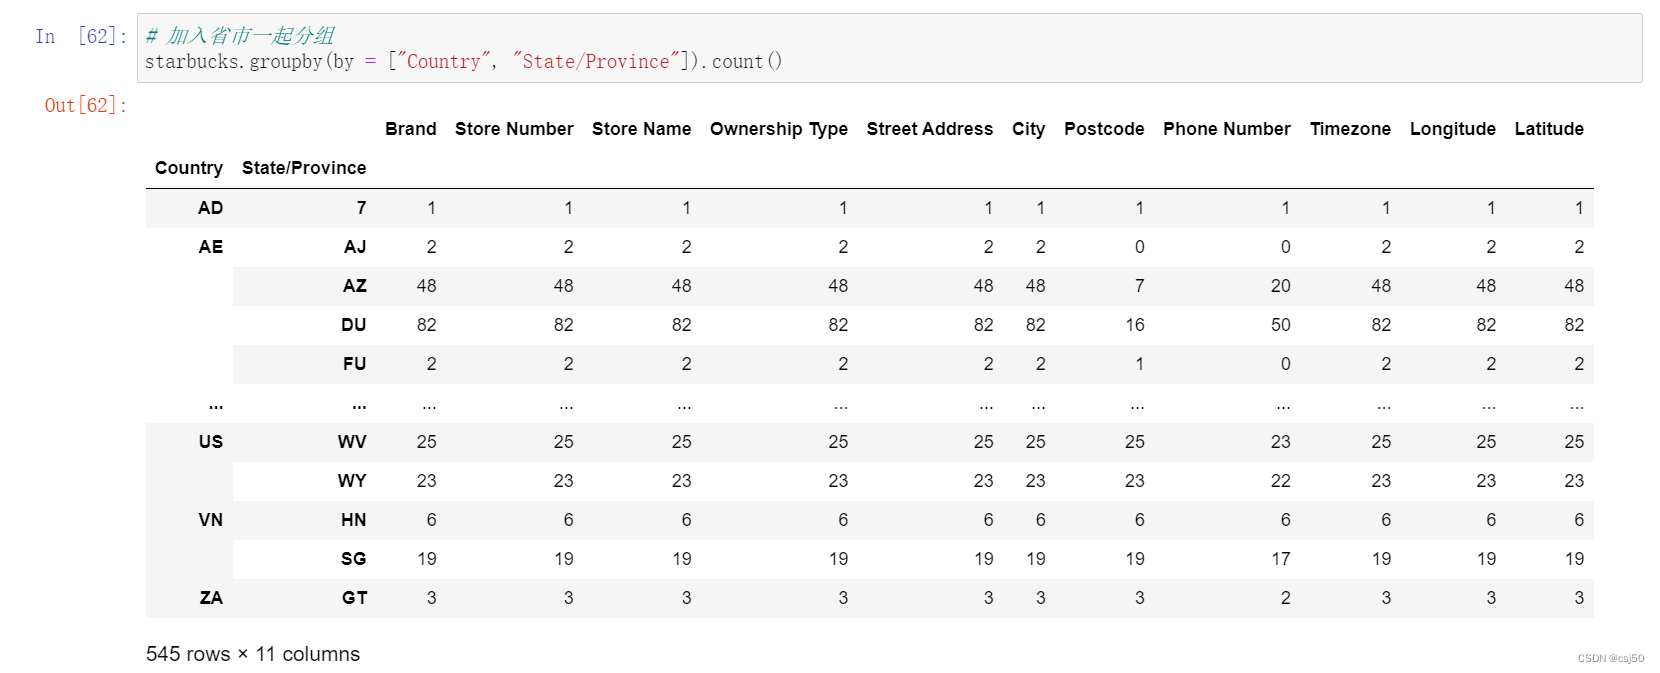
输出:
![[架构之路-275]:五张图向你展现软件开发不仅仅是编码,而是一个庞大的系统工程](https://img-blog.csdnimg.cn/direct/5a6f2e710eb847af994183cc271dcbcf.png)

![[超分辨率重建]ESRGAN算法训练自己的数据集过程](https://img-blog.csdnimg.cn/direct/6fa8fc39d6164d3183992b8b9806273f.png)
