目录
一、初始配置
二、添加文件
三、查看日志
四、修改文件
五、版本回退
六、撤销修改
七、删除文件
一、初始配置
Git版本控制器:记录每次的修改以及版本迭代的一个管理系统。
# 初始化本地仓库:git init

(base) [root@localhost gitcode]# git init
重新初始化现存的 Git 版本库于 /root/gitee/gitcode/.git/
(base) [root@localhost gitcode]# ls -a
.  ..  .git
(base) [root@localhost gitcode]# tree .git
.git
├── branches
├── config
├── description
├── HEAD
├── hooks
│   ├── applypatch-msg.sample
│   ├── commit-msg.sample
│   ├── post-update.sample
│   ├── pre-applypatch.sample
│   ├── pre-commit.sample
│   ├── prepare-commit-msg.sample
│   ├── pre-push.sample
│   ├── pre-rebase.sample
│   └── update.sample
├── info
│   └── exclude
├── objects
│   ├── info
│   └── pack
└── refs
    ├── heads
    └── tags

9 directories, 13 files
(base) [root@localhost gitcode]#
# 查看本地仓库配置
(base) [root@localhost gitcode]# git config -l
push.default=matching
core.repositoryformatversion=0
core.filemode=true
core.bare=false
core.logallrefupdates=true
(base) [root@localhost gitcode]## 配置当前仓库
(base) [root@localhost gitcode]# git config user.name "ljc"
(base) [root@localhost gitcode]# git config user.email "1210451061@qq.com"
(base) [root@localhost gitcode]# git config -l
push.default=matching
core.repositoryformatversion=0
core.filemode=true
core.bare=false
core.logallrefupdates=true
user.name=ljc
user.email=1210451061@qq.com
(base) [root@localhost gitcode]# # 删除当前仓库配置
(base) [root@localhost gitcode]# git config --unset user.name
(base) [root@localhost gitcode]# git config --unset user.email
(base) [root@localhost gitcode]# git config -l
push.default=matching
core.repositoryformatversion=0
core.filemode=true
core.bare=false
core.logallrefupdates=true
(base) [root@localhost gitcode]## 配置当前机器的全部仓库
(base) [root@localhost gitcode]# git config --global user.name "ljc"
(base) [root@localhost gitcode]# git config --global user.email "1210451061@qq.com"
(base) [root@localhost gitcode]# git config -l
push.default=matching
user.name=ljc
user.email=1210451061@qq.com
core.repositoryformatversion=0
core.filemode=true
core.bare=false
core.logallrefupdates=true
# 删除当前机器的全部仓库配置
(base) [root@localhost gitcode]# git config --global --unset user.name
(base) [root@localhost gitcode]# git config --global --unset user.email
(base) [root@localhost gitcode]# git config -l
push.default=matching
core.repositoryformatversion=0
core.filemode=true
core.bare=false
core.logallrefupdates=true
(base) [root@localhost gitcode]#二、添加文件
⼯作区:是在电脑上你要写代码或⽂件的⽬录。
暂存区:英⽂叫 stage 或 index 。⼀般存放在 .git ⽬录下的 index ⽂件(.git/index)中,我们把暂存区有时也叫作索引(index)。
版本库:⼜名仓库,英⽂名 repository 。⼯作区有⼀个隐藏⽬录 .git ,它不算⼯作区,⽽是 Git 的版本库。这个版本库⾥⾯的所有⽂件都可以被 Git 管理起来,每个⽂件的修改、删除,Git 都能跟踪,以便任何时刻都可以追踪历史,或者在将来某个时刻可以“还原”。

- 创建 Git 版本库时,Git会为我们⾃动创建⼀个唯⼀的 master 分⽀,以及指向 master 的⼀个指针叫 HEAD。
- 对⼯作区修改(或新增)的⽂件执⾏ git add 命令时,暂存区⽬录树的⽂件索引会被更新。
- 执⾏提交操作 git commit 时,master 分⽀会做相应的更新,可以简单理解为暂存区的⽬录树才会被真正写到版本库中。
# 添加一个文件

(base) [root@localhost gitcode]# ls
(base) [root@localhost gitcode]# touch file1
(base) [root@localhost gitcode]# vim file1
(base) [root@localhost gitcode]# cat file1
hello git

(base) [root@localhost gitcode]# git add file1
(base) [root@localhost gitcode]# git commit -m "Add first file"
[master(根提交) fc3a350] Add first file
 1 file changed, 2 insertions(+)
 create mode 100644 file1
(base) [root@localhost gitcode]#
# 添加多个文件
(base) [root@localhost gitcode]# touch file2 file3 file4
(base) [root@localhost gitcode]# git add .
(base) [root@localhost gitcode]# git commit -m "Add three files"
[master f2e9210] Add three files
3 files changed, 0 insertions(+), 0 deletions(-)
create mode 100644 file2
create mode 100644 file3
create mode 100644 file4
(base) [root@localhost gitcode]# git log
commit f2e92108d0fe7ec01a6c49d1372e4907cac6d96b
Author: ljc <1210451061@qq.com>
Date: Wed Feb 7 05:13:08 2024 +0800
Add three files
commit fc3a3507b30d2f4374a71245a034e00f94ea8363
Author: ljc <1210451061@qq.com>
Date: Wed Feb 7 05:11:56 2024 +0800
Add first file
(base) [root@localhost gitcode]#三、查看日志
# git log 命令显⽰从最近到最远的提交⽇志
# 加上 --pretty=online 参数会将日志简洁显示

(base) [root@localhost gitcode]# git log --pretty=oneline
f2e92108d0fe7ec01a6c49d1372e4907cac6d96b Add three files
fc3a3507b30d2f4374a71245a034e00f94ea8363 Add first file
(base) [root@localhost gitcode]#

# 通过 git log 可以看到的长字符串是每次提交的commit id(版本号),是一个哈希值
# 查看 .git
(base) [root@localhost gitcode]# tree .git
.git
├── branches
├── COMMIT_EDITMSG
├── config
├── description
├── HEAD
├── hooks
│ ├── applypatch-msg.sample
│ ├── commit-msg.sample
│ ├── post-update.sample
│ ├── pre-applypatch.sample
│ ├── pre-commit.sample
│ ├── prepare-commit-msg.sample
│ ├── pre-push.sample
│ ├── pre-rebase.sample
│ └── update.sample
├── index
├── info
│ └── exclude
├── logs
│ ├── HEAD
│ └── refs
│ └── heads
│ └── master
├── objects
│ ├── 2c
│ │ └── 0f71d14208bc896178ce4eb92870c659c04202
│ ├── 74
│ │ └── cbb01783907aa0807236331230386d5e1241cf
│ ├── 7f
│ │ └── 112b196b963ff72675febdbb97da5204f9497e
│ ├── e6
│ │ └── 9de29bb2d1d6434b8b29ae775ad8c2e48c5391
│ ├── f2
│ │ └── e92108d0fe7ec01a6c49d1372e4907cac6d96b
│ ├── fc
│ │ └── 3a3507b30d2f4374a71245a034e00f94ea8363
│ ├── info
│ └── pack
└── refs
├── heads
│ └── master
└── tags
18 directories, 24 files
(base) [root@localhost gitcode]## index 是暂存区,add 后的内容会添加进缓存区
# HEAD 是默认指向 master 分支的指针
# 默认的 master 保存的就是最新的 commit id
(base) [root@localhost gitcode]# cat .git/HEAD
ref: refs/heads/master
(base) [root@localhost gitcode]# cat .git/refs/heads/master
f2e92108d0fe7ec01a6c49d1372e4907cac6d96b
(base) [root@localhost gitcode]#
# objects 为Git的对象库,里面包含了创建的各个版本的对象及内容。
# 当执行 git add 的时候,暂存区的对象树被更新,
# 同时工作区修改(或新增)的文件内容被写入到对象库中的一个新的对象中,
# 就位于 ./git/objects 目录下
(base) [root@localhost gitcode]# ls .git/objects/
2c 74 7f e6 f2 fc info pack
# 查找 object 要将 commit id 分为两部分,前2位是目录名称,后38位文件名称# 使用 git cat-file 查看版本库对象的内容
# <类型> 可以是其中之一:blob、tree、commit、tag
# -t 显示对象类型
# -s 显示对象大小
# -e 当没有错误时退出并返回零
# -p 美观地打印对象的内容
# --textconv 对于数据(blob)对象,对其内容执行 textconv
# --batch 显示从标准输入提供的对象的信息和内容
# --batch-check 显示从标准输入提供的对象的信息
(base) [root@localhost gitcode]# git cat-file -p f2e92108d0fe7ec01a6c49d1372e4907cac6d96b
tree 74cbb01783907aa0807236331230386d5e1241cf
parent fc3a3507b30d2f4374a71245a034e00f94ea8363
author ljc <1210451061@qq.com> 1707253988 +0800
committer ljc <1210451061@qq.com> 1707253988 +0800
Add three files
(base) [root@localhost gitcode]# git cat-file -p 74cbb01783907aa0807236331230386d5e1241cf
100644 blob 7f112b196b963ff72675febdbb97da5204f9497e file1
100644 blob e69de29bb2d1d6434b8b29ae775ad8c2e48c5391 file2
100644 blob e69de29bb2d1d6434b8b29ae775ad8c2e48c5391 file3
100644 blob e69de29bb2d1d6434b8b29ae775ad8c2e48c5391 file4
(base) [root@localhost gitcode]#
# 查看 file1 对应的 commit id
[root@localhost gitcode]# git cat-file -p 7f112b196b963ff72675febdbb97da5204f9497e
hello git
(base) [root@localhost gitcode]# 四、修改文件
Git版本控制器的本质:跟踪并管理文件的修改,而非文件本身。
# 对file1文件内容进行修改,此时工作区和暂存区的文件版本不一致
# 用 git status 查看在你上次提交之后是否有对文件进行再次修改

(base) [root@localhost gitcode]# vim file1
(base) [root@localhost gitcode]# cat file1
hello git
hello world
(base) [root@localhost gitcode]# git status
# 位于分支 master
# 尚未暂存以备提交的变更:
#   (使用 "git add <file>..." 更新要提交的内容)
#   (使用 "git checkout -- <file>..." 丢弃工作区的改动)
#
#       修改:      file1
#
修改尚未加入提交(使用 "git add" 和/或 "git commit -a")
(base) [root@localhost gitcode]#
# git diff [file] 查看暂存区和工作区文件的具体差异
# git diff HEAD -- [file] 查看版本库和工作区文件的具体差异
(base) [root@localhost gitcode]# git diff file1
diff --git a/file1 b/file1
index 7f112b1..05fe86c 100644
--- a/file1
+++ b/file1
@@ -1,2 +1,2 @@
hello git
-
+hello world
(base) [root@localhost gitcode]# git diff HEAD -- file1
diff --git a/file1 b/file1
index 7f112b1..05fe86c 100644
--- a/file1
+++ b/file1
@@ -1,2 +1,2 @@
hello git
-
+hello world
(base) [root@localhost gitcode]# (base) [root@localhost gitcode]# git add file1
(base) [root@localhost gitcode]# git status
# 位于分支 master
# 要提交的变更:
# (使用 "git reset HEAD <file>..." 撤出暂存区)
#
# 修改: file1
#
(base) [root@localhost gitcode]# git commit -m "modify: file1"
[master 7df1e32] modify: file1
1 file changed, 1 insertion(+), 1 deletion(-)
(base) [root@localhost gitcode]# git status
# 位于分支 master
无文件要提交,干净的工作区
(base) [root@localhost gitcode]# 五、版本回退

Git将所有提交过的版本串成一条时间线,若只有一条时间线,则这个分支就是主分支,即master分支。
对于master分支,每一次提交master分⽀都会向前移动⼀步,这样,随着你不断提交,master分⽀的线也越来越⻓,⽽HEAD只要⼀直指向master分⽀即可指向当前分⽀。
当进行版本回退的时候,只需要改变master指针的指向,就完成了版本回退,非常高效。
# 给 file1 新增 vertion1 和 vertion2 两个版本并分别提交

(base) [root@localhost gitcode]# vim file1
(base) [root@localhost gitcode]# cat file1
hello git
hello world
add vertion1
(base) [root@localhost gitcode]# git add file1
(base) [root@localhost gitcode]# git commit -m "modify: add vertion1"
[master 167def0] modify: add vertion1
 1 file changed, 1 insertion(+)
(base) [root@localhost gitcode]# vim file1
(base) [root@localhost gitcode]# cat file1
hello git
hello world
add vertion1
add vertion2
(base) [root@localhost gitcode]# git add file1
(base) [root@localhost gitcode]# git commit -m "modigy: add vertion2"
[master c31b56a] modigy: add vertion2
 1 file changed, 1 insertion(+)
(base) [root@localhost gitcode]#
# 通过 git reset 回退版本
# 在进行版本回退之前,通常先用 git log 查看历史版本
(base) [root@localhost gitcode]# git log --pretty=oneline
c31b56a87a6387873d7db9a16f7d1c81b4b2339e modigy: add vertion2
167def04692b8f6fa68cc835f41a81584ca31b7e modify: add vertion1
7df1e322e9d267964f51e91dac900bb1a77f171d modify: file1
f2e92108d0fe7ec01a6c49d1372e4907cac6d96b Add three files
fc3a3507b30d2f4374a71245a034e00f94ea8363 Add first file
(base) [root@localhost gitcode]# git reset 167def04692b8f6fa68cc835f41a81584ca31b7e
重置后撤出暂存区的变更:
M file1
(base) [root@localhost gitcode]# cat file1
hello git
hello world
add vertion1
add vertion2
(base) [root@localhost gitcode]# git reset --hard 167def04692b8f6fa68cc835f41a81584ca31b7e
HEAD 现在位于 167def0 modify: add vertion1
(base) [root@localhost gitcode]# cat file1
hello git
hello world
add vertion1
(base) [root@localhost gitcode]#
# 由上可见,直接使用 git reset 回退版本,工作区的文件内容并未修改
# 因为回退版本的完整命令格式为:git reset [--soft | --mixed | --hard] [HEAD]
# 不同的参数代表不同的回退方式:
# --soft 对于工作区和暂存区的内容都不变,只将版本库回退到指定版本
# --mixed 对于工作区的内容不变,暂存区和版本库回退到指定版本,默认参数
# --hard 对于工作区、暂存区和版本库都回退到指定版本
# [HEAD] 说明:
# 1. 可直接写成 commid id,表示特定的版本
# 2. HEAD 表示当前版本
# 3. HEAD^ 表示上一个版本
# 4. HEAD^^ 表示上上个版本
# 5. ... 依此类推# 当我回退到 vertion1 之后后悔,我想再回到 vertion2 怎么办?
# 1. 直接用 vertion2 的 commit id 进行回退
# 2. 如果找不到 vertion2 的 commit id 了,通过 git reflog 查看本地的历史命令,
# 可以得到 vertion2 的部分 commit id,也可直接回退
(base) [root@localhost gitcode]# git reflog
167def0 HEAD@{0}: reset: moving to 167def04692b8f6fa68cc835f41a81584ca31b7e
c31b56a HEAD@{1}: commit: modigy: add vertion2
167def0 HEAD@{2}: commit: modify: add vertion1
7df1e32 HEAD@{3}: reset: moving to 7df1e322e9d267964f51e91dac900bb1a77f171d
3d8c2fe HEAD@{4}: commit: modify: add vertion1
7df1e32 HEAD@{5}: commit: modify: file1
f2e9210 HEAD@{6}: commit: Add three files
fc3a350 HEAD@{7}: commit (initial): Add first file
(base) [root@localhost gitcode]# git reset --hard c31b56a
HEAD 现在位于 c31b56a modigy: add vertion2
(base) [root@localhost gitcode]# cat file1
hello git
hello world
add vertion1
add vertion2
(base) [root@localhost gitcode]#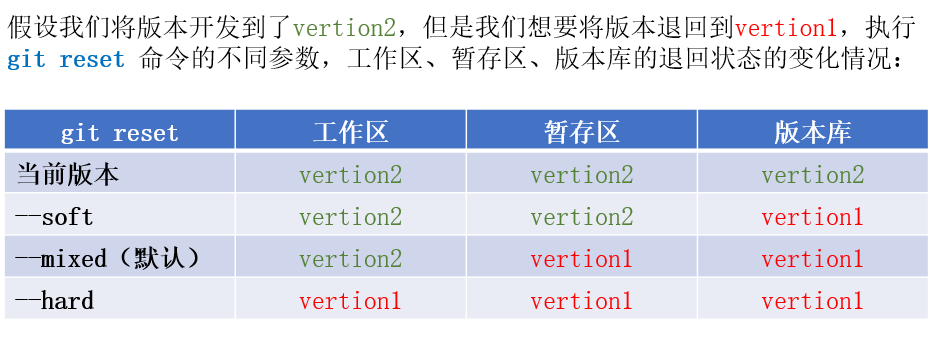
六、撤销修改
版本回退是我们已经提交了版本,更新了版本库之后再进行回退操作,但是如果我们在开发过程中,新写了很多代码但是没有 add ,这时候忽然发现自己写的代码全是屎山代码,想要回到新增代码前的版本,该怎么做呢?是先提交更新版本再版本回退吗?
上述方式虽然也行,但是太麻烦了,可以直接用 git checkout -- [file] 命令让工作区的文件回到最近一次 add 和 commit 时的状态。
(base) [root@localhost gitcode]# vim file1
(base) [root@localhost gitcode]# cat file1
hello git
hello world
add vertion1
add vertion2
too much shit code!!!
(base) [root@localhost gitcode]# git status
# 位于分支 master
# 尚未暂存以备提交的变更:
#   (使用 "git add <file>..." 更新要提交的内容)
#   (使用 "git checkout -- <file>..." 丢弃工作区的改动)
#
#       修改:      file1
#
修改尚未加入提交(使用 "git add" 和/或 "git commit -a")
(base) [root@localhost gitcode]# git checkout -- file1
(base) [root@localhost gitcode]# cat file1
hello git
hello world
add vertion1
add vertion2
(base) [root@localhost gitcode]#


# 如果代码已经 add 但还没 commit 呢?怎么处理?
# 方法1:先 git reset [file] 再 git checkout --[file]
# 方法2:直接 git reset --hard [file]

(base) [root@localhost gitcode]# vim file1
(base) [root@localhost gitcode]# cat file1
hello git
hello world
add vertion1
add vertion2
too much shit code
(base) [root@localhost gitcode]# git add file1
(base) [root@localhost gitcode]# git status
# 位于分支 master
# 要提交的变更:
#   (使用 "git reset HEAD <file>..." 撤出暂存区)
#
#       修改:      file1
#
(base) [root@localhost gitcode]# git log --pretty=oneline
c31b56a87a6387873d7db9a16f7d1c81b4b2339e modigy: add vertion2
167def04692b8f6fa68cc835f41a81584ca31b7e modify: add vertion1
7df1e322e9d267964f51e91dac900bb1a77f171d modify: file1
f2e92108d0fe7ec01a6c49d1372e4907cac6d96b Add three files
fc3a3507b30d2f4374a71245a034e00f94ea8363 Add first file
(base) [root@localhost gitcode]# git reset --hard c31b56a87a6387873d7db9a16f7d1c81b4b2339e
HEAD 现在位于 c31b56a modigy: add vertion2
(base) [root@localhost gitcode]# cat file1
hello git
hello world
add vertion1
add vertion2
(base) [root@localhost gitcode]#
七、删除文件
删除的本质也是修改,如果我们在工作区用 rm 命令删除了一个文件,那么可能是两种原因:
- 误删
- 确定要删除该文件
# 如果是误删,那么我们需要取消删除操作,也就是撤销修改操作。
# 如果是确认要删除该文件,那么通过 rm 删除之后,工作区和暂存区、版本库就不一致了。
# 我们该如何处理呢?
# 我们需要先将删除后的工作区更新到暂存区,再将暂存区提交到版本库。

(base) [root@localhost gitcode]# ls
file1  file2  file3  file4
(base) [root@localhost gitcode]# rm -rf file4
(base) [root@localhost gitcode]# ls
file1  file2  file3
(base) [root@localhost gitcode]# git status
# 位于分支 master
# 尚未暂存以备提交的变更:
#   (使用 "git add/rm <file>..." 更新要提交的内容)
#   (使用 "git checkout -- <file>..." 丢弃工作区的改动)
#
#       删除:      file4
#
修改尚未加入提交(使用 "git add" 和/或 "git commit -a")
(base) [root@localhost gitcode]# git add .
warning: 您在运行 'git add' 时没有指定 '-A (--all)' 或 '--ignore-removal',
针对其中本地移除路径的行为将在 Git 2.0 版本库发生变化。
像本地工作区移除的路径 'file4'
在此版本的 Git 中被忽略。

* 'git add --ignore-removal <pathspec>',是当前版本的默认操作,
  忽略您本地工作区中移除的文件。

* 'git add --all <pathspec>' 将让您同时对删除操作进行记录。

运行 'git status' 来检查您本地工作区中移除的路径。

(base) [root@localhost gitcode]# git add --all file4
(base) [root@localhost gitcode]# git commit -m "delete file4"
[master 0f28717] delete file4
 1 file changed, 0 insertions(+), 0 deletions(-)
 delete mode 100644 file4
(base) [root@localhost gitcode]# git status
# 位于分支 master
无文件要提交,干净的工作区
(base) [root@localhost gitcode]# ls
file1  file2  file3
(base) [root@localhost gitcode]#


# 由上可得,我们需要处理不一致问题,也就是将删除后的新版本再次提交到版本库
# 我们可以也通过 git rm 进行文件删除,这样直接就删除了工作区和暂存区的文件
# 我们只需要接着 git commit -m 更新删除后的版本就行了

(base) [root@localhost gitcode]# ls
file1  file2  file3
(base) [root@localhost gitcode]# git rm file3
rm 'file3'
(base) [root@localhost gitcode]# ls
file1  file2
(base) [root@localhost gitcode]# git status
# 位于分支 master
# 要提交的变更:
#   (使用 "git reset HEAD <file>..." 撤出暂存区)
#
#       删除:      file3
#
(base) [root@localhost gitcode]# git commit -m "delete file3"
[master 84b615b] delete file3
 1 file changed, 0 insertions(+), 0 deletions(-)
 delete mode 100644 file3
(base) [root@localhost gitcode]#