本文内容包括容器的@Bean 及 @Configuration 注解的使用、容器环境的配置文件及容器的附加功能(包括国际化消息、事件发布与监听)。
1 容器配置
在注解模式下,@Configuration 是容器核心的注解之一,可以在其注解的类中通过@Bean作用于方法上来配置Bean。xml 与 注解模式可以混合在一起使用。
1.1 @Bean
作用类似于xml 配置文件中的<bean/>标签。可以在注解内标识bean名,也可定义一些列别名。
| 作用对象 | @Component作用于类,@Bean作用于方法。 |
| 实现原理 | @Component 通常通过类路径扫描来自动探测,自动装配到Spring容器中,而@Bean则是在标有该注解的方法中创建这个Bean。 |
| 自定义性 | @Bean 的自定义性更强。例如引入第三方库中的类需要装配到Spring时,只能使用@Bean来实现。 |
表 @Bean 与 @Component的对比
通常是在@Configuration注解的类中来使用@Bean,这种被称为“Full模式”,相反,如果没在@Configuration注解的类中使用@Bean,则被称为“Lite模式”。
1.1.1 Lite 模式
lite 模式定义如下:
1)在非@Configuration标记(例如@Component或者没有任何Spring注解,但在该类中的某个方法上使用了@Bean)的类里定义的@Bean方法。
2)@Configuration(proxyBeanMethods=false)标记的类内定义的@Bean方法。
该模式相对于Full模式有以下限制:
- 不会被CGLIB代理,而是使用了原始的类类型。
- 该类的@Bean方法相互之间不能直接调用(如果直接调用会生成新的实例)。
//@Configuration(proxyBeanMethods = false)
public class LiteConfiguration {
    @Bean
    public Service liteService1() {
        System.out.println("liteService1 实例化");
        return new Service(){};
    }

    @Bean
    public Service liteService2() {
        System.out.println("liteService2 实例化" + liteService1());
        return new Service(){};
    }
}

public class LiteTest {
    public static void main(String[] args) {
        ApplicationContext applicationContext = new AnnotationConfigApplicationContext(FullConfiguration.class,LiteConfiguration.class);
        Object fullService1 = applicationContext.getBean("full1");
        Object liteService1 = applicationContext.getBean("liteService1");
        System.out.println(fullService1);
        System.out.println(liteService1);
    }
}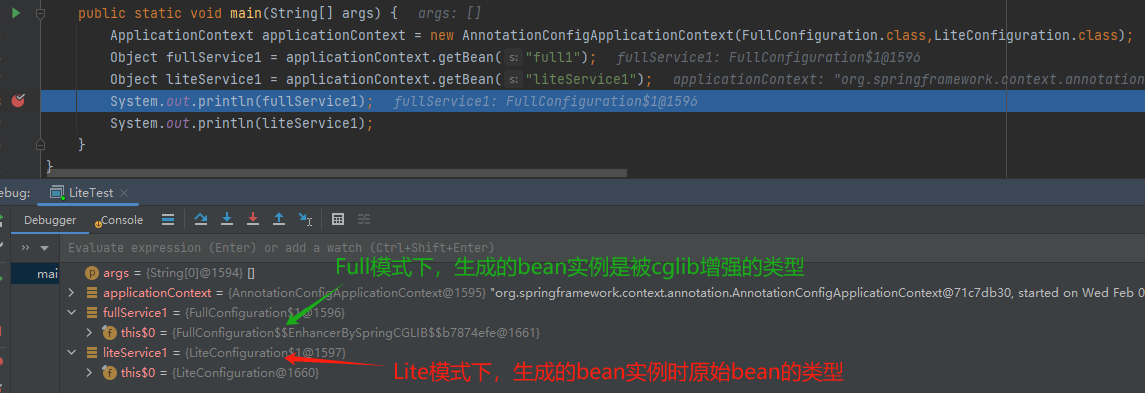
图 Lite模式下,bean没有被代理
通常情况下,推荐使用Full模式。Lite模式可能更时候需要更快响应速度或资源受限时。
1.2 @Configuration
作用类似于xml配置文件中的<beans/>标签。可以在类里配置bean,及可以在类上配置bean的扫描路径。在同一个@Configuration注解的类中,@Bean标注的方法可以相互调用,且无论调用多少次,都只会生成一个单例bean(该bean的作用域要为单例)。
@Configuration
public class FullConfiguration {
    // 如果定义了别名,则默认名失效
    @Bean({"full1","full"})
    public Service fullService1() {
        System.out.println("fullService1 实例化");
        return new Service() {};
    }

    @Bean
    public Service fullService2() {
        // 直接调用了fullService1()方法,无论该方法在个类被调用多少次,都只会生成一个实例(单例)
        System.out.println("fullService2 实例化:" + fullService1());
        return new Service() {};
    }

    @Bean
    public Service fullService3() {
        // 这里直接调用了fullService1()方法
        System.out.println("fullService3 实例化:" + fullService1());
        return new Service() {};
    }
}
1.2.1 @Lookup 方法注入依赖 Look Method Injection
通过@Inject注入时,依赖只会被注入一次,即在该bean被初始化时。如果想实现每次都能获取一个新的bean,可以使用@Lookup注解。如果想动态获取一个被容器管理的Bean实例时很有用。
该注解核心思想时:使用抽象方法声明需要注入的Bean,Spring在运行时动态生成其子类并重新实现该抽象方法(cglib代理),从而实现原型Bean的注入。使用规则如下:
- 可以在@Lookup注解中指定bean的名字。
- 该方法要符合cglib 代理方法的规则(不能是private、static、final)。
- 如果想每次调用都生成新的bean,则对应的bean作用域不能为singleton。(适合生命周期较短的Bean)
@Component
@Scope(value = "prototype")
public class LookupService1 implements Service {
}

@Component
public class LookupService2 implements Service {
}

@Component
public class LookupManage {
    @Lookup("lookupService1")
    public Service lookupService() {
        return null;
    }
}

@Configuration
@ComponentScan(basePackages = "lookup")
public class LookupConfiguration {

    public static void main(String[] args) {
        ApplicationContext context = new AnnotationConfigApplicationContext(LookupConfiguration.class);
        LookupService1 lookupService1 = context.getBean(LookupService1.class);
        LookupService2 lookupService2 = context.getBean(LookupService2.class);
        System.out.println("原型 lookupService1:" + lookupService1);
        System.out.println("原型 lookupService2:" + lookupService2);
        System.out.println("--------lookup---------");
        LookupManage lookupManage = context.getBean(LookupManage.class);
        System.out.println(lookupManage.lookupService());
        System.out.println(lookupManage.lookupService());
    }
}
1.2.2 @Import 依赖导入
可以在类上使用@Import注解来导入其他@Configuration注解的类,这些被导入的类与该类就组合成了一个整体(类之间的Bean可以相互依赖)。
@Configuration
public class Configuration1 {
    @Bean
    public Service1 service1(Service2 service2) {
        System.out.println("service1() service2:");
        Service1 service1 = new Service1();
        System.out.println("service1:" + service1);
        return service1;
    }
}

@Configuration
public class Configuration2 {
    @Bean
    public Service2 service2(Service3 service3) {
        System.out.println("service2() service3:" + service3);
        Service2 service2 = new Service2();
        System.out.println("service2:" + service2);
        return service2;
    }
}

@Configuration
@Import({Configuration1.class,Configuration2.class})
public class Configuration3 {
    @Bean
    public Service3 service3() {
        Service3 service3 = new Service3();
        System.out.println("service3:" + service3);
        return service3;
    }

    public static void main(String[] args) {
        ApplicationContext context = new AnnotationConfigApplicationContext(Configuration3.class);
        Service3 service3 = context.getBean(Service3.class);
        Service2 service2 = context.getBean(Service2.class);
        Service1 service1 = context.getBean(Service1.class);
        System.out.println("service1:" + service1);
        System.out.println("service2:" + service2);
        System.out.println("service3:" + service3);
    }
}
1.3 AnnotationConfigApplicationContext
用于创建和初始化基于Java配置类的容器。可以通过构造函数或register方法(参数为class类型,可以是有@Configuration、@Component注解的或者没有任何注解的类)来指定需要注册的bean。容器会将这些类注册为bean。
还可以通过scan方法来指定需要扫描的类路径。
使用了register或scan方法后,要使用其refresh方法来刷新容器。
AnnotationConfigApplicationContext context = new AnnotationConfigApplicationContext();
context.register(ProfilesConfiguration.class);
context.refresh();
Service bean = context.getBean(Service.class);
1.4 xml 与 注解混合使用
在代码中可以将注解与xml格式的bean配置文件混合在一起使用。可分为两种情况:1) 以XML为中心;2)以注解为中心。
1.4.1 以XML为中心
在代码中,以XML配置为主。需要使用注解形式配置的bean时,有两种方法:1)在xml中 使用 <component-scan/>标签来指定需要扫描的类路径;2)在xml中将@configuration注解的类用<bean/>标签来配置,还必须加上<context:annotation-config/>标签。
<!--xml_center.xml-->
<beans xmlns="http://www.springframework.org/schema/beans"
       xmlns:xsi="http://www.w3.org/2001/XMLSchema-instance"
       xmlns:context="http://www.springframework.org/schema/context"
       xsi:schemaLocation="http://www.springframework.org/schema/beans
        https://www.springframework.org/schema/beans/spring-beans.xsd http://www.springframework.org/schema/context https://www.springframework.org/schema/context/spring-context.xsd">
<!--    要让xml支持注解,必须加上这个-->
    <context:annotation-config/>
    <context:component-scan base-package="container.xml"/>
    <bean class="container.xml.XMLConfiguration"/>
    <bean class="container.xml.XMLService">
        <constructor-arg name="service1" ref="service1"/>
        <property name="service2" ref="service2"/>
    </bean>
</beans>

@Configuration
public class XMLConfiguration {

    public XMLConfiguration() {
        System.out.println("XMLConfiguration实例化");
    }
    @Bean
    public Service1 service1() {
        System.out.println("service1 实例化");
        return new Service1();
    }

    public static void main(String[] args) {
        ApplicationContext context = new ClassPathXmlApplicationContext("xml_center.xml");
        XMLService xmlService = context.getBean(XMLService.class);
        System.out.println("xmlService:" + xmlService);
        Object service = context.getBean("service1");
        System.out.println("service:" + service);
        System.out.println("service2:" + xmlService.getService2());
    }
}
1.4.2 以注解为中心
在代码中,以注解为主,可以在有@Configuration注解的类上,加上@ImportResource注解,来指定xml配置文件的路径。
@Configuration
@ImportResource("classpath:annotate_center.xml")
public class AnnotateConfiguration {
    @Bean("service1")
    public Service service1(XMLService xmlService) {
        System.out.println("service1 xmlService:" + xmlService);
        return new Service() {};
    }

    public static void main(String[] args) {
        ApplicationContext context = new AnnotationConfigApplicationContext(AnnotateConfiguration.class);
        XMLService xmlService = context.getBean(XMLService.class);
        Object service1 = context.getBean("service1");
        System.out.println(service1);
        System.out.println("xmlService:" + xmlService);
    }
}
2 环境配置
Environment接口是对容器环境的一个抽象,它包括两个访问:概要文件和属性。
2.1 @Profile 概要文件
@Profile是一种将容器的bean按照不同配置进行分组的机制。用于指示一个或多个组件仅在某些特定的配置下被创建和初始化。
在该注解中可以使用逻辑运算符(与 & 或 | 非 !)。
@Configuration
public class ProfilesConfiguration {

    @Bean
    @Profile("dev & other")
    public Service devService() {
        System.out.println("实例化 devService");
        return new Service() {};
    }

    @Bean
    @Profile("prod")
    public Service prodService() {
        System.out.println("实例化 prodService");
        return new Service() {};
    }

    public static void main(String[] args) {
        AnnotationConfigApplicationContext context = new AnnotationConfigApplicationContext();
        context.getEnvironment().setActiveProfiles("other","dev");
        context.register(ProfilesConfiguration.class);
        context.refresh();
        Service bean = context.getBean(Service.class);
        System.out.println(bean);
    }
}
2.2 property 环境属性
Environment 提供了在多种环境下搜索属性的接口。不同环境属性名相同时优先级如下:1)ServletConfig (例如DispatcherServlet上下文)。2)ServletContext参数(例如web.xml)。3)JNDI环境变量。4)JVM系统变量。5)JVM系统环境。
还可以使用@PropertySource 注解来引入自定义属性。
@Configuration
@PropertySource("/pro.properties")
public class PropertyConfiguration {
    public static void main(String[] args) {
        ApplicationContext context = new AnnotationConfigApplicationContext(PropertyConfiguration.class);
        String name = context.getEnvironment().getProperty("my.name");
        String address = context.getEnvironment().getProperty("my.address");
        System.out.println(name + ":" + address);
    }
}

pro.properties文件:
my.name=Jon
my.address=China
3 附加功能
ApplicationContext类还实现了MessageSource(消息)、ApplicationEventPublisher(事件发布)等接口。让容器拥有了像事件发布与监听、消息国际化等附加功能。
3.1 MessageSource 消息国际化
要实现这个功能,必须注册一个ResourceBundleMessageSource类型的bean。创建该bean时,可以指定消息的资源包(properties格式的文件)及文件编码等信息。
如果要实现国际化消息,则需要创建对应地域的资源包。
message/exception.properties:
error=The argument {0} is big error

message/message_en.properties:
info=info str
content=message content

message/message_en.properties:
info=中文内容
content=消息内容

@Configuration
public class MessageSourceConfiguration{
    @Bean
    public ResourceBundleMessageSource messageSource() {
        ResourceBundleMessageSource messageSource = new ResourceBundleMessageSource();
        messageSource.setDefaultEncoding("UTF-8");
        messageSource.setBasenames("message/message","message/exception");
        return messageSource;
    }

    public static void main(String[] args) {
        MessageSource messageSource = new AnnotationConfigApplicationContext(MessageSourceConfiguration.class);
        String info = messageSource.getMessage("info", null, Locale.ENGLISH);
        System.out.println("info:" + info);
        String error = messageSource.getMessage("error", new Object[]{"userName"}, Locale.ENGLISH);
        System.out.println("error:" + error);

        System.out.println(messageSource.getMessage("info", null, Locale.CHINESE));;
    }
}
3.2 事件发布与监听
可以自定义事件,需要继承ApplicationEvent类。使用@EventListener注解作用于方法上,参数为对应的事件类型来实现对该事件的监听,可以通过@EventListener注解的筛选表达式来对监听的事件进行筛选。返回值可以是void,也可以是事件类型,当为事件类型时,表示继续发布返回的事件。
监听事件时默认是同步的,即会阻塞其他监听器。可以使用@Async来使该监听方法成为异步监听,使用异步监听有以下限制;1)异常不会传递到调用者。2)建议(同步或异步都可以通过返回一个事件来继续发布事件)不要用返回值来再次发布事件,而是在方法内部手动发布事件。这是为了让事件代码更清晰及更好控制。
public class CustomEvent1 extends ApplicationEvent {
    public CustomEvent1(Object source) {
        super(source);
    }
}

public class CustomEvent2 extends ApplicationEvent {
    public CustomEvent2(Object source) {
        super(source);
    }
}

@Configuration
public class EventConfiguration {

    @EventListener(condition = "event.source == '测试1'")
    @Order(1)
    @Async
    public CustomEvent2 listener1A(CustomEvent1 customEvent1) {
        System.out.println("事件监听1A:" + customEvent1);
        return new CustomEvent2("测试2");
    }

    @EventListener(condition = "event.source != '测试1'")
    @Order(0)
    public void listener1B(CustomEvent1 customEvent1) {
        System.out.println("事件监听1B:" + customEvent1);
    }


    @EventListener
    public void listener2(CustomEvent2 customEvent2) {
        System.out.println("事件监听2:" + customEvent2);
    }

    public static void main(String[] args) {
        ApplicationContext context = new AnnotationConfigApplicationContext(EventConfiguration.class);
        context.publishEvent(new CustomEvent1("测试1"));
        context.publishEvent(new CustomEvent1("测试2"));
    }
}
3.2.1 泛型与事件的监听
在监听事件时,可以通过事件类型来对事件进行筛选。但是因为泛型的擦除(在运行过程中无法获取实例的泛型类型),无法之间利用泛型来对事件进行筛选。 可以让自定义事件类实现ResolvableTypeProvider接口,来对事件类的实例的类型进行处理,从而来实现通过泛型筛选事件。
public class GenericEvent<T> extends ApplicationEvent implements ResolvableTypeProvider {
    public GenericEvent(T source) {
        super(source);
    }

    @Override
    public ResolvableType getResolvableType() {
        System.out.println("getClass():" + getClass());
        System.out.println("getSource():" + getSource());
        return ResolvableType.forClassWithGenerics(getClass(),ResolvableType.forInstance(getSource()));
    }
}

@Configuration
public class GenericConfiguration {
    @EventListener
    public void listenerOfString(GenericEvent<String> genericEvent) {
        System.out.println("string 监听");
    }

    @EventListener
    public void listenerOfBoolean(GenericEvent<Boolean> genericEvent) {
        System.out.println("Boolean 监听");
    }

    public static void main(String[] args) {
        ApplicationContext context = new AnnotationConfigApplicationContext(GenericConfiguration.class);
        context.publishEvent(new GenericEvent<String>("string"));
        System.out.println("------------------------");
        context.publishEvent(new GenericEvent<Boolean>(false));
    }
}